
SQL Azure adds relational databases to the Windows Azure platform. It is essentially an SQL Server running on Azure servers. Microsoft keeps the management of the SQL Server to themselves at the physical level. SQL Azure helps in provisioning and deploying relational database solutions to the cloud with the automatic benefit of scalability, availability, security, replication, and so on. This brings all the benefits of cloud computing to SQL Server.
SQL Azure supports the SQL relational database model in contrast to Table storage, which provides a NoSQL-styled database. SQL Azure is highly available. With high availability, it means it is fault tolerant, replicated, and has an automatic failover. This means when data is written to the database, the same data is replicated into multiple storages such that during disaster recovery, the data could be easily recovered. SQL Azure automatically handles high availability thus, when one instance of the database is not available, SQL Azure will automatically put another instance online rather than making the database server go down. Microsoft guarantees that there is less than 43 minutes of downtime per month for the database, which means they are 99.9 percent available.
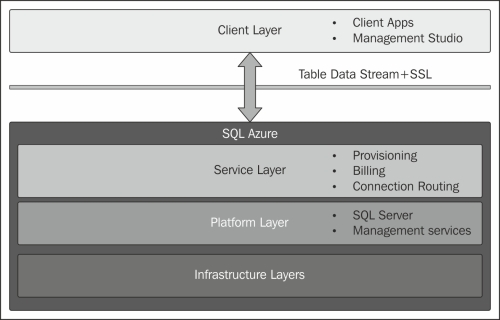
SQL Azure communicates with the Azure service following the preceding architecture. Client apps communicate the SQL Azure via Table Data Stream using the SSL communication channel and connects it to the service layer. The service layer consumes the data and passes it to the platform layer, which has the actual SQL Server instance. This is like communicating with a web service using SSL. The service layer redirects the data to the SQL Server with the support of provisioning. The service also deals with billing of data and connection routing.
The platform layer communicates with the cloud infrastructure for physical storage. The infrastructure also allows the database to be distributed over the cloud environment so that it becomes easier to handle instances over large number of servers, and Microsoft also does not need to handle each individual server manually.
SQL Azure does not support Windows authentication, but supports SQL's username and password to communicate between machines. However, it has a security firewall, which allows you to access SQL Servers only from a fixed number of machines. SQL Azure uses port number 1433 to communicate data. Thus, when the service layer receives a request to log in, the layer maintains a table of all the clients that have access to that particular instance which have been called for. For instance, if SQL Azure is accessed from Windows Azure, the IP address of 0.0.0.0 needs to be allowed to the SQL Azure instance to prevent the firewall from passing through the login process from Windows Azure.
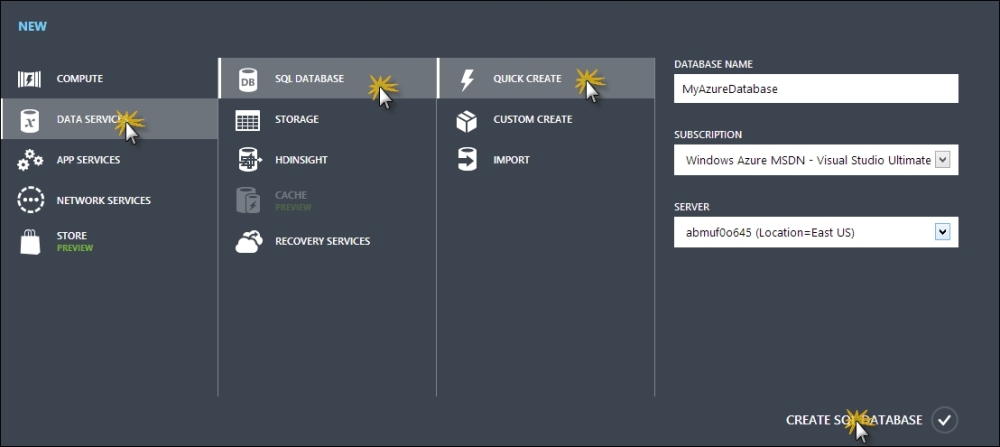
To get started with SQL Azure, lets open https://manage.windowsazure.com, go to NEW | DATA SERVICES | SQL DATABASE, select QUICK CREATE, and enter MyAzureDatabase in the DATABASE NAME field for the time being. Then, click on CREATE SQL DATABASE, as shown in the following screenshot:
Once the database has been created, you can select the database from the list to open the dashboard. The dashboard not only allows you to monitor and scale like other services, but also allows you to configure the database.
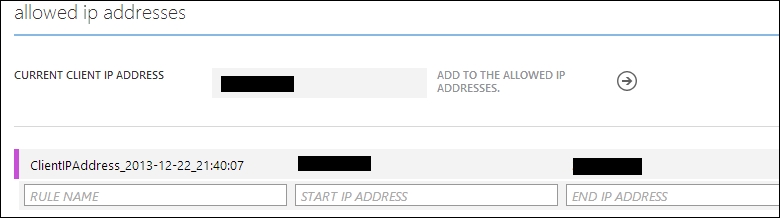
You can add the allowed IP addresses as I mentioned before. The portal will automatically suggest the IP address of the system you are browsing with. Click on DashBoard and select Manage IP Addresses. You will see the following screen:
Now this IP firewall is applied to the server that you might have created before. For instance, if you go to the dashboard of your service, you can click on the Reset Administrator Password option that you might have created before:
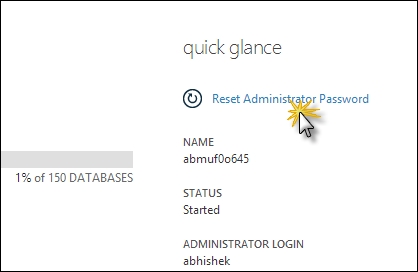
Each database service instance allows 150 databases inside it and gives a unique URL to access the service and databases inside it. The database server can be thought as a service that runs as an instance on your machine where SQL server is installed.
Once the configuration is done, open Management Studio and enter the unique URL for the database server that is created and use its username and password. Your server name would be xxxx.database.windows.net, and the port that it need to access is 1433.
In addition to this, the portal also supports a management studio inside the web browser, which allows you to to access the database, create tables, and everything that you might be doing in the SQL Server management studio.
In the dashboard section, you can click on Design your SQL Database to access the management studio. The various connection strings to access the database server is also available at the hyperlink, View SQL Database connection strings for ADO.NET, ODBC, PHP, and JDBC, as shown in the following screenshot. You can use them to access the database server from the applications.

In the following section, let's implement an OData service using SQL Azure.
OData is a web protocol to query and update data using HTTM, ATOM publishing protocol, and/or JSON. The OData protocol is released under Open Specification Promise. OData provides generic CRUD interfaces to access data on the server using normal HTTP protocols. SQL Azure supports SQL databases to be exposed over OData. The entire security model will act behind the scene, and even you can allow read-only access to OData to be safe. Now, let's create an OData service through steps that will use SQL Azure tables and host it over HTTP:
- Open Management Studio and connect to the database with appropriate credentials.
- Open the Security node and create new login credentials. Logging in will execute the
CREATE LOGINstatement on the master database, as follows:CREATE LOGIN odataLogin WITH PASSWORD = '0D@t@l0g1n' GO
The preceding code creates a login for the database service.
- Once this is done, we need to create a user that will use the same login credentials. To do that, we open the
MyAzureDatabasenode, and under the Security node, we add a new user. This will open up the script pane, where we add the following code:CREATE User odatalogin FOR LOGIN odatalogin WITH DEFAULT_SCHEMA = MyAzureDatabase GO
This will add the
odataloginuser withodataloginand default database access to the database. - We also need to provide a role to the user so that it can access certain privileges of the database. As we wanted to use read-only data access, we need to add the
db_datareaderrole to the user:EXEC sp_addrolemember N'db_datareader', N'odatalogin' GO
- Now, we open Visual Studio and create a cloud service application and select an ASP.NET web role. As you already know, a web role is just an ASP.NET web application. Name it
MyODataServiceand select Web Forms. - Add the ADO.NET Entity data model and use the Generate From Database option. Select the connection to the Azure database using the
odataloginuser with an appropriate password and click on Next. - From the listed tables, select the tables that you need to add. We created two tables,
CustomersandOrders, to test our OData service. - Add a new item to the solution and select WCF Data service. Name it
MyAzureData.svc. - In
InitializeServiceof the WCF data service, we add the following lines:config.DataServiceBehavior.MaxProtocolVersion = DataServiceProtocolVersion.V3; config.SetEntitySetAccessRule("*", EntitySetRights.All); config.SetServiceOperationAccessRule("*", ServiceOperationRights.All);The preceding lines will set access to all the tables, and as we are using the user who has only read-only access to the database, the server data will be safe from external updates.
- Finally, package the service and deploy it to Windows Azure. You can access the service using the
yourserver/MyAzureData.svc/{tableName}link.
OData uses open data specification published by Open Data Protocol, which is a REST-based protocol standard that enables accessing database objects and updating the database objects using open standards such as HTTP and using common standard formats of data such as JSON or XML. In the preceding application, we created an OData service application, consuming the SQL Azure database. We configured the SQL Azure database, put a service layer over it, and provided easy access to the objects inside the SQL Azure database. We can host the service either in Azure or any other server as standalone and consume the data from the service.
The WCF service automatically enumerates the entity objects from the database and provides the formatted data to the consumer.
SQL Azure provides a number of important features that are worth noting. Let's take a look at some more advantages of using SQL Azure.
Even though it is recommended that you access the SQL server through the management portal, there is also an option to run the management tools directly from the browser itself. The Windows Azure management portal gives an option to design the database schema or relationships. To open the database in the online management portal, go to the database and use the Design your SQL Database link, as shown in the following screenshot:

Once you open the portal, you need to feed in the appropriate username and password of the database instance to open the management portal for the database. When you open the portal, it gives a summary of the database portal, as shown in the following screenshot:
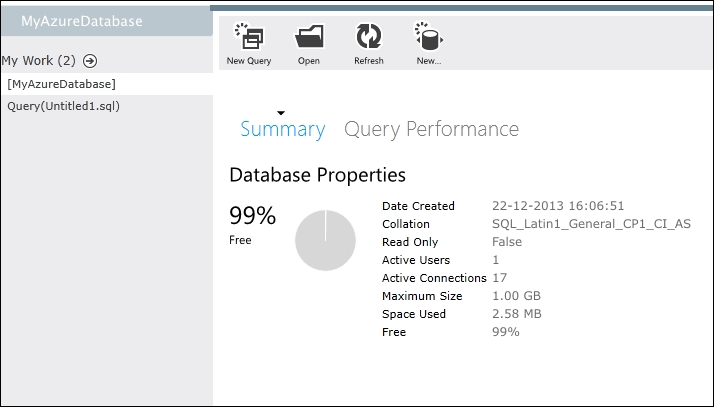
One can select New Query to start writing a query in the query window, and the query will be listed on the left-hand side pane.
You can also use the Design tab at the bottom-left corner of the screen to open the designer for Tables. This option is absent for Azure databases when they use Management Studio. The portal can even list the estimated and actual execution plans while running a query on the database.
- Refer to the MSDN documentation of SQL Azure at http://bit.ly/sqlazurechdoc