
Persistent storage is one of the most important areas that every application developer needs to know. Even though the architecture of the Windows Phone environment is in general built to have connected applications, many times there could be a case where there is a need to store data in persistent storage areas so that it can be fetched later for use. Windows Phone persistent storage exists in the form of the IsolatedStorage classes, where the application can store data on a Sandboxed environment where the other application does not have access to. Windows Phone provides a separate filesystem structure for each application, where the application can store and retrieve files and data from.
To store data in persistent storage, we use the following code:
public async void SaveToStore(string fileName, string data)
        {
            IsolatedStorageFile store = IsolatedStorageFile.GetUserStoreForApplication();
            using (StreamWriter sw = new StreamWriter(new IsolatedStorageFileStream(fileName, FileMode.Append, store)))
            {
                await sw.WriteAsync(data);
                sw.Close();
            }
        }
Here, we first get the reference of the user store using IsolatedStorageFile.GetUserStoreForApplication. The store is specific to the application that calls the store. Later on, we use a normal StreamWriter to write data to the file opened using IsolatedStorageFileStream.
We can also use StreamReader in a similar way to read from IsolatedStorageFileStream, as shown in the following code:
Public async Task<string> ReadFromStore(string fileName)
{
    IsolatedStorageFile store = IsolatedStorageFile.GetUserStoreForApplication();
    if (!store.FileExists(fileName))
    {
        IsolatedStorageFileStream dataFile = store.CreateFile(fileName);
        dataFile.Close();
    }

    using (StreamReader reader = new StreamReader(new IsolatedStorageFileStream(fileName, FileMode.Open, store)))
    {
        string rawData = await reader.ReadToEndAsync();
        reader.Close();

        return rawData;
    }
}
Here, we first check whether the file exists before opening the FileStream class again and then read from it. We can also use miscellaneous functions like the following ones:
store.DeleteFile(fileName); store.MoveFile(sourcefile, destinationfile) store.CopyFile(sourcefile, destinationfile) store.CreateDirectory(dirName)
We can also use many functions to perform normal file operations on the allotted filesystem for the application. We can also use store.Remove() to remove the whole filesystem for the application.
In addition to the file store for the application, there is also a separate concept of storage where the data is stored in relational databases. Windows Phone supports Entity Framework (EF), which can be used to store data in a relational database structure.
The LINQ to SQL object model is primarily made up of the System.Data.Linq.DataContext object, which acts as a proxy for the local database stored in IsolatedStorage for the application. It is a bridge between the object data and the relational data, as shown in the following figure:
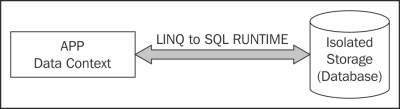
As shown in the preceding figure, the app stores Data Context, which bridges the data from relational database stored in Isolated Storage for the application using LINQ to SQL RUNTIME.
When considering local databases in Windows Phone, here are some points that we need to consider:
- Database files will be stored in an isolated storage container
- Databases are application specific and cannot be shared across applications
- LINQ is used to query database as TSQL is not supported
- A connection string must be used in the format
"Data Source='isostore:/DirectoryName/databaseName.sdf;Password='securepassword'" - A database is encrypted using AES – 128 and password is hashed using SHA-256
- Encrypting the whole database can have performance penalty and a lot of automatic optimizations are not being performed
In this recipe, we are going to perform the CRUD operation on a database. We will cover the following topics:
- Creating a local database
- Creating table, indexes, associations, and so on
- Adding data to tables
- Fetching data from tables
- Deleting data from tables
- Deleting a local database
As I have already told you, the application fetches data from databases using LINQ to SQL; there are a few concepts that are worth notifying before continuing further. In LINQ to SQL data models, classes represent tables and properties represent fields. Hence, you can think of indexes that can be applied on tables, that is, classes and association or foreign-key relationship that can be applied on a field, that is, property. The object model is annotated with a number of properties that define the schema of the database structure. Let's take a quick pick on these attributes:
TableAttribute: This designates a class to be an entity with an associated database tableColumnAttribute: This associates a class with a column of a tableIndexAttribute: This adds an index on a table. Each index covers one or more columnsAssociationAttribute: This designates a property to represent an association
In addition to these attributes, there is DataContext that acts as a proxy for the whole database. The DataContext class opens a connection to the database using ConnectionString, which is main object to save/submit data modifications on entities.
Now let's build the database in object models:
- Create a Windows Phone project and add a folder called
Model. We will use this folder to create our model classes. - Create a class
Departmentwith the following definition:[Table] public class Department { public Department() { } [Column(DbType = "INT NOT NULL IDENTITY", IsDbGenerated = true, IsPrimaryKey = true)] public int Id { get; set; } [Column] public string Name { get; set; } [Column(IsVersion = true)] private Binary _version; }You might have already noticed that the
Departmentclass is annotated with aTableattribute. This attribute indicates that the class is a part of the database table. We define two properties:IdandName. TheIdproperty is an autogenerated column of INT type, whileNameis a string. There is also aversionfield of binary type. Theversionfield is useful while updating entries. - Next, let's define an
Employeeclass that has an individual department as the foreign key:[Table] [Index(Columns="EName", IsUnique=true, Name="employee_EName")] public class Employee { [Column(IsPrimaryKey = true, IsDbGenerated = true, CanBeNull = false, DbType = "INT NOT NULL Identity", AutoSync = AutoSync.OnInsert)] public int EmpId { get; set; } [Column(CanBeNull=false, DbType="NVarchar(100) NOT NULL")] public string EName { get; set; } [Column(CanBeNull= false)] public int Age { get; set; } [Column(IsVersion=true)] public Binary Version { get; set; } // Internal column for the associated department ID value [Column] internal int _departmentId; private EntityRef<Department> _department; [Association(Storage = "_department", ThisKey = "_departmentId", OtherKey = "Id", IsForeignKey = true)] public Department Department { get { return _department.Entity; } set { _department.Entity = value; if (value != null) _departmentId = value.Id; } } }In the preceding entity definition, we kept
EmpIdas a primary key. TheENameandAgecolumns are the two specified columns, each of which are not null. We have also defined an internal column to storedepartmentId.The
EntityRefclass is used to fetch actual object from the column using the association specified for a particular entity. We defineddepartmentIdas a foreign key, which maps the entity reference of the department table.In the preceding class, we have also added an extra index for the
Employeeentity so that when theEmployeetable is searched using theENamecolumn, the query will use the index to improve search performance.Note
In the case of using the
Whereclause, the order by, or join the appropriate index on the columns can improve performance tremendously. Theindexattribute is used internally by the database engine, where it optimizes it by reindexing at an interval. If you are using an encrypted database with a password, these optimizations will not perform correctly. - As we have shown how to use
EntityRefto refer to the actual object from a foreign key reference, it is also a good idea to define a property that enumerates all the employees present in a particular department, as shown in the following code:public Department() { _employees = new EntitySet<Employee>( new Action<Employee>(this.attach_Employee), new Action<Employee>(this.detach_Employee) ); } private EntitySet<Employee> _employees; [Association(Storage = "_employees", OtherKey = "_departmentId", ThisKey = "Id")] public EntitySet<Employee> Employees { get { return this._employees; } set { this._employees.Assign(value); } } private void attach_Employee(Employee emp) { emp.Department = this; } private void detach_Employee(Employee emp) { emp.Department = null; }The
EntitySetclass enumerates all the foreign key reference objects into the key table. In the preceding context, we create an object ofEntitySet<Employee>, which automatically fetches all the objects associated with that particular department. TheEntitySetclass also takes two callbacks to attach or detach an employee from a particular department. - Once the entities are created, we need to create the
DataContextobject to proxy the actual database to the entities, as shown in the following code:public class EmployeeDataContext : DataContext { public EmployeeDataContext(string connectionString) : base(connectionString) { } public Table<Employee> Employees; public Table<Department> Departments; }Here,
EmployeeDataContextinherits fromDataContextand passesConnectionStringto it. As we have defined two tables, we can specify the references of them onEmployeeDataContextto access them individually. - After the
Objectmodel is ready, let's use it to create a database for the application. Open theApp.xaml.csfile and add the following line at the beginning of theAppclass:public const string ConnectionString = "Data Source=isostore:/Employeedb.sdf";
The
ConnectionStringproperty must have a location reference of theIsolatedStorelocation. We could also add a password to encrypt the whole database. - Now, go to the bottom of its constructor and add the following lines of code:
string DbConnectionString = ConnectionString;
using (EmployeeDataContext db = new EmployeeDataContext(DbConnectionString))
{
    if (!db.DatabaseExists())
    {
        db.CreateDatabase();
        db.Departments.InsertOnSubmit(new Department { Name = "Accounts" });
        db.Departments.InsertOnSubmit(new Department { Name = "Sales" });
        db.Departments.InsertOnSubmit(new Department { Name = "Transfer" });

        db.SubmitChanges();
    }
}
Here, we defined the filename of the database using the
ConnectionStringproperty and created theEmployeedatabase if it doesn't exist. While creating a database, sometimes we need to pre-populate some data so we added some departments during its creating. TheSubmitChangesmethod commits the changes made to the database. - Now, let's define an UI for the Employees database, as shown in the following screenshot:
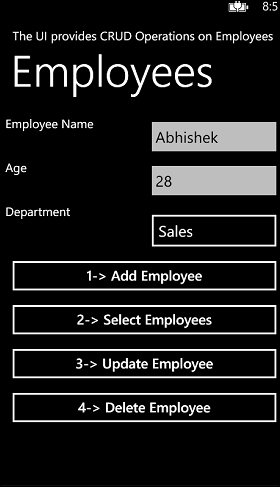
There are a few buttons with
TextBoxesandListPickeron the UI to create an employee type. We are going to create this UI for our application. - Before we do so, we added the Windows Phone toolkit from the NuGet Package Manager and added the namespace for the toolkit to
MainPage.xaml:xmlns:toolkit="clr-namespace:Microsoft.Phone.Controls;assembly=Microsoft.Phone.Controls.Toolkit"
- Once the toolkit is added, we add two
TextBoxmethods and aListPickermethod to create anEmployeetype as follows:<TextBlock Text="Employee Name" Grid.Row="0" Grid.Column="0" /> <TextBox x:Name="txtName" Grid.Row="0" Grid.Column="1" /> <TextBlock Text="Age" Grid.Row="1" Grid.Column="0" /> <TextBox x:Name="txtAge" InputScope="Digits" Grid.Row="1" Grid.Column="1" /> <TextBlock Text="Department" Grid.Row="2" Grid.Column="0" /> <toolkit:ListPicker x:Name="lstDepartment" Grid.Row="2" Grid.Column="1"> <toolkit:ListPicker.ItemTemplate> <DataTemplate> <TextBlock Text="{Binding Name}" /> </DataTemplate> </toolkit:ListPicker.ItemTemplate> </toolkit:ListPicker> <StackPanel Orientation="Vertical" Grid.Row="3" Grid.ColumnSpan="2"> <Button Content="1-> Add Employee" x:Name="btnAddEmployee" Click="btnAddEmployee_Click" /> <Button Content="2-> Select Employees" x:Name="btnSelectEmployees" Click="btnSelectEmployees_Click"/> <Button Content="3-> Update Employee" x:Name="btnUpdateEmployee" Click="btnUpdateEmployee_Click"/> <Button Content="4-> Delete Employee" x:Name="btnDeleteEmployee" Click="btnDeleteEmployee_Click" /> </StackPanel>In the preceding XAML, we added four buttons each for
Add,Select,Update, andDelete; hence, the UI is capable of utilizing all the CRUD operations. - Now, we add some code for the buttons:
private void AddEmployee() { using (EmployeeDataContext context = new EmployeeDataContext(App.ConnectionString)) { var department = this.lstDepartment.SelectedItem as Department; var contextualDepartment = context.Departments.FirstOrDefault(e => e.Id == department.Id); Employee emp = new Employee { EName = this.txtName.Text, Age = Convert.ToInt32(this.txtAge.Text), Department = contextualDepartment }; context.Employees.InsertOnSubmit(emp); context.SubmitChanges(); } }The preceding code creates a new employee and adds it to the database. It is worth noting that as we are not holding the
DataContextclass, the department created on anotherDataContextcannot be as a type of the current context. For this reason, we need to fetch the department again for each operation. - Similarly, you can select all the existing employees using the following code:
private IList<Employee> GetEmployees()
{
    using (EmployeeDataContext context = new EmployeeDataContext(App.ConnectionString))
    {
        var query = from e in context.Employees select e;
        return query.ToList();
    }
}
The LINQ query is used to fetch data from the
DataContextclass. You should always remember, that the query is of theIQueryabletype; hence, until we actually fetch either usingToListor looping through theIEnumeratorinterface, the actual data isn't been retrieved. - We can also delete an employee using the
Deletemethod:private void DeleteEmployee() { using (EmployeeDataContext context = new EmployeeDataContext(App.ConnectionString)) { IQueryable<Employee> empQuery = from e in context.Employees where e.EName == this.txtName.Text select e; Employee empToDelete = empQuery.FirstOrDefault(); if (empToDelete != null) { context.Employees.DeleteOnSubmit(empToDelete); } context.SubmitChanges(); } }The
DeleteOnSubmitmethod requires a callSubmitChangesto update the changes to persistent storage. If we are doing a batch operation, it is recommended to do all the batch statements and finally callSubmitChangesto improve performance. - Similar to these, you can also implement the
Updateoperation yourself by changing the object in memory and applySubmitChangesagain. - Finally, if you need to delete the entire database, you can call
DeleteDatabaseonDataContextand the entire database with all existing data would be deleted.
The Windows Phone does not inherently support SQL databases, even then you can use SQLite (http://bit.ly/WPSqlLite) if you want, but it has an in-built API to make use of relational databases using LINQ to SQL. The LINQ to SQL classes automatically convert the calls to the databases to generic data calls and fetches the data from the database. The LINQ to SQL classes need models to be created on the application end and the data to be retrieved and added only by the application. In the case of Windows Phone databases, the database is virtually a file stored in the IsolatedStorage namespace for that particular application, and hence the sharing of database is not possible.
In addition to the exciting way of creating and altering data to and from persistent storage, there are also some additional features that we can use to make full use of the storage capabilities.
Encryption is an important concern for data security. When dealing with sensitive information and storing data to the application storage, it is sometimes required to encrypt the data to enhance the security of the data used by the application. However, encrypting the data will not increase the security if the decryption key resides within the phone itself. No matter how you hide the key, it is always exposed. Data Protection API (DPAPI) solves the problem by providing an explicit key using the device credentials and the user to encrypt and decrypt data. This method improves security as the data protection key is different for every device and it becomes virtually impossible to get encrypted data for an external hacker.
Windows Phone API provides a class called ProtectData that provides you with access to DPAPI through the Protect and Unprotect methods. You can use the Protect method to encrypt data while Unprotect will decrypt data, as shown in the following code:
public string EncryptData(string data)
        {
            byte[] databytes = Encoding.UTF8.GetBytes(data);
            byte[] protecteddatabytes = ProtectedData.Protect(databytes, null);

            string protectedData = Encoding.UTF8.GetString(protecteddatabytes, 0, protecteddatabytes.Length);

            return protectedData;
        }

        public string DecryptData(string protectedData)
        {
            byte[] protecteddatabytes = Encoding.UTF8.GetBytes(protectedData);
            byte[] databytes = ProtectedData.Unprotect(protecteddatabytes, null);

            string data = Encoding.UTF8.GetString(databytes, 0, databytes.Length);

            return data;
        }
It is very easy to use DPAPI to protect and unprotect data. The only thing you need to do is to convert the data to a byte array and pass it to the ProtectedData class to perform the encryption. The preceding methods encrypt or decrypt a string passed to it.
When dealing with complex objects, you can use serializer to get the data in a format supported to protect and unprotect. For instance, if you need to protect DataModel, you can use DataContractJsonSerializer to serialize the Model class and get the string:
public string EncryptSerializeData(object target)
{
    var serializer = new DataContractJsonSerializer(target.GetType());
    MemoryStream memStream = new MemoryStream();
    serializer.WriteObject(memStream, target);
    string jsondata = Encoding.UTF8.GetString(memStream.GetBuffer(), 0, (int)memStream.Length);

    return this.EncryptData(jsondata);
}
Here, the DataContractJsonSerializer class is used to serialize the target object to the JSON notation and then EncryptData is used to protect the object data completely.
To store the general settings of the application, it is often not required to use relational databases or even IsolatedFiles. The IsolatedStorageSetting class provides an easy way to store settings of the application key/value pair for easy storage and retrieval of data. Let's take a look at how to store data in IsolatedStorageSettings:
public class PersistantStorageSettings
{
    IsolatedStorageSettings settings;

    public PersistantStorageSettings()
    {
        settings = IsolatedStorageSettings.ApplicationSettings;
    }

    public bool AddOrUpdateValue(string key, object value)
    {
        bool valueChanged = false;
        if (settings.Contains(key))
        {
            if (settings[key] != value)
            {
                settings[key] = value;
                valueChanged = true;
            }
        }
        else
        {
            settings.Add(key, value);
            valueChanged = true;
        }
        return valueChanged;
    }
    public T GetValueOrDefault<T>(string key)
    {
        T value;
        if (settings.Contains(key))
            value = (T)settings[key];
        else
            value = default(T);
        return value;
    }
    public void Save()
    {
        settings.Save();
    }

}
The IsolatedStorageSettings class provides an API to store and retrieve a key/value data for an easy access to settings. Here, AddOrUpdateValue is used to store a value for a particular key and GetValueOrDefault is used to get a value or the default value of the type. The Save method is used to save data to the settings.
To define settings, you can inherit a class from the type and define properties like this:
public string Settings1
{
    get
    {
        return base.GetValueOrDefault<string>("settings1");
    }
    set
    {
        if (base.AddOrUpdateValue("settings1", value))
            base.Save();
    }
}
Now by setting a value for the settings1 property, we virtually store the data in the IsolatedStorageSettings key and vice versa. Also, you should always remember that the settings key is unique to the application.
Windows Phone devices, being smart devices, support additional SD cards to be added to it. You can add them as a RemovableStorage media to the device, and later use the files present on the SD card and open it using an application in the device that is capable of opening it.
To add a file type extension, we first add the ID_CAP_REMOVABLE_STORAGE capability to the WMAppManifest.xml file and save it. Once it is saved, you can open it in the XML editor and specify FileTypeAssociation:
<FileTypeAssociation TaskID="_default" Name="GPX" NavUriFragment="fileToken=%s">
  <Logos>
    <Logo Size="small" IsRelative="true">Assets/Route_Mapper_Logo33x33.png</Logo>
    <Logo Size="medium" IsRelative="true">Assets/Route_Mapper_Logo69x69.png</Logo>
    <Logo Size="large" IsRelative="true">Assets/Route_Mapper_Logo176x176.png</Logo>
  </Logos>
  <SupportedFileTypes>
    <FileType ContentType="application/gpx">.gpx</FileType>
  </SupportedFileTypes>
</FileTypeAssociation>
As a file association is required to read a specific file type from an SD card, your app automatically gets registered by the type of files that are not present in the SD card. To handle this situation, we can add a custom Uri mapper to pass the file association's token to the correct page, as shown in the following code:
class CustomURIMapper : UriMapperBase
 {
        private string tempUri;
        public override Uri MapUri(Uri uri)
        {
            tempUri = uri.ToString();

            if (tempUri.Contains("/FileTypeAssociation"))
        {
                // Get the file ID (after "fileToken=").int fileIDIndex = tempUri.IndexOf("fileToken=") + 10;
                string fileID = tempUri.Substring(fileIDIndex);
                // Map the file association launch to route page.return new Uri("/RoutePage.xaml?fileToken=" + fileID, UriKind.Relative);
            }
            // Otherwise perform normal launch.return uri;
        }
    }
In this example, when a file association launches the app, the Uri mapper automatically routes the token to the RoutePage.xaml file of the application. To add customURiMapper to the application, let's add the line to the InitializePhoneApplication of App.xaml:
RootFrame.UriMapper = new CustomURIMapper();
When the application is invoked, the parameters of the URI can be accessed by QueryString of NavigationContext as follows:
protected override async void OnNavigatedTo(System.Windows.Navigation.NavigationEventArgs e)
{
    // Route is from a file association.
    if(NavigationContext.QueryString.ContainsKey("fileToken"))
    {
        _fileToken = NavigationContext.QueryString["fileToken"];
        await ProcessExternalGPXFile(_fileToken);
    }
    // Route is from the SD card.
    else if (NavigationContext.QueryString.ContainsKey("sdFilePath"))
    {
        _sdFilePath = NavigationContext.QueryString["sdFilePath"];
        await ProcessSDGPXFile(_sdFilePath);
    }
}
In the preceding code, sdFilePath determines the path of the file present on the SD card. Finally, we use the following code to process the file:
private async Task ProcessSDGPXFile(string _sdFilePath)
{
    // Connect to the current SD card.
    ExternalStorageDevice sdCard = (await ExternalStorage.GetExternalStorageDevicesAsync()).FirstOrDefault();

    // If the SD card is present, get the route from the SD card.
    if (sdCard != null)
    {
        try
        {
            // Get the route (.GPX file) from the SD card.
            ExternalStorageFile file = await sdCard.GetFileAsync(_sdFilePath);

            // Create a stream for the route.
            Stream s = await file.OpenForReadAsync();

            // Read the route data.
            ReadGPXFile(s);
        }
        catch (FileNotFoundException)
        {
            // The route is not present on the SD card.
            MessageBox.Show("That route is missing on your SD card.");
        }
    }
    else
    {
        // No SD card is present.
        MessageBox.Show("The SD card is mssing. Insert an SD card that has a Routes folder containing at least one .GPX file and try again.");
    }
}
Here the ExternalStorageDevice API is used to get the file stored on the SD card. The OpenForReadAsync method opens the file if present and returns a FileStream class. The stream can be used to read the data present on the file.
- Information on creating a local database app can be found at http://bit.ly/MVVMWphone