
The term Representational State Transfer (REST) was coined by Roy Fielding and is a design pattern for a networked system. In this pattern, the client invokes a web request using a URL, so the basic idea of a REST pattern is to generate a unique URI to represent data.
In Wikipedia, REST is quoted as:
"Representational State Transfer is intended to evoke an image of how a well-designed Web application behaves: a network of web pages (a virtual state-machine), where the user progresses through an application by selecting links (state transitions), resulting in the next page (representing the next state of the application) being transferred to the user and rendered for their use."
This means REST is intended for web applications where the browser invokes each request by specifying a unique URI, as shown in the following figure:
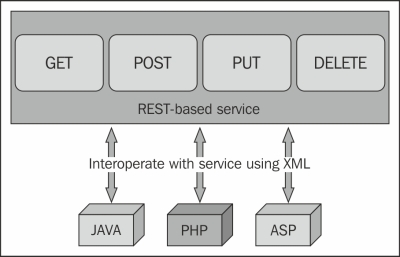
In the preceding figure, it is clear that any technology can easily call a REST-based service using basic HTTP requests.
There are a few basic thoughts behind the implementation of REST-based services. Let's look into them:
- Web is very simple and successful
- Web standards are fixed over time
- Web services should follow the standards of the Web
REST uses web verbs to communicate to services. Verbs such as GET, POST, DELETE, and PUT are major verbs for REST-based applications. If you consider Hi-REST for your application, you should be strict in choosing these verbs. The norms are as follows:
REST services have a number of major advantages, which people are always inclined toward in order to implement:
- Less overhead on messages (no envelope required to warp every call).
- Very standardized. REST uses normal HTTP verbs to communicate with the server.
- REST is more user-friendly than others. It communicates using hierarchy with data where the URL defines what exactly the result is all about.
- The XML doesn't always need to be a medium of transport. You can also make use of JSON objects to communicate.
- REST uses predefined HTTP verbs.
- REST can take part in search engine optimizations as it is representational. The URL is the representation of data.
The features of REST-based services are never-ending. It is very popular nowadays not only because it is interoperable, but because it is easily consumed by the existing toolsets that support standard HTTP verbs.
Let's now create a REST-based WCF service using the following steps:
- First, launch Visual Studio and use WCF Service Application to create a project. We will call it
ContactService. - Delete the default files that have been created automatically from the project template (
IService1.csandService1.svc), and add a new WCF Service to the solution. We will call itContactCRUD.svc. - The project now includes two files with their template implementations. As we are going to implement a service that deals with contacts, we need to implement the
IContactCRUDinterface:[ServiceContract] public interface IContactCRUD { [WebGet(UriTemplate = "contact/{roll}")] [OperationContract] Contact GetContact(string roll); [WebInvoke(Method = "POST", UriTemplate = "contacts")] [OperationContract] bool SaveContact(Contact currentContact); [WebInvoke(Method = "DELETE", UriTemplate = "contact/{roll}")] [OperationContract] bool RemoveContact(string roll); [WebInvoke(Method = "PUT", UriTemplate = "contact")] [OperationContract] bool UpdateContacts(Contact contact); [WebGet(UriTemplate = "contacts")] [OperationContract] List<Contact> GetAllContacts(); } [DataContract] public class Contact { [DataMember] public int Roll { get; set; } [DataMember] public string Name { get; set; } [DataMember] public string Address { get; set; } [DataMember] public int Age { get; set; } }In the preceding code, we have specified the
WebInvokemethod to define the REST configuration for each interface. TheWebGetmethod is used only forGETrequests, while you can employ other methods easily usingWebInvoke. Each of the attributes takesUriTemplate, which defines the routing URL that points to the service.Note
It is also worth mentioning that you can specify the request/response format for a particular interface as well. If you do not specify anything, it will take XML as a medium of transport. You can also specify JSON on either
WebInvokeorWebGetas follows:[WebGet(UriTemplate = "contacts", RequestFormat= WebMessageFormat.Json, ResponseFormat= WebMessageFormat.Json)]
- The implementation of the class is very simple as well. We will create an in-memory list of contacts, which operates on the list such that the
GetContactmethod will get an individual contact object from the list, theSaveContactmethod will put the contact on the list, theDeleteContactmethod will remove that particular contact from the list, and theUpdateContactmethod will update a contact element. - REST-based services require
webHttpBindingas the binding. Let's consider configuring the service as shown in the following code:<system.serviceModel> <services> <service name="ContactService.ContactCRUD" behaviorConfiguration="httpBehavior"> <endpoint address="" binding="webHttpBinding" contract="ContactService.IContactCRUD" behaviorConfiguration="httpEndpointBehavior"> <identity> <dns value="localhost"/> </identity> </endpoint> <endpoint address="mex" binding="mexHttpBinding" contract="IMetadataExchange"/> </service> </services> <behaviors> <serviceBehaviors> <behavior name="httpBehavior"> <serviceMetadata httpGetEnabled="True"/> <serviceDebug includeExceptionDetailInFaults="False"/> </behavior> </serviceBehaviors> <endpointBehaviors> <behavior name="httpEndpointBehavior"> <webHttp /> </behavior> </endpointBehaviors> </behaviors> <serviceHostingEnvironment aspNetCompatibilityEnabled="true" multipleSiteBindingsEnabled="true" /> </system.serviceModel>Here, the service is configured with
webHttpBindingand a contract pointing toContactService.IContactCrud. The service is getting hosted at port8080. Remember to specifyhttpGetEnabled=trueto ensure that the application can invoke the GET request, which is required for REST-based services. - As our service is completed, let's try to examine it for each of the methods that we have specified for the service. Let's add
Testpageon the project to invoke the requests. We are going to useJquery ajaxto request the service. - Let's add a jQuery library to the solution inside a
JSfolder and add a few buttons to handle each of these service interfaces. Our service is hosted asContactCRUD.svcin IIS and we can call this URL to communicate with the service. Let's create a small UI with one table and a few textboxes to take values for the contact class. We created a few buttons and a table on the screen to show the data from the service, as shown in the following screenshot: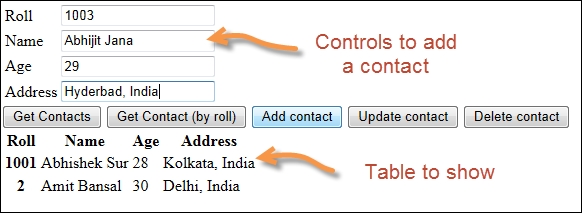
In the previous UI that we built, we placed a number of buttons, each of which pointed to a certain web service interface. We are going to call each service through these buttons and update the server. For instance,
GetContactswill callGetServiceto get all contacts from the server, whileUpdateContactcalls the PUT service to update the existing contact information on the server. - The first service that we are going to look at is the
GETservice forGetContactandGetContact(by roll), as shown in the following code:function returnContacts() { $.ajax({ type: "GET", url: "ContactCRUD.svc/Contacts", success: function (data) { updateTable(data); }, error: function (msg) { alert(msg); } }); } function returnContact() { var roll = $("#roll").val(); $.ajax({ type: "GET", url: "ContactCRUD.svc/contact/" + roll, success: function (data) { updateTable(data); }, error: function (msg) { alert(msg); } }); } function updateTable(data) { $("#output").find("tr:gt(0)").remove(); $(data).find('Contact').each(function () { var roll = $(this).find('Roll').text(); var name = $(this).find('Name').text(); var age = $(this).find('Age').text(); var address = $(this).find('Address').text(); $('<tr></tr>').html('<th>' + roll + '</th><td>' + name + '</td><td>' + age + '</td><td>' + address + '</td>').appendTo('#output'), }); }In the preceding code, we made a
GETrequest to the server. The first one is the request for all contacts without any parameters while the second one is for contacts with parameters. The$.ajaxfunction is an API to call the server side. The AJAX requests receive an XML response, which is then appended to the table with the ID output using theupdateTablefunction. - In the case of the
POSTrequest, the data needs to be sent inside the body of the AJAX object. jQuery provides a data property, which can be used to set the data that needs to be posted to the service:function postContact() { var postObj = "<Contact><Address>" + $("#address").val() + "</Address><Age>" + $("#age").val() + "</Age><Name>" + $("#name").val() + "</Name><Roll>" + $("#roll").val() + "</Roll></Contact>"; $.ajax({ type: "POST", url: "ContactCRUD.svc/contacts", contentType: "application/xml; charset=utf-8", data: postObj, success: function (data) { returnContacts(); $(":text").val(''), }, error: function (msg) { alert(msg); } }); }In the preceding code, we are posting an XML contact element to the service. The
contentTypemethod here is essential to let the service know that the data that sent is actually XML content. - Similar to
POST, thePUTrequest also sends data inside the body of an AJAX call. ThePUTrequest is used to update data on the server:function putContact() { var postObj = "<Contact><Address>" + $("#address").val() + "</Address><Age>" + $("#age").val() + "</Age><Name>" + $("#name").val() + "</Name><Roll>" + $("#roll").val() + "</Roll></Contact>"; $.ajax({ type: "PUT", url: "ContactCRUD.svc/contact", contentType: "application/xml; charset=utf-8", data: postObj, success: function (data) { returnContacts(); }, error: function (msg) { alert(msg); } }); }Similar to the
POSTrequest, thePUTrequest also posts data into the body, while the type specified asPUTand the service URL are changed. - The
DELETEstatement is used to delete content from the server:function deleteContact() { var roll = $("#roll").val(); $.ajax({ type: "DELETE", url: "ContactCRUD.svc/contact/" + roll, success: function (data) { returnContacts(); }, error: function (msg) { alert(msg); } }); }The preceding AJAX call invokes a
DELETEstatement on the server. TheDELETEstatement works in a similar way to theGETrequest, where the URL itself identifies the data.
REST is a new design pattern that has been put forward in the SOA architectures and has been widely used by enterprises because it uses the very old W3C HTTP request standards to manipulate data. Some leading social media giants, such as Twitter and Facebook, use REST to work with its services.
Internally, REST uses the routing API. The data that is passed using the REST URI is parsed by the .NET routing API, which then calls the appropriate function on the server. The main advantage of REST is that it is representational and data is in human-readable format.
A WCF Service method can be made REST-based by specifying an attribute WebInvoke to it. The WebInvoke attribute specifies the following properties:
BodyStyle: This specifies the body style of messages that are sent to and from the service. TheBodyStyleproperty can be bare (which means the body is not wrapped inside anything) or wrapped (WrappedRequestorWrappedResponse).Method: This specifies the HTTP method that is used to send the request for the WCF interface. TheWebGetservice can be used to specifyGETrequests for a service as well.RequestFormat: You are free to specify either the XML or JSON format of the request using this property.ResponseFormat: You can use this property to specify the response format of the WCF service.UriTemplate: This specifies the routing URL that needs to be parsed from the request URL to call a method.
Once the WCF service is configured properly, the REST methods for the server are enabled based on the configuration you have specified.
Let's take this further with some additional topics.
With the introduction of HTML5, WebSocket is one of the burning features that WCF needed badly. WCF 4.5 introduced WebSocket, which enables the browser sockets to communicate directly with the server WCF services, including the implementation of two-way communication channels directly from the browser.
Ever since web services came into being, developers have always tried to leverage their time to implement message formats in a way that makes the application run faster. The implementation of REST and JSON can be seen speeding up as we are trying to reduce the size of the data that is sent over the network, but we are still moving and parsing text to make it in a standard format, which is the slowest data transfer mechanism. Binary data gives the best output. However, as we communicate using the HTTP protocol, there is always an overhead while working over the Web.
Performance is not the only issue; HTTP is tied to the request/response cycle too. Even for asynchronous AJAX-based services, the request has to wait for a certain interval until the server can process the initial request and return the response. The browser then needs to parse the response body to generate the document object. This is a slower approach of communication.
A far better arrangement would be for a client to submit its request in a "fire and forget" kind of arrangement and then the service calls the client back with some data.
WebSockets addresses all these issues and also goes through the process of standardization. It uses TCP to communicate, giving you the benefit of a faster protocol as it works at a lower level than HTTP without additional HTTP header information. WebSockets also supports sending both binary and text formats. The best part of WebSockets is the two-way communication between the browser and the server.
To use WebSockets, the service needs to be configured with NetHttpBinding. Let's create DuplexContract for the WebSocket as follows:
[ServiceContract(CallbackContract=typeof(IDuplexCallbackContract))]
public interface IDuplexContract
{
    [OperationContract]
    string GreetMeDuplex(string name);
}

[ServiceContract]
public interface IDuplexCallbackContract
{
    [OperationContract]
    void GreetingMe(string message);
}
In the preceding code, we implemented two contracts: one is the original duplex contract and the other is used as a callback. Here, the notion of execution is that the client calls GreetMeDuplex with a name and GreetMe from IDuplexCallbackContract will automatically call the client with a message.
The service implementation is as follows:
[ServiceBehavior(ConcurrencyMode = ConcurrencyMode.Reentrant)]
public class WebSocketSampleService : IRegularContract, IDuplexContract
{
    public string GreetMeDuplex(string name)
    {
        OperationContext.Current.
            GetCallbackChannel<IDuplexCallbackContract>().GreetintMe("Hello " + name + " by WebSockets");
        return "Hello " + name;
    }
}
So in the implementation, we call the callback with a message and return the name. The callback will call the client itself directly with the message and also return a string response from the service.
To configure a WebSocket endpoint, we specify the endpoint binding as netHttpBinding as follows:
<service name="WebSocketSampleService">
<endpoint address="http://localhost:8083"
          binding="netHttpBinding"
          contract="Contracts.IDuplexContract"/>
</service>
<bindings>
  <netHttpBinding>
    <binding name="TextOverWebSockets" messageEncoding="Text"/>
  </netHttpBinding>
</bindings>
By specifying messageEncoding, we indicate that the service only supports text formats here. You can also set binary message encoding when required.
Finally, to consume the WebSocket service, we just add a reference to the service on a Console Application and call the service as follows:
WebSockets.IDuplexContract duplexProxy;
duplexProxy = new WebSockets.DuplexContractClient(
    callbackContext,
    "DuplexContract");
Console.WriteLine("Calling the duplex contract:");
Console.WriteLine(duplexProxy.GreetMeDuplex("ido"));

// Or use a DuplexChannelFactory
DuplexChannelFactory<WebSockets.IDuplexContract> dchf =
    new DuplexChannelFactory<WebSockets.IDuplexContract>(
        callbackContext,
        new NetHttpBinding(),
       new EndpointAddress("http://localhost:8083/"));
duplexProxy = dchf.CreateChannel();
Console.WriteLine("Calling the duplex contract using text encoded messages:");
Console.WriteLine(duplexProxy.GreetMeDuplex("ido"));
In this way, callbackContext automatically gets called from the duplex WebSocket. Most of the modern browsers are capable of invoking a call, and WebSockets can directly call this service from it.
- Refer to the REST and WCF services at http://bit.ly/wcfrestful