
The push notification is in-built on most of the modern smart phones. A Windows Phone, being no exception, also implements a number of notification techniques that can be used to bring notifications to the client app from an external source. The server can push notifications to the device and when the device receives the notification, an event occurs.
Push notifications are of three types:
- Toast notification: This notification is launched at the top of the screen with a custom message such as an e-mail alert. The notification will be displayed for 10 seconds unless the user dismisses the alert. If user clicks on the alert, then the application that sends the notification will be launched.
- Tile notification: This notification is used to display dynamic representation of an application state. We can control the image, text, and badge count of the notification.
- Raw notification: This notification can be used only when the application is running in the foreground. The notification is not delivered or even gets discarded when the application is not running.
These are the mediums by which the web server can send push notifications to the applications running on the Windows Phone platform:
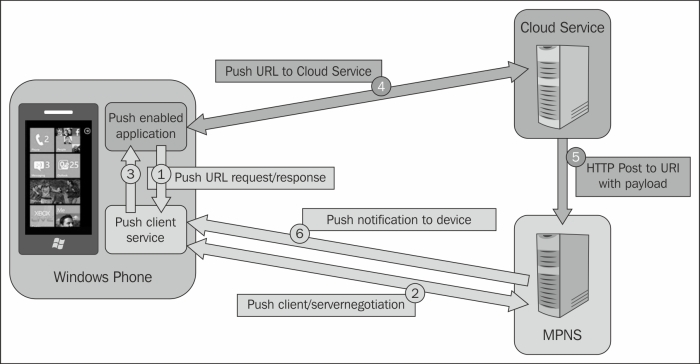
There are a number of steps to set up push notifications and a number of external hosts are involved to enable the push notifications to the clients. For a push notification, there should be a server that a developer can handle. In the preceding figure, we depict how a push notification is received by a Windows Phone. The steps are as follows:
- The application invokes
PushURIRequeston thePushClientservice. - The
PushClientservice goes to Microsoft Push Notification Service (MPNS), which is hosted on live servers to negotiate the device so that it receives push notifications. - When the response is received from
Pushclient, the application receives a signal that it has enabled push notifications and an URI through which the push notification needs to be sent from the server. - The application sends
PushUrito the external server managed by the developer in the cloud. - When server needs to push a message, it uses the URI to post the message to the MPNS server.
- Finally, when the MPNS receives the push notification, it sends the message directly to the phone.
As per the preceding architecture, to implement a full-fledged push notification, we need to create the following applications:
- A Windows Phone application that initiates the push notification channel
- An ASP.NET application that communicates with the live server
Let's create a new application that can enable the web server to use the push notifications:
- Create a new application and name it
PushClientSample. - Add a button to the
MainPage.xamlfile to create a push notification channel:<Button Content="Bind Channel" x:Name="btnBind" Click="btnBind_Click" />
We name it
BindChannel. - In the preceding code, we create
pushChannelusingHttpNotificationChanneland open it:private void btnBind_Click(object sender, RoutedEventArgs e) { string channelName = "PushClientSampleChannel"; HttpNotificationChannel pushChannel = HttpNotificationChannel.Find(channelName); if (pushChannel == null) { pushChannel = new HttpNotificationChannel(channelName); pushChannel.ChannelUriUpdated += new EventHandler<NotificationChannelUriEventArgs>(PushChannel_ChannelUriUpdated); pushChannel.ErrorOccurred += new EventHandler<NotificationChannelErrorEventArgs>(PushChannel_ErrorOccurred); pushChannel.ShellToastNotificationReceived += new EventHandler<NotificationEventArgs>(PushChannel_ShellToastNotificationReceived); pushChannel.Open(); pushChannel.BindToShellToast(); } else { pushChannel.ChannelUriUpdated += new EventHandler<NotificationChannelUriEventArgs>(PushChannel_ChannelUriUpdated); pushChannel.ErrorOccurred += new EventHandler<NotificationChannelErrorEventArgs>(PushChannel_ErrorOccurred); pushChannel.ShellToastNotificationReceived += new EventHandler<NotificationEventArgs>(PushChannel_ShellToastNotificationReceived); System.Diagnostics.Debug.WriteLine(pushChannel.ChannelUri.ToString()); MessageBox.Show(String.Format("Channel Uri is {0}", pushChannel.ChannelUri.ToString())); } }We named our push notification channel
PushClientSampleChannel. We first try to find out whether the notification is already registered. Then, we callFindto invoke a web request to the MPNS service to see whether the application is registered for the push notification or not. If it is found, it is used up; otherwise, it is registered using theOpencommand of theChannelobject.The
ChannelUriUpdatedevent is called when the server updates the URI. This method is used to get the actual URI to which the push messages need to be sent out. - When the
ChannelUriUpdatedevent is raised, we need to send the URI to the application server using the Internet. For simplicity, we enter the URI in the debugger output window, as shown in the following screenshot: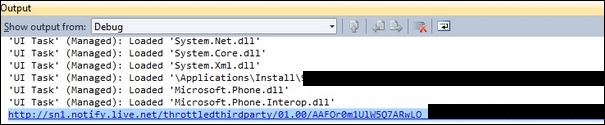
Copy the URI to a safe location, as it is required for the server application to send notifications.
- Now, create an ASP.NET application and name it
PushServerSample. InToastRequest.aspx, we add one label, twoTextBoxes, and one button: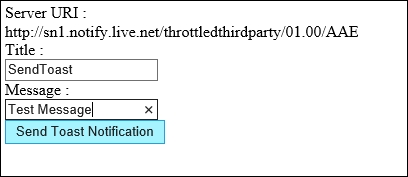
The following code shows how to create an ASP.NET application:
<div> Server URI :<br /> <asp:Label runat="server" ID="lblSubscription" /> <br /> Title : <br /> <asp:TextBox runat="server" ID="txtTitle" /> <br /> Message : <br /> <asp:TextBox runat="server" ID="txtMessage" /> <br /> <asp:Button runat="server" Text="Send Toast Notification" OnClick="ButtonSendToast_Click" /> </div> - To deal with the push notification, we create a class called
PushNotifierand add a static methodSendPushNotification:public static void SendPushNotification(string subscriptionUri, string requestMsg, string type) { HttpWebRequest sendNotificationRequest = (HttpWebRequest)WebRequest.Create(subscriptionUri); sendNotificationRequest.Method = "POST"; byte[] notificationMessage = Encoding.Default.GetBytes(requestMsg); sendNotificationRequest.ContentLength = notificationMessage.Length; sendNotificationRequest.ContentType = "text/xml"; sendNotificationRequest.Headers.Add("X-WindowsPhone-Target", type); sendNotificationRequest.Headers.Add("X-NotificationClass", "2"); using (Stream requestStream = sendNotificationRequest.GetRequestStream()) { requestStream.Write(notificationMessage, 0, notificationMessage.Length); } // Send the notification and get the response. HttpWebResponse response = (HttpWebResponse)sendNotificationRequest.GetResponse(); string notificationStatus = response.Headers["X-NotificationStatus"]; string notificationChannelStatus = response.Headers["X-SubscriptionStatus"]; string deviceConnectionStatus = response.Headers["X-DeviceConnectionStatus"]; }Here in the preceding code, we send the message to the Microsoft Live server using the URL where the application got registered.
- Hence, using
ButtonSendToast_Click, we call thetoastMessagemethod with URI for the application:protected void ButtonSendToast_Click(object sender, EventArgs e) { try { string subscriptionUri = this.lblSubscription.Text.ToString(); string toastMessage = "<?xml version="1.0" encoding="utf-8"?>" + "<wp:Notification xmlns:wp="WPNotification">" + "<wp:Toast>" + "<wp:Text1>" + this.txtTitle.Text.ToString() + "</wp:Text1>" + "<wp:Text2>" + this.txtMessage.Text.ToString() + "</wp:Text2>" + "<wp:Param>/Page2.xaml?NavigatedFrom=Toast Notification</wp:Param>" + "</wp:Toast> " + "</wp:Notification>"; PushNotifier.SendPushNotification(subscriptionUri, toastMessage, "toast"); } catch { } }In the preceding code, a new
HttpWebRequestclass is invoked with a specific formatted toast message. Once the message is received by the MPNS, it forwards the message to the actual device and a response is returned back. - Finally, if you click on the Send Toast Notification button, the phone will receive the toast notification. It is to be noted that if the application is running on the phone, it will receive a
ShellToastNotificationReceivedevent. If you handle the event handler, it will show the collection that it receives in a message box, as shown in the following screenshot: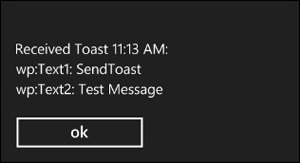
It is to be noted that the
ShellToastNotificationevent gets raised automatically by the channel, and a collection of all messages are received as parameter. In the following code, we filter out the message from theToastevent:private void PushChannel_ShellToastNotificationReceived(object sender, NotificationEventArgs e) { StringBuilder message = new StringBuilder(); string relativeUri = string.Empty; message.AppendFormat("Received Toast {0}: ", DateTime.Now.ToShortTimeString()); // Parse out the information that was part of the message. foreach (string key in e.Collection.Keys) { message.AppendFormat("{0}: {1} ", key, e.Collection[key]); if (string.Compare( key, "wp:Param", System.Globalization.CultureInfo.InvariantCulture, System.Globalization.CompareOptions.IgnoreCase) == 0) { relativeUri = e.Collection[key]; } } // Display a dialog of all the fields in the toast. Dispatcher.BeginInvoke(() => MessageBox.Show(message.ToString())); } - If the application isn't running, the environment will show the
Toastmessage using a red strip on the top of the phone screen. The message will have the icon of the application on which it is associated as shown in the following screenshot), and it will remain for 10 seconds if user doesn't click on it. You can click on the message to open up the application.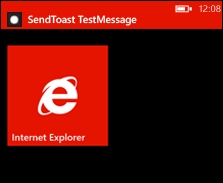
- Similar to the
Toastnotification, the Windows Phone environment also allows you to send tile notifications so that when that notification is received, the tile that is used to show the application is modified. For the tile notification, let's add a new page to the web project and call itTileRequest.aspx. Each tile can have a number of settings, as shown in the following screenshot: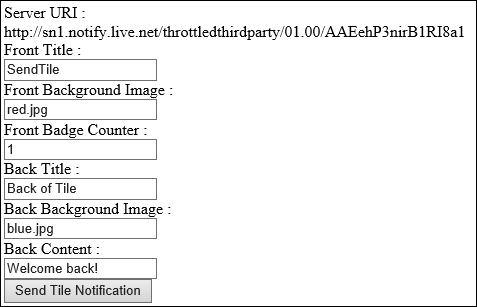
The preceding screenshot is taken from the web form created using ASP.NET. Here is the sample ASP.NET design that creates the preceding UI:
<div>
        Server URI :<br />
        <asp:Label runat="server" ID="lblSubscription" /> <br />
         Front Title : <br />
        <asp:TextBox runat="server" ID="txtTitle" /> <br />
          Front Background Image : <br />
        <asp:TextBox runat="server" ID="txtBackgroundImage" /> <br />
          Front Badge Counter : <br />
        <asp:TextBox runat="server" ID="txtBadgeCounter" /> <br />
          Back Title : <br />
        <asp:TextBox runat="server" ID="txtBackTitle" /> <br />
        Back Background Image : <br />
        <asp:TextBox runat="server" ID="txtBackgroundBackImage" /> <br />
        Back Content : <br />
        <asp:TextBox runat="server" ID="txtBackContent" /> <br />
         <asp:Button ID="btnTile" runat="server" Text="Send Tile Notification" OnClick="ButtonSendTile_Click" />
    </div>
In this case, we have front- and back-side configuration for the tiles as the tiles flip to show more content.
- To create the actual tile in the phone, you need to create two images of 176 x 175 pixels—one with a red background, named
red.jpg, and another with a blue background, namedblue.jpg—and place the images on theContentapplication. The notification will only be shown when the application is pinned to home screen. - Finally, after the application is deployed and the Send Tile Notification button is clicked, the web application sends a tile request using the push notification, as shown in the following code:
try
            {
                string subscriptionUri = this.lblSubscription.Text.ToString();
                string tileMessage = "<?xml version="1.0" encoding="utf-8"?>" +
                   "<wp:Notification xmlns:wp="WPNotification">" +
                       "<wp:Tile>" +
                         "<wp:BackgroundImage>" + txtBackgroundBackImage.Text + "</wp:BackgroundImage>" +
                         "<wp:Count>" + txtBadgeCounter.Text + "</wp:Count>" +
                         "<wp:Title>" + txtTitle.Text + "</wp:Title>" +
                         "<wp:BackBackgroundImage>" + txtBackgroundBackImage.Text + "</wp:BackBackgroundImage>" +
                         "<wp:BackTitle>" + txtBackTitle.Text + "</wp:BackTitle>" +
                         "<wp:BackContent>" + txtBackContent.Text + "</wp:BackContent>" +
                      "</wp:Tile> " +
                   "</wp:Notification>";
                PushNotifier.SendPushNotification(subscriptionUri, tileMessage,"tile");
            }
            catch
            {
            }
The device receives the notification and displays it as a tile, as shown in the following screenshot:
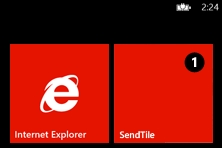
The tile automatically flips to show more content in the blue background.
Each Windows Phone device is well equipped to handle push notifications. The MPNS authenticates the device with the live services using live ID authentication, which is needed for every device. Once the device is authenticated, it can receive a push notification by subscribing a channel for the application. Once the channel is established, the MPNS responds to a unique URL that could be used to receive push notifications.
Now if a third-party application is hosted to that particular URL in cloud requests and it sends a predefined formatted XML document, the MPNS forwards the message as a push notification to the device using either tile or toast notifications.
In addition to the normal toast and tile notifications, there are a number of additional options that may be worth noting. Some of them will be discussed next.
In addition to normal tiles, there are also a number of XML formats supported by Windows Phones. Based on the configuration and the size of the tile set by the user while pinning, the tile notification can differ a lot. The tile formats are as follows:
- Flip tile template: This template flips from front to back, as shown in the following screenshot:
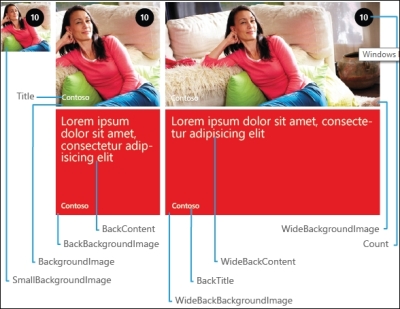
The preceding tile demonstrates the property of the schema that sits on the tile based on the different size of the tile configured. To use this template, you need to send a notification after the following schema:
<wp:Notification xmlns:wp="WPNotification" Version="2.0">
  <wp:Tile Id="[Tile ID]" Template="FlipTile">
    <wp:SmallBackgroundImage [Action="Clear"]>[small Tile size URI]</wp:SmallBackgroundImage>
    <wp:WideBackgroundImage Action="Clear">[front of wide Tile size URI]</wp:WideBackgroundImage>
    <wp:WideBackBackgroundImage Action="Clear">[back of wide Tile size URI]</wp:WideBackBackgroundImage>
    <wp:WideBackContent Action="Clear">[back of wide Tile size content]</wp:WideBackContent>
    <wp:BackgroundImage Action="Clear">[front of medium Tile size URI]</wp:BackgroundImage>
    <wp:Count Action="Clear">[count]</wp:Count>
    <wp:Title Action="Clear">[title]</wp:Title>
    <wp:BackBackgroundImage Action="Clear">[back of medium Tile size URI]</wp:BackBackgroundImage>
    <wp:BackTitle Action="Clear">[back of Tile title]</wp:BackTitle>
    <wp:BackContent Action="Clear">[back of medium Tile size content]</wp:BackContent>
  </wp:Tile>
</wp:Notification>
The template is mostly used for common notification formats.
- Cycle tile template: This kind of template is used when it is required to cycle between one to nine images:
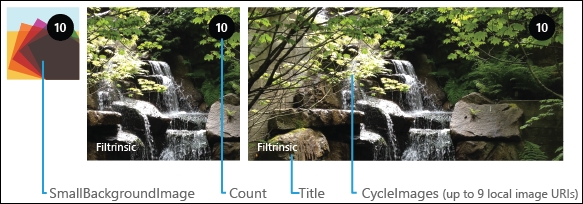
Here, the tile continuously changes after an interval. To send a tile notification, we need to send it using the following format:
<wp:Notification xmlns:wp="WPNotification" Version="2.0"> <wp:Tile Id="[Tile ID]" Template="CycleTile"> <wp:SmallBackgroundImage [Action="Clear"]>[small Tile size URI]</wp:SmallBackgroundImage> <wp:CycleImage1 Action="Clear">[photo 1 URI]</wp:CycleImage1> <wp:CycleImage2 Action="Clear">[photo 2 URI]</wp:CycleImage2> <wp:CycleImage3 Action="Clear">[photo 3 URI]</wp:CycleImage3> <wp:CycleImage4 Action="Clear">[photo 4 URI]</wp:CycleImage4> <wp:CycleImage5 Action="Clear">[photo 5 URI]</wp:CycleImage5> <wp:CycleImage6 Action="Clear">[photo 6 URI]</wp:CycleImage6> <wp:CycleImage7 Action="Clear">[photo 7 URI]</wp:CycleImage7> <wp:CycleImage8 Action="Clear">[photo 8 URI]</wp:CycleImage8> <wp:CycleImage9 Action="Clear">[photo 9 URI]</wp:CycleImage9> <wp:Count Action="Clear">[count]</wp:Count> <wp:Title Action="Clear">[title]</wp:Title> </wp:Tile> </wp:Notification> - Iconic tile template: This template displays a small image in the center of the tile and incorporates Windows Phone Design principles:
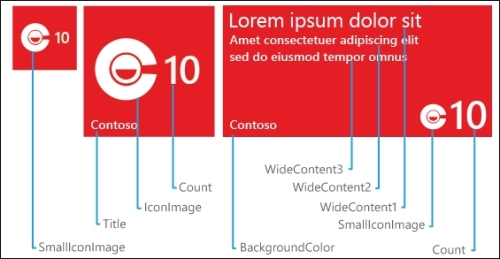
The iconic tile template is sometimes preferred because it has an icon in the middle of the tile and hence promotes branding:
<wp:Notification xmlns:wp="WPNotification" Version="2.0">
  <wp:Tile Id="[Tile ID]" Template="IconicTile">
    <wp:SmallIconImage [Action="Clear"]>[small Tile size URI]</wp:SmallIconImage>
    <wp:IconImage Action="Clear">[medium/wide Tile size URI]</wp:IconImage>
    <wp:WideContent1 Action="Clear">[1st row of content]</wp:WideContent1>
    <wp:WideContent2 Action="Clear">[2nd row of content]</wp:WideContent2>
    <wp:WideContent3 Action="Clear">[3rd row of content]</wp:WideContent3>
    <wp:Count Action="Clear">[count]</wp:Count>
    <wp:Title Action="Clear">[title]</wp:Title>
    <wp:BackgroundColor Action="Clear">[hex ARGB format color]</wp:BackgroundColor>
  </wp:Tile>
</wp:Notification>
This template can be used to create an Iconic tile notification.
- To learn more about push notifications, visit http://bit.ly/PushWPhone