
When creating an application for a phone, keep in mind that the application needs to interact with the phone environment. For instance, if you are building a contact list, you might sometimes import data from an existing contact list in the phone or you might also want to send an SMS or directly call a contact. These operations are interacting with the actual phone operating system from the application.
You can use Launchers and Choosers in your Windows Phone application to enable a user to perform common tasks on the phone environment. The Launcher and Chooser APIs invoke distinct built-in applications that replace the currently running application and when the actual operation is performed, the built-in application is again replaced by the application running on background with a callback, thus giving a seamless experience to the end users.
In this recipe, we are going to add a basic Launchers and Choosers task. Let's create a new project and add some buttons for some basic-level Launchers and Choosers.
To use launchers and choosers, we need to follow some basic steps:
- Create an instance of the task.
- Set the parameters and callback (if any).
- Call the
showmethod to invoke the task.
Let's create an UI to try some of the Launchers and Choosers. We use panorama to show the two tabs for launchers and choosers, as shown in the following screenshot:
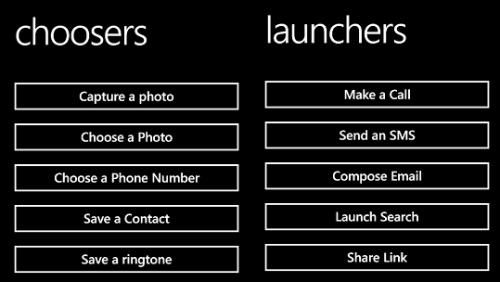
The preceding screenshot shows how the UI is laid out once we are complete with the XAML design. Let's now take a look at how the XAML looks:
<phone:Panorama Title="Launchers And Choosers">
    <phone:PanoramaItem Header="launchers">
        <StackPanel Orientation="Vertical">
                <Button Content="Make a Call" x:Name="btnCall" Click="btnCall_Click" />
            <Button Content="Send an SMS" x:Name="btnSMS" Click="btnSMS_Click"/>
            <Button Content="Compose Email" x:Name="btnEmail" Click="btnEmail_Click" />
            <Button Content="Launch Search" x:Name="btnSearch" Click="btnSearch_Click" />
            <Button Content="Share Link" x:Name="btnLink" Click="btnLink_Click" />
            <Button Content="Share Status" x:Name="btnStatus" Click="btnStatus_Click" />
        </StackPanel>
    </phone:PanoramaItem>
    <phone:PanoramaItem Header="choosers">
        <StackPanel Orientation="Vertical">
            <Button Content="Capture a photo" x:Name="btnCapturePhoto" Click="btnCapturePhoto_Click" />
            <Button Content="Choose a Photo" x:Name="btnPhoto" Click="btnPhoto_Click" />
            <Button Content="Choose a Phone Number" x:Name="btnPhone" Click="btnPhone_Click" />
            <Button Content="Save a Contact" x:Name="btnContact" Click="btnContact_Click" />
            <Button Content="Save a ringtone" x:Name="btnringtone" Click="btnringtone_Click" />
            <Button Content="Save Email Address" x:Name="btnsaveEmail" Click="btnsaveEmail_Click" />
        </StackPanel>
    </phone:PanoramaItem>
</phone:Panorama>
We used the panorama control to define the two interfaces for Launchers and Choosers. Now let's write code for these buttons.
Working with Launchers and Choosers is pretty straightforward. We need to just call the appropriate class to invoke it. The steps are as follows:
- Let's try some Launchers. To make a call, we need to use
PhoneCallTask:PhoneCallTask pcall = new PhoneCallTask(); pcall.DisplayName = "Abhishek"; pcall.PhoneNumber = "9999999999"; pcall.Show();
In the preceding code,
"Abhishek"is called to his number. - We use
SmsComposeTaskto create an SMS:SmsComposeTask stask = new SmsComposeTask(); stask.Body = "This is test sms"; stask.To = "99999999"; stask.Show();
There could be the
ToandBodyproperties for an SMS. - To send an e-mail, we use
EmailComposeTask:EmailComposeTask etask = new EmailComposeTask(); etask.Body = "This is test Email"; etask.Subject = "This is test subject"; etask.To = "[email protected]"; etask.Cc = "[email protected]"; etask.Bcc = "[email protected]"; etask.Show();
In the case of e-mails, you can use comma-separated entries of e-mail ID and send the e-mail from your configured e-mail client in Windows Phone.
- To search a text in the built-in Bing search, we use
SearchTask:SearchTask stask = new SearchTask(); stask.SearchQuery = "abhishek"; stask.Show();
- To share a status, we can use
ShareStatusTask:ShareStatusTask stask = new ShareStatusTask(); stask.Status = "This is a status sent from Windows Phone"; stask.Show();
- To share a link, we can use
ShareLinkTask:ShareLinkTask sLink = new ShareLinkTask(); sLink.LinkUri = new Uri("http://www.abhisheksur.com"); sLink.Message = "See my website"; sLink.Title = "Abhisheks new Website"; sLink.Show();Here, the link would be shared with the configured social media channels configured on the phone.
- In case of Choosers, the task will return a callback; when the task is finished, the
Completedevent gets fired. To capture an image from a camera, we useCameraCaptureTaskor we usePhotoChooserTaskto choose fromMediaLibrary, as shown in the following code:CameraCaptureTask cTask = new CameraCaptureTask(); cTask.Completed += (s, evt) => { if (evt.Error == null && evt.TaskResult == TaskResult.OK) { BitmapImage bmpImage = new BitmapImage(); bmpImage.SetSource(evt.ChosenPhoto); image.Source = bmpImage; } }; cTask.Show();For
CameraCapture/PhotoChooserTask, we need to add theID_CAP_MEDIALIB_PHOTO and ID_CAP_ISV_CAMERAcapabilities. - For phone number selection task, we can use
PhoneNumberChooserTask, as shown in the following code:PhoneNumberChooserTask task = new PhoneNumberChooserTask(); task.Completed += (s, evt) => { if (evt.Error == null && evt.TaskResult == TaskResult.OK) { MessageBox.Show(evt.PhoneNumber + " phone number selected!"); } }; task.Show();This task requires the
ID_CAP_CONTACTScapabilities. When the Chooser finishes its execution, theCompletedevent returnsPhoneNumber. - We can save
RingToneto the Windows Phone environment usingSaveRingtoneTask, as shown in the following code:SaveRingtoneTask ringtonetask = new SaveRingtoneTask(); ringtonetask.Source = new Uri("appdata:/Assets/Ring-BlackIce.wma"); ringtonetask.DisplayName = "My custom ringtone"; ringtonetask.Completed += (s, evt) => { if (evt.TaskResult == TaskResult.OK) MessageBox.Show("Ringtone saved"); }; ringtonetask.Show();The ringtone source could be either
appdata:/orisostore:/. - To save an e-mail to the contact, we can use
SaveEmailAddressTaskas shown in the following code:SaveEmailAddressTask eaddr = new SaveEmailAddressTask(); eaddr.Email = "[email protected]"; eaddr.Completed += (s, evt) => { if (evt.TaskResult == TaskResult.OK) MessageBox.Show("Email address saved"); }; eaddr.Show();
The
SaveEmailAddressTaskfunction requires theID_CAP_CONTACTScapabilities.
Launchers and Choosers are special names used to communicate with the built-in applications present in the Windows Phone applications. The Windows Phone API provides a range of these Launchers and Choosers so that the application developer can use specialized classes to invoke the properties present on the phone.
For each task, there is an associated ApplicationId class. The Launcher and Chooser classes use this ApplicationId class to call the specific application of the phone with the configuration sent from the application.
You should also remember that Launchers are separate application launched from the application, so there is every chance that the actual application will get suspended or even terminated during the process. So, before using Launcher and Choosers, tombstoning could also be required.
After looking at some of the basic Launchers and Choosers, there is always a notion of something more. Here are some of the items that are worth mentioning.
To add a NuGet Package, we go to the Library Package Manager option in the TOOLS tab and choose Manage NuGet Packages for Solution, as shown in the following screenshot:

Once you are in NuGet Package Manager, select Online from the left-hand side of the window and search for Windows Phone Toolkit. Add it to the solution.
Finally after the package is installed, add the following namespace to PhoneApplicationPage:
xmlns:toolkit="clr-namespace:Microsoft.Phone.Controls;assembly=Microsoft.Phone.Controls.Toolkit"
Notifications are one of the most important and primary requirements of any phone. People schedule reminders and alarms on their phone, which lets the phone respond automatically when the certain specified time is reached. As an application developer, you can also schedule a notification to the user so that even though the application is closed, you can still provide the message to the user. When the user gets notified by the environment, a small music file is played and a pop-up message is shown.
There are two types of notifications available:
There is a limit of defining 50 alarms/reminders within a single application. To demonstrate, let's create a page:
<Grid x:Name="ContentPanel" Grid.Row="1" Margin="12,0,12,0">
            <Grid.ColumnDefinitions>
                <ColumnDefinition />
                <ColumnDefinition/>
            </Grid.ColumnDefinitions>

            <Grid.RowDefinitions>
                <RowDefinition />
                <RowDefinition />
                <RowDefinition />
                <RowDefinition />
                <RowDefinition />
                <RowDefinition />
            </Grid.RowDefinitions>

            <RadioButton x:Name="rbAlarm" GroupName="type" Content="Alarm" Grid.Column="0" Checked="RadioButton_Checked" />
            <RadioButton x:Name="rbReminder" GroupName="type" Content="Reminder" Grid.Column="1" Checked="RadioButton_Checked" />

            <TextBlock Text="Name" Grid.Row="1"  Grid.Column="0" />
            <TextBox  x:Name="txtName" Grid.Row="1"  Grid.Column="1" />
            <TextBlock Text="Title" Grid.Row="2"  Grid.Column="0" />
            <TextBox  x:Name="txtTitle" Grid.Row="2"  Grid.Column="1" />
            <TextBlock Text="Content" Grid.Row="3"  Grid.Column="0" />
            <TextBox  x:Name="txtContent" Grid.Row="3"  Grid.Column="1" AcceptsReturn="True" />
            <TextBlock Text="Begin Time" Grid.Row="4"  Grid.Column="0" />
            <StackPanel Orientation="Horizontal" Grid.Row="4"  Grid.Column="1" >
                <toolkit:DatePicker x:Name="dtBegindate" />
                <toolkit:TimePicker x:Name="dtBegintime"/>
            </StackPanel>

            <TextBlock Text="Expiration" Grid.Row="5"  Grid.Column="0" />
            <StackPanel Orientation="Horizontal" Grid.Row="5"  Grid.Column="1" >
                <toolkit:DatePicker x:Name="dtExpdate" />
                <toolkit:TimePicker x:Name="dtExptime"/>
            </StackPanel>
        </Grid>
In the preceding code, we added three textboxes, which represent Title, Content, and Name of a notification entry. Both the reminder and alarm represents a ScheduledNotification entry where the alarm cannot have Title and NavigationUri to open the application. We also added two RadioButton controls that control whether the added notification is of the type alarm or reminder. There are also two date entries that we have added two DatePicker controls for and two TimePicker respectively, which allows you to take BeginTime and Expiration of the notification. These controls are not a part of general Windows Phone development environment. We added the Windows Phone toolkit to get them as mentioned in the previous topic.
After the toolkit is added to the MainPage.xaml file, we can add DatePicker and TimePicker to the page.
To perform an action on the controls, we will add two ApplicationBar commands—one to add the notification and another to cancel it.
Let's add the code at the bottom of the MainPage.xaml file below the grid:
<phone:PhoneApplicationPage.ApplicationBar>
        <shell:ApplicationBar>
            <shell:ApplicationBarIconButton x:Name=""btnAddNotification"" Click=""btnAddNotification_Click"" Text=""Add""
                                            IconUri=""/Assets/edit.png""/>
            <shell:ApplicationBarIconButton x:Name=""btnCancel"" Click=""btnCancel_Click""  Text=""Cancel""
                                            IconUri=""/Assets/cancel.png""/>
        </shell:ApplicationBar>
    </phone:PhoneApplicationPage.ApplicationBar>
As we already mentioned, you can add icons that come with the Windows Phone SDK. The icons edit.png and cancel.png have been added from the location DriveNameProgram FilesMicrosoft SDKs Windows Phonev8.0Icons.
Now, let's jump back to the code. We create two functions, one of which adds a reminder and another adds an alarm mentioned in the following code:
private void AddReminder()
        {
            Reminder reminder = new Reminder(txtName.Text);
            reminder.Content = this.txtContent.Text;
            reminder.Title = this.txtTitle.Text;

            DateTime bdate = this.dtBegindate.Value.Value;
            DateTime beginDateTime = bdate + this.dtBegintime.Value.Value.TimeOfDay;
            reminder.BeginTime = beginDateTime;

            DateTime edate = this.dtExpdate.Value.Value;
            DateTime exDateTime = edate + this.dtExptime.Value.Value.TimeOfDay;
            reminder.ExpirationTime = exDateTime;

            reminder.RecurrenceType = RecurrenceInterval.Daily;
            reminder.NavigationUri = new Uri("/MainPage.xaml", UriKind.Relative);

            ScheduledActionService.Add(reminder);
        }

        private void AddAlarm()
        {
            Alarm alarm = new Alarm(txtName.Text);
            alarm.Content = this.txtContent.Text;

            DateTime bdate = this.dtBegindate.Value.Value;
            DateTime beginDateTime = bdate + this.dtBegintime.Value.Value.TimeOfDay;
            alarm.BeginTime = beginDateTime;

            DateTime edate = this.dtExpdate.Value.Value;
            DateTime exDateTime = edate + this.dtExptime.Value.Value.TimeOfDay;
            alarm.ExpirationTime = exDateTime;

            alarm.RecurrenceType = RecurrenceInterval.Daily;

            ScheduledActionService.Add(alarm);
        }
In the preceding code, we can see that both the alarm and reminder are of a similar structure. Both of them are of the type ScheduledAction, while the alarm does not allow you to specify NavigationUri and Title. Now when btnAddNotification_Click is called, depending on whether rbAlarm is checked or not, we add a reminder or an alarm as follows:
private void btnAddNotification_Click(object sender, EventArgs e)
        {
            if (this.rbAlarm.IsChecked.Value)
            {
                this.AddAlarm();
            }
            else if(this.rbReminder.IsChecked.Value)
            {
                this.AddReminder();
            }
        }
In the preceding code, the action is performed based on the selection of RadioButton.
Appointments are some of the most important things that we need while working on a Windows Phone. Even reminders/alarms are important even though appointments can interact with the calendar present on the Windows Phone. To search or access references of other calendar data, we can use the Appointment object and search entries. Let's add the UI to show the appointments:
<ListBox x:Name="lstAppointments" ItemsSource="{Binding}" Grid.Row="1">
                <ListBox.ItemTemplate>
                    <DataTemplate>
                        <Grid>
                            <Grid.ColumnDefinitions>
                                <ColumnDefinition />
                                <ColumnDefinition />
                            </Grid.ColumnDefinitions>
                            <TextBlock Margin="5,0,0,0" Text="{Binding Subject}" TextWrapping="Wrap" Grid.Column="0" />
                            <TextBlock Margin="5,0,0,0" Text="{Binding Details}" TextWrapping="Wrap" Grid.Column="1"/>
                        </Grid>
                    </DataTemplate>
                </ListBox.ItemTemplate>
            </ListBox>
The ListBox class contains two TextBlock showing Subject and Details of an appointment entry. To show you the appointments on the ListBox class, we need a command that invokes the appointment search task as follows:
<phone:PhoneApplicationPage.ApplicationBar>
        <shell:ApplicationBar>
            <shell:ApplicationBarIconButton Text="Search" IconUri="/Assets/feature.search.png" Click="SearchAppointment_Click" />
            <shell:ApplicationBarIconButton Text="Add" IconUri="/Assets/add.png" Click="AddAppointment_Click" />
        </shell:ApplicationBar>
    </phone:PhoneApplicationPage.ApplicationBar>
We add two Appbar buttons, where the first one searches the appointments and the second one adds an appointment.
To search an appointment, we need to make use of the appointments API available in Windows Phone. To invoke the search operation, we use the following code:
private void RefreshAppointments()
        {
            Appointments appointment = new Appointments();
            appointment.SearchCompleted += appointment_SearchCompleted;
            DateTime starttime = DateTime.Now;
            DateTime endtime = starttime.AddDays(10);

            int max = 50;

            appointment.SearchAsync(starttime, endtime, max, null);
        }

        void appointment_SearchCompleted(object sender, AppointmentsSearchEventArgs e)
        {
                lstAppointments.DataContext = e.Results;
        }
The SearchAsync method takes three arguments: startTime, endTime, and the maximum number of appointments to enumerate all the appointments between times. If we call RefreshAppointments when the Search button is clicked, we see all the appointments between the time specified.
To test an appointment, if you don't have one, you can add an appointment on the Windows Phone environment using SaveAppointmentTask. On the AddAppointment button, we place the following code to add a sample appointment to the calendar:
var saveAppontmentTask = new SaveAppointmentTask();

saveAppontmentTask.StartTime = DateTime.Now.AddHours(1);
saveAppontmentTask.EndTime = DateTime.Now.AddHours(2);
saveAppontmentTask.Subject = "Sample Appointment Demo entry";
saveAppontmentTask.Location = "www.packtpub.com";
saveAppontmentTask.Details = "Sample save appointment entry for Windows Phone";
saveAppontmentTask.IsAllDayEvent = false;
saveAppontmentTask.Reminder = Reminder.FifteenMinutes;
saveAppontmentTask.AppointmentStatus = AppointmentStatus.Busy;

saveAppontmentTask.Show();
Each appointment has StartTime, EndTime, Subject, and Location (which takes Uri and Details). An appointment can also be AllDayEvent and automatically add a reminder before a stipulated time. As you can see, SaveAppointmentTask is a launcher; hence, you cannot silently add an appointment for the time being.
- Check out more about Launchers at http://bit.ly/Launchers
- Check out more about Choosers at http://bit.ly/Choosers