Configuring the TFS is one of the most important tasks for good utilization of development resources. After installing the TFS in your system, you can open Team Foundation Server Administration Console to configure the server so as to add collection, projects, and users. Let's try to configure the most important sections of the TFS administration console and host an application inside it using Team Explorer.
Open the TFS administration console from the path C:Program FilesMicrosoft Team Foundation Server 12.0ToolsTfsMgmt.exe if you have already installed it on your machine. The left-hand section of the following window shows the different types of subsections supported and the right-hand side will load the current section for configuration:
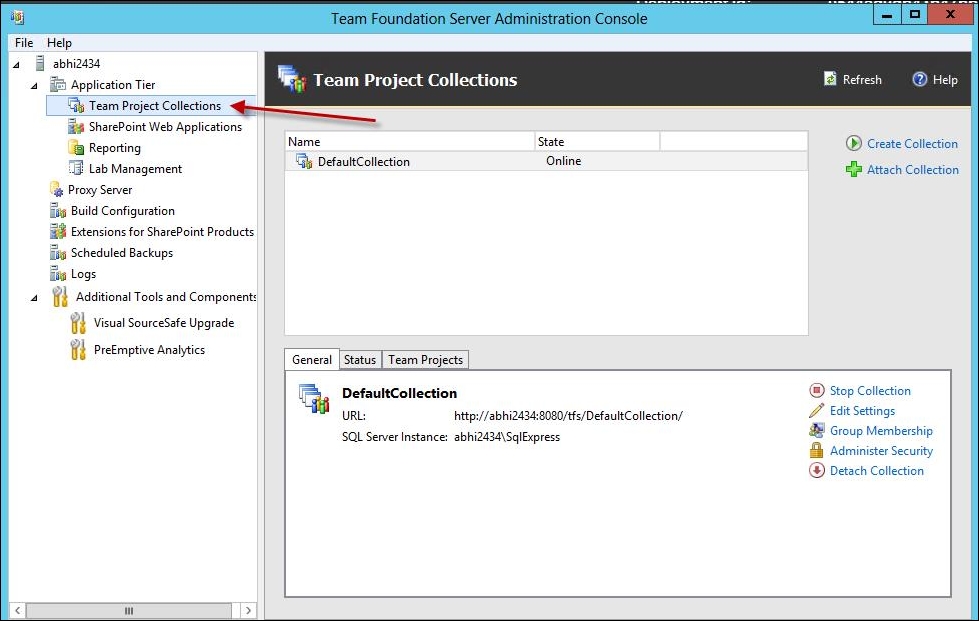
In the preceding screenshot, you can see that the default collection is already created for you. A project collection is a unit of the whole project or application. The users can be assigned to the project collection and each project collection can share a common set of configurations. A project collection holds a number of projects inside it, each of which can have their own solution. It should be worth noting that TFS creates a separate database in the SQL Server physically for each project collection.
Some important keywords you need to understand are as follows:
- Team project collection: Each project collection has a separate instance of physical database, which can hold multiple team projects. Generally, we create a team project collection for a big project, which has multiple projects inside it. Each team project collection is totally separate and isolated from one other.
- Team project: This is an individual team project that shares a common set of users, even if individual team project permission is given to individual users. A team project is a logical separation of code. A team project can have multiple solutions.
- Solution: This is an individual collection of projects that forms an individual solution. Visual Studio opens projects on the basis of the solution.
- Project: This is a unit that outputs a
.dllfile or an executable file.
To start configuring, it is important to check the existing configuration settings, such as e-mail alerts, console membership, and reporting server, when you click on the Application Tier node. Once things are done, let's follow these steps and create a new project collection:
- Select Team Project Collections from the left-hand navigation section and choose Create Collection to create a new project collection.
- A wizard will open; provide a name and a description for the TFS and then click on Next.
- Supply the Data Tier information, choose your SQL database instance where the database needs to be created for the new project collection, and click on Next.
- Finally, click on Create. Your project collection should be ready.
- After the project collection is created, we need to add users to the collection.
- By selecting the Project Collection option created, you can select Group Membership to add members to the collection. As TFS uses Windows authentication, you need to have users to be mapped with the domain.
- There are a number of groups that are already added by default to your Windows user database, as shown in the following screenshot:
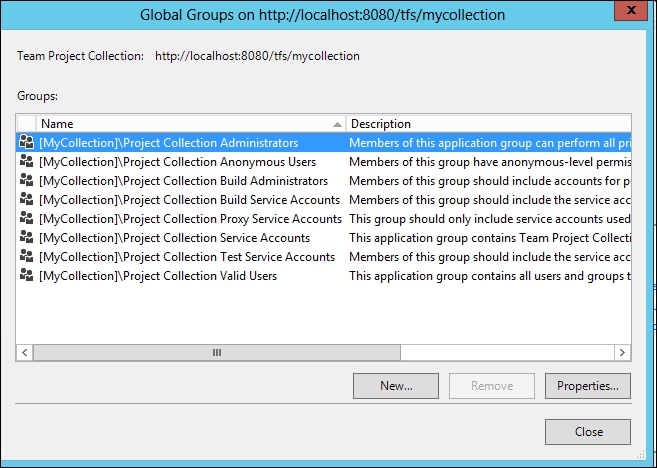
You can either add a user to the specific group to have specific role, or you can create a new one that suits your needs.
You can also use the web portal to do the same task. Enter
http://localhost:8080/tfs/MyCollection/_admin/_security/#_a=membersand you will see the following screenshot, which can be used in the same way: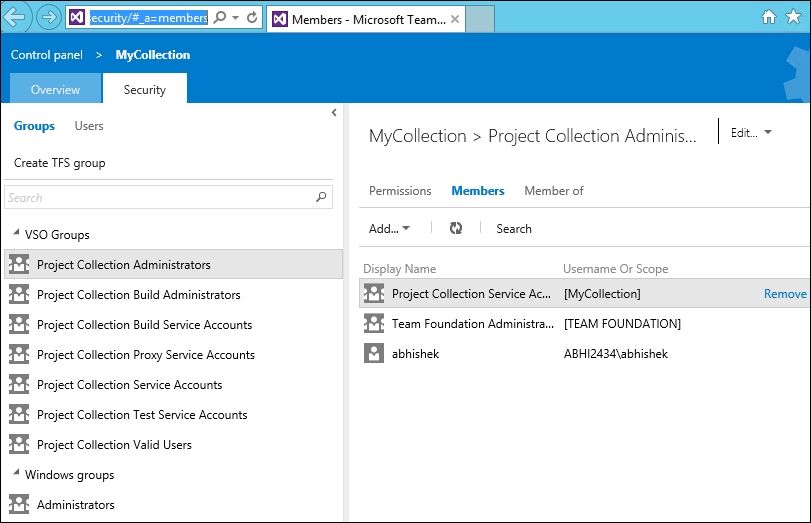
The web portal can also be accessed from outside if it is open to the external world and is backed up with a public IP address.
- Based on group selection, you can choose Administer Security to apply security settings to the groups.
- Once everything is set up, you can start collecting source in the project using Visual Studio Team Explorer.
- Open Team Explorer, click on the Sign up link, and use
http://localhost:8080/tfsas your URL (if you didn't choose anything else while installing). Once it is correctly set up, you can connect to the project. You can also protect your TFS behind HTTPS, which requires you to install Microsoft Certificate service and add an additional certificate to the server. You can get more information at http://bit.ly/tfshttps.In the following screenshot, we opened Source Control Explorer; you can see the workspace is mapped to the location
D:TeamProject. Once it is mapped, you can start adding your source code.
- Once you're on the Team Explorer - Home tab, you will be provided with are a number of different options. You can check the Pending Changes button to view all the changes that were not updated on the server. There are Check In and Checkout buttons that will allow you to hold a file for changes and update it to the server.
- Now, let's add a new team project. Select the New Team Project option in the File tab and name it
MyProject. - Select the appropriate template that you want to use for your application development process. For the time being, we implement Scrum.
- Now, select Team Foundation Server and then select Finish. The project will be created and loaded.
- You can now add a new file. Select Add Items to Folder from the toolbar of the Source Control Explorer pane and add the file or folder associated with your project.
- Once the file is added, it will show a + sign corresponding to the file. You can now check In the file(s) to upload the file on the server.
- Right-click on the project and select Check in pending changes. You need to add a comment and then select Check in in the Team Explorer.
- The file will be updated on the server.
TFS tightly integrates itself with Visual Studio and Visual Studio Team Explorer to deal with projects. The projects can be bound to a TFS project in such a way that any updates that have been made to the server can be easily transferred to the other clients notifying new updates before they start editing the content.
There are a number of components that are used internally to run the TFS. The following diagram shows the partial architecture of the TFS system:
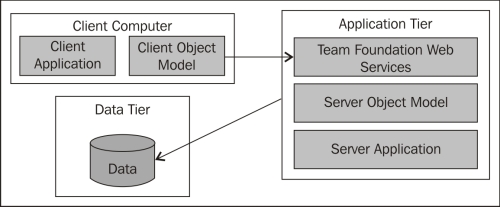
The Application Tier is the main section that connects the Team Foundation Server and the Client Computer. The main engine exposes a number of web services that lets the clients send/receive data. The Client Computer holds the Client Object Model for communication and the Client Application itself. The Application Tier, apart from being connected to the client application, is also connected to the Server Application that is used for administration. The Data Tier represents the actual repository of data. In case of the TFS system, the data is stored in the SQL Server databases.
TFS is a vast topic to be considered in a single section. There are lots of other configuration options that we can explore.
TFS can not only be used as a repository of code, but it also allows you with tools for project management. A project is a collection of small individual task items known as work items that can be assigned to a person, and once the item is done, the user can update the item as closed.
In Visual Studio, you can add Work Items, which can further be added to the current sprint for the Scrum, as shown in the following screenshot:
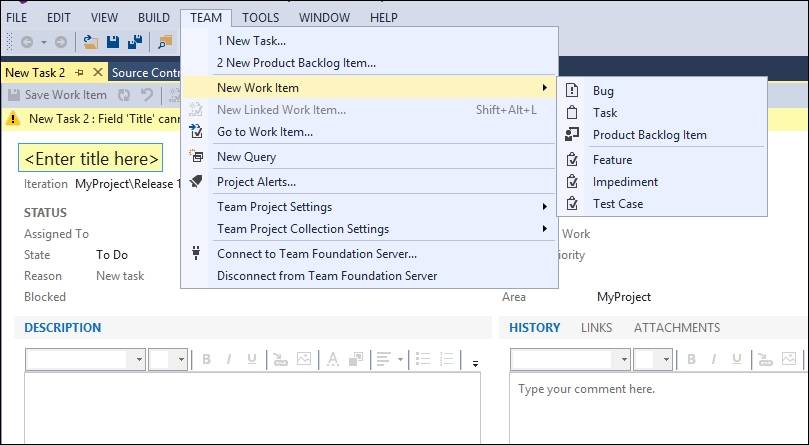
The Assigned To option will indicate the user who is responsible for the work. A description can be added and finally when the user clicks on Save work item, the user will be notified either using an e-mail notification (if it is configured) or when the user opens Visual Studio and queries its outstanding items.
A notification is another important thing for any team system. TFS allows you to configure it in such a way that every member is well informed of any changes that are made to the system. There is an option to set rules, which can trigger the appropriate e-mail notification, as shown in the following screenshot:
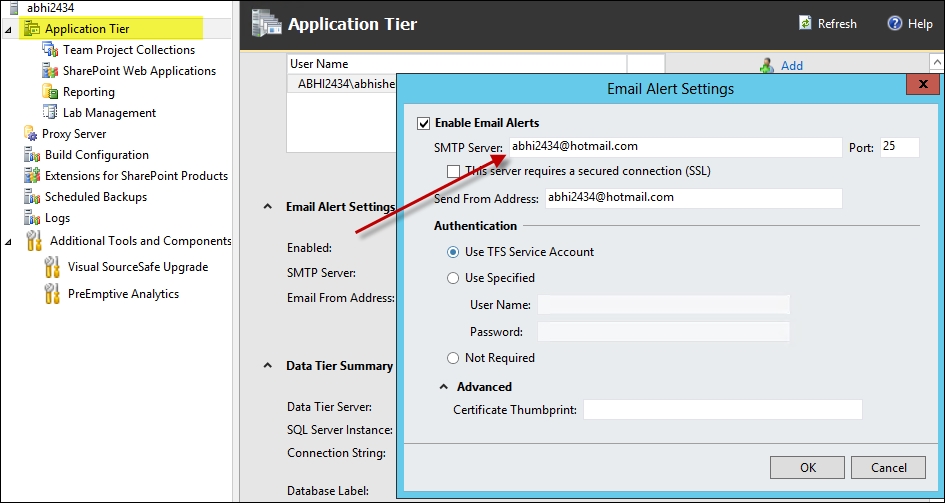
Before we do anything, we need to enable Email Notification by providing appropriate SMTP credentials. Open TFS Administration Console, select Application Tier, and then open the Email Alerts section to fill your SMTP details.
Now open the web portal using http://localhost:8080/tfs and go to the Alerts section. Add an alert to the work item so that when there is any work item change on the current project, the TFS service will notify a particular e-mail address.
The following screenshot shows how the Alert filters can be added to/removed from the query for the alert. Once alerts are set up, the TFS service will use the provided SMTP configuration to automatically notify the users.

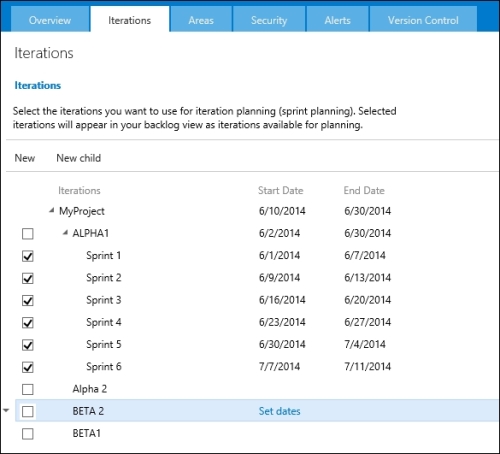
TFS can have different project methodologies or processes. By the way, it structures the work items and their relationship (workflow). It already comes with a couple of already defined processes, such as Agile, CMM, and Scrum, which can further be customized as well. Agile is a continuous development process. Every release has a set of iterations. Iterations are divided into weekly sprints where each sprint is individually tracked and backlogs are created. As TFS supports the Scrum methodology of product development, you will see an Iterations tab inside the web project when the template is selected for project collection. You can set the dates for the appropriate iterations and apply Scrum.
Go to the web portal using http://localhost:8080/tfs and select the project that you want to apply iterations to. Navigate to the Iterations tab and set the dates for every release. Remember this option is only available when the Agile project template is chosen while adding a project collection.
In the following screenshot, you can see that Sprint is set up on a weekly basis and iterations are named properly. When adding a work item to a particular sprint, choose a particular iteration properly.
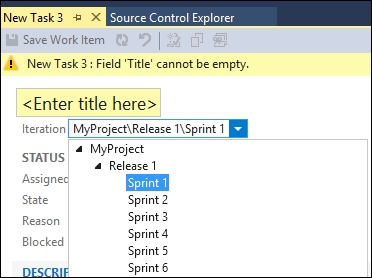
In the following screenshot, you can see the sprints that are listed in a TreeView, and you can choose the appropriate sprint or iteration for a particular work item: