Team development is not as simple as we think. If the project is small and has a very small team to work with, it can be configured as a simple deployment. However, in more advanced scenarios where the project is considerably big, there are teams specific to certain aspects of work and are working together on the same code - base.
For instance, the development team works on the core functionalities, the engineering team works on user logical issues and bugs, the quality assurance team works on testing the product, and finally the release team checks the features and releases. Not only this, the environment that these people use is quite different. The codebase that the development team uses is different from the codebase of the engineering team. Also, the development, staging, and production environments work in parallel. For such scenarios and requirements, TFS needs to maintain multiple codebases for the same solution, where the most recent will be with the developer teams while most stable ones will be with the quality assurance and production team. Branching allows you to branch one solution into another such that multiple projects can be maintained, and finally the required branch can be merged again with all the changes.
By branching, we mean creating a separate stream of source code that is capable of maintaining its own source controlling and strongly holding the links to the existing files in such a way that when there is a significant change in branch, it can be merged into the original source without any difficulty.
Before we start with the steps on creating branching and merging, let's discuss some techniques of code sharing. In the previous screenshot, you can see the main stream creates two branches: one for development and another for release, where both of them are merged to the main branch using the merging option. The techniques of code sharing are as follows:
- File linking: This is a Visual Studio feature where multiple projects share a single file. This kind of file sharing is best suited to small projects with limited number of shared files. In this mode of file sharing, each file is maintained with multiple links such that changes made to the individual file will automatically reflect to all other files (this resembles file sharing in Visual Source Safe.) With file linking, there's only one version of the linked source file to maintain. Changes made to the linked file are immediately received by all projects linking to the file. The disadvantage of file linking is that changes to the linked file should be coordinated with all the dependent project teams. Even carefully coordinated changes might break changes in dependent projects.
- Binary sharing: This means when the common source code is shared using the compiled assembly in form of Dynamic Link Libraries (
.dll), teams that own the common code have full ownership and control. In theory, this means that the control, versioning, and quality of the product are probably better. Also, branching and merging complexities are avoided as teams reusing the common code don't have access to the common source code; they're dependent on the owners to add new features and resolve bugs in the common shared code. The assemblies for the common code can be shared by copying them to a well-known file that can be referenced by dependent projects. Signed assemblies may need to be added to Global Assembly Cache (GAC). Alternatively, the assemblies can be copied from the common code team project to abinfolder under the dependent project's main branch. - Source code sharing: With source code sharing, Visual Studio has access to all the source code and can compile all the dependent assemblies together with the application. In Visual studio, the project reference is taken when source code is shared. With very large and complex projects, the compilation time can significantly increase due to source code sharing. Branching allows source code sharing in which a copy of the source code is created for each set of teams. It could be a development team, quality assurance team, implementation team, and so on—each developing on their own source. Finally, the changes made are merged to a main production stream.
To create branching inside a Visual Studio project, perform the following steps:
- Open Visual Studio and select Source Control Explorer.
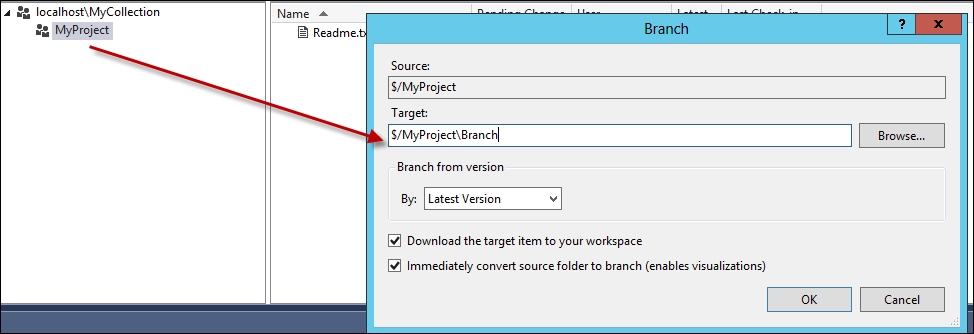
- Right-click on the project folder, select the Branching & Merging option, and then select Branch.
- A new dialog will pop up. Provide the appropriate location for Branch and click on OK, as shown in the following screenshot:
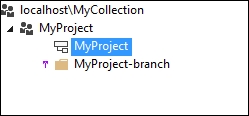
- The branch will be created, acquiring the latest version of the existing source.
In the following screenshot, MyProject has been branched out as MyProject-Branch. Here, both the projects will be under the source control and in both the projects people can work in parallel.
- These branches can be merged later on when required by right-clicking on the
Branchfolder and selecting the Merge option from the Branching & Merging tab. - For merge, you need to choose the target and source, in such a way that individual files from source are merged to the target. You also need to note that the merging can have conflicts and sometimes TFS can ask to resolve these conflicts before the actual merging takes place.
Branching is a process where a separate stream is maintained individually in a separate branch. The TFS System manages a backlink on every file it branches and separately maintains its own source control. The backlink is a unique identifier in the SQL Server tables, which identifies where the actual branch is created from so it can easily merge the source to the actual file later on during the merge operation.
Visual Studio provides various tools to show the branching architecture of the TFS system. Here are some of the visualizers that might help.
There are a number of visualizers related to branching and merging that help to clearly inspect the TFS system.
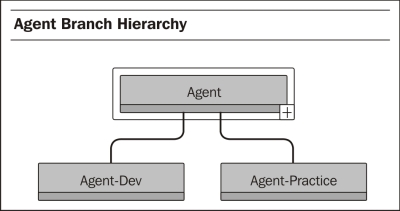
The branch visualization shows a diagrammatic view of the entire project branch. You can navigate to Source Control Explorer, click on the project that has been branched, and right-click on the View Hierarchy option in the Branching and Merging tab.
The following screenshot shows how the main Agent project is branched out to Agent-Dev and Agent-Practice. From this, you can quickly understand the branch hierarchy.
In Visual Studio, you can also see the changeset history for each branch to determine the merges to a changeset. Right-click on the project and then select Track Changeset. Once the changeset history is open, you can select the branches that you want to view changeset for and click on Visualize. This will visualize the changesets in different streams.
The following screenshot shows how a changeset is merged to different versions of streams. For a large project, it will be easier to understand the actual branching and merging using these visualizers.

- Refer to the ALM Rangers guide at http://vsarbranchingguide.codeplex.com/
- Learn more about branching and merging at http://bit.ly/branchmerge