Writing a test project inside the Visual Studio IDE has never been easier than that in Visual Studio 2013. A lot of tools inside the IDE makes it very easy to work on unit testing for an existing project and write superior test cases for the application. Microsoft has invested special efforts to make testing inside Visual Studio 2013 seamless for a developer who is already aware of how to write code inside Visual Studio. For instance, rather than running the project in the debugging mode, Visual Studio also provides shortcuts to build a project and run tests on it simultaneously. Now, let's see how to test an application inside Visual Studio in simple terms.
Before writing the actual test projects, let's first define a class that we need to test. For simplicity, let's consider a simple class called Salary, which will get the salary of an employee based on certain logic around his age. To implement, let's Open Visual Studio 2013 and create a library class and name it UnitTestingSample. Get rid of the default class produced and add a new class file called Salary. The implementation will look like what is shown in the following code:
public class Salary
{
    public const string ARGUMENTLESSTHAN20 = "Cannot calculate salary of a person below age 20";
    public const string ARGUMENTGREATERTHAN85 = "You are too old to be valid for pension";
    string name;
    int age;

    public Salary(string name, int age)
    {
        this.name = name;
        this.age = age;
    }

    // For simplicity we define salary by age.
    public float GetSalary()
    {
        int baseSalary = 20000;
        int ageSeed = this.age - 20;
        if (ageSeed < 20)
            throw new ArgumentOutOfRangeException(ARGUMENTLESSTHAN20);
        if (this.age > 85)
            throw new ArgumentOutOfRangeException(ARGUMENTGREATERTHAN85);
        float pensionFraction = 1.0f;
        if (this.age > 60) //retired
        {
            ageSeed = 40; //(60 - 20)
            pensionFraction = 0.5f;
        }
        float actualSalary = (baseSalary * ageSeed) * pensionFraction;
        return actualSalary;
    }
}
The preceding class takes two arguments in its constructor, which will be stored as the name and age of an employee using a constructor. The GetSalary method is a method that will invoke logic to determine the salary of a person based on the following:
- The salary cannot be determined if the age of a person is less than 20 or greater than 85
- Salary equals age multiplied by base salary, which is taken to be 20,000 when the age is less than 60
- Salary equals 50 percent of the final salary at age 60 as pension
Now, let's create a project and see how to test an application:
- To test the previous method, let's add a new
Unit Test Projectto the solution and call itUnitTestingSample.Tests. - Remove the default class generated from the template and add a new unit test class to the project. We will call it
SalaryTests. - Add a reference to
UnitTestingSampleusing the Add Reference dialog box to test the project. - Add a new method to test the
GetSalarymethod. The test method should always be named according to theNameofMethod_WhatToTest_ExpectedResultlogic. For the firstTestMethod, we are going to passValidValuesand expect a valid result:[TestClass] public class SalaryTests { [TestMethod] public void GetSalary_ValidValues() { //arrange int age = 50; float expected = (20000 * (age - 20)) * 1; Salary osalary = new Salary("John", age); //act float actual = osalary.GetSalary(); //assert Assert.AreEqual(expected, actual, string.Format("Expected {0} not equals actual {1}", expected, actual)); } }In the preceding
TestMethod, we use50as the age of the employeeJohnso that we receive the value based on the logic as expected. Notice that we defined the name of the method based on the nomenclature defined to write test methods.We also need to annotate the method with
TestMethod, and the actual class that defines theTestclass with theTestClassattribute. - Build the project and open Test Explorer. Test Explorer will identify the
TestMethodautomatically and list them inside Visual Studio. - Run the
TestMethodthat statesGetSalary_ValidValuesand you should see the test pass. - Now, to check whether the test actually ran before giving the result using
TestExplore, add a value with the expected result and rerun the test again; the test will eventually fail. When the test fails, the assert failure message is shown to indicate failure, as shown in the following screenshot: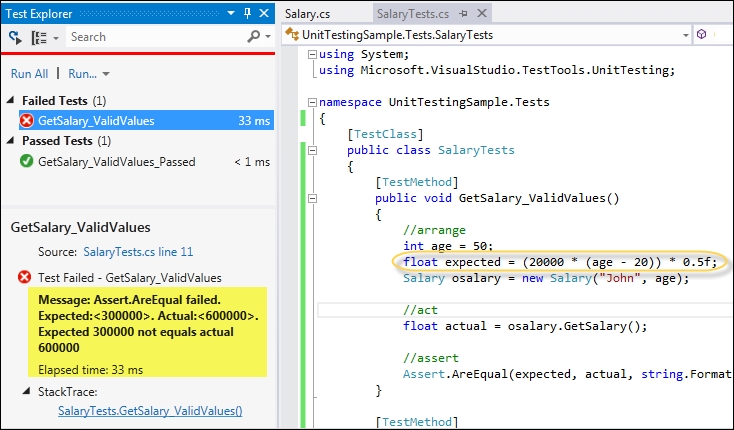
In the preceding screenshot, the Test Explorer lists the tests that have intentionally failed by changing the value of expected. When you click on any of the failed tests, the Explorer lists the assert failure message returned with a complete listing of the actual and expected values. You can fix the problem easily by clicking on the test result, which will directly point you to the code, or using
StackTraceto find the trace results. - Let's add another method to test what will happen when we pass an age less than 15:
[TestMethod]
[ExpectedException(typeof(ArgumentOutOfRangeException))]
public void GetSalary_WhenAgeLessThanTwenty__ShouldThrowException()
{
    //arrange
    int age = 15;
    Salary osalary = new Salary("John", age);

    //act
    float actual = osalary.GetSalary();

    //assert
}
When the value for the age is less than 20, we get an exception from the method, which indicates that the salary cannot be returned for a person below age 20. To assert an exception, we have used the
ExpectedExceptionattribute and annotated it with a method. This attribute indicates that the method should throw an exception when the test runs. - Run the test again to ensure that it passes.
- The method can throw
ArgumentOutOfRangeExceptionfor cases where the age is less than 20 or greater than 85. Let's test the second case where the age is greater than 85:[TestMethod] public void GetSalary_WhenGreaterThanEightyFive_ShouldThrowException() { //arrange int age = 90; Salary osalary = new Salary("John", age); //act try { float actual = osalary.GetSalary(); } catch (ArgumentOutOfRangeException e) { //assert StringAssert.Contains(e.Message, Salary.ARGUMENTGREATERTHAN85); return; } Assert.Fail("No exception was thrown"); }In the preceding code, we have used the
try/catchblocks to determine the argument. TheStringAssert.Containsmethod will compare the message that is received by the argument exception with the expected string to indicate whether the assertion is passed. In the preceding code, we placeAssert.Failin the final step to indicate that we don't have an exception. Finally, run the tests again and ensure everything is passed.
The Visual Studio IDE has built-in unit testing. Visual Studio is capable of determining TestClass and TestMethod automatically when tests are run. It automatically browses the entire project hierarchy and finds all the classes that are annotated with the TestClass attribute. It also lists the names of all the methods defined inside them and annotated with the TestMethod attribute inside the Test Explorer of Visual Studio. The Test Explorer can be used to run the test methods directly within it, which will call the tests, run them, and show the asserted result on the screen.
The IDE determines the failure or success based on the assert statements. An assert statement determines the validity of the statement when Visual Studio runs the method. The method produces an exception when an assert statement fails logically, which is captured by the IDE and the results are shown on the screen. In other words, if you call the TestMethod from outside, it will produce AssertFailedException if the expected and actual value differs. This exception is handled by Visual Studio to show a failure inside the IDE.
There are a number of APIs available for the Assert method, which are useful in various ways:
Assert.AreEquals: This fails when two values differAssert.AreSame: This fails when two objects point to different locationsAssert.Fail: This fails irrespective of any logicAssert.IsTrue/Assert.IsFalse: This determines the failure based on a true or false conditionAssert.IsNull/Assert.IsNotNull: This fails when an object points tonull
Similar to Assert, there are a number of other classes that are used to test values, such as StringAssert and CollectionAssert, which work specially on a set of types.
As you've already got the basic idea of unit testing, let's help you further understand the additional features.
Sometimes, it becomes essential to test a private type or a private member of a type. Let's create a new UnitTest class on the same project and call it SalaryPrivateTests. The unit testing API provides two classes to handle private types and members:
PrivateObjectPrivateType
The PrivateObject class is used to invoke private members of a type. To test this feature, let's test the validity of the Salary class constructor as follows:
[TestMethod]
public void TestPrivateMembers()
{
    //arrange
    string name = "Abhishek";
    int age = 30;
    Salary osalary = new Salary(name, age);

    //act
    PrivateObject pObj = new PrivateObject(osalary);

    //asset
    Assert.AreEqual<int>(age, Convert.ToInt32(pObj.GetField("age")));
    Assert.AreEqual<string>(name, pObj.GetFieldOrProperty("name") as string);
}
In the preceding code, the instance of PrivateObject is used to get the private data members defined in the Salary class using GetField or GetFieldOrProperty to determine the validity of the constructor. The PrivateObject class provides methods such as GetField, GetProperty, SetField, and SetProperty to handle private fields, properties, or methods. You can call a Private method using the Invoke method from the PrivateObject instance.
The PrivateObject class is used to test instance members of a private type. When there is a need to test a private static member, we need to use
PrivateType instead of PrivateObject. Let's add a simple static method to the Salary class, which takes an object of the salary and returns the name associated with the object:
static string GetName(Salary oSalary)
{
    return oSalary.name;
}
The preceding code takes an object of the Salary class and retrieves the name associated with it. To test this method, we need to create an instance of the PrivateType class as follows:
[TestMethod]
public void GetName_StaticMethodTest()
{
    //arrange
    string name = "Abhishek";
    int age = 30;
    Salary osalary = new Salary(name, age);

    //act
    PrivateType pType = new PrivateType(typeof(Salary));
    string returnValue = pType.InvokeStatic("GetName", osalary) as string;

    //assert
    Assert.AreEqual(name, returnValue);
}
In the preceding code, the PrivateType class allows you to call the private static member GetName and get the result of the method. Similarly, using the object of PrivateType, we can call the static field, properties, and so on using GetField and GetProperty.
From Test Explorer, Visual Studio 2013 allows you to analyze a project to ensure that all the lines of the project are tested. The Code Coverage window allows you to get an estimate on how much code has already been tested by the test cases defined in the unit testing project.
Let's say we comment out all the tests other than the GetSalary_ValidValues method from the project and rerun them. You will see that the tests have been passed to the Test Explorer. Once the tests have been passed, right-click on the test entry in the Test Explorer and select Analyze Code coverage for Selected Tests. The project will be analyzed and the result will be displayed inside the IDE.
In the following screenshot, how much code has been covered by the selected test has been shown. The GetSalary method listed on the Code Coverage Results window shows 50%. If you choose Show code coverage coloring form the Result pane, it will annotate all the lines that have been tested.
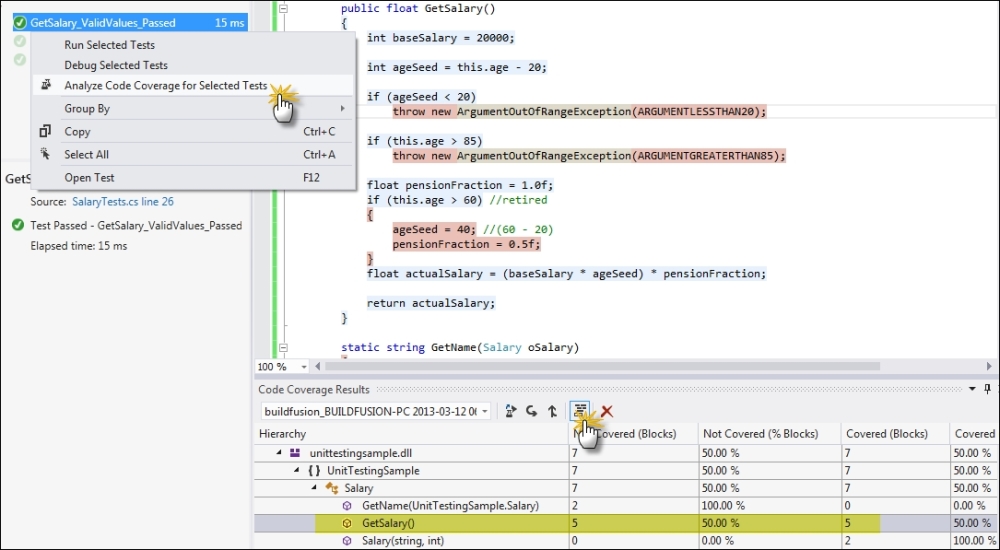
If you uncomment all the test cases for the project and run the code coverage, you will see that a lot more lines of the GetSalary method are colored in blue, which indicates that the lines are covered by test cases.
Test-driven development is a new way of developing code, where the test cases are written before the actual code is written. Visual Studio IDE helps in developing the actual code from the test cases easily. To create a test-driven method, let's create a unit testing project in Visual Studio and name it TDDSample.Tests.
Get rid of the default test file and create a new unit test class on the project. Create a test case and name it BasicDivideTest:
[TestMethod]
public void BasicDivideTest()
{
    //arrange
    Calculator ocalc = new Calculator();
    double expected = 4d;
    //act
    double actual = ocalc.Divide(20d, 5d);

    //assert
    Assert.AreEqual(expected, actual);
}
In the preceding code, we created an instance of the Calculator class that does not exist and call its Divide method with two double arguments. Now, we need to generate the class and the method automatically.
Let's add a new project to the solution and call it TDDSample. Right-click on Calculator in the code and select the New Type option from Generate, as shown in the following screenshot:

The new type pops up a new window, where you need to choose the correct project to autogenerate the Calculator class. Once the class is generated, you can again right-click on the Divide method and generate it inside the calculator class in a similar way.
Next, when we run the test from Test Explorer, it fails as the method throws NotImplementedException by default. If you select the test entry from Test Explorer, you will be navigated to the actual method. Let's now write the code that will ensure that the test passes:
public double Divide(double p1, double p2)
{
    return p1 / p2;
}
If we run the test again, it will pass because the result returned by the Divide method is valid for the test case.
Now, let's validate our test using a range of values:
[TestMethod]
public void RangeDivideTest()
{
    //arrange
    Calculator ocalc = new Calculator();

    //act
    for(double p1 = -100d; p1 < 100d; p1 ++)
        for (double p2 = -100d; p2 < 100d; p2++)
        {
            double expected = p1 / p2;
            AssertRange(ocalc, p1, p2, expected);
        }
}

private void AssertRange(Calculator ocalc, double p1, double p2, double expected)
{
    double actual = ocalc.Divide(p1, p2);

    //Assert
    Assert.AreEqual(expected, actual);Assert.IsFalse(Double.IsInfinity(actual));
}
In the preceding code, we try to test a range of values for p1 and p2 from -100 to +100. The test will fail because when the value of p2 is 0, the result will be returned as infinity. A check of Double.IsInfinity will ensure that the assert statement fails.
Let's add a code snippet to fix the problem:
public double Divide(double p1, double p2)
{
    if (p2 == 0 || p1 == 0)
        return 0;

    return p1 / p2;
}
Here, we validated p1 and p2 to return 0. Hence, the code will run.
- Refer to creating and running unit tests in a managed environment at http://bit.ly/TestRuntime