
Visual Studio uses Managed Extensibility Framework (MEF) to extend most of the code instead of writing VSPackage. MEF is an extensibility framework built inside the framework to support the plugin function of the application. The plugin model has been used by the IDE itself to ensure that we can hook in some of the code inside the IDE as an MEF component so that when the IDE loads up, it can compose elements directly as extensions.
Before we get started with MEF, let's try to understand what it is and how it works.
MEF is a framework that is built on top of the reflection API that addresses one special kind of requirement, which most of the current developers are into. Modularizing an application is one of the biggest concerns for any software giant. When we try to implement a pluggable model, we generally look for some sort of a plugin-based modularization for our respective application and ultimately end up doing in the same way we did before. Finally, this does not solve the problem as someone else might end up doing the same thing in a different manner and eventually we may face a "my plugins cannot go into your application" kind of a situation. Hence, we need some sort of standardization to address this situation such that every plugin-based application can work together. MEF addresses this situation by giving you a sleek way to define your modules as plugins and your application as a standard host for any plugins.
MEF allows defining imports and exports for classes such that it can allow you to plug-in classes to import the host automatically. Visual Studio has defined a number of imports as hooks inside the IDE, while you need to write their corresponding exports inside the plugin to hook into it.
You can read a lot more about MEF from the posts at http://bit.ly/mefch6 and http://bit.ly/meftipch6.
In this recipe, we will create an editor extension using MEF to plug in our code inside Visual Studio Editor.
The Visual Studio Editor UI is built using Windows Presentation Foundation (WPF), which provides a rich visual experience and consistent programming model that separates the presentation layer with the business logic.
There are a number of editor extension points that you can use to extend the editor. A few of them are as follows:
- Content types
- Classification types and formats
- Margins and scrollbars
- Tags
- Adornments
- Mouse processors
- Drop handlers
- Options
- IntelliSense
These extensions can be handled using MEF. In this recipe, we will be extending the editor using the MEF endpoint to show how this works inside the IDE. To do this, you need to install the Visual Studio SDK from http://bit.ly/vssdk.
Once the SDK is installed, Open Visual Studio and click on Extensibility. There are a number of project templates that you will see, as shown in the following screenshot:

In the preceding screenshot, you can see C# Item Template, Project Template packages, The Visual Studio Package, and some of the editor extensions too. The Editor Classifier, Editor Margins, Editor Text Adornment, and Editor Viewport Adornment extensions are the project types that are associated with MEF extensibility.
In this recipe, we are going to create a statement completion extension, which is triggered when certain characters are typed inside the IDE like the one you see in IntelliSense. This recipe will show you how to implement a statement completion for a hardcoded set of strings appearing in the IntelliSense menu.
Now, let's build an editor classifier using MEF to see how it behaves inside the IDE:
- Create a project with Editor Classifier and name it
StatementCompletionAdorner. - Open the VSIX manifest file and check whether the
Microsoft.VisualStudio.MEFcomponent is added as a content type in the Asset section. Add your name as the publisher, and then save and close the file. Delete all the existing files created and add the following references:Microsoft.VisualStudio.EditorMicrosoft.VisualStudio.Language.IntelliSenseMicrosoft.VisualStiudio.Shell.12.0Microsoft.VisualStudio.Shell.Immutable.10.0Microsoft.VisualStudio.OLE.InteropMicrosoft.VisualStudio.TextManager.Interop
Once the references are added, we can start creating the project. You can find the files in the
C:Program Files (x86)Microsoft Visual Studio 12.0VSSDKVisualStudioIntegrationCommonAssembliesv4.0folder. - Now to create the completion IntelliSense editor, we need to implement the following four components:
CompletionSource: This class is responsible for collecting the identifiers that you type into the IDE and creating the content for the Completion window. We use a static source for our completion texts for the time being.CompletionSourceProvider: This is an MEF component that instantiates theSourceclass.CommandHandler: This is the main command completion handler, which is implemented fromIOleCommandTargetand can trigger, commit, or dismiss the process.CommandHandlerProvider: This is an MEF component that instantiates theCommandHandlerinterface.
So, basically, there are two classes: one to create the identifier component and one to handle keystrokes over the
CompletionSourceclass. - Now, let's add the
CompletionSourceclass to the project. This class should implement theIComletionSourceinterface. TheAugmentCompletionSessionmethod allows you to createcompletionSetsand add aITrackingSpanelement directly in the current caret's position, as shown in the following code:private CompletionSourceProvider sourceProvider; private ITextBuffer txtBuffer; private List<Completion> lstCompletion; public CompletionSource(CompletionSourceProvider sourceProvider, ITextBuffer textBuffer) { this.sourceProvider = sourceProvider; this.txtBuffer = textBuffer; } void ICompletionSource.AugmentCompletionSession(ICompletionSession session, IList<CompletionSet> completionSets) { List<string> elList = new List<string> { ".NET", ".COM", "Microsoft", "PacktPub", "Visual Studio", "Managed Extensibility Framework", "Windows Presentation Foundation", "Packt Publications"}; lstCompletion = new List<Completion>(); foreach (string el in elList) lstCompletion.Add(new Completion(el, el, el, null, null)); completionSets.Add(new CompletionSet( "Tokens", "Tokens", FindTokenSpanAtPosition(session.GetTriggerPoint(txtBuffer), session), lstCompletion, null)); } private ITrackingSpan FindTokenSpanAtPosition(ITrackingPoint point, ICompletionSession session) { SnapshotPoint currentPoint = (session.TextView.Caret.Position.BufferPosition) - 1; ITextStructureNavigator navigator = sourceProvider.NavigatorService.GetTextStructureNavigator(txtBuffer); TextExtent extent = navigator.GetExtentOfWord(currentPoint); return currentPoint.Snapshot.CreateTrackingSpan(extent.Span, SpanTrackingMode.EdgeInclusive); }In the preceding code, we can see that we implemented the
AugmentCompletionSessionmethod of the interfaceICompletionSource, so that we can handle the tokens. We have used a standalone token list and added it to theCompletionSourceclass. Once theCompletionSetclass is created, we add that tocompletionSetspassed into the method just next to the caret's position. TheFindTokenSpanAtPositionmethod will create aTextExtentclass just next to the caret to show a menu of options to the user. - The
CompletionHandlerclass, on the other hand, helps in adding the handler, which will run when theCompletionSourceclass is picked or dismissed by the user. Let's now add a class calledCompletionCommandHandlerand implement it fromIOleCommandTarget. The two methods that need to be implemented areQueryStatusandExecrespectively, where theExecmethod is the method that actually processes the request. Let's see what theExecmethod looks like:public int Exec(ref Guid pguidCmdGroup, uint nCmdID, uint nCmdexecopt, IntPtr pvaIn, IntPtr pvaOut) { if (VsShellUtilities.IsInAutomationFunction(handlerProvider.ServiceProvider)) { return nextCommandHandler.Exec(ref pguidCmdGroup, nCmdID, nCmdexecopt, pvaIn, pvaOut); } uint commandID = nCmdID; char typedChar = char.MinValue; if (pguidCmdGroup == VSConstants.VSStd2K && nCmdID == (uint)VSConstants.VSStd2KCmdID.TYPECHAR) { typedChar = (char)(ushort)Marshal.GetObjectForNativeVariant(pvaIn); } if (nCmdID == (uint)VSConstants.VSStd2KCmdID.RETURN || nCmdID == (uint)VSConstants.VSStd2KCmdID.TAB || (char.IsWhiteSpace(typedChar) || char.IsPunctuation(typedChar))) { if (completionSession != null && !completionSession.IsDismissed) { if (completionSession.SelectedCompletionSet.SelectionStatus.IsSelected) { completionSession.Commit(); return VSConstants.S_OK; } else { completionSession.Dismiss(); } } } int retVal = nextCommandHandler.Exec(ref pguidCmdGroup, nCmdID, nCmdexecopt, pvaIn, pvaOut); bool handled = false; if (!typedChar.Equals(char.MinValue) && char.IsLetterOrDigit(typedChar)) { if (completionSession == null || completionSession.IsDismissed) { this.TriggerCompletion(); completionSession.Filter(); } else { completionSession.Filter(); } handled = true; } else if (commandID == (uint)VSConstants.VSStd2KCmdID.BACKSPACE || commandID == (uint)VSConstants.VSStd2KCmdID.DELETE) { if (completionSession != null && !completionSession.IsDismissed) completionSession.Filter(); handled = true; } if (handled) return VSConstants.S_OK; return retVal; }The preceding code first checks the input to be a character before handling it. Once it ensures that it has received a character, it checks whether it is due to a return key hit, a Tab press, a white space, or a punctuation mark. If this is the case, it will treat as a
Commitoperation. It commits theselectedStatusclass and statements. On the other hand, if the command isBackspaceorDelete, it will redo the filter. The commit oncompletionSessioninserts the text into the buffer, and ultimately when closing the IntelliSense menu, it will pick the element. TheDismissoperation, on the other hand, will unpick the element and dismiss the IntelliSense menu or the presenter to be destroyed. - The
TriggerCompletionmethod creates a dismissal on the current IntelliSense menu for the current caret's position, which is invoked when something outside the range is typed in:private bool TriggerCompletion() { //the caret must be in a non-projection location SnapshotPoint? caretPoint = txtView.Caret.Position.Point.GetPoint( textBuffer => (!textBuffer.ContentType.IsOfType("projection")), PositionAffinity.Predecessor); if (!caretPoint.HasValue) { return false; } completionSession = handlerProvider.CompletionBroker.CreateCompletionSession (txtView, caretPoint.Value.Snapshot.CreateTrackingPoint(caretPoint.Value.Position, PointTrackingMode.Positive), true); //subscribe to the Dismissed event on the session completionSession.Dismissed += this.OnSessionDismissed; completionSession.Start(); return true; }The preceding code retrieves
currentCompletionSessionand calls itsStartmethod, which will invoke the completion and ultimately the dismissal of the menu. - To implement the providers, we first export the
ICompletionSourceProviderclass that we need to be created as an MEF composable component, as shown in the following code:[Export(typeof(ICompletionSourceProvider))] [ContentType("plaintext")] [Name("token completion")] public class CompletionSourceProvider : ICompletionSourceProvider { [Import] internal ITextStructureNavigatorSelectorService NavigatorService { get; set; } public ICompletionSource TryCreateCompletionSource(ITextBuffer textBuffer) { return new CompletionSource(this, textBuffer); } }In the preceding code, the
CompletionSourceProviderclass is implemented fromICompeletionSource. TheExportattribute on the header exports the component to the corresponding import defined inside Visual Studio. You might have also noticed that theICompletionSourceclass has aTryCreateCompletionSourcemethod, which needs to return theCompletionSourceobject. TheContentTypeproperty is defined as plain text, thus the completion will work on text files. - Similar to
ICompletionSourceProvider, there is another export that we need to implement, which can connectCompletionHandler. Let's create aCompletionHandlerProviderclass and type in the following content:[Export(typeof(IVsTextViewCreationListener))] [Name("token completion handler")] [ContentType("plaintext")] [TextViewRole(PredefinedTextViewRoles.Editable)] public class CompletionHandlerProvider : IVsTextViewCreationListener { [Import] internal IVsEditorAdaptersFactoryService AdapterService = null; [Import] internal ICompletionBroker CompletionBroker { get; set; } [Import] internal SVsServiceProvider ServiceProvider { get; set; } public void VsTextViewCreated(IVsTextView textViewAdapter) { ITextView textView = AdapterService.GetWpfTextView(textViewAdapter); if (textView == null) return; Func<CompletionCommandHandler> createCommandHandler = delegate() { return new CompletionCommandHandler(textViewAdapter, textView, this); }; textView.Properties.GetOrCreateSingletonProperty(createCommandHandler); } } - The preceding code implements
IVsTextViewCreationListener, which will allow you to listen to the keystrokes pressed in the IDE. TheVSTextViewCreatedmethod will be called whenever theTextViewCompletionSourceclass is created. We add a delegate totextViewsuch that the handler gets called whenever a key is pressed. Here, the export will be mapped to the appropriate import inside Visual Studio and your code will be called. - Now, let's compile the code and see if there are any problems. When everything is successful, you can run the code to open Visual Studio Experimental Instance (We intentionally selected the black theme here). Open a text file and type
M; it will list Microsoft and Managed Extensibility Framework. You can start typing to filter the content or press Enter, Tab, Space bar, or any punctuation to select the content.In the following screenshot, you can see that when we first pressed
M, it opens the IntelliSense menu in the text file, where we can either choose the option or continue typing:
Visual Studio Editor is built using WPF such that the model and the UI remain separated. It also extensively uses MEF to control plugins or extensions to it. The various interfaces that are built into it allows the developer to export their respective logic in the form of classes, such that it seamlessly plugs in to the IDE.
The preceding code adds a key listener to the PlainText content type IDE editor, so whenever something is typed in, certain words pop up in the menu, which could be either picked in or continued typing in.
The ICompletionSource interface works on data blocks where you provide the dictionary of texts as CompletionSet, and the IOleCommandTarget interface provides the command to target for. The objects are exported using ICompletionSourceProvider and IVsTextViewCreationListener. The listener allows you to hook the handler, which needs to be executed when a certain key is pressed on the editor.
Building Editor Extension is a vast topic. There are a lot of hooks that you could use to implement extensions to Visual Studio. Let's look at some more examples in this section.
Smart tags are a common way of providing additional options for text inside the IDE. There are a lot of endpoints that can handle the smart tags so that you can define some additional options to the text. Some classes that are worth noting to define a smart tag are ITagger, SmartTags, TagProvider, and SmartTagActions. Let's create a project and name it SmartTaggingText.
Create a class and implement it from SmartTag. We add a constructor to pass ActionSet. It is important to note that SmartTagType is factoid when a blue line appears and ephemeral when a red line appears on the IDE:
public class SmartTagText : SmartTag
{
    public SmartTagText(ReadOnlyCollection<SmartTagActionSet> actionSets) :
        base(SmartTagType.Factoid, actionSets) { }
}
We defined SmartTag as Factoid so it will allow us to open the smart tag even though the word is not complete.
Let's create another class and implement it from ITagger, as shown in the following code:
public class SmartTaggerText : ITagger<SmartTagText>
    {
public IEnumerable<ITagSpan<SmartTagText>> GetTags(NormalizedSnapshotSpanCollection spans)
        {
            ITextSnapshot snapshot = buffer.CurrentSnapshot;
            if (snapshot.Length == 0)
                yield break;
            ITextStructureNavigator navigator = provider.NavigatorService.GetTextStructureNavigator(buffer);

            foreach (var span in spans)
            {
                ITextCaret caret = view.Caret;
                SnapshotPoint point;

                if (caret.Position.BufferPosition > 0)
                    point = caret.Position.BufferPosition - 1;
                else
                    yield break;

                TextExtent extent = navigator.GetExtentOfWord(point);
                if (extent.IsSignificant)
                    yield return new TagSpan<SmartTagText>(extent.Span, new SmartTagText(GetSmartTagActions(extent.Span)));
                else yield break;
            }
        }

        private ReadOnlyCollection<SmartTagActionSet> GetSmartTagActions(SnapshotSpan span)
        {
            List<SmartTagActionSet> actionSetList = new List<SmartTagActionSet>();
            List<ISmartTagAction> actionList = new List<ISmartTagAction>();

            ITrackingSpan trackingSpan = span.Snapshot.CreateTrackingSpan(span, SpanTrackingMode.EdgeInclusive);
            actionList.Add(new UpperCaseSmartTagAction(trackingSpan));
            actionList.Add(new LowerCaseSmartTagAction(trackingSpan));
            SmartTagActionSet actionSet = new SmartTagActionSet(actionList.AsReadOnly());
            actionSetList.Add(actionSet);
            return actionSetList.AsReadOnly();
        }
}
In the preceding code, we have created Smart Tags. The GetTags function will be automatically called when the blue arrow for the smart tag is hit on the editor and the menu is opened. We created SmartTags for the current text using GetSmartTagAction. Based on the current text, we can also create actions here.
The actions are classes derived from ISmartTagAction, which have an Invoke method. The Invoke method is called when an action is chosen from the list:
public class LowerCaseSmartTagAction : ISmartTagAction
    {
public LowerCaseSmartTagAction(ITrackingSpan span)
        {
            this.span = span;
            tsnapshot = span.TextBuffer.CurrentSnapshot;
            lower = span.GetText(tsnapshot).ToLower();
            display = "Convert to lower case";
        }
public void Invoke()
        {
            span.TextBuffer.Replace(span.GetSpan(tsnapshot), lower);
        }
}
Here, the text that has been passed to SmartTagAction is changed to lowercase. Finally, to hook SmartTag to the IDE, we need a provider. The IViewTaggerProvider interface allows you to export the type to the IDE as SmartTagger. Let's see the following code:
[Export(typeof(IViewTaggerProvider))]
    [ContentType("plaintext")]
    [Order(Before = "default")]
    [TagType(typeof(SmartTag))]
    public class SmartTaggerProviderText : IViewTaggerProvider
    {
        [Import(typeof(ITextStructureNavigatorSelectorService))]
        internal ITextStructureNavigatorSelectorService NavigatorService { get; set; }

        public ITagger<T> CreateTagger<T>(ITextView textView, ITextBuffer buffer) where T : ITag
        {
            if (buffer == null || textView == null)
            {
                return null;
            }

            //make sure we are tagging only the top buffer
            if (buffer == textView.TextBuffer)
            {
                return new SmartTaggerText(buffer, textView, this) as ITagger<T>;
            }
            else return null;
        }
    }
In the preceding code, the CreateTagger method checks whether the TextBuffer class has data and based on CreateTagger creates an object of SmartTaggerText with the buffer value. The object is exported to the IViewTaggerProvider import and defined within the IDE. Thus, we do not need to handle anything manually.
When you run the project and type something in the text editor on the experimental instance of Visual Studio, a blue line appears on the first character. When it is clicked, you will see the tagger, as shown in the following code:
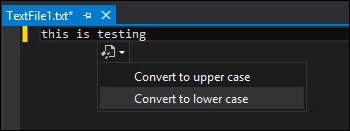
The tagger allows you to change the case of the underlying text.