
A number of components of the Windows Azure platform are exposed using Internet protocols. There are a number of storage components exposed with Windows Azure Platform. Hence, these components need to be secured behind a valid authentication. Windows Azure Storage Service manages the storage of blobs, queues, and tables. Each storage account has an account name and an access key that are used to authenticate to access the storage service.
The storage service supports Hash-based Message Authentication (HMAC) in which the storage operation request is hashed with the access key such that upon receiving the request, the storage service validates it and either accepts or denies it. The Windows Azure storage client library provides several classes that support various ways to create HMAC, which hides the complexity of creating and using messages.
The Windows Azure SDK provides a compute and storage emulator. It points to the localhost (127.0.0.1) service and hence uses a hardcoded account name and access key. This hardcoded value will be treated differently to ensure that a proper local emulator gets connected.
There are three types of storages supported by Storage Service:
- Blobs: These are used to store the static content of the Web. The static content could be images, videos, audios, and so on, or anything that does not change over time.
- Queues: These are special objects that support the FIFO algorithm and can handle objects in a sequence. The queue-based object gets objects from one point, while the objects are inserted at the other end. A Queue supports 8 KB of data to be put as messages.
- Tables: These provide NoSQL data objects where data is stored in a key/value pair. These Tables support transaction and locking on data without SQL support.
The storage emulator has a hardcoded account name and access keys. The storage service uses different subdomains to indicate each storage accounts, while the storage emulator uses different ports to differentiate the different subdomains. The different ports are as follows:
- Blobs:
127.0.0.1:10000/devstoreaccount1 - Queues:
127.0.0.1:10001/devstoreaccount1 - Tables:
127.0.0.1:10002/devstoreaccount1
In this recipe, we'll create Blobs, Queues, and Tables inside the project so that at a later stage we can use them in real environments.
Open Visual Studio, create a Windows Azure project, and add a worker role to it. We name it MyWorkerRole, as shown in the following screenshot:

After adding the MyWorkerRole project to the Azure project, Visual Studio creates two nodes in the Solution Explorer window. There is a cloud project that stores all the configurations about the cloud projects. Here, it is named StorageAccountExample, which is same as the project name we specified while creating a cloud solution, and another is the WorkerRole project we created. As we are going to create different storage classes, let's create some classes in the MyWorkerRole project to demonstrate the working principles of the storage objects.
Now, let's consider creating a storage-based cloud service, which can have a front-facing web application and a connecting background service such that both can seamlessly talk to each other.
- Add a new class to the
MyWorkerRoleproject and name itBlobExample. - Add the following constructor to create a Blob connection:
private CloudBlobContainer cloudBlobContainer;

public BlobExample(string containerName)
{
     CloudStorageAccount cloudStorageAccount = CloudStorageAccount.DevelopmentStorageAccount;
     CloudBlobClient cloudBlobClient = cloudStorageAccount.CreateCloudBlobClient();
     cloudBlobContainer = cloudBlobClient.GetContainerReference(containerName);
}
In the preceding code, we created
CloudStorageAccountin connection to the Development account. If you want to switch to production, you can put it inside the configuration, useCloudStorageAccount.Parse, and send the connection string. We then createCloudBlobClient. TheclientBlobClientmethod is used to create a connection between the Blob account and the storage. Using the client, you can get a reference to the Blob account. - Now, add the following method:
private void CreateBlob(String blobName)
        {
            using (MemoryStream stream = new MemoryStream())
            {
                StreamWriter writer = new StreamWriter(stream);
                writer.WriteLine(blobName);
                writer.Flush();

                CloudBlockBlob cloudBlockBlob = cloudBlobContainer.GetBlockBlobReference(blobName);

                //Write data to the stream and upload it to the storage blob
                cloudBlockBlob.UploadFromStream(stream);

                writer.Dispose();
            }
            this.TakeSnapshot(blobName);
        }
The
UploadFromStreammethod takes a stream as an argument and uploads the data into the stream. Once the stream source is specified, in our case it is only the Blob name, it uploads the data to the Blob storage. - The
TakeSnapshotmethod is used to take a backup of the Blob. As an Azure account does not charge for storage, it charges for uploads and downloads; you can take as many backups of data as required:private DateTimeOffset TakeSnapshot(string blobName) { CloudBlockBlob cloudBlockBlob = cloudBlobContainer.GetBlockBlobReference(blobName); CloudBlockBlob snapshot = cloudBlockBlob.CreateSnapshot(); //Backs up the blob return (DateTimeOffset)snapshot.SnapshotTime; } - Now to create Blobs based on a URL, you can call the
CreateBlobmethod as many times to create specified Blobs:private void CreateBlobs() { cloudBlobContainer.CreateIfNotExists(); CreateBlob("Abhishek/FirstBlob"); CreateBlob("Abhishek/SecondBlob"); }Here, two Blobs are created inside the
Abhishekdirectory of the Blob container. The data stored inside the Blobs would be the path of the Blob name. - To traverse the Blob directories inside the container, you can pass a
directorynamestring and all the Blobs inside the directory would be listed using the following code:private void TraverseDirectoryTree(String directoryName) { CloudBlobDirectory cloudBlobDirectory = cloudBlobContainer.GetDirectoryReference(directoryName); IEnumerable<IListBlobItem> blobItems = cloudBlobDirectory.ListBlobs(); foreach (CloudBlobDirectory cloudBlobDirectoryItem in blobItems.OfType<CloudBlobDirectory>()) { Uri uri = cloudBlobDirectoryItem.Uri; Trace.WriteLine(uri.ToString()); IEnumerable<CloudBlockBlob> leafBlobs = cloudBlobDirectoryItem.ListBlobs().OfType<CloudBlockBlob>(); foreach (CloudBlockBlob leafBlockBlob in leafBlobs) { Uri leafUri = leafBlockBlob.Uri; Trace.WriteLine(leafUri.ToString()); } } }The preceding code writes the URLs in a debugger. The
GetDirectoryReferencemethod gets the reference of a directory under the Blob container andListBlobson it gets all the items present in the directory. It is worth noting that the Blob inside a directory can also representCloudBlobDirectory. Hence, a nested loop is required. - Similar to Blob, let's create another class for Tables; we'll name it
TableExample.cs. Now, add the following code:private CloudTableClient cloudTableClient; public TableExample() { CloudStorageAccount cloudStorageAccount = CloudStorageAccount.Parse(CloudConfigurationManager.GetSetting("StorageConnectionString")); cloudTableClient = cloudStorageAccount.CreateCloudTableClient(); } - To create a Table, we either call
CreateorCreateIfNotExistson theCloudTablereference using the following code:public void CreateTable(string tableName) { CloudTable table = cloudTableClient.GetTableReference(tableName); table.CreateIfNotExists(); } - Similar to this,
DeleteIfExistscould be called to delete the table if it exists, as follows:public void DeleteTable(string tableName) { CloudTable table = cloudTableClient.GetTableReference(tableName); table.DeleteIfExists(); } - To list all the tables in a client, we use the following code:
public void ListTables(string tablePrefix) { var listTable = cloudTableClient.ListTables(tablePrefix); foreach (var table in listTable) Trace.WriteLine(table.Name); - Now, to add an entry to the table, we can either use
TableEntityor create a class and inherit fromTableEntityto add additional columns. There are two fixed columns for eachTableEntity,PartitionKey, andRowKeyobject.PartitionKeyis used to group rows andRowKeyrepresents the unique identifier for each partition. Let's take a look at the following code:public class TableData : TableEntity { public TableData(string partition, string row) { this.PartitionKey = partition; this.RowKey = row; } public int Age { get; set; } } public void AddEntryToTable(string tableName, TableData customData) { CloudTable table = cloudTableClient.GetTableReference(tableName); table.CreateIfNotExists(); var insertOperation = TableOperation.Insert(customData); table.Execute(insertOperation); }Here,
AddEntryToTabletakes a reference ofTableData. TheTableDataclass inherits fromTableEntityand adds a new property calledAge. We use a constructor to specifyPartitionKeyandRowKeybecause these values need not be left blank. WhenTableOperation.Insertgets executed, the data object is embedded into aTableOperationobject, which could later be executed onCloudTable. - We can also use the following
BatchOperationmethod instead of a single operation to ensure all the entries on the Batch are executed at a time:public void AddEntryToTable(string tableName) { CloudTable table = cloudTableClient.GetTableReference(tableName); table.CreateIfNotExists(); TableBatchOperation batch = new TableBatchOperation(); batch.Add(TableOperation.Insert(new TableEntity { RowKey = "Abhishek", PartitionKey = "Kolkata" })); batch.Add(TableOperation.Insert(new TableEntity { RowKey = "Abhijit", PartitionKey = "Kolkata" })); table.ExecuteBatch(batch); }Here, in the preceding code, the
TableOperationobjects are added toTableBatchOperation, and all of them are executed using theExecuteBatchmethod API. - Let's add the following code:
public void UpdateEntryToTable(string tableName, TableData customData)
{
    CloudTable table = cloudTableClient.GetTableReference(tableName);
    table.CreateIfNotExists();
    var replaceOperation = TableOperation.Replace(customData);
    table.Execute(replaceOperation);
}
The
Replacemethod automatically compares theTableEntityobject using thePartitionKeyandRowKeyattributes and determines which object needs to be replaced. Similarly, to delete an entry, you can use theDeletemethod and pass the reference of theTableEntityobject. - You can also query a Table using either
PartitionKeyandRowKeyor anything. To query a Table, we use LINQ, as follows:public void QueryTable(string tableName, string partitionKey, string rowKey) { CloudTable table = cloudTableClient.GetTableReference(tableName); TableQuery<TableData> tableQuery = new TableQuery<TableData>().Where(TableQuery.CombineFilters( TableQuery.GenerateFilterCondition("PartitionKey", QueryComparisons.Equal, partitionKey), TableOperators.And, TableQuery.GenerateFilterCondition("RowKey", QueryComparisons.Equals, rowKey))); foreach (TableData data in table.ExecuteQuery(tableQuery)) Trace.WriteLine(data.ToString()); }The preceding code creates a filter for a specific
PartitionKeyandRowKeycombination such that it gives you an entry that is unique in the Table. - Similar to Blobs and Tables, Queues follow the same type of development approach. The only difference with Queues is that a Queue follows FIFO logic and, hence, the message that goes in first will come out first. Let's take a look at how to work on Queues:
private CloudQueueClient cloudQueueClient; public QueueExample() { CloudStorageAccount cloudStorageAccount = CloudStorageAccount.DevelopmentStorageAccount; cloudQueueClient = cloudStorageAccount.CreateCloudQueueClient(); } - To create a Queue, we use the following code:
public void CreateQueue(string queueName)
{
    CloudQueue cloudQueue = cloudQueueClient.GetQueueReference(queueName);
    cloudQueue.CreateIfNotExists();
}
The
GetQueueReferencemethod gets a reference of the Queue present in the cloud, which is the main repository for Queue messages. TheCreateIfNotExistsmethod will create the Queue if it is not present. - To add a message to the Queue, we use the following code:
public void Enqueue(string queueName, string message)
{
    CloudQueue cloudQueue = cloudQueueClient.GetQueueReference(queueName);
    CloudQueueMessage cmessage = new CloudQueueMessage(message);

    cloudQueue.AddMessage(cmessage);
}
Here,
CloudQueueMessagecan take a message as an argument, and you can use theAddMessagemethod to add that message to the Queue. - To dequeue a message, you can use the following code:
public void Dequeue(string queueName)
{
    CloudQueue cloudQueue = cloudQueueClient.GetQueueReference(queueName);
    CloudQueueMessage cmessage = cloudQueue.PeekMessage(); //Gets message without removing it

    Trace.WriteLine(cmessage.AsString);

    cmessage = cloudQueue.GetMessage(); //Gets message and makes it invisible for 30 sec
    cloudQueue.DeleteMessage(cmessage); //deletes the message
}
In the preceding code, we can either use
PeekMessage, which will get the message without altering or removing the first item from the queue, or you can useGetMessage, which will get the message and make the same message invisible on the Queue for 30 seconds. In between, if the process invokesDeleteMesssageon the message, the Queue message will be removed. SoDequeueis a two-step process to callGetMessagewithDeleteMessage. - The
UpdateMessagemethod can be performed when the message is available:public void UpdateMessage(string queueName, string message) { CloudQueue cloudQueue = cloudQueueClient.GetQueueReference(queueName); CloudQueueMessage cmessage = cloudQueue.GetMessage(); cmessage.SetMessageContent(message); cloudQueue.UpdateMessage(cmessage, TimeSpan.FromSeconds(0d), MessageUpdateFields.Content | MessageUpdateFields.Visibility); }The preceding code invokes
GetMessage, which will get the first message from the Queue and make it invisible. TheSetMessageContentmethod will change the content and finallyUpdateMessagewill update the message in the Queue after a specified time. In the preceding code, the message gets updated on the Queue and immediately becomes visible to the Queue. - Blobs, Tables, and Queues form the basic storage units of Azure storage, and based on the requirement of the situation, any type of storage could be used.
In the Azure environment, three types of Azure storages are found: Blobs, Tables, and Queues. Each of these forms a REST-based URI approach to store and retrieve data, as shown in the following figure:
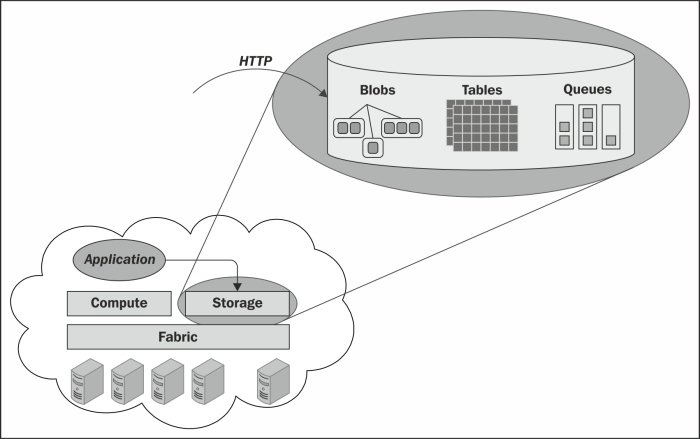
In the main Azure Storage, storage components are exposed as HTTP objects over a network. Blobs are used to store large unstructured data, which does not change over time. Tables are used to store key/value pair objects with a special capability of performing a query over the data based on keys and Queue, which mainly stores messages following the FIFO algorithm.
When dealing with Azure Storage, the following three components are present:
Account can point to a CloudStorageAccount reference object. Here, you can either use CloudStorageAccount.DevelopmentStorageAccount to point the client to a local emulator, or you can parse a connection string from the portal and add it back here.
To find the actual connectionstring from the portal, open the Azure portal (https://manage.windowsazure.com); navigate to NEW | STORAGE | QUICK CREATE; and enter the unique URL, LOCATION, and SUBSCRIPTION, as shown in the following screenshot:
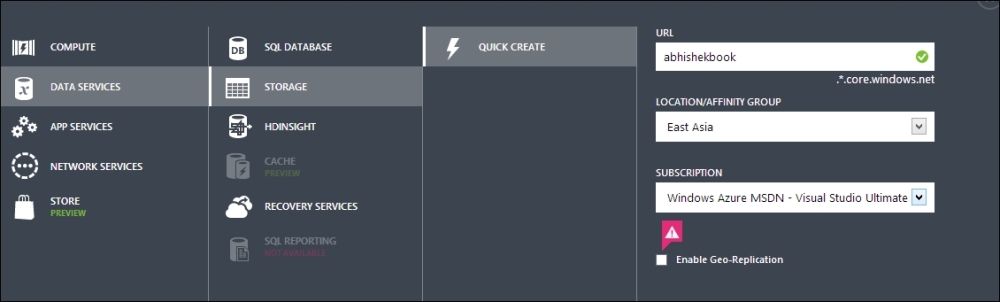
Here, we created a storage account called abhishekbook.core.windows.net. When you create the service, it will create the storage client for you where you can store data. Once the storage account has been created, you will find the storage links from the dashboard, as shown in the following screenshot:

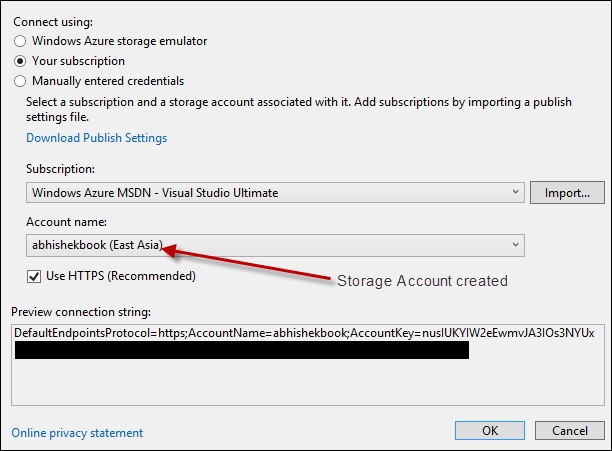
Each of the links points to the development storage account. Now, let's specify StorageAccountName and a key to ConnectionString to create a valid connection.
The name of the account would be abhishekbook, and there will be two access keys that can be accessed via the Manage Access Key button when Storage is clicked on the left-hand pane.
Now, go to properties of the Worker Role project and select Settings to add a new settings key. You can go to the alias in the connection string to access the window to configure the keys for the connection; you can name it StorageConnectionString. You can directly connect to the Azure portal to get the entire connectionstring from the superior tool of Visual Studio, as shown in the following screenshot:
Once you get the connection, you can access the connection using the following code:
CloudStorageAccount cloudStorageAccount = CloudStorageAccount.Parse(CloudConfigurationManager.GetSetting("StorageConnectionString"));The first step for any client is to connect to an appropriate storage account. Once the storage account object is created, we need to set up a client with an appropriate storage type. The client can be created using CreateCloudBlobClient, CreateCloudTableClient, or CreateCloudQueueClient.
The client can access the container that can be accessed with a unique identifier. In the steps defined earlier, each storage is accessed by following these simple steps. Once the container is retrieved, individual methods are used to manipulate the data inside it.
Above simple storage usages, there are a number of additional things that are worth noticing. The following sections present some of them.
A Queue can store up to 8 KB of messages. This limitation is very small when dealing with real-world scenarios. It is often required to access a large storage file from another process. A Queue is used to communicate with two processes, but if you need to send data that is larger than the maximum size of the Queue, it makes it impossible to use such a data structure.
In addition to a queue, a Blob storage is used to communicate large data between the processes. The data is stored inside a Blob instead of a Queue, and the URL that uniquely identifies the Blob is stored in the queue. We access the data through the Queues sequentially getting the blob URL and fetching the data from the Blob storage.
Say, for instance, we want to process large files on a service. To deal with large files, we will create a Blob storage, as follows:
public void UploadFileForProcessing(string path, string fileName)
{
   CloudStorageAccount storageAccount = CloudStorageAccount.Parse(ConfigurationManager.ConnectionStrings["StorageConnectionString"].ConnectionString);
   CloudBlobClient blobClient = storageAccount.CreateCloudBlobClient();
   CloudBlobContainer container = blobClient.GetContainerReference("largeDatafolder");
   container.CreateIfNotExists();
   container.SetPermissions(new BlobContainerPermissions { PublicAccess = BlobContainerPublicAccessType.Blob });

   CloudBlockBlob blockBlob = container.GetBlockBlobReference(fileName);

   //Create the Queue reference
   CloudQueueClient queueClient = storageAccount.CreateCloudQueueClient();
   CloudQueue queue = queueClient.GetQueueReference("fileProcessingQueue");
   queue.CreateIfNotExists();

   using (var fileStream = System.IO.File.OpenRead(path))
   {
       blockBlob.UploadFromStream(fileStream);
      //Once upload finished, add the message to the Queue
      CloudQueueMessage newBlobAddress = new CloudQueueMessage(blockBlog.Uri);
      queue.AddMessage(newBlobAddress);
   }
}
Here, the Queue fileProcessingQueue is used to send a message between two processes. Once the message has been added to the Queue, the other process will receive it via the GetMessage method from the Queue and process the Blob from its URL, as follows:
public void ProcessFileFromQueue(string downloadfilePath)
{
   CloudStorageAccount storageAccount = CloudStorageAccount.Parse(ConfigurationManager.ConnectionStrings["StorageConnectionString"].ConnectionString);

   //Create the Queue reference
   CloudQueueClient queueClient = storageAccount.CreateCloudQueueClient();
   CloudQueue queue = queueClient.GetQueueReference("fileProcessingQueue");
   queue.CreateIfNotExists();

   CloudQueueMessage blobAddress = queue.GetMessage();
   if(blobAddress != null)
   {
       CloudBlobClient blobClient = storageAccount.CreateCloudBlobClient();
       CloudBlobContainer container = blobClient.GetContainerReference("largeDatafolder");

       CloudBlockBlob blockBlob = container.GetBlockBlobReference(blobAddress.AsString);
       using (var fileStream = System.IO.File.OpenWrite(downloadfilePath))
       {
           blockBlob.DownloadToStream(fileStream);
       }
       queue.DeleteMessage(blobAddress);
   }
}
The preceding code downloads the files one by one from the Blob storage, which is uploaded by another process and notified using a request that comes from the Queue. Being the medium for exchanging information, the Queue cannot hold the whole file; instead, the requested URL could be sent through Queue, and the process that is subscribed to the same Queue can access it in real time. Thus, the files sent from a process using UploadFileForProcessing are eventually sent to another process shown in the ProcessFileFromQueue method.
As we move forward, you might think about which Azure Storage to use when there are a number of storage types available in Windows Azure. The storage types are as follows:
- Blobs
- Tables
- Queues
- Azure Drive
- SQL Azure
Windows Azure Blobs support two types of Blobs: one that supports blocks for streamed access and another that supports a page for random read-write access. The maximum size of a block Blob is 200 GB and the maximum size of a page blob is 1 TB. The primary use of block Blobs is to have streaming content on websites, while the primary use of page blobs is to store VHDs.
The Table gives a structured NoSql data to store a collection of entities where each entity has a primary key of PartitionKey and RowKey as well as a Timestamp property. The Table does not support indexes as of now. However, it supports the transaction when the input is in batches.
Queues store messages up to 8 KB of message size and return messages based on FIFO. The messages in Queue remain there until they get deleted or remain there for a maximum of 7 days.
The Azure drive allows an instance to be mounted as an NTFS drive, a VHD stored as a page Blob. Once mounted, VHD has full access to perform the read/write function.
SQL Azure is a relational database with full transactional capabilities of SQL Server running on Windows Azure data centers. The Azure database in the portal initially has a maximum size of 50 GB, but it can be subsequently changed using an alternate database statement up to 150 GB or even up to 500 GB as per the latest news. The following command changes the maximum size of the database to 100 GB:
ALTER DATABASE MyDatabase MODIFY (EDITION='BUSINESS', MAXSIZE=100GB)
Refer to the following list:
- We choose Blobs if we want to have large data content streamed on websites (block Blob) or perform random read/write access to a large file (page Blob)
- We choose Azure Tables if we need a cost-effective, highly scalable storage of entities that accept the limitations of a query
- We choose SQL Azure if we want relational databases
- We choose Queues when we need to implement disconnected communication between processes
- We choose Azure Drive if we need NTFS Access to a durable disk
- Refer to the Azure Storage documentation at http://bit.ly/azurestoragech7