When you create an application and run it in Windows Azure, the configuration file along with the code that constitutes the package together is called a Windows Azure cloud service. With a cloud service, you can host a multi-tier application in a single host and combine one or more cloud services together with the Web role and/or worker roles, each with its own application files and configurations with the support of autoscaling. A cloud infrastructure maintains the services for you by maintaining virtual copies of the software, patching operating systems and attempting to recover hardware failures. A cloud service is recommended to have at least two instances running to qualify Windows Azure Level Agreement that states 99.95 percent guaranteed connectivity.
Cloud service roles that constitute application and configuration files are of two types:
There are three types of files present in each package. They are as follows:
- Service definition file (
.csdef): This file defines the service model and the number of roles - Service configuration file (
.cscfg): This file provides configuration settings for the cloud service as well as individual roles, including the number of instances per role - Service package (
.cspkg): This is a zipped archive with the application code and service definition file
Now, let's create a service with one Web role and one worker role and host them into a cloud.
Open Visual Studio and create a Windows Cloud Service application; we name it CloudServiceSample. On the next screen that is presented, we add WebRole and WorkerRole. The project adds two projects in addition to the Service Configuration project in the Solution Explorer window. WebRole is actually a WebForms application (if you have chosen WebForm from a template), and WorkerRole represents a mere Windows service.
If you run the project, WebRole pops up a new Internet Explorer, and the default template is good enough for our deployment.
After you compile, you will get two files: one that is produced with a .cspkg extension, which represents a zipped archive holding the whole package with application files and service definition files, and the other is a .cscfg file for configurations.
Let's deploy the small project that comes with the template and configure it to the Azure portal using the following steps:
- Open the Windows Azure portal (https://manage.windowsazure.com/).
- Create a new CLOUD SERVICE, as shown in the following screenshot, and name it as something you want:
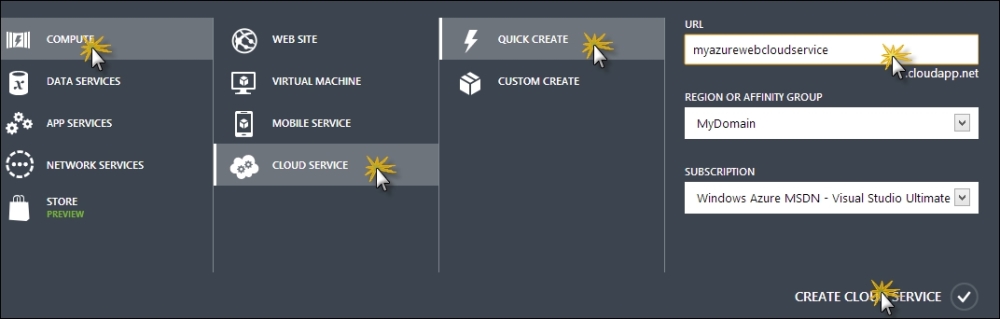
- The
myazurecloudservicename would have already been assigned to you, but change this name to something that suits you. - Once the service is created and ready, we need to upload the created package to the service. When you open the service, you will see there are two options to upload the package. The production environment will automatically put the URL to production, while staging is used for testing purposes with a temporary URL.
- Let's upload the package file here. To upload, select the Upload option at the bottom of the page on the Staging tab.
- Select DEPLOYMENT LABEL for the application and choose the PACKAGE file and the CONFIGURATION file from the
app.publishfolder where the package has been created from Visual Studio: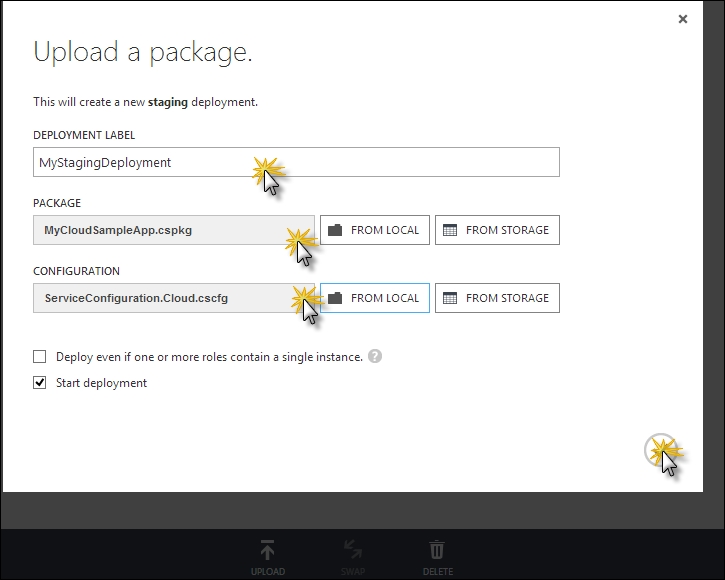
If the Start deployment option is checked, it means the application will be automatically deployed after it is uploaded.
- Let's choose these settings; after the application is uploaded, you will see the application is listed on the websites section as a deployed website. The dashboard allows you to configure different options of the website.
- To configure the IIS Server, you can use the Configuration option on the website. The Configuration option allows you to handle the .NET Framework version for the website, the platform type, the application settings, connection strings, default pages, HTTP handler mappings, and so on. All the things that you may have been doing in IIS would be available through this tab.
- On the other hand, the Scaling tab, as shown in the following screenshot, allows you to scale the application's performance. With scaling, you can increase the number of parallel instances that the same website will run on, the size of the machine where it is deployed, and so on.
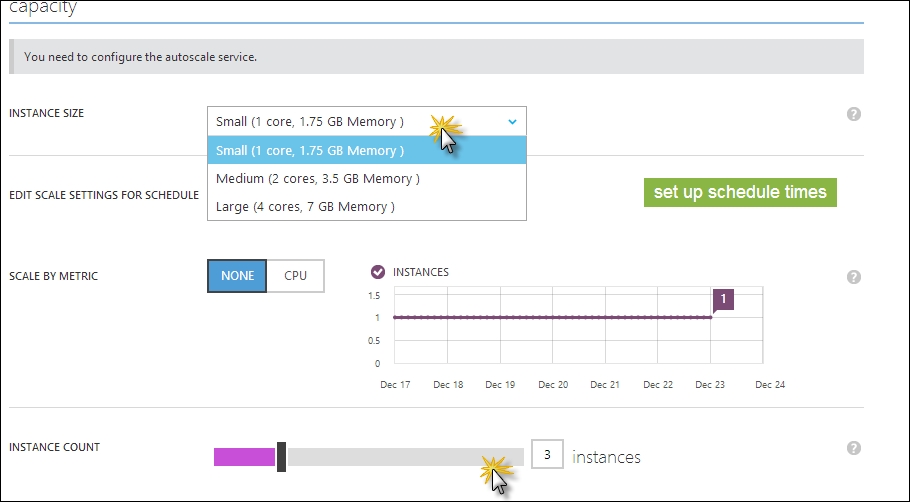
Here, you can see the capacity is configured to run on a small instance machine with one core and 1.75 GB of memory and scaled to three instances.
- You can also link resources to automatically add firewall settings or other features that are required to access the resources from Windows Azure websites.
An Azure service application runs IIS over a cloud environment as a distributed application. The application developed in Visual Studio can be deployed to the cloud server without changing any code. Everything that is required to configure the application could be done inside Visual Studio, and finally, it can be deployed to the server using a management portal.
In the preceding recipe, we tried to deploy a website to the staging environment, and the same technique can be used to deploy the application to production.
Deploying data into Windows Azure is very important. There are a few more things that can be worth noting.
Windows Azure runs in cloud platforms. The main advantage of deploying applications to the cloud is to enable data and services to be consumed by external applications. The Windows Azure Marketplace is a global online market where ISVs and data publishers can publish the data and make money.
Start a web browser and enter http://datamarket.azure.com. Sign in using a live account, and you can then browse the datasets available. Once you are in the portal, you can access any dataset available in the marketplace. Some of the data is free, while some is paid. The free dataset could be accessed without the use of credit cards.
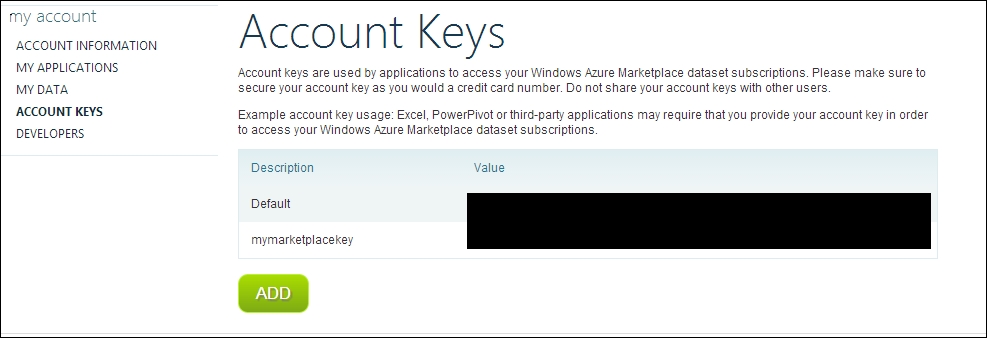
If you go to your account using the My Account link, there are some additional tabs that you might look at. The MY DATA tab in the following screenshot shows all the data services that this account is subscribed to. The account key is used by a third-party application to access your subscription. It is important to note that the account key is sensitive, and you shouldn't give the same key to multiple vendors.
There is a remove link to remove the account keys once they are not in use. To subscribe to a data service, you need to simply go to the service and subscribe. There is also an option to autorefill a service after the subscribed value is over. For example, the STATS Sports Database service gives access to 50 Transaction/month for $12.00, as shown in the following screenshot:

You can navigate to the MY DATA tab in the My Account link to enable the autorefill option after the number of transactions are already consumed. For paid subscriptions, there is a small link that says Enable Auto refill, which will enable you to select the autorefill option for the dataset.
Now, to use the dataset, you can go to MY DATA and select Use. The dataset can also support downloading in CSV or Power Pivot formats.
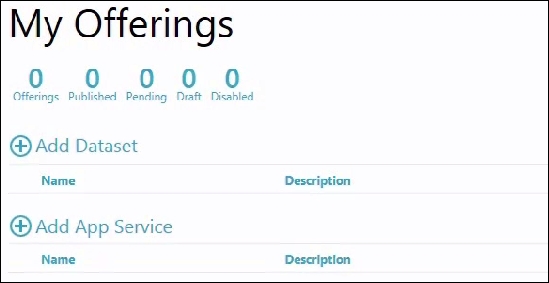
Finally, to publish the dataset to the marketplace, you need to register for data publishing. You can use the Publish link to register for publishing. This is a paid enrollment, so you might need to put your credit card information while registering. Once you are registered, you will see the following Publisher home page:
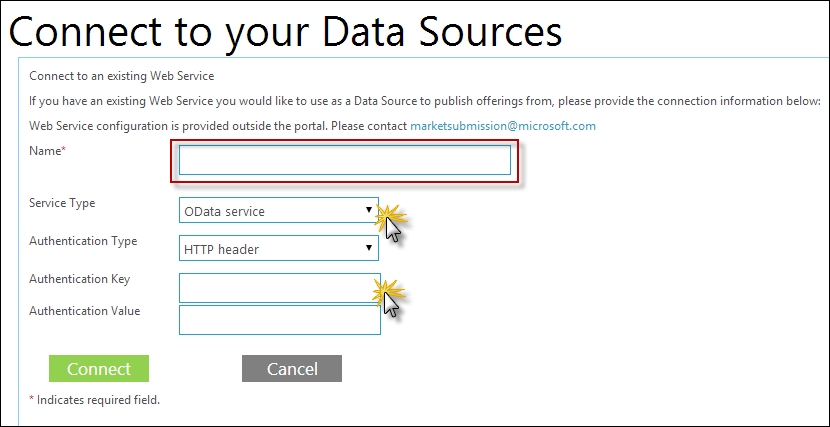
On this page, you can either add a dataset or add an app service. When selecting Add DataSet, you will be redirected to Add DataSource. There are two ways to add a data source:
- Connecting to SQL Server or the SQL Azure database
- Connecting to an existing web service
Choosing Connecting to an existing web service allows us to connect to the data source and the type of service and finally connect to the service.
It is worth mentioning that web service is a better way to expose data rather than going for full database sharing. You can also use a SQL database and provide a SQL connection to the marketplace.
Once the service gets connected, the deployed database tables/dataset can be configured from the Publisher page. You can configure the data-offering credentials from the page for a particular dataset and finally select Publish.
Once it is successfully published, people will start finding the dataset to the Windows Azure marketplace.