
With the growing number of mobile developments around the world, there is a constant need for a server system to closely interact with the mobile environment. The server needs to handle scalability and allow advanced features such as Push Technology and Scheduling to the server. Windows Azure Mobile Services are a solution to this problem. Windows Azure Mobile Services provide some benefits that include the following:
- Stores data in a SQL Server database
- Secures and supports multiple authentication modes (Live authentication and Facebook authentication)
- Provides the Push messaging service
- Provides the ability to schedule recurring jobs
From an application developer's point of view, Mobile services provide a complete solution to all the problems that need to be handled as a server for an app.
Open the management portal and create a Mobile Service.
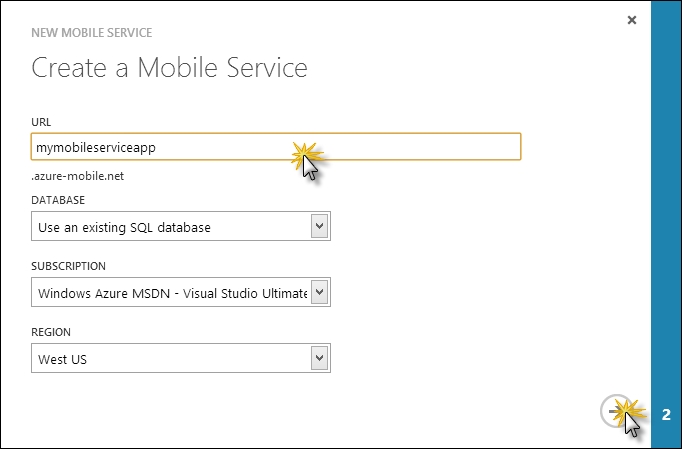
We name it mymobileserviceapp. Once the service is ready and in the running state, you can configure it to provide authentication, push notification, scheduling, and so on.
Now let's create a Mobile Service and use it for the server-side app for devices.
- Open Mobile Service and navigate to Identity.
- Enter the details of the client ID and client secret for various settings that you want to enable.
- Now, create a table and select the option to provide permission to access for only authenticated users.
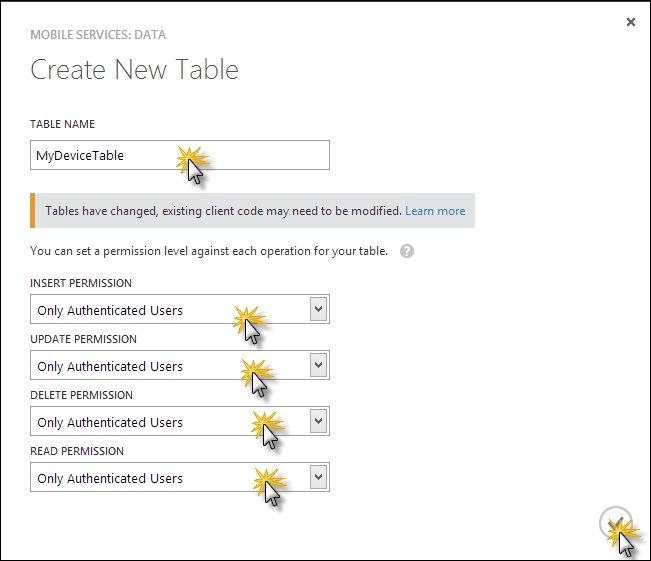
The table then created will only be accessed by an authenticated user from the app.
- Now, once you navigate to the dashboard, download the Windows 8 App for C# with the
ToDoItemstable included.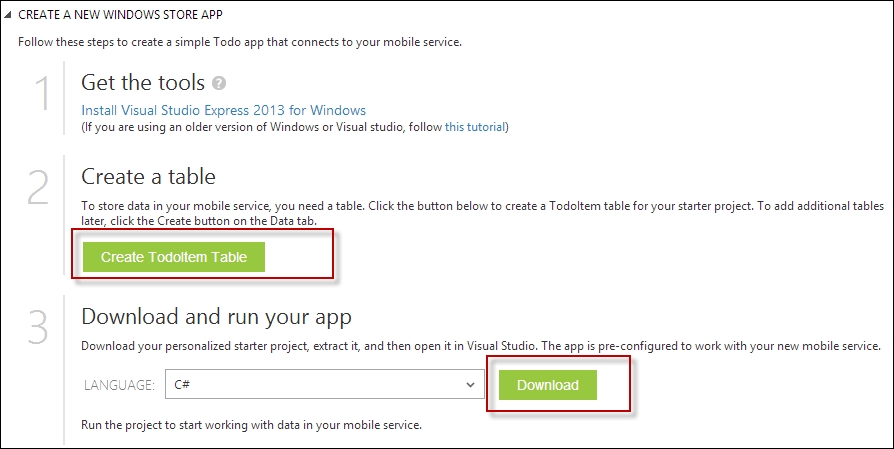
If you open the project, you will see that
MobileServiceClientis already referenced for the current Mobile Service and configured appropriately. - Now, to authenticate the application using credentials, we use the following code:
var user = await App.MobileService.LoginAsync(MobileServiceAuthenticationProvider.Facebook);
The preceding code will authenticate the service using the Facebook authentication for the current device. Now, if you call it
OnNavigatedToof the main page, the application will authenticate on startup. - To add a schedule update script to the application, go to the Scheduler tab of the Mobile Service and add a scheduler job. Let's name it
getupdateavailablescript: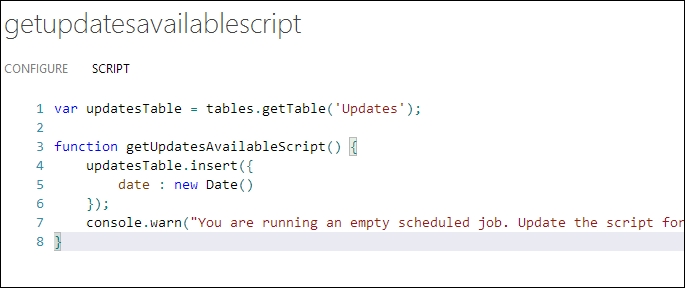
- Here,
getTablegets a table calledUpdatesand inserts a date into the table. After every scheduled time is elapsed, data is inserted into theUpdatestable with the current date and time. Note that theUpdatestable has a column date. You can use a scheduler to push data to the clients at an interval. - Open the Windows store app and add a push notification to the application. The application opens up with a Register name dialog. Register the app name here and finish the wizard. The app is now registered for notifications.
- To send the push notification, we use the following code:
function sendNotifications(uri) {
    console.log("Uri: ", uri);
    push.wns.sendToastText01(uri, {
        text1: "Sample toast from sample insert"
    }, {
        success: function (pushResponse) {
            console.log("Sent push:", pushResponse);
        }
    });
}
The preceding code sends the push notification with the
Sample toast from sample inserttext to the app.
Mobile Services act as a backbone for any mobile app. Windows Azure built Mobile Services to ensure the scalability of Azure is easily available to mobile apps. The server supports scheduling and allows access to push notification services; it also allows the app to use an existing technology to easily add features that might be commonly needed for an app to run.
Mobile Services handle authentication and security so that only authenticated users can access the service.
Mobile applications have been widely becoming popular nowadays. With the increase in app development, Mobile Services are widely been favored as they are pluggable and support ready code for various mobile platforms. Let's look at some other things that might be worth noting about Mobile Services.
Mobile Services support the addition of a custom API such that mobile devices can call the API to get the data or run specified batch requests. A custom API gives the ability to send a single POST request and sets a defined task.
We open the Windows Azure management portal and add a new API with the name MyCustomAPI. As we require POST messages to be accessed by this API, we set POST PERMISSION to Everyone to avoid security of the application:

Once the custom API is created, you need to add some code to it so that when the API is called from the client, the server is updated:
exports.post = function(request, response) {
     var mssql = request.service.mssql;
    var sql = "insert into Updates (data) values (GetDate())"
    mssql.query(sql, {
        success: function(results) {
            if(results.length == 1)
                response.send(200, results[0]);
        }
    })
};
Here, the preceding code inserts a new row to the table Updates when it is called from the client. To call the API from the client application, we use the following code:
var result = await App.MobileService.InvokeApiAsync<MarkAllResult>("mycustomapi",
            System.Net.Http.HttpMethod.Post, null);
        message =  result.Count + " rows updated.";
Here, the Mobile Service calls the mycustomapi method created on the server to run the Post script and get the result from the query.
Uploading and saving large files on transactional databases is not a good practice. Windows Azure supports Blob storage to store data files that are big enough to store in transactional databases. Mobile Service supports relational databases, but occasionally, with a trick. You can also store files that are large in size to Blob storage and reference them using the URL rather than actual data being stored in the database. To configure this, create a storage account and update the credentials to the app settings of Mobile Service:
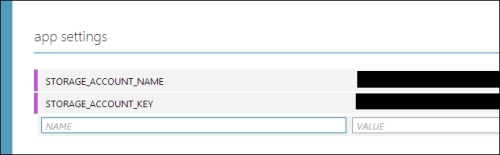
Once the storage account name and access key is added to the app settings of Mobile Services, then by taking the credentials from the Blob storage account, let's try to add some data to the Blob storage:
private async void InsertData(MyDeviceTable deviceTable)
{
    string errorString = string.Empty;


if (media != null)
{
    deviceTable.ContainerName = "myimages";
    deviceTable.ResourceName = media.Name;
}


await deviceTable.InsertAsync(deviceTable);


if (!string.IsNullOrEmpty(deviceTable.SasQueryString))
{
    // Get the new image as a stream.
    using (var fileStream = await media.OpenStreamForReadAsync())
    {

        StorageCredentials cred = new StorageCredentials(deviceTable.SasQueryString);
        var imageUri = new Uri(deviceTable.ImageUri);


        // Instantiate a Blob store container based on the information in the returned item.
        CloudBlobContainer container = new CloudBlobContainer(
            new Uri(string.Format("https://{0}/{1}",
                imageUri.Host, todoItem.ContainerName)), cred);


        // Upload the new image as a BLOB from the stream.
        CloudBlockBlob blobFromSASCredential =
            container.GetBlockBlobReference(deviceTable.ResourceName);
        await blobFromSASCredential.UploadFromStreamAsync(fileStream.AsInputStream());
    }
}


// Add the new item to the collection.
items.Add(deviceTable);


}
Here, when the insert operation on the Table is performed, it generates a SAS request that waits for the application to upload the data to the Blob storage. Here, you can see during the insertion of data to a deviceTable storage on the cloud. The large data file is being uploaded to the server using SAS credentials. Now, to enable the service to receive SAS credentials from the server such that the appropriate Blob storage container is used, we change the code of the insert statement of MyDeviceTable on the Azure portal to support the SASString response:
var azure = require('azure'),
var qs = require('querystring'),
var appSettings = require('mobileservice-config').appSettings;


function insert(item, user, request) {
    // Get storage account settings from app settings.
    var accountName = appSettings.STORAGE_ACCOUNT_NAME;
    var accountKey = appSettings.STORAGE_ACCOUNT_ACCESS_KEY;
    var host = accountName + '.blob.core.windows.net';


if ((typeof item.containerName !== "undefined") && (item.containerName !== null)) {
    item.containerName = item.containerName.toLowerCase();

    var blobService = azure.createBlobService(accountName, accountKey, host);
    blobService.createContainerIfNotExists(item.containerName, {
        publicAccessLevel: 'blob'
    }, function(error) {
        if (!error) {
            var sharedAccessPolicy = {
                AccessPolicy: {
                    Permissions: azure.Constants.BlobConstants.SharedAccessPermissions.WRITE,
                    Expiry: new Date(new Date().getTime() + 5 * 60 * 1000)
                }
            };


            // Generate the upload URL with SAS for the new image.
            var sasQueryUrl =
            blobService.generateSharedAccessSignature(item.containerName,
            item.resourceName, sharedAccessPolicy);


            // Set the query string.
            item.sasQueryString = qs.stringify(sasQueryUrl.queryString);

            item.imageUri = sasQueryUrl.baseUrl + sasQueryUrl.path;


        } else {
            console.error(error);
        }
        request.execute();
    });
} else {
    request.execute();
}


}
The preceding code modifies the insert operation on mydevicetable such that it provides a window of 5 minutes to upload large data to the secured Blob storage. It generates the SASString URI for the Blob container, which is later used by the client to upload the files.