There is often a requirement to alert your users that something has happened. Titanium allows you to use the alert function, just as you would do on the web. But, often this modal alert can be limiting and outside of your design requirements.
This recipe walks through how to use the NotifyUI module to create cross-platform, branded notification windows.
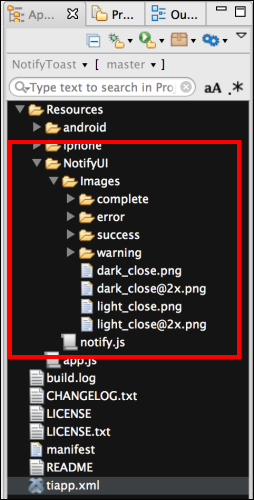
NotifyUI is a CommonJS module consisting of a single JavaScript file, notify.js, and a few image assets used for styling. You can control the styling of the module through configuration or by updating core image files, making it easy to fit your existing branding requirements.
This recipe is a simple demonstration on how to use the NotifyUI module. You can use this example to quickly incorporate the module into your Titanium project.
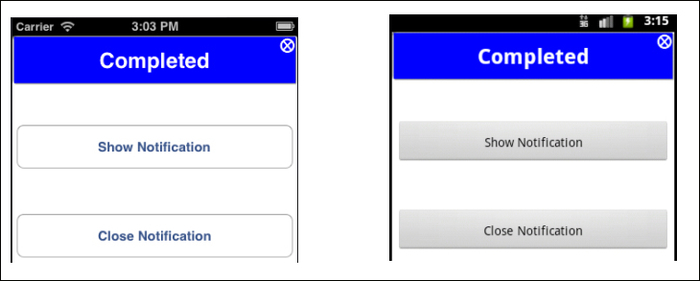
The following screenshots show this recipe in action:
Once you've added the NotifyUI folder to your project, you need to use require to import the module into your code:
//Create our application namespace
var my = {
  notify = require('./NotifyUI/notify'),
  isAndroid : Ti.Platform.osname === 'android'
};To demonstrate the NotifyUI module, we create a basic window with two buttons:
var win = Ti.UI.createWindow({
  backgroundColor:'#fff'
});

var showNotifyButton = Ti.UI.createButton({
  title:'Show Notification', top: 100,
  height:50, right:5, left:5
});
win.add(showNotifyButton);

var closeNotifyButton = Ti.UI.createButton({
  title:'Close Notification', top: 200,
  height:50, right:5, left:5
});
win.add(closeNotifyButton);Next in our example, we add a series of listeners. The following code block demonstrates how to add a listener, to be fired when the NotifyUI notification window is closed:
my.notify.addEventListener('close',function(e){
  Ti.API.info(Notify Window Closed'),
});- You can also listen to
openevent, which will fire when the notification window is opened.my.notify.addEventListener('open',function(e){ Ti.API.info('Notify Window Open'), }); - The
dblclickevent is fired when the user double taps on the notification window.my.notify.addEventListener('dblclick',function(e){ Ti.API.info('Notify Window double clicked'), }); - The
textChangedevent is fired from theNotifyUImodule wheneverupdateMessageis called to update the notification window message.my.notify.addEventListener('textChanged',function(e){ Ti.API.info('Text Changed from ' + e.oldValue + ' to ' + e.newValue); });
If you are using the Close Timer functionality, it is helpful to know if your window is being closed by the timer or by some other method. To help determine this, you can subscribe to the timerClose event, as shown in the following snippet:
my.notify.addEventListener('timerClose',function(e){
  Ti.API.info('Notify Window Closed by Timer'),
});We can now use the button created earlier, to demonstrate how to show the notification window. To the click handler of the button we've added logic to load the module with the message text, Hello World, and the style, complete. Then we call the show method, which displays the notification window to the user.
showNotifyButton.addEventListener('click',function(e){
  win.navBarHidden = true;
  my.notify.load({
    style:'complete',
    message:'Hello World'
  }).show();
});There are three ways to close the notification window. The first and most common way is to call the hide function, as shown in the following snippet:
my.notify.hide();
The second way to close the notification window is to use the addCloseTimer function before the show function is called, as shown in the following code block. In this example, the window will automatically close after 5,000 milliseconds (5 seconds).
my.notify.load({
  style:'complete',
  message:'Hello World'
}).addCloseTimer(5000).show();
The third and the final way to close the notification window is to have the user double tap on the message. This gesture will trigger the module to internally handle the close actions.
The NotifyUI module provides a series of functions to create, update, and maintain the notification window. The following list provides a description of each method, along with their associated functionalities:
- The
loadfunction: This is called to build theTi.UI.Window,Ti.UI.Label, and associated notification style, that will later be used to display your notification. Please note you will need to first call theloadfunction, followed by theshowfunction, to display the notification window. - The
showfunction: This displays the notification window. Please note you first need to call theloadmethod before callingshow. If this is done out of sequence, the notification window will not appear. These sequenced operations provide the flexibility to separate the load and show operations. This can be important if you have several notification events in succession. - The
updateMessagefunction: To update the notification label, you call this function, providing it a string with the updated text to be displayed. - The
hidefunction: Calling this will close the notification window and remove all theNotifyUIobjects created. - The
addCloseTimerfunction: You use this function to set a timer that will close the notification window after the provided duration (in milliseconds). - The
removeCloseTimerfunction: Using this you can close the timer that you set usingaddCloseTimer. - The
addEventListenerfunction: TheNotifyUImodule supports several events as detailed in the next section. You can subscribe to these events using this function. - The
removeEventListenerfunction: Any events you have subscribed to can be removed by calling this function. To remove an event, you need to provide the same arguments as you used while callingaddEventListener.
The
NotifyUI module comes with the following built-in styles:
- Complete: This displays a window with a blue background and the default text,
Completedmy.notify.load({style:'complete'}).show();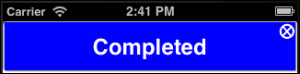
- Error: This displays a window with a red background and the default text,
Errormy.notify.load({style:'error'}).show();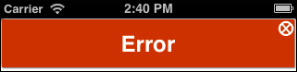
- Warning: This displays a window with an orange background and the default text,
Warningmy.notify.load({style:'warning'}).show();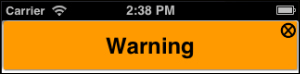
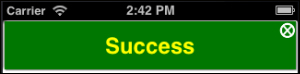
- Success: This displays a window with a green background and the default text,
Successmy.notify.load({style:'success'}).show();