Starting with iOS 4, Apple introduced the ability for apps to use the data protection feature to add an additional level of security for data stored on disk. Data protection uses the built-in hardware encryption to encrypt files stored on the device. This feature is available when the user's device is locked and protected with a passcode lock. During this time, all files are protected and inaccessible until the user explicitly unlocks the device.
This recipe uses the securely native module for enhanced security functionality. This module and other code assets can be downloaded from the source provided by the book. Installing these in your project is straightforward. Simply copy the modules folder into your project as shown in the following screenshot:
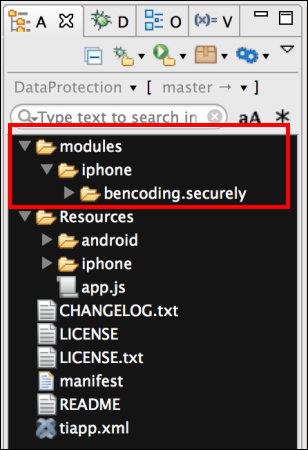
After copying the mentioned folder, you will need to click on your tiapp.xml file in Titanium Studio and add a reference to the bencoding.securely module as shown in the following screenshot:
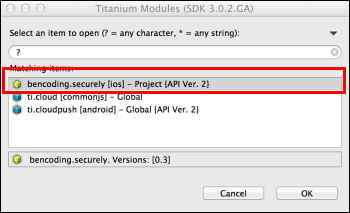
This recipe requires your iOS device to have data protection enabled. You will need a device as the simulator does not support data protection. The following steps cover how to enable this feature on your device:
- Go to Settings | General | Passcode.
- Follow the prompts to set up a passcode.
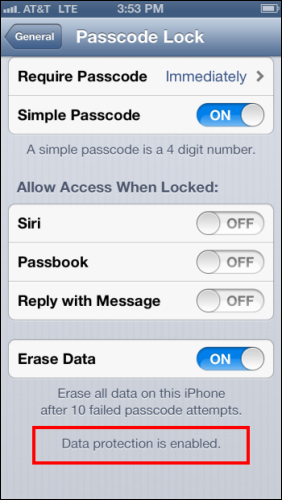
- After adding a passcode, scroll to the bottom of the screen and verify that the text Data protection is enabled is visible as shown in the following screenshot:
A third-party iOS device browser is needed to verify that data protection for the example recipe app has successfully been enabled. This recipe discusses how to verify data protection using the popular iExplorer app. An evaluation version of the iExplorer app can be used to follow along with this recipe. For more information and to download iExplorer, please visit http://www.macroplant.com/iexplorer.
To enable iOS data protection, the DataProtectionClass and com.apple.developer.default-data-protection keys need to be added to your tiapp.xml as demonstrated in the following code snippet:
- First, add the
iosconfiguration node if your project does not already contain this element.<ios> <plist> <dict> - Then at the top of the
dictnode, add the following highlighted keys.<key>DataProtectionClass</key> <string>NSFileProtectionComplete</string> <key>com.apple.developer. default-data-protection</key> <string>NSFileProtectionComplete</string> </dict> </plist> </ios>
- After saving the updates to your
tiapp.xml, you must clean your Titanium project in order to have the updates take effect. This can be done in Titanium Studio by selecting Project | Clean.
Once you have added the securely module and added the tiapp.xml updates to your project, you need to create your application namespace in the app.js file and use require to import the module into your code as the following code snippet demonstrates:
//Create our application namespace
var my = {
  secure : require('bencoding.securely')
};The following steps outline how to create the UI used in this recipe:
- First, a
Ti.UI.Windowis created to attach all UI elements.var win = Ti.UI.createWindow({ backgroundColor: '#fff', title: 'Data Protection Example', barColor:'#000',layout:'vertical' }); - Next, a
Ti.UI.Buttonis added to theTi.UI.Window. This will be used to trigger our example.var button1 = Ti.UI.createButton({ title:'Create Test File', top:25, height:45, left:5, right:5 }); win.add(button1);
To verify if data protection is enabled in the app, the recipe creates a time-stamped file in the Ti.Filesystem.applicationDataDirectory directory. Using an iOS device browser, we can verify if the test file is protected when the device is locked. The following steps describe how the recipe creates this test file:
- The
clickevent forbutton1creates a time-stamped file that allows us to verify if data protection has been correctly enabled for the app.button1.addEventListener('click',function(e){ - Next the
isProtectedDataAvailablemethod is called onsecurely. This provides a Boolean result indicating that data protection allows the app to read from or write to the filesystem.if(!my.secure.isProtectedDataAvailable()){ alert('Protected data is not yet available.'), return; } - To ensure there is a unique identifier in the file, a token is created using the current date and time. This token is then added to the following message template:
  var timeToken = String.formatDate(new Date(),"medium") +
  String.formatTime(new Date());
  var msg = "When device is locked you will not be able";
  msg += " to read this file. Your time token is ";
  msg += timeToken;
- The message created in step 3 is then written to the
test.txtfile located in theTi.Filesystem.applicationDataDirectorydirectory. If the file already exists, it is removed so that the latest message will be available for testing.var testfile = Ti.Filesystem.getFile( Ti.Filesystem.applicationDataDirectory, 'test.txt'), if(testfile.exists()){ testfile.deleteFile(); } testfile.write(msg); testfile = null; - Once the
test.txtfile is written to the device, a message is displayed to the user notifying them to lock their device and use an iOS device browser to confirm data protection is enabled.var alertMsg = "Please lock your device."; alertMsg+= "Then open an iOS Device Browser."; alertMsg+= "The time token you are looking for is "; alertMsg+= timeToken; alert(alertMsg);
After the DataProtectionClass and com.apple.developer.default-data-protection keys have been added to your tiapp.xml, the iOS device handles protecting your files when the device is locked. The following steps discuss how to test that this recipe has correctly implemented data protection:
- The first step in the validation process is to build and deploy the recipe app to your iOS device.
- Once the app has been loaded onto your device, open the app and press the Create Test File button.
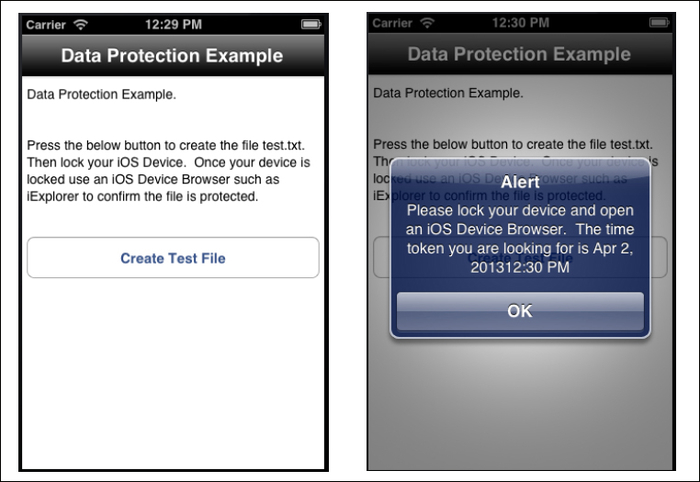
- Once you have received an alert message indicating the test file has been created, press the home button and lock your device.
- Plug your device into a computer with iExplorer installed.
- Open iExplorer and navigate so that you can view the apps on your device.
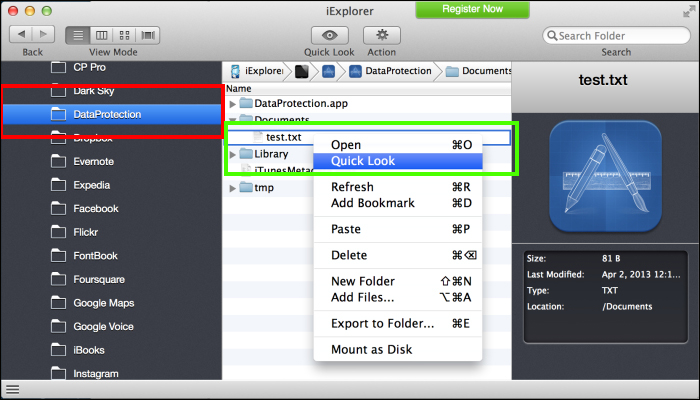
- Select the DataProtection app as marked with the red box in the following screenshot. Then right-click on the test.txt file located in the Documents folder and select Quick Look as marked with the green box in the following screenshot:
- After Quick Look is selected, iExplorer will try to open the
test.txtfile. Since it is protected, it cannot be opened and Quick Look will show the progress indicator until a timeout has been reached.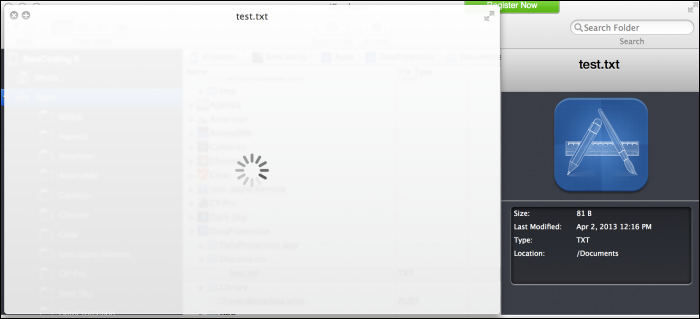
- You can then unlock your device and repeat the preceding steps to open the file in Quick Look.
