
The Advanced Encryption Standard (AES) is a specification for the encryption of electronic data established by the U.S. NIST in 2001. This encryption algorithm is used for securing sensitive, but unclassified material by U.S. Government agencies. AES has been widely adopted by enterprise and has become a de facto encryption standard for many commercially sensitive transactions.
This recipe discusses how AES can be implemented in JavaScript and incorporated into your Titanium Enterprise app.
This recipe uses the Ti.SlowAES CommonJS module as a wrapper around the SlowAES open source project. This module and other code assets can be downloaded from the source provided by the book, or individually through the links provided in the See also section at the end of this recipe. Installing these in your project is straightforward. Simply copy the SlowAES folder into the Resources folder of your project as shown in the following screenshot:

Once you have added the SlowAES folder to your project, next you need to create your application namespace in the app.js file and use require to import the module into your code as the following code snippet demonstrates:
//Create our application namespace
var my = {
  mod : require('SlowAES/Ti.SlowAES')
};This recipe demonstrates the usage of the Ti.SlowAES CommonJS module through a sample app using two Ti.UI.TextField controls for input.
- First, a
Ti.UI.Windowis created to attach all UI elements.var win = Ti.UI.createWindow({ backgroundColor: '#fff', title: 'AES Crypto Example', barColor:'#000',layout:'vertical',fullscreen:false });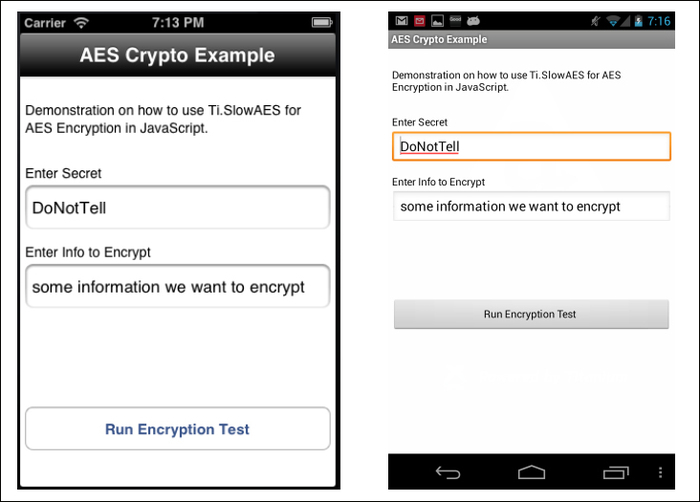
- Next, a
Ti.UI.TextFieldcontrol is added to theTi.UI.Windowto gather the secret from the user.var txtSecret = Ti.UI.createTextField({ value:'DoNotTell',hintText:'Enter Secret', height:45, left:5, right:5, borderStyle:Ti.UI.INPUT_BORDERSTYLE_ROUNDED }); win.add(txtSecret); - Another
Ti.UI.TextFieldis added to theTi.UI.Windowto gather the string to encrypt from the user.var txtToEncrypt = Ti.UI.createTextField({ value:'some information we want to encrypt', hintText:'Enter information to encrypt', height:45, left:5, right:5, borderStyle:Ti.UI.INPUT_BORDERSTYLE_ROUNDED }); win.add(txtToEncrypt); - Next a
Ti.UI.Labelis added to theTi.UI.Window. ThisTi.UI.Labelwill be used to display the encrypted value to the user.var encryptedLabel = Ti.UI.createLabel({ top:10, height:65, left:5, right:5,color:'#000', textAlign:'left',font:{fontSize:14} }); win.add(encryptedLabel); - Finally a
Ti.UI.Buttonis added to theTi.UI.Window. ThisTi.UI.Buttonwill be used later in the recipe to perform the encryption test.var btnEncrypt = Ti.UI.createButton({ title:'Run Encryption Test', top:25, height:45, left:5, right:5 }); win.add(btnEncrypt);
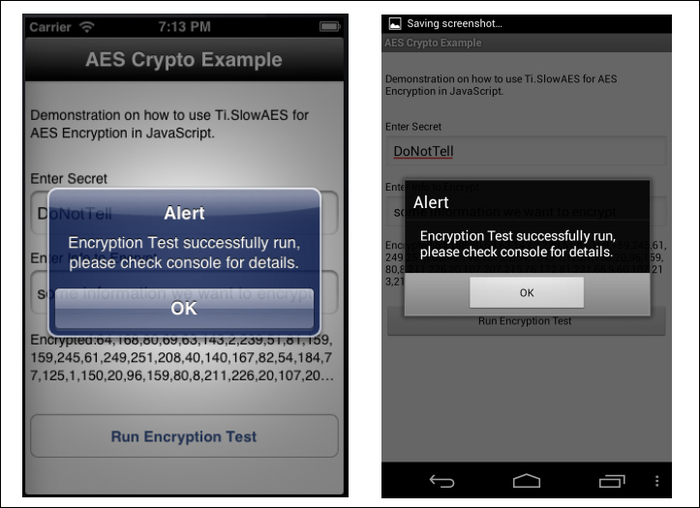
This section demonstrates how to use the Ti.SlowAES module to use the secret entered in the txtSecret, Ti.UI.TextField to encrypt the contents of the txtToEncrypt, Ti.UI.TextField. Once completed, the encrypted value is then decrypted and compared against the original input. The results are displayed to the user in an alert message as shown in the following screenshots:
The encryption test is performed when the click event for the btnEncrypt control is fired as shown in the following code snippet:
btnEncrypt.addEventListener('click',function(x){- The first step in the encryption process is to create a new instance of the
SlowAESmodule as shown in this code snippet.var crypto = new my.mod();
- Next using the encrypt function, the secret provided in the
txtSecretcontrol is used to encrypt the value in thetxtToEncryptcontrol. The encrypted results are then returned to theencryptedValueas demonstrated in the following statement:var encryptedValue = crypto.encrypt(txtToEncrypt.value,txtSecret.value);
- The
encryptedLabel.textproperty is then updated to display the encrypted value to the user.encryptedLabel.text = 'Encrypted:' + encryptedValue;
- Next, the
decryptmethod is used to demonstrate how to decrypt the string value encrypted earlier. This method requires the encrypted string value and the secret as shown in the following snippet:var decryptedValue = crypto.decrypt(encryptedValue,txtSecret.value);
- Finally, the original input value is compared against the decrypted value to ensure our encryption test was successful. The results of this test are then displayed to the user through a message alert and the Titanium Studio console.
  alert((txtToEncrypt.value ===decryptedValue) ?
  'Encryption Test successfully ran check console for details.':
  'Test failed, please check console for details.'),

});
You can also refer to the following resources:
- It is important to understand some of the weaknesses of JavaScript Cryptography. When deciding on an encryption approach, I would recommend reading the Matasano Security article on this subject available at http://www.matasano.com/articles/javascript-cryptography.
- This recipe uses the
SlowAESproject to implement the AES algorithm. To read the license and to learn more about theSlowAESproject, please visit http://code.google.com/p/slowaes. - To download the
Ti.SlowAESCommonJS module and learn more about how to implement its functionality visit https://github.com/benbahrenburg/Ti.SlowAES.