
Chapter 7. Graphics
The main reason for the popularity of the SWT/JFace toolset is its use of the operating system’s native widgets. Most users, accustomed to their operating system, prefer applications that resemble their environment. They want widgets that look and operate similarly from one GUI to the next. But sometimes, a developer needs to go beyond built-in parts and create components of his own. Customized controls add a sense of individuality to a user interface, and images may be necessary for visually oriented applications. In these situations, it’s necessary to understand the graphics capabilities of the SWT/JFace toolset.
This chapter’s goal is to provide that understanding. To meet this goal, we’ll proceed from general concepts to specific applications. The first section will describe the class that makes the toolset’s graphical capability possible: the graphic context. Then, we’ll explain how SWT works with colors and how JFace makes this easier. The third section will show how SWT and JFace allow applications to use text with different fonts and graphical properties. Finally, we’ll show how the SWT and JFace libraries create and modify images, and when to use the methods of one library over the other.
7.1. The graphic context
The graphic context functions like a drawing board on top of a Control. It lets you add custom shapes, images, and multifont text to GUI components. It also provides event processing for these graphics by controlling when the Control’s visuals are updated.
In SWT/JFace, the graphic context is encapsulated in the GC class. GC objects attach to existing Controls and make it possible to add graphics. This section will deal with how this important class and its methods operate.
7.1.1. Creating a GC object
The first step in building a graphically oriented application is creating a graphic context and associating it with a component. The GC constructor method performs both tasks. The two available constructor methods are shown in table 7.1.
Table 7.1. The constructor methods of the GC class and their functions
|
Color constructor |
Function |
|---|---|
| GC(Drawable) | Creates a GC and configures it for the Drawable object |
| GC(Drawable, int) | Creates and configures a GC and sets the text-display style |
The style constant mentioned in the second constructor determines how text appears in the display. The two values are RIGHT_TO_LEFT and LEFT_TO_RIGHT; the default style is LEFT_TO_RIGHT.
The first argument requires an object that implements the Drawable interface. This interface contains methods that relate to the internals of a graphic context. SWT provides three classes that implement Drawable: Image, Device, and Control. Unless you create your own Drawable objects, you can only add graphics to instances of these classes or their subclasses. A diagram describing these relationships is presented in figure 7.1. Since Image objects will be covered in a later section, we’ll discuss Devices and Controls here.
Figure 7.1. Only classes that implement the Drawable interface can have graphic contexts associated with them.
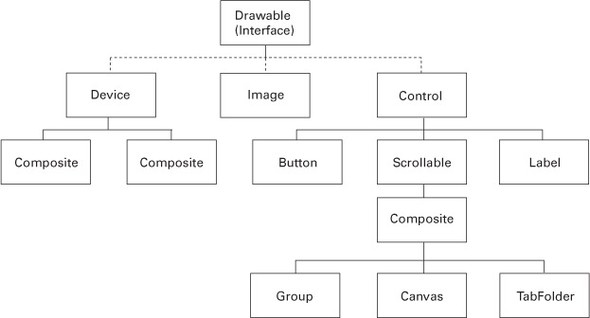
The Device class represents any mechanism capable of displaying SWT/JFace objects. This is easier to understand if you consider its two main subclasses: Printer, which represents print devices, and Display, which accesses a computer’s console. The Display class, the base class of any SWT/JFace application, is described in chapter 2. But since this chapter deals with adding graphics to individual components, we’ll associate our GC with the third Drawable class, Control.
As we mentioned in chapter 3, a Control object is any widget that has a counterpart in the underlying operating system. Instances of this class and its subclasses can be resized, traversed, and associated with events and graphics. Figure 7.1 shows some of the Control subclasses provided in SWT. Although of all them can contain graphics, only one class is particularly suited for GC objects: Canvas, shown at the bottom of figure 7.1. This class not only provides the containment property of a Composite, but also can be customized with a number of styles that determine how graphics are shown in its region.
Because of this, the code in this chapter will focus on creating images in Canvas objects. Since we have a means of creating graphics (the GC class) and a means of seeing them displayed (the Canvas class), let’s see how these classes work together.
7.1.2. Drawing shapes on a Canvas
A full graphical application, DrawExample.java, is shown in listing 7.1. It uses a GC object to draw lines and shapes on a Canvas instance.
Listing 7.1. DrawExample.java
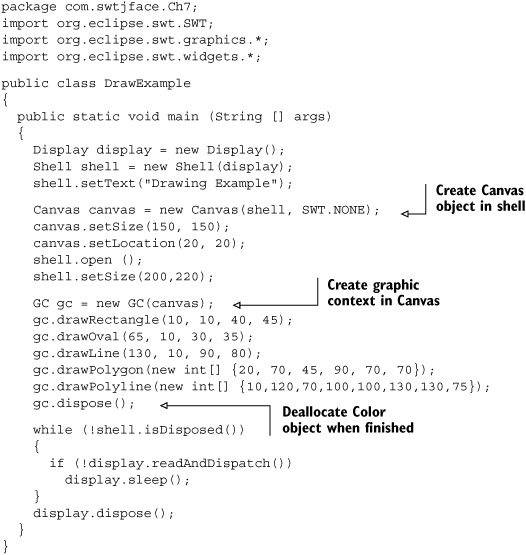
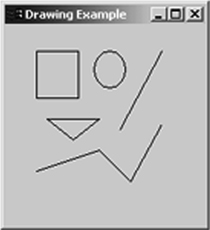
Figure 7.2 shows the GUI created by the DrawExample class.
Figure 7.2. Creating shapes on a Canvas using the graphic context
This example demonstrates two important concerns to keep in mind when you work with GCs. First, the program constructs its Canvas object before invoking the shell.open() method; it creates and uses the GC object afterward. This sequence is necessary since open() clears the Canvas display. This also means that graphic contexts must be created in the same class as the Shell object. Second, the program deallocates the GC object immediately after its last usage. Doing so frees up computer resources quickly without affecting the drawing process.
Along with those used in DrawExample.java, the GC class provides a number of methods that draw and fill shapes on a Drawable object. These are listed in table 7.2.
Table 7.2. Drawing methods of the GC class
|
Method |
Function |
|---|---|
| drawArc(int x, int y, int width, int height, int startAngle, int arcAngle) | Draws a curve with the given starting point and parameters |
| fillArc(int x, int y, int width, int height, int startAngle, int arcAngle) | Draws and fills an arc with the background color |
| drawFocus(int x, int y, int width, int height) | Draws a focus rectangle with the given vertices |
| drawLine(int x1, int y1, int x2, int y2) | Draws a line between coordinates |
| drawOval(int x, int y, int width, int height) | Draws an oval with the given center point and dimensions |
| fillOval(int x, int y, int width, int height) | Fills an oval with the given dimensions |
| drawPolygon(int[] pointArray) | Draws a closed figure with the given vertices |
| fillPolygon(int[] pointArray) | Fills a closed figure with points |
| drawPolyline(int[] pointArray) | Draws a line with multiple segments and the specified endpoints |
| drawRectangle(int x, int y, int width, int height) | Draws a rectangle with the given starting point and coordinates |
| fillRectangle(int x, int y, int width, int height) | Draws and fills a rectangle with the given coordinates |
| drawRectangle(Rectangle rect) | Draws a rectangle based on an object |
| fillRectangle(Rectangle rect) | Fills a rectangle based on an object |
| drawRoundRectangle(int x, int y, int width, int height, int arcWidth, int arcHeight) | Creates a rounded rectangle with the given width, height, and arc dimensions |
| fillGradientRectangle(int x, int y, int width, int height, boolean vertical) | Draws and fills a rectangle with a gradient from the foreground to the background color |
One problem with DrawExample is that its shapes are erased whenever the shell is obscured or minimized. This is an important concern, since we need to make sure the graphics remain visible despite windowing changes. For this purpose, SWT lets you control when a Drawable object is refreshed. This updating process is called painting.
7.1.3. Painting and PaintEvents
When a GC method draws an image on a Drawable object, it performs the painting process only once. If a user resizes the object or covers it with another window, its graphics are erased. Therefore, it’s important that an application maintain its appearance whenever its display is affected by an external event.
These external events are called PaintEvents, and the interfaces that receive them are PaintListeners. A Control triggers a PaintEvent any time its appearance is changed by the application or through outside activity. These classes are used in a similar manner to the events and listeners mentioned in chapter 4. The following snippet shows an example; because a PaintListener has only one event-handling method, no adapter class is necessary:
Canvas canvas = new Canvas(shell, SWT.NONE);
canvas.setSize(150, 150);
canvas.setLocation(20, 20);
canvas.addPaintListener(new PaintListener()
{
  public void paintControl(PaintEvent pe)
  {
    GC gc = pe.gc;
    gc.drawPolyline(new int[] {10,120,70,100,100,130,130,75});
  }
});
shell.open();
An interesting aspect of using PaintListeners is that each PaintEvent object contains its own GC. This is important for two reasons. First, because the GC instance is created by the event, the PaintEvent takes care of its disposal. Second, the application can create the GC before the shell is opened, which means that graphics can be configured in a separate class.
SWT optimizes painting in PaintListener interfaces, and its designers strongly recommend painting with Controls only in response to PaintEvents. If an application must update its graphics for another reason, they recommend using the control’s redraw() method, which adds a paint request to the queue. Afterward, you can invoke the update() method to process all the paint requests associated with the object.
It’s important to remember that, although painting in a PaintListener is recommended for Control objects, Device and Image objects can’t use this interface. If you need to create graphics in an image or device, you must create a separate GC object and dispose of it when you’re finished.
7.1.4. Clipping and Canvas styles
By default, the area available for drawing with a graphic context is the same as that of its associated Control. However, the GC provides methods that establish bounds for its own graphical region, called the clipping region. The setClipping() method specifies the limits for the GC’s graphics, and the getClipping() method returns the coordinates of the clipping region.
The concept of clipping is also important when you’re dealing with Paint-Events. Not only do these events fire whenever a Drawable object is covered by another window, but they also keep track of the area being obscured. That is, if a user covers part of a Canvas with a second window, the PaintEvent determines which section has been clipped and sets its x, y, height, and width fields according to the smallest rectangle that encloses the concealed region. This is necessary since repainting refreshes only this clipped region, not the entire object.
If multiple sections of a Control object are obscured, then by default, the object merges these sections into a single region and requests that it be repainted. However, if an application requires that separate requests be made for each concealed area, then the Control should be constructed with the NO_MERGE_PAINTS style. This is the first of the styles associated with the Composite class but specifically intended for Canvas objects. The rest of these styles are shown in table 7.3.
Table 7.3. Style options for Canvas objects
|
Function |
|
|---|---|
| NO_MERGE_PAINTS | Keeps concurrent paint requests separate |
| NO_FOCUS | Specifies that Canvas can’t receive focus |
| NO_REDRAW_RESIZE | Specifies that Canvas doesn’t repaint itself if resized |
| NO_BACKGROUND | Specifies that Canvas has no default background color |
Normally, when a user clicks a window, any keyboard input is directed to it. This property is called focus behavior, and you can remove it from a Canvas object by constructing the object with the NO_FOCUS style. Similarly, when a Canvas is resized, a PaintEvent is triggered by default and the display is repainted. You can change this default behavior by using the NO_REDRAW_RESIZE style. It’s important to note, though, that using this style may cause graphical artifacts during a resize operation.
Before a graphic context draws its images, its Canvas paints itself with the color of its shell, the default background color. These paint operations can cause screen flicker on certain displays. You can prevent this by using the NO_BACKGROUND style, which prevents the first painting. Without a background color, the graphic context must cover every pixel of the Canvas, or it will take the appearance of the screen behind the shell.
Now that we’ve begun discussing the colors associated with graphic contexts, let’s pursue this important topic in detail.
7.2. Programming with colors
One of the fundamental aspects of any graphical toolset is its use of colors. The theory behind colors is straightforward, but their practical usage requires explanation. This section will discuss how colors are represented in SWT and how to allocate and deallocate them in a program. It will also discuss two classes provided by the JFace library that simplify the process of working with colors.
7.2.1. Color development with SWT
Because monitors use light to provide color, it makes sense to use light’s primary colors—red, green, and blue (RGB)—to represent the colors of a display. This color system is additive, which means that colors are generated by adding red, green, and blue elements to a black field. For example, if 24 bits are used to specify the RGB value at a point, then black (the absence of light) is represented in hexadecimal as 0x000000, and white (the combination of light) as 0xFFFFFF. SWT follows this course by providing classes and methods that access and use RGB objects.
This concept may seem simple, but SWT’s designers faced a serious challenge in implementing it on multiple platforms. The problem involved providing a standard set of colors despite variations in display resolution and color management policy. In the end, they decided on a two-part solution.
First, SWT provides a set of 16 basic colors (called system colors) using the display’s getSystemColor() method. This method takes an integer representing one of SWT’s color constants and returns a Color object. These constants are listed in table 7.4 with their RGB representations.
Table 7.4. Default system colors provided by SWT
|
SWT color constant |
Color hex value |
|---|---|
| SWT.COLOR_BLACK | 0x000000 |
| SWT.COLOR_DARK_GRAY | 0x808080 |
| SWT.COLOR_GRAY | 0xC0C0C0 |
| SWT.COLOR_WHITE | 0xFFFFFF |
| SWT.COLOR_RED | 0xFF0000 |
| SWT.COLOR_DARK_RED | 0x800000 |
| SWT.COLOR_MAGENTA | 0xFF00FF |
| SWT.COLOR_DARK_MAGENTA | 0x800080 |
| SWT.COLOR_YELLOW | 0xFFFF00 |
| SWT.COLOR_DARK_YELLOW | 0x808000 |
| SWT.COLOR_GREEN | 0x00FF00 |
| SWT.COLOR_DARK_GREEN | 0x008000 |
| SWT.COLOR_CYAN | 0x00FFFF |
| SWT.COLOR_DARK_CYAN | 0x008080 |
| SWT.COLOR_BLUE | 0x0000FF |
| SWT.COLOR_DARK_BLUE | 0x000080 |
If you want to use colors that fall outside this set, you must allocate a Color object according to its RGB values. You do so by invoking one of two constructor methods associated with the Color class, shown in table 7.5. If a display’s resolution is too low to show this color, then it will use the system color with the nearest RGB value.
Table 7.5. The constructor methods of the Color class
|
Color constructor |
Function |
|---|---|
| Color(Device, int, int, int) | Allocates a color according to separate RGB values |
| Color(Device, RGB) | Allocates a color according to a given RGB object |
In both constructors, the first argument is an object of the Device class. Afterward, the color’s RGB value is set according to three integers between 0 and 255, or an instance of the RGB class. This RGB class, whose constructor is RGB(int, int, int), is used to describe a color according to the values of its elements. It’s important to remember that creating an RGB instance doesn’t create a color and that an RGB object doesn’t require disposal.
The code in listing 7.2 creates a Canvas that displays colored two shapes. At this point, we recommend that you create a package named com.swtjface.Ch7 in the WidgetWindow project and add the Ch7_Colors class.
Listing 7.2. Ch7_Colors.java
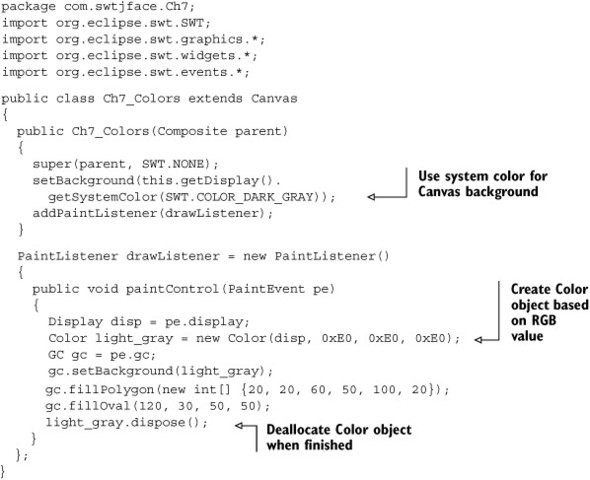
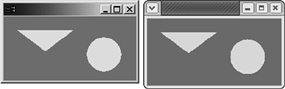
This code demonstrates the two ways that applications can obtain and use color. In the constructor, the getSystemColor() method returns a basic color, SWT.COLOR_DARK_GRAY, which doesn’t need to be disposed of. The graphic context created by the PaintEvent allocates resources for a new color using the Color() constructor. This color, light_gray, is created using three hexadecimal values corresponding to the desired amounts of red, green, and blue. After its last use, the light_gray color is deallocated. These colors are shown in figure 7.3.
Figure 7.3. The program uses the system color SWT.COLOR_DARK_GRAY and creates the color light_gray according to its RGB values.
In both cases, a Display object is needed in order to generate a color. This is done by using the getDisplay() method associated with the Canvas. But the PaintListener interface can’t access the constructor’s members. Instead, it uses the PaintEvent’s display field.
The two uses of setBackground() play significant roles in assigning colors. In the class constructor, this method sets the background color of the Canvas, which is DARK_GRAY. This method is used again to add color to the PaintEvent’s GC, which is the color of the triangle and oval. It’s worth noting that the setForeground() method isn’t needed at all.
Working with SWT colors is a straightforward process, but there are ways to make it even simpler. For this purpose, JFace provides classes that reduce the work of managing colors.
7.2.2. Additional color capability with JFace
JFace uses the same color methodology as SWT. It also provides two interesting classes to simplify color manipulation: JFaceColors, located in the org.eclipse. jface.resource package; and ColorSelector, located in the org.eclipse.jface. preference package.
The JFaceColors class
The JFaceColors class contains a number of static methods that you can use to obtain colors in an Eclipse Workbench application. getBannerBackground() returns the color of an application’s banner, and getErrorBorder() returns the border color of widgets that display errors. There are also methods that return colors of different kinds of text.
The JFaceColors class also provides a useful method that can be invoked in both SWT and JFace applications: setColors(), which you can use to set both the foreground and background colors of a widget at once. The following code snippet makes the button’s foreground color red and its background color green:
Button button = new Button(parent, SWT.NONE);
red = display.getSystemColor(SWT.COLOR_RED);
green = display.getSystemColor(SWT.COLOR_GREEN);
JFaceColors.setColors(button,red,green);
There is also a disposeColors() method, which despite its described capability of deallocating all colors at once, can’t replace the dispose() method in the Color class. Instead, it’s meant to perform additional tasks when the workbench disposes of its color resources.
The ColorSelector class
Another class offered by the JFace toolset lets the user choose colors in an application. Although the ColorSelector is part of JFace’s Preference framework, we felt it necessary to mention its capability here. In essence, this class adds a button to an instance of SWT’s ColorDialog class. An example is shown in figure 7.4.
Figure 7.4. The ColorSelector allows users to select an RGB object.
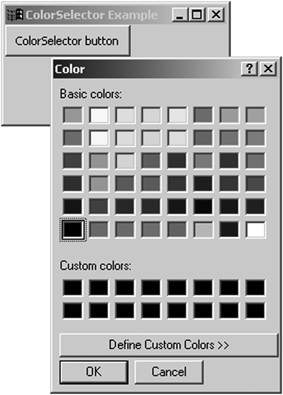
The ColorSelector sets and retrieves the RGB value corresponding to the user’s selection. The setColorValue() method sets the default selection as the dialog box is created. The getColorValue() method converts the user’s selection into an RGB object that can be used to allocate the color. This is shown in the following code snippet:
ColorSelector cs = new ColorSelector(this);
Button button = cs.getButton();
RGB RGBchoice = cs.getColorValue();
Color colorchoice = new Color(display, RGBchoice);
Colors improve the appearance of a GUI, but they don’t convey useful information. A proper user interface needs to communicate with the user. This means adding text, which means working with resources that control how text is presented. These resources are called fonts.
7.3. Displaying text with fonts
Like working with colors, programming with fonts is simple to understand, but there are important details to consider. This section will present the means of choosing, allocating, and deallocating fonts with the SWT toolset. Then, we’ll show you how to simplify these tasks with JFace.
In keeping with its goal of maintaining a native look and feel, the SWT/ JFace toolkit relies primarily on fonts provided by the operating system. Unfortunately, these fonts vary from one platform to another. Therefore, when this section describes a font’s name, it means the name of one of the fonts installed on your system.
7.3.1. Using fonts with SWT
SWT provides a number of font-related classes that perform one of three functions. The first involves font management—allocating and deallocating Font objects. The second function is implementing fonts in objects to change the display of their text. Finally, SWT contains methods that provide measurements of text dimensions for use in graphical applications.
Font management
Just as RGB objects contain the information needed to create Color objects, FontData objects provide the basic data for creating Font instances. This data consists of three parts, which are also the three arguments to the most common FontData constructor method:
FontData(String name, int height, int style)
The first argument represents the name of the font, such as Times New Roman or Arial. The height refers to the number of points in the font, and the style represents the type of font face: SWT.NORMAL, SWT.ITALIC, or SWT.BOLD.
In addition, you can customize a FontData object by specifying its locale (the application’s geographic location and the set of characters that should be used). A font’s locale can be determined by invoking the getLocale() method and specified with setLocale().
Neither RGB or FontData instances need to be disposed of, but Font objects require allocation and deallocation. Table 7.6 presents the constructor methods available for the Font class.
Table 7.6. Constructor methods of the Font class
|
Font constructor |
Function |
|---|---|
| Font(Device, FontData) | Allocates a font according to its FontData object |
| Font(Device, FontData[]) | Allocates a font according to an array of FontData |
| Font(Device, String, int, int) | Allocates a font based on its name, size, and style |
There is only one deallocation method for the Font class: dispose(). You should invoke it shortly after the Font’s last usage.
Implementing fonts in objects
In SWT, fonts are generally associated with one of two GUI objects: Controls and GCs. When you use the setFont() method associated with Controls, any text presented with a setText() method is displayed with the specified font. Graphic contexts also use the setFont() method, but they provide a number of different methods for painting text in its clipping region. These methods are shown in table 7.7.
Table 7.7. Text methods of the graphic context (GC) class
|
Function |
|
|---|---|
| drawString(String, int, int) | Displays String with the given coordinates |
| drawString(String, int, int, Boolean) | Displays String with the given coordinates and background |
| drawText(String, int, int) | Displays String with the given coordinates |
| drawText(String, int, int, Boolean) | Displays String with the given coordinates and background |
| drawText(String, int, int, int) | Displays String with the given coordinates and flags |
Because of the overloaded drawString() and drawText() methods, this table requires some explanation. Although implementations of drawString() and drawText() have the same argument types and functions, the difference is that drawText() processes carriage returns and tab expansions, whereas drawString() disregards them. Also, the two integers following the String argument represent the coordinates of the text display.
The Boolean argument in the second and fourth methods indicates whether the text background should be transparent. If this value is set to TRUE, then the color of the rectangle containing the text won’t be changed. If it’s FALSE, the color of the rectangle will be set to that of the graphic context’s background.
The third integer in the last drawText() method represents a flag that changes the text display. These flags are as follows:
- DRAW_DELIMITER—Displays the text as multiple lines if necessary
- DRAW_TAB—Expands tabs in the text
- DRAW_MNEMONIC—Underlines accelerator keys
- DRAW_TRANSPARENT—Determines whether the text background will be the same color as its associated object
Many of these flags are implemented in the code that follows.
Measuring font parameters
When incorporating text in GUIs, you may want to know the text’s dimensions, which means knowing the measurements of a given font. SWT provides this information through its FontMetrics class, which contains a number of methods for determining these parameters. These are shown in table 7.8.
Table 7.8. Measurement methods of the FontMetrics class
|
FontMetrics text method |
Function |
|---|---|
| getAscent() | Returns the distance from the baseline to the top of the characters |
| getAverageCharWidth() | Returns the width of an average character |
| getDescent() | Returns the distance from the baseline to the bottom of the characters |
| getHeight() | Returns the sum of the ascent, the descent, and the leading area |
| getLeading() | Returns the distance between the top of the characters and raised marks |
This class has no constructor methods. Instead, the GC object must invoke its getFontMetrics() method. It returns a FontMetrics object for the font used in the graphic context and lets you use the listed methods. Each returns an integer that measures the given dimension according to the number of pixels.
Now that we’ve described the management, integration, and measurement of fonts, it’s important to use these classes and methods in actual code.
7.3.2. Coding with fonts
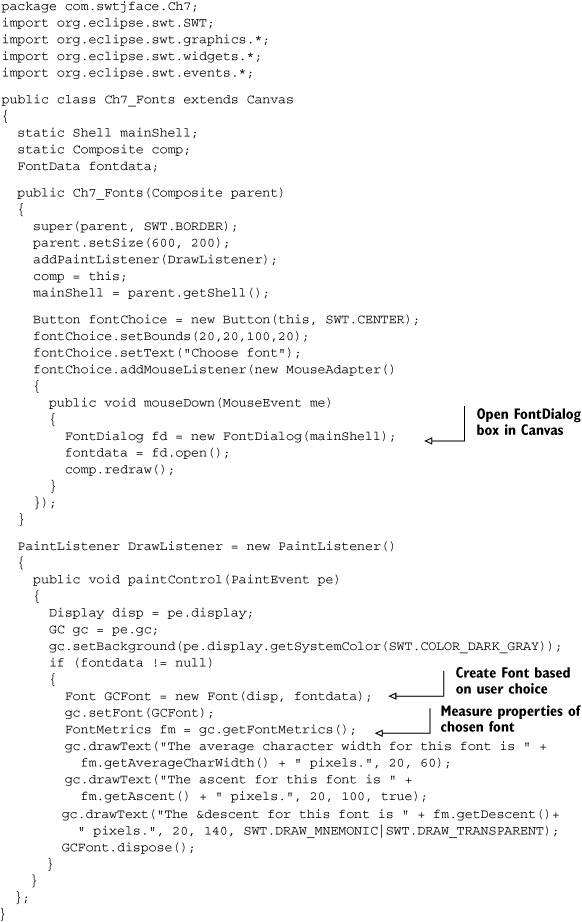
The class Ch7_Fonts, shown in listing 7.3, extends Canvas and creates a graphic context that draws text with a chosen font. When the user clicks a button, a Font-Dialog instance opens. This dialog determines which fonts are available on the platform and lets the user choose the name, size, and style of the text in the Canvas. Once the user has chosen, the graphic context displays the text dimensions by invoking its getFontMetrics() method.
This class will be added to WidgetWindow, so we recommend placing Ch7_Fonts in the com.swtjface.Ch7 package.
Listing 7.3. Ch7_Fonts.java
Once the user clicks the Choose Font button, the MouseEvent handler creates an instance of a FontDialog and makes it visible by invoking the dialog’s open() method. This method returns a FontData object, which is used in the DrawListener interface to create a font for the graphic context. This GC object, created by the PaintEvent, then invokes its getFontMetrics() method to measure the parameters of the font.
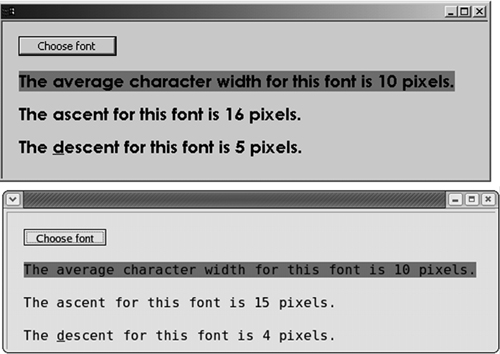
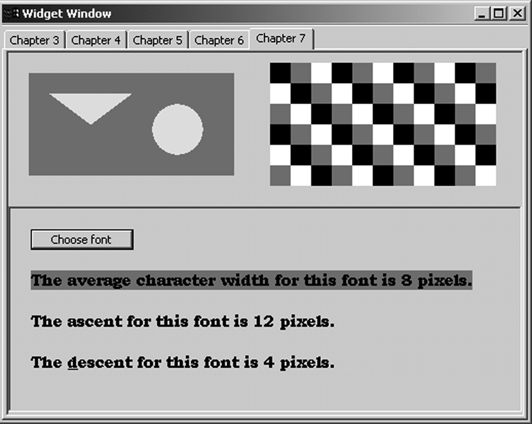
When the graphic context sets its foreground color to SWT.COLOR_DARK_GRAY, this usually means that all text created by the GC will be surrounded by this color. However, as you can see in figure 7.5, only the first drawText() method is surrounded by the foreground color; this is because the second and third invocations are considered transparent and take the color of the underlying Canvas. The third drawText() method also enables mnemonic characters, which means that an ampersand (&) before a letter results in the display underlining this character. This is shown in figure 7.5 by the underlined d in the third sentence.
Figure 7.5. The user interface for Ch7_Fonts.java. This application combines the many elements of SWT font manipulation.
In the DrawListener interface, a great deal of the processing is performed only after the FontData object has been set by the FontDialog. This is necessary since errors will result if the FontData argument is null. Also, since the graphic context only draws its text after a PaintEvent, the MouseAdapter ends by invoking the redraw() method, which causes the Canvas to repaint itself.
7.3.3. Improved font management with JFace
As we mentioned in section 7.3.1, one of the main functions of SWT’s graphics is to provide font management—the allocation and deallocation of font resources. This can be accomplished with the Font constructor and dispose() methods, but there is no efficient way to manage multiple fonts in a single application. JFace provides this capability with its FontRegistry class, located in the org.eclipse.jface.resource package.
By using a FontRegistry, you don’t need to worry about the creation or disposal of Fonts. Instead, the FontRegistry’s put() method lets you match a String value with a corresponding FontData[] object. This method can be invoked multiple times to add more Fonts to the registry. Then, when the application needs a new Font to change its text display, it calls the registry’s get() method, which returns a Font object based on the argument’s String value. This is shown in the following example code:
FontRegistry fr = JFaceResources.getFontRegistry();
fr.put("User_choice", fontdialog.getFontList());
fr.put("WingDings", WDFont.getFontData());
Font choice = fr.get("User_choice");
Rather than create an empty registry, this code uses the preexisting FontRegistry associated with JFace and adds two more fonts. The first font is placed in the registry from the result of a FontDialog selection, and the second is taken from a font that existed previously in the application. In the last line, the FontRegistry converts the FontData[] object associated with the FontDialog into a Font instance. Just as the FontRegistry manages the creation of this font, it also performs its disposal, as well as that of every font in its registry.
The fonts in the FontRegistry include those used in the Eclipse Workbench’s banners and dialog boxes. However, you need the JFaceResources class to access them. The following code shows how this can be performed. It’s important to note that the Strings used to invoke the registry’s get() method, as well as the FontRegistry itself, are member fields in JFaceResources:
FontRegistry fr = JFaceResources.getFontRegistry();
Font headFont = fr.get(JFaceResources.HEADER_FONT);
Font dialogFont = fr.get(JFaceResources.DIALOG_FONT);
Table 7.9 lists these fonts with their String values and functions.
Table 7.9. Fonts available in the JFace FontRegistry
|
Access String |
Font function |
|---|---|
| JFaceResources.BANNER_FONT | Font used in JFace banners |
| JFaceResources.DEFAULT_FONT | Standard JFace font |
| JFaceResources.DIALOG_FONT | Font used in JFace dialogs |
| JFaceResources.HEADER_FONT | Font used in JFace headers |
| JFaceResources.TEXT_FONT | Font used for Workbench text |
Although the String value in the left column remains the same across multiple platforms, the font to which it refers may vary. For example, on Linux, the Banner font is Adobe Courier, Boldface, at 14 pitch. On MacOS, the default Banner font is Lucida Grande, Bold, at 12 pitch.
Having progressed from colors to fonts, we need to discuss graphics that convey even more information: images. After all, a picture is worth a thousand words...
7.4. Incorporating images in graphics
Although the subject of manipulating images is more complicated than fonts or colors, there are fewer concerns with platform dependence. Different operating systems and applications may support divergent file types, but many image formats have become so prevalent that they are supported on nearly all systems. The code examples in this section work exclusively with these common image types.
As this section will make clear, working with images is similar to working with fonts. SWT provides classes and methods for image management and integration in much the same way that it provides for font handling. Also, JFace provides built-in resources and registries that reduce the amount of complexity involved with image management.
7.4.1. Allocating images
Most applications only create Image objects to add existing image files to a user interface. In this case, you should use the first and simplest of the Image constructor methods:
Image(Device, String)
Applications seeking to present the image in a GUI invoke this method using the Display object as the first argument and the image file’s pathname as the second. As of the time of this writing, SWT accepts *.jpg, *.gif, *.png, *.bmp, and *.ico file types.
If the image file resides in the same directory as a known class, then an Input-Stream can be generated by invoking the class’s getResourceAsStream() method. With this InputStream, you can use the second constructor method:
InputStream is = KnownClass.getResourceAsStream("Image.jpg");
Image Knownimage = new Image(Display, is);
The full list of overloaded Image constructor methods is shown in table 7.10.
Table 7.10. Constructor methods for the Image class
|
Constructor method |
Function |
|---|---|
| Image(Device, String) | Creates an Image using an existing file |
| Image(Device, InputStream) | Creates an Image using an InputStream from an existing image |
| Image(Device, int, int) | Creates an empty Image with the given dimensions |
| Image(Device, Rectangle) | Creates an empty Image with the dimensions of a Rectangle |
| Image(Device, Image, int) | Creates an Image based on another Image and a set parameter |
| Image(Device, ImageData) | Creates an Image according to information in the ImageData |
| Image(Device, ImageData, ImageData) | Creates an Image (icon) according to an ImageData object and a second ImageData object that determines transparency |
The third and fourth constructor methods create empty Image instances with dimensions set by the method’s arguments. The two integers specify the x and y parameters of the image, and the Rectangle object in the fourth method frames the image according to its boundaries. The fifth creates an Image based on a second Image instance and an integer flag that determines whether the image should appear disabled or in grayscale.
The last two constructor methods construct Image instances using objects of the ImageData class. This class provides device-independent information about an Image object and contains methods to manipulate the image. Like the FontData class, instances of ImageData don’t use operating system resources and don’t require deallocation. Image instances, however, need to invoke their dispose() methods when they’re no longer in use.
The ImageData class and its ability to incorporate effects in images will be explored in greater depth shortly. First, it’s important for you to understand how images are integrated in applications.
7.4.2. Coding graphics with images
The process of adding an Image to a GUI begins with creating a graphic context. This GC object then calls its drawImage() method, which takes one of two forms, based on whether the image will be presented with its original dimensions. This method is presented in the code that follows.
In chapter 4, we used a standard Eclipse image to show how the Action class functions. To fully show SWT’s image capabilities, we need a larger image. Therefore, we recommend that you copy eclipse_lg.gif from $ECLIPSE_HOME/plugins/org.eclipse.platform_x.y.z and add it to the com.swtjface.Ch7 package. This way, any class in the package will be able to work with this image.
However, the following snippet is presented only to demonstrate how an Image object works in a graphic context:
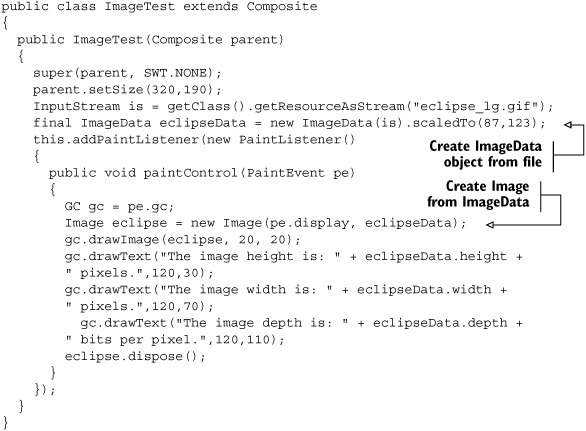
This code begins by constructing an ImageData object using an InputStream. In this case, it makes sense to start with an ImageData instance since Image objects can’t be resized or recolored. This resizing process is performed using the scaleTo() method, which shrinks the image for the GUI. This new image is shown in figure 7.6.
Figure 7.6. Although an Image object can be displayed in a window, the ImageData instance provides the information.
When a PaintEvent occurs, the program invokes the paintControl() method. This method creates the window’s graphic context and an Image object based on the ImageData. To the right of the image, three statements provide information regarding the fields of the ImageData instance. It’s worth noting that by changing the coordinates, you can superimpose the text (or any graphic) on the image.
The code shows how you can ue the ImageData class to obtain information about images and change their size. However, this class is capable of much more. But before we can discuss how ImageData creates image effects, you need to fully understand this class and how it represents images.
7.4.3. Creating a bitmap with ImageData
The easiest way to learn about ImageData is to design, build, and display an instance of this class. In this case, you’ll create a bitmap and use it to form an Image. Doing so will introduce many of the fields and methods associated with the ImageData class and provide a better idea why this class is necessary.
The first step involves determining which colors will be used. Given this book’s grayscale presentation, we’ll restrict ourselves to shades of gray. To reduce the amount of programming, we’ll keep the number of different colors to a minimum. With this in mind, this example uses three colors—white, black, and gray—and combines them into a racing flag bitmap. This isn’t terribly exciting, but it will be sufficient to show you how to generate ImageData.
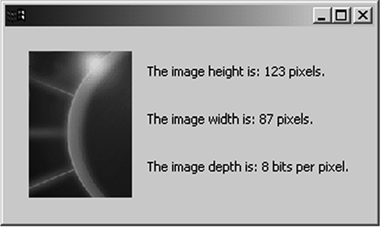
To tell ImageData about the colors you’ll be using, you need to create an instance of the PaletteData class. This object contains an array of the RGB values in the image. For the image sketched in figure 7.7, this consists of three elements: 0x000000 (black), 0x808080 (gray), and 0xFFFFFF (white).
Figure 7.7. Each pixel in an image can be identified by its offset, scanline, and color value.
Each pixel in an image has three pieces of information: its x coordinate, or offset; its y coordinate, or scanline; and the pixel’s color, which is referred to as its value or index. Because this image contains only three colors, you don’t need to assign each pixel its full RGB value (0x000000, 0x808080, 0xFFFFFF). Instead, it’s simpler and less memory-intensive to use the color’s index in the PaletteData array and assign pixel values of (0, 1, 2). This simplified mapping between a pixel’s value and color is referred to as an indexed palette. For example, because the eclipse_lg.gif file used in the last code snippet has a depth of only 8 bits per pixel, each pixel is assigned a value between 1 and 28 (255).
However, for images with depth greater than 8 bits per pixel, the additional processing needed to translate between an index and its color isn’t worth the reduced memory. These images use a direct palette, which directly assigns a pixel’s value to its RGB value. The isDirect() method in the PaletteData class tells whether an instance uses direct or indexed conversion.
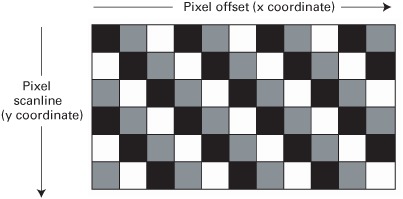
If you understand how the PaletteData class functions, then coding a bitmap is straightforward, as shown in listing 7.4. Because this ImageData object will be integrated in an animated graphic, we recommend that you add this FlagGraphic class to the com.swtjface.Ch7 package.
Listing 7.4. FlagGraphic.java
This example begins by creating a PaletteData object as an array of RGB objects corresponding to black, gray, and white colors. Then, an ImageData instance is constructed with the dimensions of the image, the depth of the image, and the PaletteData. Because there are three possible colors, the depth is set to 2, which provides support for up to 22 (4) colors. If an image’s color depth is 1, 2, 4, or 8, then the application creates an indexed palette for the ImageData object during its allocation process. For images with greater depth, the application will create a direct palette.
Note
If the user attempts to create a palette with a depth outside the set of {1, 2, 4, 8, 16, 24, 32}, the compiler will throw an ERROR_INVALID_ARGUMENT.
In this example, the setPixel() method assigns values to all the pixels in the 220x120 image. This is only one of many bitmap methods provided by the Image-Data class; table 7.11 provides a complete list.
Table 7.11. Bitmap methods for the ImageData class
|
Method |
Function |
|---|---|
| getPixel(int, int) | Returns the pixel value at the specified coordinates |
| getPixels(int, int, int, int[], int) | Returns a specified number of pixels beginning at a given offset and scanline |
| getPixels(int, int, int, byte[], int) | Returns a specified number of pixels beginning at a given offset and scanline |
| getRGBs() | Returns the array of RGB objects in the indexed palette; returns null if a direct palette is used |
| setPixel(int, int, int) | Sets the value of the pixel located at the given coordinates |
| setPixels(int, int, int, int[], int) | Sets the values of a specified number of pixels beginning at a given offset and scanline |
| setPixels(int, int, int, byte[], int) | Sets the values of a specified number of pixels beginning at a given offset and scanline |
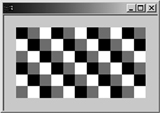
It’s important to remember that, because flagData only works with RGB, Palette-Data, and ImageData objects, no dispose() methods need to be invoked. Deallocation is only necessary when an ImageData instance is used to create an Image or if the RGB values are used to create Colors. However, if an Image was constructed from the flagData information, it would resemble that shown in figure 7.8.
Figure 7.8. Bitmap of an example ImageData object
Now that we’ve covered the basics of working with ImageData objects, we can progress to more advanced topics. It will take some time before an SWT application can compete with a commercial photo-editing tool, but the toolset provides a number of impressive ways to manipulate images.
7.4.4. Manipulating images with ImageData
Along with the bitmap methods described so far, the ImageData class also contains methods that provide graphical effects. You can set pixels in an image to provide transparency instead of a color. Using alpha blending, two images can be combined into an image that contains elements of both. Finally, using the ImageData and ImageLoader classes, you can sequence images into animated GIF files.
Transparency
With sufficient color depth, the RGB system can provide any color in the visible spectrum. However, this won’t help if you want sections of the image to be transparent. No combination of red, green, and blue elements will add up to a see-through color, so you need to set a specific pixel value to represent transparency. This way, any pixel with this value will instead take the color of the background behind it. This capability is provided with the transparentPixel field of the ImageData class. This is simple to use in code, as the following snippet shows:
flagData.transparentPixel = 2;
Image flagImage = new Image(pe.display, flagData);
gc.drawImage(flagImage, 20, 20);
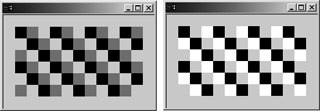
In this code, any pixels in FlagImage with the value of 2 (representing white) take the color of the image’s background. This is shown on the left image in figure 7.9. The right image is the result of setting the transparentPixel value to 1 (representing gray).
Figure 7.9. Image transparency. On the left, all white pixels are made transparent. On the right, all gray pixels are transparent.
In addition to the transparentPixel field, the ImageData class contains a number of methods that provide information about transparency. The getTransparencyMask() method returns an ImageData object with its transparent pixels separated in a mask array. The getTransparencyType() method returns an integer representing the type of transparency used. In many image-editing toolsets, a program can specify different degrees of transparency in an image. However, since there is no setTransparencyType() method at the time of this writing, this feature has yet to be integrated in SWT.
Transparency is a helpful capability, but it’s still static. It would be much more striking to create a series of images and display them at short time intervals to provide the illusion of continuous motion. We’ll now cover this king of computer graphic effects: animation.
Saving and animating images
Of the many common types of images, the Graphics Interchange Format (GIF) is the only one that supports animation. Therefore, before we can discuss animation in depth, we need to describe how SWT’s Image objects are saved as image files. This means looking into SWT’s ImageLoader class.
Like the ImageData constructors, the ImageLoader class contains methods that accept image files and streams and return ImageData[] objects. However, this class’s main purpose involves converting ImageData[] instances into Output-Streams and image files. This way, graphics can be persisted instead of being disposed with their Image objects. Table 7.12 shows the formats accepted for loading and saving files with SWT.
Table 7.12. Image file formats accepted for SWT access
|
SWT constant |
Image type |
|---|---|
| SWT.IMAGE_JPEG | Joint Photographic Experts Group (*.jpg) |
| SWT.IMAGE_GIF | Graphics Interchage File (*.gif) |
| SWT.IMAGE_PNG | Portable Native Graphic (*.png) |
| SWT.IMAGE_BMP | Windows Bitmap (*.bmp)—No compression |
| SWT.IMAGE_BMP_RLE | Windows Bitmap (*.bmp)—RLE compression |
| SWT.IMAGE_ICO | Windows Icon format (*.ico) |
There are two steps in the process of building an image file in SWT:
1. The application creates an instance of the ImageLoader class and sets its data field equal to the ImageData or ImageData[] object that contains the image information.
2. The image file is created by invoking the ImageLoader’s save() method. This method can also be used to create an OutputStream for the image.
However, an application seeking to create an animated GIF file must perform several additional tasks:
3. Each ImageData object, or frame, in the sequence must be configured to display itself for a specified amount of time and then dispose of itself appropriately. In code, this is done using the delayTime and disposal-Method fields of the ImageData class.
4. The application must combine these frames in an ImageData array and load this array into an ImageLoader.
5. The application must initialize the repeatCount field of the ImageLoader instance in order to specify how many times the animated sequence should repeat itself.
6. The ImageLoader’s save() method is used with the SWT.IMAGE_GIF tag to save the image array as an animated GIF file.
The Ch7_Images class, shown in listing 7.5, demonstrates the process of integrating multiple instances of the ImageData class into a single animated GIF.
Note
This GIF works best if you open it in a browser that supports animation.
Listing 7.5. Ch7_Images.java
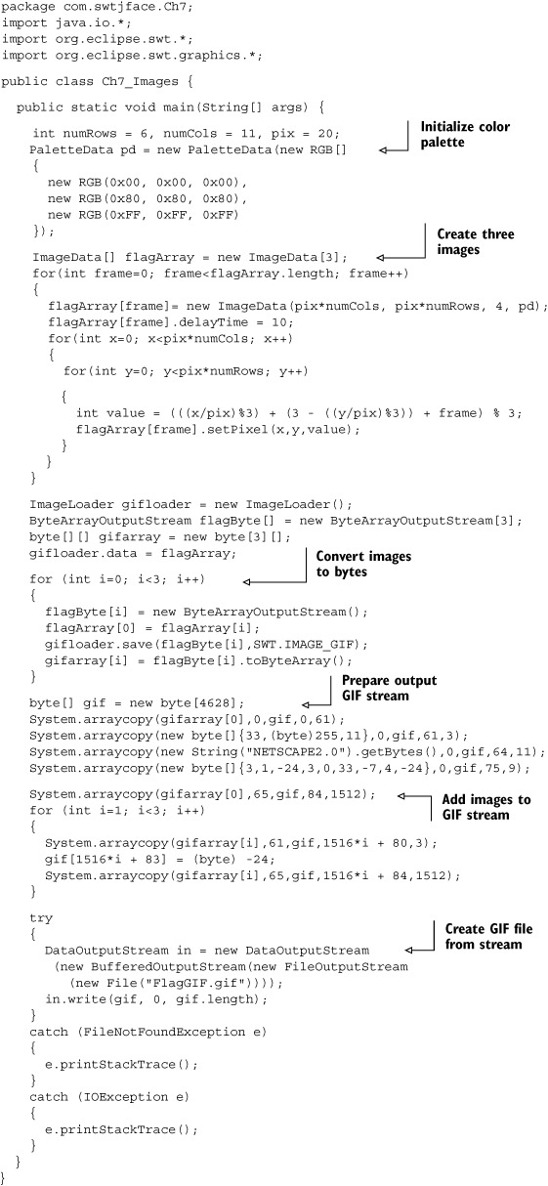
The complexity of this code is due to the fact that the ImageLoader.save() method can’t convert an ImageData array into an animated GIF. However, this method can create a GIF OutputStream from an individual ImageData object, and this capability is used for each image in the array. Then, after a great deal of byte manipulation, these three OutputStreams are fused into a final OutputStream that creates the FlagGIF.gif file.
If this file doesn’t immediately appear in Eclipse, right-click the project name (WidgetWindow) and select the Refresh option. The file will appear in the project.
Now that we’ve discussed SWT’s image-handling capability in excruciating detail, let’s look at JFace. Although the JFace library can’t create incredible special effects, it can greatly simplify the process of working with images.
7.4.5. Managing images with JFace
Just as JFace’s FontRegistry class simplifies font management, the ImageRegistry class lets you incorporate multiple images in an application without worrying about resource deallocation. It also uses the same access methods as the FontRegistry class. To place an image in the registry, you use the put() method with an Image object and a String. When the image needs to be displayed, the get() method returns the image based on the key. Here’s an example that uses the eclipse_lg.gif file:
ImageRegistry ir = new ImageRegistry();
ir.put("Eclipse", new Image(display, "eclipse_lg.gif"));
Image eclipse = ir.get("Eclipse");
In this case, you still need to allocate resources for the Image object. This may cause a problem if the application places many images in the registry but only needs to display a few. For this reason, JFace created the ImageDescriptor class. Like SWT’s ImageData class, the ImageDescriptor contains the information needed for an image without requiring allocation of system resources. The get() and put() methods associated with the ImageRegistry class are also available for ImageDescriptor objects, as shown in the following code sample:
ImageRegistry ir = new ImageRegistry();
ImageDescriptor id = createFromFile(getClass(),"eclipse_lg.gif");
ir.put("Eclipse", id);
Image eclipse = ir.get("Eclipse");
If you use ImageDescriptors, the put() and get() operations can be performed without allocating for Image objects. This way, you can add a large number of ImageDescriptors to an application’s ImageRegistry without worrying about image creation. Finally, since an ImageRegistry disposes of its contents when its Display object is closed, you don’t need to concern yourself with image deallocation.
7.5. Updating the WidgetWindow
To add graphics to the WidgetWindow application, in this section you’ll create a Composite subclass containing colors, fonts, and images. This container incorporates the Ch7_Colors and Ch7_Fonts classes, as well as the animated image created by the Ch7_Images class.
7.5.1. Building the chapter 7 composite
Listing 7.6 presents the Ch7_Composite class, which extends the Canvas class and combines the drawing from section 7.2.1 with the font dialog box from section 7.3.2 and the animated image from section 7.4.4. In order for this to function properly, you must add the FlagGIF.gif file to the com.swtjface.Ch7 package.
Listing 7.6. Ch7_Composite.java
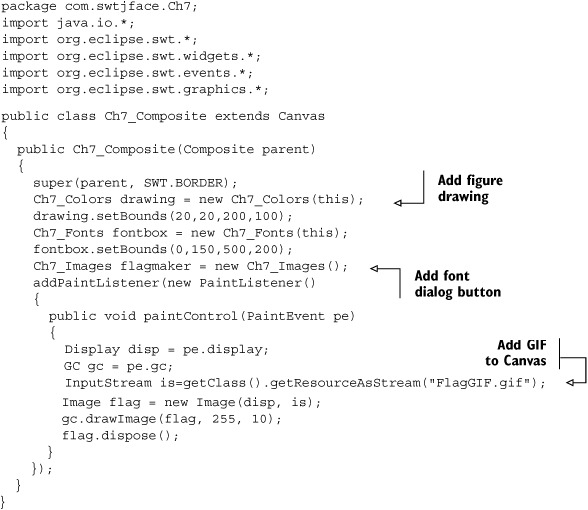
The operation of Ch7_Composite is simple to understand: It creates a Ch7_Colors Composite in the upper-left corner of the Canvas and a Ch7_Fonts Composite at the bottom of the display. It also constructs a graphic context that displays the Flag-GIF.gif file in the upper-right corner of the window.
7.5.2. Adding Ch7_Composite to the WidgetWindow
Let’s add a tab to the WidgetWindow Tabfolder that comprises the Ch7_Composite class created in this chapter. As in previous chapters, the only parts of the code that need to be updated are the import statements and the createContents() method. To conserve space, these are the only sections presented in listing 7.7.
Listing 7.7. WidgetWindow.java (updated)
...Previous import statements...
import com.swtjface.Ch6.*;
import com.swtjface.Ch7.*;

protected Control createContents(Composite parent) {
  getShell().setText("Widget Window");
  TabFolder tf = new TabFolder(parent, SWT.NONE);

  ...Previous tab items...

  TabItem chap7 = new TabItem(tf,SWT.NONE);
  chap7.setText("Chapter 7");
  chap7.setControl(new Ch7_Composite(tf));

  return parent;
}
Once it’s been updated, the WidgetWindow should appear similar to the GUI shown in figure 7.10. Unfortunately, although the FlagGIF.gif file is an animated GIF, the image loaded in the application remains static.
Figure 7.10. The updated WidgetWindow combines the color, font, and image-handling capabilities of SWT/JFace.
7.6. Summary
The SWT/JFace graphics library allows applications to display significantly more than the widgets described in chapters 3 and 5. This capability isn’t perfect, but it’s incredible for such a young toolset. Not only does it let you manage and manipulate colors, images, and fonts, it also provides numerous classes to hold their information. These are particularly helpful for running graphical applications on systems with limited resources.
It’s difficult to keep track of ImageData, ImageDescriptor, and ImageLoader objects, but SWT/JFace separates the roles of the graphical classes clearly. Also, although the registries provided by JFace may seem complicated to work with, they perform helpful functions, so we hope you remember them when building your applications.
The special-effects methods in SWT/JFace need work, but the potential for future capabilities is enormous. We hope that in a few years’ time, Eclipse applications will be used to create and manipulate professional-quality graphical editing applications, which can be used not only to create images and animation, but also to incorporate full audio/visual aspects.