
Chapter 4. Working with events
Without events, the widgets and containers we’ve looked at are only good for decoration. This chapter focuses on how to configure these components to understand and respond to user actions. In particular, it describes the SWT/JFace framework that acquires these actions and translates them into software constructs called events. The process of using a toolset to generate, receive, and respond to these events is the toolset’s event model. Many books on GUIs leave the event model until later chapters, but we feel the subject’s importance demands an early introduction.
The first part of this chapter describes the SWT data structures that enable applications to process events. These include the event classes, which are created when a user carries out actions, and the listener interfaces, which receive event objects. By combining these appropriately, an application can provide multiple responses to nearly every form of event that can occur. However, SWT’s powerful event-processing mechanisms can make coding more complicated than it needs to be. For this reason, we need to examine how JFace simplifies the process.
This chapter’s second part deals with using both SWT and JFace to interface with the user. The JFace library replaces events and listeners with actions and contributions, which perform the same function as their SWT counterparts but in very different ways. These new classes simplify the process of event programming by separating the event-processing methods from the GUI’s appearance. Also, actions and contributions are meant for performing window-oriented interfacing, and this narrowed scope reduces the developer’s programming burden.
4.1. Event processing in SWT
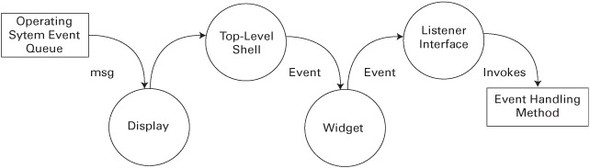
The SWT event-processing cycle is depicted in figure 4.1. It begins with the operating system’s event queue, which records and lists actions taken by the user. Once an SWT application begins running, its Display class sorts through this queue using its readAndDispatch() method and msg field, which acts as a handle to the underlying OS message queue. If it finds anything relevant, it sends the event to its top-level Shell object, which determines which widget should receive the event. The Shell then sends the event to the widget that the user acted on, which transfers this information to an associated interface called a listener. One of the listener’s methods performs the necessary processing or invokes another method to handle the user’s action, called an event handler.
Figure 4.1. Acquiring events from the operating system and processing them in an SWT application
When making a widget responsive to events, the main tasks of the GUI designer are determining which events need to be acted on, creating and associating listeners to sense these events, and then building event handlers to perform the necessary processing. This section will show how to accomplish these tasks using the SWT data structures contained in the org.eclipse.swt.events package.
4.1.1. Using typed listeners and events
Most of the listener interfaces in SWT only react to a particular set of user actions. They’re called typed listeners for this reason, and they inherit from the TypedListener class. Similarly, the events corresponding to these specific actions are typed events, which subclass the TypedEvent class. For example, a mouse click or doubleclick is represented by a MouseEvent, which is sent to an appropriate MouseListener for processing. Keyboard actions performed by the user are translated into KeyEvents, which are picked up by KeyListeners. A full list of these typed events and listeners is shown in table 4.1.
Table 4.1. SWT Event classes and their associated listeners
|
Event |
Listener |
Listener methods |
GUI component |
|---|---|---|---|
| ArmEvent | ArmListener | widgetArmed() | MenuItem |
| ControlEvent | ControlListener | controlMoved() controlResized() | Control, TableColumn, Tracker |
| DisposeEvent | DisposeListener | widgetDisposed() | Widget |
| FocusEvent | FocusListener | focusGained() focusLost() | Control |
| HelpEvent | HelpListener | helpRequested() | Control, Menu, MenuItem |
| KeyEvent | KeyListener | keyPressed() keyReleased() | Control |
| MenuEvent | MenuListener | menuHidden() menuShown() | Menu |
| ModifyEvent | ModifyListener | modifyText() | CCombo, Combo, Text, StyledText |
| MouseEvent | MouseListener | mouseDoubleClick() mouseDown() mouseUp() | Control |
| MouseMoveEvent | MouseMoveListener | mouseMove() | Control |
| MouseTrackEvent | MouseTrackListener | mouseEnter() mouseExit() mouseHover() | Control |
| PaintEvent | PaintListener | paintControl() | Control |
| SelectionEvent | SelectionListener | widgetDefaultSelected() widgetSelected() | Button, CCombo, Combo, CoolItem, CTabFolder, List, MenuItem, Sash, Scale, ScrollBar, Slider, StyledText, TabFolder, Table, TableCursor, TableColumn, TableTree, Text, ToolItem, Tree |
| ShellEvent | ShellListener | shellActivated() shellClosed() shellDeactivated() shellDeiconified() shellIconified() | Shell |
| TraverseEvent | TraverseListener | keyTraversed() | Control |
| TreeEvent | TreeListener | treeCollapsed() treeExpanded() | Tree, TableTree |
| VerifyEvent | VerifyListener | verifyText() | Text, StyledText |
In order to function, these listeners must be associated with components of the GUI. For example, a TreeListener will only receive TreeEvents if it’s associated with a Tree object. But not every GUI component can use each listener. For example, as shown in the GUI component column of the table, a Control component broadcasts many more types of events than a Tracker object. There are also listeners, such as MenuListeners and TreeListeners, that can only be attached to very specific widgets. This attachment is performed by invoking the component’s add...Listener() method with the typed listener as the argument.
Understanding Event classes
The Event column in table 4.1 lists the subclasses of TypedEvent that the Display and Shell objects send to typed listeners. Although programmers generally don’t manipulate these classes directly, the classes contain member fields that provide information regarding the event’s occurrence. This information can be used in event handlers to obtain information about the environment. These fields, inherited from the TypedEvent and EventObject classes, are shown in table 4.2.
Table 4.2. Data fields common to all typed events
|
TypedEvent field |
Function |
|---|---|
| data | Information for use in the Event handler |
| display | The display in which the Event fired |
| source | The component that triggered the Event |
| time | The time that the Event occurred |
| widget | The widget that fired the Event |
In addition to these, many event classes have other fields that provide more information about the user’s action. For example, the MouseEvent class also includes a button field, which tells which mouse button was pressed, and x and y, which specify the widget-relative coordinates of the mouse action. The ShellEvent class contains a boolean field called doit, which lets you specify whether a given action will result in its intended effect. Finally, the PaintEvent class provides additional methods that we’ll discuss in chapter 7.
Programming with listeners
There are two main methods of incorporating listeners in code. The first creates an anonymous interface in the component’s add...Listener() method, which narrows the scope of the listener to the component only. This method is shown in the following code snippet:
Button button = new Button(shell, SWT.PUSH | SWT.CENTER);
button.addMouseListener(new MouseListener()
{
  public void mouseDown(MouseEvent e)
  {
    clkdwnEventHandler();
  }
  public void mouseUp(MouseEvent e)
  {
    clkupEventHandler();
  }
  public void mouseDoubleClick(MouseEvent e)
  {
    dblclkEventHandler();
  }
});

static void dblclkEventHandler()
{
  System.out.println("Double click.");
}
static void clkdwnEventHandler()
{
  System.out.println("Click - down.");
}
static void clkupEventHandler()
{
  System.out.println("Click - up.");
}
In the first line, a Button widget is created and added to the application’s Shell. Then, the addMouseListener() method creates an anonymous MouseListener interface and associates it with the button. This interface contains three methods—mouseDown(), mouseUp(), and mouseDoubleClick()—which must be implemented in any instance of a MouseListener. If the user presses the mouse button, releases the button, or double-clicks, a MouseEvent is sent to one of these methods, which invokes the appropriate event-handling method. These event handlers complete the event processing by sending a message to the console. Although the event-handling routines are simple in this example, they generally demand more effort than any other aspect of event processing.
An anonymous interface can be helpful if you need to access objects (declared with the final keyword) in the outer class. However, the listener can’t be associated with other components. You can solve this problem by declaring a separate interface that inherits from MouseListener. An example is shown here:
Button button = new Button(shell, SWT.PUSH | SWT.CENTER);
button.addMouseListener(ExampleMouseListener);

MouseListener ExampleMouseListener = new MouseListener()
{
  public void mouseDoubleClick(MouseEvent e)
  {
    System.out.println("Double click.");
  }
  public void mouseDown(MouseEvent e)
  {
    System.out.println("Click - down.");
  }
  public void mouseUp(MouseEvent e)
  {
    System.out.println("Click - up.");
  }
};
The previous code samples declare all three of the MouseListener’s member methods. But what if you’re only concerned with the double-click event, and you only want to work with the mouseDoubleClick() method? If you use the MouseListener interface, you have to declare all of its methods, just as in any interface. However, you can eliminate this unnecessary code by using special classes called adapters.
4.1.2. Adapters
Adapters are abstract classes that implement Listener interfaces and provide default implementations for each of their required methods. This means that when you associate a widget with an adapter instead of a listener, you only need to write code for the method(s) you’re interested in. Although this may seem like a minor convenience, it can save you a great deal of programming time when you’re working with complex GUIs.
Note
The adapters mentioned in this section are very different from the model-based adapters provided by the JFace library, first mentioned in chapter 2. Here, adapters reduce the amount of code necessary to create listener interfaces. Although model-based adapters can simplify event processing, as you’ll see in section 4.2, they also help with many other aspects of GUI programming.
Adapters are only available for events whose listeners have more than one member method. The full list of these classes is shown in table 4.3, along with their associated Listener classes.
Table 4.3. SWT adapter classes and their corresponding listener interfaces
|
Adapter |
Listener |
|---|---|
| ControlAdapter | ControlListener |
| FocusAdapter | FocusListener |
| KeyAdapter | KeyListener |
| MenuAdapter | MenuListener |
| MouseAdapter | MouseListener |
| MouseTrackAdapter | MouseTrackListener |
| SelectionAdapter | SelectionListener |
| ShellAdapter | ShellListener |
| TreeAdapter | TreeListener |
Adapter objects are easy to code and are created with the same add...Listener() methods. Two examples are shown here:
button.addMouseListener(new MouseAdapter()
{
  public void mouseDoubleClick(MouseEvent e)
  {
    dblclkEventHandler();
  }
)};

static void dblclkEventHandler()
{
  System.out.println("Double click.");
}
As shown, using the MouseAdapter class allows you to disregard the other methods associated with the MouseListener interface and concentrate on handling the double-click event. Similar to listener interfaces, adapters can be coded as anonymous classes or local classes.
4.1.3. Keyboard events
Although most of the events in table 4.1 are straightforward to understand and use, the keyboard event classes require further explanation. Specifically, these events include the KeyEvent class, which is created any time a key is pressed, and its two subclasses, TraverseEvent and VerifyEvent. A TraverseEvent results when the user presses an arrow key or the Tab key in order to focus on the next widget. A VerifyEvent fires when the user enters text that the program needs to check before taking further action.
In addition to the fields inherited from the TypedEvent and EventObject classes, the KeyEvent class has three member fields that provide information concerning the key that triggered the event:
- character— Provides a char value representing the pressed key.
- stateMask— Returns an integer representing the state of the keyboard modifier keys. By examining this integer, a program can determine whether any of the Alt, Ctrl, Shift, and Command keys are currently pressed.
- keyCode— Provides the SWT public constant corresponding to the typed key, called the key code. These public constants are presented in table 4.4.
Table 4.4. Keyboard entries and their SWT code constants
Key
Key code
Alt SWT.ALT Arrow (down) SWT.ARROW_DOWN Arrow (left) SWT.ARROW_LEFT Arrow (right) SWT.ARROW_RIGHT Arrow (up) SWT.ARROW_UP Backspace SWT.BS Mouse button 1 SWT.BUTTON1 Mouse button 2 SWT.BUTTON2 Mouse button 3 SWT.BUTTON3 Carriage return SWT.CR Ctrl SWT.CTRL End SWT.END Esc SWT.ESC F1–F12 SWT.F1–SWT.F12 Home SWT.HOME Insert SWT.INSERT Line feed SWT.LF Mod1–Mod4 SWT.MOD1–SWT.MOD4 Page Down SWT.PAGE_DOWN Page Up SWT.PAGE_UP Shift SWT.SHIFT Tab SWT.TAB
The following code snippet shows how to use a KeyListener to receive and process a KeyEvent. It also uses the fields (character, stateMask, and keyCode) to acquire information about the pressed key:
Button button = new Button(shell, SWT.CENTER);
button.addKeyListener(new KeyAdapter()
{
  public void keyPressed(KeyEvent e)
  {
    String string = "";
    if ((e.stateMask & SWT.ALT) != 0) string += "ALT-";
    if ((e.stateMask & SWT.CTRL) != 0) string += "CTRL-";
    if ((e.stateMask & SWT.COMMAND) != 0) string += "COMMAND-";
    if ((e.stateMask & SWT.SHIFT) != 0) string += "SHIFT-";
    switch (e.keyCode)
    {
      case SWT.BS: string += "BACKSPACE"; break;
      case SWT.CR: string += "CARRIAGE RETURN"; break;
      case SWT.DEL: string += "DELETE"; break;
      case SWT.ESC: string += "ESCAPE"; break;
      case SWT.LF: string += "LINE FEED"; break;
      case SWT.TAB: string += "TAB"; break;
      default: string += e.character; break;
    }
    System.out.println (string);
  }
});
This code uses the KeyEvent fields and the public constants to create a String that displays the name of the pressed key and any associated modifier keys. The first step in the event handler’s operation involves checking the event’s stateMask field to see whether the Alt, Ctrl, Shift, and Command keys are pressed. If so, the name of the modifier key is added to the String. The method continues by checking whether the event’s keyCode corresponds to an alphanumeric character or one of the support keys. In either case, the name of the key is appended to the String, which is sent to the console.
The TraverseEvent fires when the user presses a key to progress from one component to another, such as in a group of buttons or checkboxes. The two fields contained in this class let you control whether the traversal action will change the focus to another control, or whether the focus will remain on the widget that fired the event. The simplest field, doit, is a boolean value that allows (TRUE) or disallows (FALSE) traversal for the given widget. The second field of the TraverseEvent class, detail, is more complicated. It’s an integer that represents the identity of the key that caused the event. For example, if the user presses the Tab key to switch to a new component, the detail field will contain the SWT constant TRAVERSE_TAB_NEXT.
Each type of control has a different default behavior for a given traversal key. For example, a TraverseEvent that results from a TRAVERSE_TAB_NEXT action will, by default, cause a traversal if the component is a radio button, but not if it’s a Canvas object. Therefore, by setting the doit field to TRUE, you override the default setting and allow the user to traverse. Setting the field to FALSE keeps the focus on the component.
The use of the VerifyEvent is similar to that of the TraverseEvent. The goal is to determine beforehand whether the user’s action should result in the usual or default behavior. In this case, you can check the user’s text to determine whether it should be updated or deleted in the application. Two of the class fields, start and end, specify the range of the input, and the text field contains the input String under examination. Having looked at the user’s text, you set the boolean doit field to allow (TRUE) or disallow (FALSE) the action.
4.1.4. Customizing event processing with untyped events
Typed events and listeners enable event processing with classes and interfaces expressly suited to their tasks. Further, typed listeners provide specific methods to receive and handle these events. By narrowing the scope of listeners and events to handle only particular actions, the use of typed components reduces the possibility of committing coding errors.
However, if you prefer coding flexibility over safety, SWT provides untyped events and listeners. When an untyped listener, represented by the Listener class, is associated with a GUI component, it receives every class of event that the component is capable of sending. Therefore, you have to manipulate the catch-all event, represented by the Event class, to determine which action the user performed. The proper event-handling method can then be invoked.
It’s important to note that Eclipse.org recommends against using untyped events and listeners. In fact, it mentions that they are “not intended to be used by applications.” These mechanisms also aren’t included with their typed counterparts in the org.eclipse.swt.events package. Instead, both the untyped Listener interface and the Event class are located in the org.eclipse.swt.widgets package.
Despite this, the SWT code snippets provided by the Eclipse website use untyped listeners and events exclusively. This makes coding convenient, since you can create a customized listener that reacts to a specified set of events. An example is shown here:
Listener listener = new Listener ()
{
  public void handleEvent (Event event)
  {
    switch (event.type)
    {
      case SWT.KeyDown:
        if (event.character == 'b')
          System.out.println("Key"+event.character);
        break;
      case SWT.MouseDown:
        if (event.button == 3)
          System.out.println("Right click");
      break;
      case SWT.MouseDoubleClick:
        System.out.println("Double click");
      break;
    }
  }
};
Button button = new Button(shell, SWT.CENTER);
button.addListener(SWT.KeyDown, listener);
button.addListener(SWT.MouseDown, listener);
button.addListener(SWT.MouseDoubleClick, listener);
In this code, the Listener object sends any Event instance to its single method, handleEvent(). Then, the Event’s type field determines what processing needs to be done. If the event has type SWT.Keydown and the character is the letter b, then a statement is sent to the console. If the type is SWT.MouseDown and the third mouse button was pressed (that is, the user right-clicked), then the statement Right click is shown. If an SWT.MouseDoubleClick event fires, then Double click is displayed.
You can obtain this capability using typed listeners and events, but the process is more involved. The button needs to add both a MouseListener and KeyListener, with corresponding adapters. Then, you need to place the event-handling routines in the appropriate listener method. Clearly, untyped event processing is not only more convenient in this case, but also reduces the number of classes necessary to handle the event.
In order to take the place of typed events, the Event class contains all the fields in each typed event. It has the same character field as a KeyEvent and the same button field as a MouseEvent. As shown in the previous code, it also has a field called type, which refers to the nature of the event. A listing of these types is presented in table 4.5.
Table 4.5. SWT type values for the Event class
|
Values for type field |
|---|
| SWT.Activate SWT.Arm SWT.Close SWT.Collapse SWT.Deactivate SWT.DefaultSelection SWT.Deiconify SWT.Dispose SWT.DragDetect SWT.FocusIn SWT.FocusOut SWT.Expand SWT.HardKeyDown SWT.HardKeyUp SWT.Help SWT.Hide SWT.Iconify SWT.KeyDown SWT.KeyUp SWT.MenuDetect SWT.Modify SWT.MouseDoubleClick SWT.MouseEnter SWT.MouseExit SWT.MouseHover SWT.MouseMove SWT.MouseUp SWT.Move SWT.None SWT.Paint SWT.Resize SWT.Selection SWT.Show SWT.Traverse SWT.Verify |
4.1.5. An SWT listener/event application
Before we discuss the JFace event model, we’ll present an SWT Composite that integrates and summarizes the material covered. This class, shown in listing 4.1, contains two buttons, a label, and the necessary event processing. We recommend creating a com.swtjface.Ch4 package to your project and adding this class to it.
Listing 4.1. Ch4_MouseKey.java
package com.swtjface.Ch4;
import org.eclipse.swt.events.*;
import org.eclipse.swt.widgets.*;
import org.eclipse.swt.*;

public class Ch4_MouseKey extends Composite
{
  Label output;

  Ch4_MouseKey(Composite parent)
  {
    super(parent, SWT.NULL);
    Button typed = new Button(this, SWT.PUSH);
    typed.setText("Typed");
    typed.setLocation(2,10);
    typed.pack();

    typed.addKeyListener(new KeyAdapter()
    {
      public void keyPressed(KeyEvent e)
      {
        keyHandler();
      }
    });

    Button untyped = new Button(this, SWT.PUSH);
    untyped.setText("Untyped");
    untyped.setLocation(80,10);
    untyped.pack();
    untyped.addListener(SWT.MouseEnter, UntypedListener);
    untyped.addListener(SWT.MouseExit, UntypedListener);

    output = new Label(this, SWT.SHADOW_OUT);
    output.setBounds(40,70,90,40);
    output.setText("No Event");

    pack();
  }

  Listener UntypedListener = new Listener()
  {
    public void handleEvent(Event event)
    {
      switch (event.type)
      {
        case SWT.MouseEnter:
          output.setText("Mouse Enter");
          break;
        case SWT.MouseExit:
          output.setText("Mouse Exit");
          break;
      }
    }
  };

  void keyHandler()
  {
    output.setText("Key Event");
  }
}
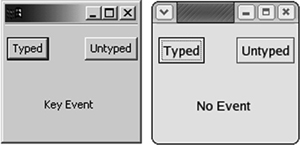
The first button is associated with an anonymous typed listener that receives keyboard events when selected. An untypedListener interface is added to the second button, which catches events that occur when the mouse pointer enters and exits the button. Whenever either button fires an event, a String is sent to the label.
By integrating this Composite in the CompViewer application from the previous chapter, the displayed Shell should resemble figure 4.2.
Figure 4.2. The Ch4_MouseKey Composite. This example combines many types of SWT classes and interfaces used for event handling.
The SWT structure of this code allows a widget to receive many types of events and provides for many different responses. But in the majority of GUIs, this isn’t necessary. In these cases, SWT’s broad capabilities only increase the complexity of coding event processing. Those willing to trade power for simplicity will find the JFace event model very helpful.
4.2. Event processing in JFace
A listener interface can provide the same event handling for different controls, but its usage depends on the component that launched the event. Listeners that receive MouseEvents can’t be used for menu bar selections. Even untyped Events are only useful after the program determines which type of control triggered the event.
But when you’re dealing with complex user interfaces, it’s helpful to separate the event-handling capability from the GUI components that generated the event. This allows one group to work on a GUI’s event handling independently from the group designing its appearance. Also, if a listener’s capability can be attached to any component, then its code can be reused more often. Finally, if one section of a program deals strictly with the GUI’s view and another is concerned only with event processing, then the code is easier to develop and understand.
JFace provides this separation with its Action and ActionContributionItem classes. Put simply, an ActionContributionItem combines the function of a GUI widget and its attached listener class. Whenever the user interfaces with it, it triggers its associated Action class, which takes care of handling the event. Although this may seem similar to SWT’s listener/event model, these classes are more abstract, simpler to use, and narrower in scope.
Because these classes are more abstract than their SWT counterparts, it may take time to appreciate their merits. However, once you understand them, we feel certain that you’ll use them regularly when handling repetitive event processing. This can be best proven through coding examples. But first, a technical introduction is in order.
4.2.1. Understanding actions and contributions
Although it’s interesting to know that you can handle TraverseEvents and ArmEvents if they occur, few applications use them. Also, it may be fascinating to attach multiple listeners and event handlers to a widget, but GUI components usually perform only a single function in response to a single input type. Because SWT’s structure provides for every conceivable component and combination of events, even the simplest listener/event code requires complexity.
It would make event programming easier if a toolset concentrated on only those few widgets and events that are used most often and made their usage as simple as possible. JFace’s event-processing structure does exactly this: Its goal is to make event processing more straightforward, allowing programmers to receive and use common events with fewer lines of code. In reaching this goal, JFace makes three assumptions:
- The user’s actions will involve buttons, toolbars, and menus.
- Each component will have only one associated event.
- Each event will have only one event handler.
By taking these assumptions into account, JFace simplifies event processing considerably. The first assumption means that contributions only need to take one of three forms. The second assumption provides the separation of contributions from their associated actions; that is, if each contributing component triggers only one event, then it doesn’t matter what action is triggered or which component fired the event. The third assumption means that each action needs only one event-handling routine. This simplified event model for SWT/JFace is shown in figure 4.3.
Figure 4.3. By combining listeners and widgets into contributions, this event model is much easier to code.
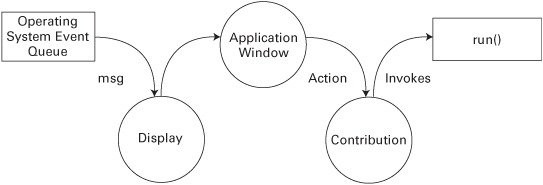
Like the SWT event model, the interface process begins with the Display class keeping track of the operating system’s event queue. This time, though, it passes information to the ApplicationWindow, which contains the Display’s Shell object. The ApplicationWindow creates an Actionb class and sends it to the contribution that generated the original event. The contribution then invokes the run() method of the Action class as the single event handler.
The Action class behaves similarly to SWT’s Event class, but the contribution capability is more complicated. The two main contribution classes are the ContributionItem class and the ContributionManager class. The ContributionItem class provides individual GUI components that trigger actions, and the Contribution-Manager class produces objects capable of containing ContributionItems. Because these are both abstract classes, event handling is performed with their subclasses. Figure 4.4 shows these inheritance relationships.
Figure 4.4. The classes and interfaces that provide contribution capability in the SWT/JFace model
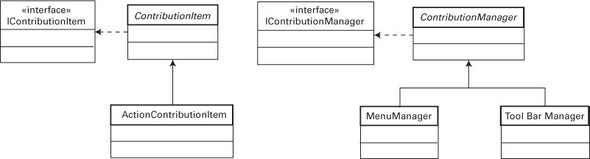
Although the ActionContributionItem class is one of many concrete subclasses of ContributionItem, it’s the most important. This class is created and implemented in an ApplicationWindow to connect an action to the GUI. It has no set appearance, but instead takes the form of a button, menu bar item, or toolbar item, depending on your use of the fill() method.
The second way to incorporate contributions in an application involves the use of a ContributionManager subclass. These subclasses serve as containers for ContributionItems, combining them to improve GUI organization and simplify programming. The MenuManager class combines ContributionItems in a window’s top-level menu, and the ToolBarManager class places these objects in a toolbar located just under the menu.
4.2.2. Creating Action classes
Listing 4.2 creates a subclass of the abstract Action class called Ch4_StatusAction. This class functions by sending a String to an ApplicationWindow’s status line whenever it triggers. We recommend that you add this class to your project directory.
Because this class will be implemented in a toolbar, it needs an associated image. The simplest way to do this is to enter the $ECLIPSE_HOME/plugins/ org.eclipse.platform_x.y.z directory, copy the eclipse.gif file, and paste it into the current project folder.
Listing 4.2. Ch4_StatusAction.java
package com.swtjface.Ch4;

import org.eclipse.jface.action.*;
import org.eclipse.jface.resource.*;

public class Ch4_StatusAction extends Action
{
  StatusLineManager statman;
  short triggercount = 0;

  public Ch4_StatusAction(StatusLineManager sm)
  {
    super("&Trigger@Ctrl+T", AS_PUSH_BUTTON);
    statman = sm;
    setToolTipText("Trigger the Action");
    setImageDescriptor(ImageDescriptor.createFromFile
      (this.getClass(),"eclipse.gif"));
  }

  public void run()
  {
    triggercount++;
    statman.setMessage("The status action has fired. Count: " +
      triggercount);
  }
}
The first thing to observe in this class is what isn’t present. Although the constructor receives a StatusLineManager object to display output, the Ch4_StatusAction class has no idea what components are firing its action. Therefore, any control that can generate actions can have an associated Ch4_StatusAction without additional code. Also, there is only one event-handling routine, run(), as opposed to the multiple handlers associated with SWT events.
The run() method handles the event processing, but the main work in this class is performed in the constructor. First, it invokes the constructor of its superclass, Action, and initializes its TEXT and STYLE fields. This way, if the Ch4_StatusAction is incorporated in a menu, the item label will read Trigger. The & before the T means that this letter will serve as the accelerator key for the action. The Ctrl+T in the TEXT field ensures that the action will fire if the user presses the Ctrl and T keys simultaneously.
Beneath the Action constructor, further methods are invoked to configure its appearance in the GUI. If it’s implemented in a Composite, the Ch4_StatusAction class will take its form according to the AS_PUSH_BUTTON style, as opposed to the AS_RADIO_BUTTON or AS_CHECK_BOX style. Next, the setToolTipText() method initializes the TOOL_TIP_TEXT field of the class, creating the String that will appear when a mouse pointer hovers over the toolbar item. Finally, the constructor associates an image with the Ch4_StatusAction class, which will appear on the toolbar item and button.
Every time the Ch4_StatusAction is generated, the run() method is invoked. In this case, the triggercount accumulator is updated, and a message is sent to the StatusLineManager object. In most applications, however, this method will be much more involved in order to serve your event-processing needs.
4.2.3. Implementing contributions in an ApplicationWindow
Because actions and contributions can only be associated with buttons, toolbar items, and menu items, any application demonstrating their capability must rely on these components. So, although a formal introduction to these widgets will have to wait until later chapters, we must include them here for that purpose.
Listing 4.3 shows how ContributionItem and ContributionManager classes are added to a window. Three contributor classes, ActionContributionItem, MenuManager, and ToolBarManager, all trigger the Ch4_StatusAction when acted on. This action sends a message to the status line at the bottom of the window.
We recommend that you create the Ch4_Contributions class in com.swtjface.Ch4 and run the executable with the Ch4_StatusAction class in the same directory.
Note
On many platforms, the Contribution operation can’t take place unless the OSGi library is added. For this reason, we recommend that you create an OSGI_LIB variable and match it to the osgi.jar file located at $ECLIPSE/plugins/osgi_x.y.z/. The full process for adding classpath variables is described in appendix A.
OSGi refers to the Open Services Gateway Initiative, which was formed to enable networking for smart devices in consumer electronics, cars, and homes. Although its widespread adoption seems uncertain at the time of this writing, it’s certain that IBM wants it to succeed very badly.
Listing 4.3. Ch4_Contributions.java
package com.swtjface.Ch4;
import org.eclipse.swt.*;
import org.eclipse.swt.widgets.*;
import org.eclipse.jface.window.*;
import org.eclipse.jface.action.*;

public class Ch4_Contributions extends ApplicationWindow
{
  StatusLineManager slm = new StatusLineManager();
  Ch4_StatusAction status_action = new Ch4_StatusAction(slm);
  ActionContributionItem aci = new
    ActionContributionItem(status_action);   1 Assign status_action contribution

  public Ch4_Contributions()  2 Add resources to
  {                             ApplicationWindow
    super(null);
    addStatusLine();
    addMenuBar();
    addToolBar(SWT.FLAT | SWT.WRAP);
  }

  protected Control createContents(Composite parent)
  {
    getShell().setText("Action/Contribution Example");
    parent.setSize(290,150);
    aci.fill(parent);   3 Create button
    return parent;        within window
  }

  public static void main(String[] args)
  {
    Ch4_Contributions swin = new Ch4_Contributions();
    swin.setBlockOnOpen(true);
    swin.open();
    Display.getCurrent().dispose();
  }

  protected MenuManager createMenuManager()
  {
    MenuManager main_menu = new MenuManager(null);
    MenuManager action_menu = new MenuManager("Menu");
    main_menu.add(action_menu);
    action_menu.add(status_action);   1 Assign status_action
    return main_menu;                   contribution
  }

  protected ToolBarManager createToolBarManager(int style)
  {
    ToolBarManager tool_bar_manager = new ToolBarManager(style);
    tool_bar_manager.add(status_action);   1
    return tool_bar_manager;
  }

  protected StatusLineManager createStatusLineManager()
  {
    return slm;
  }
}
The only difference between this JFace application and those in prior chapters is the introduction of actions and contributions.
-
 Beneath the class declaration, the program constructs an instance of the Ch4_StatusAction with a StatusLineManager object as its argument. Then, it creates an ActionContributionItem object and identifies it with the Ch4_StatusAction instance. This contribution has no form yet, but is simply a high-level means of connecting an action to the user interface.
-
 The constructor method creates an ApplicationWindow object and adds a menu, toolbar, and status line.
-
 The createContents() method sets the title and size of the window and then invokes aci.fill(). This method is important since it places the ActionContributionItem object in the GUI. In this case, because the fill() argument is a Composite object, the contributor takes the form of a button that triggers a StatusEvent whenever it’s pressed.
The last three methods in Ch4_Contributions are also straightforward. The main() method takes care of creating and opening the window and then disposing of the GUI resources. Then, the createMenuManager() method creates a menu instance at the top of the window. Because it’s a subclass of ContributionManager, an Action object can be associated with it, and the status_action object is added with the add() method. This method is also used in the createToolBarManager() method to associate the action instance. In both cases, an ActionContributionItem is implicitly created and added to the menu in the form of a menu item and to the toolbar as a toolbar item.
The createContents() method sets the title and size of the window and then invokes aci.fill(). This method is important since it places the ActionContributionItem object in the GUI. In this case, because the fill() argument is a Composite object, the contributor takes the form of a button that triggers a StatusEvent whenever it’s pressed.
The last three methods in Ch4_Contributions are also straightforward. The main() method takes care of creating and opening the window and then disposing of the GUI resources. Then, the createMenuManager() method creates a menu instance at the top of the window. Because it’s a subclass of ContributionManager, an Action object can be associated with it, and the status_action object is added with the add() method. This method is also used in the createToolBarManager() method to associate the action instance. In both cases, an ActionContributionItem is implicitly created and added to the menu in the form of a menu item and to the toolbar as a toolbar item.
Figure 4.5 shows the user interface of Ch4_Contributions. The status line at the bottom keeps a running count of the number of Ch4_StatusActions that trigger.
Figure 4.5. Ch4_Contributions. This application shows the three ways a ContributionItem can be incorporated in a window.

4.2.4. Interfacing with contributions
There are two main ways of incorporating an ActionContributionItem in a GUI. The first method is to use the add() method of a ContributionManager subclass, as performed by the MenuManager and ToolBarManager in the Ch4_Contributions application. The second is to use the fill() method associated with the Action-ContributionItem class and add an SWT widget as its argument. If the argument is a Composite, as in Ch4_Contributions, then the contributor will appear as determined by the STYLE property of the action. If the argument is an SWT Menu object, then the contributor will take the form of a menu item. Finally, if the argument is an SWT ToolBar object, then the contributor will appear as an item in a toolbar. The characteristics of the fill() method are shown in table 4.6.
Table 4.6. Overloaded fill() methods of the ActionContributionItem and their associated appearances
|
fill() method |
GUI implementation (appearance) |
|---|---|
| fill(Composite) | According to Action's STYLE property |
| fill(Menu, index) | MenuItem with index position |
| fill(ToolBar, index) | ToolBarItem with index position |
An interesting characteristic of the ContributionManager class is that its add() method is overloaded to accept arguments of both Action and ActionContribution-Item classes. So, you can associate a ContributionItem with a ContributionManager implicitly (with the Action) or explicitly (with the ActionContributionItem). But there’s a fundamental difference: You can perform implicit contribution association repeatedly with the same Action object, as shown in the Ch4_Contributions class. Explicit contribution association can be performed only once.
4.2.5. Exploring the Action class
Although Ch4_StatusAction was simple to code and understand, you need to keep in mind many more aspects of the Action class. The Action class contains a large number of methods to enhance the capability of your user interface. These have been divided into categories and listed in the tables that follow.
The first set of methods, shown in table 4.7, is important in any implementation of the Action class. The first and most important method is run(). As we mentioned earlier, this is the single event-handling routine in an Action class, and it’s invoked every time the action is triggered. The next method in the table serves as the default constructor. In addition, constructor methods initialize the member fields associated with the Action class, which we’ll fully describe shortly.
Table 4.7. Important methods of the Action class
|
Action method |
Function |
|---|---|
| run() | Performs event processing associated with the Action |
| Action() | Default constructor |
| Action(String) | Constructor that initializes the TEXT field |
| Action(String, ImageDescriptor) | Constructor that initializes the TEXT field and associates an image with the Action |
| Action(String, int) | Constructor that sets the TEXT and STYLE fields |
As shown in the Ch4_StatusAction code sample, an instance of the Action class contains a number of fields that provide information about displaying the Action in a GUI. You can access and manipulate these fields using the methods listed in table 4.8. The TEXT field, set and accessed by the first two methods, contains a String that displays a title or menu item description in a contributor. The next two deal with the DESCRIPTION field, which is generally written to a status line to provide additional help. When the user rests the pointer on a contributor, the String in the TOOL_TIP_TEXT field is shown. The last two methods in this table set and access the IMAGE property of the Action class, which contains a String representing an object of the ImageDescriptor class. As we’ll further explain in chapter 7, an ImageDescriptor isn’t an image, but an object that holds information needed to create one.
Table 4.8. Property methods for the Action class
|
Action property method |
Function |
|---|---|
| setText(String) | Sets the TEXT field |
| getText() | Returns the TEXT field |
| setDescription(String) | Sets the DESCRIPTION field |
| getDescription() | Returns the DESCRIPTION field |
| setToolTipText(String) | Sets the TOOL_TIP_TEXT field |
| getToolTipText() | Returns the TOOL_TIP_TEXT field |
| setImageDescriptor(ImageDescriptor) | Sets the IMAGE field |
| getImageDescriptor() | Returns the IMAGE field |
The final field contained in the Action class is the STYLE. This integer value is set by a constructor and accessed through the getStyle() method listed at the top of table 4.9. The next two methods, setEnabled() and getEnabled(), determine whether the component(s) associated with the Action object can be acted on by the user. If not, they are grayed out by default. The final methods, setChecked() and isChecked(), are useful if the Action is associated with a radio button or checkbox. They’re used to set the default state of the button or determine whether the user has checked it.
Table 4.9. Style methods for the Action class
|
Action style method |
Function |
|---|---|
| getStyle() | Returns the STYLE field |
| setEnabled(boolean) | Sets the ENABLED field |
| getEnabled() | Returns the ENABLED field |
| setChecked(boolean) | Sets the CHECKED field |
| isChecked(void) | Returns the CHECKED field |
Table 4.10 shows the methods that deal with accelerator keys and keyboard conversion. Accelerator keys are keyboard shortcuts that accomplish the same function as a mouse click. As mentioned in section 4.1.4, pressed keys are represented in SWT with integer key codes, which include all alphanumeric keys and modifier keys (Alt, Ctrl, Shift, Command). The first method creates an accelerator key for the Action object and associates it with an SWT key code. The next method provides the key code for the Action’s accelerator key. The next two methods convert back and forth between an accelerator key’s key code and its String representation. The removeAcceleratorKey() method parses text and deletes occurrences of the Action’s accelerator key. The last four methods in the table provide conversion between Strings representing keyboard characters and modifier keys, and their SWT code representations.
Table 4.10. Accelerator key / keyboard methods for the Action class
|
Keyboard method |
Function |
|---|---|
| setAccelerator(int) | Set the key code as the Action’s accelerator key |
| getAccelerator() | Returns the key code for the Action’s accelerator key |
| convertAccelerator(int) | Converts the accelerator key to a String |
| convertAccelerator(String) | Converts the String to an accelerator key |
| removeAcceleratorText(String) | Removes the accelerator keys from a given String |
| findKeyCode(String) | Converts the key name to an SWT key code |
| findKeyString(int) | Converts the key code to a key name |
| findModifier(String) | Converts the modifier name to a modifier key code |
| findModifierString(int) | Converts the modifier key code to a modifier name |
Although JFace uses actions to replace the SWT listener/event mechanism, the Action class can still incorporate listeners for special-purpose event handling. These methods are shown in table 4.11; they mainly concern the IPropertyChangeListener interface. This interface pays attention to user-customized PropertyChangeEvents, which fire whenever a given Object changes into a different Object in a manner you describe. Although dealing with property changes may seem complicated, they let you create custom listener/event relationships instead of being limited to those provided by SWT.
Table 4.11. Listener methods for the Action class
|
Action listener method |
Function |
|---|---|
| addPropertyChangeListener (IPropertyChangeListener) | Associates a property change listener with the Action |
| removePropertyChangeListener (IPropertyChangeListener) | Removes a property change listener from the Action |
| firePropertyChange(Event) | Changes a property according to an event |
| firePropertyChange (String, Object, Object) | Changes a property according to old and new objects |
| setHelpListener(HelpListener) | Associates a help listener with the Action |
| getHelpListener() | Returns a help listener associated with the Action |
The first two methods in table 4.11 take care of associating and disassociating PropertyChangeListeners. You can use the next two methods to test these listeners by triggering property changes, based on a precreated event class or a specified change in a given Object. The final methods in this table relate to HelpListeners, which deal with the user’s attempt to obtain information concerning a given component.
Table 4.12 lists a group of diverse methods contained in the Action class. The first four are used to obtain and access identifiers for both the Action class and its definition. The next two, setMenuCreator() and getMenuCreator(), work with IMenu-Creator interfaces that can be associated with an Action object. This interface provides a simple way of creating a drop-down or pop-up menu when a particular action triggers. The last four methods concern more images that can be linked to an action. When an Action’s ENABLED field is set to FALSE, you can specify which image will represent the action by using the setDisabledImageDescriptor() method and retrieve the image with the getDisabledImageDescriptor() method. Also, if you want to change an image while a pointer hovers above it, the setHoverImageDescriptor() method will set this property.
Table 4.12. Miscellaneous methods of the Action class
|
Method |
Description |
|---|---|
| setID(String) | Sets an Action identifier |
| getID() | Returns an Action identifier |
| setActionDefinitionID(String) | Sets an Action definition identifier |
| getActionDefinitionID() | Returns an Action definition identifier |
| setMenuCreator(IMenuCreator) | Sets a menu creator for the Action |
| getMenuCreator() | Returns a menu creator for the Action |
| setDisabledImageDescriptor(ImageDescriptor) | Sets the disabled Action image |
| getDisabledImageDescriptor() | Returns the disabled Action image |
| setHoverImageDescriptor(ImageDescriptor) | Sets the mouse-hovering image |
| getHoverImageDescriptor() | Returns the mouse hovering image |
With these methods, the JFace toolset broadens the functionality of the Action class far beyond the simple Ch4_StatusAction class. Although you may not need all of them, it’s important to know how they function and how they can be used in applications.
4.3. Updating the WidgetWindow
To continue populating the WidgetWindow application, this chapter provides a Composite subclass containing widgets that receive and respond to user actions. This will incorporate code presented earlier in the chapter.
4.3.1. Building the chapter 4 Composite
Listing 4.4 presents the Ch4_Composite class, which subclasses the Ch4_MouseKey class from section 4.1 and launches the Ch4_Contributions class developed in section 4.2. We recommend that you add this class to the com.swtjface.Ch4 package.
Listing 4.4. Ch4_Composite.java
package com.swtjface.Ch4;
import org.eclipse.swt.*;
import org.eclipse.swt.widgets.*;
import org.eclipse.swt.events.*;

public class Ch4_Composite extends Ch4_MouseKey
{
  public Ch4_Composite(Composite parent)
  {
    super(parent);
    Button launch = new Button(this, SWT.PUSH);
    launch.setText("Launch");
    launch.setLocation(40,120);
    launch.pack();
    launch.addMouseListener(new MouseAdapter()
    {
      public void mouseDown(MouseEvent e)
      {
        Ch4_Contributions sw = new Ch4_Contributions();
        sw.open();
      }
    });
  }
}
The operation of Ch4_Composite is simple to understand. By extending the Ch4_MouseKey class, it incorporates the typed and untyped SWT listeners associated with that Composite. It also adds a third button labeled Launch. When clicked, this button creates an instance of the JFace window that uses actions and contributors to perform event processing.
4.3.2. Adding Ch4_Composite to the WidgetWindow
Next a tab is added to the WidgetWindow Tabfolder that comprises the Composite created in this chapter. The code for the main WidgetWindow application is shown in listing 4.5, with the lines added in this chapter in boldface.
Listing 4.5. The updated WidgetWindow
package com.swtjface.Ch2;

import org.eclipse.swt.*;
import org.eclipse.swt.widgets.*;
import org.eclipse.jface.window.*;

import com.swtjface.Ch3.*;
import com.swtjface.Ch4.*;

public class WidgetWindow extends Window {

  public WidgetWindow() {
    super(null);
  }

  protected Control createContents(Composite parent) {
    TabFolder tf = new TabFolder(parent, SWT.NONE);

    TabItem chap3 = new TabItem(tf,SWT.NONE);
    chap3.setText("Chapter 3");
    chap3.setControl(new Ch3Comp(tf));

    TabItem chap4 = new TabItem(tf,SWT.NONE);
    chap4.setText("Chapter 4");
    chap4.setControl(new Ch4_Composite(tf));
    getShell().setText("Widget Window");
    return parent;
  }

  public static void main(String[] args) {
    WidgetWindow wwin = new WidgetWindow();
    wwin.setBlockOnOpen(true);
    wwin.open();
    Display.getCurrent().dispose();
  }
}
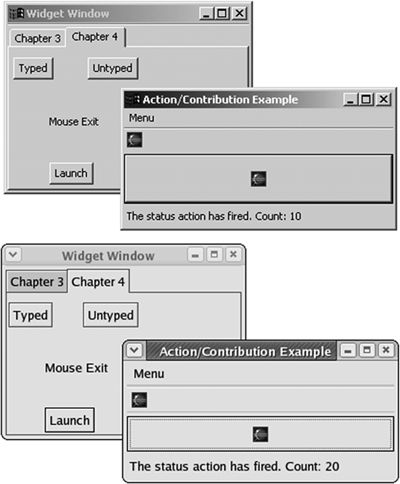
Once updated, the WidgetWindow should appear similar to the GUI shown in figure 4.6. Ch4_Contributions appears when the Launch button is clicked.
Figure 4.6. The updated WidgetWindow
4.4. Summary
Event handling is simple in theory but complicated in practice. It’s obvious that when a user clicks a button or enters text, a software routine should respond. But the process of keeping track of which widget fired the event, what type of event occurred, and which software routine should execute isn’t obvious and requires effort. To an extent, the degree of effort depends on the toolset. If the toolset provides processing of as many events as possible, for as many widgets as possible, then you’ll pay for this vast scope by having to comply with a complicated code structure.
This is the situation with SWT’s event model. Because there are so many different types of events, you need tables 4.1 and 4.5 in order to write responsive code. So many methods are available for responding to events that a separate adapter class becomes necessary. This event processing demands a fair amount of understanding, but when you need to keep track of right-click events and whether the user can traverse a widget, SWT is the best toolset available.
The developers of JFace, on the other hand, used the Pareto Rule in designing the toolset. This rule, applied to GUI programming, states that 80% of the code needed for event processing will deal with only 20% of the available events. Similarly, the majority of these events will be fired by a small set of widgets. By following these rules, the developers of JFace concluded that there is no need for listeners, adapters, or widgets. Instead, JFace performs event processing with actions, which are triggered when a user interfaces the GUI, and contributors, which can take multiple forms but trigger a single action.
Clearly, a user interface of any complexity must incorporate both event-processing methods. Although JFace will provide rapid coding for menus, toolbars, and buttons, SWT is needed to process keyboard actions as well as events related to widgets like Shells and tables. Also, JFace’s classes won’t help you when you need to distinguish between a left click and a right click. Therefore, a GUI developer seeking to provide a maximum of capability with a minimum of code should be familiar with both toolsets.
As shown by the tables in this chapter, effective event programming depends on keeping track of a myriad of rules, classes, and details. Because of this complexity, we thought long and hard about where to present this material in this book. We first planned to present the SWT/JFace event model in the later chapters, but then all of the preceding code would be static. So, to ensure that future code examples will be more helpful to readers, we decided to introduce this convoluted subject early on.
Let’s start building dynamic GUIs!