
Chapter 12. Advanced features
By now, you should be familiar with everything you need to build a working application using SWT and JFace. We’ve covered the essential widgets, shown you how to easily position them on the screen, and discussed the issues to keep in mind to ensure a well-designed piece of software. However, you’ll want to become familiar with a few miscellaneous topics as your use of SWT increases.
This chapter covers a variety of issues. We’ll start by discussing how to transfer data to and from the underlying operating system, and we’ll show how to use this capability to implement drag-and-drop and copy-and-paste functionality in your applications. Next we’ll discuss two frameworks provided by SWT for managing user preferences and enhancing how your labels are displayed by the viewer classes. Finally, we’ll close with a brief look at a new widget provided in SWT 3.0, the Browser, which enables you to control the user’s web browser from within your application.
Because some of these classes are designed around interacting directly with the underlying operating system, there are differences in how they function on different platforms. In addition, some widgets aren’t fully supported on all platforms at the current time. We’ll point out these platform-specific gotchas as we go along.
12.1. Transferring data
Although you may not notice it, almost any application you use is constantly shuffling data back and forth behind the scenes. Every time you cut and paste, the application must interact with the system clipboard, where data is stored temporarily. Dragging and dropping items requires similar communication, because the application needs to let the system know what kind of data formats it can provide as well as whether it will accept any given data type.
SWT handles many of the common cases automatically. For example, you saw in earlier chapters that it’s possible to cut and paste text from a text control using the standard keyboard shortcuts for your operating system. However, you need to handle this work yourself if you wish to support drag-and-drop operations or cutting and pasting with application-specific formats. This section will cover how to do so, as we build a primitive file browser that supports dragging, dropping, and copy-and-paste operations both internally and interacting with the native operating system tools.
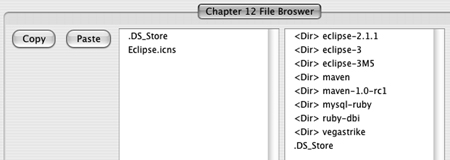
Before we get too deep into the technical details, look at figure 12.1, which shows what we’re about to build. Two ListViewers are used, each displaying the contents of a certain directory. Dragging a file or files from one to the other will cause a corresponding file copy on disk. The Copy and Paste buttons copy the current selection in the left list to the system clipboard or paste files from the clipboard to the directory currently displayed in the left list, respectively.
Figure 12.1. The File Browser, displaying the contents of two different directories
12.1.1. The Transfer class
In order for data to be moved or copied between elements, there must be a way for those elements to agree on what format that data is in. If the application doesn’t understand a given format, it won’t make sense to try to import it—for example, there is no way for a text editor to handle an image that’s dropped into it. SWT provides a relatively simple way for elements to negotiate what data formats are acceptable through the use of the Transfer class and its subclasses.
Each subclass of Transfer represents a certain type of data and knows how to convert that data between a Java representation and one that makes sense to the underlying operating system. SWT ships with Transfer subclasses to handle files, plain text, and text in Rich Text Format (RTF). If none of these meets your needs, you can write your own Transfer implementation, although doing so is beyond the scope of this book. Consult the Javadocs for org.eclipse.swt.dnd.Transfer and org.eclipse.swt.dnd.ByteArrayTransfer if you need a custom implementation.
For our purposes, we can treat the Transfer instances as black boxes that represent certain data types. Each subclass has a static factory method getInstance() to obtain an instance of the class. We can pass these instances around to designate what data types we’re interested in, but we never need to call any methods on them ourselves. Under the hood, SWT calls javaToNative() and nativeToJava() when appropriate to transform data.
Table 12.1 shows the default general-purpose transfer agents that SWT provides.
Table 12.1. Default transfer agents provided by SWT
|
Description |
|
|---|---|
| FileTransfer | Transfers one or more files. Data is an array of Strings, each of which is the path to a file or directory. |
| TextTransfer | Transfers plain text. Data is a String. |
| RTFTransfer | Transfers text in RTF. Data is a String with rich text formatting. |
12.1.2. Drag-and-drop capability
Allowing a user to drag an item from its current location to wherever they wish it to be can help make your application’s interface intuitive and easy to use. However, to accomplish this, a fair amount of work must go on behind the scenes. First, your application must make the system aware of the kinds of data it can provide or knows how to accept. These data types are configured separately for each widget—just because an object can accept objects dropped into it doesn’t imply that it can provide data to be dragged out. Once the system is aware of the capabilities of the various widgets in your application, those widgets will receive events when a drag or drop occurs that it must use to implement appropriate logic.
Types of drag-and-drop operations
When a user drags an item from one place to another, there are typically multiple ways the action can be interpreted—for example, as either a copy or a move. Each operating system has different keyboard conventions that are used to toggle between these operations. However, your widgets also need to tell SWT what operations they support. A read-only display may support copying items by dragging them out but may not allow the user to move them. Support for these operations is designated by using constants from the org.eclipse.swt.dnd.DND class, summarized in table 12.2.
Table 12.2. Types of transfer operations
|
Operation constant |
Description |
|---|---|
| DROP_COPY | The item is copied when dragged in or out of this control. |
| DROP_MOVE | The item is moved from its current location to wherever it’s dropped. |
| DROP_LINK | Dropping the item creates a link back to the original. |
| DROP_NONE | Nothing happens when the item is dropped. |
Dropping items into an application
You can register a control to be able to receive dropped data by using an instance of DropTarget. DropTarget stores both the type of data a widget can select and the operations that are legal to perform on that widget. The operating system uses this information to provide visual feedback as to whether an item may be dropped when it’s dragged over the widget. Once the target has been registered, any DropTargetListeners will receive DropTargetEvents when the user attempts to drop something within the control.
Creating a DropTarget is simple. You instantiate it with a widget and a set of operations, and you set the allowed data types by calling setTransfer(). A listener is then attached, which contains the logic to execute when something is dropped. The following snippet demonstrates:
int operations = DND.DROP_MOVE | DND.DROP_COPY;
DropTarget target = new DropTarget(control, operations);
Transfer[] transfers = new Transfer[] {
   TextTransfer.getInstance(),
   RTFTransfer.getInstance() };
target.setTransfer(transfers);
target.addDropListener( new DropTargetListener(){...} );
If you’re working with a viewer, you must call the method addDropSupport() on the viewer instance instead of attempting to manipulate the control directly. The next snippet, taken from our file browser example, shows how we add support for dropping files into a list viewer:
Transfer[] types = new Transfer[] {
  FileTransfer.getInstance()
};

viewer.addDropSupport(DND.DROP_COPY,
                      types,
                      new FileDropListener(this));
The registration process isn’t complicated. The most important part is implementing the DropTargetListener interface. The methods in this interface are called in the following specific order as the user drags an item into a control:
- dragEnter()— The cursor has entered the boundaries of the control while dragging an item.
- dragOver()— The cursor is moving across the control, dragging an item.
- dragOperationChanged()— This method may be called multiple times during the operation, whenever the user changes the type of operation to be performed. This occurs most often when the user presses or releases a modifier key, such as Ctrl or Option.
- dropAccept()— The user has dropped an item in the control. This is the application’s last chance to reject the drop or to change the type of operation being performed.
- drop()— The data has been dropped. The listener must implement the appropriate logic to handle the data it has been given.
Each method is given a DropTargetEvent containing information about the current operation. Most important, this event contains a list of data types that the data source can support, the current data type that will be dropped, the operations available to be performed, and the current operation to be performed. You can change the data type to be used and the operation to be performed by modifying the currentDataType and detail fields, respectively.
A sixth method, dragLeave(), may be called at any time before dropAccept(). This method lets the application know that the user has moved the cursor outside of the control and that no drop will occur.
Unless you need to dynamically change the data type or operation, the only method for which you need to implement logic is drop(). SWT and the operating system handle the other details; if a suitable agreement on data type and operation can’t be reached, the drop won’t be allowed, and your listener won’t receive the events. Listing 12.1 shows how we implemented a DropTargetListener for the file browser example.
Listing 12.1. FileDropListener.java
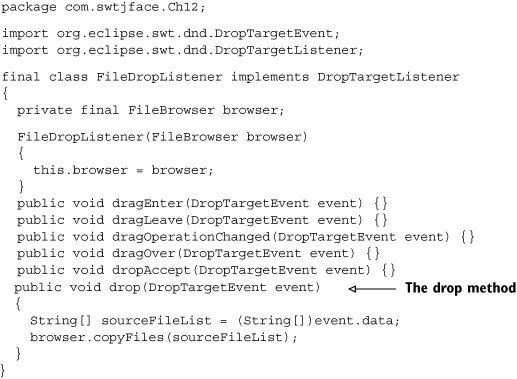
The logic to implement the drop operation is simple. We only support the file transfer type, so when this method is called it’s safe to assume that the data type is FileTransfer, which provides the data as an array of Strings. If we supported other data types, we would need to add conditional logic to react differently depending on the data type. Likewise, we can assume that the operation is a copy. Therefore, all our listener needs to do is extract the list of filenames and tell the FileBrowser component to copy them.
Dragging items from your application
Allowing data to be dragged from your application follows a process similar to what you just saw. A DragSource is created to register the control as a source of data. An implementation of DragSourceListener receives events when the user starts a drag operation and is responsible for implementing the logic once the item(s) have been dropped. The registration code looks almost identical. The first snippet shows how to create a DragSource by hand:
int operations = DND.DROP_MOVE | DND.DROP_COPY;
DragSource source = new DragSource(control, operations);
Transfer[] transfers = new Transfer[] {
   TextTransfer.getInstance(),
   RTFTransfer.getInstance() };
source.setTransfer(transfers);
source.addDragListener( new DragSourceListener(){...} );
Just like for a DropTarget, when you’re using a viewer a method on the viewer handles some of the work for you. The next excerpt shows the drag registration in the file browser example:
Transfer[] types = new Transfer[] {
  FileTransfer.getInstance()
};
...
viewer.addDragSupport(DND.DROP_COPY,
                      types,
                      new FileDragListener(this));
The DragSourceListener interface is much simpler than the one to handle drops; it consists of only three methods, called in the following order:
- dragStart()— The user has started dragging data from this control. If the drag should be allowed to proceed, the doit field of the event must be set to true.
- dragSetData()— A drop has been performed. This method must supply the data to be dropped by putting it in the event’s data field.
- dragFinished()— The drop has completed successfully. Any cleanup remaining to be done, such as deleting the original data for a move operation, should be performed here.
Each method receives a DragSourceEvent with data about the drag. Unlike the DropTargetEvent, this event may not be modified except as noted.
Listing 12.2 shows how we implement this listener in the filesystem browser.
Listing 12.2. FileDragListener.java
package com.swtjface.Ch12;

import org.eclipse.swt.dnd.DragSourceEvent;
import org.eclipse.swt.dnd.DragSourceListener;

public class FileDragListener implements DragSourceListener
{
  private FileBrowser browser;

  public FileDragListener(FileBrowser browser)
  {
    this.browser = browser;
  }

  public void dragStart(DragSourceEvent event)
  {
    event.doit = true;   1  Drag has started
  }

  public void dragSetData(DragSourceEvent event)
  {
    event.data = browser.getSelectedFiles();    2  Provide data to be
  }                                                transferred

  public void dragFinished(DragSourceEvent event) {}    3  Clean up
}
-
 This method is called when the user attempts to drag an item from the control. If this drag should be allowed, the doit field must be set to true. Our example always allows drags, so we always set this field to true.
-
 The item has been dropped in a receiver, and data must be provided. This data must match what is expected by the current data
type, obtained from the dataType field. We only support FileTransfers, so our implementation gets the currently selected files from the browser and inserts them into the event.
The item has been dropped in a receiver, and data must be provided. This data must match what is expected by the current data
type, obtained from the dataType field. We only support FileTransfers, so our implementation gets the currently selected files from the browser and inserts them into the event.
-
 The operation has completed successfully. If the operation was a move, the original data should be deleted. Likewise, if any
cleanup is associated with the other operation types, it should be performed in this method. Because our example only supports
copying, our implementation is empty.
The operation has completed successfully. If the operation was a move, the original data should be deleted. Likewise, if any
cleanup is associated with the other operation types, it should be performed in this method. Because our example only supports
copying, our implementation is empty.
12.1.3. Using the clipboard
The process of copying data to or from the system clipboard has some similarities to dragging and dropping. It also uses Transfer subclasses to copy data to or from the operating system. The primary difference is that it isn’t necessary to register in advance to use the system clipboard, as it is when you’re dragging or dropping. Any time your application decides to cut, copy, or paste, usually in response to an Action of some sort, it can access the clipboard using the org.eclipse.swt.dnd.Clipboard class and do whatever it needs to do.
Each instance of Clipboard is created with a Display. Remember that on some platforms, accessing the clipboard may use native resources. It’s therefore critical that you use dispose() to discard the Clipboard as soon as you’ve finished using it.
Putting data into the clipboard
Placing data on the system clipboard is a simple method call, setContents(). All it must do is pass the data, along with suitable Transfers to interpret it. This snippet shows how this is done for our filesystem browser:
Clipboard clipboard = new Clipboard(getDisplay());
FileTransfer transfer = FileTransfer.getInstance();
clipboard.setContents(
  new Object[] { browser.getSelectedFiles()},
  new Transfer[] { transfer });
clipboard.dispose();
Notice that we pass both an Object array and a Transfer array. These arrays must be the same size, and the Transfer instance at index i must be able to handle the Object at index i in the Object array. This way, all data in all supported formats is placed on the clipboard at once, and your application doesn’t need to worry about when it’s removed.
Although our example implements a copy operation, not a cut, the Clipboard doesn’t care. It accepts the data; whether that data should be removed from its original source is up to the application and must be implemented separately.
Pasting data from the clipboard
Likewise, copying data from the clipboard is a simple process. When your application wishes to retrieve data that is currently stored in the clipboard, it can use two methods.
getAvailableTypeNames() returns an array of Strings with the names of all data types that the clipboard can currently provide. These values are operating-system dependent, and the String returned for a given data type will vary from platform to platform. Hence, this method is intended as a debugging aid and shouldn’t be used in production code. However, when you’re debugging and trying to figure out what data is currently on the clipboard, this method is invaluable.
getContents() takes a Transfer and returns the data from the clipboard in the format given by that Transfer, or null if no data can be provided in the given format. If your application supports multiple data formats, you’ll typically call getContents() repeatedly, passing a different Transfer type each time, until you find data that you can handle.
This code implements a paste in the file browser example:
Clipboard clipboard = new Clipboard(getDisplay());
FileTransfer transfer = FileTransfer.getInstance();

Object data = clipboard.getContents(transfer);
if (data != null)
{
  browser.copyFiles((String[]) data);
}
clipboard.dispose();
You should always check for null after calling getContents(). It’s always possible that the data currently on the clipboard can’t be converted to a format your application understands, or that the clipboard is empty. Forgetting to check will eventually lead to NullPointerExceptions, which users never appreciate.
12.1.4. The filesystem browser
You’ve seen all the code our file browser uses to interact with the operating system. Some snippets have been presented out of context, however, and you haven’t seen the FileBrowser class itself. For completeness, we’ll present listings for the remaining code needed to compile and run this example.
First, listing 12.3 shows the Composite that builds the visual components. This class instantiates the visual controls and attaches listeners to the two buttons to handle the copy and paste logic when the buttons are clicked.
Listing 12.3. Ch12FileBrowserComposite.java
package com.swtjface.Ch12;

import org.eclipse.swt.SWT;
import org.eclipse.swt.dnd.*;
import org.eclipse.swt.events.SelectionEvent;
import org.eclipse.swt.events.SelectionListener;
import org.eclipse.swt.layout.RowLayout;
import org.eclipse.swt.widgets.Button;
import org.eclipse.swt.widgets.Composite;

public class Ch12FileBrowserComposite extends Composite
{

  private FileBrowser browser;

  public Ch12FileBrowserComposite(Composite parent)
  {
    super(parent, SWT.NONE);

    RowLayout layout = new RowLayout(SWT.HORIZONTAL);
    setLayout(layout);

    Button copyButton = new Button(this, SWT.PUSH);
    copyButton.setText("Copy");
    copyButton.addSelectionListener(new SelectionListener()
    {

      public void widgetSelected(SelectionEvent e)
      {
        Clipboard clipboard = new Clipboard(getDisplay());

        FileTransfer transfer = FileTransfer.getInstance();
        clipboard.setContents(
          new Object[] { browser.getSelectedFiles()},
          new Transfer[] { transfer });
        clipboard.dispose();
      }

      public void widgetDefaultSelected(SelectionEvent e) {}
    });

    Button pasteButton = new Button(this, SWT.PUSH);
    pasteButton.setText("Paste");
    pasteButton.addSelectionListener(new SelectionListener()
    {
      public void widgetSelected(SelectionEvent e)
      {
        Clipboard clipboard = new Clipboard(getDisplay());
        FileTransfer transfer = FileTransfer.getInstance();

        Object data = clipboard.getContents(transfer);
        if (data != null)
        {
          browser.copyFiles((String[]) data);
        }
        clipboard.dispose();
      }

      public void widgetDefaultSelected(SelectionEvent e) {}
    });

    browser = new FileBrowser(this);
    new FileBrowser(this);
  }
}
Next, listing 12.4 shows the FileBrowser class. Each instance of FileBrowser creates and manages a ListViewer. A ContentProvider reads the contents of the current directory, and we add a sorter and a LabelProvider to make the display clearer. (We covered the use of these components in chapters 8 and 9, so we won’t discuss them in detail here.) FileBrowser also contains public methods to retrieve the list of currently selected files and to copy a list of files into the current directory. This code isn’t SWT related; if you’re unfamiliar with what’s going on, we recommend consulting the documentation for the java.io package.
Listing 12.4. FileBrowser.java
package com.swtjface.Ch12;

import java.io.*;
import java.util.*;

import org.eclipse.jface.viewers.*;
import org.eclipse.swt.dnd.*;
import org.eclipse.swt.widgets.Composite;

public class FileBrowser
{
  private ListViewer viewer;
  private File currentDirectory;

  public FileBrowser(Composite parent)
  {
    super();
    buildListViewer(parent);

    Transfer[] types = new Transfer[] {
      FileTransfer.getInstance()
    };

    viewer.addDropSupport(DND.DROP_COPY,
                          types,
                          new FileDropListener(this));
    viewer.addDragSupport(DND.DROP_COPY,
                          types,
                          new FileDragListener(this));
  }

  private void buildListViewer(Composite parent)
  {
    viewer = new ListViewer(parent);
    viewer.setLabelProvider(new LabelProvider()
    {
      public String getText(Object element)
      {
        File file = (File) element;
        String name = file.getName();
        return file.isDirectory() ? "<Dir> " + name : name;
      }
    });

    viewer.setContentProvider(new IStructuredContentProvider()
    {
      public Object[] getElements(Object inputElement)
      {
        File file = (File) inputElement;
        if (file.isDirectory())
        {
          return file.listFiles();
        }
        else
        {
          return new Object[] { file.getName()};
        }
      }

      public void dispose()
      {
      }

      public void inputChanged(Viewer viewer,
                               Object oldInput,
                               Object newInput)
      {
      }
    });
    viewer.setSorter(new ViewerSorter()
    {

      public int category(Object element)
      {
        return ((File) element).isDirectory() ? 0 : 1;
      }

      public int compare(Viewer viewer, Object e1, Object e2)
      {
        int cat1 = category(e1);
        int cat2 = category(e2);
        if (cat1 != cat2)
          return cat1 - cat2;

        return ((File) e1).getName().compareTo(
                  ((File) e2).getName());
      }
    });

    viewer.addDoubleClickListener(new IDoubleClickListener()
    {
      public void doubleClick(DoubleClickEvent event)
      {
        IStructuredSelection selection =
          (IStructuredSelection) event.getSelection();
        setCurrentDirectory((File) selection.getFirstElement());
      }
    });

    setCurrentDirectory(File.listRoots()[0]);
  }

  private void setCurrentDirectory(File directory)
  {
    if (!directory.isDirectory())
      throw new RuntimeException(
        directory + " is not a directory!");

    currentDirectory = directory;
    viewer.setInput(directory);
  }

  String[] getSelectedFiles()
  {
    IStructuredSelection selection =
      (IStructuredSelection) viewer.getSelection();
    List fileNameList = new LinkedList();
    Iterator iterator = selection.iterator();
    while (iterator.hasNext())
    {
      File file = (File) iterator.next();
      fileNameList.add(file.getAbsoluteFile().toString());
    }
    return (String[]) fileNameList.toArray(
      new String[fileNameList.size()]);
  }

  void copyFiles(String[] sourceFileList)
  {
    for (int i = 0; i < sourceFileList.length; i++)
    {
      File sourceFile = new File(sourceFileList[i]);
      if (sourceFile.canRead() && currentDirectory.canWrite())
      {
        File destFile =
          new File(currentDirectory, sourceFile.getName());
        if (!destFile.exists())
        {
          FileOutputStream out;
          FileInputStream in;
          try
          {
            out = new FileOutputStream(destFile);
            in = new FileInputStream(sourceFile);
            byte[] buffer = new byte[1024];
            while ((in.read(buffer)) != -1)
            {
              out.write(buffer);
            }
            out.flush();
            out.close();
            in.close();
            viewer.refresh();
          }
          catch (FileNotFoundException e)
          {
            e.printStackTrace();
          }
          catch (IOException e)
          {
            e.printStackTrace();
          }
        }
        else
        {
          System.out.println(
            destFile + " already exists, refusing to clobber");
        }
      }
      else
      {
        System.out.println(
          "Sorry, either your source file is not readable " +
          "or the target directory is not writable");
      }
    }
  }
}
To run this code, add the following lines to WidgetWindow:
TabItem ch12Files = new TabItem(tf, SWT.NONE);
ch12Files.setText("Chapter 12" File Broswer");
ch12Files.setControl(new Ch12FileBrowserComposite(tf));
12.2. Preferences
Any nontrivial application has settings the user may configure. Although the specific options that may be modified are limitless and tightly tied to the specific application, the process of setting these options can generally be boiled down to a few interactions such as clicking a checkbox, choosing from a list, or choosing a target directory. JFace provides a framework to simplify storing a user’s preferences, retrieving them, and presenting them to the user to be modified.
Like most areas of JFace, the preference framework is divided into a series of interfaces, each of which has a default implementation. You’re free to use the provided concrete classes, or you may implement your own from scratch to meet your specific needs. We’ll consider each interface, followed by the implementation provided by JFace.
The preferences framework is an extension of the JFace dialog framework. Only the IPreferencePage interface extends the interfaces from the dialogs package, but the assumption is that preferences will be displayed in a modal dialog. It’s possible to change this behavior if you need to by writing your own implementation of IPreferencePageContainer, which we’ll discuss later in the chapter.
12.2.1. Preference pages
Preferences are generally grouped into related sets, rather than strewn about randomly, in order to make it easier for a user to find the specific option he is looking for. In JFace, these sets are assigned to separate preference pages, which are displayed to the user one at a time. It isn’t necessary to split up your settings, especially if there aren’t many, but you must have at least one page.
IPreferencePage
The IPreferencePage interface extends IDialogPage. In addition to the IDialogPage methods we discussed in chapter 11, seven new methods are defined (see table 12.3).
Table 12.3. Methods defined by the IPreferencePage interface
|
Method |
Description |
|---|---|
| setContainer() | Associates an instance of IPreferencePageContainer with the page. |
| computeSize(), setSize() | Deal with the size of the control as it appears on screen. These methods are passed and return an instance of org.eclipse.swt.graphics.Point. Instead of representing an (x,y) coordinate, the fields of this Point object should be interpreted as the width and height, respectively, of the control. |
| okToLeave() | Called when the use wishes to flip to another page. Returning false prevents the user from leaving the page. |
| isValid() | Indicates whether the page is currently valid. Exactly what “valid” means is subjective, but it’s generally an indicator of whether it’s possible to leave the page or close the dialog in the current state. |
| performOk(), performCancel() | Indicate that the OK or Cancel button has been clicked, respectively. Any processing relevant to these events should be performed in these methods, both of which return a boolean indicating whether the event should be allowed to happen. |
PreferencePage
The abstract class PreferencePage forms the basis of all implementations of IPreferencePage provided by JFace. Extending from DialogPage, PreferencePage provides much of the support needed to display preferences in a dialog, including a title and an optional image.
If you’re subclassing PreferencePage directly, you must implement the abstract createControl() method to instantiate the controls necessary for the page. Again, this is the same as any other DialogPage. Two buttons, Apply and Defaults, are automatically added to the parent composite of your control unless the noDefaultAndApplyButton() method is called before the control is created. Typically this will be done in the constructor of your subclass if necessary.
By default, PreferencePage returns true for okToLeave() whenever isValid() returns true. Unless you change the validity of the page using setValid(), a PreferencePage will always consider itself to be valid. This also means that a user will be allowed to flip pages or close the dialog at any time.
The performOk(), performCancel(), performApply(), and performDefaults() methods may all be overridden to react to the occurrence of the appropriate event. By default, these methods do nothing, so you need to override them if you wish your page to do anything useful.
FieldEditorPreferencePage
The only subclass of PreferencePage provided by JFace, and the only one you’ll need for the majority of cases, is FieldEditorPreferencePage. FieldEditorPreferencePage assumes that your preferences consist of a number of discrete fields that can be modified independently. The FieldEditorPreferencePage is meant to make it easy to collect all the FieldEditors necessary to edit the preferences for the page. As such, it implements and overrides all the methods from PreferencePage discussed in the previous section. Typically, you’re left with only one method that you must implement.
createFieldEditors() is called once the page is ready to lay out the editors. All the method does is add the editors to be displayed using addField(). Editors are then laid out on the displayed control in the order in which they were added.
FieldEditorPreferencePage exposes only a few public methods beyond those present in PreferencePage, and clients generally have little need to call them.
12.2.2. Field editors
A field editor is responsible for displaying and editing a single preference value. The editor can range from displaying a text field and allowing the user to type, to opening a complex dialog and allowing the user to select a valid value. JFace includes nine concrete FieldEditor subclasses, which we’ll discuss. These should cover most of your needs.
You must follow a few steps if you need to define your own FieldEditor subclass:
1. Think about the basic controls you’ll need in order for your editor to function. Implement getNumberOfControls() to return the number of controls you’ll be using. FieldEditor uses this value to figure out how to lay out your control.
2. In its implementation of createControl(), FieldEditor calls the abstract doFillIntoGrid() method. This should be implemented to instantiate your controls and add them to the Composite that’s passed to the method.
3. If your editor includes a label, FieldEditor includes built-in support for storing the label text and the label control. You should use getLabelControl(Composite parent) in this case, rather than creating your own Label.
4. Implement the doLoad(), doLoadDefault(), and doStore() methods to load values from and persist them to the PreferenceStore associated with your editor. This store can be retrieved by using the getPreferenceStore() method, which may return null if no persistent store has been configured for the editor.
In addition to implementing all the abstract methods, you can fire events when your editor’s properties change. FieldEditor provides a fireValueChanged() method, which takes a property name, the old value, and the new value and automatically invokes any registered PropertyChangeListener. This isn’t necessary if your control doesn’t have any properties that are interesting to outside listeners—most of the FieldEditor subclasses included in JFace don’t bother to fire these events, but the support is there if you need it.
Whether you’re implementing a completely new editor or using a built-in one, it can be useful to add validation to your FieldEditor. You do so by overriding both the isValid() and refreshValidState() methods. By default, isValid() always returns true, and refreshValidState() does nothing. isValid() is simple: It returns true or false according to whether your editor currently contains a value that is valid to save. refreshValidState() is slightly more complicated. This method should query isValid() and, if the value has changed, fire a value-changed event for the property FieldEditor.IS_VALID. refreshValidState() is invoked at various times by the FieldEditor framework, particularly after loading and before attempting to save values.
Implementing your own FieldEditor may sound complicated, but you shouldn’t need to do this very often. JFace provides nine types of FieldEditor (see table 12.4), and most of the time you should be able to use or subclass one of them.
Table 12.4. Field editors provided by JFace
|
Editor class |
Description |
|---|---|
| BooleanFieldEditor | Displays its preference as checkboxes, which are checked to indicate true or unchecked to indicate false. By default, the checkbox appears to the left of any supplied label, but using the style BooleanFieldEditor.SEPARATE_LABEL creates the label on the left and the checkbox on the right. |
| ColorFieldEditor | Lets the user choose a color. A button is displayed; when it’s clicked, another dialog is opened, allowing the user to see the available colors and choose one by pointing with the mouse. The chosen color is saved as an org.eclipse.swt.graphics.RGB value. |
| DirectoryFieldEditor | Lets the user choose any directory on the filesystem. A text field displays the current chosen directory. This value may be modified in place, or the displayed Browse button lets the user navigate the filesystem and choose a directory graphically. |
| FileFieldEditor | Lets the user choose a filename and location. You can filter the types of files displayed when browsing the filesystem by using the setFileExtensions() method, which takes an array of Strings. Files must match one of the extensions in this array, or they won’t be displayed. |
| FontFieldEditor | Lets the user choose a font, including size and bold or italic attributes. Clicking the Change button opens a dialog presenting all the available font options. Text demonstrating the chosen font is displayed; you can set the string to use for this text in FontFieldEditor’s constructor. The value for this editor is returned as an org.eclipse.swt.graph-ics.FontData object. |
| IntegerFieldEditor | Ensures that any entered value is an integer. You can force the entered value to be in a certain range by using the setValidRange() method. |
| PathEditor | Lets the user choose multiple directory paths. The currently selected paths are displayed in a list on the left; buttons to add, remove, or change the order of the paths are on the right. |
| RadioGroupFieldEditor | Presents a set of mutually exclusive options, forcing the user to pick exactly one of them. Labels for the available options
are specified in the constructor, along with the value to return if each one is selected. These are passed as a two-dimensional
array of Strings, as shown here:
RadioGroupFieldEditor editor = new RadioGroupFieldEditor( /*some other parameters*/, new String[][] { {"Option One", "Value1"}, {"Option Two", "Value2"} }, /*more parameters*/ ); |
| StringFieldEditor | Provides the user with a text field to enter a string of characters. This editor supports two options for validating the entered text: VALIDATE_ON_FOCUS_LOST and VALIDATE_ON_KEY_STROKE; you can toggle between them using setValidateStrategy(). By default, StringFieldEditor accepts any string as valid. To add your own validation, override the protected doCheckState() method. To limit the length of the entered text, use the setTextLimit() method. |
12.2.3. Preference page containers
Just as wizard pages are hosted by a wizard container, preference pages are displayed by a preference page container.
IPreferencePageContainer
The IPreferencePageContainer interface must be implemented by any class that wishes to host preference pages. The interface is straightforward; it has only four methods (see table 12.5).
Table 12.5. Methods defined by the IPreferencePageContainer interface
|
Method |
Description |
|---|---|
| getPreferenceStore() | Used by preference pages to retrieve a persistent store for their values |
| updateButtons(), updateMessage(), updateTitle() | Let pages request that the container update its display to match the currently active page |
Although it’s easy to implement IPreferencePageContainer if you need to, doing so generally isn’t necessary. Preference pages are typically displayed in a dialog, and PreferencePageDialog provides a default implementation that handles this case well.
IPreferencePageNode
Whereas in a wizard dialog pages are typically displayed in a set order, preference pages may be filled out in any sequence the user desires. It would be unfriendly to force a user to click through several pages of options that she isn’t interested in, just to modify one setting. However, avoiding this scenario necessitates a way to display a list of the pages to the user. A preference node fills this role.
A preference node combines a preference page with a unique ID and an optional title and image. The title and image are displayed to the user in a tree on the left side of a dialog; when one of them is clicked, the corresponding page is displayed on the right. This way, users can quickly navigate to the group of settings they’re interested in. IPreferenceNode also adds support for making one node a subnode of another with the add() method; in this case, the children are shown when the parent is expanded in the tree. PreferenceNode provides a default implementation of IPreferenceNode, and you’ll rarely need to implement the interface yourself.
Most of the methods on PreferenceNode are used by the framework. You can set a title and image when instantiating PreferenceNode. Typically the only other methods you’ll ever need to call on it are add() and remove(), to manage the children associated with a given node.
PreferenceManager
PreferenceManager is a utility class that JFace uses to organize preference nodes. It introduces the concept of a path, which is used to identify nodes in the hierarchy. A path consists of a string made up of the IDs of one or more nodes, divided by a separator character. By default, the separator is a period (.), but you can change it by passing any other character to PreferenceManager’s constructor. The string is tokenized on the separator character, and each ID is used to search starting from the root, then the children of the first node found, then the next node’s children, and so on, until the final node in the path has been found. You can add nodes at the root or as a child of any node currently in the structure, identified by its path.
PreferencePageDialog
PreferencePageDialog is JFace’s implementation of IPreferencePageContainer. It extends Dialog and adds support for displaying preference pages. The pages available are displayed in a tree on the left, and the currently active page is displayed in the main area of the dialog. Once you have instantiated the dialog with an instance of PreferenceManager and associated a persistent store using setPreferenceStore(), you can call open(); PreferencePageDialog takes care of the rest.
12.2.4. Persistent preferences
Preferences aren’t very useful if they must be reset each time an application is launched. JFace provides a way to make your preferences persistent using the IPreferenceStore.
IPreferenceStore
An IPreferenceStore maps preference names to values. Each named preference may have both a default value and a current value; if there is no current value, the default is returned. Preferences may be any of Java’s primitive types (see also the discussion of PreferenceConverter for an easy way to store certain JFace objects in an IPreferenceStore). Each get and set method defined in this interface takes the name of the preference to operate on. Additionally, there are methods to set the default value for a given preference or reset a preference to the default, and a dirty indicator to check whether the store has been changed. A subinterface, IPersistentPreferenceStore, adds a save() method to persist the values.
PreferenceStore
JFace includes PreferenceStore, an implementation of IPreferenceStore that’s based on the java.util.Properties class. PreferenceStore only saves properties that aren’t equal to the default value, thereby minimizing the amount of data that must be written to disk. Values are persisted using the standard properties file format (name-value pairs separated by =). You have two options for loading and saving your data when using PreferenceStore. The simplest way is to specify a filename when instantiating a new instance:
PreferenceStore store = new PreferenceStore( "some_file_name" );
store.load();
Alternatively, you can give the store a stream to use when loading or saving:
PreferenceStore store = new PreferenceStore();
FileInputStream in = new FileInputStream( "some_file_name" );
store.load( in );
...
FileOutputStream out = new FileOutputStream( "some_file_name" );
store.save( out, "Custom Header" );
You must also remember to explicitly call load() before passing your PreferenceStore to a PreferenceDialog, because the dialog won’t call the method on your behalf. It automatically calls save() when appropriate, however.
Note that calling the no-argument load() or save() method when no filename is specified in the PreferenceStore constructor results in an IOException. Because PreferenceDialog calls the no-argument method, you should always use the constructor that takes a filename; use the overloaded versions of load() and save() only if you need to copy the values to a backup stream.
PreferenceConverter
PreferenceConverter is another utility provided by JFace. It consists of a series of static methods used to set or retrieve common SWT objects that otherwise couldn’t be used with an IPreferenceStore. Behind the scenes, PreferenceConverter serializes the object to or from a string format suitable for long-term storage. Values are set and retrieved like so:
IPreferenceStore store = ...
PreferenceConverter.setValue( store,
                              "color_pref",
                              new RGB(0, 255, 0) );
...
RGB color = PreferenceConverter.getColor( store,
                                          "color_pref" );
12.3. Label decorators
In our earlier discussion of ILabelProvider, we mentioned that there is an alternate implementation of IBaseLabelProvider. That implementation is in ILabelDecorator, an interface designed to collaborate with basic label providers to provide additional information.
Label decorators are intended to “decorate” a given object’s presentation with visual cues as to the object’s current state. A good example can be found in the Package Explorer in Eclipse. The Package Explorer displays all the Java classes in the current project in a tree, organized by the package to which each belongs. A label provider displays each object’s name along with an icon designating the object as either a class or package. Label decorations are added on top of the standard icons to designate abnormal conditions, such as the small red X that appears when there is a compilation error.
The main advantage of this design is the way it encourages decoupling. Continuing the Eclipse example, the standard label provider for a Java class only needs to know how to retrieve the name of a class and draw the basic icon. The logic to overlay the error icon (or warning icon, or any other variable status) is separated out into the decorator, where it can also be applied to packages or any other appropriate type of object. Likewise, because the Java class label provider isn’t encumbered with code to display the status icons, it can easily be reused in another context where the status icons aren’t desired.
12.3.1. ILabelDecorator
The main interface you’ll use to implement decorator functionality is ILabelDecorator. ILabelDecorator extends IBaseLabelProvider and is similar to ILabelProvider. Two methods are defined: decorateText() and decorateImage(). Each is passed a domain object, along with the text or image that’s currently being displayed. Each method returns the new text or image that should be displayed for the given domain object.
When you’re implementing decorateImage(), keep in mind that each Image consumes relatively rare system resources. It’s therefore important to avoid creating new Images if possible. Using the ImageRegistry, as we do in the example later in the chapter, is helpful to avoid instantiating unnecessary Image instances. Best practices for using Images are discussed further in chapter 7.
12.3.2. DecoratingLabelProvider
Once you’ve implemented the decorator, we need to make sure it gets a shot at performing its decorations. Rather than provide methods to explicitly add decorators to viewers, JFace supplies the DecoratingLabelProvider class. DecoratingLabelProvider extends LabelProvider and thereby implements ILabelProvider. Instead of providing labels itself, DecoratingLabelProvider takes an instance of ILabelProvider and an ILabelDecorator in its constructor. Calls to getText() or getImage() are delegated first to the label provider and then to the label decorator. The DecoratingLabelProvider is then associated with the viewer, instead of calling setLabelProvider() with the ILabelProvider directly.
Because DecoratingLabelProvider is an instance of ILabelProvider, you can easily chain decorators together by passing appropriate instances of DecoratingLabelProvider in the constructor instead of LabelProviders. Each decorator is then called in turn to build the final result. This technique is shown here:
DecoratingLabelProvider firstDecorator =
  new DecoratingLabelProvider( new MyLabelProvider(),
                               new FirstLabelDecorator() );
DecoratingLabelProvider secondDecorator =
  new DecoratingLabelProvider( firstDecorator,
                               new SecondLabelDecorator() );
viewer.setLabelProvider(secondDecorator);
12.3.3. An example
We’ll now show an example of the decorator concepts we’ve discussed as they’re used to build a tree showing the relationships between family members. Each person will be decorated with their family name and an icon indicating whether they are male or female. The infrastructure for this example is similar to the TreeViewers we’ve discussed earlier. In the interest of conserving space, we won’t reproduce the entire example; instead, we’ll discussing only the sections that are relevant for label decorators.
The first step is to create the TreeNode class that represents each node in the tree. The member variables and constructor look like this:
public class TreeNode
{
  private String firstName;
  private boolean isMale = false;
  private String familyName;
  private List children = new ArrayList();
  private TreeNode parent;

  public TreeNode(String firstName,
                  String familyName,
                  boolean male)
  {
    this.firstName = firstName;
    this.familyName = familyName;
    isMale = male;
  }
  //accessor methods
  ...
}
Each of the attributes has an accessor, so that our decorator will be able to query the TreeNode for the data it needs.
Our implementation of ILabelDecorator is straightforward. Here we extend LabelProvider for the convenient implementations of the methods defined in IBaseLabelProvider:
public class FamilyDecorator
      extends LabelProvider
      implements ILabelDecorator
{
  private static final String MALE_IMAGE_KEY = "male";
  private static final String FEMALE_IMAGE_KEY = "female";
  private ImageRegistry imageRegistry;

  public FamilyDecorator(Shell s)
  {
    imageRegistry = new ImageRegistry(s.getDisplay());
    Image maleImage = new Image(s.getDisplay(), "male.gif");
    Image femaleImage = new Image(s.getDisplay(), "female.gif");
    imageRegistry.put(FEMALE_IMAGE_KEY, femaleImage);
    imageRegistry.put(MALE_IMAGE_KEY, maleImage);
  }


  public Image decorateImage(Image image, Object element)
  {
    if(element == null) return null;
    TreeNode node = (TreeNode)element;
    if(node.isMale())
    {
      return imageRegistry.get(MALE_IMAGE_KEY);
    }
    else
    {
      return imageRegistry.get(FEMALE_IMAGE_KEY);
    }
  }

  public String decorateText(String text, Object element)
  {
    if(element == null) return null;
    TreeNode node = (TreeNode)element;
    return text + " [" + node.getFamilyName() + "]";
  }
}
The constructor creates the Images we need and saves them in an ImageRegistry for future use. When decorateImage() is called, it checks the isMale() method of the TreeNode object and retrieves the appropriate image by name from the registry; this is then returned as the Image to display. (Note that this section has been simplified; in a real application, you’ll typically need to draw your decoration on top of another image and return the combined result.)
decorateText() is also straightforward. Each node’s family name is retrieved and appended to whatever text is already being displayed, and the result is returned as the text to display.
Finally, we create a DecoratingLabelProvider with an instance of our decorator and tell the viewer to use the new instance instead of the default label provider:
...
viewer.setLabelProvider(
        new DecoratingLabelProvider(
              (ILabelProvider)viewer.getLabelProvider(),
              new FamilyDecorator(getShell())));
...
Note that here we retrieve the viewer’s default label provider and pass it as the base for the DecoratingLabelProvider to use. In your own applications, this code may frequently be replaced with an instance of a custom label provider.
Running the demo results in a tree such as the one shown in figure 12.2.
Figure 12.2. A decorated TreeViewer
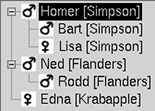
The default label provider only added the text for each character’s first name by calling toString() on each node. The icons and family names were added after the fact by our label decorator.
Note
Using label decorators in Eclipse—When you’re using label decorators in an Eclipse plug-in, you must be aware of some additional gotchas, such as making sure you don’t accidentally clobber the built-in decorators. Additional features are also available to you, such as configuring your decorators in the plugin.xml file. A detailed discussion of these issues is outside of the scope of this book; but the excellent article “Understanding Decorators in Eclipse” by Balaji Krish-Sampath, available online at www.eclipse.org/articles/Article-Decorators/decorators.html, will prove invaluable if you’re working with decorators in Eclipse.
12.4. The Browser widget
With the rise of the World Wide Web, HTML has become one of the most important technologies for creating a user interface. It has the advantage of being simple to write, easy to understand, and quick to modify in order to try out different designs. When you’re developing an application using a thick-client technology such as SWT or Swing, it’s common to find yourself becoming envious of the quick development cycles afforded by an HTML-based interface. When you consider the vast amount of information that exists in HTML, sometimes it makes sense to design your application to be able to display HTML documents.
Thankfully, in the 3.0 release the SWT team has provided the Browser widget to make this easy to do. By using Browser, you can embed the user’s web browser in your application and use it to display HTML without having to write a custom rendering engine. Additionally, because Browser uses the full-fledged native web browser for your platform, you gain the ability to handle JavaScript, XML, and any other format already understood by the browser.
Before we dive too deeply into our discussion of the Browser widget, a couple of caveats are in order:
- Browser isn’t currently supported on all platforms. It works on Microsoft Windows without a problem, but using it on Linux requires Mozilla 1.5. OS X and other platforms don’t support Browser at all; if you try to instantiate it, the result is an SWTError. This code is under active development, however, so if you’re considering using Browser you should check the status under all platforms you plan to support.
- As of the time of this writing, the API for Browser is considered unstable. It will be finalized by the time the final version of SWT 3.0 is released, but it’s possible that it will be different from the code samples we discuss here. In this case, you should consult the Javadocs for the version of the widget in your distribution to learn the differences.
The API for Browser is simple. It consists of methods to load the document found at a URL, to navigate backward and forward between pages, to refresh the current URL, and to stop the loading of the current page. Additionally, Browser broadcasts several unique events. At the current time, these events include opening, closing, and hiding windows; changing locations; and indicating progress as a page is loaded.
Using the Browser widget may also require additional native libraries, depending on your platform. There are no additional dependencies for Windows, but using Browser in the Linux/GTK distribution of SWT requires the libswt-mozillagtk library to be included in your LD_LIBRARY_PATH. On other supported platforms, you should check for the existence of a native library that includes the name of your platform’s web browser.
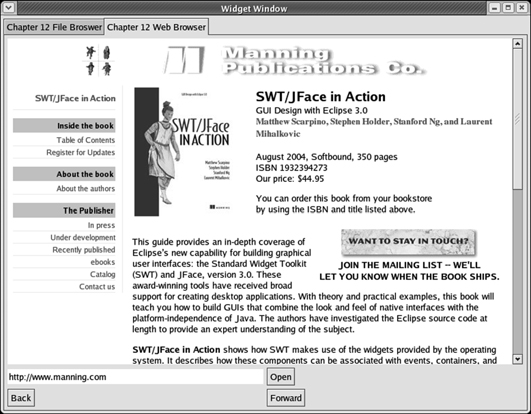
We next provide a simple example of Browser in action. The code in listing 12.5 opens a browser window when you run it. A text box allows the user to type a URL, and when the Open button in the WidgetWindow is clicked, the corresponding location is opened in the browser. Forward and Back buttons let the user control navigation in the browser from within WidgetViewer. Running the example results in the screenshot shown in figure 12.3.
Figure 12.3. Mozilla embedded in an SWT application
Listing 12.5. Ch12WebBrowserComposite.java
package com.swtjface.Ch12;

import org.eclipse.swt.SWT;
import org.eclipse.swt.browser.Browser;
import org.eclipse.swt.events.SelectionEvent;
import org.eclipse.swt.events.SelectionListener;
import org.eclipse.swt.layout.GridData;
import org.eclipse.swt.layout.GridLayout;
import org.eclipse.swt.widgets.*;

public class Ch12WebBrowserComposite extends Composite
{
  private Browser browser;

  public Ch12WebBrowserComposite(Composite parent)
  {
    super(parent, SWT.NONE);

    GridLayout layout = new GridLayout(2, true);
    setLayout(layout);

    browser = new Browser(this, SWT.NONE);    1  Create Browser instance
    GridData layoutData = new GridData(GridData.FILL_BOTH);
    layoutData.horizontalSpan = 2;
    layoutData.verticalSpan = 2;
    browser.setLayoutData(layoutData);
    browser.setUrl("http://www.manning.com/catalog/view.php?book=scarpino");

    final Text text = new Text(this, SWT.SINGLE);
    layoutData = new GridData(GridData.FILL_HORIZONTAL);
    text.setLayoutData(layoutData);

    Button openButton = new Button(this, SWT.PUSH);
    openButton.setText("Open");
    openButton.addSelectionListener(new SelectionListener() {
      public void widgetSelected(SelectionEvent e)
      {
        browser.setUrl(text.getText());   2  Open URL
      }
      public void widgetDefaultSelected(SelectionEvent e) {}
    });

    Button backButton = new Button(this, SWT.PUSH);
    backButton.setText("Back");
    backButton.addSelectionListener(new SelectionListener() {
      public void widgetSelected(SelectionEvent e)
      {
        browser.back();    3  Forward and Back buttons
      }
      public void widgetDefaultSelected(SelectionEvent e) {}
    });
    Button forwardButton = new Button(this, SWT.PUSH);
    forwardButton.setText("Forward");
    forwardButton.addSelectionListener(new SelectionListener() {
      public void widgetSelected(SelectionEvent e)
      {
        browser.forward();   3  Forward and Back buttons
      }
      public void widgetDefaultSelected(SelectionEvent e) {}
    });
  }
}
-
Browser is instantiated like any other control, with a parent Composite and a style parameter. Currently, Browser doesn’t support any styles.
-
Any valid URL can be opened by passing it to the setUrl() method. This will clear whatever page is currently loaded in the browser.
-
The browser can be told to move forward and back through its history by calling the appropriate method.
If you’re on a supported platform, you can run this example by adding these lines to WidgetWindow:
TabItem ch12WebBrowser = new TabItem(tf, SWT.NONE);
ch12WebBrowser.setText("Chapter 12" Web Browser");
ch12WebBrowser.setControl(new Ch12WebBrowserComposite(tf));
12.5. Summary
We’ve covered several important topics in this chapter, and the volume of information can seem overwhelming. Don’t worry about mastering it all at first glance; many of the concepts we’ve discussed aren’t necessary for day-to-day programming with SWT and JFace. The important thing is to be aware of the capabilities that are present, so that when you find yourself needing to implement drag and drop or user preferences, you’ll know where to turn.
You should also keep in mind that SWT is under constant development. Although at the time we’re writing this, widgets such as Browser aren’t fully supported on all platforms, the situation may have changed by the time you write your own SWT application. Check the articles available at www.eclipse.org to see what enhancements have been made since this book went to press.