
JUnit primer
This section is a quick and admittedly incomplete introduction to JUnit. We’ll provide the basics needed to understand our code examples. First, JUnit test cases extend junit.framework.TestCase. Our concrete test classes adhere to a naming convention: we suffix class names with Test. For example, our QueryParser tests are in QueryParserTest.java.
JUnit automatically executes all methods with the signature public void test-XXX(), where XXX is an arbitrary but meaningful name. JUnit test methods should be concise and clear, keeping good software design in mind (such as not repeating yourself, creating reusable functionality, and so on).
Assertions
JUnit is built around a set of assert statements, freeing you to code tests clearly and letting the JUnit framework handle failed assumptions and reporting the details. The most frequently used assert statement is assertEquals; there are a number of overloaded variants of the assertEquals method signature for various data types. An example test method looks like this:
public void testExample()  {
 SomeObject obj = new SomeObject();
 assertEquals(10,  obj.someMethod());
}
The assert methods throw a runtime exception if the expected value (10, in this example) isn’t equal to the actual value (the result of calling someMethod on obj, in this example). Besides assertEquals, there are several other assert methods for convenience. We also use assertTrue(expression), assertFalse(expression), and assertNull(expression) statements. These test whether the expression is true, false, and null, respectively.
The assert statements have overloaded signatures that take an additional String parameter as the first argument. This String argument is used entirely for reporting purposes, giving the developer more information when a test fails. We use this String message argument to be more descriptive (or sometimes comical).
By coding our assumptions and expectations in JUnit test cases in this manner, we free ourselves from the complexity of the large systems we build and can focus on fewer details at a time. With a critical mass of test cases in place, we can remain confident and agile. This confidence comes from knowing that changing code, such as optimizing algorithms, won’t break other parts of the system, because if it did, our automated test suite would let us know long before the code made it to production. Agility comes from being able to keep the codebase clean through refactoring. Refactoring is the art (or is it a science?) of changing the internal structure of the code so that it accommodates evolving requirements without affecting the external interface of a system.
JUnit in context
Let’s take what we’ve said so far about JUnit and frame it within the context of this book. One of our test cases (from chapter 3) is shown here:
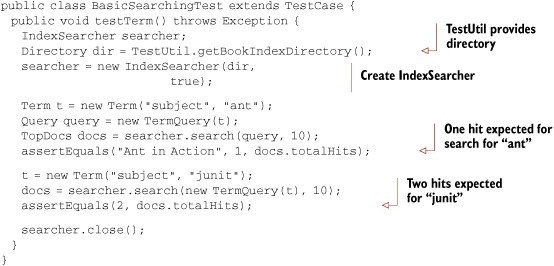
Of course, we’ll explain the Lucene API used in this test case later. Here we’ll focus on the JUnit details. The TestUtil class, from lia/common/TestUtil.java, contains a few utility methods used frequently throughout the book. Each time we use such a method for the first time, we show its source code. Here’s getBookIndexDirectory:
public static String getBookIndexDirectory() {
 // The build.xml ant script sets this property for us:
 return System.getProperty("index.dir");
}
That method returns the path to where our sample data index resides in the filesystem. While we don’t use it in this test, JUnit provides an initialization hook that executes prior to every test method; this hook is a method with the public void setUp() signature.
If our first assert in testTerm fails, we see an exception like this:
junit.framework.AssertionFailedError:
  Ant in Action expected:<1> but was:<0>
   at lia.searching.BasicSearchingTest.testTerm(BasicSearchingTest.java:20)
This failure indicates our test data is different than what we expect.
Testing Lucene
The majority of the tests in this book test Lucene itself. In practice, is this realistic? Isn’t the idea to write test cases that test our own code, not the libraries themselves? There is an interesting twist to Test Driven Development used for learning an API: Test Driven Learning. It’s immensely helpful to write tests directly to a new API in order to learn how it works and what you can expect from it. This is precisely what we’ve done in most of our code examples, so that tests are testing Lucene itself. Don’t throw these learning tests away, though. Keep them around to ensure your expectations of the API hold true when you upgrade to a new version of the API, and refactor them when the inevitable API change is made.
Mock objects
In a couple of cases, we use mock objects for testing purposes. Mock objects are used as probes sent into real business logic in order to assert that the business logic is working properly. For example, in chapter 4, we have a SynonymEngine interface (see section 4.6). The real business logic that uses this interface is an analyzer. When we want to test the analyzer itself, it’s unimportant what type of SynonymEngine is used, but we want to use one that has well defined and predictable behavior. We created a MockSynonymEngine, allowing us to reliably and predictably test our analyzer. Mock objects help simplify test cases such that they test only a single facet of a system at a time rather than having intertwined dependencies that lead to complexity in troubleshooting what really went wrong when a test fails. A nice effect of using mock objects comes from the design changes it leads us to, such as separation of concerns and designing using interfaces instead of direct concrete implementations.