
Chapter 4. Lucene’s analysis process
- Understanding the analysis process
- Using Lucene’s core analysis classes
- Writing custom analyzers
- Handling foreign languages
Analysis, in Lucene, is the process of converting field text into its most fundamental indexed representation, terms. These terms are used to determine what documents match a query during searching. For example, if you indexed this sentence in a field the terms might start with for and example, and so on, as separate terms in sequence. An analyzer is an encapsulation of the analysis process. An analyzer tokenizes text by performing any number of operations on it, which could include extracting words, discarding punctuation, removing accents from characters, lowercasing (also called normalizing), removing common words, reducing words to a root form (stemming), or changing words into the basic form (lemmatization). This process is also called tokenization, and the chunks of text pulled from a stream of text are called tokens. Tokens, combined with their associated field name, are terms.
Lucene’s primary goal is to facilitate information retrieval. The emphasis on retrieval is important. You want to throw gobs of text at Lucene and have them be richly searchable by the individual words within that text. In order for Lucene to know what “words” are, it analyzes the text during indexing, extracting it into terms. These terms are the primitive building blocks for searching.
Choosing the right analyzer is a crucial development decision with Lucene, and one size definitely doesn’t fit all. Language is one factor, because each has its own unique features. Another factor to consider is the domain of the text being analyzed; different industries have different terminology, acronyms, and abbreviations that may deserve attention. Although we present many of the considerations for choosing analyzers, no single analyzer will suffice for all situations. It’s possible that none of the built-in analysis options are adequate for your needs, and you’ll have to invest in creating a custom analysis solution; fortunately, Lucene’s building blocks make this quite easy.
In this chapter, we’ll cover all aspects of the Lucene analysis process, including how and where to use analyzers, what the built-in analyzers do, and how to write your own custom analyzers using the building blocks provided by the core Lucene API. Custom analyzers are trivial to create, and many applications do so, so we’ll cover examples such as synonym injection, sounds-like searching, stemming, and stop-word filtering. Let’s begin by seeing when and how analyzers are used by Lucene.
4.1. Using analyzers
Before we get into the gory details of what lurks inside an analyzer, let’s explore how an analyzer is used in Lucene. Analysis occurs any time text needs to be converted into terms, which in Lucene’s core is at two spots: during indexing and when using QueryParser for searching. If you highlight hits in your search results (which we strongly recommend because it gives a better end-user experience), you may need to analyze text at that point as well. Highlighting, enabled with two of Lucene’s contrib modules, is covered in detail in chapter 8. In this section, we first detail how an analyzer is used in each of these scenarios, and then describe the important difference between parsing a document and analyzing it.
Before we begin with any code details, let’s look at what the analysis process is all about. First we analyze the phrase “The quick brown fox jumped over the lazy dog,” using each of the four built-in analyzers:
Analyzing "The quick brown fox jumped over the lazy dog"
  WhitespaceAnalyzer:
    [The] [quick] [brown] [fox] [jumped] [over] [the] [lazy] [dog]

  SimpleAnalyzer:
    [the] [quick] [brown] [fox] [jumped] [over] [the] [lazy] [dog]

  StopAnalyzer:
    [quick] [brown] [fox] [jumped] [over] [lazy] [dog]

  StandardAnalyzer:
    [quick] [brown] [fox] [jumped] [over] [lazy] [dog]
Each token is shown between brackets to make the separations apparent. During indexing, the tokens extracted during analysis are the terms indexed. And, most important, it’s only the terms that are indexed that are searchable!
Note
Only the tokens produced by the analyzer are searchable, unless the field is indexed with Field.Index.NOT_ANALYZED or Field.Index.NOT_ANALYZED_NO_NORMS, in which case the entire field’s value, as a single token, is searchable.
Next we analyze the phrase “XY&Z Corporation - [email protected]” with the same analyzers:
Analyzing "XY&Z Corporation - [email protected]"
  WhitespaceAnalyzer:
    [XY&Z] [Corporation] [-] [[email protected]]

  SimpleAnalyzer:
    [xy] [z] [corporation] [xyz] [example] [com]

  StopAnalyzer:
    [xy] [z] [corporation] [xyz] [example] [com]

  StandardAnalyzer:
    [xy&z] [corporation] [[email protected]]
You can see that the resulting tokens are very analyzer dependent. A few interesting things happen in these examples. Look at how the word the is treated, and likewise the company name XY&Z and the email address [email protected]; look at the special hyphen character (-) and the case of each token. Section 4.2.3 explains more of the details of what happened, and you can see the code that produced this output in listing 4.1 in section 4.24. In the meantime, here’s a summary of each of these analyzers:
- WhitespaceAnalyzer, as the name implies, splits text into tokens on whitespace characters and makes no other effort to normalize the tokens. It doesn’t lowercase each token.
- SimpleAnalyzer first splits tokens at nonletter characters, then lowercases each token. Be careful! This analyzer quietly discards numeric characters but keeps all other characters.
- StopAnalyzer is the same as SimpleAnalyzer, except it removes common words. By default, it removes common words specific to the English language (the, a, etc.), though you can pass in your own set.
- StandardAnalyzer is Lucene’s most sophisticated core analyzer. It has quite a bit of logic to identify certain kinds of tokens, such as company names, email addresses, and hostnames. It also lowercases each token and removes stop words and punctuation.
Lucene doesn’t make the results of the analysis process visible to the end user. Terms pulled from the original text are immediately and quietly added to the index. It’s these terms that are matched during searching. When searching with QueryParser, the analysis process takes place again on the textual parts of the search query, in order to ensure the best possible matches.
Let’s see how the analyzer is used during indexing.
4.1.1. Indexing analysis
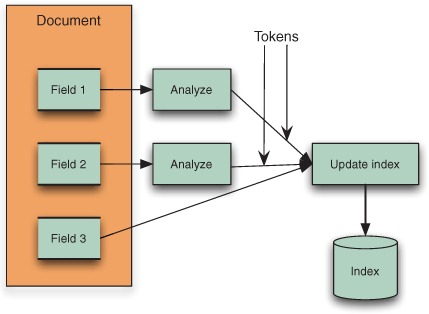
During indexing, text contained in the document’s field values must be converted into tokens, as shown in figure 4.1. You provide IndexWriter with an Analyzer instance up front:
Analyzer analyzer = new StandardAnalyzer(Version.LUCENE_30);
IndexWriter writer = new IndexWriter(directory, analyzer,
                        IndexWriter.MaxFieldLength.UNLIMITED);
Figure 4.1. Analysis process during indexing. Fields 1 and 2 are analyzed, producing a sequence of tokens; Field 3 is unanalyzed, causing its entire value to be indexed as a single token.
Each analyzed field of every document indexed with the IndexWriter instance uses the analyzer specified by default. But if an individual document has special analysis needs, the analyzer may be specified on a per-document basis: both the addDocument and updateDocument methods in IndexWriter optionally accept an analyzer to be used for that one document.
To make sure the text is analyzed, specify Field.Index.ANALYZED or Field.Index.ANALYZED_NO_NORMS when creating the field. To index the entire field’s value as a single token, like Field 3 in figure 4.1, pass Field.Index.NOT_ANALYZED or Field.Index.NOT_ANALYZED_NO_NORMS as the fourth argument. One example where this is usually required is if you intend to sort on the field, as covered in section 2.4.6.
Note
new Field(String, String, Field.Store.YES, Field.Index.ANALYZED) creates a tokenized and stored field. Rest assured the original String value is stored. But the output of the designated Analyzer dictates what’s indexed and available for searching.
The following code demonstrates indexing of a document where one field is analyzed and stored, and the second field is analyzed but not stored:
Document doc = new Document();
doc.add(new Field("title", "This is the title", Field.Store.YES,
                  Field.Index.ANALYZED));
doc.add(new Field("contents", "...document contents...", Field.Store.NO,
                  Field.Index.ANALYZED));
writer.addDocument(doc);
Both "title" and "contents" are analyzed using the Analyzer instance provided to the IndexWriter.QueryParser also uses an analyzer to parse fragments of the user’s textual query.
4.1.2. QueryParser analysis
QueryParser is wonderful for presenting the end user with a free-form option of querying. To do its job, QueryParser uses an analyzer to break the text it encounters into terms for searching. You provide an analyzer when you instantiate the QueryParser:
QueryParser parser = new QueryParser(Version.LUCENE_30,
                                     "contents", analyzer);
Query query = parser.parse(expression);
The analyzer receives individual contiguous text pieces of the expression, not the expression as a whole, which in general may include operators, parentheses, and other special expression syntax to denote range, wildcard, and fuzzy searches. For example, when provided this query text:
"president obama" +harvard +professor
QueryParser will invoke the analyzer three separate times, first with the text president obama, then the text harvard, then professor. QueryParser analyzes all text equally, without knowledge of how it was indexed. This is a particularly thorny issue when you’re querying for fields that were indexed without tokenization. We address this situation in section 4.7.3.
Should you use the same analyzer with QueryParser that you used during indexing? It depends. If you stick with the basic built-in analyzers, you’ll probably be fine using the same analyzer in both situations. But when you’re using more sophisticated analyzers, quirky cases can come up in which using different analyzers between indexing and QueryParser is necessary. We discuss this issue in more detail in section 4.5. Now we draw the difference between parsing and analyzing a document.
4.1.3. Parsing vs. analysis: when an analyzer isn’t appropriate
An important point about analyzers is that they’re used internally for textual fields enabled for analysis. Document formats such as HTML, Microsoft Word, XML, and others contain metadata such as the author, the title, the last modified date, and potentially much more. When you’re indexing rich documents, this metadata should be separated and indexed as separate fields. Analyzers are used to analyze a specific field at a time and break things into tokens only within that field; creating new fields isn’t possible within an analyzer.
Analyzers don’t help in field separation because their scope is to deal with a single field at a time. Instead, parsing these documents prior to analysis is required. For example, it’s a common practice to separate at least the <title> and <body> of HTML documents into separate fields. In these cases, the documents should be parsed, or preprocessed, into separate blocks of text representing each field. Chapter 7 covers this preprocessing step in detail.
Now that we’ve seen where and how Lucene uses analyzers, it’s time to delve into just what an analyzer does and how it works.
4.2. What’s inside an analyzer?
To understand the analysis process, we need to open the hood and tinker around a bit. Because it’s possible that you’ll be constructing your own analyzers, knowing the architecture and building blocks provided is crucial.
The Analyzer class is the abstract base class. Quite elegantly, it turns text into a stream of tokens enumerated by the TokenStream class. The single required method signature implemented by analyzers is
public TokenStream tokenStream(String fieldName, Reader reader)
The returned TokenStream is then used to iterate through all tokens.
Let’s start “simply” with the SimpleAnalyzer and see what makes it tick. The following code is copied directly from Lucene’s codebase:
public final class SimpleAnalyzer extends Analyzer {
  @Override
  public TokenStream tokenStream(String fieldName, Reader reader) {
    return new LowerCaseTokenizer(reader);
  }

  @Override
  public TokenStream reusableTokenStream(String fieldName, Reader reader
       throws IOException {
    Tokenizer tokenizer = (Tokenizer) getPreviousTokenStream();
    if (tokenizer == null) {
      tokenizer = new LowerCaseTokenizer(reader);
      setPreviousTokenStream(tokenizer);
    } else
      tokenizer.reset(reader);
    return tokenizer;
  }
}
The LowerCaseTokenizer divides text at nonletters (determined by Character.isLetter), removing nonletter characters and, true to its name, lowercasing each character.
The reusableTokenStream method is an additional, optional method that an analyzer can implement to gain better indexing performance. That method is allowed to reuse the same TokenStream that it had previously returned to the same thread. This approach can save a lot of allocation and garbage collection cost because every field of every document otherwise needs a new TokenStream. Two utility methods are implemented in the Analyzer base class, setPreviousTokenStream and getPreviousTokenStream, to store and retrieve a TokenStream in thread local storage. All the built-in Lucene analyzers implement this method: the first time the method is called from a given thread, a new TokenStream instance is created and saved. Subsequent calls return the previous TokenStream after resetting it to the new Reader.
In the following sections, we take a detailed look at each of the major players used by analyzers, including the TokenStream family, as well as the various attributes that represent the components of a token. We’ll also show you how to visualize what an analyzer is actually doing, and describe the importance of the order of tokenizers. Let’s begin with the basic unit of analysis, the token.
4.2.1. What’s in a token?
A stream of tokens is the fundamental output of the analysis process. During indexing, fields designated for analysis are processed with the specified analyzer, and the important attributes from each token are then written into the index.
For example, let’s analyze the text “the quick brown fox.” Each token represents an individual word of that text. A token carries with it a text value (the word itself) as well as some metadata: the start and end character offsets in the original text, a token type, and a position increment. The token may also optionally contain application defined bit flags and an arbitrary byte[] payload, and can be easily extended to include any application specific attributes. Figure 4.2 shows the details of the token stream analyzing this phrase with the SimpleAnalyzer.
Figure 4.2. A token stream with positional and offset information

The start offset is the character position in the original text where the token text begins, and the end offset is the position just after the last character of the token text. These offsets are useful for highlighting matched tokens in search results, as described in chapter 8. The token type is a String, defaulting to "word", that you can control and use in the token-filtering process if desired. As text is tokenized, the position relative to the previous token is recorded as the position increment value. Most of the built-in tokenizers leave the position increment at the default value of 1, indicating that all tokens are in successive positions, one after the other. Each token also has optional flags; a flag is a set of 32 bits (stored in an int) that’s unused by Lucene’s built-in analyzers but could be used by your application. Likewise, each token can have a byte[] recorded in the index, referred to as the payload. Using payloads is an advanced topic that we cover in section 6.5.
Tokens into Terms
After text is analyzed during indexing, each token is posted to the index as a term. The position increment, start, and end offsets and payload are the only additional metadata associated with the token that’s recorded in the index. The token type and flags are discarded—they’re only used during the analysis process.
Position Increments
The token position increment value relates the current token’s position to the previous token’s position. Position increment is usually 1, indicating that each word is in a unique and successive position in the field. Position increments factor directly into performing phrase queries (see section 3.4.6) and span queries (see section 5.5), which rely on knowing how far terms are from one another within a field.
Position increments greater than 1 allow for gaps and can be used to indicate where words have been removed. See section 4.6.1 for an example, where stop-word removal leaves gaps using position increments.
A token with a zero position increment places the token in the same position as the previous token. Analyzers that inject synonyms can use a position increment of zero for the synonyms. The effect is that phrase queries work regardless of which synonym was used in the query. See our SynonymAnalyzer in section 4.5 for an example that uses position increments of 0.
4.2.2. TokenStream uncensored
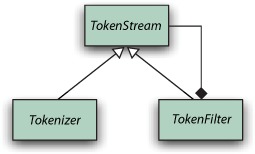
A TokenStream is a class that can produce a series of tokens when requested, but there are two very different styles of TokenStreams: Tokenizer and TokenFilter. They both inherit from the abstract TokenStream class, as shown in figure 4.3. Note the composite pattern used by TokenFilter to encapsulate another TokenStream (which could, of course, be another TokenFilter). A Tokenizer reads characters from a java.io.Reader and creates tokens, whereas a TokenFilter takes tokens in, and produces new tokens by either adding or removing whole tokens or altering the attributes of the incoming tokens.
Figure 4.3. The hierarchy of classes used to produce tokens: TokenStream is the abstract base class; Tokenizer creates tokens from a Reader; and TokenFilter filters any other TokenStream.
When an analyzer returns a TokenStream from its tokenStream or reusableTokenStream method, it typically starts with a single Tokenizer, which creates the initial sequence of tokens, then chains together any number of TokenFilters to modify these tokens. This is referred to as the analyzer chain. Figure 4.4 shows an analyzer chain that has three TokenFilters.
Figure 4.4. An analyzer chain starts with a Tokenizer, to produce initial tokens from the characters read from a Reader, then modifies the tokens with any number of chained TokenFilters.

Lucene’s core tokenizers and analyzers
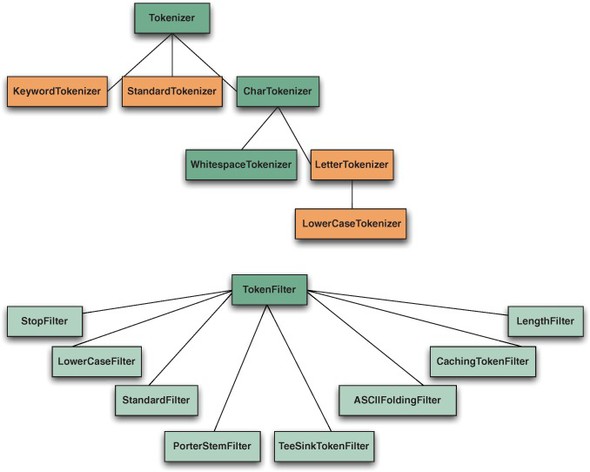
Let’s look at the core Tokenizers and TokenFilters in Lucene, shown in table 4.1. The corresponding class hierarchy is shown in figure 4.5.
Table 4.1. Analyzer building blocks provided in Lucene’s core API
|
Class name |
Description |
|---|---|
| TokenStream | Abstract Tokenizer base class. |
| Tokenizer | TokenStream whose input is a Reader. |
| CharTokenizer | Parent class of character-based tokenizers, with abstract isTokenChar() method. Emits tokens for contiguous blocks when isTokenChar() returns true. Also provides the capability to normalize (for example, lowercase) characters. Tokens are limited to a maximum size of 255 characters. |
| WhitespaceTokenizer | CharTokenizer with isTokenChar() true for all nonwhitespace characters. |
| KeywordTokenizer | Tokenizes the entire input string as a single token. |
| LetterTokenizer | CharTokenizer with isTokenChar() true when Character.isLetter is true. |
| LowerCaseTokenizer | LetterTokenizer that normalizes all characters to lowercase. |
| SinkTokenizer | A Tokenizer that absorbs tokens, caches them in a private list, and can later iterate over the tokens it had previously cached. This is used in conjunction with TeeTokenizer to “split” a TokenStream. |
| StandardTokenizer | Sophisticated grammar-based tokenizer, emitting tokens for high-level types like email addresses (see section 4.3.2 for more details). Each emitted token is tagged with a special type, some of which are handled specially by StandardFilter. |
| TokenFilter | TokenStream whose input is another TokenStream. |
| LowerCaseFilter | Lowercases token text. |
| StopFilter | Removes words that exist in a provided set of words. |
| PorterStemFilter | Stems each token using the Porter stemming algorithm. For example, country and countries both stem to countri. |
| TeeTokenFilter | Splits a TokenStream by passing each token it iterates through into a SinkTokenizer. It also returns the token unnmodified to its caller. |
| ASCIIFoldingFilter | Maps accented characters to their unaccented counterparts. |
| CachingTokenFilter | Saves all tokens from the input stream and can replay the stream once reset is called. |
| LengthFilter | Accepts tokens whose text length falls within a specified range. |
| StandardFilter | Designed to be fed by a StandardTokenizer. Removes dots from acronyms and ’s (apostrophe followed by s) from words with apostrophes. |
Figure 4.5. TokenFilter and Tokenizer class hierarchy
To illustrate the analyzer chain in code, here’s a simple example analyzer:
public TokenStream tokenStream(String fieldName, Reader reader) {
    return new StopFilter(true,
                          new LowerCaseTokenizer(reader),
                          stopWords);
}
In this analyzer, LowerCaseTokenizer produces the initial set of tokens from a Reader and feeds them to a StopFilter. The LowerCaseTokenizer emits tokens that are adjacent letters in the original text, lowercasing each of the characters in the process. Non-letter characters form token boundaries and aren’t included in any emitted token. Following this word tokenizer and lowercasing, StopFilter removes words in a stop-word list while preserving accurate positionIncrements (see section 4.3.1).
Buffering is a feature that’s commonly needed in the TokenStream implementations. Low-level Tokenizers do this to buffer up characters to form tokens at boundaries such as whitespace or nonletter characters. TokenFilters that emit additional tokens into the stream they’re filtering must queue an incoming token and the additional ones and emit them one at a time; our SynonymFilter in section 4.5 is an example of such a filter.
Most of the built-in TokenFilters alter a single stream of input tokens in some fashion, but one of them, TeeSinkTokenFilter, is more interesting. This is a filter that clones an incoming token stream into any number of output streams called sinks. It reads tokens from its single input source, then sends a copy of that token to all of its sink output streams as well as its output stream. Each of the sink streams can undergo its own further processing. This is useful when two or more fields would like to share the same initial analysis steps but differ on the final processing of the tokens.
Next we describe how to see the results of the analysis process.
4.2.3. Visualizing analyzers
Normally, the tokens produced by analysis are silently absorbed by indexing. Yet seeing the tokens is a great way to gain a concrete understanding of the analysis process. In this section we’ll show you how to do just that. Specifically, we’ll show you the source code that generated the token examples in section 4.1. Along the way we’ll see that a token consists of several interesting attributes, including term, positionIncrement, offset, type, flags, and payload.
We begin with listing 4.1, AnalyzerDemo, which analyzes two predefined phrases using Lucene’s core analyzers. Each phrase is analyzed by all the analyzers, then the tokens are displayed with bracketed output to indicate what would be indexed.
Listing 4.1. AnalyzerDemo: seeing analysis in action
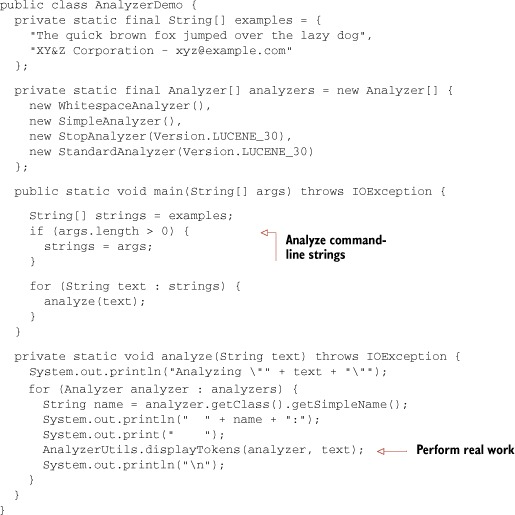
The real fun happens in AnalyzerUtils (listing 4.2), where the analyzer is applied to the text and the tokens are extracted. AnalyzerUtils passes text to an analyzer without indexing it and pulls the results in a manner similar to what happens during the indexing process under the covers of IndexWriter.
Listing 4.2. AnalyzerUtils: delving into an analyzer
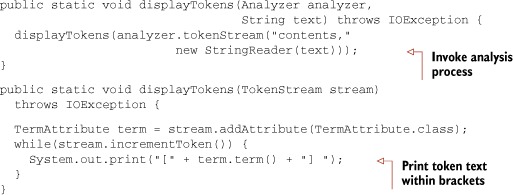
Generally you wouldn’t invoke the analyzer’s tokenStream method explicitly except for this type of diagnostic or informational purpose. Note that the field name contents is arbitrary in the displayTokens() method. We recommend keeping a utility like this handy to see what tokens emit from your analyzers of choice. In fact, rather than write this yourself, you can use our AnalyzerUtils or the AnalyzerDemo code for experimentation. The AnalyzerDemo application lets you specify one or more strings from the command line to be analyzed instead of the embedded example ones:
%java lia.analysis.AnalyzerDemo "No Fluff, Just Stuff"

Analyzing "No Fluff, Just Stuff"
  org.apache.lucene.analysis.WhitespaceAnalyzer:
    [No] [Fluff,] [Just] [Stuff]

  org.apache.lucene.analysis.SimpleAnalyzer:
    [no] [fluff] [just] [stuff]

  org.apache.lucene.analysis.StopAnalyzer:
    [fluff] [just] [stuff]

  org.apache.lucene.analysis.standard.StandardAnalyzer:
    [fluff] [just] [stuff]
Let’s now look deeper into what makes up a token.
Looking Inside Tokens
We’ve seen that TokenFilters access and alter the attributes of tokens that flow through them. But exactly what attributes make up a token? We’ve added the displayTokensWithFullDetails utility method in AnalyzerUtils, shown in listing 4.3, to shed some light on this.
Listing 4.3. Seeing the term, offsets, type, and position increment of each token

We display all token information on the example phrase using SimpleAnalyzer:
public static void main(String[] args) throws IOException {
  AnalyzerUtils.displayTokensWithFullDetails(new SimpleAnalyzer(),
      "The quick brown fox....");
}
Here’s the output:
1: [the:0->3:word]
2: [quick:4->9:word]
3: [brown:10->15:word]
4: [fox:16->19:word]
Each token is in a successive position relative to the previous one (noted by the incrementing numbers 1, 2, 3, and 4). The word the begins at offset 0 and ends just before offset 3 in the original text. Each of the tokens has a type of word. We present a similar, but simpler, visualization of token position increments in section 4.6.1, and we provide a visualization of tokens sharing the same position. Each of these aspects of a token is recorded in its own Attribute class.
Attributes
Notice that the TokenStream never explicitly creates a single object holding all attributes for the token. Instead, you interact with a separate reused attribute interface for each element of the token (term, offsets, position increments, etc.). Past versions of Lucene did use a standalone Token object, but in order to be more extensible, and to provide better analysis performance through reuse, Lucene switched to the attribute-based API as of version 2.9.
TokenStream subclasses from a class called AttributeSource (in org.apache.lucene.util). AttributeSource is a useful and generic means of providing strongly typed yet fully extensible attributes without requiring runtime casting, thus resulting in good performance. Lucene uses certain predefined attributes during analysis, as listed in table 4.2, but your application is free to add its own attributes by creating a concrete class implementing the Attribute interface. Note that Lucene will do nothing with your new attribute during indexing, so this is only currently useful in cases where one TokenStream early in your analysis chain wishes to send information to another TokenStream later in the chain.
Table 4.2. Lucene’s built-in token attributes
|
Token attribute interface |
Description |
|---|---|
| TermAttribute | Token’s text |
| PositionIncrementAttribute | Position increment (defaults to 1) |
| OffsetAttribute | Start and end character offset |
| TypeAttribute | Token’s type (defaults to word) |
| FlagsAttribute | Bits to encode custom flags |
| PayloadAttribute | Per-token byte[] payload (see section 6.5) |
With this reusable API, you first obtain the attributes of interest by calling the addAttribute method, which will return a concrete class implementing the requested interface. Then, you iterate through all tokens by calling TokenStream.incrementToken. This method returns true if it has advanced to a new token and false once you’ve exhausted the stream. You then interact with the previously obtained attributes to get that attribute’s value for each token. When incrementToken returns true, all attributes within it will have altered their internal state to the next token.
If you’re only interested in the position increment, you could do this:
TokenStream stream = analyzer.tokenStream("contents",
                                          new StringReader(text));
PositionIncrementAttribute posIncr =
  stream.addAttribute(PositionIncrementAttribute.class);
while (stream.incrementToken()) {
  System.out.println("posIncr=" + posIncr.getPositionIncrement());
}
Note that the core attribute classes in table 4.2 are bidirectional: you can use them to get and set the value for that attribute. Thus, a TokenFilter that alters only the position increment would grab and store the PositionIncrementAttribute from its input TokenStream when it’s first instantiated, then implement the incrementToken method by first calling incrementToken on its input stream and calling PositionIncrementAttribute.setPositionIncrement to change the value.
Sometimes you need to take a complete copy of all details for the current token and restore it later. You can do this by calling captureState, which returns a State object holding all state. You can later restore that state by calling restoreState. Note that this results in slower performance so you should avoid doing so, if possible, when creating your own TokenFilters.
What Good are Start and end Offsets?
The start and end offset values, which record the original character offset at the start and end of each token’s text, aren’t used in the core of Lucene. Rather, they’re treated as opaque integers for each token, and you could put any arbitrary integers you’d like into there.
If you index with TermVectors, as described in section 2.4.3, and specify that the offsets are stored, then at search time you can retrieve the TermVectors for a given document and access the offsets. Often this is used for highlighting, as discussed in chapter 8. It’s also possible to reanalyze the text to do highlighting without storing TermVectors, in which case the start and end offsets are recomputed by the analyzer, then used in real time.
Token Type Usefulness
You can use the token type to denote special lexical types for tokens. Under the covers of StandardAnalyzer is a StandardTokenizer that parses the incoming text into different types based on a grammar. Analyzing the phrase “I’ll email you at [email protected]” with StandardAnalyzer produces this interesting output:
1: [i'll:0->4:<APOSTROPHE>]
2: [email:5->10:<ALPHANUM>]
3: [you:11->14:<ALPHANUM>]
5: [[email protected]:18->33:<EMAIL>]
Notice the token type of each token. The token i'll has an apostrophe, which StandardTokenizer notices in order to keep it together as a unit; and likewise for the email address. The word at was removed as a stop word. We cover the other StandardAnalyzer effects in section 4.3.2. StandardAnalyzer is the only built-in analyzer that leverages the token type data. Our metaphone and synonym analyzers, in sections 4.4 and 4.5, provide another example of token type usage. By default, Lucene doesn’t record the token type into the index; thus, it only serves a purpose during analysis. But you can use the TypeAsPayloadTokenFilter to record the type of each token as a payload. Section 6.5 describes payloads in more detail.
4.2.4. TokenFilter order can be significant
For certain TokenFilters, the order of events may be important during analysis. Each step may rely on the work of a previous step. A prime example is that of stop-word removal. StopFilter performs a case-sensitive lookup of each token in a set of stop words. It relies on being fed already lowercased tokens. As an example, we first write a functionally equivalent StopAnalyzer variant; we’ll follow it with a flawed variant that reverses the order of the steps:
public class StopAnalyzer2 extends Analyzer {

  private Set stopWords;

  public StopAnalyzer2() {
    stopWords = StopAnalyzer.ENGLISH_STOP_WORDS_SET;
  }

  public StopAnalyzer2(String[] stopWords) {
    this.stopWords = StopFilter.makeStopSet(stopWords);
  }

  public TokenStream tokenStream(String fieldName, Reader reader) {
    return new StopFilter(true,
                   new LowerCaseFilter(
                     new LetterTokenizer(reader)),
                   stopWords);
  }
}
StopAnalyzer2 uses a LetterTokenizer feeding a LowerCaseFilter, rather than just a LowerCaseTokenizer. A LowerCaseTokenizer has a performance advantage: it lowercases as it tokenizes, rather than dividing the process into two steps. This test case proves that our StopAnalyzer2 works as expected, by using AnalyzerUtils.tokensFromAnalysis and asserting that the stop word the was removed:
public void testStopAnalyzer2() throws Exception {
  AnalyzerUtils.assertAnalyzesTo(new StopAnalyzer2(),
                                 "The quick brown...",
                                 new String[] {"quick", "brown"});
}
We’ve added a utility method to our AnalyzerUtils. This method asserts that tokens match an expected list:
public static void assertAnalyzesTo(Analyzer analyzer, String input,
                                    String[] output) throws Exception {
  TokenStream stream =
      analyzer.tokenStream("field", new StringReader(input));

  TermAttribute termAttr = stream.addAttribute(TermAttribute.class);
  for (String expected : output) {
    Assert.assertTrue(stream.incrementToken());
    Assert.assertEquals(expected, termAttr.term());
  }
  Assert.assertFalse(stream.incrementToken());
  stream.close();
}
To illustrate the importance that the order can make with token filtering, we’ve written a flawed analyzer that swaps the order of the StopFilter and the LowerCaseFilter:
public class StopAnalyzerFlawed extends Analyzer {
  private Set stopWords;

  public StopAnalyzerFlawed() {
    stopWords = StopAnalyzer.ENGLISH_STOP_WORDS_SET;
  }

  public TokenStream tokenStream(String fieldName, Reader reader) {
    return new LowerCaseFilter(
           new StopFilter(true, new LetterTokenizer(reader),
                          stopWords));
  }
}
The StopFilter presumes all tokens have already been lowercased and does a case-sensitive lookup. Another test case shows that The wasn’t removed (it’s the first token of the analyzer output), yet it was lowercased:
public void testStopAnalyzerFlawed() throws Exception {
  AnalyzerUtils.assertAnalyzesTo(new StopAnalyzerFlawed(),
                                 "The quick brown...",
                                 new String[] {"the", "quick", "brown"});
}
Lowercasing is just one example where order may matter. Filters may assume previous processing was done. For example, the StandardFilter is designed to be used in conjunction with StandardTokenizer and wouldn’t make sense with any other TokenStream feeding it. There may also be performance considerations when you order the filtering process. Consider an analyzer that removes stop words and injects synonyms into the token stream—it would be more efficient to remove the stop words first so that the synonym injection filter would have fewer terms to consider (see section 4.5 for a detailed example).
At this point you should have a solid grasp of the internals of the analysis process. An analyzer simply defines a specific chain of tokenizers, beginning with an original source of new tokens (TokenStream) followed by any number of TokenFilters that alter the tokens. A Token consists of values for a certain set of interesting attributes, which Lucene stores in different ways. Finally, we saw helpful methods for visualizing what an analyzer is doing. We’ll now have a closer look at some example analyzers, beginning with the out-of-the-box analyzers that Lucene provides and followed by some of our own concoctions.
4.3. Using the built-in analyzers
Lucene includes several built-in analyzers, created by chaining together certain combinations of the built-in Tokenizers and TokenFilters. The primary ones are shown in table 4.3. We’ll discuss certain language-specific contrib analyzers in section 4.8.2 and the special PerFieldAnalyzerWrapper in section 4.7.2.
Table 4.3. Primary analyzers available in Lucene
|
Analyzer |
Steps taken |
|---|---|
| WhitespaceAnalyzer | Splits tokens at whitespace. |
| SimpleAnalyzer | Divides text at nonletter characters and lowercases. |
| StopAnalyzer | Divides text at nonletter characters, lowercases, and removes stop words. |
| KeywordAnalyzer | Treats entire text as a single token. |
| StandardAnalyzer | Tokenizes based on a sophisticated grammar that recognizes email addresses, acronyms, Chinese-Japanese-Korean characters, alphanumerics, and more. It also lowercases and removes stop words. |
The built-in analyzers—WhitespaceAnalyzer, SimpleAnalyzer, StopAnalyzer, KeywordAnalyzer, and StandardAnalyzer—are designed to work with text in almost any Western (European-based) language. You can see the effect of each of these analyzers, except KeywordAnalyzer, in the output in section 4.1. WhitespaceAnalyzer and SimpleAnalyzer are truly trivial: the one-line description in table 4.3 pretty much sums them up, so we don’t cover them further here. We cover KeywordAnalyzer in section 4.7.3. We explore the StopAnalyzer and StandardAnalyzer in more depth because they have nontrivial effects.
4.3.1. StopAnalyzer
StopAnalyzer, beyond doing basic word splitting and lowercasing, also removes special words called stop words. Stop words are words that are very common, such as the, and thus assumed to carry very little standalone meaning for searching since nearly every document will contain the word.
Embedded in StopAnalyzer is the following set of common English stop words, defined as ENGLISH_STOP_WORDS_SET. This default set is used unless otherwise specified:
"a", "an", "and", "are", "as", "at", "be", "but", "by",
"for", "if", "in", "into", "is", "it",  "no", "not", "of", "on",
"or", "such","that", "the", "their", "then", "there", "these",
"they", "this", "to", "was", "will", "with"
The StopAnalyzer has a second constructor that allows you to pass your own set instead.
Under the hood, StopAnalyzer creates a StopFilter to perform the filtering. Section 4.6.1 describes StopFilter in more detail.
4.3.2. StandardAnalyzer
StandardAnalyzer holds the honor as the most generally useful built-in analyzer. A JFlex-based[1] grammar underlies it, tokenizing with cleverness for the following lexical types: alphanumerics, acronyms, company names, email addresses, computer hostnames, numbers, words with an interior apostrophe, serial numbers, IP addresses, and Chinese and Japanese characters. StandardAnalyzer also includes stop-word removal, using the same mechanism as the StopAnalyzer (identical default English set, and an optional Set constructor to override). StandardAnalyzer makes a great first choice.
1 JFlex is a sophisticated and high-performance lexical analyzer. See http://jflex.de.
Using StandardAnalyzer is no different than using any of the other analyzers, as you can see from its use in section 4.1.1 and AnalyzerDemo (listing 4.1). Its unique effect, though, is apparent in the different treatment of text. For example, compare the different analyzers on the phrase “XY&Z Corporation - [email protected]” from section 4.1. StandardAnalyzer is the only one that kept XY&Z together as well as the email address [email protected]; both of these showcase the vastly more sophisticated analysis process.
4.3.3. Which core analyzer should you use?
We’ve now seen the substantial differences in how each of the four core Lucene analyzers works. How do you choose the right one for your application? The answer may surprise you: most applications don’t use any of the built-in analyzers, and instead opt to create their own analyzer chain. For those applications that do use a core analyzer, StandardAnalyzer is likely the most common choice. The remaining core analyzers are usually far too simplistic for most applications, except perhaps for specific use cases (for example, a field that contains a list of part numbers might use WhitespaceAnalyzer). But these analyzers are great for test cases, and are indeed used heavily by Lucene’s unit tests.
Typically an application has specific needs, such as customizing the stop-words list, performing special tokenization for application-specific tokens like part numbers or for synonym expansion, preserving case for certain tokens, or choosing a specific stemming algorithm. In fact, Solr makes it trivial to create your own analysis chain by expressing the chain directly as XML in solrconfig.xml.
With that in mind, and now that you’re equipped with a strong foundational knowledge of Lucene’s analysis process, we’ll move on to creating our own real-world analyzers. We’ll show you how to implement a couple of frequently requested features: sounds-like querying and synonym expansion. Next, we create our own analyzer chain that normalizes tokens by their stems, removing stop words in the process, and discuss some challenges that result. After that we’ll discuss some interesting field-specific variations that impact analysis. Finally we’ll visit issues that arise when analyzing different languages, and we’ll wrap up with a quick taste of how the Nutch project handles document analysis. Let’s begin with sounds-like querying.
4.4. Sounds-like querying
Have you ever played the game charades, cupping your hand to your ear to indicate that your next gestures refer to words that “sound like” the real words you’re trying to convey? Neither have we. Suppose, though, that a high-paying client has asked you to implement a search engine accessible by Java 2 Micro Edition (J2ME)-enabled devices, such as a smart phone, to help during those tough charade matches. In this section, we’ll implement an analyzer to convert words to a phonetic root using an implementation of the Metaphone algorithm from the Apache Commons Codec project. We chose the Metaphone algorithm as an example, but other algorithms are available, such as Soundex.
Let’s start with a test case, shown in listing 4.4, showing the high-level goal of our search experience.
Listing 4.4. Searching for words that sound like one another
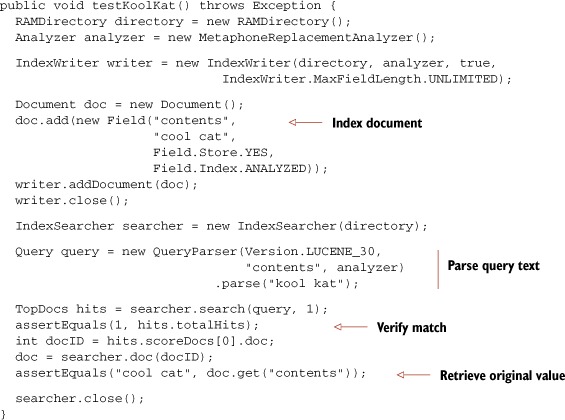
It seems like magic! The user searched for “kool kat.” Neither of those terms was in our original document, yet the search found the desired match. Searches on the original text would also return the expected matches. The trick lies in the MetaphoneReplacementAnalyzer:
public class MetaphoneReplacementAnalyzer extends Analyzer {
  public TokenStream tokenStream(String fieldName, Reader reader) {
    return new MetaphoneReplacementFilter(
                   new LetterTokenizer(reader));
  }
}
Because the Metaphone algorithm expects words that only include letters, the LetterTokenizer is used to feed our metaphone filter. The LetterTokenizer doesn’t lowercase, however. The tokens emitted are replaced by their metaphone equivalent, so lowercasing is unnecessary. Let’s now dig into the MetaphoneReplacementFilter (listing 4.5), where the real work is done.
Listing 4.5. TokenFilter that replaces tokens with their metaphone equivalents
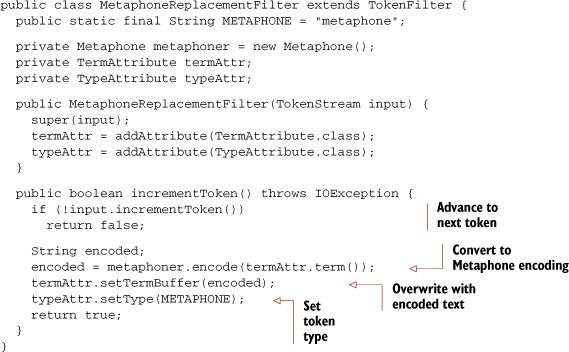
The token emitted by our MetaphoneReplacementFilter, as its name implies, literally replaces the incoming token. This new token is set with the same position offsets as the original, because it’s a replacement in the same position. The last line before returning the token sets the token type. The StandardTokenizer, as discussed in section 4.3.2, tags tokens with a type that is later used by the StandardFilter. The metaphone type isn’t used in our examples, but it demonstrates that a later filter could be metaphone-token aware by calling Token’s type() method.
Note
Token types, such as the metaphone type used in MetaphoneReplacementFilter, are carried through the analysis phase but aren’t encoded into the index. Unless otherwise specified, the type word is used for tokens by default. Section 4.2.4 discusses token types further.
As always, it’s good to view what an analyzer is doing with text. Using our AnalyzerUtils, two phrases that sound similar yet are spelled differently are tokenized and displayed:
public static void main(String[] args) throws IOException {
  MetaphoneReplacementAnalyzer analyzer =
                               new MetaphoneReplacementAnalyzer();
  AnalyzerUtils.displayTokens(analyzer,
                 "The quick brown fox jumped over the lazy dog");

  System.out.println("");
  AnalyzerUtils.displayTokens(analyzer,
                 "Tha quik brown phox jumpd ovvar tha lazi dag");
}
We get a sample of the metaphone encoder, shown here:
[0] [KK] [BRN] [FKS] [JMPT] [OFR] [0] [LS] [TKS]
[0] [KK] [BRN] [FKS] [JMPT] [OFR] [0] [LS] [TKS]
Wow—an exact match!
In practice, it’s unlikely you’ll want sounds-like matches except in special places; otherwise, far too many undesired matches may be returned.[2] In the “What would Google do?” sense, a sounds-like feature would be great for situations where a user misspelled every word and no documents were found but alternative words could be suggested. One implementation approach to this idea would be to run all text through a sounds-like analysis and build a cross-reference lookup to consult when a correction is needed.
2 While working on this chapter, Erik asked his brilliant, then five-year-old son Jakob how he would spell cool cat. Jakob replied, “c-o-l c-a-t.” What a wonderfully confusing language English is. Erik imagines that a “sounds-like” feature in search engines designed for children would be very useful. Metaphone encodes cool, kool, and col all as KL.
Now let’s walk through an analyzer that can handle synonyms during indexing.
4.5. Synonyms, aliases, and words that mean the same
How often have you searched for “spud” and been disappointed that the results didn’t include “potato”? Okay, maybe that precise example doesn’t happen often, but you get the idea: natural languages for some reason have evolved many ways to say the same thing. Such synonyms must be handled during searching, or your users won’t find their documents.
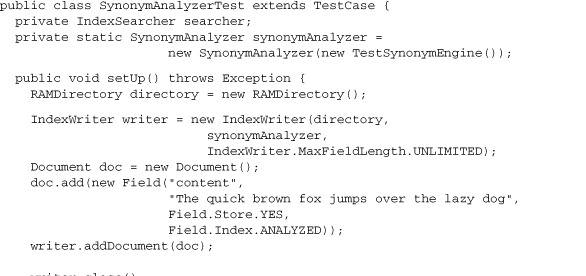
Our next custom analyzer injects synonyms of words into the outgoing token stream during indexing but places the synonyms in the same position as the original word. By adding synonyms during indexing, searches will find documents that may not contain the original search terms but that match the synonyms of those words. We start with the test case showing how we expect our new analyzer to work, shown in listing 4.6.
Listing 4.6. Testing the synonym analyzer
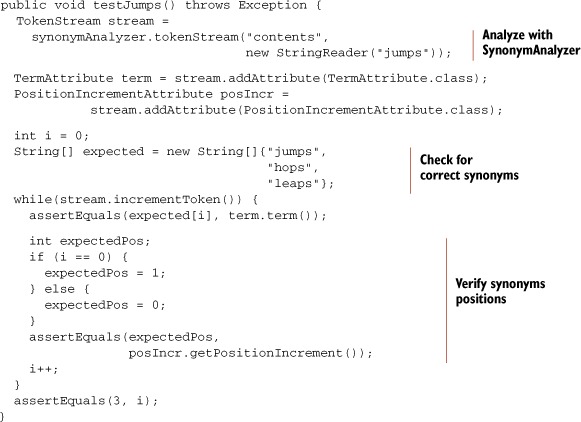
Notice that our unit test shows not only that synonyms for the word jumps are emitted from the SynonymAnalyzer but also that the synonyms are placed in the same position (using an increment of 0) as the original word. Now that we see what behavior we expect of SynonymAnalyzer, let’s see how to build it.
4.5.1. Creating SynonymAnalyzer
SynonymAnalyzer’s purpose is to first detect the occurrence of words that have synonyms, and second to insert the synonyms at the same position. Figure 4.6 graphically shows what our SynonymAnalyzer does to text input, and listing 4.7 is the implementation.
Figure 4.6. SynonymAnalyzer visualized as factory automation
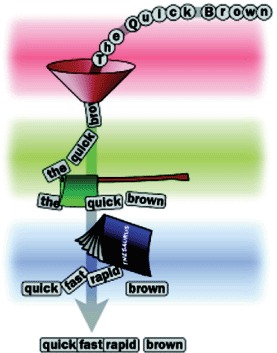
Listing 4.7. SynonymAnalyzer implementation
public class SynonymAnalyzer extends Analyzer {
  private SynonymEngine engine;

  public SynonymAnalyzer(SynonymEngine engine) {
    this.engine = engine;
  }

  public TokenStream tokenStream(String fieldName, Reader reader) {
    TokenStream result = new SynonymFilter(
                          new StopFilter(true,
                            new LowerCaseFilter(
                              new StandardFilter(
                                new StandardTokenizer(
                                 Version.LUCENE_30, reader))),
                            StopAnalyzer.ENGLISH_STOP_WORDS_SET),
                          engine
                         );
    return result;
  }
}
Once again, the analyzer code is minimal and simply chains a Tokenizer together with a series of TokenFilters; in fact, this is the StandardAnalyzer wrapped with an additional filter. (See table 4.1 for more on these basic analyzer building blocks.) The final TokenFilter in the chain is the new SynonymFilter (listing 4.8), which gets to the heart of the current discussion. When you’re injecting terms, buffering is needed. This filter uses a Stack as the buffer.
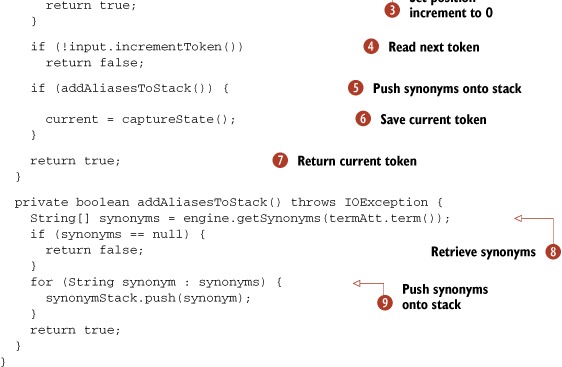
Listing 4.8. SynonymFilter: buffering tokens and emitting one at a time
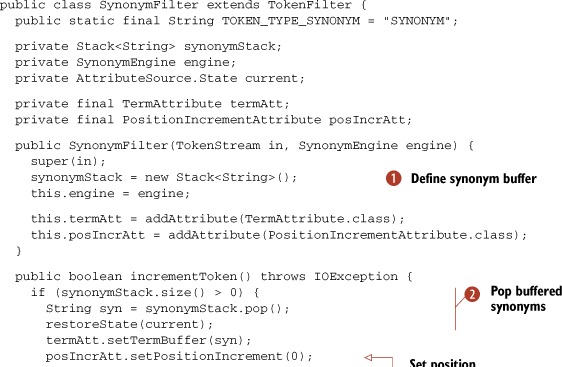
| We create a stack to hold the pending synonyms. | |
| The code successively pops the stack of buffered synonyms from the last streamed-in token until it’s empty. | |
| After all previous token synonyms have been emitted, we read the next token. | |
| We push all synonyms of the current token onto the stack. | |
| We save details for the current token, if it has synonyms. | |
| We return the current (and original) token before its associated synonyms. | |
| Synonyms are retrieved from the SynonymEngine. |
The design of SynonymAnalyzer allows for pluggable SynonymEngine implementations. SynonymEngine is a one-method interface:
public interface SynonymEngine {
  String[] getSynonyms(String s) throws IOException;
}
Using an interface for this design easily allows test implementations. We leave it as an exercise for you to create production-quality SynonymEngine implementations.[3] For our examples, we use a simple test that’s hard-coded with a few synonyms:
3 It’s cruel to leave you hanging with a mock implementation, isn’t it? Actually, we’ve implemented a powerful SynonymEngine using the WordNet database. It’s covered in section 9.3.2.
public class TestSynonymEngine implements SynonymEngine {
  private static HashMap<String, String[]> map =

    new HashMap<String, String[]>();

  static {
    map.put("quick", new String[] {"fast", "speedy"});
    map.put("jumps", new String[] {"leaps", "hops"});
    map.put("over", new String[] {"above"});
    map.put("lazy", new String[] {"apathetic", "sluggish"});
    map.put("dog", new String[] {"canine", "pooch"});
  }
  public String[] getSynonyms(String s) {
    return map.get(s);
  }
}
Notice that the synonyms generated by TestSynonymEngine are one-way: quick has the synonyms fast and speedy, but fast has no synonyms. In a real production environment, you should ensure all synonyms list one another as alternate synonyms, but because we’re using this for simple testing, it’s fine.
Setting the position increment seems powerful, and indeed it is. You should only modify increments knowing of some odd cases that arise in searching, though. Because synonyms are indexed just like other terms, TermQuery works as expected. Also, PhraseQuery works as expected when we use a synonym in place of an original word. The SynonymAnalyzerTest test case in listing 4.9 demonstrates things working well using API-created queries.
Listing 4.9. SynonymAnalyzerTest: showing that synonym queries work
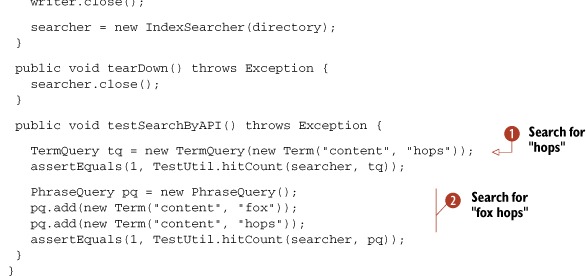
| A search for the word hops matches the document. | |
| A search for the phrase “fox hops” also matches. |
The phrase “...fox jumps...” was indexed, and our SynonymAnalyzer injected hops in the same position as jumps. A TermQuery for hops succeeded, as did an exact PhraseQuery for “fox hops.” Excellent!
Let’s test it with QueryParser. We’ll run two tests. The first one creates QueryParser using our SynonymAnalyzer and the second one using StandardAnalyzer, as shown in listing 4.10.
Listing 4.10. Testing SynonymAnalyzer with QueryParser
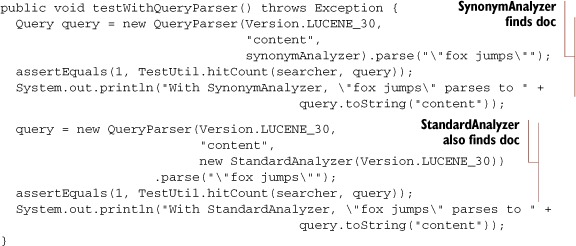
Both analyzers find the matching document just fine, which is great. The test produces the following output:
With SynonymAnalyzer, "fox jumps" parses to "fox (jumps hops leaps)"
With StandardAnalyzer, "fox jumps" parses to "fox jumps"
As expected, with SynonymAnalyzer, words in our query were expanded to their synonyms. QueryParser is smart enough to notice that the tokens produced by the analyzer have zero position increment, and when that happens inside a phrase query, it creates a MultiPhraseQuery, described in section 5.3.
But this is wasteful and unnecessary: we only need synonym expansion during indexing or during searching, not both. If you choose to expand during indexing, the disk space consumed by your index will be somewhat larger, but searching may be faster because there are fewer search terms to visit. Your synonyms have been baked into the index, so you don’t have the freedom to quickly change them and see the impact of such changes during searching. If instead you expand at search time, you can see fast turnaround when testing. These are simply trade-offs, and which option is best is your decision based on your application’s constraints.
Next we improve our AnalyzerUtils class to more easily see synonyms expansion during indexing.
4.5.2. Visualizing token positions
Our AnalyzerUtils.displayTokens doesn’t show us all the information when dealing with analyzers that set position increments other than 1. To get a better view of these types of analyzers, we add an additional utility method, displayTokensWithPositions, to AnalyzerUtils, as shown in listing 4.11.
Listing 4.11. Visualizing the position increment of each token
public static void displayTokensWithPositions
  (Analyzer analyzer, String text) throws IOException {

  TokenStream stream = analyzer.tokenStream("contents",
                                            new StringReader(text));
  TermAttribute term = stream.addAttribute(TermAttribute.class);
  PositionIncrementAttribute posIncr =
       stream.addAttribute(PositionIncrementAttribute.class);

  int position = 0;
  while(stream.incrementToken()) {
    int increment = posIncr.getPositionIncrement();
    if (increment > 0) {
      position = position + increment;
      System.out.println();
      System.out.print(position + ": ");
    }

    System.out.print("[" + term.term() + "] ");
  }
  System.out.println();
}
We wrote a quick piece of code to see what our SynonymAnalyzer is doing:
public class SynonymAnalyzerViewer {

  public static void main(String[] args) throws IOException {

  SynonymEngine engine = new TestSynonymEngine();

  AnalyzerUtils.displayTokensWithPositions(
    new SynonymAnalyzer(engine),
    "The quick brown fox jumps over the lazy dog");
  }
}
And we can now visualize the synonyms placed in the same positions as the original words:
2: [quick] [speedy] [fast]
3: [brown]
4: [fox]
5: [jumps] [hops] [leaps]
6: [over] [above]
8: [lazy] [sluggish] [apathetic]
9: [dog] [pooch] [canine]
Each number on the left represents the token position. The numbers here are continuous, but they wouldn’t be if the analyzer left holes (as you’ll see with the next custom analyzer). Multiple terms shown for a single position illustrate where synonyms were added.
4.6. Stemming analysis
Our final analyzer pulls out all the stops. It has a ridiculous, yet descriptive name: PositionalPorterStopAnalyzer. This analyzer removes stop words, leaving positional holes where words are removed, and leverages a stemming filter.
The PorterStemFilter is shown in the class hierarchy in figure 4.5, but it isn’t used by any built-in analyzer. It stems words using the Porter stemming algorithm created by Dr. Martin Porter, and it’s best defined in his own words:
The Porter stemming algorithm (or “Porter stemmer”) is a process for removing the commoner morphological and inflexional endings from words in English. Its main use is as part of a term normalisation process that is usually done when setting up Information Retrieval systems.[4]
4 Taken from the website http://tartarus.org/~martin/PorterStemmer/index.html
In other words, the various forms of a word are reduced to a common root form. For example, the words breathe, breathes, breathing, and breathed, via the Porter stemmer, reduce to breath.
The Porter stemmer is one of many stemming algorithms. See section 8.2.1 for coverage of an extension to Lucene that implements the Snowball algorithm (also created by Dr. Porter). KStem is another stemming algorithm that has been adapted to Lucene (search Google for KStem and Lucene).
Next we’ll show how to use StopFilter to remove words but leave a positional hole behind, and then we’ll describe the full analyzer.
4.6.1. StopFilter leaves holes
Stop-word removal brings up an interesting issue: what happens to the holes left by the words removed? Suppose you index “one is not enough.” The tokens emitted from StopAnalyzer will be one and enough, with is and not thrown away. By default, StopAnalyzer accounts for the removed words by incrementing the position increment. This is illustrated from the output of AnalyzerUtils.displayTokensWithPositions:
2: [quick]
3: [brown]
4: [fox]
5: [jump]
6: [over]
8: [lazi]
9: [dog]
Positions 1 and 7 are missing due to the removal of the. If you have a need to disable the holes so that position increment is always 1, use StopFilter’s setEnablePositionIncrements method. But be careful when doing so: your index won’t record the deleted words, so there can be surprising effects. For example, the phrase “one enough” will match the indexed phrase “one is not enough” if you don’t preserve the holes!
Stepping back a bit, the primary reason to remove stop words is because these words typically have no special meaning; they are the “glue” words required in any language. The problem is, because we’ve discarded them, we’ve lost some information, which may or may not be a problem for your application. For example, nonexact searches can still match the document, such as “a quick brown fox.”
There’s an interesting alternative, called shingles, which are compound tokens created from multiple adjacent tokens. Lucene has a TokenFilter called ShingleFilter in the contrib analyzers module that creates shingles during analysis. We’ll describe it in more detail in section 8.2.3. With shingles, stop words are combined with adjacent words to make new tokens, such as the-quick. At search time, the same expansion is used. This enables precise phrase matching, because the stop words aren’t discarded. Using shingles yields good search performance because the number of documents containing the-quick is far fewer than the number containing the stop word the in any context. Nutch’s document analysis, described in section 4.9, also uses shingles.
4.6.2. Combining stemming and stop-word removal
This custom analyzer uses a stop-word removal filter, enabled to maintain positional gaps and fed from a LowerCaseTokenizer. The results of the stop filter are fed to the Porter stemmer. Listing 4.12 shows the full implementation of this sophisticated analyzer. LowerCaseTokenizer kicks off the analysis process, feeding tokens through the stop-word removal filter and finally stemming the words using the built-in Porter stemmer.
Listing 4.12. PositionalPorterStopAnalyzer: stemming and stop word removal
public class PositionalPorterStopAnalyzer extends Analyzer {
  private Set stopWords;

  public PositionalPorterStopAnalyzer() {
    this(StopAnalyzer.ENGLISH_STOP_WORDS_SET);
  }

  public PositionalPorterStopAnalyzer(Set stopWords) {
    this.stopWords = stopWords;
  }

  public TokenStream tokenStream(String fieldName, Reader reader) {
    StopFilter stopFilter = new StopFilter(true,
                                           new LowerCaseTokenizer(reader),
                                           stopWords);
    stopFilter.setEnablePositionIncrements(true);
    return new PorterStemFilter(stopFilter);
  }
}
Next we describe field-specific issues with analysis.
4.7. Field variations
The fact that a document is composed of multiple fields, with diverse characteristics, introduces some interesting requirements to the analysis process. We’ll first consider how analysis is impacted by multivalued fields. Next we’ll discuss how to use different analyzers for different fields. Finally, we’ll talk about skipping analysis entirely for certain fields.
4.7.1. Analysis of multivalued fields
Recall from chapter 2 that a document may have more than one Field instance with the same name, and that Lucene logically appends the tokens of these fields sequentially during indexing. Fortunately, your analyzer has some control over what happens at each field value boundary. This is important in order to ensure queries that pay attention to a Token’s position, such as phrase or span queries, don’t inadvertently match across two separate field instances. For example, if one value is “it’s time to pay income tax” and the next value is “return library books on time,” then a phrase search for “tax return” will happily match this field!
To fix this, you’ll have to create your own analyzer by subclassing the Analyzer class, then override the getPositionIncrementGap method (along with the tokenStream or reusableTokenStream method). By default, getPositionIncrementGap returns 0 (no gap), which means it acts as if the field values were directly appended to one another. Increase it to a large enough number (for example, 100) so that no positional queries could ever incorrectly match across the boundary.
It’s also important to ensure that token offsets are computed properly for multivalued fields. If you intend to highlight such fields, as described in section 8.3, incorrect offsets will cause the wrong parts of the text to be highlighted. The token’s OffsetAttribute, which exposes methods to retrieve the start and end offset, also has a special method endOffset, whose purpose is to return the final offset for the field. This is necessary for cases where a TokenFilter has stripped out one or more final tokens; Lucene would otherwise have no way to compute the final offset for that field value. The offsets of each Field instance are shifted by the sum of the endOffset of all fields before it. Lucene’s core tokenizers all implement endOffset properly, but if you create your own tokenizer, it’s up to you to do so. Similarly, if your application requires a gap to be added to offsets when a field has multiple values, you should override the getOffsetGap method of your custom analyzer.
Another frequently encountered analysis challenge is how to use a different analyzer for different fields.
4.7.2. Field-specific analysis
During indexing, the granularity of analyzer choice is at the IndexWriter or per-document level. With QueryParser, there’s only one analyzer applied to all encountered text. Yet for many applications, where the documents have diverse fields, it would seem that each field may deserve unique analysis.
Internally, analyzers can easily act on the field name being analyzed, because that’s passed as an argument to the tokenStream method. The built-in analyzers don’t leverage this capability because they’re designed for general-purpose use and field names are application specific, but you can easily create a custom analyzer that does so. Alternatively, Lucene has a helpful built-in utility class, PerFieldAnalyzerWrapper, that makes it easy to use different analyzers per field. Use it like this:
PerFieldAnalyzerWrapper analyzer = new PerFieldAnalyzerWrapper(
                                          new SimpleAnalyzer());
analyzer.addAnalyzer("body", new StandardAnalyzer(Version.LUCENE_30));
You provide the default analyzer when you create PerFieldAnalyzerWrapper. Then, for any field that requires a different analyzer, you call the addAnalyzer method. Any field that wasn’t assigned a specific analyzer simply falls back to the default one. In the previous example, we use SimpleAnalyzer for all fields except body, which uses StandardAnalyzer.
Let’s see next how PerFieldAnalyzerWrapper can be useful when you need to mix analyzed and unanalyzed fields.
4.7.3. Searching on unanalyzed fields
There are often cases when you’d like to index a field’s value without analysis. For example, part numbers, URLs, and Social Security numbers should all be indexed and searched as a single token. During indexing this is easily done by specifying Field.Index.NOT_ANALYZED or Field.Index.NOT_ANALYZED_NO_NORMS when you create the field. You also want users to be able to search on these part numbers. This is simple if your application directly creates a TermQuery.
But a dilemma can arise if you use QueryParser and attempt to query on an unanalyzed field; this is because the fact that the field wasn’t analyzed is only known during indexing. There’s nothing special about such a field’s terms once indexed; they’re just terms. Let’s see the issue exposed with a straightforward test case that indexes a document with an unanalyzed field and then attempts to find that document again, shown in listing 4.13.
Listing 4.13. Using QueryParser to match part numbers

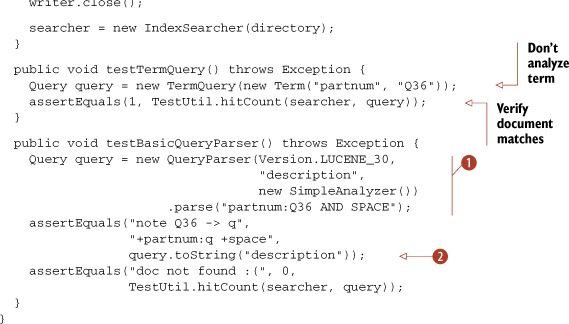
| QueryParser analyzes each term and phrase of the query expression. Both Q36 and SPACE are analyzed separately. SimpleAnalyzer strips nonletter characters and lowercases, so Q36 becomes q. But at indexing time, Q36 was left as is. Notice, also, that this is the same analyzer used during indexing, but because the field was indexed with Field.Index.NOT_ANALYZED_NO_NORMS, the analyzer wasn’t used. | |
| Query has a nice toString() method (see section 3.3.2) to return the query as a QueryParser-like expression. Notice that Q36 is gone. |
The TermQuery worked fine, but QueryParser found no results. This issue of QueryParser encountering an unanalyzed field emphasizes a key point: indexing and analysis are intimately tied to searching. The testBasicQueryParser test shows that searching for terms created using Index.NOT_ANALYZED_NO_NORMS when a query expression is analyzed can be problematic. It’s problematic because QueryParser analyzed the partnum field, but it shouldn’t have. There are a few possible solutions:
- Change your UI so a user selects a part number separately from free-form queries. Generally, users don’t want to know (and shouldn’t need to know) about the field names in the index. This approach, while simple to implement, isn’t generally recommended because it’s poor practice to present more than one text entry box to the user: he or she may become confused.
- If part numbers or other textual constructs are common lexical occurrences in the text you’re analyzing, consider creating a custom domain-specific analyzer that recognizes and preserves them.
- Subclass QueryParser and override one or both of the getFieldQuery methods to provide field-specific handling.
- Use PerFieldAnalyzerWrapper for field-specific analysis.
Designing a search UI is application-dependent; BooleanQuery (section 3.4.5) and filters (section 5.6) provide the support you need to combine query pieces in sophisticated ways. Section 9.5 shows how to present a forms-based search interface that uses XML to represent the full query. The information in this chapter provides the foundation for building domain-centric analyzers. We cover subclassing QueryParser in section 6.3. Of all these solutions, the simplest is to use PerFieldAnalyzerWrapper.
We’ll use Lucene’s KeywordAnalyzer to tokenize the part number as a single token. Note that KeywordAnalyzer and Field.Index.NOT_ANALYZED* are identical during indexing; it’s only with QueryParser that using KeywordAnalyzer is necessary. We want only one field to be “analyzed” in this manner, so we leverage the PerFieldAnalyzerWrapper to apply it only to the partnum field. First let’s look at the KeywordAnalyzer in action as it fixes the situation:
public void testPerFieldAnalyzer() throws Exception {
  PerFieldAnalyzerWrapper analyzer = new PerFieldAnalyzerWrapper(
                                            new SimpleAnalyzer());
  analyzer.addAnalyzer("partnum", new KeywordAnalyzer());

  Query query = new QueryParser(Version.LUCENE_30,
                                "description", analyzer).parse(
              "partnum:Q36 AND SPACE");

  assertEquals("Q36 kept as-is",
            "+partnum:Q36 +space", query.toString("description"));
  assertEquals("doc found!", 1, TestUtil.hitCount(searcher, query));
}
We use PerFieldAnalyzerWrapper to apply the KeywordAnalyzer only to the partnum field, and SimpleAnalyzer to all other fields. This yields the same result as during indexing. The query now has the proper term for the partnum field, and the document is found as expected.
Given KeywordAnalyzer, we could streamline our code (in KeywordAnalyzerTest.setUp) and use the same PerFieldAnalyzerWrapper used in testPerFieldAnalyzer during indexing. Using a KeywordAnalyzer on special fields during indexing would eliminate the use of Index.NOT_ANALYZED_NO_NORMS during indexing and replace it with Index.ANALYZED. Aesthetically, it may be pleasing to see the same analyzer used during indexing and querying, and using PerFieldAnalyzerWrapper makes this possible.
We’ve seen some interesting situations arising for different kinds of fields. Multivalued fields require setting a position increment gap, to avoid matching across different values, while PerFieldAnalyzerWrapper lets us customize which analyzer is used for which field. Let’s change topics now and discuss analyzing text from non-English languages.
4.8. Language analysis issues
Dealing with languages in Lucene is an interesting and multifaceted issue. How can text in various languages be indexed and subsequently retrieved? As a developer building Unicode-aware applications based on Lucene, what issues do you need to consider?
You must contend with several issues when analyzing text in various languages. The first hurdle is ensuring that character-set encoding is done properly so that external data, such as files, are read into Java properly. During the analysis process, different languages have different sets of stop words and unique stemming algorithms. Perhaps accents and other diacritics should be removed from characters as well, which would be language-dependent. Finally, you may require language detection if you aren’t sure what language is being used. Each of these issues is ultimately up to the developer to address, with only basic building-block support provided by Lucene. A number of analyzers and additional building blocks such as Tokenizers and TokenStreams are available in the contrib directory (discussed in section 8.2) and elsewhere online.
We’ll first describe the Unicode character encoding, then discuss options for analyzing non-English languages, and in particular Asian languages, which present unique challenges. Finally we’ll investigate options for mixing multiple languages in one index. Let’s begin with a brief introduction to Unicode and character encodings.
4.8.1. Unicode and encodings
Internally, Lucene stores all characters in the standard UTF-8 encoding. Java frees us from many struggles by automatically handling Unicode within Strings, represented as UTF16 code points, and providing facilities for reading in external data in the many encodings. You, however, are responsible for getting external text into Java and Lucene. If you’re indexing files on a file system, you need to know what encoding the files were saved as in order to read them properly. If you’re reading HTML or XML from an HTTP server, encoding issues get a bit more complex. Encodings can be specified in an HTTP content-type header or specified within the document itself in the XML header or an HTML <meta> tag.
We won’t elaborate on these encoding details, not because they aren’t important, but because they’re separate issues from Lucene. Please refer to appendix D for several sources of more detailed information on encoding topics. In particular, if you’re new to I18N issues, read Joel Spolsky’s excellent article “The Absolute Minimum Every Software Developer Absolutely, Positively Must Know About Unicode and Character Sets (No Excuses!)” (http://www.joelonsoftware.com/articles/Unicode.html) and the Java language Internationalization tutorial (http://java.sun.com/docs/books/tutorial/i18n/intro/).
We’ll proceed with the assumption that you have your text available as Unicode, and move on to the Lucene-specific language concerns.
4.8.2. Analyzing non-English languages
All the details of the analysis process apply when you’re dealing with text in non-English languages. Extracting terms from text is the goal. With Western languages, where whitespace and punctuation are used to separate words, you must adjust stop-word lists and stemming algorithms to be specific to the language of the text being analyzed. You may also want to use the ASCIIFoldingFilter, which replaces non-ASCII Unicode characters with their ASCII equivalents, when possible.
Beyond the built-in analyzers we’ve discussed, the contrib directory provides many language-specific analyzers, under contrib/analyzers. These analyzers generally employ language-specific stemming and stop word removal. Also freely available is the SnowballAnalyzer family of stemmers, which supports many European languages. We discuss SnowballAnalyzer in section 8.2.1.
Next we see an advanced capability in Lucene that enables filtering of characters even before the Tokenizer sees them.
4.8.3. Character normalization
As of version 2.9, Lucene makes it possible to normalize the character stream seen by the Tokenizer. This normalization fits in between the Reader and the Tokenizer, filtering the characters produced by the Reader, as shown in figure 4.7. What’s crucial about this API is it properly accounts for the necessary corrections to the start and end offsets of Tokens whenever the filtering adds or removes characters. This means highlighting will work correctly in the original input string.
Figure 4.7. ChineseDemo illustrating analysis of the title Tao Te Ching
When would you want to filter characters? One example usage might be mapping between the hiragana and katakana in Japanese character streams. Another is mapping traditional Chinese to simplified Chinese. Most applications don’t need to filter the character stream, but if yours does you’ll be happy to know it’s simple.
Regardless of your reasons, Lucene provides a set of character filtering classes that mirrors their token-based counterparts. The CharStream abstract base class simply adds one method, correctOffset, to the Reader class. CharReader wraps a normal Reader and creates a CharStream, whereas CharFilter chains any CharStream together. Using these building blocks, you can create a character filter chain, beginning with a single CharReader followed by any number of CharFilters, before tokenization even gets started. Figure 4.7 shows an initial CharReader followed by three CharFilters.
Lucene provides a single core concrete implementation of CharFilter, called MappingCharFilter, that allows you to enroll input and output pairs of substrings. Whenever one of the input substrings is seen in the input character stream, it’s replaced with the corresponding output string. Although you can use this class as is, if you want to perform simple substring replacement keep in mind that it has a potentially high performance cost. That’s because the current implementation allocates many temporary objects during analysis.
None of the core analyzers perform character filtering. You’ll have to create your own analyzer that builds a chain starting with a CharReader followed by any number of CharFilters, then a Tokenizer and TokenFilter chain. Let’s see what support Lucene provides for analyzing Asian languages next.
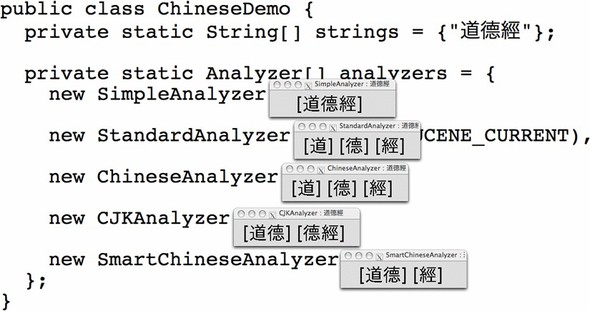
4.8.4. Analyzing Asian languages
Asian languages, such as Chinese, Japanese, and Korean (also denoted as CJK), generally use ideograms rather than an alphabet to represent words. These pictorial words may or may not be separated by whitespace and thus require a different type of analysis that recognizes when tokens should be split. The only built-in analyzer capable of doing anything useful with Asian text is the StandardAnalyzer, which recognizes some ranges of the Unicode space as CJK characters and tokenizes them individually.
Three analyzers in the Lucene contrib directory are suitable for Asian language analysis (see section 8.2 for more details on Lucene’s contrib analyzers): CJKAnalyzer, ChineseAnalyzer, and SmartChineseAnalyzer. In our sample book data, the Chinese characters for the book Tao Te Ching were added to the title. Because our data originates in Java properties files, Unicode escape sequences are used:[5]
5java.util.Properties loads properties files using the ISO-8859-1 encoding but allows characters to be encoded using standard Java Unicode u syntax. Java includes a native2ascii program that can convert natively encoded files into the appropriate format.
title=Tao Te Ching u9053u5FB7u7D93
We used StandardAnalyzer for all tokenized fields in our index, which tokenizes each English word as expected (tao, te, and ching) as well as each of the Chinese characters as separate terms (tao te ching) even though there’s no space between them. Our ChineseTest demonstrates that searching by the word tao using its Chinese representation works as desired:
public class ChineseTest extends TestCase {
  public void testChinese() throws Exception {
    Directory dir = TestUtil.getBookIndexDirectory();
    IndexSearcher searcher = new IndexSearcher(dir);
    Query query = new TermQuery(new Term("contents", "  "));
    assertEquals("tao", 1, TestUtil.hitCount(searcher, query));
  }
}
"));
assertEquals("tao", 1, TestUtil.hitCount(searcher, query));
}
}
Note that our ChineseTest.java file was saved in UTF-8 format and compiled using the UTF-8 encoding switch (-encoding utf8) for the Javac compiler. We had to ensure that the representations of the Chinese characters are encoded and read properly and use a CJK-aware analyzer.
Similar to the AnalyzerDemo in listing 4.2, we created a ChineseDemo (listing 4.14) program to illustrate how various analyzers work with Chinese text. This demo uses Abstract Window Toolkit (AWT) Label components to properly display the characters regardless of your locale and console environment.
Listing 4.14. ChineseDemo: illustrates what analyzers do with Chinese text

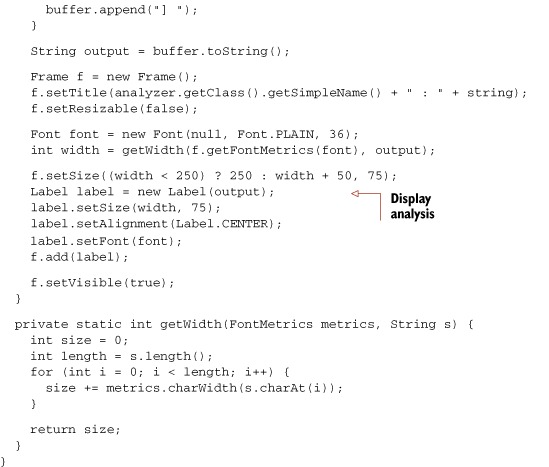
CJKAnalyzer, ChineseAnalyzer, and SmartChineseAnalyzer are analyzers found in the Lucene contrib directory; they aren’t included in the core Lucene distribution. ChineseDemo shows the output using an AWT Label component to avoid any confusion that might arise from console output encoding or limited fonts mangling things; you can see the output in figure 4.8.
Figure 4.8. Analysis chain that includes character normalization
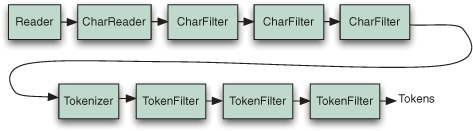
The CJKAnalyzer pairs characters in overlapping windows of two characters each. Many CJK words are two characters. By pairing characters in this manner, words are likely to be kept together (as well as disconnected characters, increasing the index size). The ChineseAnalyzer takes a simpler approach and, in our example, mirrors the results from the built-in StandardAnalyzer by tokenizing each Chinese character. Words that consist of multiple Chinese characters are split into terms for each component character. Finally, SmartChineseAnalyzer uses probabilistic knowledge to find the optimal word segmentation for Simplified Chinese text.
4.8.5. Zaijian[6]
6Zaijian means good-bye in Chinese.
A major hurdle remains when you’re dealing with various languages in a single index: handling text encoding. The StandardAnalyzer is still the best built-in general-purpose analyzer, even accounting for CJK characters; however, the contrib SmartChineseAnalyzer seems better suited for Chinese language analysis.
When you’re indexing documents in multiple languages into a single index, using a per-document analyzer is appropriate. You may also want to add a field to documents indicating their language; this field can be used to filter search results or for display purposes during retrieval. In section 6.3.4, we’ll show you how to retrieve the locale from a user’s web browser, which could be used to select an appropriate analyzer during searching.
One final topic is language detection. This, like character encodings, is outside the scope of Lucene, but it may be important to your application. We don’t cover language-detection techniques in this book, but it’s an active area of research with several implementations to choose from (see appendix D).
4.9. Nutch analysis
We don’t have the source code to Google, but we do have the open source project Nutch, created by Lucene’s creator Doug Cutting. Nutch takes an interesting approach to analyzing text, specifically how it handles stop words, which it calls common terms. If all words are indexed, an enormous number of documents become associated with each common term, such as the. Querying for the is practically a nonsensical query, given that the majority of documents contain that term. When common terms are used in a query, but not within a phrase, such as the quick brown with no other adornments or quotes, they are discarded. However, if a series of terms is surrounded by double quotes, such as “the quick brown,” a fancier trick is played, which we detail in this section.
Nutch combines an index-time analysis bigram (grouping two consecutive words as a single token) technique with a query-time optimization of phrases. This results in a far smaller document space considered during searching; for example, far fewer documents have the quick side by side than contain the. Using the internals of Nutch, we created a simple example to demonstrate the Nutch analysis trickery. The shingles contrib package offers the same capability. Listing 4.15 first analyzes the phrase “The quick brown...” using the NutchDocumentAnalyzer, then parses a query of “the quick brown” to demonstrate the Lucene query created.
Listing 4.15. NutchExample: demonstrating Nutch analysis and query parsing
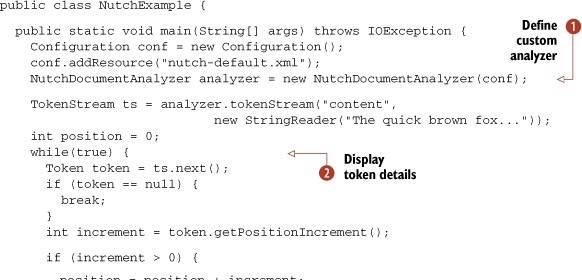
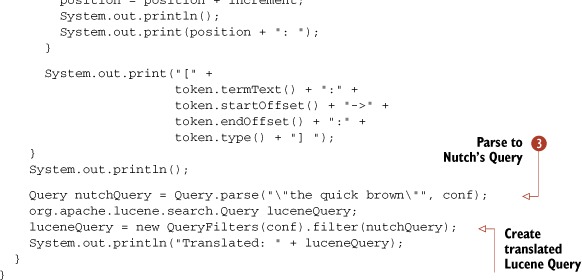
| Nutch uses a custom analyzer, NutchDocumentAnalyzer. Note that Nutch internally embeds an earlier version (2.4) of Lucene, which explains why it’s using the old analysis API based on the Token class and the next() method of TokenStream. These old deprecated APIs have been replaced with the attributes-based API as of version 3.0. | |
| We iterate through the tokens and print the details. | |
| We create the Nutch query, and use Nutch’s QueryFilters to translate the Query into the rewritten Lucene Query. |
The analyzer output shows how “the quick” becomes a bigram, but the word the isn’t discarded. The bigram resides in the same token position as the:
1: [the:0->3:<WORD>] [the-quick:0->9:gram]
2: [quick:4->9:<WORD>]
3: [brown:10->15:<WORD>]
4: [fox:16->19:<WORD>]
Because additional tokens are created during analysis, the index is larger, but the benefit of this trade-off is that searches for exact-phrase queries are much faster. And there’s a bonus: no terms were discarded during indexing.
During querying, phrases are also analyzed and optimized. The query output (recall from section 3.3.2 that Query’s toString() is handy) of the Lucene Query instance for the query expression "the quick brown" is:
Translated: +(url:"the quick brown"^4.0 anchor:"the quick brown"^2.0
  content:"the-quick quick brown" title:"the quick
  brown"^1.5 host:"the quick brown"^2.0)
A Nutch query expands to search in the url, anchor, title, and host fields as well, with higher boosts for those fields using the exact phrase. The content field clause is optimized to only include the bigram of a position that contains an additional <WORD> type token.
This was a quick view of what Nutch does with indexing analysis and query construction. Nutch continues to evolve, optimize, and tweak the various techniques for indexing and querying. The bigrams aren’t taken into consideration except in the content field, but as the document base grows, whether optimizations are needed on other fields will be reevaluated. You can use the shingles contrib module, covered in section 8.2.3, to take the same approach as Nutch.
4.10. Summary
Analysis, while only a single facet of using Lucene, is the aspect that deserves the most attention and effort. The words that can be searched are those emitted during indexing analysis: nothing more, nothing less. Sure, using StandardAnalyzer may do the trick for your needs, and it suffices for many applications. But it’s important to understand the analysis process. Users who take analysis for granted often run into confusion later when they try to understand why searching for “to be or not to be” returns no results (perhaps due to stop-word removal).
It takes less than one line of code to incorporate an analyzer during indexing. Many sophisticated processes may occur under the covers, such as stop word removal and stemming of words. Removing words decreases your index size but can have a negative impact on precision querying.
Because one size doesn’t fit all when it comes to analysis, you may need to tune the analysis process for your application domain. Lucene’s elegant analyzer architecture decouples each of the processes internal to textual analysis, letting you reuse fundamental building blocks to construct custom analyzers. When you’re working with analyzers, be sure to use our AnalyzerUtils, or something similar, to see firsthand how your text is tokenized. If you’re changing analyzers, you should rebuild your index using the new analyzer so that all documents are analyzed in the same manner.
Now, after four chapters, we’ve finished the first pass through the major components of Lucene: indexing, analysis, and searching. In the next chapter we’ll dig deeper into search by describing Lucene’s advanced search capabilities.