
This chapter covers |
|---|
|
In the previous chapter, we started creating a multipage document editor called MultiDoc. The aim is to create a desktop application that can load and save multipage documents stored in a single file. In this chapter, we show the implementation of a core part of this specification: the ability to save and load multipage documents stored as XML. You’ll add new load and save commands to MultiDoc, using classes in the System.Xml assembly. In the process, we’ll explore an extensible approach to reading XML with IronPython.
One of the big differences between Python and traditional .NET languages is its support for first-class functions. We start this chapter by looking at what first-class functions are and how they can help you write shorter and more beautiful code. Next, we turn our attention to working with the .NET XML classes and putting what you’ve learned about functions to work.
First, on with the first-class functions.
In a programming language, functions are first class if they’re just another kind of object—you can create them at runtime and pass them around your code, including using them as arguments to functions or return values from functions.
First-class functions are a core part of the functional-programming style of programming. Functional programming breaks problems into a set of functions. Preferably, these functions should only have inputs and outputs, neither storing internal state nor having side effects.
To programmers used to working with object-oriented languages, this seems an odd set of constraints—almost a step backwards. But there are some advantages to this style. Along with encouraging modularity, elegance and expressiveness are the biggest advantages. It’s also theoretically possible to construct formal proofs of purely functional programs—which has attracted a lot of interest in academic circles.
One aspect of first-class functions that you met in the Python tutorial is inner functions. These are functions defined inside the body of another function or method. If you have code repeated inside a function, it’s often tidier to factor this out into another function. If the code uses several local variables, then it may require too many arguments if turned into a separate method. In this case, it can make sense for it to be an inner function that has access to any of the variables in the scope in which it’s defined.
There’s another class of functions commonly used in functional programming: higher order functions.
Functions that take functions as arguments or return functions are called higher order functions. Functions that work with functions can be extremely useful. They allow you to separate out parts of a program more easily; for example, a higher order function might provide a traversal of a data structure, where the function you pass in decides what to do for each item.
This technique is highly reminiscent of the strategy pattern from Design Patterns: Elements of Reusable Object-Oriented Software:[1]
Define a family of algorithms, encapsulate each one, and make them interchangeable. Strategy lets the algorithm vary independently from clients that use it.
You can implement this pattern very simply with higher order functions. Imagine you’re writing a banking application that handles many different transactions. You need to apply these transactions to accounts, rolling back the transactions in the event of an error (such as insufficient funds in one of the accounts). Transactions of many different types can be created, but the code that consumes the transactions should be able to apply them without knowing anything about how they’re implemented.
A function to create a transaction may look something like this:
def get_transfer(account1, account2, amount):
   def do_transfer():
      account1.withdraw(amount)
      account2.deposit(amount)

   return do_transfer
The do_transfer function is for transactions that transfer money from one account to another. do_transfer closes over the parameters to get_transfer and encapsulates them. The parameters will be used when do_transfer is applied.
The transaction is applied by apply_transaction.
def apply_transaction(transaction, connection):
   connection.begin_transaction()
   try:
      transaction()
   except TransactionError:
      connection.abort_transaction()
      return False
   else:
      connection.commit_transaction()
      return True
apply_transaction can apply any transaction. It handles errors, aborting the transaction in case of error. It returns True or False depending on whether the transaction succeeds or not. The advantage of this kind of structure is that you can change how the transactions are applied in a single place, and individual transactions can be modified without affecting how they’re used.
Another place where higher order functions commonly turn up in Python is in the form of decorators.
It turns out that writing a function that takes a function, and then wraps it, is a common idiom in Python. Python has syntax to make this easier, syntactic sugar called decorators.
First, we show you an example that doesn’t use the decorator syntax. We wrap a function so that it prints whenever it is called. In practice, you might put logging or timing code inside the wrapper function.
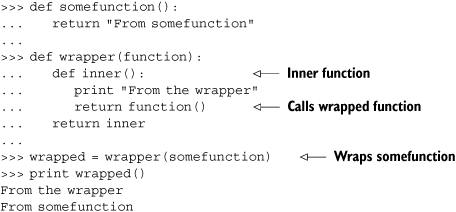
The decorator syntax allows a nicer way of expressing the line wrapped = wrapper (somefunction). You’ll especially appreciate it if you want to decorate all the methods in a class. Decorators use the @ symbol, along with the name of the decorator function, above the function definition.
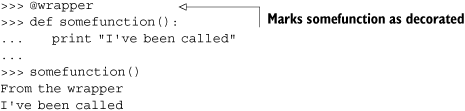
When you decorate a function, the function name is automatically rebound to the wrapped function rather than the original one. So is this actually useful? Let’s look at how you can use this to automate a repetitive task like checking method arguments for null values.
Even with static typing, method parameters can still be None (or null, using .NET speak) in .NET languages such as C#. If your code requires that the argument is valid and can’t be null, then it’s common to have code like the following:
void Present(Region present, Region selection)
{
  if (present == null)
  { throw new ArgumentNullException("present"); }
  if (selection == null)
  { throw new ArgumentNullException("selection"); }

  // Actual code that we care about
}
In Python, you can write a decorator that checks function arguments and raises a TypeError if any of them are None. Any methods that you want to check in this way can then be decorated.
To do this, you need a decorator that returns a wrapped function. The wrapper should check all the arguments before calling the function or method that’s wrapping. The wrapper function will need to call the wrappee with the same arguments it’s called with, and return the value that the wrapped function returns. This should do the trick:
def checkarguments(function):
   def decorated(*args):
      if None in args:
         raise TypeError("Invalid Argument")
      return function(*args)
   return decorated
Any arguments a wrapped function is called with are collected as a tuple (args). If any of these arguments are None (if None is in args), then a TypeError is raised. You use it like this:
class MyClass(object):

   @checkarguments
   def method(self, arg1, arg2):
      return arg1 + arg2
>>> instance = MyClass()
>>> instance.method(1, 2)
3
>>> instance.method(2, None)
Traceback (most recent call last):
TypeError: Invalid Argument
You should pass the parameter name when you raise the exception. You could do this by using introspection on the function object, but that’s another subject altogether.
OK, we’ve had some fun with functions in Python. Now it’s time to put what you’ve learned to practical use in working with XML.
XML is a text-based format that uses tags to structure data. XML is certainly no silver bullet when it comes to persisting data; it’s generally verbose and, for complex data structures, inefficient. On the other hand, XML is a text-based format. If something goes wrong with your program, it’s easier to see what’s going wrong than with a binary format.
An XML document will look something like the following segment:
<?xml version="1.0" encoding="utf-8"?>
<rootelement>
   <childelement1 attribute="An attribute value.">An element value, with parsed
     character data.</childelement1>
   <childelement2><![CDATA [An element value, with unparsed character data.
     ]]></childelement2>
</rootelement>
The encoding declaration at the start is optional, but useful if the document is in an encoding other than ASCII or UTF-8. XML is a hierarchical format, so it must contain a root element, which contains the rest of the document. The root element can contain child elements, which themselves can contain child elements nested to whatever degree of horrific complexity you desire.
XML elements are simple, but wrap together several concepts. Figure 5.1 shows all the components of an element.
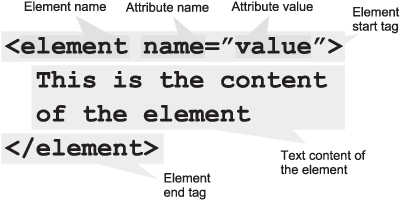
The text content contained between an element start tag and the end tag is restricted. Angle brackets in the text could be confused for the start of a new tag, unless they’re escaped. The XML spec stipulates five characters that should be escaped with entity references. Table 5.1 shows the characters that need to be escaped and their corresponding entity references.
Good XML writing and parsing libraries will handle the escaping and un-escaping for you; but, if your text contains a lot of these characters, it can make the resulting XML much less human-readable. Plain text content, which needs escaping and un-escaping, is called parsed data. An alternative is to include the text content in unparsed character data blocks, like the one from the previous XML document:
<![CDATA[An element value, with unparsed character data. ]]>
But there’s a disadvantage to CDATA blocks. They must not contain ]]> inside the text, and there’s no way of escaping them if they do occur. If you need to include arbitrary text—sourced from a user, for example—then CDATA blocks may not be suitable.
Back to the subject at hand: representing documents with XML. document will make an excellent root level element. You also need an element to represent pages. Each page has a title and contents. It seems logical that the title should be an attribute of the page start tag, and that the page contents should be the text content between the start and end elements. This will leave you with documents that look like the following segment:
<?xml version="1.0" encoding="utf-8"?>
<document>
   <page title="The page title">This is the contents of the first page.</page>
    <page title="Page Two">This is another page, as beautiful as the first.</
     page>
</document>
Now that the structure for representing documents is decided, you need to write the code to turn the model objects into XML.
The .NET XML support is enshrined in the System.Xml assembly. The System.Xml namespace has classes for reading and writing XML. There are further namespaces for working with XML schema, XSLT transformations, and XPath queries. Table 5.2 shows the major XML namespaces in .NET 2.0.
Table 5.2. The .NET XML namespaces
Namespace | Purpose |
|---|---|
| Provides support for standards-based XML support. Includes the |
| Support for XML Schemas in the form of schema definition language (XSD) schemas. |
| Classes to serialize objects in XML form. |
| Classes to work with the XQuery 1.0 and XPath 2.0 Data Model. |
| Support for Extensible Stylesheet Language Transformation (XSLT) transforms. |
The basic classes for reading and writing XML documents are the XmlReader and XmlWriter. Because you’ll be modifying the SaveCommand, we start with the XmlWriter.
XmlWriter is designed for creating conformant documents. The documents it creates will be valid XML, capable of being read by any standards-based reader. Along with the XmlWriter class, you use XmlWriterSettings. This is a class used for configuring an XmlWriter instance; you set attributes on the XmlWriterSettings instance to configure how the XML is written out.
Table 5.3 shows the different settings (properties) on XmlWriterSettings. The defaults are largely sensible, but we do like to change a couple. We like the XML tags to be indented with each level of nesting. This gives you a visual indication of the structure of the document (and we all know that indentation to indicate structure is a brilliant idea). The following segment creates an XmlWriterSettings instance, and sets the two properties required for indentation with four spaces. Because you haven’t yet used the System.Xml assembly, you first need to add a reference to it.
Table 5.3. The properties of XmlWriterSettings and the default values
Property | Initial value |
|---|---|
|
|
|
|
|
|
|
|
|
|
|
|
|
|
|
|
|
|
|
|
>>> import clr
>>> clr.AddReference('System.Xml')
>>> from System.Xml import XmlWriter, XmlWriterSettings
>>> settings = XmlWriterSettings()
>>> settings.Indent = True
>>> settings.IndentChars = '  ' # four spaces
You don’t instantiate a new XmlWriter instance directly; instead, you call the static method Create, which returns a new instance of the correct type of writer for the settings passed in. There are various call signatures for Create; for example, you could pass in a filename and your settings object, and the writer would create the file for you. If you don’t want the writer to be responsible for creating the file, you can pass in an opened FileStream instead. In the segments that follow, you’ll pass in a StringBuilder instance. StringBuilder is in the System.Text namespace, and is a mutable string type—it allows strings to be built up incrementally.
An odd side effect of passing a StringBuilder to the XmlWriter is that it will refuse to write any encoding in the XML declaration other than UTF-16.[2] Because you’re likely to be happy with the default encoding of UTF-8, you set OmitXmlDeclaration to True.
>>> settings.OmitXmlDeclaration = True
>>> from System.Text import StringBuilder
>>> document = StringBuilder()
>>> writer = XmlWriter.Create(document, settings)
>>> writer.WriteStartDocument()
>>> writer.WriteStartElement("document")
>>> writer.WriteStartElement("page")
>>> writer.WriteAttributeString("title", "A page title")
>>> writer.WriteString("This is a page contents")
>>> writer.WriteEndElement()
>>> writer.WriteEndElement()
>>> writer.WriteEndDocument()
>>> writer.Flush()
>>> writer.Close()
>>> print document.ToString()
   <document>
    <page title="A page title">This is a page contents</page>
   </document>
This is great because (by happy coincidence) it’s exactly the kind of structure that we want for our documents. Having to remember to close all the elements in the right order is a nuisance, though. This is what happens if you get it wrong:
>>> document = StringBuilder()
>>> writer = XmlWriter.Create(document, settings)
>>> writer.WriteEndElement()
Traceback (most recent call last):
 File System.Xml, line unknown, in WriteEndElement
 File System.Xml, line unknown, in AdvanceState
 File System.Xml, line unknown, in ThrowInvalidStateTransition
SystemError: Token EndElement in state Start would result in an invalid XML document.
Make sure that the ConformanceLevel setting is set to ConformanceLevel.Fragment or
ConformanceLevel.Auto if you want to write an XML fragment.
Oops. A sensible way to avoid this is to make sure that your XML document structure and your program structure are as similar as possible. Ideally, a top-level method should create (and close) the root node, calling down to submethods to write out its child elements. Each method should only be responsible for creating and closing a single element, again calling submethods for their child elements. This way you know that, as long as the code runs to completion, every element will be closed and the result will be valid XML. A nice side effect is that this is also a good way to write modular and readable code—which is important because you’re writing Python. In the next section, we apply this strategy to MultiDoc.
Writing out XML from a MultiDoc document is an important enough job that we can encapsulate it in its own class. This keeps the logic separate from the other machinations of the save commands, and easier to understand.
Note
By the end of chapter 4, we were still keeping the MultiDoc project as a single file, which was getting large and unwieldy. To make it easier to work with and provide a better application structure, you can break MultiDoc down into several modules containing the core classes. You can see this structure if you download the source code that accompanies this book. All the code from here on contains the appropriate imports to use our classes from the correct modules.
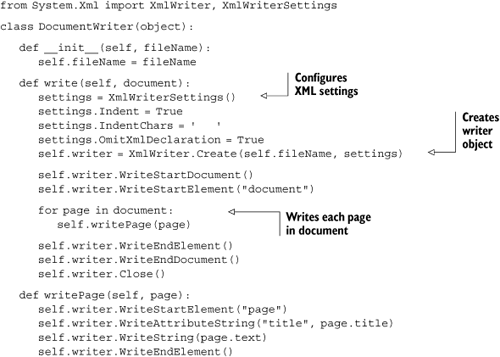
Listing 5.1 shows the DocumentWriter for MultiDoc; it uses XmlWriter and is instantiated with a filename. To write out the document, you must call write, passing in an instance of a MultiDoc document. The write method is responsible for creating the XmlWriter instance and opening and closing the root element of the XML. It calls down to writePage for each page in the document, creating the page element with title attribute.
This class needs to be saved as the file documentwriter.py. To plug this into MultiDoc, you need to modify the commands to use it. First, DocumentWriter needs to be imported inside the savecommands module.
from documentwriter import DocumentWriter
The SaveAsCommand inherits from SaveCommand, and the file writing is done in the saveFile method. You can get most of the way toward the changes you want by modifying saveFile as follows:
def saveFile(self, fileName, document):
      try:
         writer = DocumentWriter(fileName)
         writer.write(document)
         return True
      except IOError, e:
         ...
Previously the execute and promptAndSave methods of the commands only needed to pass some text to saveFile; now they need to pass the document instead. The document still needs to be updated before saving, so getText becomes getUpdatedDocument.
def getUpdatedDocument(self):
   self.tabController.updateDocument()
   return self.document
The execute method of both SaveCommand and SaveAsCommand must be modified to call getUpdatedDocument, and to pass the document through to saveFile and save-AndPrompt. These changes are simple; and, rather than using space here we leave you to figure them out. If you want to see the changes, they’re in the 5.3 folder of the sources that go with this book.
The DocumentWriter you’ve created follows the structure we suggested earlier, with a top-level method that writes out the top-level node (write). This calls down to writePage to write out the child page nodes. To do this, the XmlWriter has to be stored as state on the DocumentWriter, as the self.writer instance variable. Because you only have one root node, the structure is simple. You could avoid having to store state by refactoring to use an inner function.
The writePage method is simple. You can refactor this into an inner function that takes a page as its argument. It needs access to the writer, which can be a local variable in its enclosing scope, which is the body of the write method.
The refactored write method looks like listing 5.2.
Example 5.2. Implementation of DocumentWriter.write using an inner function
def write(self, document):
   settings = XmlWriterSettings()
   settings.Indent = True
   settings.IndentChars = '   '
   settings.OmitXmlDeclaration = True
   writer = XmlWriter.Create(self.fileName, settings)

   writer.WriteStartDocument()
   writer.WriteStartElement("document")

   def WritePage(page):
      writer.WriteStartElement("page")
      writer.WriteAttributeString("title", page.title)
      writer.WriteString(page.text)
      writer.WriteEndElement()
      for page in document:
         WritePage(page)

      writer.WriteEndElement()
      writer.WriteEndDocument()
      writer.Flush()
      writer.Close()
This version of write is still an acceptable length, and the number of occurrences of self have been dramatically reduced, making the code more readable!
Tip
There’s a performance implication when defining inner functions. The def statement is executed every time the method containing it is executed. It isn’t a high cost, but may become significant if it’s in a performance-sensitive part of your code. Inner functions close over the variables in their containing scope. They’re most useful when you need a new closure for each execution.
Now that we’ve created a way of writing MultiDoc documents in XML formats, we ought to provide a way of reading them back in again.
The counterpart to XmlWriter is XmlReader. Although logically it’s the inverse of XmlWriter, XmlReader is slightly more complex; it has almost twice as many public properties and methods. A lot of these are to allow you to read typed data from an XML file.
XmlReader is usually instantiated in the same way as XmlWriter—through the static Create method. There’s a plethora of different overloads for creating new instances; you can supply a stream, TextReader, or a resource locator as a string. You can also optionally pass in XmlReaderSettings and an XmlParserContext, and just about any combination of these items.
Note
There are two common approaches to parsing XML. The first, perhaps more intuitive, is to read the whole document and access the Document Object Model in memory. This is known as DOM parsing, and it turns out to be very cumbersome in practice. This chapter uses event-driven parsing, which fires events as elements of the document are read in.
The resource locator doesn’t need to be a filename; it can also be a URI[3] so that the XML document can be fetched from the internet. The default XmlResolver used by XmlReader is an XmlUrlResolver, which supports URIs that use the http:// and file:// protocols. You can supply authentication credentials, or use a different resolver by setting it on the instance of XmlReaderSettings that you use to Create your XmlReader.
The most convenient way, especially for this use case, is to supply a filename and an XmlReaderSettings instance. Table 5.4 shows the configurable properties on XmlReaderSettings, along with their default values. If you were reading only a fragment of XML, you might want to set ConformanceLevel to ConformanceLevel.Fragment. If the XML could have processing instructions that you don’t want to handle, then you can set IgnoreProcessingInstructions to True.
Table 5.4. The properties of XmlReaderSettings and the default values
Property | Initial value |
|---|---|
|
|
|
|
|
|
|
|
|
|
|
|
|
|
|
|
|
|
| An empty |
|
|
|
|
| A new |
Curiously, the default is for the XmlReader to not ignore insignificant whitespace (for example, whitespace that indents elements rather than being part of an attribute value or element content). Because you probably won’t want to handle insignificant whitespace, the following code segment shows the pattern you’ll be using for creating and configuring an XmlReader:
from System.Xml import XmlReader, XmlReaderSettings
settings = XmlReaderSettings()
settings.IgnoreWhitespace = True
reader = XmlReader.Create(filename, settings)
Once you’ve opened the XML file with XmlReader, the most straightforward way to use your instance is to repeatedly call the Read method. This consumes the document, one node at a time, exposing information about each node.
On completion, you should call reader.Close(), which frees the file. Forgetting to do this will cause the file to be held open until the reader is garbage-collected.
If you take the straightforward approach to reading MultiDoc files, the code would be simple, but also tedious and trivial. To make this section more interesting (and possibly even useful), we look at a more general approach to reading XML documents.
A useful pattern for implementing a Read loop is to establish handlers for the types of node that you expect. Read can be called in a simple loop, delegating to the handlers for each node you encounter.
Our documents have elements, with or without attributes and with or without contents. This doesn’t use the whole XML spec, not by a long stretch of the imagination. XML has many additional aspects to it, such as CDATA, namespaces, and processing instructions. You could write more handlers for these components we haven’t yet dealt with, but a significant proportion of XML documents are made up of nothing more than elements, attributes, and text.
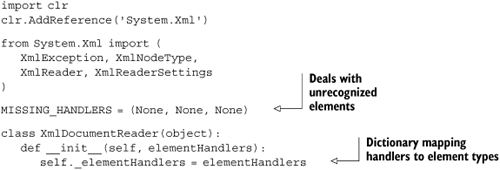
The following code is a general XmlDocumentReader class. It’s adapted from a similar class used in Resolver One; many thanks to the kind Resolver Systems folk for letting us use and abuse the code. We’ve mangled it quite a bit from the original, so any bugs are entirely of our own devising. As well as being a general (and easily extensible) XML reading class, it’s another example of using Python functions as first-class objects. The node handlers are packaged as a dictionary of node types mapping to functions (or methods) that know how to process them.
Listing 5.3 shows the imports and the constructor for XmlDocumentReader. It’s instantiated with the node handling functions. These will be explained when we get to using them, and we’ll put together a concrete example for reading MultiDoc documents.
Listing 5.4 is the read method of XmlDocumentReader. The element handlers passed into the constructor will be called when the reader encounters different elements in the document. This happens within the onStartElement method, which is called whenever an element start tag is encountered. Because you’re just handling elements, attributes, and contents, you need only three general node handlers: element start tags, element end tags, and the text contents of elements. Element attributes will be dealt with inside the element start tag node handler (listing 5.4).
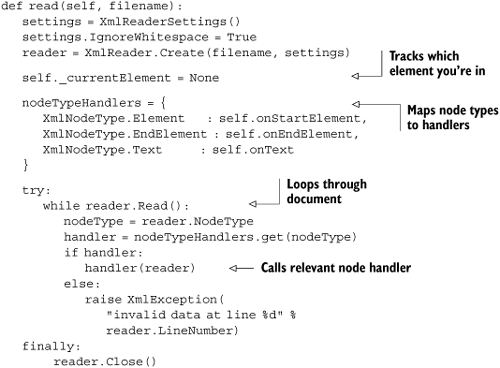
nodeTypeHandlers is a dictionary mapping the different XmlNodeTypes to handler functions. The call to reader.Read() advances the reader to the next node. It returns True if the reader finds a node, or False when the end of the document is read—which ends the reading loop.
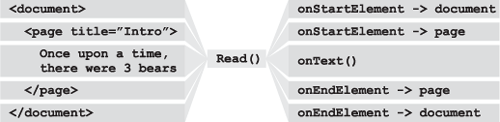
nodeTypeHandlers.get(reader.NodeType) looks up the current node in the dictionary of handlers. If the node type isn’t recognized, then get returns None and an XmlException[4] is raised. If the node type is recognized, then the handler is called and the reader passed in. Figure 5.2 shows how the read loop maps XML components it encounters into the handler method calls.
The finally block around the read loop ensures that the reader is closed, whatever error might occur.
The first node handler is onStartElement. This will be called when the reader encounters a start element tag such as <document> or <page title="Page title">. onStartElement is shown in listing 5.5.

onStartElement needs to extract the attributes from the element. These are collected in the attributes dictionary in another loop that calls reader.MoveToNextAttribute(). Next you check in the _elementHandlers to see if you have a handler for this type of element. If you do, the handler is called with the line number and attributes as arguments. Otherwise, an XmlException is raised.
_elementHandlers is a dictionary, and get returns a default value if the key (the element name) is missing. You use MISSING_HANDLERS as the default value (as defined in listing 5.1). Every element needs a handler for the start tag, end tag, and contents.
Element handlers are passed into the constructor as a dictionary that maps element names to the three handler functions. Elements can be self-closing (like <element />), which means that they won’t have any contents or a separate end tag. The only required handler is the start tag.[5] The three handlers for each element type should be provided in a tuple (which will become clearer later when you use XmlDocumentReader to read MultiDoc documents). For handling the page element, you have these handlers:
elementHandlers = {
   'page': (handleStartPage, handlePageText, handleEndPage)
}
If you have elements that don’t have text contents or don’t need their end tag handling, then you can replace these handlers with None.
elementHandlers = {
   'someElement': (handleStartPage, None, None)
}
MISSING_HANDLERS is a tuple of three Nones. self._elementHandlers.get(name, MISSING_HANDLERS) will always return a tuple of three values. The start tag handler is the first value; if the element isn’t contained in the elementHandlers dictionary, then this value will be None and an exception will be raised.
The middle handler in the tuple, index position one, is the handler for the text contents of elements. Listing 5.6 shows the code for the onText method. It’s similar to onStartElement, but simpler, because it doesn’t need to collect attributes. Because the text handler is optional, it doesn’t throw an exception if the text handler is None. The text handler gets called with the same arguments as the start tag handler.

Tuples of element handlers have three members. The third member is the handler for end element tags. Listing 5.7 shows onEndElement.
Example 5.7. Node handler for end element tags
def onEndElement(self, reader):
   endHandler = self._elementHandlers.get(reader.Name,
                  MISSING_HANDLERS)[2]
   if endHandler:
    endHandler(reader.LineNumber)
The end tag handler is called with the line number.
In the first part of the chapter, we looked at first-class functions in Python. In this part, we’ve put together a general-purpose XML reader class that uses handler functions stored in a dictionary to process different nodes. As long as the handler functions all have the same signature (by taking the same arguments), you’re free to implement your handler functions how you want.
To illustrate our general purpose reader at work, let’s implement the handler functions needed for the MultiDoc XML save format.
MultiDoc documents are represented programmatically by the classes Document and Page. To read them in, you can use XmlDocumentReader to read the XML and re-inflate the model classes.
The stages of reading a saved document are shown in figure 5.3.
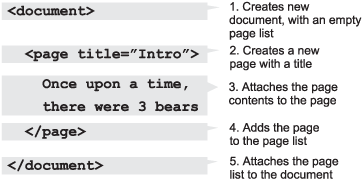
Steps 2 through 4 will obviously be repeated for every page in the document.
To use XmlDocumentReader, you need to provide handler functions for these steps; the handlers map to the steps as follows:
Document start element handler
Page start element hander
Page text handler
Page end element handler
Document end element handler
Before reading the file, you need to set up some state that will be used in the reading process. You need to store the document when it’s first created, a list to read pages into, and the filename to read. You also need to keep track of the current page so that the text handler can attach the text to it.
The document reader needs access to the model classes and the XmlDocumentReader. It will also do some verifying of the document structure, so you should import XmlException. DocumentReader sounds like a reasonable name for a document reader class. Listing 5.8 shows the imports and constructor for DocumentReader.
Example 5.8. Initializing the DocumentReader
from model import Document, Page
from xmldocumentreader import XmlDocumentReader, XmlException

class DocumentReader(object):
   def __init__(self, fileName):
      self.fileName = fileName
      self.document = None
      self.currentPage = None
      self.pages = []
Because we spent some time creating and discussing XmlDocumentReader, it ought to be easy to use. Listing 5.9 demonstrates just how easy.
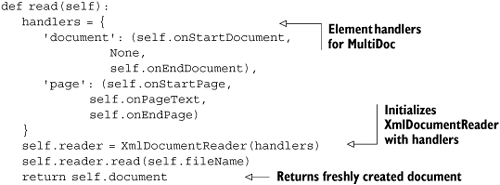
We’ve identified five handlers you need to pass in. Each element needs a tuple of three handlers: start tag handler, text handler, and end tag handler. MultiDoc documents have a humble two tags: document and page. The document element has child page tags, but no content; it doesn’t need a text handler, and the middle element can be None. The read method of DocumentReader sets up these handlers, using yet-to-be-defined methods. When XmlDocumentReader works its magic, the handlers are called—which builds the document.
The important pieces of the jigsaw puzzle are the handlers themselves. Listing 5.10 contains the document start and end tag handlers.
Example 5.10. Handlers for the document element
def onStartDocument(self, lineNumber, attributes):
   self.document = Document(self.fileName)

def onEndDocument(self, lineNumber):
   self.document.pages = self.pages
Both handles are simple. When you start reading the document (or, encounter the document start tag), you create a new document with the right filename. By the time you encounter the document end tag, you should have read all the pages, and onEndDocument should attach the pages to the document. XmlDocumentReader can then complete and read return the document.
Reading pages requires three handlers; the code for these is in listing 5.11.
Example 5.11. Handlers for the page element
def onStartPage(self, lineNumber, attributes):
   title = attributes.get('title')
   if title is None:
      raise XmlException('Invalid data at line %d' %
                    lineNumber)
   self.currentPage = Page(title)

def onPageText(self, lineNumber, value):
   self.currentPage.text = value.replace('
', '
')

def onEndPage(self, lineNumber):
   self.pages.append(self.currentPage)
Pages need a title, which is extracted from the attributes in onStartPage. If the title is missing, then the document is invalid, and an exception is raised. If a title is present, then a new page is created and set as the current page.
When the page contents are read in, the page is set as the current page in onPageText. XmlDocumentReader reads in files using an XmlReader returned by XmlReader.Create. XmlReader.Create returns an instance of XmlTextReader, which unsurprisingly opens files for reading in text mode. Python tries to do you a favor by converting
line-endings into
when you read files in text mode, which normally enables you to ignore cross-platform differences when dealing with line endings. Unfortunately, this favor backfires when you need to set the text on a Windows Forms control, which doesn’t recognize
as a line ending. To avoid this problem, onPageText converts
into
in the value passed to it.
When you reach the end page element, onEndPage adds the current page to the page list.
It may seem like there isn’t a lot of checking to ensure that the document is valid, beyond a cursory check that the title is present. In fact, there’s quite a lot of checking being done for you. Any unrecognized nodes or elements would cause an XmlException to be raised from inside XmlDocumentReader. If the XML document itself is invalid (due to missing or misplaced tags, for example), then the .NET XmlReader will raise an error. It will be important for you to catch these potential errors and alert the user when you read in documents.
DocumentReader is a concrete example of using XmlDocumentReader. DocumentReader is a simple class, only 44 lines of Python code, but extending it to read more complex documents and construct more intricate objects from them should be easy.
Now that you’ve created these classes to form MultiDoc document objects from saved files, you need to plug them into the user interface. To do this, you need an open command.
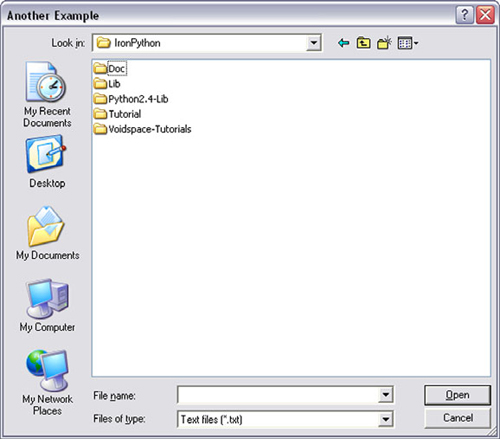
The OpenCommand is going to provide the mirror functionality to the SaveCommand and will look similar.[6] Instead of the SaveFileDialog, it will use its close (but equally familiar) cousin, the OpenFileDialog (figure 5.4), so that the user can choose a file to open. The open command is very similar to the save commands. The similarity even extends to the imports—except that, obviously, OpenFileDialog is imported instead of SaveFileDialog. OpenCommand also needs access to the DocumentReader class and Xml-Exception. If any errors are raised while reading a file, an XmlException will be raised. To catch these errors, you need to import XmlException.
Listing 5.12 is the imports and initialize for OpenCommand. Like SaveCommand, you have a title and a filter for use on the dialog control.
Example 5.12. Initializing the OpenCommand
from System.IO import Directory, Path
from System.Windows.Forms import (
   DialogResult, MessageBox,
   MessageBoxButtons, MessageBoxIcon,
   OpenFileDialog
)

from documentreader import DocumentReader, XmlException
from savecommands import filter

class OpenCommand(object):

   title = "Open Document"

   def __init__(self, mainForm):
      self.openFileDialog = OpenFileDialog()
      self.mainForm = mainForm

      self.openFileDialog.Filter = filter
      self.openFileDialog.Title = self.title
There are two things of note in this otherwise unremarkable code. The first is the reuse of the filter from the save commands. When you switched to an XML file format, you could have switched the save file extension too; personally, I (Michael) like .txt because it makes the files easier to open with a text editor. The second thing is that the OpenCommand constructor needs the MainForm passed in. When a new document is created, it needs to be set back on MainForm.
These commands need to implement an execute method. For OpenCommand, this is the method that asks the user to choose a file and attempts to open it as a MultiDoc file. You do the same manipulation with the filename (and directory) as you did for the save commands. If the current document already has a filename, then you set the initial directory and filename on the dialog box (listing 5.13).
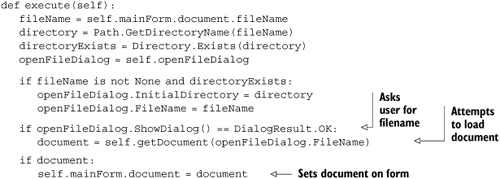
If the call to openFileDialog.ShowDialog() returns DialogResult.OK, then the user has selected a file, and self.getDocument is called with the filename. Reading the document could result in an exception being thrown if the document is invalid. If an exception is raised, it’s trapped inside getDocument, and a MessageBox is displayed to the user before None is returned. If a real document is returned, then it’s set on the MainForm.
Listing 5.14 shows the implementation of getDocument.
Example 5.14. The getDocument method of OpenCommand
def getDocument(self, fileName):
   try:
      reader = DocumentReader(fileName)
      return reader.read()
   except (IOError, XmlException), e:
      name = Path.GetFileName(fileName)
      MessageBox.Show(
         'Could not read file "%s"
The error was:
%s' %
         (name, str(e)),
         "Error Saving File",
         MessageBoxButtons.OK,
         MessageBoxIcon.Error
      )
      return None
getDocument is almost identical to the saveFile method of SaveCommand, except for the following three differences:
It uses
DocumentReaderinstead ofDocumentWriter.It returns a new document object or
None, instead ofTrueorFalse.It traps for a tuple of exceptions (
IOError,XmlException).
Two possible errors can occur. The first is that you fail to read the file from disk, perhaps due to a hard drive failure or the user whipping out a USB stick in between selecting the file with the dialog box and you actually managing to read it. This would cause an IOError. Alternatively, the document could be badly structured, resulting in an XmlException. If either situation happens, then you trap the error and alert the user with a message box.
At this point, we’d love to say that our work is done. Unfortunately, there’s a problem with this implementation of OpenCommand.
When the new document is returned from getDocument, it’s set on the MainForm. It is not just the MainForm that holds a reference to the current document, but also the TabController and the save commands. The TabController also needs to take action when a new document is loaded—it needs to update the tabs to reflect the new document.
To solve this problem, chapter 6 will set up a document observer system. But before we get to that, let’s review what we’ve done in this chapter.
We started the chapter by looking at first-class functions in Python. Being able to treat functions (or other callable objects) as ordinary objects enables some useful patterns. There’s a lot more to functional programming than we’ve covered here. Functional programming languages have been used mainly in academia, but they’ve been enjoying something of a renaissance recently. Languages like Haskell and Erlang are starting to gain popularity, but they’re still seen as harder to learn than imperative languages. Python supports functional programming, without limiting you to one particular style.
The rest of the chapter was concerned with XML reading and writing for MultiDoc. The approach we showed for reading should handle enough of the XML components for reading complex documents. It should also be easily extensible (simply add more node type handlers) for supporting parts of the XML spec that we haven’t covered. The XmlDocumentReader class demonstrates the power of IronPython. The .NET framework provides powerful and effective ways of dealing with XML that can be used from IronPython with much less code (which means more readable code) than from other .NET languages.
We did a small refactoring of the SaveCommand to use the XML writing capabilities, but we haven’t yet extended the MultiDoc user interface to incorporate the new OpenCommand.
The next chapter creates the additional features that MultiDoc is still missing, and integrates them into the user interface. This is the exciting part; you get to transform MultiDoc from the bare shell it is now (with exposed wires and plumbing—to return to our building analogy) into a functioning application. But you’ll need to get a little assistance from Visual Studio.
[1] The strategy pattern is the last pattern described in this 1995 book.
[2] Because the writer is writing into a string, which is still Unicode and has no encoding yet, it’s no wonder that it gets confused. The logic is possibly that the Windows internal UCS2 Unicode representation is most like UTF-16. Still, ignoring the explicit encoding on the XmlWriterSettings is a dubious practice.
[3] Uniform Resource Indicator—a term often used interchangeably with URL (Uniform Resource Locator), but supposedly more general.
[4] From the System.Xml namespace.
[5] In fact, for self-closing elements, the XmlReader doesn’t call the end tag handler.
[6] But, annoyingly, it’s different enough that little code that can be shared.