
|
Testing is an increasingly important part of software development. Automated test suites allow you to easily include testing as part of your development process, rather than as a separate, time-consuming, and expensive manual process. The alternative is letting your customers find the bugs for you. Testing isn’t only about finding bugs early, though; writing code in a testable way encourages the writing of modular and loosely coupled code—which means better code. Additionally, when adding new features or refactoring, your tests can warn you about what other parts of your code you’ve broken. Fortunately, testing is an area where dynamic languages particularly shine.
There are many different ways of categorizing tests, and many names for subtly different styles of testing. Broadly speaking, the three categories of tests are as follow:
Unit tests
Functional tests[1]
Regression tests
Unit tests are for testing components of your code, usually individual classes or functions. The elements under test should be testable in isolation from other parts; this isn’t always possible, but you have ways of handling these unavoidable dependencies within your tests. Dependencies that need to be managed include cases where your tests need to access external resources like databases or the filesystem.
Functional tests are higher-level tests that drive your application from the outside. They can be done with automation tools, by your test framework, or by providing functional hooks within your application. Functional tests mimic user actions and test that specific input produces the right output. As well as testing the individual units of code that the tests exercise, they also check that all the parts are wired together correctly—something that unit testing alone doesn’t achieve.
Regression testing checks that bugs you’ve fixed don’t recur. Regression tests are basically unit tests, but your reason for writing them is different. Once you’ve identified and fixed a bug, the regression test guarantees that it doesn’t come back.
The easiest way to start with testing in IronPython is to use the Python standard library module unittest.
Setting up a test framework with the unittest module is easy; simple tests can be set up and run within a matter of minutes. unittest, sometimes referred to as pyunit, owes its heritage to the Java test framework JUnit.[2]
The basis of using unittest is creating test classes, which inherit from unittest.TestCase. You pass these to a test runner, which executes all the test methods. Inside the test methods, you create objects, call the functions and methods you’re testing, and make assertions about the results.
The test runner runs all your tests and outputs a nicely formatted display of the results. Let’s take a closer look at how to use it.
The test runner recognizes any method whose name starts with test as a test method. The test runner will call these methods and collect the results.
Assertions are made by calling assert methods inherited from the TestCase class.
You need something to test; and, in order to test it, you need to know what it’s supposed to do. Let’s create a simple Value class for performing operations on numbers. This class should meet the following specifications:
It should be initialized with a number and store it as a
valueattribute.It should have an
addmethod, which takes a number and returns the stored value plus the number.It should have an
isEvenmethod, which returnsTruefor even numbers andFalsefor odd numbers.
From this specification, you can write the tests. Writing the tests first is a process called test-driven development.[4] With appropriately named tests that record the specification (and clearly written tests as well, of course), tests can act as a specification for the code.
Listing 7.1 shows a TestCase, called ValueTest, which tests the specification just listed.
Example 7.1. A TestCase class for Value, which tests the specification
import unittest
class ValueTest(unittest.TestCase):
def testConstructorShouldStoreValue(self):
value = Value(6)
self.assertEquals(value.value, 6,
"value attribute not set correctly")
def testAddShouldReturnArgumentAddedToValue(self):
value = Value(6)
self.assertEquals(value.add(3), 9,
"add returned the wrong answer")
def testIsEvenShouldReturnTrueForEvenNumbers(self):
value = Value(6)
self.assertTrue(value.isEven(),
"Wrong answer for isEven with an even number")
def testIsEvenShouldReturnFalseForOddNumbers(self):
value = Value(7)
self.assertFalse(value.isEven(),
"Wrong answer for isEven with an odd number")
if __name__ == '__main__':
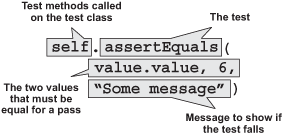
unittest.main()The test methods all create an instance of our Value class and then test its state or the result of calling methods. The calls to the assert methods do the actual testing, and they all follow a pattern similar to the one in figure 7.1.
Several assert methods are available on TestCase. In creating a test framework customized for your application, you’ll build higher-level tests on these primitive assert methods, or possibly directly with the assert statement. Table 7.1 shows the standard assert methods.
Table 7.1. The assert methods available on TestCase subclasses. Where relevant, the failure message is always optional.
Method | Usage | Description |
|---|---|---|
|
| Asserts that |
|
| Asserts that |
|
| Asserts that |
|
| Asserts that |
|
| Asserts that a specified exception type (the first argument) is raised when |
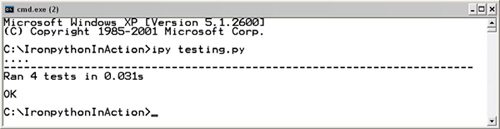
So what happens when you run the test we’ve just created? Take a look at figure 7.2.

All the tests error out with a NameError because we haven’t yet written the Value class. This is the TDD approach—to write the tests before the implementation. You’ll know when we have a complete implementation; all the tests will pass.
unittest formats the results of running the tests in the output. The first line of the output is a line of characters, with one character representing the result of each test.
The three possible results of calling a test method are as follow:
The last line of the output is the summary of the test run; here all four tests have failed with the same error. Obviously, the missing component is the Value class. If we were following strict TDD, you’d implement one method at a time, running the tests in between each method. To save space, listing 7.2 is a full implementation of our enormously complex Value class.
Example 7.2. An implementation of Value class, which should pass your tests
class Value(object):
   def __init__(self, value):
      self.value = value

   def add(self, number):
      return self.value + number

    def isEven(self):
       return (self.value % 2) == 0
When you run the tests now, the output should be much improved (figure 7.3).
The ‘EEEE’ from the first run has been replaced with four dots (....), and the summary says OK. Great.
Four out of our five tests start with the same line: value = Value(6). Code duplication is always bad, right? The next section looks at how you can reduce boilerplate in unit tests using setUp and tearDown.
Some classes can’t be tested in isolation; they need either support classes configuring or state initializing before they can be tested. If this initialization includes creating test files or opening external connections, then you may need to both set up tests and clean up after them.
unittest makes this possible through the setUp and tearDown methods on TestCase. As you might surmise, setUp is run before each test method and tearDown is run afterward. Any exceptions raised in setUp and tearDown will count as a test failure.
Listing 7.3 demonstrates how you can use the setUp and tearDown methods with our simple tests.
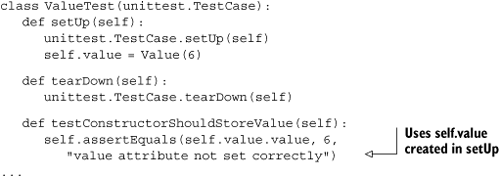
The tearDown shown in this listing isn’t strictly necessary, but we wanted to demonstrate how it works. Both setUp and tearDown call up to the base class methods. When creating a test framework for a project, it’s common to create a hierarchy of test case classes for different types of tests. Forgetting to call up to the base class setUp is an easy (and sometimes hard to diagnose) mistake to make.
The approach to unittest we’ve used so far is fine when you have all your tests in a single module. The next section will look at how to create test suites from multiple test files.
When writing tests for a project, you’ll want to create different test files for different classes and modules in your project. We’ve been running tests using the unittest.main function. This runs all the tests in whatever is running as the main script. This approach is fine for running each test file separately, but you’ll usually want to run all your tests in one go and collect the results.
unittest supports running many tests by allowing you to create test suites from multiple test classes, and passing them to a test runner. (This is what main does under the hood.) Figure 7.4 illustrates the different classes available in unittest to help automate your test running.
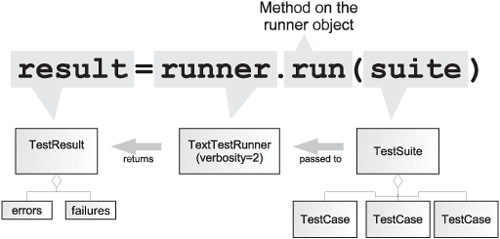
Using the following components, it’s easy to collect our tests and run them all together:
TestCase—. The test classes.TestSuite—. Can hold multiple test classes to be executed together.TextTestRunner—. Executes test suites, outputting the results as text. You can control how much information this outputs through theverbositykeyword argument.TestResult—. Is returned by the runner and holds information about errors and failures.
To test a large project, you want to be able to collect all the tests together and run them in one go. Using the __name__ == '__main__' pattern, it will still be possible to run tests contained in individual modules while developing. Using introspection, you can import the test modules and automatically add all the test classes they contain to a suite. You can then pass the suite to a runner and check the results. Let’s create a set of utility functions and keep them in a module called testutils (listing 7.4), which we’ll be using shortly to test MultiDoc.
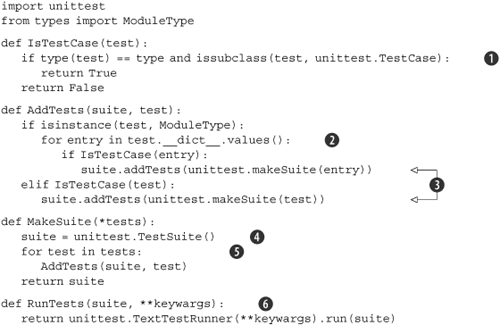
The easiest way of explaining these functions is to work from the bottom up.
RunTests ![]() runs a test suite and returns the results. It accepts keyword arguments that are passed through to the
runs a test suite and returns the results. It accepts keyword arguments that are passed through to the TextTestRunner. MakeSuite creates a test suite ![]() , and initializes it with any test classes or modules that you pass in
, and initializes it with any test classes or modules that you pass in ![]() .
. AddTests adds tests to a suite ![]() . If you pass in a module (recognized because its type is
. If you pass in a module (recognized because its type is ModuleType), then you check every object it contains by iterating over its __dict__ dictionary ![]() , as follows:
, as follows:
for entry in test.__dict__.values()
Objects are checked to see if they’re tests by calling IsTestCase, which checks to see if an object is a test class or not ![]() .
. type(test) == type is only true for classes. You can tell if a class is a test class by checking if it’s a subclass of TestCase, as follows:
issubclass(test, unittest.TestCase)
Listing 7.5 is an example of using these functions to run the unit tests for the Value class that you created in the previous sections. It assumes you’ve put these tests in a module called ValueTestModule that you can import into our test runner code.
Example 7.5. Running tests for Value class with help from functions in testutils
import sys from testutils import MakeSuite, RunTests import ValueTestModulesuite = MakeSuite(ValueTestModule) results = RunTests(suite, verbosity=2)
if results.failures or results.errors: sys.exit(1)
This listing imports the module containing our tests ![]() and creates the test suite. If you have several test modules, then you can use something like this code segment:
and creates the test suite. If you have several test modules, then you can use something like this code segment:
import testmodule1
import testmodule2
import testmodule3

suite = MakeSuite(testmodule1, testmodule2, testmodule3)
MakeSuite adds all the modules you pass it to the suite. After creating the suite, you run the tests ![]() . Listing 7.5 passes in the optional keyword argument
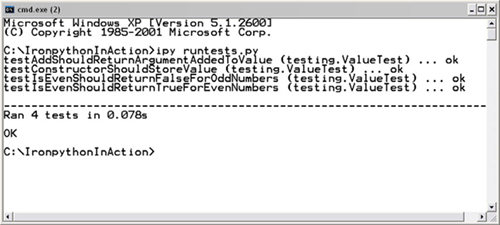
. Listing 7.5 passes in the optional keyword argument verbosity=2. This increases the amount of information output while tests are running—which is useful for keeping track of tests as they run. Figure 7.5 shows the output of running tests with a higher verbosity level.
Listing 7.5 checks the results of these tests; if there are any errors or failures, it exits with an exit code of 1 ![]() . A correct exit code allows you to integrate running your tests into your build process (for example using msbuild)[5] and stop the build if tests fail.
. A correct exit code allows you to integrate running your tests into your build process (for example using msbuild)[5] and stop the build if tests fail.
So far, we’ve concentrated on getting familiar with the basics of the unittest framework. This is background to the really interesting part—exploring different testing techniques with IronPython. Many of these techniques make great use of the dynamic nature of Python. To demonstrate this, we write tests for MultiDoc.
The point of unit testing is to test as many aspects of your code as possible in isolation from the other parts; it’s easier to tightly specify the behavior of your code and makes the tests run faster. In practice, life is never quite so neat. Your objects need to interact with other objects, and you need to test that interaction. Several different approaches can minimize the number of live objects your tests need to use; the most useful of these approaches is creating mock objects.
Working with mock objects is one place where you’ll see the advantage of using a dynamically typed language. In a statically typed language, the compiler won’t let you run any code unless the types match those declared in the production code. The objects you use in tests must be real objects, or objects that inherit from the expected type.
In a dynamically typed language, you can take advantage of duck typing. The objects you use for testing need only implement the attributes and methods used in the tests. Let’s see this in action by testing the execute method of MultiDoc’s OpenCommand.
Listing 7.6 gives a quick refresher of what the execute code looks like.
Example 7.6. OpenCommand.execute: the method we want to test
def execute(self):
fileName = self.mainForm.document.fileName
directory = Path.GetDirectoryName(fileName)
directoryExists = Directory.Exists(directory)
openFileDialog = self.openFileDialog
if fileName is not None and directoryExists:
openFileDialog.InitialDirectory = directory
openFileDialog.FileName = fileName
if openFileDialog.ShowDialog() == DialogResult.OK:
document = self.getDocument(openFileDialog.FileName)
if document:
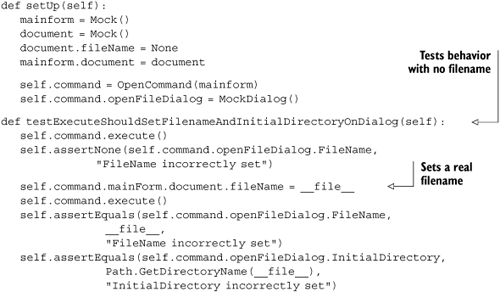
self.mainForm.document = documentThe first behavior of execute to test is that it correctly sets the Filename and InitialDirectory attributes on the OpenFileDialog. OpenCommand has a reference to the MainForm, so it can check whether the current document has a fileName set on it or not. If this reference isn’t None, then the filename should be set on the OpenFileDialog, so that the dialog opens in the same folder as the current file.
Where possible, classes should be tested in isolation. This is one of the ways that testing encourages you to write better code. By making classes easier to test, you end up making them more modular and decoupled from other classes (which is usually in the right direction along the road to better).
The only attribute of MainForm that OpenCommand uses is the document. Instead of using a real instance and a real document, you can use a mock object. With a statically typed language, you’d have to provide an object that the compiler recognizes as being of a suitable type. Plenty of libraries could help you to do this, but it’s a lot simpler with a dynamic language such as Python. Listing 7.7 shows just about the simplest possible mock object, and how you can use it to create a mock MainForm for testing the OpenCommand.
Example 7.7. A simple Mock class and a mock mainform instance
class Mock(object):
   pass
mainform = Mock()
document = Mock()
document.fileName = None
mainform.document = document
command = OpenCommand(mainform)
If you call execute as it stands, then the call to openFileDialog.ShowDialog() will block—which isn’t ideal for an automated test suite. Instead of a real OpenFileDialog, we need a mock one with a ShowDialog method.
The real dialog box returns either DialogResult.OK or DialogResult.Cancel. If the user chooses a file, then the returned value is DialogResult.OK, which triggers the creation of a new document. In this test, we don’t want this result, so we want a class that returns DialogResult.Cancel and has Filename and InitialDirectory attributes (which we do want to test). Next, we’ll want to test what happens when the user accepts the dialog box. Listing 7.8 shows a MockDialog class that allows you to control what’s returned from ShowDialog.
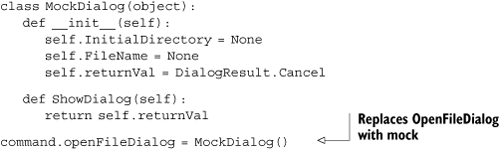
The OpenCommand stores the dialog as an instance attribute, so replacing it with the mock dialog is easy.
Now to use this in a test. In listing 7.9, the test name reflects the behavior we’re testing. Because you’ll need an OpenCommand initialized with a mock MainForm and dialog in the next few tests, we place this code in a setUp method.
The mock objects we’ve created in this section are pretty specific to testing the OpenCommand. Instead of creating all your mocks from scratch, you could use any of the following Python mock libraries:
The Python Mock Module—http://python-mock.sourceforge.net/
pymockobject—http://pypi.python.org/pypi/pymockobject/
Perhaps the reason for the many different mock libraries is that they’re so easy to write. The first one in the list is my favorite, because I wrote it, but it’s often simpler to write mocks as you need them as we’ve been doing.
Even though creating mocks is easy, that doesn’t mean that there aren’t reusable patterns. In the next section, we look at a slightly different testing pattern using a Listener class.
Next, we need to test the behavior of execute when the dialog is accepted or canceled. If the dialog is accepted, it calls the getDocument method with the filename from the dialog and sets the returned document onto the MainForm. If the dialog is canceled, then it doesn’t.
You could test this by providing a known filename and then checking that the returned document is valid and complete. The test would need a real file, and would also depend on the Document class remaining the same. If you changed Document, then you’d also need to change the way you test OpenCommand. This is why testing in isolation is preferred—tests for one part of the code become much less brittle to changes in another part of the code.
You can get around this by replacing the getDocument method with a custom object that returns a mock document and also allows you to confirm whether it has been called or not.
Adding methods at runtime is another feature of dynamic languages, but is known among the Python community by the slightly pejorative term of monkey patching. The reason it’s frowned on is that it can make your code hard to read. If a class defines a method, and then later on you see that method being called, you’ll assume you know what code is being executed. If in fact that method has been replaced, it’s difficult to know what code is being executed.
One place where monkey patching is both accepted and useful is in testing. Because methods are looked up dynamically, you can add methods at runtime. In order to understand monkey patching, it will be useful to take a brief look at the Python attribute lookup rules.
Note
Monkey patching is a term that started with the Python community but is now widely used (especially within the Ruby community). It seems to have originated with Zope[7] programmers, who referred to guerilla patching. This evolved from gorilla patching into monkey patching.
When you call a method on an instance, the method is looked up using the normal order shown in figure 7.6.[8]
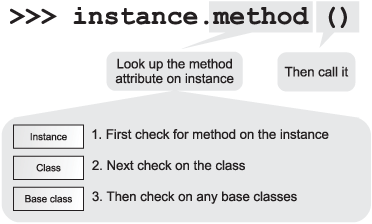
You can confirm these rules at the interactive interpreter by adding a new method to a class. All instances of the class then gain the method.
>>> class AClass(object):
...    pass
...
>>> instance = AClass()
>>> def method(self):
...    print 'Hello'
...
>>> AClass.method = method
>>> instance.method()
Hello
In our case, you have the choice of patching the replacement object on the class or on the instance. The disadvantage of patching the class is that it’s effectively a global and modifying it will also modify it for other tests. You can override methods used at runtime by patching the instance—which is what we need for testing. Again, this is easy to show in an interactive interpreter session.
>>> def method2():
...    print 'Hello 2'
...
>>> instance.method = method2
>>> instance.method()
Hello 2
We’ve now covered most of the basic principles of testing in Python, useful knowledge to apply whether you’re programming in CPython or IronPython. Coming soon is functional testing, but first we put monkey patching into practice with a useful test class.
We want to test the behavior of OpenCommand.execute. If the call to ShowDialog returns DialogResult.OK, then getDocument should be called with the filename from the dialog, and the return value should be set as the document on MainForm. You need to monkey-patch getDocument with something that will record what arguments it’s called with and lets you control what it returns.
You could write a function that will record these things, but a useful pattern provides a general solution to this need: the Listener class (listing 7.10).
Example 7.10. Listener class that records arguments it’s called with
class Listener(object):
   def __init__(self):
      self.reset()

   def reset(self):
      self.returnVal = None
      self.triggered = False
      self.triggerArgs = None
      self.triggerKeyWargs = None

   def __call__(self, *args, **keywargs):
      self.triggered = True
      self.triggerArgs = args
      self.triggerKeyWargs = keywargs
      return self.returnVal
The magic of the Listener is in the __call__ method, which is another one of Python’s magic methods. Instances of objects that define a __call__ method are callable like functions; but, because they’re class instances, they can store state.
This __call__ method collects all the arguments it’s called with (using *args and **keywargs) and stores them on the instance. When you monkey-patch a method with a Listener instance you can tell whether it has been called and with what arguments. Let’s use this to test the behavior of execute when the dialog is accepted or canceled. The first part of this test, shown in listing 7.11, is easy. You assert that, when the dialog is canceled, getDocument isn’t called.
Example 7.11. Testing that getDocument isn’t called if the dialog is canceled
def testExecuteShouldNotCallGetDocumentForCancelledDialog(self):
   listener = Listener()
   self.command.getDocument = listener

   self.command.execute()
   self.assertFalse(listener.triggered, "getDocument called incorrectly")
Listing 7.11 is trivially simple; you’re just testing that getDocument isn’t called. Its more important counterpart test is listing 7.12.
Example 7.12. Testing that accepting the dialog should call getDocument
def testExecuteWithAcceptedDialogShouldCallGetDocument(self):
   listener = Listener()
   self.command.getDocument = listener

   originalDocument = self.command.mainForm.document
   self.command.mainForm.document.fileName = __file__
   self.command.openFileDialog.returnVal = DialogResult.OK
   self.command.execute()
   self.assertEquals(listener.triggerArgs, (__file__,),
               "getDocument not called with filename")
   self.assertEquals(self.command.openFileDialog.InitialDirectory,
               Path.GetDirectoryName(__file__),
               "FileName incorrectly set")
   self.assertEquals(self.command.mainForm.document,
               originalDocument,
               "document incorrectly changed")
Here you’re testing what happens if the dialog is accepted, but getDocument returns None (the default). If the dialog is accepted, then getDocument should be called with the filename set on the dialog. Because getDocument returns None, the document on MainForm should not be replaced.
The last part of this test is listing 7.13, which tests that the document is replaced when it should be.
Example 7.13. Testing getDocument and MainForm interaction
def testNewDocumentFromGetDocumentShouldBeSetOnMainForm(self):
   listener = Listener()
   self.command.getDocument = listener
   self.command.mainForm.document.fileName = __file__
   self.command.openFileDialog.returnVal = DialogResult.OK
   newDocument = object()
   listener.returnVal = newDocument
   self.command.execute()
   self.assertEquals(self.command.mainForm.document,
               newDocument,
               "document not replaced")
Although the Listener is only a small class, it opens up the way to an effective and readable testing pattern.
But there’s a potential problem with monkey patching. Your tests become white-box tests that know a great deal about the implementation of the objects under test. For example, if you change the implementation of getDocument so that it takes two arguments instead of one, the tests we’ve written so far would continue to pass even though the code is broken. Finding this balance between testing implementation and testing behavior is a constant tension in unit testing. One pattern that can help reduce this coupling is dependency injection.
In dependency injection, dependencies are supplied to components rather than being used directly. Dependency injection makes testing easier, because you can supply mocks instead of the real dependencies and test that they’re used as expected. A common way to do dependency injection in Python is to provide dependencies as default arguments in object constructors.[10]
Let’s look at testing a simple scheduler class to see how this works (listing 7.14).
Example 7.14. A simple Scheduler class to test with dependency injection
import time

class Scheduler(object):
   def __init__(self, tm=time.time, sl=time.sleep):
      self.time = tm
      self.sleep = sl

   def schedule(self, when, function):
      self.sleep(when - self.time())
      return function()
Scheduler has a single method, schedule, that takes a callable and a time for the callable to be fired. The schedule method blocks by sleeping until the correct time (when) using the time.time and time.sleep standard library functions; but, because it obtains them with dependency injection, it’s easy to test. The injection is set up in the Scheduler constructor, so the first thing you need to test is that the default constructor does the right thing. Setting up the default dependency in the constructor is the extra layer that dependency injection introduces into your code. Listing 7.15 shows the test for the constructor.
Example 7.15. Testing that dependency injection is set up correctly
import time
from unittest import TestCase
from dependency_injection import Scheduler

class DependencyInjectionTest(TestCase):

   def testConstructor(self):
      scheduler = Scheduler()
      self.assertEquals(scheduler.time, time.time,
                   "time not initialized correctly")
      self.assertEquals(scheduler.sleep, time.sleep,
                   "sleep not initialized correctly")
Having tested that the dependency injection is properly initialized in the default case, you can use it to test the schedule method. Listing 7.16 uses a fake time module that records calls to time, sleep, and the function you pass into schedule. Methods on FakeTime are passed into the constructor instead of the defaults. You can then assert that calls are made in the right order, with the right arguments, and that schedule returns the right result.
Example 7.16. Testing schedule method by injecting faked-up dependencies
def testSchedule(self):
   class FakeTime(object):
      calls = []

      def time(self):
         self.calls.append('time')
         return 100

      def sleep(self, howLong):
         self.calls.append(('sleep', howLong))

   faketime = FakeTime()
   scheduler = Scheduler(faketime.time, faketime.sleep)

   expectedResult = object()
   def function():
      faketime.calls.append('function')
      return expectedResult

   actualResult = scheduler.schedule(300, function)

   self.assertEquals(actualResult, expectedResult,
    "schedule did not return result of calling function")

   self.assertEquals(faketime.calls,
          ['time', ('sleep', 200), 'function'],
          "time module and functions called incorrectly")
Because the fake time function is set up to return 100, and the function is scheduled to be called at 300, sleep should be called with 200. Dependency injection can easily be done using setter properties, or even with simple attributes. Yet another approach is to use factory methods or functions for providing dependencies, which can be needed where fresh instances of dependencies are required for each use. Dependency injection is useful for both unit testing and subclassing, or overriding the behavior of classes; subclassing is significantly easier to do with Python than some other languages.
One of the problems with unit testing is that, although it’s good for testing components in isolation, it isn’t so good at testing that they’re wired together correctly. To make sure that this is covered, you need some higher-level tests; this is where functional testing comes in.
Functional tests, or acceptance tests, are high-level tests of an application from the outside. As much as possible, they should interact with the application in the same way the user does. Where unit tests test the components of your application, functional tests test the interaction of those components; they’ll often pick up on bugs or problems that unit tests miss. Functional tests can be more than just useful tests, though.
In the Extreme Programming (XP) tradition (you know a methodology has arrived when it becomes a tradition), new features are specified by the customer as user stories.[11] User stories describe (and specify) the behavior of your application. A functional test then becomes an executable version of this user story. If you follow XP, then your user stories provide a full specification of your application’s behavior. As well as testing your components, functional tests will warn you when new features interact in unexpected ways with existing features.
In the first part of this section, we write a functional test to test the New Tab Page feature, so we need a user story. The user story describes a feature from the point of view of a user, and our user will be called Harold.[12]
Harold opens MultiDoc.
He clicks the New Page toolbar button.
A dialog called Name Tab appears.
Harold changes his mind, so he selects Cancel.
No new tab appears.
Our capricious user clicks the button again.
The dialog appears again.
This time he enters a name: My New Page.
He clicks OK.
There are now two tabs.
The second one is called My New Page.
Harold is ecstatic.
This user story specifies how the New Tab Page dialog should work, and how the user interacts with it. We need to implement a test that follows Harold’s actions and checks that MultiDoc behaves in the expected way.
This is where it gets tricky. We want to use our existing test framework, so that our functional tests can be first-class members of the automated test suite, but you need a way of driving and interacting with MultiDoc. You need to create a new test case class that provides the infrastructure for writing functional tests. This test case should start MultiDoc for you and allow you to interact with it. This in turn gives us a new problem to solve: how do you interact with a running MultiDoc?
You need to start MultiDoc, perform actions, and then make assertions about the state of MultiDoc. But, starting MultiDoc means starting the Windows Forms event loop, which will seize the control flow of the thread. The logical thing to do is start MultiDoc on another thread. As if we didn’t have enough problems already, doing this will create another one—any interaction with Windows Forms controls has to be on the thread on which they were created. Fortunately, this is all relatively simple to do. You need to know the following three facts:
The Windows Forms event loop must run in a Single Threaded Apartment (STA) thread.[13]
Windows Forms controls provide an
Invokemethod, which takes a delegate and executes on the control thread. It’s synchronous, soInvokecan return values but blocks until execution has completed.IronPython provides a convenient delegate that you can create with a function and use with Invoke. This delegate is called
CallTarget0, and where you import it from depends on which version of IronPython you’re using.
Listing 7.17 shows a simple example of starting the event loop on another thread.
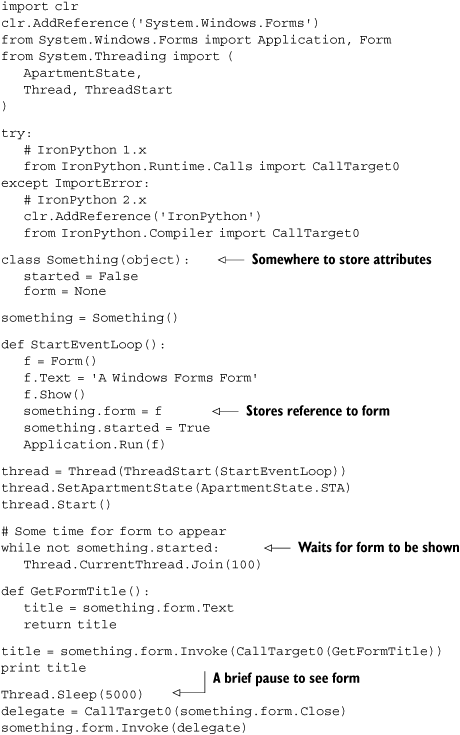
The delegate CallTarget0 wraps functions that don’t take any arguments. A corresponding CallTarget1 wraps functions taking one argument, CallTarget2 for functions that take two arguments, and so on up to CallTarget5.[14]. We find it simpler to use CallTarget0 and pass in lambda functions where we need a function called with multiple arguments.
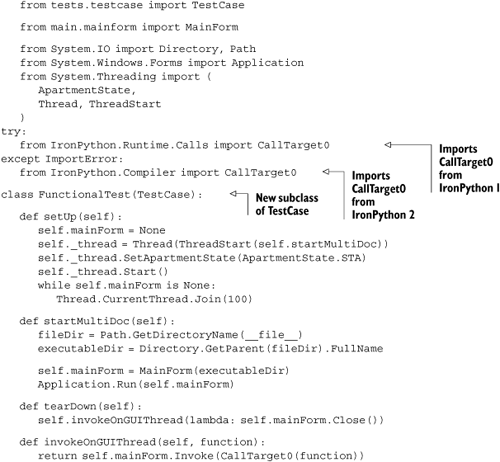
Listing 7.18 puts this knowledge to work with a new base class for tests: FunctionalTest. The setUp method starts MultiDoc and tearDown stops it. FunctionalTest also provides a convenience method invokeOnGUIThread for interacting with MultiDoc by executing functions on the GUI thread.
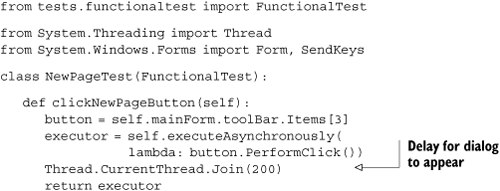
This new test case is nice, and it will work fine (trust me; we’ve already tried it). But it isn’t quite sufficient for what we want to achieve. We want to test the New Page dialog; and, if you invoke a function on the control thread that opens the dialog, Invoke will block until the dialog is closed again. You need a way to asynchronously perform actions on the control so that you can interact with the Name Tab dialog. This means more fun with dialogs.
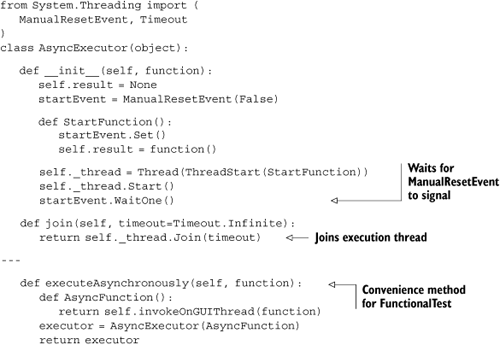
You can use a similar pattern to interact asynchronously with the GUI thread. You can launch the action from yet another thread that has the job of calling Invoke. This won’t block the test thread while it’s waiting for Invoke to return. You may want to be able to retrieve a return value, and to be able to join to the new thread to check that it exits, you can encapsulate this functionality in an object. Listing 7.19 shows the AsyncExecutor object along with a convenience method to use it from functional tests.
Now you have all the infrastructure you need to write the functional test. Ideally, the test would know nothing about the internal structure of MultiDoc; but in order to make assertions about the state of MultiDoc, it needs to know something. This makes the test brittle against changes to the structure of MultiDoc. In the next section, we turn our user story into a functional test while looking at how you can mitigate against this potential brittleness.
You need to create a test file and add it to runtests.py. The new test inherits from the test case, FunctionalTest. setUp automatically launches MultiDoc and gives you access to the main class (the MainForm instance) as self.mainForm. We still need to work out how you’ll interact with MultiDoc.
One way would be to insert fake mouse and key events into the event loop. A managed class is available for sending key presses to the Windows Forms message loop. There are no managed classes for sending mouse movements and button presses, but you can do this using unmanaged classes.[15] Even taking this route, you’d still need access to the controls to get the locations to send clicks to. If you’re going to have access to the controls anyway, then you might as well trigger them programmatically. This approach still tests that event handlers are wired correctly, and is a good compromise between fully black-box testing and testing completely below the level of the GUI. The advantage of simulating mouse moves and clicks is that it only works if your GUI components are accessible to the mouse (that is, visible). The cost is having to maintain a more complex test framework.
The first important step in our user story is clicking the New Page toolbar button. This button is the fourth button in the toolbar, so you can access it using code like mainForm.toolBar.Items[3].PerformClick() (which must be executed on the control thread, of course). This suffers from the brittleness we mentioned earlier. If you change the order of buttons in the toolbar, then you have to modify everywhere that uses this code. A simple solution is to access the button through a single method. This has all the usual advantages of avoiding duplication and means that you can change the way you access toolbar buttons from a single place. Listing 7.20 shows the start of the functional test and a method for clicking the New Page button.
Putting the access to UI components into methods also has the advantage of making the functional test more readable. As you write more functional tests, and abstract out of them methods for common actions, you effectively create a Domain Specific Language (DSL) for writing your tests. The ideal would be to have one line of code per line of user story.
An alternative way of making tests less susceptible to breakage caused by layout changes is to give controls a descriptive Name attribute. It’s then easy to provide a findControlByName method that recursively iterates through child controls looking for a specific control. You don’t need to store a reference to all the controls you might want to access through functional tests, and changing your layout won’t (necessarily) break all your functional tests.
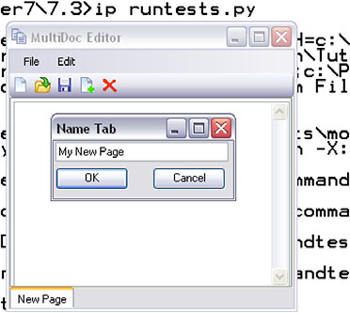
Executing our functional test will cause MultiDoc to appear along with dialog and new tab pages. Following the user story, MultiDoc will dance under the invisible hand of Harold. (Because this is automated, the actual dance is very quick, but it will look like figure 7.7.)
The full functional test is shown in listing 7.21. It contains the user story as comments in the test method, each line followed by the code that implements it.
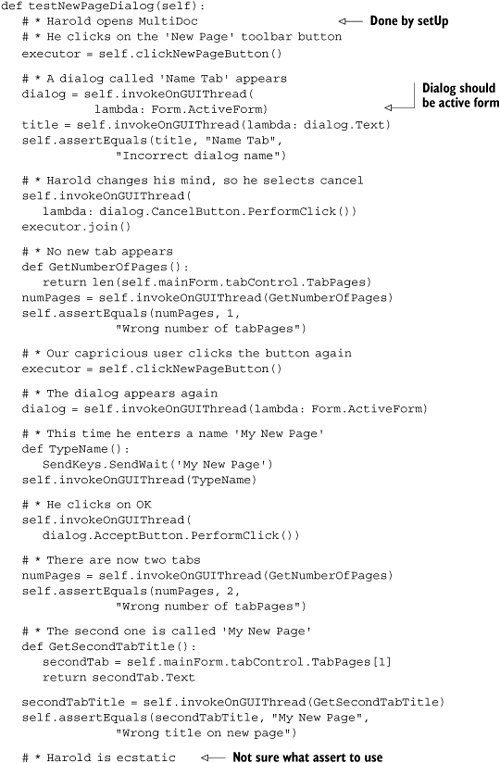
As you can see, several pieces of code in the test still poke inside MultiDoc to test its state. If you were to implement more tests, you’d find that a lot of this code could be shared between tests and moved up to become methods on FunctionalTest. In this way, the tests become more DSL-like, and you build a comprehensive test framework.
That was fun, but it might give you the impression that creating a functional test suite for your application is easy. We didn’t have to deal with timing or threading issues at all. Despite potential difficulties, getting functional tests working is the most satisfying part of writing tests. We’ve now finished with testing, so it’s time to wrap up.
In this chapter, we’ve gone from setting up a unittest-based test framework to the principles of testing with Python. The dynamic nature of Python makes it easy to test.
It seems obvious that testing is an important part of software development. A good principle is that if you have untested code, you can’t be sure it works. As you add new features, good test coverage tells you if you’ve broken any of your existing features—an enormous benefit. A less obvious benefit comes when refactoring code. Changing classes that you use extensively, to extend or improve the architecture of your code, can be a daunting task. Your initial changes may break a lot, but with good test coverage you’ll know you’ve finished when all your tests pass again!
There’s a lot we haven’t covered in this chapter, but the basic examples of monkey patching and mocks that we’ve used can be extended to provide solutions to difficult testing situations. Because dynamic languages are so easy to test, lots of people are exploring testing with Python, and lots of resources on the internet are available to help you.
Along the way, you encountered another of Python’s magic methods, __call__, for creating callable objects. This method provides access to the Python equivalent of .NET interfaces, plus things that aren’t possible with C# or VB.NET. In the next chapter, we explore some more of these Python protocols. Not everything in the .NET framework maps to Python syntax or concepts straightforwardly. In the next chapter, we also look at some of the ways that IronPython integrates with the .NET framework. These are things that past experience with Python or .NET alone hasn’t equipped you for.
[1] Also known as acceptance, integration, or black-box tests.
[2] See http://www.junit.org.
[3] For a much more complete reference on a bewildering array of Python testing tools, see http://pycheesecake.org/wiki/PythonTestingToolsTaxonomy.
[4] Often abbreviated to TDD. See http://en.wikipedia.org/wiki/Test-driven_development.
[6] For an article on testing by Martin Fowler that strongly argues that these are stubs, see http://martinfowler.com/articles/mocksArentStubs.html.
[7] Zope is a large Python web framework that was first released in 1998. It’s mainly used to create Content Management Systems (CMS). The most famous application built with Zope is a popular CMS called Plone.
[8] Because of the descriptor protocol, the lookup order and rules are a bit more complex—but figure 7.6 shows the basic principle.
[9] Actually, thanks to Seo Sanghyeon, who found this for us.
[10] With thanks to Alex Martelli. Examples adapted from http://www.aleax.it/yt_pydi.pdf.
[12] This is in homage to the long-suffering, but perhaps ever so slightly demented, star of the Resolver Systems user stories.
[13] Because they wrap native controls that assume they’ll run in a thread with an STA state.
[14] .NET 3 also has two useful delegates with various aritys. These are Action and Func
[15] This is the approach Resolver Systems takes with the test framework for Resolver One.