
Chapter 13. Designing an API
- Building an API using new Rails 3 features
- Rate-limiting the API
- Versioning APIs
In the past chapters, you’ve created a great application that allows your users to manage projects and tickets through a web browser. In this chapter, you are going to create a way for your users to manage this content through what’s known as an Application Programming Interface (API). As its name implies, an API is a programming interface (for your application) that returns either JavaScript Object Notation[1] (JSON) or XML[2] data for its requests, which are the two most common formats for modern APIs to return information in. People can then create programs or libraries (referred to as clients) to read and present this data in any way they see fit.
One great example of how an API is used is Twitter. Twitter has had an API for an exceptionally long time now, and people have written Twitter clients for just about every operating system out there using this API. The functionality of the site is effectively the same, but people have come up with interesting ways of displaying and modifying that information, such as the Twitter for Mac clients.
There are many, many Rails sites out there that already provide an API interface, such as GitHub[3] and (as previously mentioned) Twitter.[4] Both of these APIs have exceptionally well-documented examples of how to use them and what can be done with them, which is a great way to convince people to start using your API. API documentation, however, is an exercise best left for you after this chapter’s done.
3 The octopi gem was built to interact with the GitHub API—you can see the source at http://github.com/fcoury/octopi.
4 The (non-official) twitter gem was built to interact with the API that Twitter provides; you can see the source of this gem at http://github.com/jnunemaker/twitter.
APIs aren’t unique to Rails. There are plenty of other sites out there that have implemented their own APIs, such as the StackExchange services that run on Microsoft.Net. Furthermore, APIs created in one language are not for exclusive use of API clients written in that specific language. For example, if you wanted to parse the data from the StackExchange API in Ruby, you could do that just fine.
In Rails, however, it’s extremely easy to make a modern API for an application, as you’ll see in this chapter. Your application will serve in two formats: JSON and XML.
Back to the Twitter and GitHub examples now, and one further thing to note is both of these APIs are also versioned. The point of this is that an API should be presented in a “frozen” state and should not be modified once it’s considered stable. This way, a user is be able to use an API without fear of it changing and potentially breaking the code that they’re using to parse the data from the API.
Twitter has a URL such as http://api.twitter.com/1/statuses/public_timeline.json that has the version as the first part of the URL after the site name and then the format as an extension at the end. Github’s is slightly different, with a URL such as http://github.com/api/v2/json/repos/show/rails3book/ticketee having the version prefixed with a v as the second part of the URL, and the format as the part of the URL directly after. The v prefix here makes the version part of the URL clearer to those who are reading it, which is a good thing.
You’re going to borrow ideas from both of these API designs, presenting your API at the base URL of /api/v1 and the format at the end of the URL, like most web requests. Your URLs will look like /api/v1/projects.json, which will be the URL to return a list of projects that the user is able to read. The reason for this versioning is so that you can always provide data that is predictable to your end users. If you wished to change the format of this data, you would create a new version namespace, which is the final thing we look at toward the end of this chapter. Really, these new version numbers can be whatever you wish, with minor versions such as 0.1 being the standard for unstable APIs, and major versions such as 1, v1, or 1.0 being the standard for the stable, fixed APIs.[5]
5 Although logical (incremental) versioning is recommended to stave off questions such as, “What were they thinking?!” and “Are they crazy?” This is often referred to as Semantic Versioning, http://semver.org/.
To check what user is making a request to your API, you’ll use a token-based authentication system, which is something that the Devise gem can be configured to provide. You’ll require the token attribute to be passed through in every API request, because without it you cannot be sure of who is doing what with the API. You can then restrict things, such as the list of projects, based on the user’s permissions. You can also use tokens to track the number of requests the user has performed on the API and then block them if they make more than 100 requests per hour, which is one of the final things you look at in this chapter. Twitter and GitHub both implement rate-limiting so that people do not spam the system with too many API requests.
Along the path of developing this API, you’ll learn additional Rails goodies such as the to_json and to_xml methods, which will convert an object into JSON or XML representations of that object respectively, as well as the respond_with and respond_to controller methods, which are responsible for serving data in different formats.
When you’re done with this chapter, you’ll have a nice solid API that other developers can build upon. Other applications (be it Rails or not) will also be able to read the data from your application.
13.1. The projects API
To get started with Ticketee’s API, you’re going to write the projects part of it. In this section, you make extensive use of the respond_with and respond_to methods, which are new in Rails 3.
Before you go about implementing the first building blocks for your API, you’ll learn about a module called Rack::Test::Methods, provided by the rack-test gem, which will allow you to easily test your API.
After that, you’ll begin writing the API by creating the index action, which will be responsible for displaying all the projects in a JSON format. Next, you’ll implement token-based authentication so you can know who’s who when they access the API. This will allow you to restrict the list of projects shown in the index action to only those that the user should see. Later on, you’ll get this action to return XML as well as the JSON output.
With an API, you don’t need to provide a new and edit actions, because this functionality should be provided by the client that is accessing the API. Instead, you’ll only write the action[6] parts of your API: the create, show, update, and destroy actions. Along the way, you’ll be restricting the create, update, and destroy actions to administrators of the application.
6 An absolutely terrible pun. Forgive us.
When learning about these actions, you’ll see a lot of reference to HTTP status codes, which are the standard for all pages of the web. These status codes play a critical role in an API, providing key information such as if the request was successful (the 200 status code) or if the user is unauthorized (the 401 status code) to perform the request. These are standardized ways of quickly informing people of the result of their requests.
Tip
There’s a handy gem called cheat that provides cheat sheets for a number of things, including one for HTTP status codes. You can install this gem using the gem install cheat command and then bring up the cheat sheet for status codes using cheat status_codes.
But if you’re on Windows, this won’t work because Cheat requires a function not found on your system. Instead, go to http://cheat.errtheblog.com/b where you can view the list of all the cheat sheets.
To begin writing this API, you’ll need to define the routes to it. Without routes, making requests to /api/v1/projects.json will forever be fruitless. If you recall from this chapter’s introduction, the API URL that you’ll be using looks like /api/v1/projects.json. Previously, when you wanted URLs to be prefixed with a name (such as back in chapter 7), you used a namespace method for them. You’re going to do the same thing here, except you’ll use a namespace within another namespace. Let’s open config/routes.rb and add the code from the following listing to the top of the routes definition.
Listing 13.1. config/routes.rb
Ticketee::Application.routes.draw do
  namespace :api do
    namespace :v1 do
      resources :projects
    end
  end
  ...
This new route defines routes and routing helpers for the projects resources, such as /api/v1/projects, and api_v1_projects_path respectively. You’re going to need to be serving content from this route, namely a list of projects. This list will be served in one of two forms: XML or JSON. Before you actually implement the code that makes these responses get served, you’re going to write a new RSpec test that makes sure these routes return the right data. To help you along, you’ll be using a feature provided by one of the dependencies of Rails: the rack-test gem.
This gem provides a module called Rack::Test::Methods, which contains methods such as get, post, put, and delete. Look familiar? They should. They’re the four basic HTTP methods that you use when making requests. The methods from Rack::Test::Methods take a path on which to make a request and then return a Rack response (an Array) that consists of three parts: the HTTP status code, the HTTP headers (in Hash form), and the body. The simplest Rack response would look something like this:
[200, {}, "Hello World!"]
The first element of this result is the HTTP status code, and in this case it indicates that your fictional response was 200, or in human-terms: OK. The second element contains no special HTTP headers, but you’ll see these as you progress in the next section. Finally, the third element contains a string, which represents the body of this request, returning the string “Hello World!”
Using Rack::Test::Methods, you can initiate requests to your application’s API that then return these Rack responses, and you can then use these responses to check that your API is responding in the correct way. You’re purposely not using the standard RSpec controller tests here to make sure that the precise URLs are responding in the correct manner, instead of only testing that the actions are doing what you tell them.
Let’s get into writing this initial test for your API.
13.1.1. Your first API
You’re going to continue on the running theme of “test everything” with your API, and with the rack-test gem you’ve got the necessary tools to test what your API’s URLs are doing. Rather than testing this in Cucumber, you’re instead going to use RSpec, which provides a nicer DSL for testing your APIs. To begin with, you’re going to create a new folder structure at spec/apis/v1. You should name the apis directory as a plural for two reasons: first, it matches the consistency of the other directories in the spec directory; and second, it may one day contain more than one API version. Then you’ll create a new file called spec/apis/v1/projects_spec.rb and begin to fill it with the following:
require "spec_helper"

describe "/api/v1/projects", :type => :api
 do

end
There’s much more code to come after this short snippet, but it’s a pretty good start.
In the describe block here you pass through an option of :type => :api. What does this do? Well, you can use it to modify the behavior of this describe block in many ways, such as including modules. The Rack::Test::Methods module you’re going to use needs to be included into each test. Rather than doing this manually, you can use this :type option to do the include for you, as well as some additional behavior. Let’s open a new file at spec/support/api/helper.rb and put the content from the following listing inside.
Listing 13.2. spec/support/api/helper.rb
module ApiHelper
  include Rack::Test::Methods

  def app
    Rails.application
  end
end
RSpec.configure do |c|
  c.include ApiHelper, :type => :api
end
Here you define a module called ApiHelper, which you include into any test marked as an API test with the :type option. Inside the module, you use the Rack::Test::Methods module, which provides useful methods that you’ll see throughout this chapter for making requests to your application, such as the get method (not yet shown). You define the app method here so that the Rack::Test::Methods knows which application to act on. With this done, let’s go back to your test.
Inside the describe block underneath this new method you’re going to want to create a new user (an admin one at that, because later on you’ll need it for the create and other actions) whom you’ll use to make this request to the API. You can create this admin by adding a let inside spec/v1/api/projects_spec.rb:
let(:user) { create_user! }
You’ll need to set up Devise to include the token_authenticatable module so that you can authenticate API requests from users by using a token they provide with each request. This is so that you will know what projects to show to your users, as well as any other authorization criteria that you need to apply to this user’s request. For example, only users with permission to create projects in the application should be able to do so through the API.
To implement the change that you need, go into the User model (app/models/user.rb) and change the devise call to be this:
devise :database_authenticatable, :registerable, :confirmable,
       :recoverable, :rememberable, :trackable, :validatable,
       :token_authenticatable
Next, generate a migration to add a field called authentication_token to the users table, which will be used to store this token. You’ll need to add this migration to both the development and test environments. To do this, run these three commands:
rails g migration add_authentication_token_to_usersauthentication_token:string rake db:migrate rake db:test:prepare
The migration generator is smart here and will know to add the authentication_token to the users table based on the name you’re passing through. The additional argument on the end tells Rails what type of field you’d like this to be.
With the migration created and run, you still need to add a callback to your User model, so that tokens are generated for users when they’re created, or for when users are updated but don’t have a token.[7] To do this, you’ll put this line in your User model:
7 A situation that is unlikely to happen (as you’ve got no serious users currently), but could potentially happen.
before_save :ensure_authentication_token
The before_save method here is run on a record whenever it is created or updated, as opposed to the before_create callback that you saw back in chapter 10, which only calls the specified method upon record creation.
With the callback to create the token in place, let’s jump back to your spec and write a test to make a request with this token. Directly underneath the let(:user) in spec/api/v1/projects_spec.rb, you’ll put the code from the following listing.
Listing 13.3. spec/api/v1/projects_spec.rb
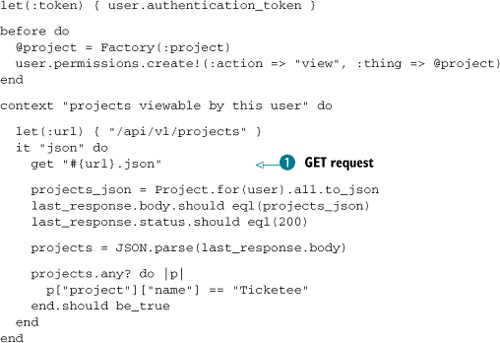
You’re using another let to define a token method that, when called, will return the authentication_token for the current user. You’ll use this later for authenticating requests for your API. The get method ![]() you use here is provided by Rack::Test::Methods and simply makes a GET request with the provided URL. You put the URL in a let because you don’t want to repeat the URL too many times if you have multiple tests, and the let stops you from repeating yourself in your code.
you use here is provided by Rack::Test::Methods and simply makes a GET request with the provided URL. You put the URL in a let because you don’t want to repeat the URL too many times if you have multiple tests, and the let stops you from repeating yourself in your code.
After the request is done in the test, you ensure that the last_response.status returns 200, which is the HTTP status code for OK and means the request was successful. The rest of this spec tests that the data contained within last_response.body contains the appropriate data. This to_json method will take the attributes for each project returned and turn them into JSON, resulting in an output such as
[
  {"project":
    {
      "created_at":"[timestamp]",
      "id":1,
      "name":"Ticketee",
      "updated_at":"[timestamp]"
     }
  }
]
This output can then be read with a JSON parser by the receiving user, which is what you do on the line directly after this by using the JSON.parse method that is provided by the json gem. This method takes the JSON string and converts it into a Ruby Array or Hash. On the final line of your spec, you check that there’s anything in this array—anything at all—which returns true for p["project"]["name"] == "Ticketee", to make sure that the project you’ve created really shows up. You need the first key, project, because this is how elements are returned in JSON response so that their types can easily be identified. If something does match for the any? method, then your test passes.
Let’s see what happens when you run bin/rspec spec/api/v1/projects_spec.rb now:
Failures:
  1) /api/v1/projects projects viewable by this user index JSON
       Failure/Error: get "#{url}.json", :token => token
       uninitialized constant Api::V1::ProjectsController
You haven’t yet defined any controllers for your API, and so this test is going to quite obviously fail. To make it pass, you’ll need to define the constant it requires, Api::V1::ProjectsController. This controller will be responsible for serving all the requests for your projects API.
13.1.2. Serving an API
To begin to define controllers for your namespace-within-a-namespace, you’ll create a new file at app/controllers/api/v1/base_controller.rb. This file will serve as a base for all controllers within version 1 of your API, providing functionality (eventually) for authenticating and authorizing users, much like the ApplicationController currently does. In app/controllers/api/v1/base_controller.rb, you’ll define the following:
class Api::V1::BaseController < ActionController::Base
  respond_to :json
end
Eventually you’ll put in the token authentication code into this, but for now you’re only trying to get the example to pass. The respond_to method here sets up any inheriting controller to respond to JSON requests, such as the ProjectsController that you’re about to create. To make your test pass, you need to return JSON data from this action, which is much easier than it sounds. You can get the functionality you need from this controller by creating a new file at app/controllers/api/v1/projects_controller.rb and filling it with this content:
class Api::V1::ProjectsController < Api::V1::BaseController
  def index
    respond_with(Project.all)
  end
end
The respond_with method here will return the JSON representation of Project.all when you make a JSON request to this path by calling to_json on the object. Rails knows to return JSON data back from any request with the format (that’s the bit after the dot in api/v1/projects.json) of JSON. Rails handles all of this internally for you, which is nice of it to do. Let’s find out if this new controller and its only action make the spec pass with bin/rspec spec/api/v1/projects_spec.rb:
1 example, 0 failures
There you have it, your first API route and action are serving up data! Now you’re going to need to restrict what this action returns to only the projects that the user can read, but you’ll need to first authenticate a user based on their token, which is made easy with Devise.
13.1.3. API authentication
Your next task is authenticating the user who’s making the request in your API. The first step is to do something with the token parameter that gets passed through with your request. A sensible place to check this token would be in Api::V1::BaseController, because you want to authenticate for all controllers in the API (although there’s only one, for now). For this authentication, you’ll find if there’s a user with the token passed in by using a before_filter like this in app/controllers/api/v1/base_controller.rb:
before_filter :authenticate_user

private
  def authenticate_user
    @current_user = User.find_by_authentication_token(params[:token])
  end

  def current_user
    @current_user
  end
To check and see if this is working, you’ll alter your test in spec/api/v1/projects_spec.rb to generate another project, give the user read access to only that project, and check that the response from the API only contains that project. To do this, you’ll add a new before to the “projects viewable by this user” context inside the spec, using the code from the following listing.
Listing 13.4. spec/api/v1/projects_spec.rb
context "projects viewable by this user" do

  before do
    Factory(:project, :name => "Access Denied")
  end

  ...
end
In the before block you create one project that the user should not have access to read. Inside the test itself, you’re still using the for scope on the Project class to get only the projects that the specified user has access to. Let’s add a couple more lines to your example now to check that this user cannot see the Access Denied project:
projects.any? do |p|
  p["project"]["name"] == "Access Denied"
end.should be_false
When you run this spec with bin/rspec spec/api/v1/projects_spec.rb you’ll see that the JSON returned from your controller still contains both projects:
expected "[[Ticketee hash]]"
            got "[[Ticketee hash], [Access Denied hash]]"
To make this test pass, you’re going to need to stop returning all the projects in the index action of Api::V1::ProjectsController and only return the projects that this user should be able to see. Let’s now open app/controllers/api/v1/projects_controller.rb and change the index action to use the for method and pass in the current_user, rather than the all method:
def index
  respond_with(Project.for(current_user))
end
This will now return only the list of projects that the user should be able to see, which should be enough to get this test passing. You can find out with another quick run of bin/rspec spec/api/v1/projects_spec.rb:
1 example, 0 failures
Great, now you’ve got your API finding a user based on the token that you’ve gathered in your spec. One thing you haven’t tested for yet is: what happens when an invalid (or no) token is given? Well, you should return an error when that happens. This is the final change you’ll be making before you make a commit, because it’s been a little too long since you’ve last done that.[8]
8 As a reminder: you should commit after every safe point so that if you stuff something up (it happens!) you won’t have to roll back as much.
13.1.4. Error reporting
Something will inevitably go wrong in your application, and when that happens you’re going to want to provide useful error messages to your users. One of the things that could go wrong in your API is that the user uses an invalid token to authenticate against your API. When a user makes a request with an invalid token, you should inform them of their mistake, which you can do by returning JSON that looks like this:
{ error: "Token is invalid." }
To test this behavior, you’re going to make a request without a token and then fix up your projects_spec.rb test to pass in a token. You’ll write your first test now in a new file at spec/api/v1/authentication_spec.rb, which will be filled with the content from the following listing.
Listing 13.5. spec/api/v1/authentication_spec.rb
require "spec_helper"

describe "API errors", :type => :api do

  it "making a request with no token" do
    get "/api/v1/projects.json", :token => ""
    error = { :error => "Token is invalid." }
    last_response.body.should eql(error.to_json)
  end

end
You’re using Rack::Test::Methods in the spec again, and you’ve set up the token to be a blank string so get will pass this through as the token. Let’s run this spec to make sure it’s failing first with bin/rspec spec/api/v1/authentication_spec.rb:
Failures:
  1) API errors making a request with no token
       Failure/Error: get "/api/v1/projects.json", :token => ""
       NoMethodError:
         undefined method `admin?' for nil:NilClass
       # ./app/models/project.rb:13:in `for'
       # ./app/controllers/api/v1/projects_controller.rb:3:in `index'
       # ./spec/api/v1/
     authentication_spec.rb:6:in `block (2 levels) in <top (required)>'

1 example, 1 failure
Yup, definitely looks like it’s failing. Line 13 of app/models/project.rb attempts to call admin? on the User object passed in to the for method. If you attempt to make a request without a valid token, the call to User.find_by_authentication_token will return nil, resulting in the error you see here. You should check if the user has been found, and if not then you’ll show the error. To make your authenticate_user method do this in app/controllers/api/v1/base_controller.rb, you’ll change it to what is shown in the following listing.
Listing 13.6. app/controllers/api/v1/base_controller.rb
def authenticate_user
  @current_user = User.find_by_authentication_token(params[:token])
  unless @current_user
    respond_with({:error => "Token is invalid." })
  end
end
If the @current_user variable is nil here, you set the response’s body to be the JSON-form of { :error => "Token is invalid" } and respond_with that object. Does this work? Let’s find out with bin/rspec spec/api/v1/authentication_spec.rb:
1 example, 0 failures
Booyah, it works! How about bin/rspec spec/api/v1/projects_spec.rb too?
1 example, 0 failures
All green there too, and so it’s definitely time to do a commit now. You should run the customary checks before you commit by running rake cucumber:ok spec:
63 scenarios (63 passed)
732 steps (732 passed)
# and
43 examples, 0 failures, 19 pending
Great! Everything’s still green. From now on you will only run the spec tests, because all you are going to be changing is the API, which will not impact anything that the features test. At the end of the chapter, you’ll run it again to make sure that nothing is broken. Commit and push the changes that you’ve made:
git add .
git commit -m "Implemented token-based authentication API base"
git push
You’ve begun to implement the API now, and you’ve got the /api/v1/projects URL returning a list of the projects that a user can see. To check what user this is, you’ve implemented a basic token authentication using functionality built in to Devise.
There’s still a little way to go before you’re done with the API. For starters, this API only serves JSON requests, and some people who use it may wish for the data to be returned in XML. You’ve also only got the one action in your controller, and you need to implement a way for people to create, update, and delete projects through the API. Before you do that, you’ll add in support for XML. This is incredibly easy to implement, as you’ll soon see.
13.1.5. Serving XML
So far, you’ve been using the respond_with and respond_to methods to serve JSON responses. You can serve XML using these same methods while continuing to serve JSON. It’s very, very easy. First of all, you’re going to want to create a test to make sure that your new XML data is being returned correctly. You’ll place this test in the index context for “projects viewable by this user” in spec/api/v1/projects_spec.rb using the code from the following listing.
Listing 13.7. spec/api/v1/projects_spec.rb
it "XML" do
  get "#{url}.xml", :token => token
  last_response.body.should eql(Project.readable_by(user).to_xml)
  projects = Nokogiri::XML(last_response.body)
  projects.css("project name").text.should eql("Ticketee")
end
In this spec you use the nokogiri gem to parse the XML (in chapter 6, you used it to parse HTML). Then you use the css method to find an element called name inside another called project, and then check to see if its text is equal to the name of your project, which it should be if everything works out fine. When you run bin/rspec spec/api/v1/projects_spec.rb, this spec will fail:
Diff:
 @@ -1,10 +1,2 @@
 -<?xml version="1.0" encoding="UTF-8"?>
 -<projects type="array">
 -  <project>
 -    <created-at type="datetime">[timestamp]</created-at>
 -    <id type="integer">1</id>
 -    <name>Ticketee</name>
 -    <updated-at type="datetime">[timestamp]</updated-at>
 -  </project>
 -</projects>
 +
 ...
 2 examples, 1 failure
The diff here shows that the expected XML is nowhere to be found in the response, and instead you’re getting back a final line of absolutely nothing. This is because your Api::V1::BaseController doesn’t yet respond to XML requests. So now with a failing test you can go right ahead and change this controller to fix it. To make your API serve XML requests, you’ll change this line in app/controllers/api/v1/base_controller.rb
respond_to :json
to this:
respond_to :json, :xml
This simple little change will now make your spec pass, which you can see by running bin/rspec spec/api/v1/projects_spec.rb:
2 examples, 0 failures
Apologies if something harder was expected, but it really is this simple in Rails. You’ve only changed the API controller and spec, and it’s all contained in itself, but even so it’s still a good habit to run all the features and specs to make sure everything is fine:
61 scenarios (61 passed)
726 steps (726 passed)
# and
36 examples, 0 failures, 12 pending
Green is good. Commit this change:
git add .
git commit -m "Support XML & JSON with /api/v1/projects"
git push
Now that you’ve got your first action of your API responding to both XML and JSON, why don’t you make some more actions, like the create action for creating projects in Ticketee?
13.1.6. Creating projects
In this section, you’re going to implement a new API action that will allow you to create projects. The route for this action was provided by this code in config/routes.rb:
namespace :api do
  namespace :v1 do
    resources :projects
  end
end
You only need to implement the create action in your controller, which makes it all quite simple. When you make a request to this action and it passes validations, you will return the XML or JSON representation of the project that was created, along with a 201 Created HTTP status code, which indicates that a new resource has been created.[9] If the creation of the project fails any validation, then Rails will return a 422 Unprocessable Entity HTTP Status Code,[10] which will indicate that there are errors with the request. The body returned by this failing will contain those errors and look something like this:
9 This isn’t unique to Rails, but is rather part of RFC 2616: http://tools.ietf.org/html/rfc2616#section-10.2.2.
10 As described in RFC 4918, Section 11.2: http://tools.ietf.org/html/rfc4918#section-11.2.
{"name":"can't be blank"}
It’s then up to the people receiving the status back from the API to choose how to display this information.
To make this request to the create action, you need to make a POST request to the /api/v1/projects path, and to do this there’s the post method provided by Rack ::Test::Methods that you can use. You’ll open spec/api/v1/projects_spec.rb now and add in another context block under the first for checking that creating a project through JSON works, as shown in the following listing.
Listing 13.8. spec/api/v1/projects_spec.rb

In the normal create action for the normal ProjectsController in your application, you’re restricting creation of projects to admin users. You’ll do this for this API action in a bit—you’re only trying to get the most basic example going first. Here you again set up the url in a let so that you can re-use it for the other tests you’ll implement later.
You begin your test by making a POST request using post (provided by the Rack::Test::Methods module, just like get), passing through the parameters of a project as the second argument in this method. Then you check that the status of the
last_response is set to 201, which is the correct reply if the resource was created successfully. Next, check that the Location ![]() in the header is set to the correct API route, which would be something such as http://example.com/api/v1/projects. You’ll find out why when you go to implement this action. On the final line of the spec, check that the last_response.body contains the JSON representation of the project that should have been created.
in the header is set to the correct API route, which would be something such as http://example.com/api/v1/projects. You’ll find out why when you go to implement this action. On the final line of the spec, check that the last_response.body contains the JSON representation of the project that should have been created.
When you run bin/rspec spec/api/v1/projects_spec.rb this test will fail, because you’ve yet to implement the create action for its controller:
Failure/Error: post "#{url}.json", :token = token,
  The action 'create' could not be found for Api::V1::ProjectsController
You’ll need to implement this action to make the spec pass. Let’s open app/controllers/api/v1/projects_controller.rb and add this action underneath your index action, using the code shown in the following listing.
Listing 13.9. app/controllers/projects_controller.rb
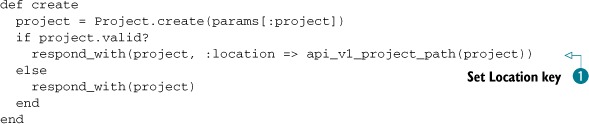
By using the create method of Project, Rails will attempt to create a new record. If this succeeds, then the status that will be returned will be 201 and you’ll
get back the proper representation (either JSON or XML) of the new project. On the final line of this action, you manually
set the Location key in the headers by passing through the :location option ![]() so that it points to the correct URL of something such as http://example.com/api/v1/projects/1, rather than the Rails default of http://example.com/projects/1. People who are using your API can then store this location and reference it later on when they wish to retrieve information
about the project. The URL that Rails defaults to goes to the user-facing version of this resource (/projects/1.json), which
is incorrect.
so that it points to the correct URL of something such as http://example.com/api/v1/projects/1, rather than the Rails default of http://example.com/projects/1. People who are using your API can then store this location and reference it later on when they wish to retrieve information
about the project. The URL that Rails defaults to goes to the user-facing version of this resource (/projects/1.json), which
is incorrect.
If the project isn’t valid (that is, if the save method returns false), then you simply let Rails return a response that will contain the errors of the project, without having a custom location set.
This should be all that you need in order to get your spec to pass, so let’s see what happens when you run bin/rspec spec/api/v1/projects_spec.rb:
3 examples, 0 failures
Great! Now you need to write a test to check that when you attempt to pass through a project with no name you’re given a 422 status code and an error along with it, indicating that the project wasn’t created due to those errors. Directly underneath the previous test in spec/api/v1/projects_spec.rb, you’ll add this test shown in the following listing.
Listing 13.10. spec/api/v1/projects_spec.rb
 it "unsuccessful JSON" do
  post "#{url}.json", :token => token,
                      :project => {}
  last_response.status.should eql(422)
  errors = {"name" => ["can't be blank"]}.to_json
  last_response.body.should eql(errors)
end
Naughty you, writing the test after the code is already there, but you can get away with it once. Let’s run the spec and see how it goes now:
4 examples, 0 failures
Great success! With this URL working for valid and non-valid projects appropriately, you are now providing a way for your users to create a project through the API, and so it’s time to make a commit:
git add .
git commit -m "Added API to create projects"
git push
Your next task is to restrict this action to only the admins of your application, as in the real ProjectsController controller. You want to limit the number of people who can change the projects to a select few who know what they’re doing.
13.1.7. Restricting access to only admins
In app/controllers/projects_controller.rb you’ve got this line, which restricts some actions to only admins:
before_filter :authorize_admin!, :except => [:index, :show]
As it says on the line, every action other than index or show has this filter run before it. This filter is defined in app/controllers/application_controller.rb like this:
def authorize_admin!
  authenticate_user!
  unless current_user.admin?
    flash[:alert] = "You must be an admin to do that."
    redirect_to root_path
  end
end
You’re not going to be able to use this same before_filter for your API because the API doesn’t return flash messages. You have to return errors in a lovely little JSON or XML format. This particular error, for example, is “You must be an admin.” Also, redirection doesn’t make sense here, because it wouldn’t tell users why they were redirected. Therefore, you’ll implement a different authorize_admin! method in your Api::V1::BaseController instead. You’ll take the time, however, to write a test to check for this error occurring. Let’s open a new file at spec/api/v1/project_errors_spec.rb and add a test that if you attempt to make a POST request to api/v1/projects using a token for a user who’s not an admin, you get an error. Use the code from the following listing.
Listing 13.11. spec/api/v1/project_errors_spec.rb
require "spec_helper"

describe "Project API errors", :type => :api do
  context "standard users" do
    let(:user) { create_user! }

    it "cannot create projects" do
      post "/api/v1/projects.json",
        :token => user.authentication_token,
        :project => {
          :name => "Ticketee"
        }
      error = { :error => "You must be an admin to do that." }
      last_response.body.should eql(error.to_json)
      last_response.code.should eql(401)
      Project.find_by_name("Ticketee").should be_nil
    end
  end
end
With this spec, you test that a normal user who’s using a valid authenticity token cannot create a project through the API because they’re not an admin. Instead, the API should return a response of “You must be an admin to do that.” This response should have a code of 401, indicating an Unauthorized response. When you run this spec using bin/rspec spec/api/v1/project_errors_spec.rb, it will not return the error as you expect:
expected "{"error":"You must be an admin to do that."}"
     got "{[project hash]}"
To make this error happen, you’ll go into app/controllers/api/v1/base_controller.rb and underneath your authenticate_user method add the authorize_admin! method shown in the following listing.
Listing 13.12. app/controllers/api/v1/base_controller.rb
def authorize_admin!
  if !@current_user.admin?
    if !@current_user.admin?
      error = { :error => "You must be an admin to do that." }
      warden.custom_failure!
      render params[:format].to_sym => error
, :status => 401
    end
  end
end
Here you use warden.custom_failure! to inform Warden (the Rack backend to Devise) that you’re going to raise a custom 401 response. Without this, Devise would instead take over from this 401 response, showing a “You must be signed in to continue” error message.
You also use the render method in a unique manner here. You call it and pass in a hash with the key being a symbolized version of the format (in this case, json) and the value being the hash that contains the error. By calling render in this way, Rails will convert the hash to JSON, or if it were an XML request, to XML. The reason for doing it this way rather than using respond_with is because respond_with will attempt to do some weird behavior and doesn’t work for POST requests, so you must work around that little issue.
By specifying the status option to the render here, your response’s status code will be set to that particular status, which will let the code used to connect to the API know that the user is unauthorized to perform the specific request.
Now all you need to do is add this as a before_filter into app/controllers/api/v1/projects_controller.rb using this line:
before_filter :authorize_admin!, :except => [:index, :show]
With this line in the ProjectsController, any request to any action that’s not the index or show action will have the admin check run before it. If a user doesn’t meet this criteria, then you will return the “You must be an admin to do that” error. These pieces of code should be enough to get your test running, so let’s find out with bin/rspec spec/api/v1/project_errors_spec.rb:
1 example, 0 failures
Now when people who aren’t admins try to create a project, they will see the “You must be an admin to do that” error message returned from the API. Because this is the case, you’ll need to set up the user in the projects API examples to be an admin when they attempt to create a project, which you can do by putting this before after the beginning of the “creating a project” context block:
before do
  user.admin = true
  user.save
end
When you run bin/rspec spec/api/v1/projects_spec.rb, all the examples will be passing:
4 examples, 0 failures
With this new authorization added you will make a commit, but before that you’ll run a customary check to make sure everything is still alright by running rake spec, because all you’ve edited in this section is the API. You should see this output:
47 examples, 0 failures, 19 pending
Great, so let’s go ahead and commit this then:
git add .
git commit -m "Only admins are able to create projects through API"
git push
In the response for your create action, the headers point to a location (you customized) of a project, something such as http://example.com/api/v1/projects/1. Currently, this URL doesn’t go anywhere because it needs the show action to exist. You should probably get on to that.
13.1.8. A single project
You’ve got a link (http://example.com/api/v1/projects/1) provided by your create action that doesn’t go anywhere if people try to access it. Soon this URL will show a particular project’s attributes through the show action in your Api::V1::ProjectsController. Within those attributes, you’ll also show a last_ticket element, which will contain the attributes for the most recently updated ticket. To do this, you use another option of respond_with, the :methods option. Using this option will change the output of each project resource in your JSON API to something like this:
{
  "project": {
    "created_at": "[timestamp]",
    "id": 1,
    "name": "Ticketee",
    "updated_at": "[timestamp]",
    "last_ticket": {
      "ticket": {
        "asset_updated_at": null,
        "created_at": "[timestamp]",
        "description": "A ticket, nothing more.",
        "id": 1,
        "project_id": 1,
        "state_id": null,
        "title": "A ticket, nothing more.",
        "updated_at": "[timestamp]",
        "user_id": 2
      }
    }
  }
}
Using the last_ticket method, people using the API will be able to discover when the last activity was on the project. You could add other fields such as the comments too if you wished, but this example is kept simple for quality and training purposes.
To get started with this show action, you’ll write a test in spec/api/v1/projects_spec.rb for it inside the “projects viewable by this user” context block, as shown in the following listing.
Listing 13.13. spec/api/v1/projects_spec.rb
context "show" do
  let(:url) { "/api/v1/projects/#{@project.id}"}

  before do
    Factory(:ticket, :project => @project)
  end

  it "JSON" do
    get "#{url}.json", :token => token
    project = @project.to_json(:methods => "last_ticket")
    last_response.body.should eql(project)
    last_response.status.should eql(200)


    project_response = JSON.parse(last_response.body)["project"]

    ticket_title = project_response["last_ticket"]["ticket"]["title"]
    ticket_title.should_not be_blank
  end
end
You’re using the project method that was set up by the “projects viewable by this user” context block earlier to generate the URL to a Project resource, as well as using it to create a new ticket for this project so that last_ticket returns something of value. You take this URL and do a JSON request on it, and you expect to get back a JSON representation of the object with the last_ticket method being called and also returning data. Then you check that the response’s status should be 200, indicating a good request, and finally you check that the last ticket title isn’t blank.
To make this test pass, open app/controllers/api/v1/projects_controller.rb and add in the show action, as shown in the following listing.
Listing 13.14. app/controllers/api/v1/projects_controller.rb
def show
  @project = Project.find(params[:id])
  respond_with(@project, :methods => "last_ticket")
end
In this action, you find the Project based on the params[:id] value and then respond_with this object, asking it to call the last_ticket method. If this method is undefined (as it is right now), then the method will not be called at all. When you run this test with bin/rspec spec/api/v1/projects_spec.rb, you’ll see this error:
Failure/Error: ticket_title = last_response ...
  You have a nil object when you didn't expect it!
  You might have expected an instance of Array.
  The error occurred while evaluating nil.[]
The error occurs because you’re attempting to call the [] method on something that is nil, and it’s really likely that the something is the last_ticket key, which doesn’t exist yet because the method is not defined. To define this method, open app/models/project.rb and add this method inside the class:
def last_ticket
  tickets.last
end
Why are you doing it this way? Well, respond_with doesn’t let you chain methods, and so you’ll work around this by defining a method that calls the chain in your model. When you run bin/rspec spec/api/v1/projects_spec.rb, this test will pass because the last_ticket method is now defined:
1 example, 0 failures
Great! Now the show action is responding with data similar to this:
{
  "project": {
    "created_at": "[timestamp]",
    "id": 1,
    "name": "Ticketee",
    "updated_at": "[timestamp]",
    "last_ticket": {
      "ticket": {
        "asset_updated_at": null,
        "created_at": "[timestamp]",
        "description": "A ticket, nothing more.",
        "id": 1,
        "project_id": 1,
        "state_id": null,
        "title": "A ticket, nothing more.",
        "updated_at": "[timestamp]",
        "user_id": 2
      }
    }
  }
}
How goes the rest of your API? Let’s find out with a quick run of rake spec:
40 examples, 0 failures, 19 pending
Ok, that’s good to see, time to make a commit:
git add .
git commit -m "Added API action for a single project with last ticket"
git push
Back in the main part of the application, you’ve got permissions on users that restrict which projects they can see. Currently in the API there is no such restriction, and so you need to add one to bring it in line with how the application behaves.
13.1.9. No project for you!
Currently, any user can see the details of any project through the API. The main application enforces the rule that users without permission to view a project are not able to do so. To enforce this rule in your API as well, you use the find_project method:
def find_project
  @project = Project.for(current_user).find(params[:id])
rescue ActiveRecord::RecordNotFound
  flash[:alert] = "The project you were looking for could not be found."
  redirect_to projects_path
end
Here you use the for method, which will return a scope for all projects viewable by the current user. By calling find on this scope, if the user doesn’t have access to the project then an ActiveRecord::RecordNotFound exception will be raised. You then rescue this exception and lie to the user, telling them the project is mysteriously gone.[11] Much like the authorize_admin! method you ported over before, you can’t set the flash notice or redirect here. Instead, you’re going to have to present an API error as you did earlier.[12]
11 It’s not really.
12 Although this may seem like repetition (which it is), it’s part of the project’s API and will help you understand the concepts better. Practice, practice, practice! It makes perfect prefects.
To test this new before_filter :authorize_user, write a new test in spec/api/v1/project_errors_spec.rb where a user without permission on a project attempts to view it, only to be rebuked by the server with an error. This test should be placed inside the “standard users” context block and is shown in the following listing.
Listing 13.15. spec/api/v1/project_errors_spec.rb
it "cannot view projects they do not have access to" do
  project = Factory(:project)

  get "/api/v1/projects/#{project.id}.json",
    :token => user.authentication_token
  error = { :error => "The project you were looking for" +
                      " could not be found." }
  last_response.status.should eql(404)
  last_response.body.should eql(error.to_json)
end
When the user attempts to go to the show page, they should receive the error informing them that the project has run away (or doesn’t exist). The status code for this response should be 404, indicating the resource the user was looking for is not found. To make this work, you’ll remove this line from the show action in app/controllers/api/v1/projects_controller.rb:
project = Project.find(params[:id])
Then you’ll put this line under the authorize_admin! filter inside this controller’s class:
before_filter :find_project, :only => [:show]
Next, you need to add the find_project after the show action as a private method, as shown in the following listing.
Listing 13.16. app/controllers/api/v1/projects_controller.rb
private

def find_project
  @project = Project.for(current_user).find(params[:id])
  rescue ActiveRecord::RecordNotFound
    error = { :error => "The project you were looking for " +
                        "could not be found."}
    respond_with(error, :status => 404)
end
Here you respond with the error message and set the status to 404 to tell the user that the project doesn’t exist. When you run bin/rspec spec/api/v1/project_errors_spec.rb, your spec will pass:
2 examples, 0 failures
You’re now restricting the projects that a user can access to only the ones they have permission to view. If the API user doesn’t have the permission, you’ll deny all knowledge of the project and return a 404 status code. It’s quite grand how this is possible in such few lines of easy-to-understand code.
You’ll run all the specs now to make sure everything’s rosy with rake spec. You should see that it’s all green:
40 examples, 0 failures, 12 pending
A nice round number this time. A commit you shall make:
git add . git commit -m "Restricting projects API show to only users who have
Currently you’ve got the index, show, and create actions implemented for your controller. What’s missing? Well, you could say the new, edit, update, and destroy actions are, but you don’t need the new and edit actions, because this should be handled on the client side of the API, not the server. It is the client’s duty to present the new and edit dialogs to the user. Therefore, you only need to implement the update and destroy methods and then you’re done with this API. So close!
13.1.10. Updating a project
To update a project in the API, people will need to make a POST request to the /api/v1/projects/:id URL with the project’s new information contained in a params[:project] hash. Simple, really.
To test that this action works correctly, you’ll add yet another spec to spec/api/v1/projects_spec.rb using the code from the following listing.
Listing 13.17. spec/api/v1/projects_spec.rb

At the top of this new context block, you’ve defined that the user is an admin again. You could wrap the create and update tests within another context that sets this flag too, but you’ll do it this way for now.
You need to make a put request to this action for Rails to accept it, and you can do that by using the put method ![]() . Along with this request, you send the token and project parameters. The project parameter contains a new name for this project. Because it’s a valid (non-blank) name, the response’s status code will be
200, but the response will be an empty hash indicating no errors. This doesn’t return an updated object, because what’s the
point? The client should be aware of the updates that have occurred, given it triggered them!
. Along with this request, you send the token and project parameters. The project parameter contains a new name for this project. Because it’s a valid (non-blank) name, the response’s status code will be
200, but the response will be an empty hash indicating no errors. This doesn’t return an updated object, because what’s the
point? The client should be aware of the updates that have occurred, given it triggered them!
At the end of this spec, you use the reload method to find this object again from the database. This is because the object that the spec is working with will be a completely different Ruby object from the one in the update action in the controller. By calling reload, Rails will fetch the data for this object again from the database and update the object in the process.
To begin writing this action in Api::V1::ProjectsController, you’re going to need to first modify the before_filter :find_project line to include the update action, changing it from this
before_filter :find_project, :only => [:show]
before_filter :find_project, :only => [:show, :update]
Now in the update action you’ll have a project that you can work with because this before_filter will find it for you. Next, you’ll write this action into the controller using the code from the following listing.
Listing 13.18. app/controllers/api/v1/projects_controller.rb
def update
  @project.update_attributes(params[:project])
  respond_with(@project)
end
Well isn’t this quite a difference from your standard update actions? You only need to call update_attributes here, which will save the object and return a valid object in the format that you’ve asked for. If this object fails validation, the status code returned by respond_with will be 422, which represents an Unprocessable Entity, and the body will contain only the validation errors that occurred. If the object is valid, respond_with will return a 200 status code, but an empty response. This is because the client should be aware of what changes it has made to the object, and so there’s no need to send back the object.
So which is it? Does the update action work and return the 200 status code you want, or does it break? It’s easy to find out by running bin/rspec spec/api/v1/projects_spec.rb:
5 examples, 0 failures
All working, good stuff. You’ve now got a check that the update action responds correctly when a valid object is given, but what if invalid parameters are given instead? Well, the action should return that 422 response mentioned earlier. Although this is testing the already extensively tested[13] Rails behavior, you’re making sure that this action always does what you think it should. No misbehaving allowed! You’ll quickly whip up a spec for this, placing it right underneath the previous example, “successful JSON” that you wrote in spec/api/v1/projects_spec.rb. The code for it is shown in the following listing.
13 It’s tested within Rails itself.
Listing 13.19. spec/api/v1/projects_spec.rb
it "unsuccessful JSON" do
  @project.name.should eql("Ticketee")
  put "#{url}.json", :token => token,
                      :project => {
                        :name => ""
                      }
  last_response.status.should eql(422)
  @project.reload
  @project.name.should eql("Ticketee")
  errors = { :name => ["can't be blank"]}
  last_response.body.should eql(errors.to_json)
end
In this example, you attempt to set the project’s name to a blank string, which should result in the 422 error you want to see. After you reload the project, the name should be the same. You should then get the 422 error as the response.
A quick run of bin/rspec spec/api/v1/projects_spec.rb should let you know if this is working:
7 examples, 0 failures
Indeed it is! Is everything else working? A run of rake spec will let you know:
51 examples, 0 failures, 19 pending
“51 examples, 0 failures” is exactly what you like to see. That means that your update action is all wrapped up, and now it’s time for a commit:
git add .
git commit -m "Implement update action for projects API"
git push
You’ve now got three fourths of the CRUD of this API. You’re able to create, read, and update project resources. With updating, clients authorized with an admin’s token can send through updates to the project resource, which will update the information in the application. The one remaining action you’ve got to implement is the destroy action, for making projects go bye-bye. You’re almost home!
13.1.11. Exterminate!
You need to create the destroy action, which allows admins of Ticketee to delete projects through the API. To do this, API clients need to make a DELETE request to /api/v1/projects/1.json or /api/v1/projects/1.xml. Upon making this request, the specified project will be deleted—gone forever, exterminated!
You’ll write the final example in the spec/v1/api/projects_spec.rb to make sure that people are able to delete projects using this route. You’ll use the code from the following listing to do this.
Listing 13.20. spec/v1/api/projects_spec.rb
context "deleting a project" do
  before do
    user.admin = true
    user.save
  end

  let(:url) { "/api/v1/projects/#{@project.id}" }
  it "JSON" do
    delete "#{url}.json", :token => token
    last_response.status.should eql(200)
  end
end
When you run bin/rspec spec/v1/api/projects_spec.rb, this spec will fail because the destroy action doesn’t exist:
1) /api/v1/projects deleting a project JSON
   Failure/Error: delete "#{url}.json", :token => token
   The action 'destroy' could not be found for Api::V1::ProjectsController
You need to add the destroy action to the Api::V1::ProjectsController, which you can do with this code:
def destroy
  @project.destroy
  respond_with(@project)
end
The respond_with here will respond with a 200 status code and an empty JSON or XML response, which indicates the object was successfully destroyed. But where does @project come from? Your before_filter should set this up, but it doesn’t right now. Let’s fix it by changing it from this
before_filter :find_project, :only => [:show,
                                       :update]
to this:
before_filter :find_project, :only => [:show,
                                       :update,
                                       :destroy]
When you run bin/rspec spec/api/v1/projects_spec.rb, does it pass?
8 examples, 0 failures
It does, because you’re great at what you do! That’s the final piece of the projects API, and now people are able to create, read, update, and delete projects through it. The rest of your specs probably pass because you didn’t change anything outside the scope, but it’s still good to do a check. For old time’s sake, you’ll also run the features to make sure everything’s ok there too. The full command that you’ll now run is rake cucumber:ok spec. For this command, you should see this output:
63 scenarios (63 passed)
732 steps (732 passed)
# and
52 examples, 0 failures, 19 pending
All systems are go, so let’s make a commit at this lovely point in time where everything is beautiful:
git add .
git commit -m "Projects can now be deleted through the API"
The entire projects API is now complete. What you’ve got at the moment is a solid base for version 1 of Ticketee’s projects API. You’ll now see how you can begin creating the nested API for tickets on a project.
13.2. Beginning the tickets API
In this section you’ll begin to create an API for tickets on a project. You’re only going to be creating the part of the API to list tickets for now, because the remaining parts are similar in style to what you saw with the projects API. This section will give you a taste of how to work with nested resources within the context of an API.
The first part you’re going to need for this API is two tests: one to make sure you can get XML results back from this API and another for JSON results. Put these new tests in a new file at spec/api/v1/tickets_spec.rb, beginning with the setup required for both of these tests shown in the following listing.
Listing 13.21. spec/api/v1/tickets_spec.rb
require 'spec_helper'

describe "/api/v1/tickets", :type => :api do
  let(:project) { Factory(:project, :name => "Ticketee") }

  before do
    @user = create_user!
    @user.update_attribute(:admin, true)
    @user.permissions.create!(:action => "view",
                              :thing => project)
  end

  let(:token) { @user.authentication_token }
In this spec you use a before block to set up your user, rather than using a let as you did in spec/api/v1/projects_spec.rb. The reason for this is when a let is referenced, the block is re-run. If you were to create five tickets and reference a user object set up with let, it would create five users. This problem becomes way more pronounced when you create 100 objects, each referencing the let.
With this setup, you can begin the context for your index action and then in a before block, create 20 tickets for the project by using these lines after the let(:project) line:
context "index" do
  before do
    5.times do
      Factory(:ticket, :project => project, :user => @user)
    end
  end
Finally, you can write the XML and JSON tests by placing the code shown in the following listing inside the context block you have written.
Listing 13.22. spec/api/v1/projects_spec.rb
context "index" do
  ...

  let(:url) { "/api/v1/projects/#{project.id}/tickets" }

  it "XML" do
    get "#{url}.xml", :token => token
    last_response.body.should eql(project.tickets.to_xml)
  end

  it "JSON" do
    get "#{url}.json", :token => token
    last_response.body.should eql(project.tickets.to_json)
  end
end
You’ve defined the let(:url) here to point to the nested route for tickets of a given project. This URL is currently undefined and so when you run this test with bin/rspec spec/api/v1/tickets_spec.rb, you’re told that the route you’re requesting doesn’t exist:
Failure/Error: get "#{url}.json", :token => token
     ActionController::RoutingError:
       No route matches [GET] "/api/v1/projects/1/tickets.json"
You can define this route easily inside config/routes.rb by changing these lines
namespace :api do
  namespace :v1 do
    resources :projects
  end
end
to this:
namespace :api do
  namespace :v1 do
    resources :projects do
      resources :tickets
    end
  end
end
Now you’ve got the tickets resource nested within projects for your API again. When you re-run this spec you’ll be told this:
uninitialized constant Api::V1::TicketsController
You can create this controller by creating a new file at app/controllers/api/v1/tickets_controller.rb. This controller needs to first of all respond to both JSON and XML, and find the project for each request using a before_filter. You can begin to define this controller using the code from the following listing.
Listing 13.23. app/controllers/api/v1/tickets_controller.rb
class Api::V1::TicketsController < Api::V1::BaseController

  before_filter :find_project

  private
    def find_project
      @project = Project.for(current_user).find(params[:project_id])
      rescue ActiveRecord::RecordNotFound
        error = { :error => "The project you were looking for" +
                            " could not be found."}
        respond_with(error, :status => 404)
    end
end
In the beginning, you set up the controller to inherit from Api::V1::BaseController so that it inherits the basic behavior of your API. Then you tell it that this controller responds to both JSON and XML. Finally, you define a before_filter :find_project that will find a project, providing that the user is able to access it. If the user cannot access it, then you respond_with a 404 error.
Underneath the before_filter in this controller, you need to define the index action to return a list of tickets for your project. You can do that with the code shown in the following listing.
Listing 13.24. app/controllers/api/v1/tickets_controller.rb
def index
  respond_with(@project.tickets)
end
That feels like you’re getting too much for free, doesn’t it? Rails is handling a lot of the actions here for you. When you run bin/rspec spec/api/v1/tickets_spec.rb specs again, your tests will now pass because you’ve got the controller defined correctly:
2 examples, 0 failures
This is a great start to generating a tickets API, and now with the skills you’ve learned a little earlier in this chapter you should be able to bash out the rest with little effort. Rather than covering that old ground again, it’ll be left as an exercise for you.
Let’s run all the tests with rake spec to make sure you didn’t break anything:
54 examples, 0 failures, 19 pending
Nope, nothing broken there, which is awesome to see. Time for a commit:
git add .
git commit -m "Added beginnings of the V1 Tickets API"
git push
You should probably limit the number of tickets that are sent back through the API or, even better, cache the result. You’ll see ways to do both of these things in chapter 15, and then you can apply them to the API when you feel it’s right. For now, it would be fine for a project with a small amount of tickets, but if a project grew to something say, the size of the Rails project,[14] then it would be problematic because Rails would have to instantiate thousands of new Ticket objects per-request. That’s no good.
14 6000 tickets, as of this writing.
Now that you’re versed in the Ways of the API, you can tackle potential problems with it. One of the potential problems with this API is that you’ll have too many users accessing it all at once, which may cause performance problems with the application. To prevent this, you’ll implement the rate of requests people can make to your server.
13.3. Rate limiting
When a server receives too many requests, it can seem unresponsive. This is simply because it is too busy serving existing requests to serve the hoard of incoming requests. This can happen when an application provides an API to which many clients are connecting. To prevent this, you’ll implement rate-limiting on the API side of things, limiting users to only 100 API requests per hour.
The way you’re going to do this is to add a new field to the users table that stores a count of how many requests the user has made per hour. To reset the user’s count back to zero, you’ll create a method that finds only the users who’ve made requests in the last hour and reset their counts.
13.3.1. One request, two request, three request, four
Currently in app/controllers/api/v1/base_controller.rb you’ve got code that only checks if the token specified is correct, and if so, assigns a user to the @current_user variable:
def authenticate_user
  @current_user = User.find_by_authentication_token(params[:token])
  unless @current_user
    respond_with({ :error => "Token is invalid." })
  end
end
You’ll now be able to do whatever you wish to this user object in an API request. First, you’re going to make sure that it’s incrementing the request count for a user whenever they make an API request. For this, you need a field in the database to keep a track of user API requests. You’ll generate a migration using this command
rails g migration add_request_count_to_users request_count:integer
This migration will do exactly what you say it should do: add a field called request_count to the users table. You’ll need to modify this migration slightly so that the field defaults to 0, which you can do by replacing this line in the new migration:
add_column :users, :request_count, :integer
with this:
add_column :users, :request_count, :integer, :default => 0
You can run these two commands to run this migration, and then you’ll be on your way:
rake db:migrate
rake db:test:prepare
You can now write a test to make sure that the request count is going to be incremented with each request. You’ll open a new file at spec/v1/api/rate_limit_spec.rb so that you can separate these tests from the others, because they are not part of the projects API or the errors from it. Into this file you’ll put the code from the following listing.
Listing 13.25. spec/v1/api/rate_limit_spec.rb
require 'spec_helper'

describe "rate limiting", :type => :api do
  let(:user) { create_user! }

  it "counts the user's requests" do
    user.request_count.should eql(0)
    get '/api/v1/projects.json', :token => user.authentication_token
    user.reload
    user.request_count.should eql(1)
  end
end
When you run this spec now with bin/rspec spec/v1/api/rate_limit_spec.rb, it’s going to fail on the final line because the request count hasn’t been incremented:
Failure/Error: user.request_count.should eql(1)

  expected 1
       got 0

  (compared using eql?)
Alright, now that you’ve got a failing test, you can make it work! Open app/controllers/api/v1/base_controller.rb and add in a new method called check_rate_limit right underneath the current_user method, using this code:
def check_rate_limit
  @current_user.increment!(:request_count)
end
By calling the increment! method on the user object, the field specified will be incremented once. To call this method, you’ll put it as another before_filter underneath the authenticate_user one at the top of this controller:
before_filter :check_rate_limit
That’s all there is to it, and so it will pass when you run bin/rspec spec/api/v1/rate_limit_spec.rb:
1 example, 0 failures
This is splendid. Before you run any more specs or make any commits, you’ll do what you came here to do: limit some rates.
13.3.2. No more, thanks!
You’ve got the method called check_rate_limit, but it’s not actually doing any checking right now, it’s only incrementing. You should do something about this.
You’ll begin by writing a test to check that people who reach the rate limit (of 100) receive a warning that tells them simply “Rate limit exceeded.” You’ll put this new test underneath the previous test you wrote in spec/v1/api/rate_limit_spec.rb using the code from the following listing.
Listing 13.26. spec/v1/api/rate_limit_spec.rb
it "stops a user if they have exceeded the limit" do
  user.update_attribute(:request_count, 200)
  get '/api/v1/projects.json', :token => user.authentication_token
  error = { :error => "Rate limit exceeded." }
  last_response.code.should eql(403)
  last_response.body.should eql(error.to_json)
end
In this spec, you set the request count to be over the 100 limit. If the user makes another request, they should see the “Rate limit exceeded” error. For the status in this spec, you’re expecting the error to be set to a 403, which would indicate a forbidden request that is perfectly in line with the no, we’re not going to let you make any more requests theme you’ve got going on.
To make this work, change the check_rate_limit method in app/controllers/api/v1/base_controller.rb to what is shown in the following listing.
Listing 13.27. api/controllers/v1/base_controller.rb
def check_rate_limit
  if @current_user.request_count > 100
    error = { :error => "Rate limit exceeded." }
    respond_with(error, :status => 403)
  else
    @current_user.increment!(:request_count)
  end
end
In this method, if the user’s current request_count is greater than 100, then you respond with the “Rate limit exceeded” error and set the status code of the response to 403. If it’s less than 100, then you’ll increment their request count. This should be enough to make your spec pass now, so let’s run bin/rspec spec/api/v1/rate_limit_spec.rb and find out if this is working:
2 examples, 0 failures
Your API is now limiting requests to 100 per user, but that’s for all time right now, which isn’t fun. You need a method that will reset the request count for all users who’ve made requests. It’s the final step you need to complete the rate limiting part of your API.
13.3.3. Back to zero
You need to reset the request_count of each user who’s made a request to your API. This will be a method on the User model, and so you’ll put its test in a new file as spec/models/user_spec.rb file, inside the describe User block, using the code from the following listing.
Listing 13.28. spec/models/user_spec.rb
require 'spec_helper'

describe User do
  it "resets user request count" do
    user = Factory(:user)
    user.update_attribute(:request_count, 42)
    User.reset_request_count!
    user.reload
    user.request_count.should eql(0)
  end
end
With this spec, you set a new user’s request count to something other than 0; 42 is a random number,[15] and you’re quite fortunate for it to exist so that you can use it. The reset_request_count! method isn’t defined, but as the remainder of the test implies, the user’s request count should be 0. This test, unsurprisingly, will not pass when it runs, and so you should write the method to make it pass.
15 Not really.
As the reset_request_count! method is called on User, you define this method in app/models/user.rb using the following code above the to_s method:
def self.reset_request_count!
  update_all("request_count = 0", "request_count > 0")
end
You’re placing this code right above the to_s method because it is best practice to place class methods (such as reset_request_count!) above instance methods in a model, as some instance methods may refer to class methods. Also, if everybody puts their code in logical places, then you won’t be confused when you look at it, which is what Rails is all about.
The update_all method here will set the request_count on all user records (the first argument) that have a request_count > 0 (the second argument), or a request_count greater than zero. No point resetting counts that are zero back to zero.
Now that the reset_request_count! method is defined, does it work as your test says it should? Well, let’s run bin/rspec spec/models/user_spec.rb:
1 example, 0 failures
Cool, so now you’ve got the request count being reset for all users whenever this method is called. You’ll take a look at calling this method automatically when we look at background jobs in chapter 15.
That completes everything you need to do for rate limiting in your API. Before you make a commit, run all the specs with the rake spec to see if the API is still working:
56 examples, 0 failures, 18 pending
All good! You can commit this now:
git add .
git commit -m "Added rate limiting to the V1 API"
git push
You’ve implemented a way to stop people from making too many requests to your API, which will possibly stop your application from being overloaded due to excessive API requests. Next, we look at how you can implement versioning in your API.
13.4. Versioning an API
At the beginning of this chapter, we discussed how all your API routes would be under the /api/v1/namespace. This was because you wanted to provide a predictable outcome of the requests to the URLs. If you go changing URLs to provide extra data or to take away data, some API clients may malfunction. So when you want to make changes to your API, you group them all up into logical versions.
With this separation, you can provide a link, such as /api/v1/projects.json, which will return the attributes you’re already familiar with, as well as another path for the next version. This second version’s path will be /api/v2/projects.json, and the difference between the two is that you’ll change the name field to be called title instead. Although this is potentially a trivial example,[16] it’s a great case to show off how to make two API versions different.
16 Also a tiny fraction slower than v1, given you’ll be calling a method from within another method rather renaming it.
13.4.1. Creating a new version
To begin the versioning process, copy these routes from config/routes.rb in your application:
namespace :api do
  namespace :v1 do
    resources :projects
  end
end
And place them beneath, renaming v1 to v2:
namespace :api do
  namespace :v2 do
    resources :projects
  end
end
Now you’ll need to create a new app/controllers/api/v2 directory, which you can do by copying app/controllers/api/v1 into that location. You’ve now got version 2 of your API. You’ll need to open these controllers and replace the multiple occurrences of Api::V1 with Api::V2.
Strangely, version 2 of your API is, right now, identical to version 1 of your API. That’s intentional: a new version of the API should be an improvement, not an entirely new thing. With this separation, you can modify version 2 of the API as you please, leaving version 1 alone.
Before deprecating the name field in your project responses, you’ll write a test to make sure that this is gone. This test will now test version 2 of the API, and so you’ll copy over the spec/api/v1 directory to spec/api/v2, also replacing occurrences of v1 in these files with v2. The test for the new title field will now go in spec/api/v2/projects_spec.rb and will test that the projects viewable by this user action returns projects with title, and not name, using the code from the following listing to replace the JSON example in the index context.
Listing 13.29. spec/api/v2/projects_spec.rb
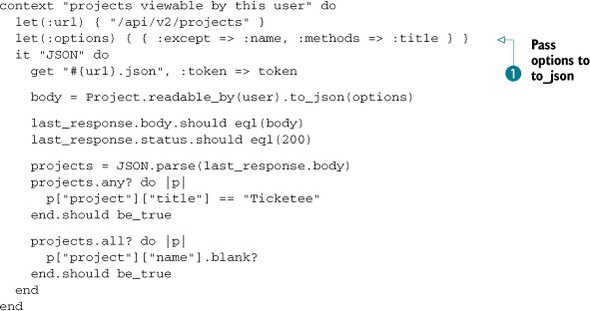
At the beginning of this test, you need to pass the same options to to_json ![]() as you pass to respond_with, because the respond_with method generates the same output as to_json.
as you pass to respond_with, because the respond_with method generates the same output as to_json.
In the final lines of this test, you’re checking that it’s now title and not name that returns the correct project title, and that the name key on all projects is blank. You’ll also need to change the XML test of this method to the code shown in the following listing.
Listing 13.30. spec/api/v2/projects_spec.rb
it "XML" do
  get "#{url}.xml", :token => token

  body = Project.readable_by(user).to_xml(options)
  last_response.body.should eql(body)
  projects = Nokogiri::XML(last_response.body)
  projects.css("project title").text.should eql("Ticketee")
  projects.css("project name").text.should eql("")
end
When you run this test using bin/rspec spec/api/v2/projects_spec.rb, it’s broken:
Failure/Error: last_response.body.should eql(body)
  expected "[{[ticket hash without name key]}]"
  got      "[{[ticket hash with name key]}]"
This is because the name field is still being returned by your API. To exclude this field from your API, you can use the :except option to respond_with calls. In app/controllers/api/v2/projects_controller.rb the index method can now be altered to this:
def index
  projects = Project.readable_by(current_user)
  respond_with(projects, :except => :name, :methods => :title)
end
The :except option here will exclude the name field from the responses provided by this API, and the methods option will call the title method (you’ll define it in a moment), providing that in your API response. You still need to have the name field in your database because it’s used in quite a few places in your application. You could change it all now, but this example is purely to show off the :except option and API versioning. A change like that would be recommended over this example, however it’s best left as another exercise for you.
To make your API respond with the title method, you need to define it in app/models/project.rb inside the Project class like this:
def title
  name
end
Now when you run bin/rspec spec/api/v2/projects_spec.rb, the tests that you edited will pass:
8 examples, 0 failures
You’ve seen how you can generate a new version of your API and alter the output of it, and the text says that your original API (v1) shouldn’t be effected, but was it? A great way to check is a quick run of bin/rspec spec/api/v1:
15 examples, 0 failures
Great, that’s all working! A quick run of rake spec will confirm your suspicions that nothing is broken:
71 examples, 0 failures, 18 pending
Awesome stuff. Let’s make a new commit:
git add .
git commit -m "Implement v2 of the API,
              renaming name to title for projects"
git push
Alright, so now you’ve got two versions of your API. Generally, there’s much more than a single change in a new API version, but this is a good start. When you announce this API to the people who use your application, they can switch their libraries over to using it immediately, or, ideally, remain using the old version. After a while, you may elect to turn off the first version of the API, and you would do that by giving your users considerable notice such as a month, and then un-defining the routes and deleting the controllers and tests associated with that version. Out with the old and in with the new, as they say.
You’ve now seen how you can serve data from your application using an API, but how do you read it? The answer to that lies in a part of Rails called Active Resource.
13.5. Summary
You’ve seen in this chapter how you can use the Rack::Test::Methods module, given to you for free by the rack-test gem, to test that requests to URLs provided by your application return valid API responses in JSON and XML formats. Users will then be able to make these same requests for their own applications or libraries to get at the data in your system. What they come up with is up to their imagination. In this chapter, we only covered one aspect (projects) for your API, but with the knowledge found in this chapter you could easily create the other aspects for tickets, users, states, or tags.
In the second section of this chapter you saw how you can limit the request rate to your API on a per-user basis. Users can make up to 100 requests to your system, and when they attempt to make their 101st the application denies them the request and provides a relevant error message. This is to deter people from excessively using the API, as you do not want your server to become overloaded immediately.
Last, you saw how you can generate a new version of your API so that you can introduce a change, or changes, so as to not break the previous version of the API. Once an API has been released to the public, its output shouldn’t be modified, as this may affect the libraries referring to it. The easiest way to introduce these modifications is through a new version, which is what you did. Eventually, you may choose to deprecate the old API, or you may not. It’s really a matter of personal choice.
Your application’s at a pretty great point now and is ready for prime time! To show it off to the masses, it’s best that you put the code on a computer dedicated to serving the application, rather than running it on some local hardware. In chapter 14, you’ll deploy your application to an Ubuntu 10.10 box, learning about the core components to a deployment software stack as you go.