Chapter 6. Printing
Printing continues to be one of the most important ways to share information with others. Windows 7 includes many new features to help you work with printers, including the Device Stage dialog shown on page 80.
Viewing Available Printers
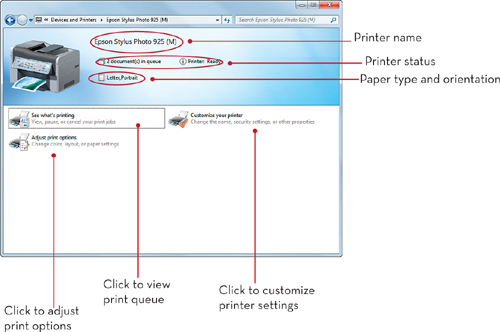
The Devices and Printers folder, a new feature of Windows 7, displays devices and printers on your system.
![]()
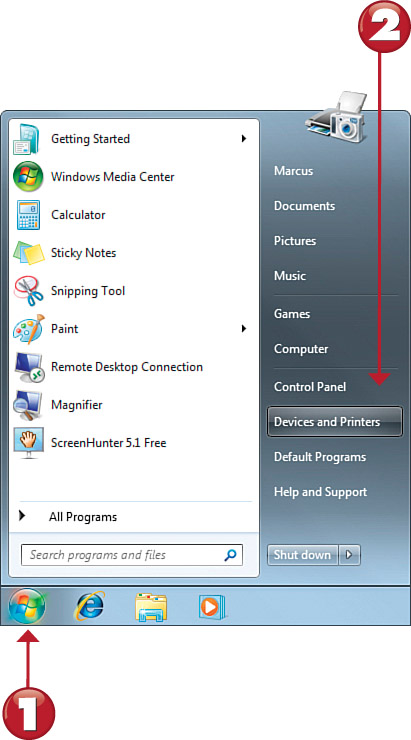
![]() Click the Start orb.
Click the Start orb.
![]() Click Devices and Printers.
Click Devices and Printers.

![]() Indicates default printer.
Indicates default printer.
![]() Right-click to open context menu.
Right-click to open context menu.
![]() Click to adjust printer settings.
Click to adjust printer settings.
![]() Click to customize printer properties.
Click to customize printer properties.

Installing a New Printer
When you connect a USB printer to your computer and turn it on, the printer is installed automatically. Here’s what you see if you perform this task while Devices and Printers is open.
![]()
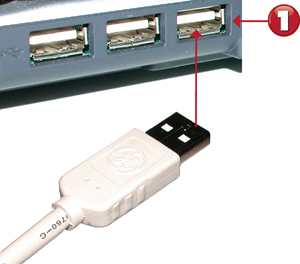
![]() Connect the printer to a USB port on your computer.
Connect the printer to a USB port on your computer.

![]() Turn on the printer.
Turn on the printer.
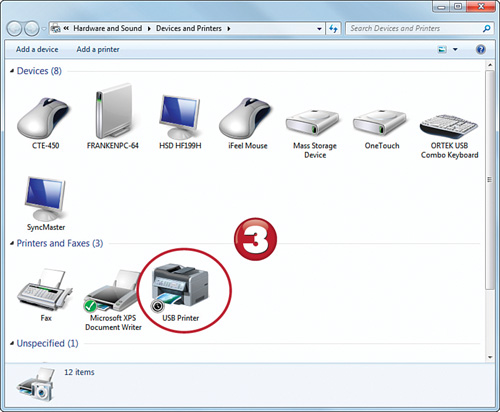
![]() The printer is detected.
The printer is detected.
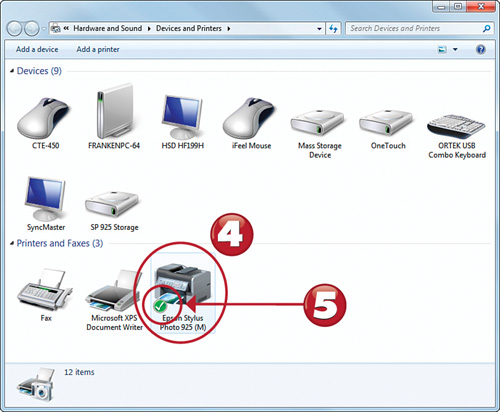
![]() After the driver is installed, the printer is ready to use.
After the driver is installed, the printer is ready to use.
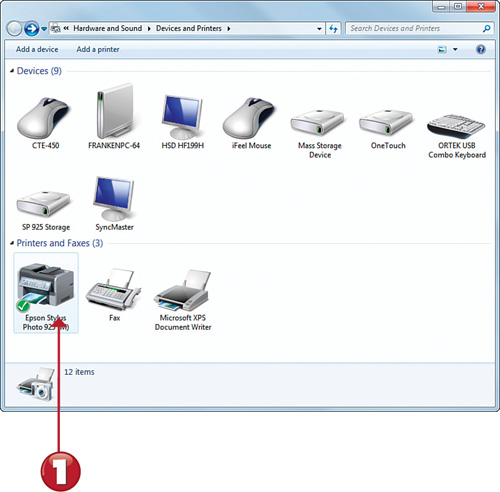
![]() The printer is now the default printer.
The printer is now the default printer.
You can set a different default printer by right-clicking the printer you prefer as default and selecting Set As Default Printer from the context menu.
Using Device Stage to View and Change Printer Properties
Device Stage is a new feature in Windows 7. It enables you to access all management functions for printers or other devices from a single interface. In this example, you see how to use Device Stage to change print options.
![]()
![]() Double-click the printer in Devices and Printers.
Double-click the printer in Devices and Printers.
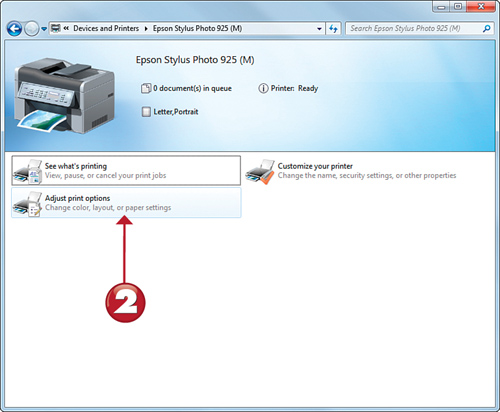
![]() Double-click to adjust print options.
Double-click to adjust print options.
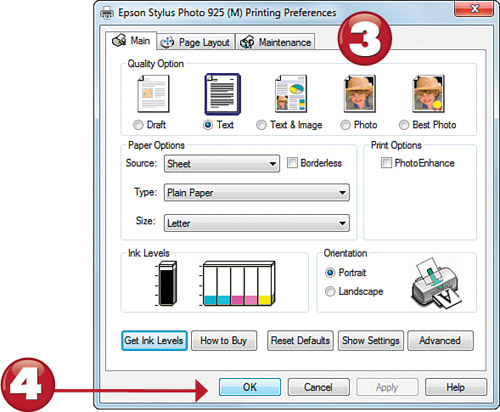
![]() Adjust print preferences as desired.
Adjust print preferences as desired.
![]() Click OK to close the preferences menu.
Click OK to close the preferences menu.
Printers with drivers made especially for Windows 7 offer additional options in the Device Stage menu. These options could include ordering ink or updating drivers.
Printing preferences menus vary a great deal from printer model to printer model. To clean printheads on an inkjet printer, for example, you might find the option in various locations, such as on a Maintenance tab or elsewhere. See the printer’s documentation for details.
Printing a Test Page to a Local Printer
As you learned in a previous section, Windows 7 does not prompt you to print a test page when you install a USB printer. However, it’s easy to print a test page for any local or network printer whenever you want. Here’s how.
![]()
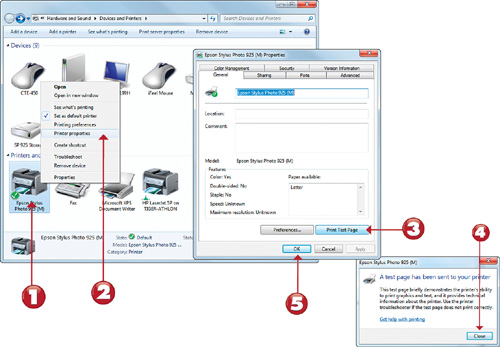
![]() Right-click a printer.
Right-click a printer.
![]() Select Printer Properties.
Select Printer Properties.
![]() Click Print Test Page.
Click Print Test Page.
![]() Click Close.
Click Close.
![]() Click OK.
Click OK.
You can also access the General tab (which contains the Print Test Page button) by double-clicking the Customize Your Printer link in the Devices and Printers dialog for the printer.
Installing a Network Printer
If you have a home network with a shared printer, you can connect to that printer and use it in Windows 7. Here’s how.
![]()
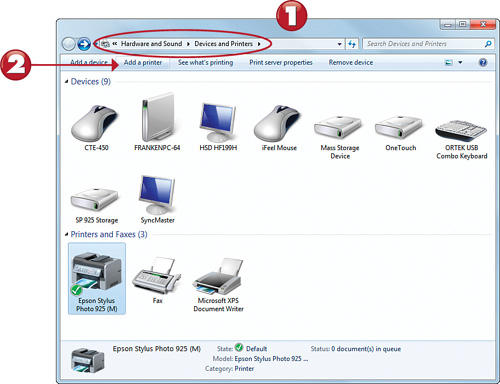
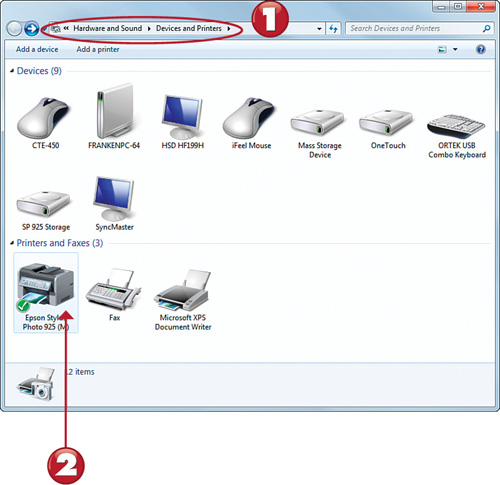
![]() Open the Devices and Printers folder.
Open the Devices and Printers folder.
![]() Click Add a Printer.
Click Add a Printer.
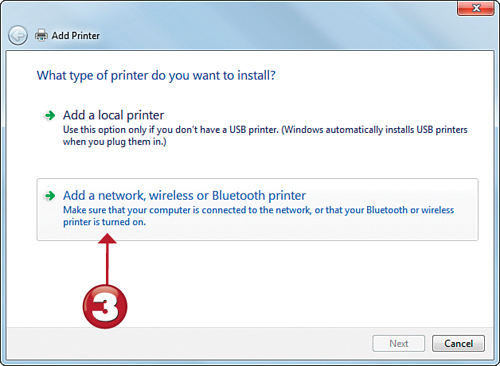
![]() Click Add a Network, Wireless, or Bluetooth printer.
Click Add a Network, Wireless, or Bluetooth printer.
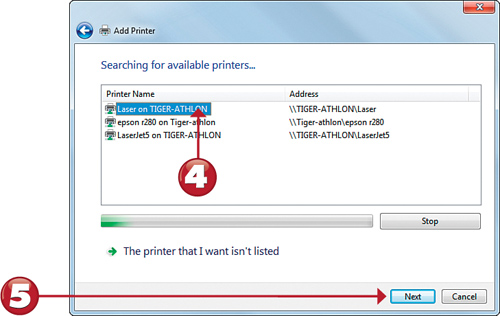
![]() Select a printer.
Select a printer.
![]() Click Next.
Click Next.
If no printers are listed, make sure your network connection is working, and that you are part of the workgroup or domain sharing the printer. See Chapter 16, “Networking Your Home,” for details.
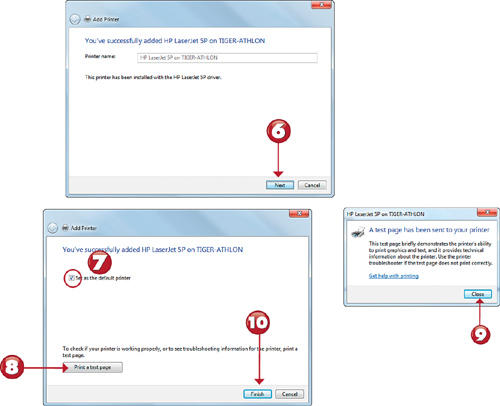
![]() Click Next.
Click Next.
![]() If you don’t want the printer to be the active printer, click to clear the checkbox.
If you don’t want the printer to be the active printer, click to clear the checkbox.
![]() Click to print a test page.
Click to print a test page.
![]() Click Close.
Click Close.
![]() Click Finish.
Click Finish.
If you are installing an all-in-one device that connects directly to the network (rather than to a specific computer), you might be prompted to share the printer and to select multiple default printers for different locations.
Sharing a Printer
Windows 7 uses a multi-tabbed interface for printer properties. In this tutorial, you learn how to use the Sharing tab to share a printer on the network.
![]()
![]() Open the Devices and Printers folder.
Open the Devices and Printers folder.
![]() Double-click a printer.
Double-click a printer.

![]() Double-click Customize Your Printer.
Double-click Customize Your Printer.
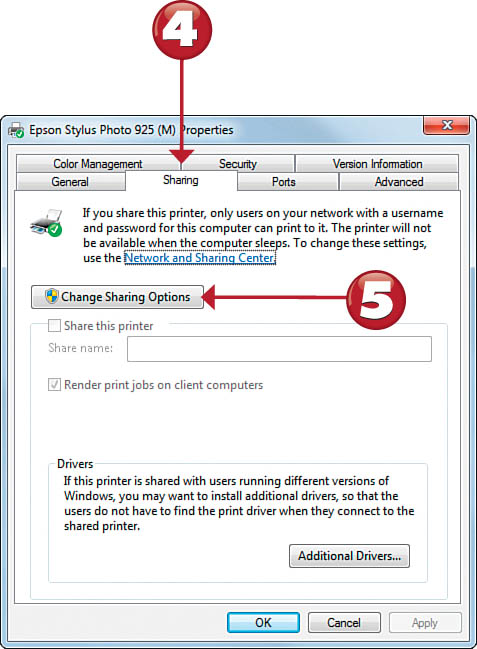
![]() Click the Sharing tab.
Click the Sharing tab.
![]() Click Change Sharing Options.
Click Change Sharing Options.
Depending upon your UAC settings, you might see a UAC dialog appear after Step 5. Click through it or provide an administrator’s password as prompted.
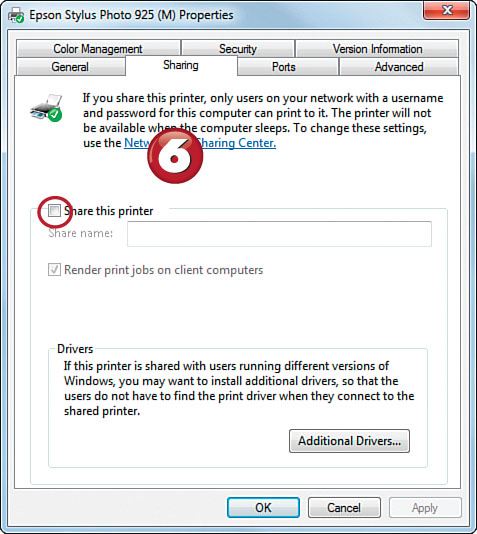
![]() Click the Share This Printer checkbox.
Click the Share This Printer checkbox.
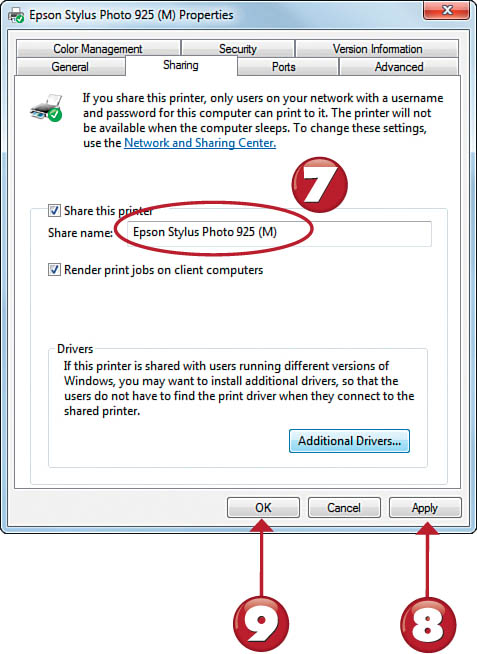
![]() You can change the share name if desired.
You can change the share name if desired.
![]() Click Apply.
Click Apply.
![]() Click OK.
Click OK.
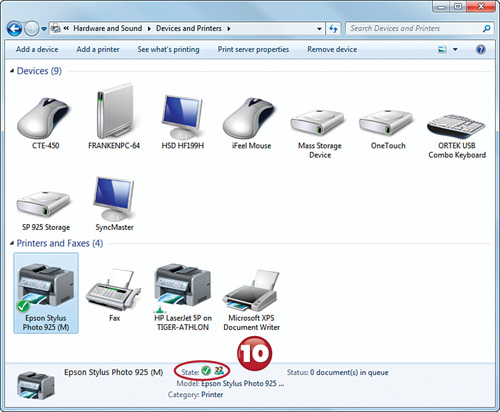
![]() The printer is set as a shared device.
The printer is set as a shared device.
Highlight a printer to see its status (default, shared, number of documents waiting to print, and so on).
Printing a Document with Print Preview
Some programs included with Windows 7, as well as programs you might install later, include a Print Preview option. Use this option to see how your document will look when printed. In this tutorial, you see how to use Print Preview with WordPad.
If you do not need to use Print Preview, select the Print option rather than the Print Preview option.
![]()
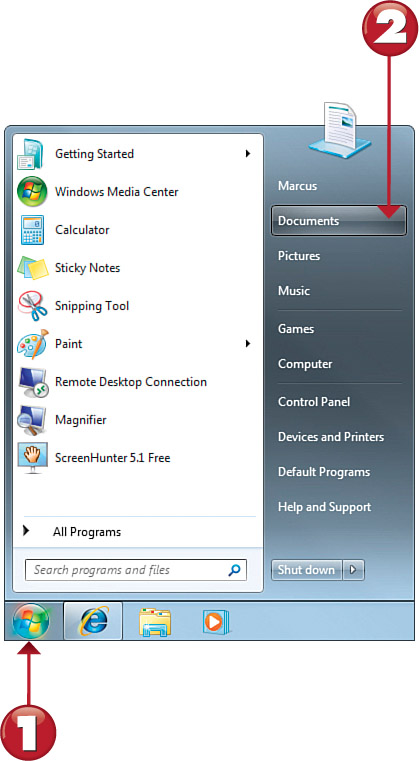
![]() Click Start.
Click Start.
![]() Click Documents.
Click Documents.
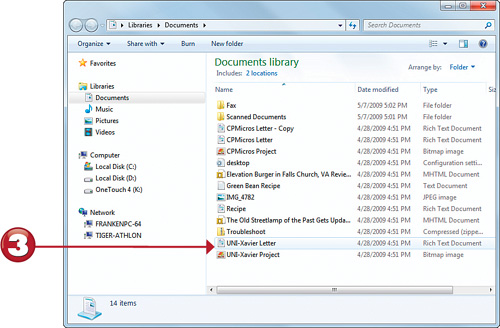
![]() Double-click a document to open it.
Double-click a document to open it.
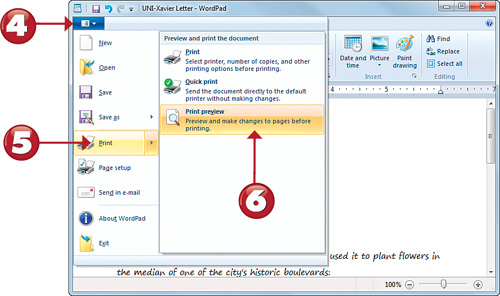
![]() Click to open the menu.
Click to open the menu.
![]() Click Print.
Click Print.
![]() Click Print Preview.
Click Print Preview.
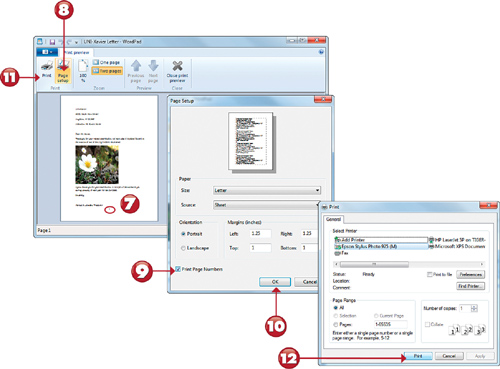
![]() This page has an unnecessary page number.
This page has an unnecessary page number.
![]() Click Page Setup.
Click Page Setup.
![]() Clear the Print Page Numbers checkbox.
Clear the Print Page Numbers checkbox.
![]() Click OK.
Click OK.
![]() Click Print.
Click Print.
![]() Click the Print button.
Click the Print button.
Viewing and Managing the Print Queue
Windows saves print jobs as temporary files managed by the print queue. In this exercise, you learn how to view the print queue and delete a print job.
![]()
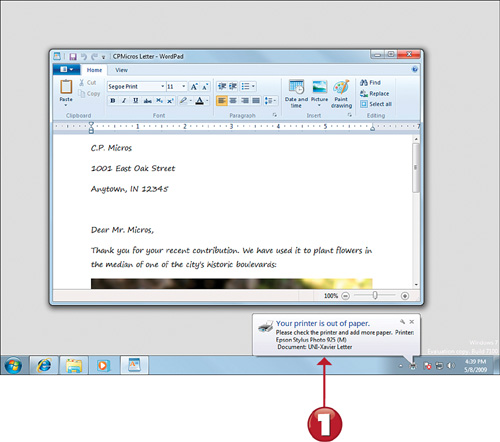
![]() The printer you are using is out of paper.
The printer you are using is out of paper.
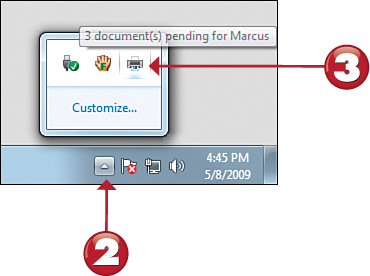
![]() Open the notification area.
Open the notification area.
![]() Double-click the printer icon to open the print queue.
Double-click the printer icon to open the print queue.
To see the number of documents waiting to print (Step 3), hover the mouse over the printer icon before double-clicking the icon.
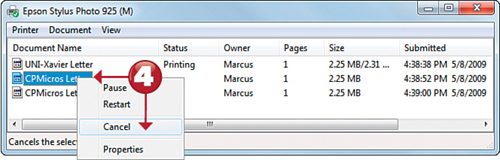
![]() Right-click a document and select Cancel.
Right-click a document and select Cancel.
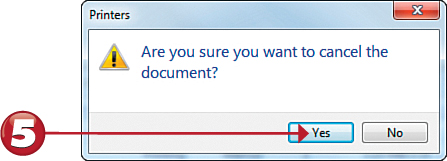
![]() Click Yes.
Click Yes.

![]() The document is removed from the queue. Click X to close the window.
The document is removed from the queue. Click X to close the window.
You can also view print jobs by clicking See What’s Printing in the Devices and Printers listing for the printer.
Viewing Fonts
Using different fonts in printed documents and labels for photos can make them more interesting. Windows 7 includes a brand-new font manager that makes it easier than ever before to preview and organize fonts. Here’s how to use it to preview a particular font family.
![]()
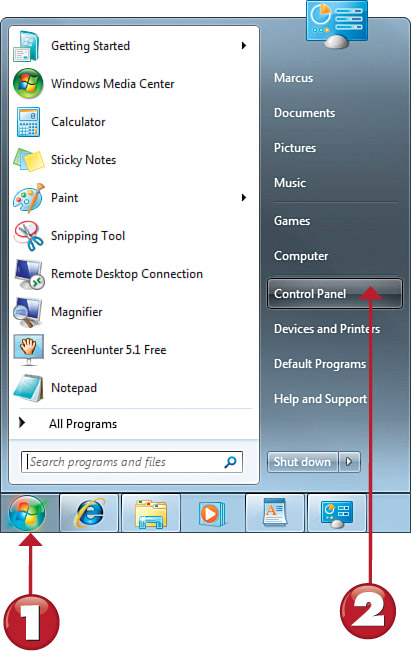
![]() Click Start.
Click Start.
![]() Click Control Panel.
Click Control Panel.
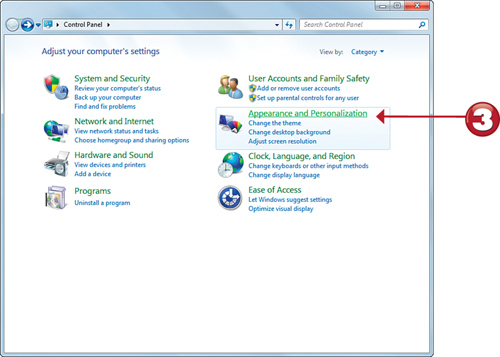
![]() Click Appearance and Personalization.
Click Appearance and Personalization.
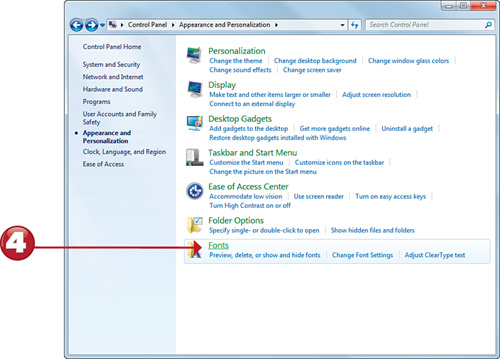
![]() Click Fonts.
Click Fonts.
Fonts designed for languages other than the current language are hidden from applications. Hidden fonts are displayed in gray. To unhide a font so you can use it, select the font and click Show. To hide a font you don’t want to use, select the font and click Hide.
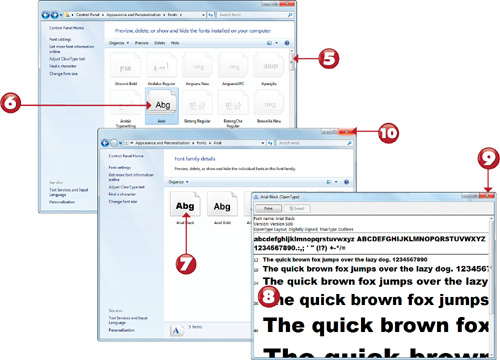
![]() Scroll until the font family you want to preview is visible.
Scroll until the font family you want to preview is visible.
![]() Double-click the font family.
Double-click the font family.
![]() Double-click a specific font.
Double-click a specific font.
![]() The font is displayed in different sizes.
The font is displayed in different sizes.
![]() Click to close the preview.
Click to close the preview.
![]() Click to close the Fonts folder.
Click to close the Fonts folder.
When you install a new application that includes fonts, the fonts are automatically installed to the Fonts folder. However, if you download fonts, make sure you place them in the Fonts folder.
Using the ClearType Wizard
Most computers are used with LCD flat panel displays; portable computers also use LCD displays. Windows 7 includes the ClearType wizard to help you fine-tune the appearance of text on your screen.
Do not use ClearType if you use a CRT or other type of non-LCD display.
![]()
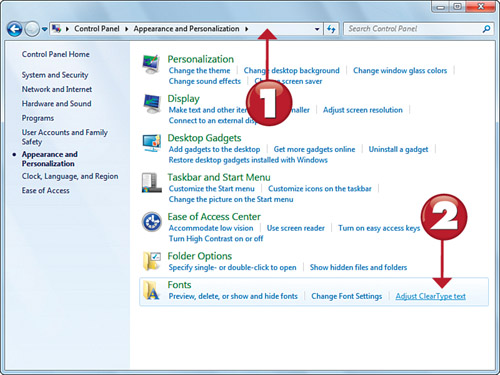
![]() Open Control Panel, Appearance and Personalization.
Open Control Panel, Appearance and Personalization.
![]() Click Adjust ClearType Text.
Click Adjust ClearType Text.
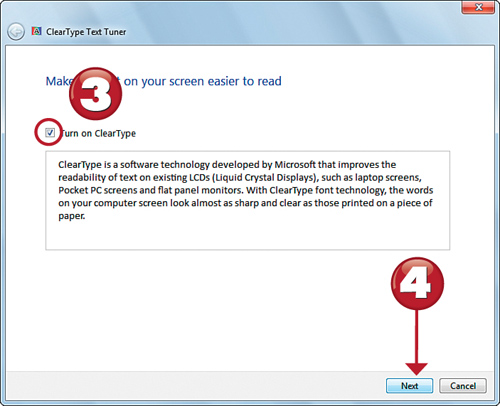
![]() Make sure Turn On ClearType is enabled.
Make sure Turn On ClearType is enabled.
![]() Click Next.
Click Next.

![]() Click Next.
Click Next.
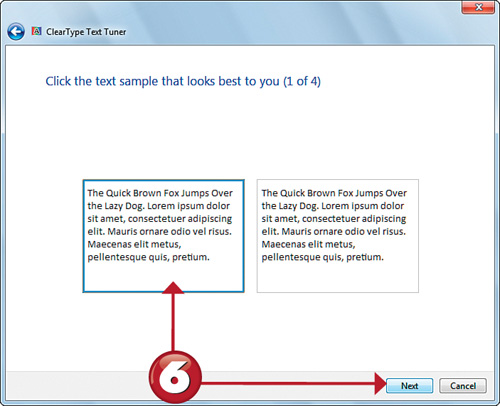
![]() Select the better-looking text sample and click Next.
Select the better-looking text sample and click Next.
If your monitor is not set to its native resolution, you will be prompted to select the native (optimal) resolution or leave the resolution as is before continuing. Unless you have a specific reason to use a non-optimal resolution, change the resolution as prompted.

![]() Select the best-looking text sample and click Next.
Select the best-looking text sample and click Next.
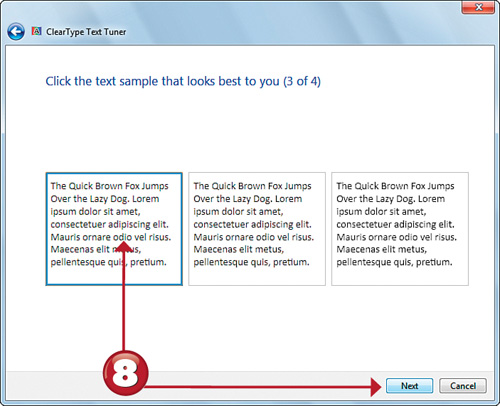
![]() Select the best-looking text sample and click Next.
Select the best-looking text sample and click Next.
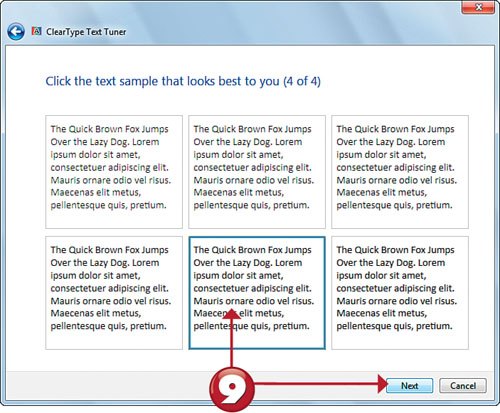
![]() Select the best-looking text sample and click Next.
Select the best-looking text sample and click Next.
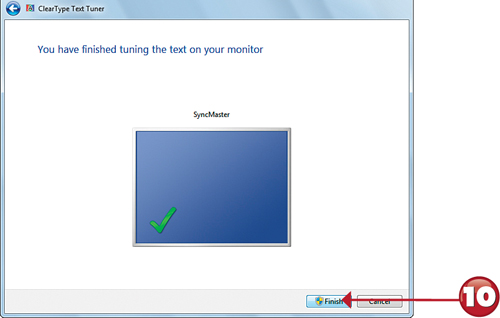
![]() Click Finish.
Click Finish.
Be sure to choose the text samples you prefer in Steps 6–9. These might not necessarily be the ones I chose.