Chapter 13. System Maintenance and Performance
Windows 7 includes many features designed to help keep your computer running fast and reliably. This chapter discusses the most important features for the typical home user.
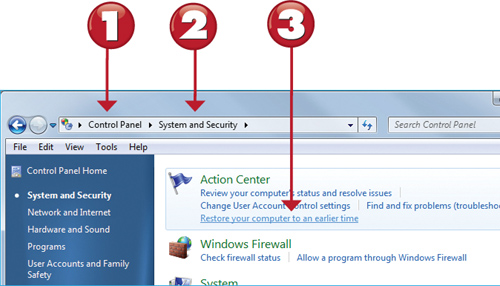
The System and Security Category in Control Panel
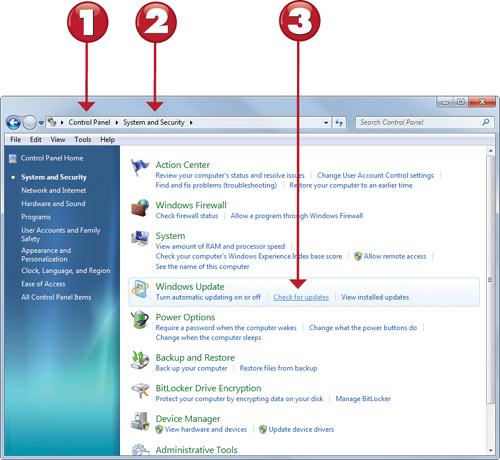
The System and Security category in Control Panel is the starting point for most of the tasks covered in this chapter. This section shows you how to access this category.
![]()
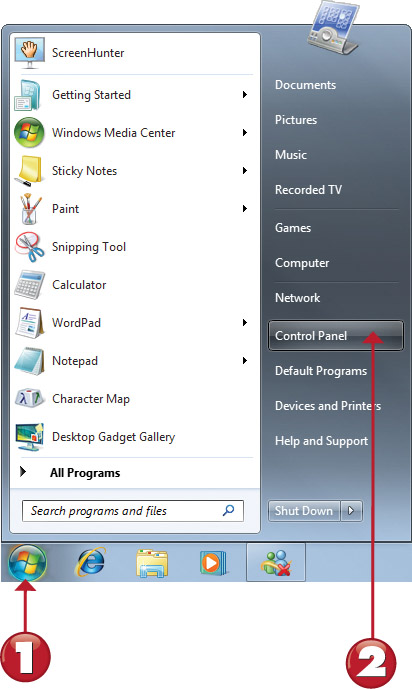
![]() Click the Start orb.
Click the Start orb.
![]() Click Control Panel.
Click Control Panel.
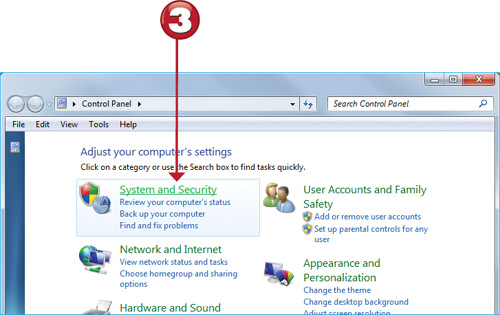
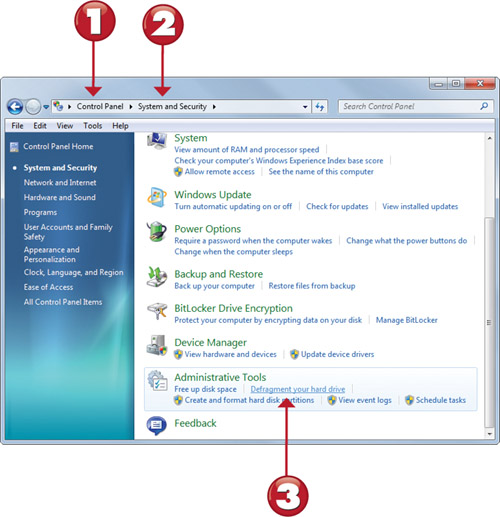
![]() Click System and Security.
Click System and Security.
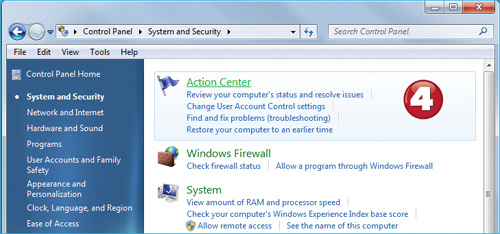
![]() The System and Security category opens.
The System and Security category opens.

Click the blue links shown to go directly to the most common tasks in any Control Panel menu.
If Control Panel displays individual icons instead of categories, click Control Panel Home in the left pane to display categories.
Displaying System Information
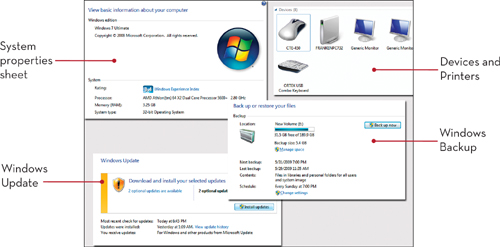
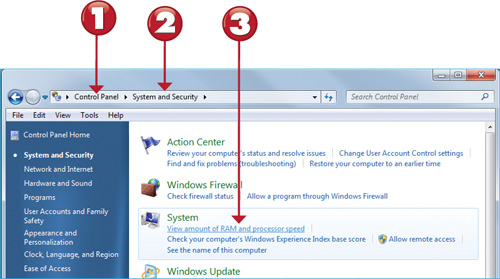
Windows 7’s System properties sheet provides a one-stop source for important system information, including processor type, speed, memory size, network information, and Windows version. Here’s how to access it from the Control Panel.
![]()
![]() Open Control Panel.
Open Control Panel.
![]() Open the System and Security category.
Open the System and Security category.
![]() Click View Amount of RAM and Processor Speed.
Click View Amount of RAM and Processor Speed.
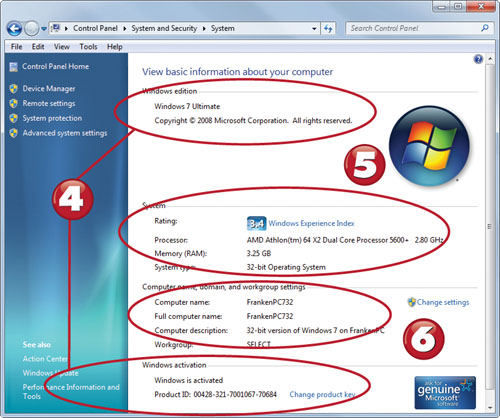
![]() Windows information.
Windows information.
![]() Hardware information.
Hardware information.
![]() Network information.
Network information.
Configuring Windows Update
By default, Windows Update automatically downloads and installs important updates. However, if you prefer to specify when to receive and install updates, you can change Windows Updates’ default settings. Here’s how.
![]()
![]() Open Control Panel.
Open Control Panel.
![]() Open System and Security.
Open System and Security.
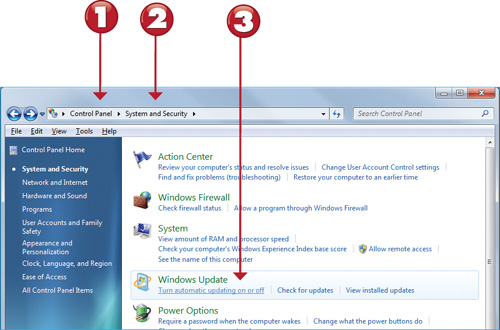
![]() Click Turn Automatic Updating On or Off.
Click Turn Automatic Updating On or Off.
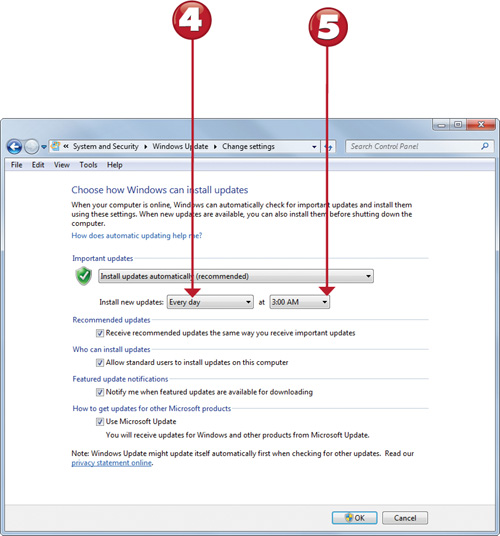
![]() Click to change how often updates are installed.
Click to change how often updates are installed.
![]() Click to change at what time updates are installed.
Click to change at what time updates are installed.
Select a time that the computer is on, but is not in use.
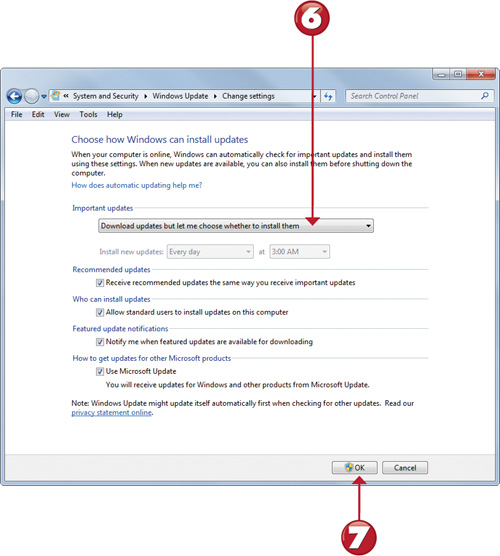
![]() Choose this option if you want to install updates manually.
Choose this option if you want to install updates manually.
![]() Click to save changes.
Click to save changes.
Note the Windows security shield. Depending on how UAC is configured and whether you are an administrator or standard user, you might see an additional UAC prompt appear after you click OK.
Updating Windows Manually
If you find out about an important Windows update, you don’t need to wait until Windows Update runs automatically to download and install the update. This tutorial shows you how to update Windows manually using Windows Update.
![]()
![]() Open Control Panel.
Open Control Panel.
![]() Open System and Security.
Open System and Security.
![]() Click Check for Updates.
Click Check for Updates.
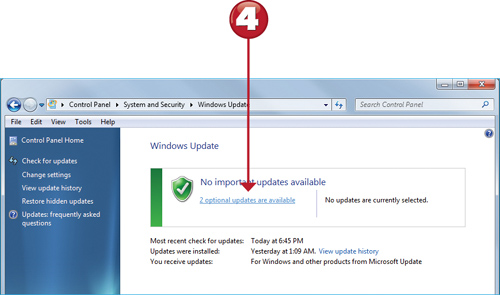
![]() Click to start the installation process.
Click to start the installation process.
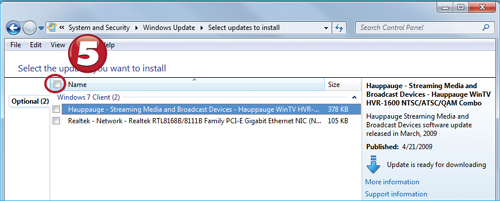
![]() Click to select all updates.
Click to select all updates.
If there are no updates available, you will see a message to that effect in Step 4.
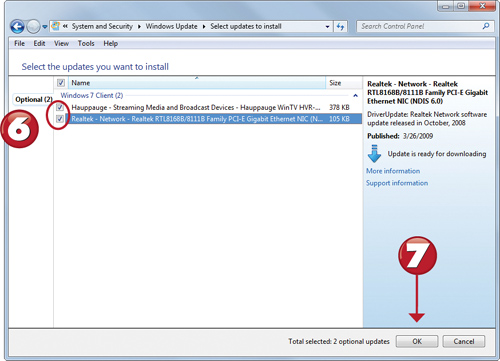
![]() All updates are selected.
All updates are selected.
![]() Click OK to continue.
Click OK to continue.
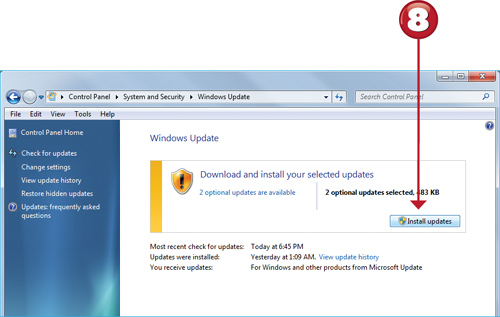
![]() Click Install Updates.
Click Install Updates.
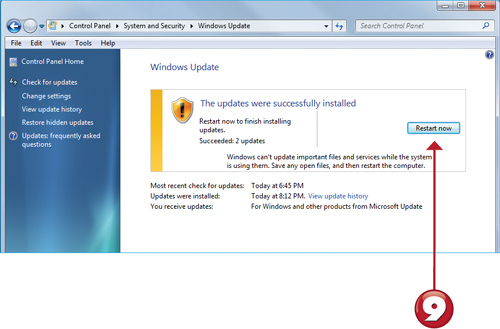
![]() Click Restart Now if prompted to complete the process.
Click Restart Now if prompted to complete the process.
To prevent installing an update, clear the checkbox for the update.
Using Devices and Printers
The Devices and Printers dialog is a brand-new feature in Windows 7, enabling you to see, at a glance, the drives, printers, and other devices connected to your PC and manage them. Here’s how to use it.
![]()
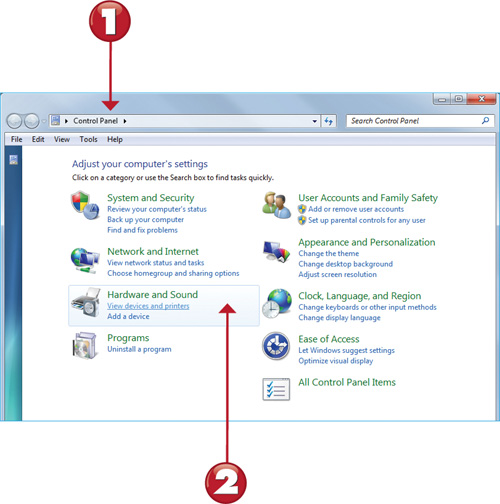
![]() Open Control Panel.
Open Control Panel.
![]() Click View Devices and Printers.
Click View Devices and Printers.
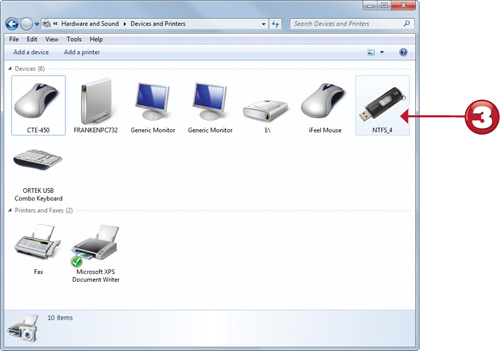
![]() Double-click a device.
Double-click a device.
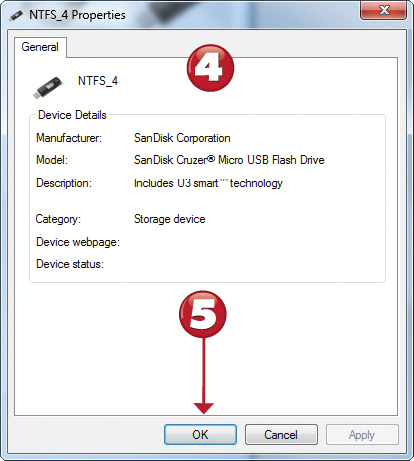
![]() Device information.
Device information.
![]() Click OK to close the properties sheet.
Click OK to close the properties sheet.
You might see generic icons for your devices or actual pictures of some devices, depending upon the information stored in the device driver.
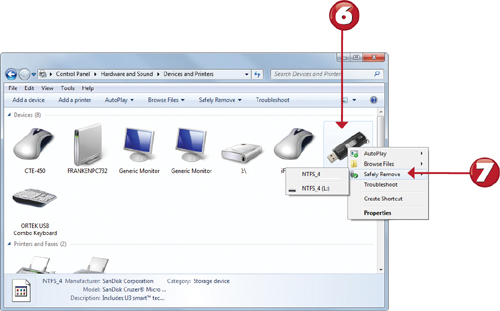
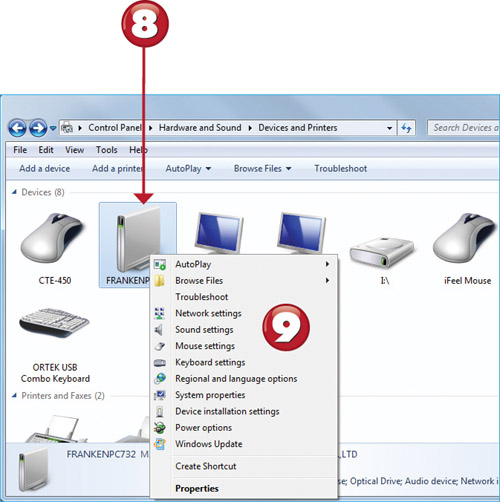
![]() Right-click the device.
Right-click the device.
![]() Right-click the device.
Right-click the device.
![]() Right-click another device.
Right-click another device.
![]() Tasks vary by device.
Tasks vary by device.
Use Devices and Printers to provide a quick way to the most common tasks you need to perform for each device.
![]()
Selecting a Power Plan
No matter the type of computer you use for Windows 7, you can adjust the power management settings. You can choose to optimize for performance, for longer battery life and less heat (on a laptop) or lower utility bills (on a desktop), or strike a balance. This section shows you how to configure your system for high performance.
![]()
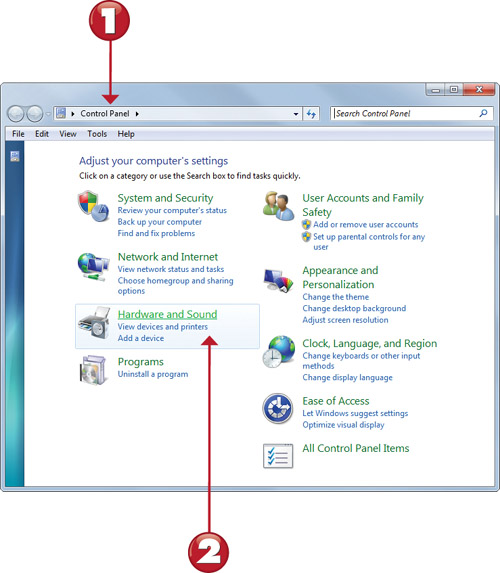
![]() Open Control Panel.
Open Control Panel.
![]() Click Hardware and Sound.
Click Hardware and Sound.
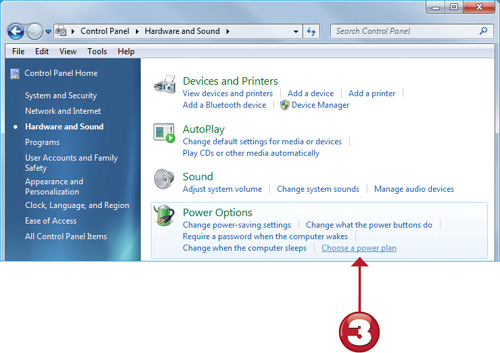
![]() Click Choose a Power Plan.
Click Choose a Power Plan.
By default, Windows 7 uses the Balanced power plan for both desktop and portable computers.

![]() Click to see all power plans.
Click to see all power plans.
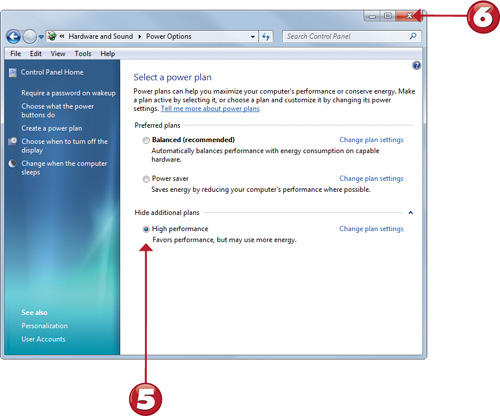
![]() Click High Performance.
Click High Performance.
![]() Close dialog.
Close dialog.
To change specific settings used by any power plan, click the Change Plan Settings link for the plan.
Viewing Disk Information
Windows 7’s Computer explorer provides several ways to view the drives connected to your computer. This tutorial demonstrates how to access the Computer explorer and change views.
![]()
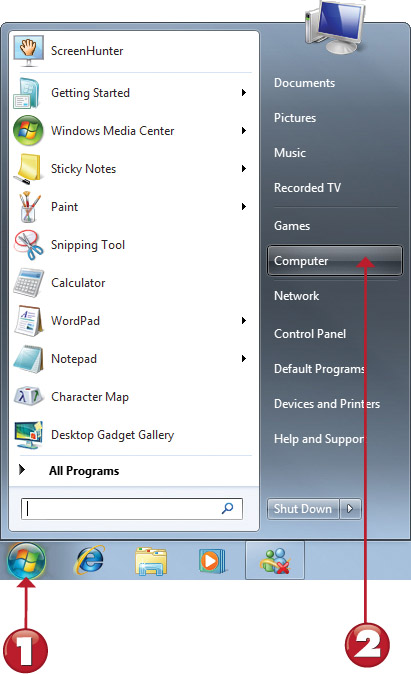
![]() Click Start.
Click Start.
![]() Click Computer.
Click Computer.
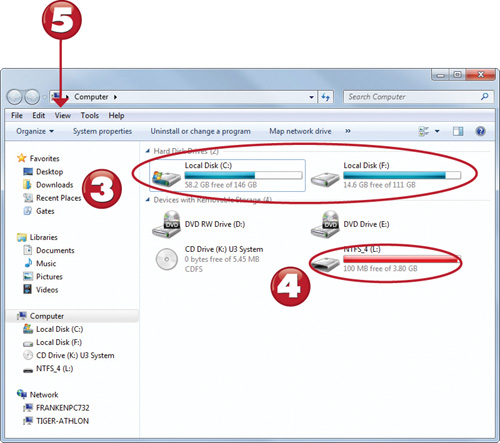
![]() Drives with blue capacity gauges have more than 10% free space.
Drives with blue capacity gauges have more than 10% free space.
![]() Drives with red capacity gauges have less than 10% free space.
Drives with red capacity gauges have less than 10% free space.
![]() Click to select other views.
Click to select other views.
This page shows the default Tiles view.
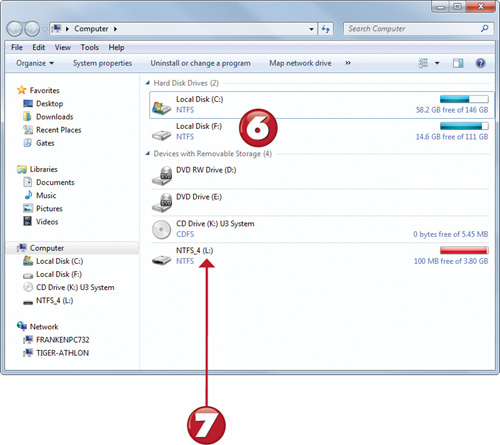
![]() Contents view.
Contents view.
![]() Double-click to display drive contents.
Double-click to display drive contents.
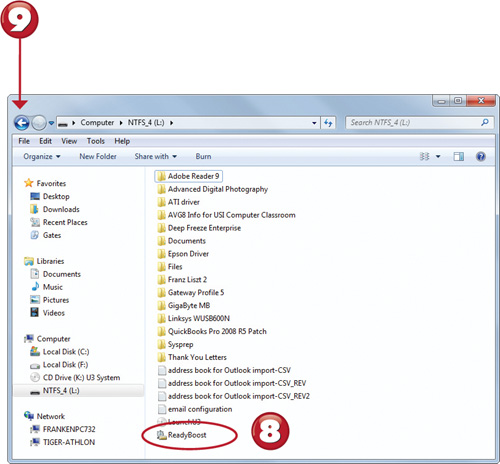
![]() ReadyBoost cache file.
ReadyBoost cache file.
![]() Click to return to previous view.
Click to return to previous view.
To learn more about ReadyBoost (Step 8), see the next exercise.
Using ReadyBoost
For systems with less than 1GB of RAM, adding a USB flash memory drive or flash memory card designed for ReadyBoost can improve memory performance. This tutorial shows you how to set up a USB flash memory drive for ReadyBoost.
![]()
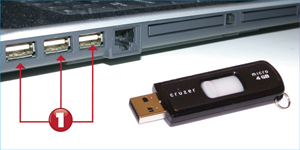
![]() Insert flash drive into a USB 2.0 port.
Insert flash drive into a USB 2.0 port.

![]() Select Speed Up My System from the AutoPlay menu.
Select Speed Up My System from the AutoPlay menu.
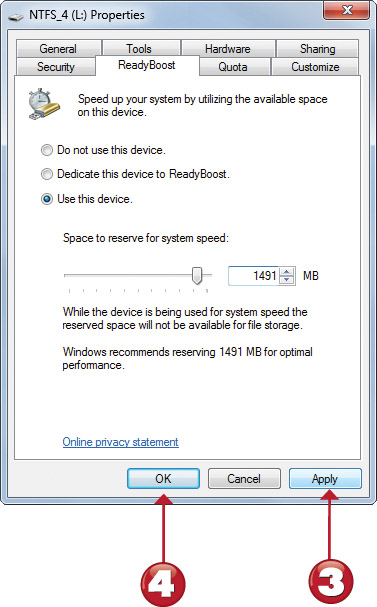
![]() Click Apply.
Click Apply.
![]() Click OK.
Click OK.
A file called ReadyBoost.sfcache is placed on the flash drive. The file is used to improve memory transfers.
Some flash memory drives and cards are not fast enough to use with ReadyBoost. Drives and cards that support ReadyBoost are labeled as ReadyBoost-compatible.
Cleaning Up Unnecessary Files
If any drive is displayed with a red capacity gauge, it has less than 10% free space remaining. If the free space on any drive drops below 15%, Windows 7 cannot defragment the drive. If the system drive (usually C: drive) runs out of space, temporary files (such as those created for printing) cannot be created, and sending information to and from the paging (swap) file (which is used as a substitute for RAM) becomes very slow. For these reasons, keeping an eye on the free space for your disk drives is important.
You can use the Disk Cleanup tool to remove unnecessary files or compress seldom-used files to gain space. Here’s how it works.
![]()
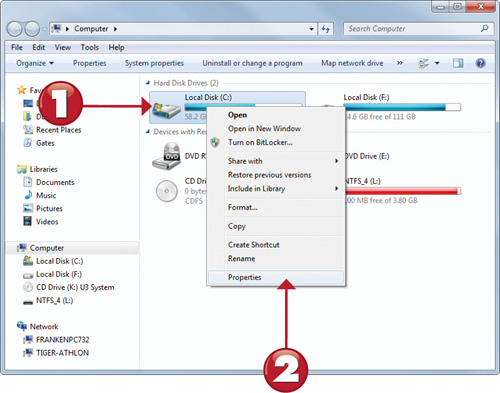
![]() Right-click a drive in Computer explorer.
Right-click a drive in Computer explorer.
![]() Select Properties.
Select Properties.
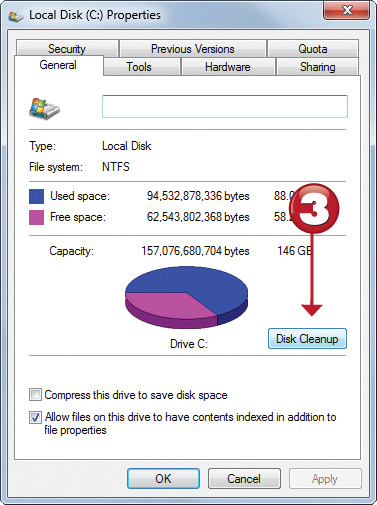
![]() Click Disk Cleanup.
Click Disk Cleanup.
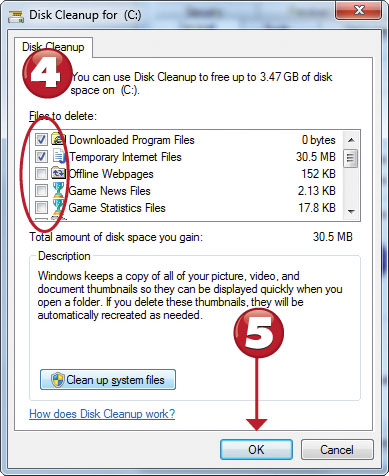
![]() Add/remove items by adding/clearing checkboxes.
Add/remove items by adding/clearing checkboxes.
![]() Click to proceed.
Click to proceed.
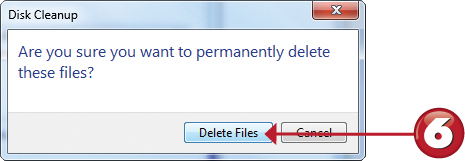
![]() Click Delete Files to clean up selected files.
Click Delete Files to clean up selected files.
A description of each category appears when you select it. Windows 7 selects “safe” categories for deletion. However, you should review the choices and make changes as desired before proceeding.
Checking Drives for Errors
You should periodically check hard disks and USB flash drives for errors. Windows 7 starts this task from the Drive Properties menu.
![]()

![]() Right-click a drive in Computer explorer.
Right-click a drive in Computer explorer.
![]() Select Properties.
Select Properties.
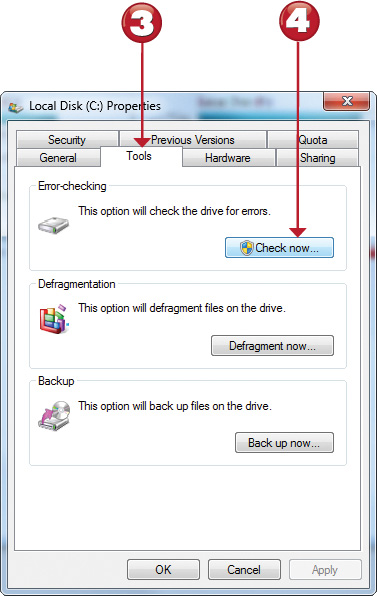
![]() Click Tools.
Click Tools.
![]() Click Check Now.
Click Check Now.
You can correct errors on hard disks, USB flash memory drives, and flash memory cards with Check Now (Chkdsk). You cannot use it to fix errors on DVD and CD media.
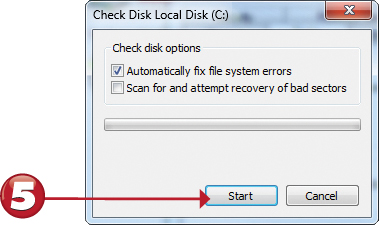
![]() Click Start.
Click Start.
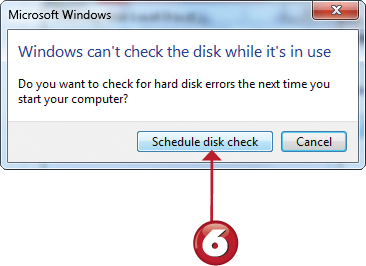
![]() Click Schedule Disk Check if prompted.
Click Schedule Disk Check if prompted.
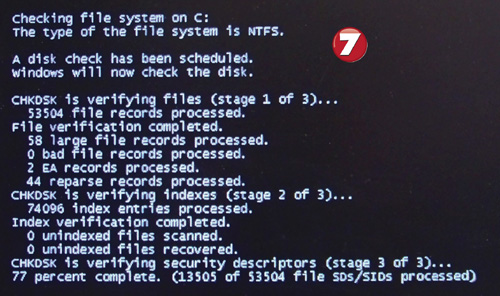
![]() The next time the system starts, the disk check is performed.
The next time the system starts, the disk check is performed.
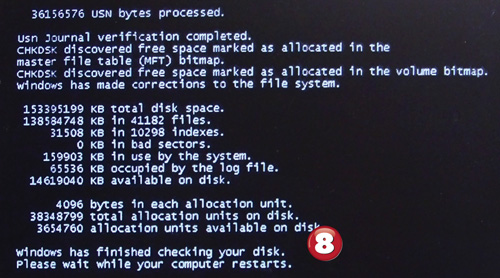
![]() After displaying the results, disk check restarts the computer.
After displaying the results, disk check restarts the computer.
Windows must schedule disk checking of drives containing system files or drives with open files. Non-system drives that are not in use are tested immediately without restarting the system.
Configuring Defragment
Windows 7’s Disk Defragment feature runs automatically to improve disk read-write performance. However, you can control when the defragger runs, and you can also defragment drives manually. In this tutorial, you learn how to change the day of the week used for defragmentation and how to analyze your drives.
![]()
![]() Open Control Panel.
Open Control Panel.
![]() Open System and Security.
Open System and Security.
![]() Click Defragment Your Hard Drive.
Click Defragment Your Hard Drive.
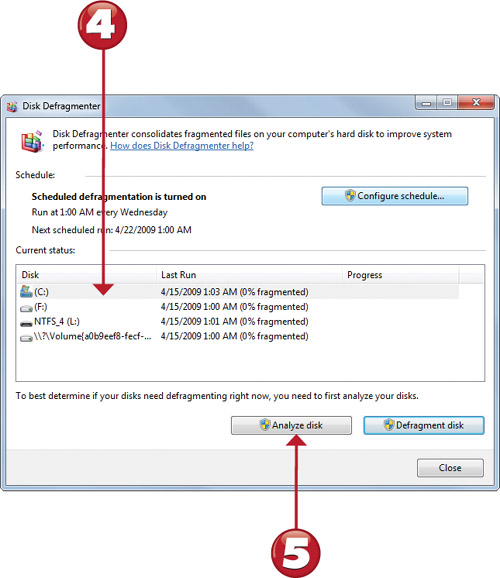
![]() Select a drive to analyze.
Select a drive to analyze.
![]() Click Analyze Disk.
Click Analyze Disk.
If Windows recommends defragmenting your drive, click Defragment Disk.

![]() To change the defragmentation schedule, click Configure Schedule.
To change the defragmentation schedule, click Configure Schedule.
![]() Open the day menu.
Open the day menu.
![]() Select Sunday.
Select Sunday.
![]() Click OK.
Click OK.
![]() Click Close.
Click Close.
By default, Disk Defragmenter automatically defragments all hard disks and USB flash memory drives. If you are using a solid-state drive (SSD) instead of a hard disk, you should disable defragmenting for the SSD. Do this by opening the Choose Disks menu and unchecking the drive letter for the SSD. SSDs are most commonly used in netbook systems.
Troubleshooting
Windows 7 contains a large number of troubleshooters designed to help you solve system problems. This section shows you how to locate the troubleshooters and solve a problem with Internet connectivity by using the Internet Connection troubleshooter.
![]()
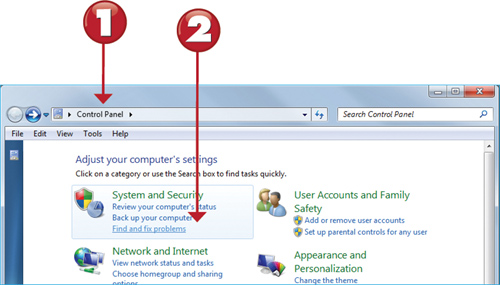
![]() Click the Start orb.
Click the Start orb.
![]() Click Find and Fix Problems.
Click Find and Fix Problems.
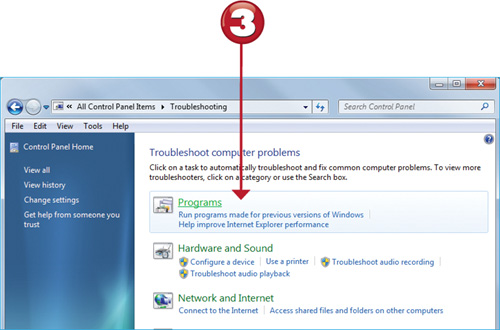
![]() Click Programs.
Click Programs.
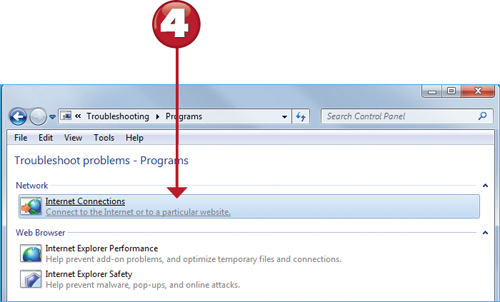
![]() Click Internet Connections
Click Internet Connections
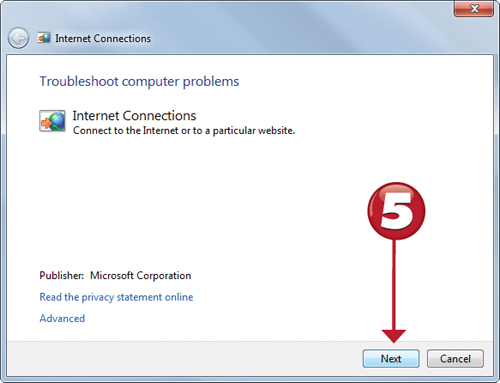
![]() Click Next.
Click Next.
For this example, I deliberately disconnected the Ethernet (RJ-45) cable from my computer before starting. If you want to test the troubleshooter and don’t use an Ethernet cable, consider disconnecting a USB printer cable or disabling your Wireless Ethernet (Wi-Fi) network adapter and selecting the appropriate troubleshooter.
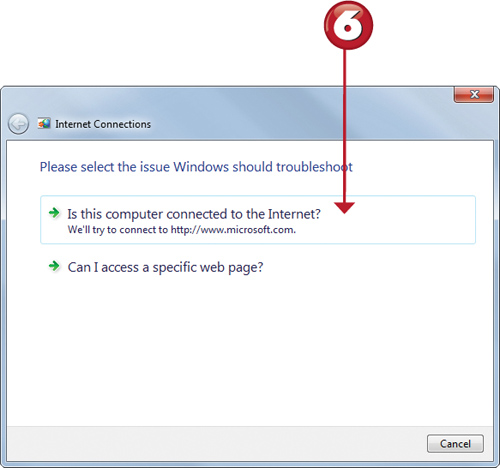
![]() Click the issue you need to troubleshoot.
Click the issue you need to troubleshoot.
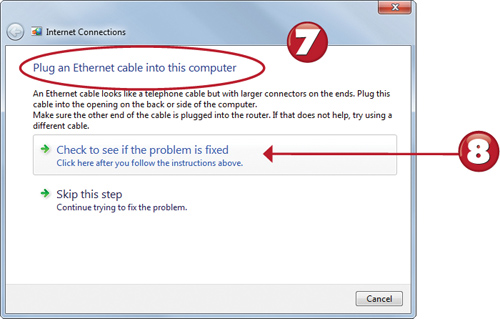
![]() If Windows offers a solution, make the change suggested.
If Windows offers a solution, make the change suggested.
![]() Click to see if the problem is fixed.
Click to see if the problem is fixed.

![]() Review the list of problems checked.
Review the list of problems checked.
![]() Click Close.
Click Close.
If you deliberately disable a device or remove a cable to trigger the troubleshooter, make sure you enable the device or reconnect the cable afterwards.
Fixing Problems with System Restore
If a computer problem appears to be caused by a program installation, hardware upgrade, or Windows upgrade, you can return your computer to a previous condition with System Restore. System Restore resets the Windows Registry to its state as of the date/time you select, and in Windows 7, System Restore can also check to see what programs will be affected by running System Restore. Here’s how to use System Restore to send your computer back in time.
![]()
![]() Open Control Panel.
Open Control Panel.
![]() Open the System and Security category.
Open the System and Security category.
![]() Click Restore Your Computer to an Earlier Time.
Click Restore Your Computer to an Earlier Time.
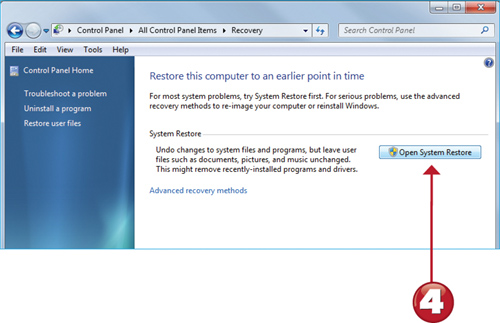
![]() Click Open System Restore.
Click Open System Restore.
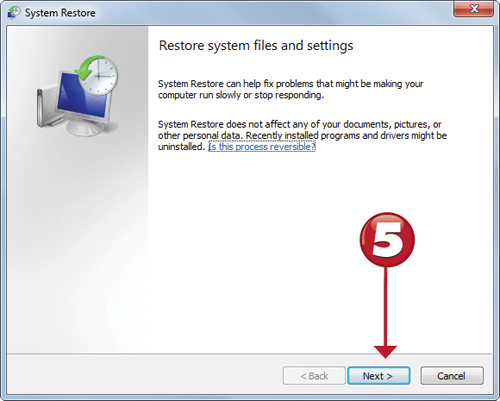
![]() Click Next.
Click Next.
System Restore does not remove data files when it restores your system to an earlier time, but it will remove downloaded programs.
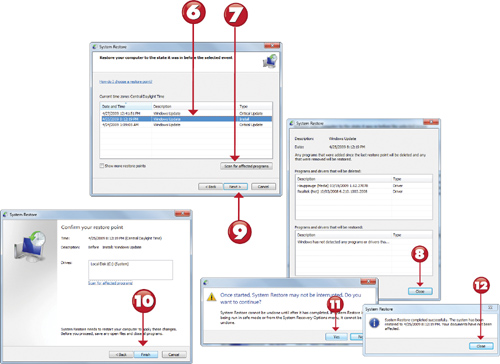
![]() Select a restore point.
Select a restore point.
![]() Click Scan for Affected Programs.
Click Scan for Affected Programs.
![]() After reviewing the list of affected programs and drivers, click Close.
After reviewing the list of affected programs and drivers, click Close.
![]() Click Next.
Click Next.
![]() Click Finish.
Click Finish.
![]() Click Yes.
Click Yes.
![]() After your system restarts, click Close.
After your system restarts, click Close.
If you want to use affected programs and drivers after running System Restore, you must reinstall them. If possible, get updated versions from the vendor.
Creating a System Repair Disc
Windows 7 includes a program that creates a system repair disc. This disc can be used to start the system if it will not boot and provides access to system restore, backup image restore, and other advanced repair features. This tutorial shows you how to create a system repair disc.
![]()
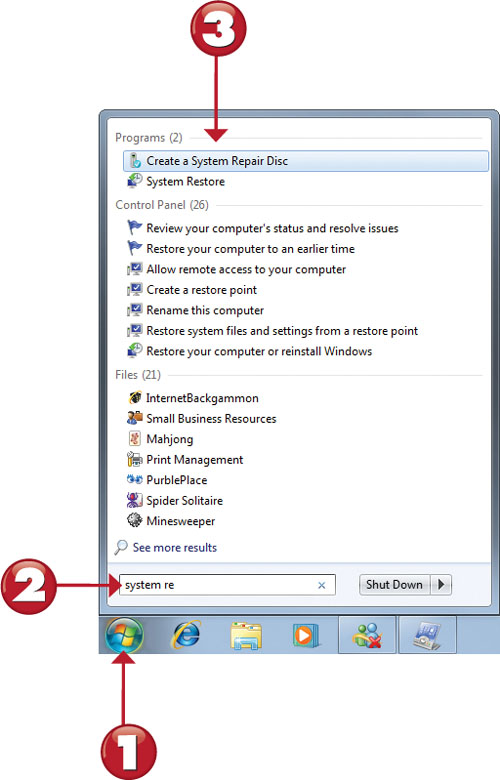
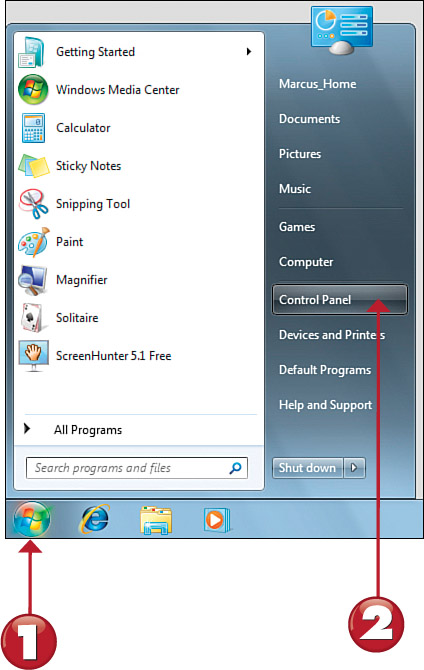
![]() Click Start.
Click Start.
![]() Click the Desktop Search window and enter system re.
Click the Desktop Search window and enter system re.
![]() Click Create a System Repair Disc.
Click Create a System Repair Disc.
Be sure to label the disc and put it in a safe place after the process is complete.
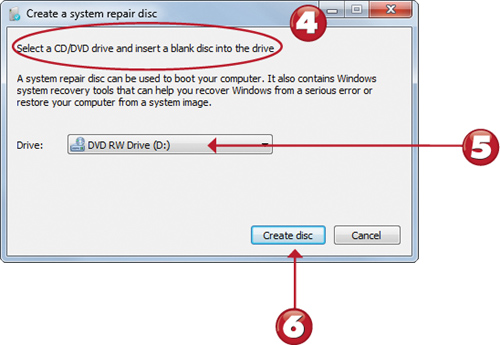
![]() Insert a blank CD or DVD.
Insert a blank CD or DVD.
![]() Select the correct drive if you have more than one CD/DVD drive.
Select the correct drive if you have more than one CD/DVD drive.
![]() Click Create Disc.
Click Create Disc.
The Windows 7 DVD can also be used as a system repair disc. However, making a system repair disc allows you to store your Windows 7 DVD in a safe place.

Backing Up Your Files
Windows 7 Home Premium, Business, and Ultimate editions include a backup utility that does two backups in one: it backs up your entire computer’s contents, including Windows, so you can restore it to a formatted or brand-new hard disk in case of a serious system crash, and it also backs up your data files. Microsoft recommends using an external hard disk with enough space for your backup, and in this tutorial, that is what we’re using.
![]()
![]() Click Start.
Click Start.
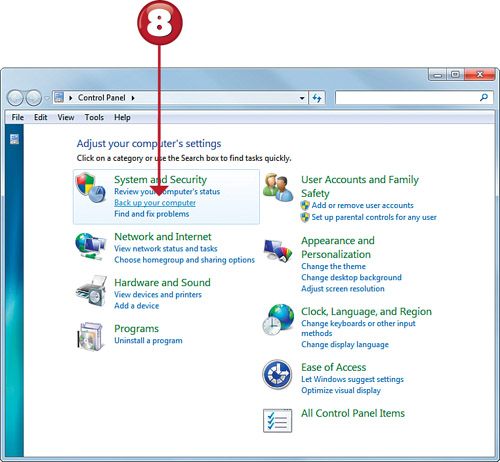
![]() Click Control Panel.
Click Control Panel.
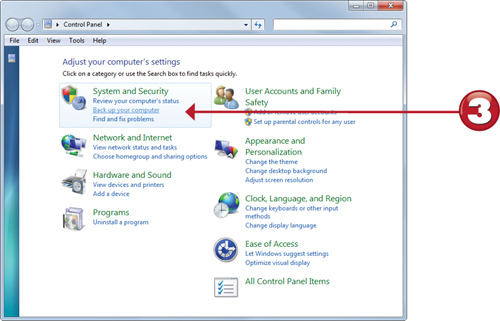
![]() Click Back Up Your Computer.
Click Back Up Your Computer.
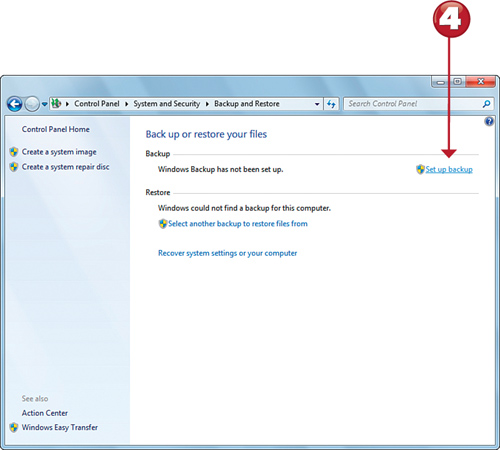
![]() Click Set Up Backup.
Click Set Up Backup.
By using an external hard disk as recommended here, Windows 7 can perform periodic backups automatically for you.
Windows Business and Ultimate editions include additional backup options on this dialog. However, the basic backup process works the same way in these editions as in Home Premium (shown here).
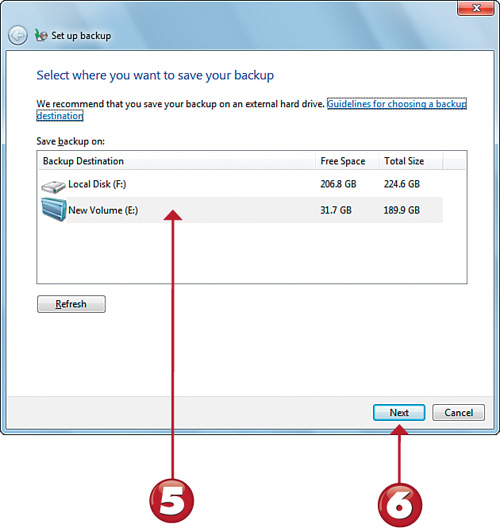
![]() Select your external hard disk.
Select your external hard disk.
![]() Click Next.
Click Next.

![]() Select Let Windows Choose.
Select Let Windows Choose.
![]() Click Next.
Click Next.
Make sure the external hard disk you select has enough room for your initial backup and additional backups. I recommend an external hard disk that’s at least twice the capacity of your computer’s hard disk.

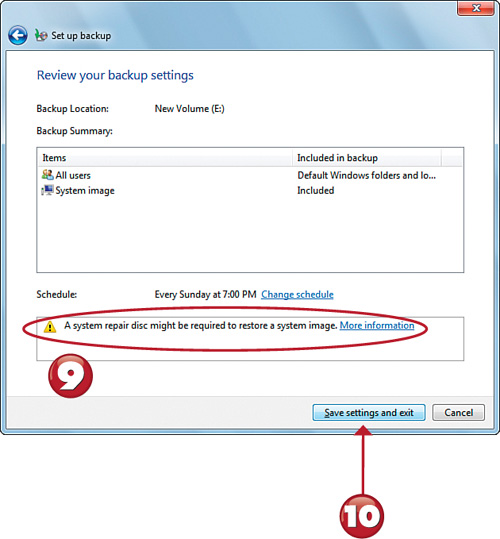
![]() Note the reminder to create a system repair disc if you haven’t made one already.
Note the reminder to create a system repair disc if you haven’t made one already.
![]() Click Save Settings and Run Backup.
Click Save Settings and Run Backup.
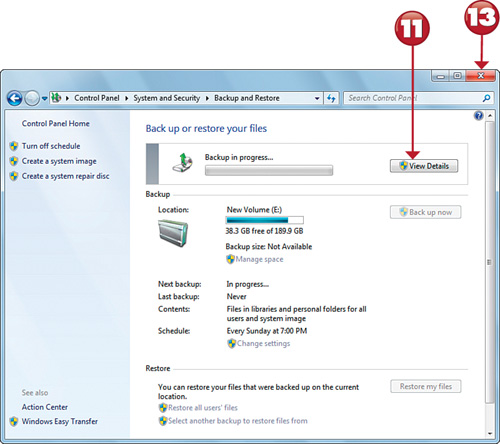
![]() To see the backup status, click View Details.
To see the backup status, click View Details.
To restore a system image, you need to use the Windows 7 DVD or a system repair disc. If you have a preinstalled copy of Windows 7 without a DVD, be sure to make a repair disc right away.

![]() At the end of the backup, click Close.
At the end of the backup, click Close.
![]() Click Close to close the backup window.
Click Close to close the backup window.
By default, the Windows 7 backup program runs every Sunday night at 7:00 PM. If you typically use your computer at that time, click the View Details link (see Step 11) and select a different date and/or time.

Restoring Files from a Backup
Oops! You erased the birthday party pictures—or your family budget. If you use Windows 7’s backup, though, there’s a good chance you can retrieve a backup copy and save the day. In this tutorial, you learn how to test your backup by retrieving individual files from a backup and restoring them to a different location.
![]()
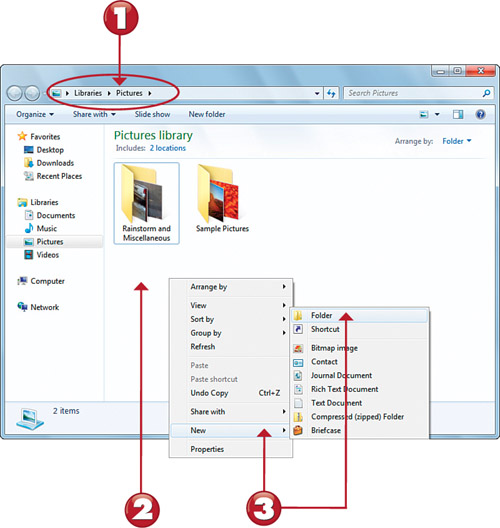
![]() Open the Pictures library.
Open the Pictures library.
![]() Right-click inside the folder
Right-click inside the folder
![]() Select New, Folder.
Select New, Folder.
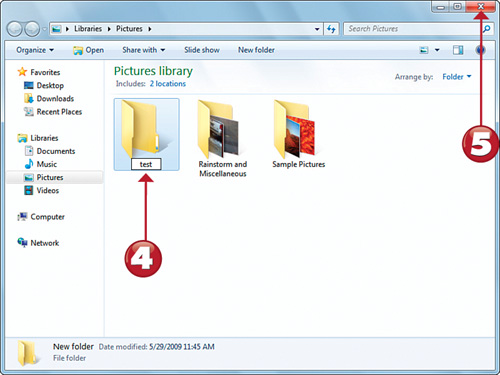
![]() Name the folder test.
Name the folder test.
![]() Close the library.
Close the library.
The test folder will be used as the location for restored files.
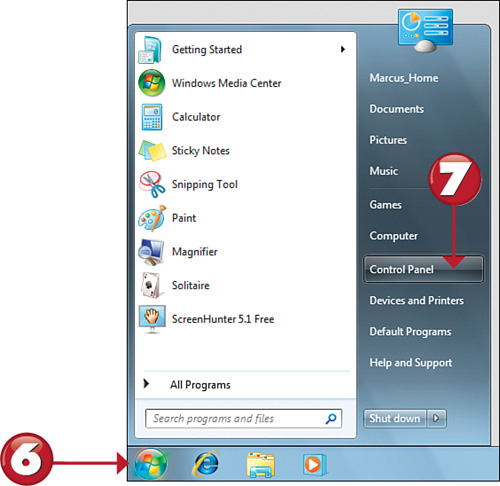
![]() Click Start.
Click Start.
![]() Click Control Panel.
Click Control Panel.
![]() Click Back Up Your Computer.
Click Back Up Your Computer.
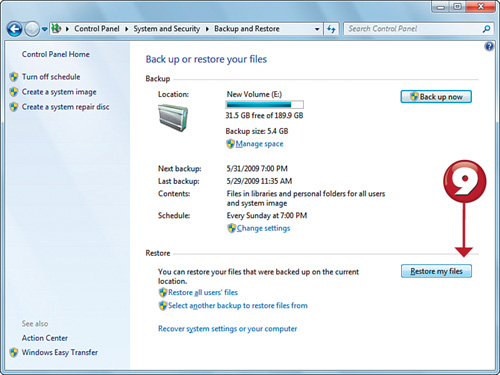
![]() Click Restore My Files.
Click Restore My Files.
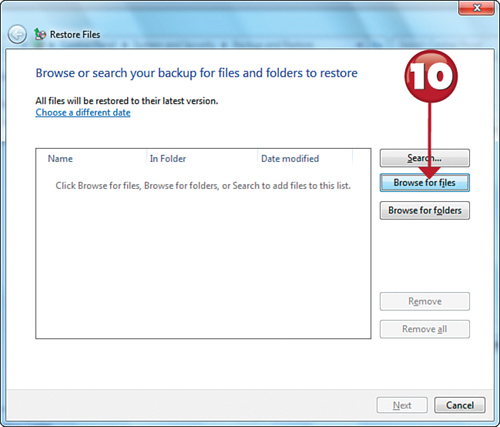
![]() Click Browse for Files.
Click Browse for Files.
Testing a backup (as in this exercise) assures you that your backup can be restored in case of an emergency.
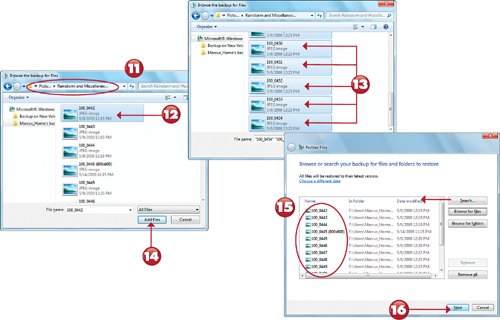
![]() Navigate to the location containing the files you want to restore.
Navigate to the location containing the files you want to restore.
![]() Click the first file.
Click the first file.
![]() Press and hold Shift or Ctrl while clicking other files.
Press and hold Shift or Ctrl while clicking other files.
![]() Click Add Files.
Click Add Files.
![]() The files you have selected to restore are listed.
The files you have selected to restore are listed.
![]() Click Next.
Click Next.
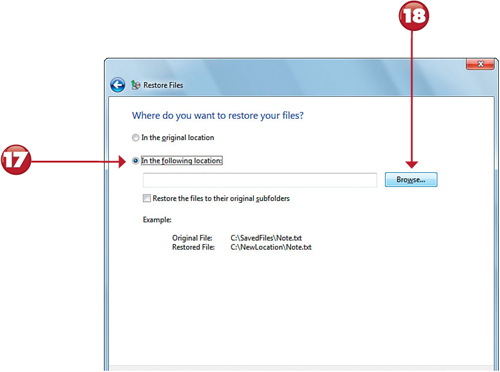
![]() Select In the Following Location.
Select In the Following Location.
![]() Click Browse.
Click Browse.
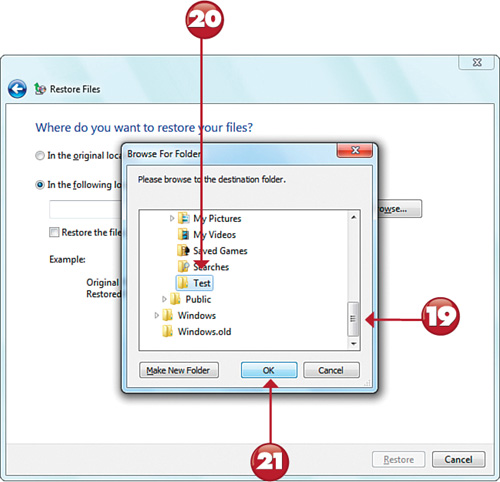
![]() Navigate to the Test folder.
Navigate to the Test folder.
![]() Click Test.
Click Test.
![]() Click OK.
Click OK.
If you are restoring files that have been deleted from your system, use the default setting, In the Original Location, in Step 17.
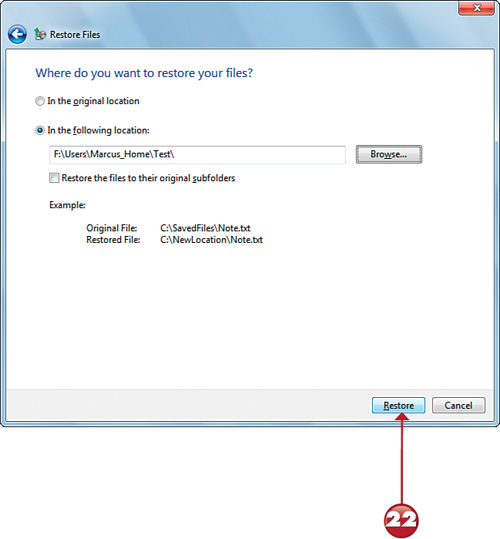
![]() Click Restore.
Click Restore.
Depending upon the number of files you are restoring, it might take a while after you click Restore before the next dialog appears.
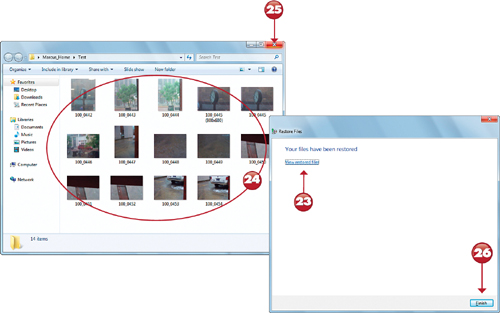
![]() Click View Restored Files.
Click View Restored Files.
![]() The restored files.
The restored files.
![]() Click to close window.
Click to close window.
![]() Click Finish.
Click Finish.
You can delete the Test folder after completing this exercise.