Chapter 8. Windows Media Center
Windows Media Center, an integral part of Windows 7 Home Premium and higher editions, turns your Windows 7 PC into a multimedia powerhouse that’s HDTV and home theater friendly. Whether you use WMC on your desktop PC or as the hub of your home entertainment system, Windows Media Center makes TV viewing and recording, music playback, video playback, and photo viewing more enjoyable than ever before.
Windows Media Center uses a so-called “10-foot UI” to make it compatible with computer displays, standard TVs, and HDTVs. By using a wireless keyboard and mouse or Windows Media Center-compatible remote control, you can enjoy your media through Windows Media Center from a comfortable easy chair or couch.
You can also view WMC in a small window by using the Windows Media Center desktop gadget. See Chapter 3, “Using the Windows 7 Desktop,” for details.

Opening and Configuring Windows Media Center
The first time you start Windows Media Center, you need to configure it to use the hardware in your PC. This section assumes that you have installed a TV tuner connected to either cable or broadcast TV.
![]()
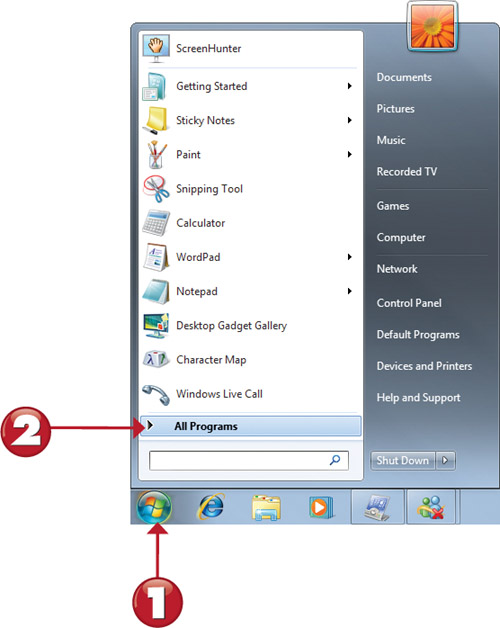
![]() Click Start.
Click Start.
![]() Hover the mouse over All Programs.
Hover the mouse over All Programs.
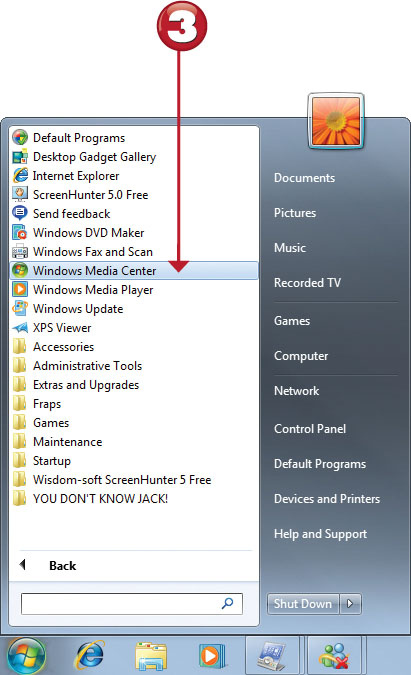
![]() Click Windows Media Center.
Click Windows Media Center.

![]() Click Maximize.
Click Maximize.
![]() Click Continue.
Click Continue.
The browser and window controls at the top of the WMC screen appear for a few moments each time you move your mouse or pointing device. If you control WMC with a remote control, these controls will not be displayed.

![]() Click Express.
Click Express.
![]() WMC downloads information and then displays the WMC desktop.
WMC downloads information and then displays the WMC desktop.

Express Setup is recommended if you want to start using WMC right away but don’t have a TV tuner or don’t want to use it immediately. Custom Setup is recommended if you are not sure that you have your speakers or display configured correctly for WMC. You can perform Custom Setup at any time through the Tasks menu.
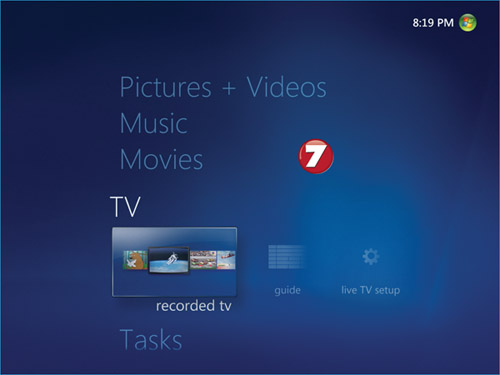
Configuring the TV Signal
If you have a TV tuner card or USB device, you can use WMC to watch, pause, and record live TV. In other words, WMC and a TV tuner enable your computer to function like a DVR. To enable WMC to display TV signals after you install a TV tuner card or USB device, you must set up your TV source. In this section, you learn how to set up WMC for use with cable TV.
![]()
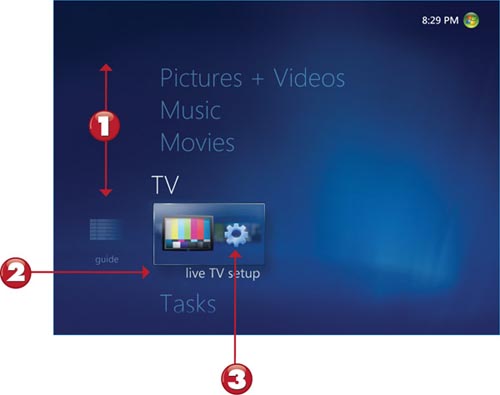
![]() Scroll up or down to the TV menu band.
Scroll up or down to the TV menu band.
![]() Scroll to Live TV Setup.
Scroll to Live TV Setup.
![]() Click Live TV Setup.
Click Live TV Setup.
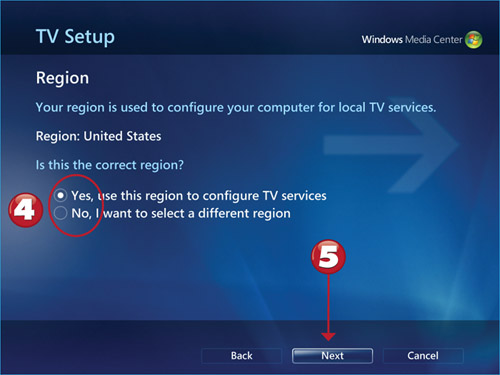
![]() Select the appropriate region.
Select the appropriate region.
![]() Click Next.
Click Next.
This tutorial assumes that the answer selected in step 4 was “yes.” If WMC incorrectly identifies your region, you will be prompted to identify it before you can continue.
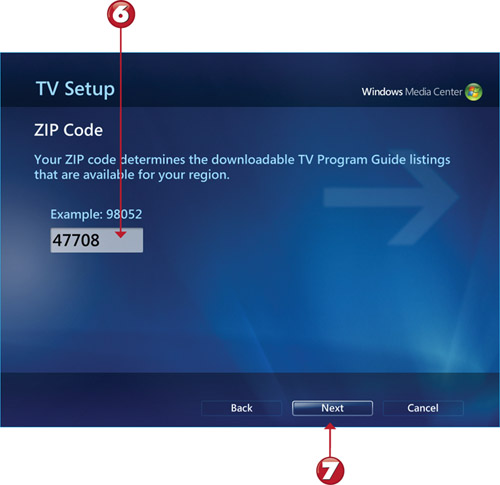
![]() Enter the correct ZIP or postal code for your locality.
Enter the correct ZIP or postal code for your locality.
![]() Click Next.
Click Next.
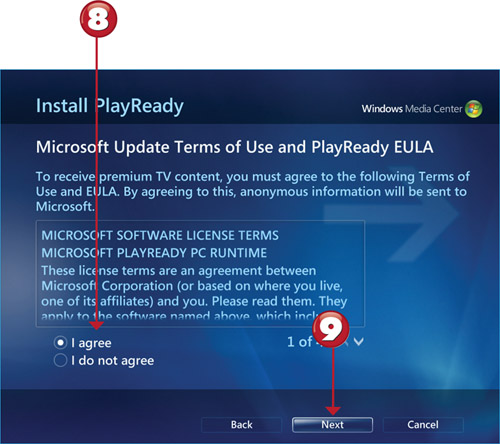
![]() Select I Agree.
Select I Agree.
![]() Click Next.
Click Next.
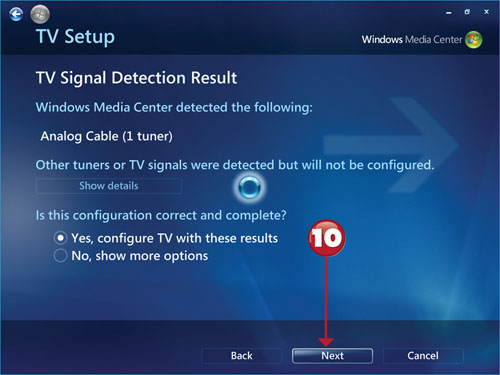
![]() After WMC checks for TV signals, it displays the results. Click Next to continue.
After WMC checks for TV signals, it displays the results. Click Next to continue.
PlayReady is a new Microsoft technology for protecting digital media content from illegal copying.
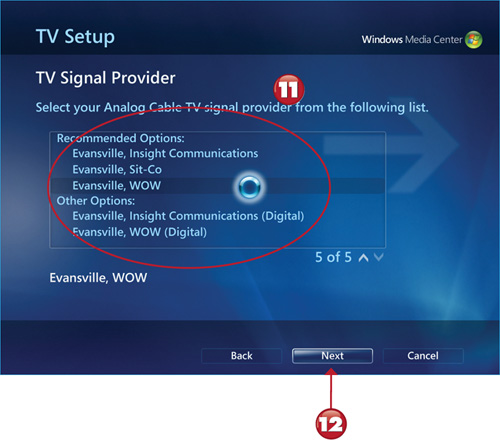
![]() Select your TV signal provider.
Select your TV signal provider.
![]() Click Next.
Click Next.
If you select digital cable TV in Step 11, you might need to edit the channel listings. Go to the main WMC menu and choose Tasks, Settings, TV, Guide to access these options.
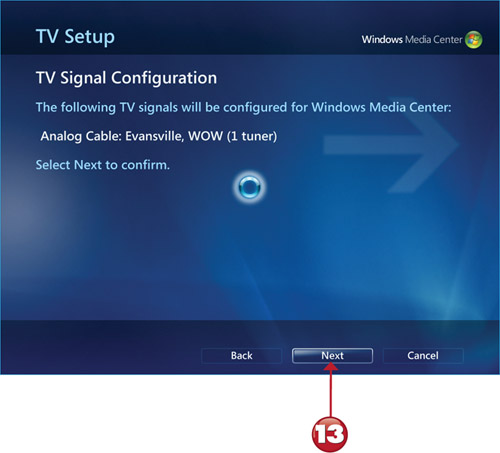
![]() Click Next.
Click Next.
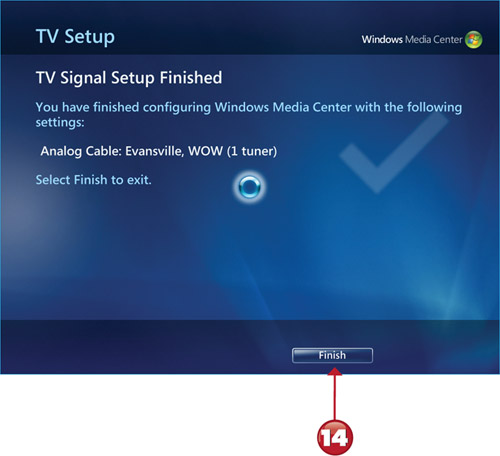
![]() Click Finish.
Click Finish.
If you select broadcast TV instead of cable, you will be prompted to test digital TV (ATSC) signal strength for the channels in your area. If you have a cable and an ATSC TV tuner, you will be prompted to set up cable TV as in this tutorial, as well as ATSC broadcast TV.
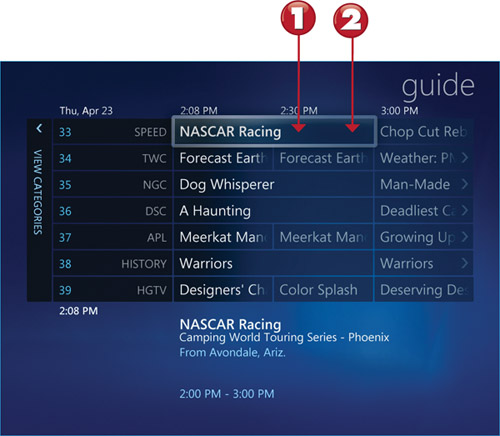
Viewing the Program Guide
The Program Guide displays up to fourteen days of programming for the channels you can receive. Use it to plan your live TV and movie watching and recording.
In Windows 7, Windows Media Center’s Program Guide also includes Internet TV programs.
![]()
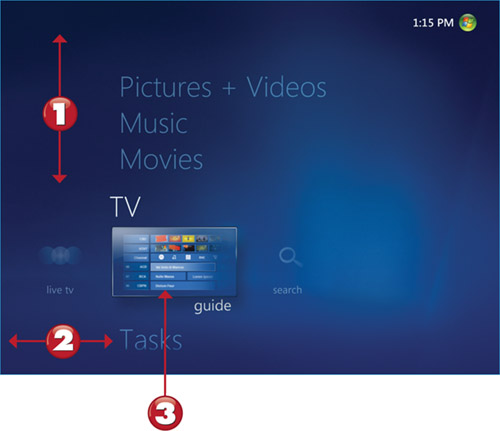
![]() Scroll to the TV menu strip.
Scroll to the TV menu strip.
![]() Scroll to the Guide if it is not visible on-screen.
Scroll to the Guide if it is not visible on-screen.
![]() Click the Guide.
Click the Guide.
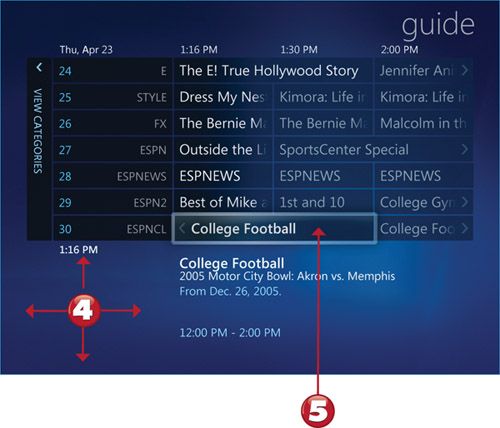
![]() Scroll through the Guide.
Scroll through the Guide.
![]() Highlight a show to learn more about it.
Highlight a show to learn more about it.
Current shows use white titles; upcoming shows are listed in light blue titles.
![]() Scroll through the TV listings.
Scroll through the TV listings.
![]() Highlight a regular or Internet TV series to see details.
Highlight a regular or Internet TV series to see details.
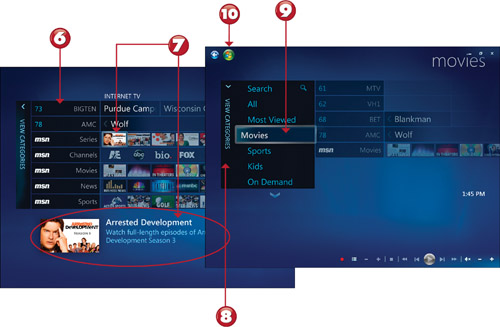
![]() Click View Categories.
Click View Categories.
![]() Select a category to view matching channels and Internet TV results.
Select a category to view matching channels and Internet TV results.
![]() Click the WMC button on the screen or on your WMC remote to return to the WMC desktop.
Click the WMC button on the screen or on your WMC remote to return to the WMC desktop.
To find specific programs, actors, or directors, use the Search feature.

Watching TV
The Guide makes it easy to watch live TV on either standard or widescreen displays.
![]()
![]() Highlight a show you want to watch in the Guide.
Highlight a show you want to watch in the Guide.
![]() Click the show.
Click the show.
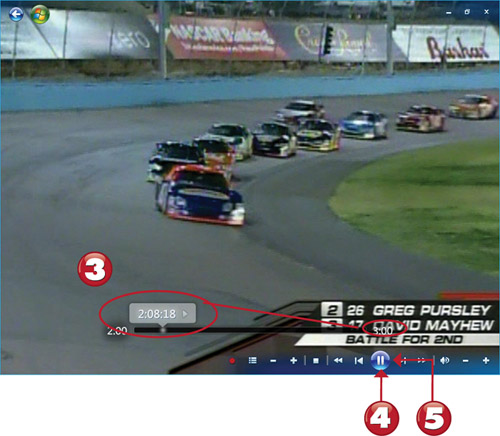
![]() Move the mouse to see the timeline; the timeline shows when the show started, when it will end, and where you are in the broadcast.
Move the mouse to see the timeline; the timeline shows when the show started, when it will end, and where you are in the broadcast.
![]() Click to pause.
Click to pause.
![]() Click again to resume playback.
Click again to resume playback.
You can pause live TV for up to 30 minutes.
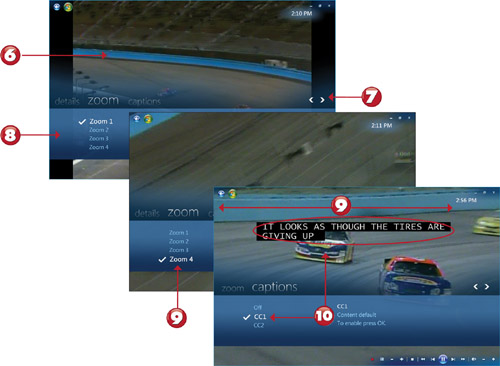
![]() Right-click the picture to display the menu band.
Right-click the picture to display the menu band.
![]() Scroll to the desired section of the menu band.
Scroll to the desired section of the menu band.
![]() Zoom 1 displays black bands when playing 4:3 aspect ratio TV shows on a widescreen display
Zoom 1 displays black bands when playing 4:3 aspect ratio TV shows on a widescreen display
![]() Zoom 4 stretches the picture dynamically when playing 4:3 aspect ratio TV shows on a widescreen display.
Zoom 4 stretches the picture dynamically when playing 4:3 aspect ratio TV shows on a widescreen display.
![]() Select CC1 closed captioning from the menu band.
Select CC1 closed captioning from the menu band.
Zoom settings are available only if you are using a widescreen display in widescreen mode.
Recording TV
You can record a TV program while you watch it or from the Guide, and you can also set all the episodes of a TV series to be recorded as they appear. This tutorial demonstrates all these methods.
![]()
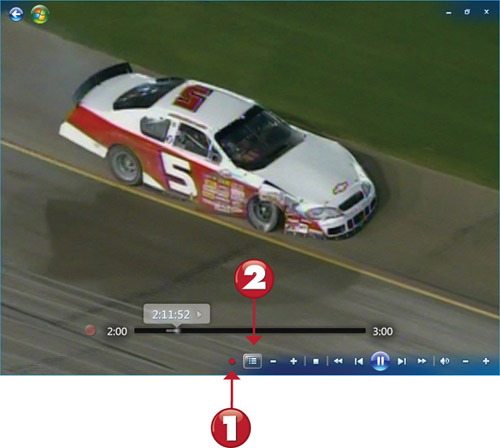
![]() To record a program you are watching, click the Record button.
To record a program you are watching, click the Record button.
![]() Click to open the Guide as an overlay.
Click to open the Guide as an overlay.
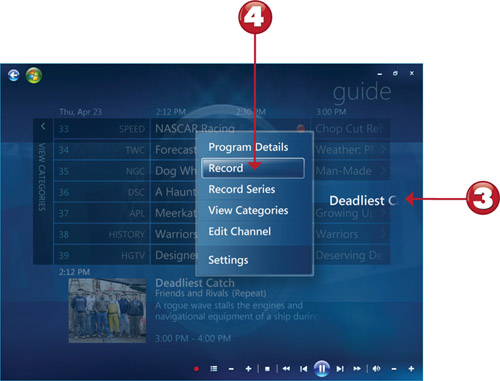
![]() Right-click a program you want to record.
Right-click a program you want to record.
![]() Select Record.
Select Record.
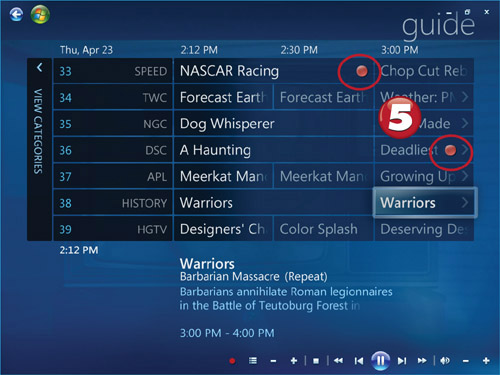
![]() Red dots indicate programs set to record.
Red dots indicate programs set to record.
![]()
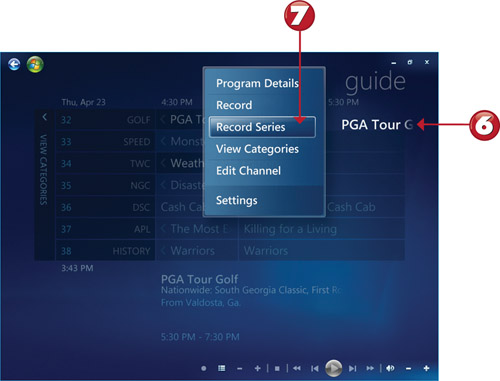
![]() Right-click a program you want to record as a series.
Right-click a program you want to record as a series.
![]() Select Record Series.
Select Record Series.
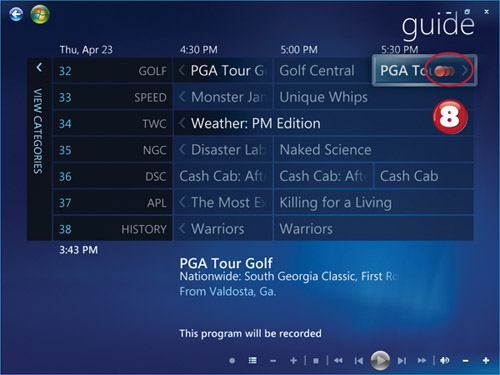
![]() Overlapping red dots indicate that the program is being recorded as part of a series.
Overlapping red dots indicate that the program is being recorded as part of a series.
To discontinue recording a program or a series, right-click the listing, select Program Details, and select the appropriate option from the menu.
Searching for TV Shows and Movies
The Search tool in the TV menu enables you to find TV shows and movies by title, actor/actress, director, keyword, or categories. In this example, you’ll see how to search by title.
![]()
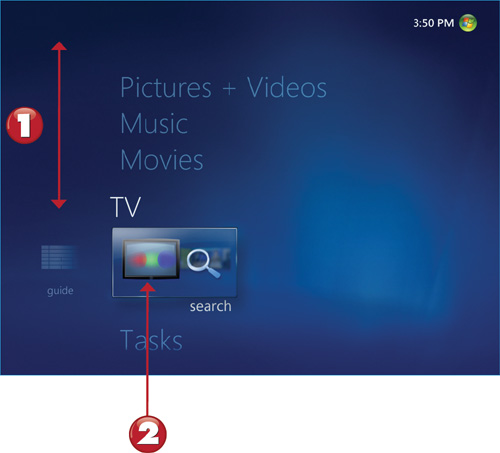
![]() Scroll to the TV menu.
Scroll to the TV menu.
![]() Click Search.
Click Search.
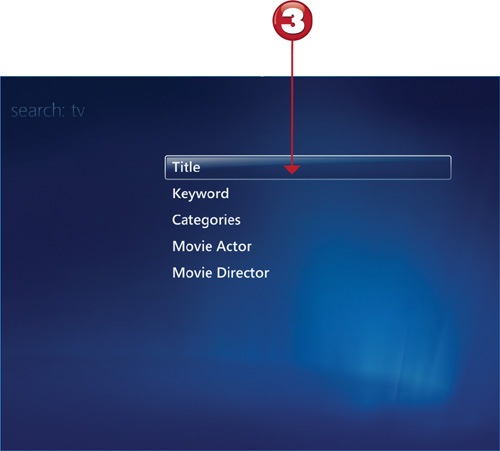
![]() Select a search category.
Select a search category.
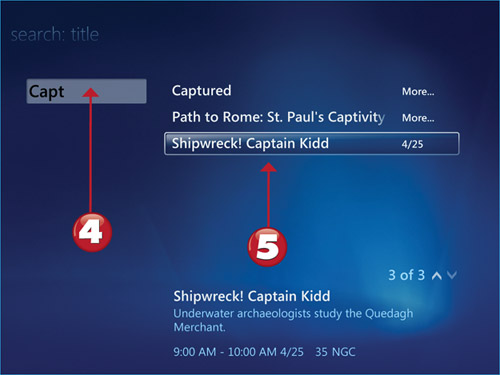
![]() Enter text to search.
Enter text to search.
![]() Select TV show or movie from listing.
Select TV show or movie from listing.
The Search tool searches current program listings.
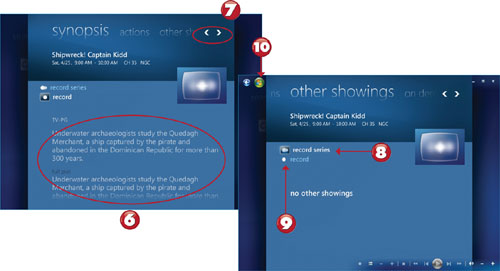
![]() Review synopsis and full plot.
Review synopsis and full plot.
![]() Scroll to see other showings, or other information.
Scroll to see other showings, or other information.
![]() Click to record series.
Click to record series.
![]() Click to record listed episode.
Click to record listed episode.
![]() Click to return to WMC desktop.
Click to return to WMC desktop.
The Search tool searches current program listings.
To specify how long to keep a recording, what recording quality to use, and other settings, open the Advanced Recording section of this dialog.
Viewing Photos in a Slide Show
Windows Media Center enables you to browse your photos in a variety of ways and play slide shows without additional software.
![]()
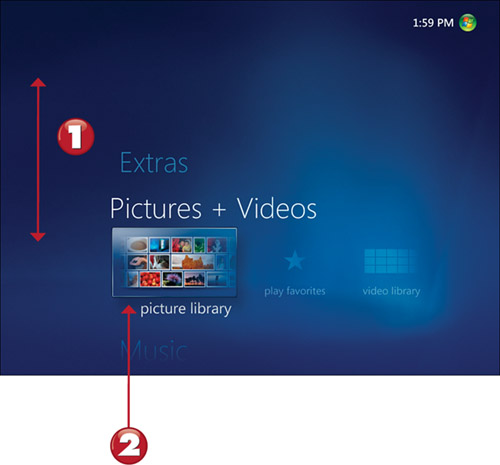
![]() Scroll to the Pictures + Videos menu strip.
Scroll to the Pictures + Videos menu strip.
![]() Click Picture Library.
Click Picture Library.
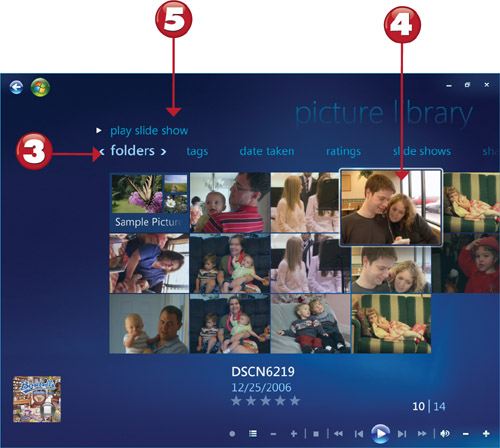
![]() Click Folders to view pictures by folder.
Click Folders to view pictures by folder.
![]() Hover the mouse over a photo to see a larger version.
Hover the mouse over a photo to see a larger version.
![]() Click to view the photos in a slide show.
Click to view the photos in a slide show.
By default, Windows Media Center displays photos in the current user’s Pictures folder and photos in the PublicPictures folder. You can have WMC watch additional folders for photos through the Tasks menu.
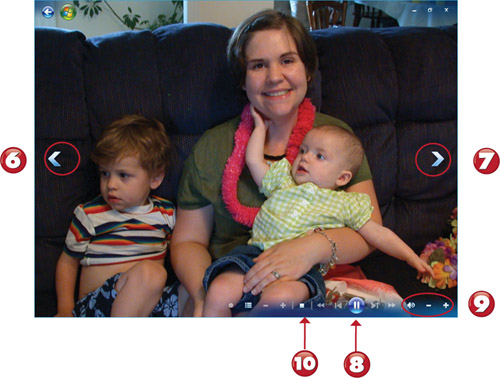
![]() Displays previous photo.
Displays previous photo.
![]() Displays next photo.
Displays next photo.
![]() Pause/continue show.
Pause/continue show.
![]() Volume control.
Volume control.
![]() Stops slide show.
Stops slide show.

Viewing Photos by Tags and Dates
Windows Media Center provides several ways to view your photos. In addition to the default Folders view, you can also view photos by tags, date taken, and ratings. In this tutorial, you will see how to view photos by tags and dates.
Tags can be applied through the Details tab of the properties sheet for a photo, or through the Tags view in Windows Live Photo Gallery (see Chapter 17, “Using Windows Live Essentials,” for details).
![]()
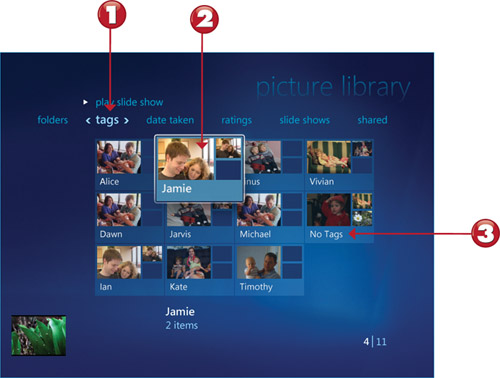
![]() Click Tags.
Click Tags.
![]() Photos identified with the same tag are grouped together.
Photos identified with the same tag are grouped together.
![]() Photos with no tags are grouped together.
Photos with no tags are grouped together.
If a photo has more than one tag, it will be displayed in each tag group.

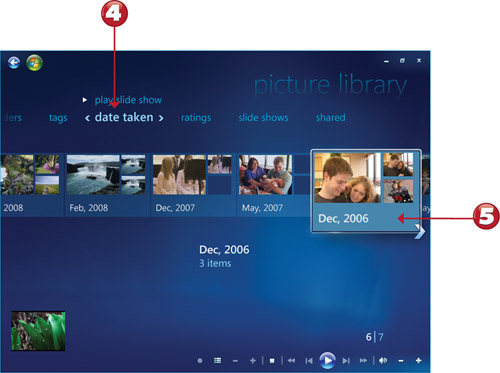
![]() Click Date Taken.
Click Date Taken.
![]() Photos are grouped by month and year taken
Photos are grouped by month and year taken
To see individual photos, double-click the grouping.
Changing Slide Show Settings
Windows Media Center can now use your photos as a screen saver. Use this tutorial to see and change slide show settings as desired.
![]()
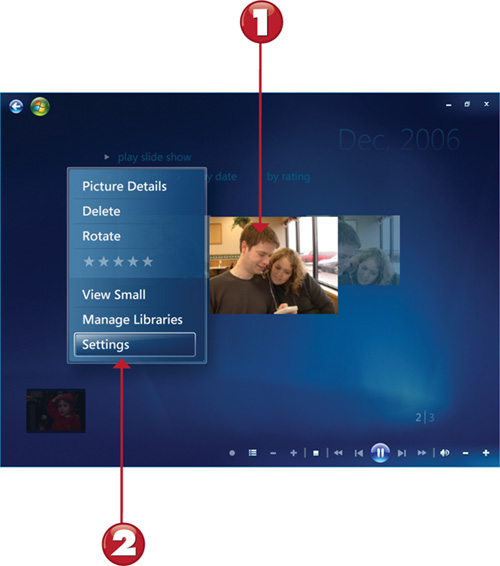
![]() To change settings, right-click a picture or folder in Pictures Library.
To change settings, right-click a picture or folder in Pictures Library.
![]() Select Settings.
Select Settings.
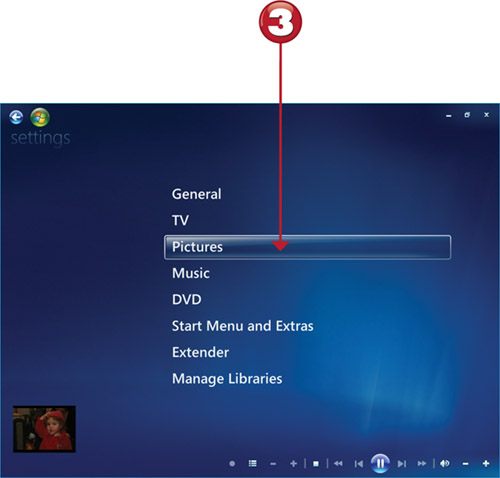
![]() Click Pictures.
Click Pictures.
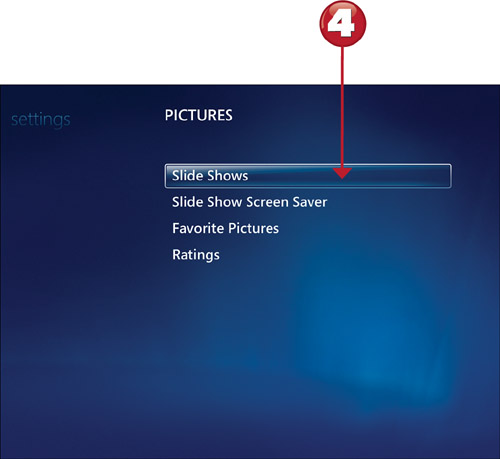
![]() Click Slide Shows.
Click Slide Shows.
The Windows Media Center screen saver runs only while Windows Media Center is open in full-screen mode and is idle.
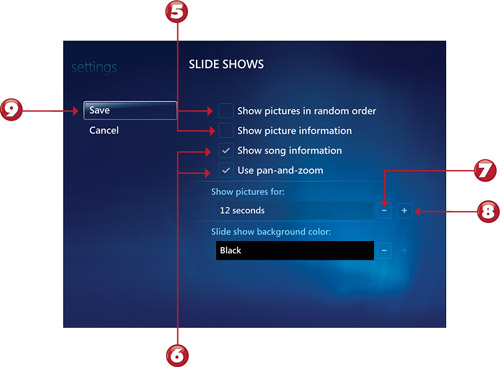
![]() Click to enable options.
Click to enable options.
![]() Click to disable options.
Click to disable options.
![]() Click to decrease transition time.
Click to decrease transition time.
![]() Click to increase transition time.
Click to increase transition time.
![]() Click to save changes.
Click to save changes.
If you decide not to keep your changes, click Cancel in Step 9.
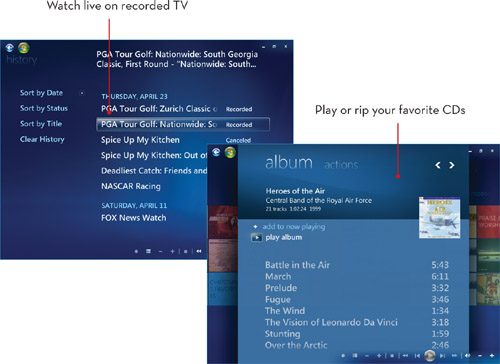
Watching Recorded TV
You can watch three types of videos with Windows Media Center: recorded TV, DV camcorder/home video, and Internet video. This tutorial shows you how to watch TV recordings.
![]()
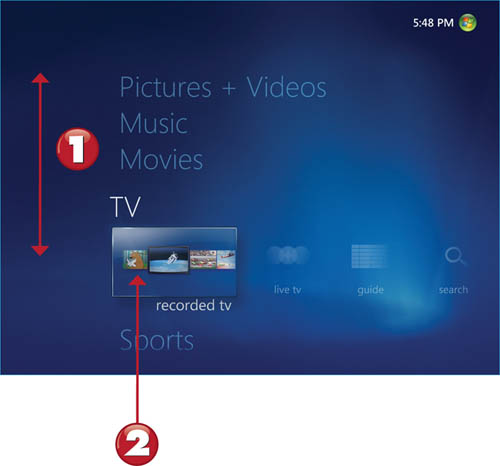
![]() Scroll to the TV menu strip.
Scroll to the TV menu strip.
![]() Click Recorded TV.
Click Recorded TV.
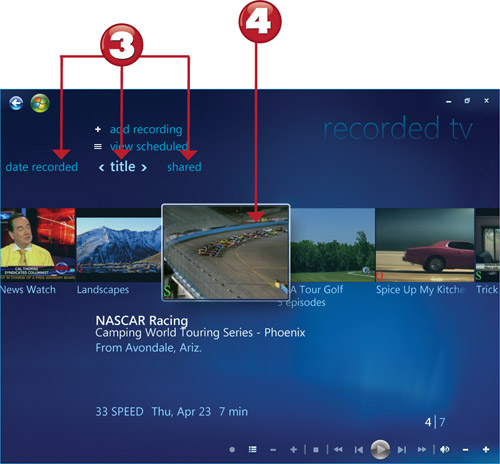
![]() Select an option for listing recordings.
Select an option for listing recordings.
![]() Click a recording.
Click a recording.
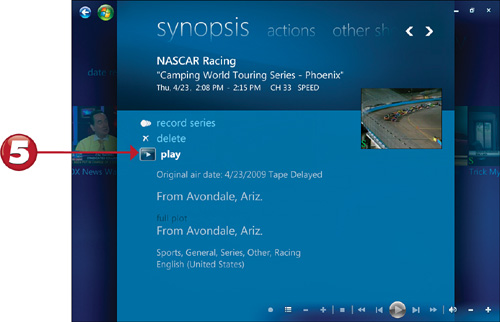
![]() Click Play.
Click Play.
You can also restart the recording from the beginning or delete the recording from disk.
![]()
Deleting a TV Recording
You can manually delete TV recordings you no longer need.
![]()
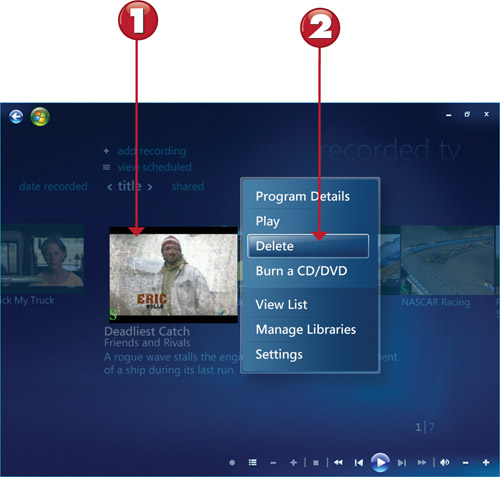
![]() In the Recorded TV menu, right-click a recording.
In the Recorded TV menu, right-click a recording.
![]() Select Delete to erase it from your system.
Select Delete to erase it from your system.
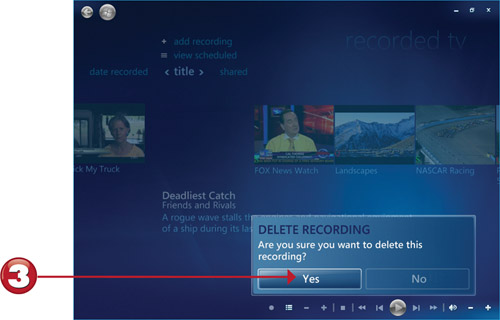
![]() Click Yes.
Click Yes.
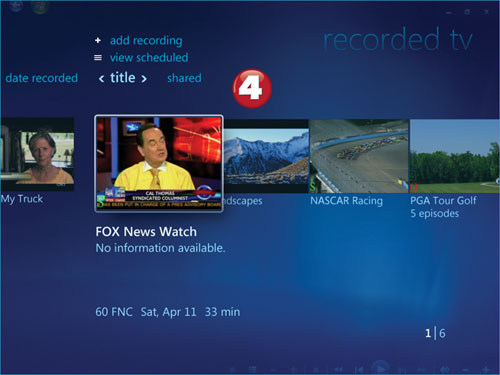
![]() The recording is deleted from your system.
The recording is deleted from your system.
Make sure you no longer need the recording before you delete it. Windows Media Center bypasses the Recycle Bin.
Managing Recordings
In addition to viewing and deleting recordings, you can also see what recordings you have scheduled and what has happened with shows you previously scheduled for recording.
![]()
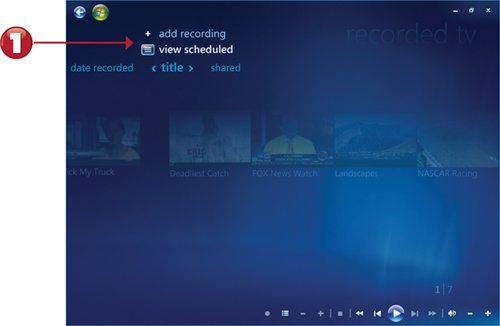
![]() In the Recorded TV menu, click View Scheduled.
In the Recorded TV menu, click View Scheduled.
![]() Scroll through the listing.
Scroll through the listing.
![]() Select a listing for more information.
Select a listing for more information.
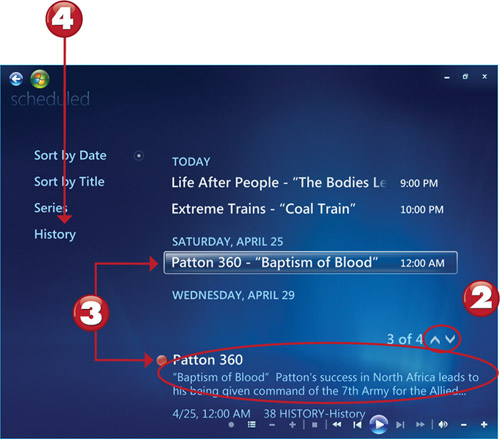
![]() Click History.
Click History.
To cancel a scheduled recording, right-click the listing and select Do Not Record.
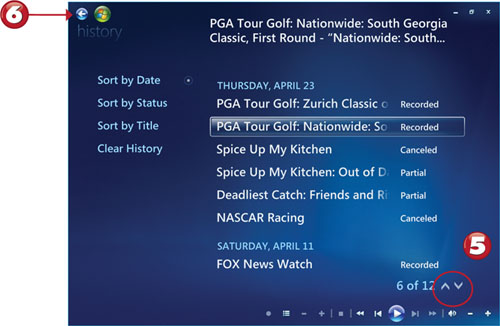
![]() Scroll to see information for each recording.
Scroll to see information for each recording.
![]() Click to return to the previous menu.
Click to return to the previous menu.
If you clear the history, only recordings made after the history is cleared will be listed.
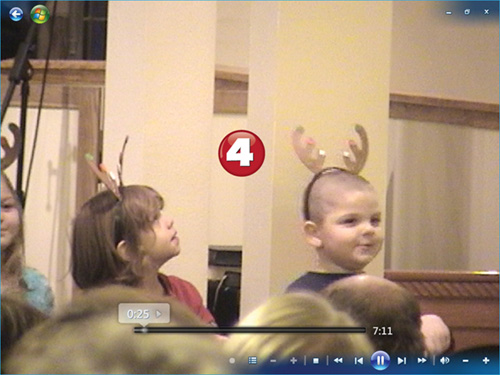
Watching Videos
Windows Media Center delivers videos from your DV camcorder to your desktop or easy chair. Here’s how to enjoy all of that digital goodness.
![]()
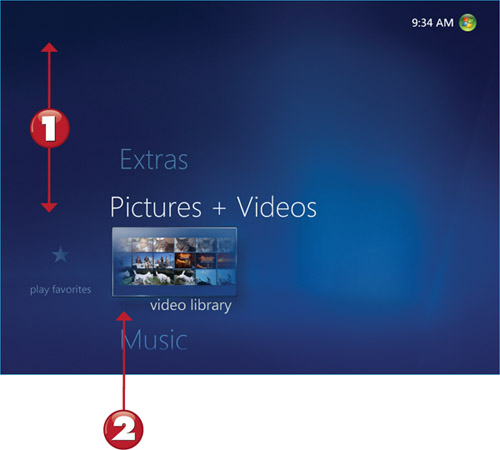
![]() Scroll to the Pictures + Videos menu.
Scroll to the Pictures + Videos menu.
![]() Click Video Library.
Click Video Library.
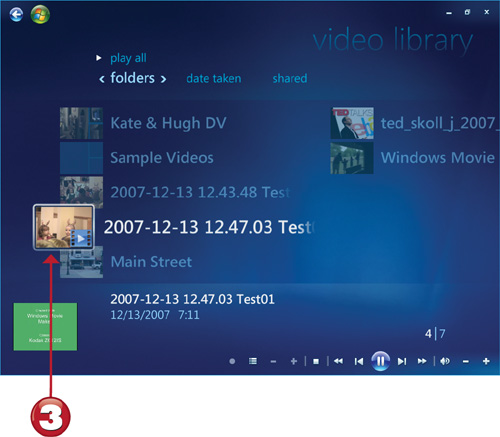
![]() Double-click the video you want to play.
Double-click the video you want to play.
![]() The video plays.
The video plays.
If you need to restart a video or delete it from the system, right-click the video, select Video Details, and choose the appropriate option.
Playing Music
Combine Windows Media Center with your home theater system, and you also have a great platform for enjoying your favorite digital music. Here’s how it works.
![]()
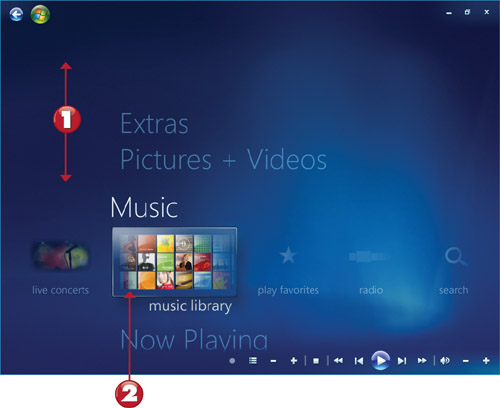
![]() Scroll to Music.
Scroll to Music.
![]() Click Music Library.
Click Music Library.
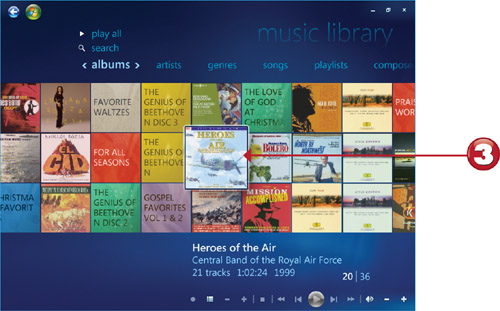
![]() Double-click an album.
Double-click an album.
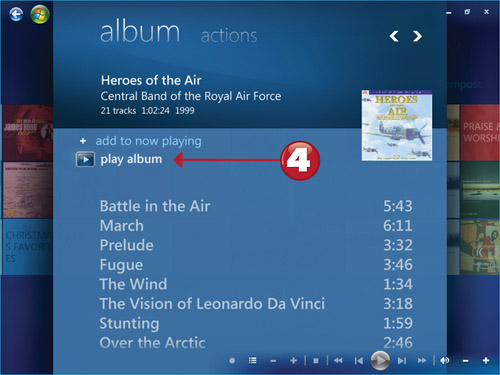
![]() Click Play Album.
Click Play Album.
You can also view your music collection by artist, genres, songs, playlists (created in Windows Media Player), and composer. Click the links above the album titles (Step 3).
Use the playback controls in Step 4 or your WMC remote to pause/continue playback, adjust volume, change tracks, or stop playback.
Playing and Ripping a CD
You can also play and rip CDs within Windows Media Center. Here’s how.
![]()
![]() Insert a music CD. The CD begins to play.
Insert a music CD. The CD begins to play.
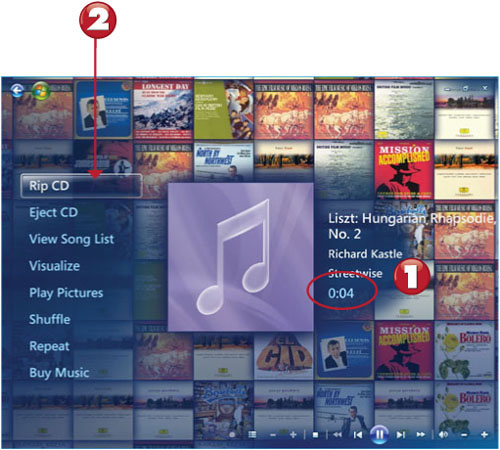
![]() To add the CD to your digital music collection, click Rip CD.
To add the CD to your digital music collection, click Rip CD.

![]() Click Do Not Add Copy Protection to My Music.
Click Do Not Add Copy Protection to My Music.
![]() Click Next.
Click Next.
If you choose the Add Copy Protection... option in Step 3, you might not be able to burn a CD of your music.

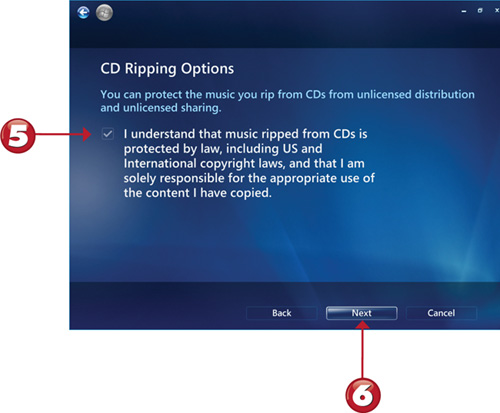
![]() Click to accept statement.
Click to accept statement.
![]() Click Next.
Click Next.
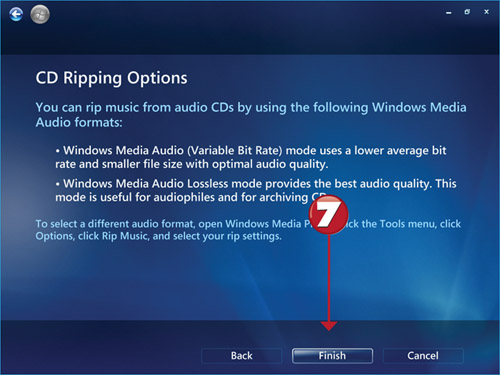
![]() Click Finish.
Click Finish.
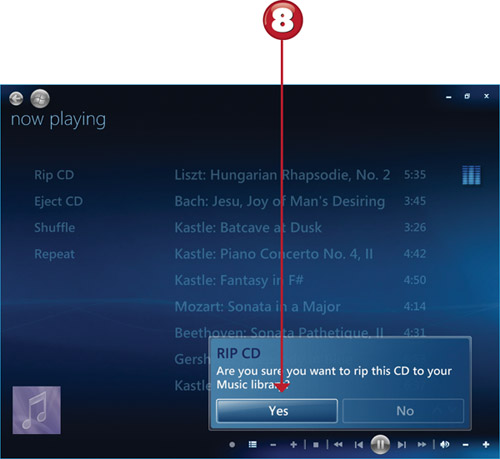
![]() Click Yes.
Click Yes.
To change CD ripping settings, open Windows Media Player and select the format and bit rate preferred. See Chapter 7 for details.

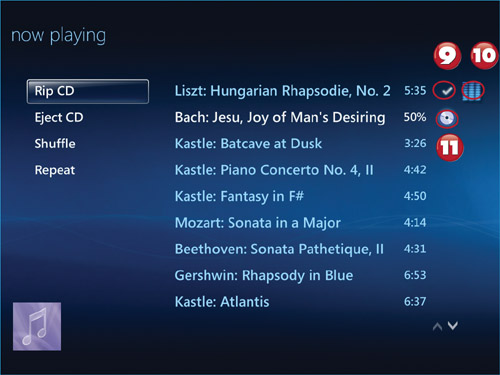
![]() Completed track.
Completed track.
![]() Track being played.
Track being played.
![]() Track being ripped.
Track being ripped.
To eject the CD, or to shuffle or repeat tracks during CD playback, use the task list in the left pane.

![]() Ripped album.
Ripped album.
![]() Album in CD/DVD drive.
Album in CD/DVD drive.
Some older albums might not display cover art when they are ripped.
Starting a Game from Windows Media Center
Windows 7 includes several casual games that are perfect for playback on TVs as well as computer screens. You can start these games from within Windows 7. Here’s how to play one of those games, Chess Titans.
![]()
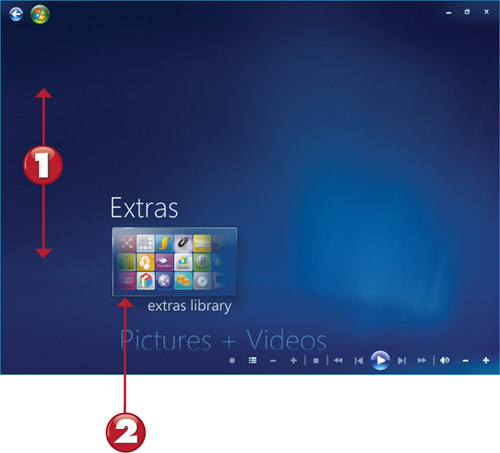
![]() Scroll to Extras.
Scroll to Extras.
![]() Click Extras Library.
Click Extras Library.
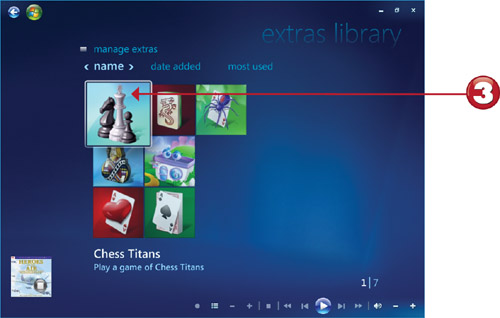
![]() Double-click Chess Titans.
Double-click Chess Titans.
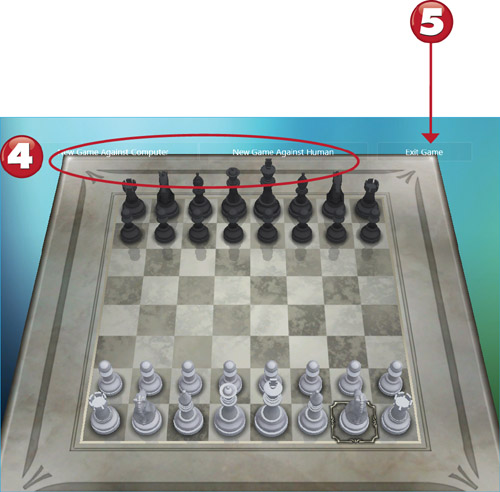
![]() Select a game option to start.
Select a game option to start.
![]() Click to quit the game.
Click to quit the game.
When you exit, you have the option to save the game. When you start the game again, you can continue a saved game or start a new game.

Quitting WMC
In Windows 7, the WMC Shutdown task has been enhanced with new options.
![]()
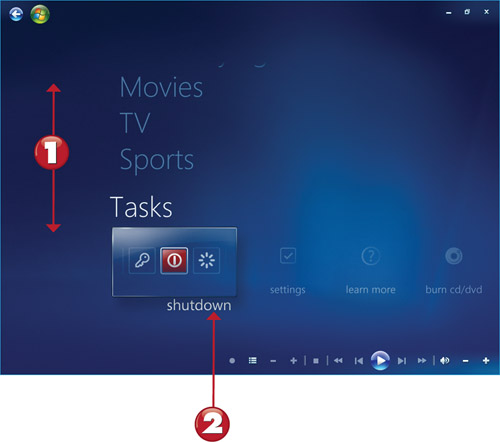
![]() Scroll to Tasks.
Scroll to Tasks.
![]() Click Shutdown.
Click Shutdown.
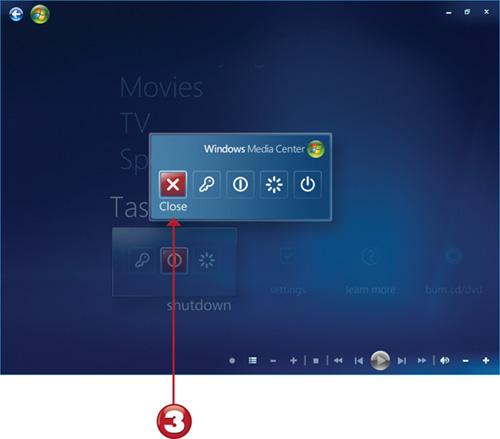
![]() Click Close to return to the Windows 7 desktop.
Click Close to return to the Windows 7 desktop.
Other options, from left to right, include log off, shutdown, restart, and sleep.