
The TaskChain is the central concept of TEA. A Task without a TaskChain is only half the fun because it cannot be executed as stand-alone by the TEA Engine. Thus, a TaskChain is required at all times.
- 1.
Create a class that implements TaskChain: This class is an empty TEA service interface that is used as a marker only.
- 2.
Implement a method annotated with the @TaskChainContextInit annotation: This method is called to initialize the list of Task objects/classes that make up the actual TaskChain.
- 3.
Add a @Component annotation: This step is not strictly required because any TaskChain can be executed manually via the TEA APIs (using org.eclipse.tea.core.TaskingEngine.runTaskChain(TaskExecutionContext)). When the annotation is present, the TaskChain is registered as an OSGi service—as previously described—and can be provided via the TEA UI (the dynamic TEA menu). It is also possible to execute the TaskChain using the headless TEA application without writing any additional code in this case.
A Very Simple TaskChain
Note
Looking back at the samples in previous chapters, you will notice (when looking at the sample code in the TEA workspace) that all of them have a TaskChain that looks like the one in Listing 6-1.
The init method receives the TaskExecutionContext to initialize with Task objects (which can be specified as Class or instance of the according Class) and adds all of them to it.
If a Task is added as using its Class instead of providing an instance, the TEA framework will instantiate the Class at some point during preparation of TaskChain execution.
Headless vs. UI
In some situations, it might be necessary to react to the fact that a TaskChain is executed in a headless context. This might happen both statically and dynamically. What I mean by this is that, for some TaskChain implementations, it might not make any sense to specify a location in the dynamic TEA menu to display it (meaning it is visible to the user of the IDE, something I will discuss later in this chapter), when it can actually only run in a headless context. On the other hand, some TaskChain implementations run fine in both situations but may need to adapt their behavior. An example would be a TaskChain that sets up a workspace from scratch in a headless environment, but operates on existing projects in an existing workspace in a developer’s IDE.
Detecting the Headless Mode

TaskChain in headless mode

The same TaskChain executed from the runtime workspace
Note
The TaskExecutionContext can be injected nearly everywhere in TEA, not only in @TaskChainContextInit methods. For instance, any Task or any TaskingLifecycleListener method can accept it. This provides a sufficient amount of flexibility to react in certain situations such as to clone a repository and import projects in a headless environment, but not when running the TaskChain via the UI.
Using UI to Configure a TaskChain
Using a UI to Initialize a TaskChain
Note
The selectFile method requests injection of a Shell object. TEA will make sure to inject the proper active Eclipse Workbench Window’s Shell when requested by a method with then @TaskChainUiInit annotation.
The @TaskChainUiInit method will be called before the @TaskChainContextInit method so it can set up additional things. In this case, it prompts the user for a filename and stores this information in the IEclipseContext, which is the dependency injection context used to inject the methods of the TaskChain.
In this particular situation, the TaskChain is not able to execute without having the KEY value set in the DI context. This means that the TaskChain can actually not run in a headless environment. We will discuss better and/or different configuration mechanisms in Chapter 7. You can also add @Optional to the @Named(KEY) String filename parameter . This would allow executing even if KEY is not present in the DI context. It will be passed null instead in this case.
Identifying a TaskChain
In both headless and UI environments, there is the need to be able to reference a TaskChain implementation. In headless environments, we want to tell the headless application which TaskChain to execute. In the UI, we want to choose the TaskChain to execute from the dynamic TEA menu.
By default, TEA will use the TaskChain implementations class name for both purposes. The headless application can be passed the fully qualified class name to execute. The TEA menu will use the simple class name (without package) and display this to the user.
Naming and Describing a TaskChain

Example for specifying a menu path with @TaskChainMenuEntry
Hint
You can see this yourself by running the TEA-Book-Samples launch configuration from the TEA workspace.
The @TaskChainId and @TaskChainMenuEntry annotations can be seen very frequently on TaskChain implementations since doing so greatly improves the presentation and accessibility of them.
description: A human readable description of the TaskChain. This will be used by the dynamic TEA menu to display the TaskChain.
alias: One or more aliases that can be used to instruct the headless application(s) to execute this TaskChain.
retries: In case any of the Task instances in this TaskChain fails, it configures the number of times TEA retries execution of the TaskChain as a whole. It defaults to 1.
path: Specifies the menu path as an array of String objects . TEA will create sub-menus as required and specified. Listing 6-4 and Figure 6-3 demonstrate how this works.
- icon: Specifies an icon to use for the menu entry. The path of the icon is relative to the plug-in root that defines the TaskChain. Make sure to include the icon in the plug-ins build.properties (to be found in the root of each plug-in project) as binary include; forgetting this is a common mistake. (See Figure 6-4.)
 Figure 6-4
Don’t forget to add icons to be included in binary builds
- development: A Boolean value specifying whether the TaskChain is for development purposes only. The effect of this is that the TaskChain will not be shown by default. It will only be visible in the menu when switching on development mode in the settings, as shown in Figure 6-5.
 Figure 6-5
Setting to show development TaskChain in the TEA menu
groupingId: This is a more advanced possibility to influence how menu entries are sorted and grouped in the menu. Since this process can get quite complex, I will describe this separately.
Note
The dynamic TEA menu usually only displays menu entries that relate directly to a TaskChain. TEA provides a mechanism to hook arbitrary code (even dynamically) to the menu by implementing a TaskingAdditionalMenuEntryProvider. This components getAdditionalEntries method is called whenever the menu is about to show, so make sure to keep it fast.
Grouping Menu Entries
You have heard about the groupingId attribute of the @TaskChainMenuEntry annotation. It can be used to group menu entries, but how does this work?
Defining Menu Grouping IDs
Briefly explained, the first (GID_A) grouping will move all menu entries with this groupingId to before any menu entries without any groupingId set. The second (GID_B) grouping will move any menu entry with that groupingId to after any menu entry with groupingId GID_A. This means that entries with groupingId GID_B will end up in between entries with GID_A and entries without any groupingId.
To fully understand this, read more on grouping in Chapter 15.
Styling Sub-Menus
Styling a Sub-Menu

Styled sub-menu with full-menu path
Note
The styling is applied to the exact matching menu path— to the CH06-Nested item in the sample.
The MyDeco.java in the provided sample projects (org.eclipse.tea.samples.ch06.s02 in this case) has some commented out code so that the icon is not present from the start. Uncomment the code to make the icon appear.
XVFB and Friends
We have talked about headless, but what exactly do we mean by “headless”? It is kind of a gray zone. Headless typically means running on systems without UI. But does that mean that UI code cannot be executed, or that it simply does not display anything? Well, it depends. TEA provides two headless applications under the hood. One is a simple Eclipse IApplication, which can be used to actually run completely headless. UI code will not work when using this application1 simply because the UI parts of the Eclipse framework are not started at all by this application. On the other hand, there is a second IApplication, together with a RCP product2 definition, which binds a headless rendering engine to this application. This idea (and most of the implementation) is taken from the E4 UI tests.3 This application4 allows the execution of virtually any UI (-related) code. For instance launching (and debugging) in Eclipse is usually very UI-bound, yet it can be very handy to run a launch configuration from the current workspace in a headless environment.
This, of course, has a downside. Running UI code (typically SWT) will require that UI is accessible. On X11-based systems, this will require a UI to be present. We frequently set up headless Linux systems running Jenkins builds using TEA. All of them have the Jenkins Xvfb plug-in ( https://wiki.jenkins.io/display/JENKINS/Xvfb+Plugin ) installed to make sure an X11 server is available. Nothing is actually ever displayed there (if all goes well); it is just required to be able to initialize and run UI code.
Updates
In my opinion, the only major downside of TEA in headless environments is updates . When installing Eclipse on servers, somebody needs to make updates from time to time, and at least once required TEA component implementation changes.
At the company I work for, we have solved this problem by implementing an automatic update as TaskingHeadlessLifeCycle. Eclipse will check for (and apply) updates on every startup. The mechanism is unfortunately relying on third-party software as of now (so it cannot be added to TEA directly), but it is definitely feasible to implement if done in an environment-specific fashion without too much effort.
Configuration
A Sample headless.properties File
This property file can be passed to the headless application using the -properties <file> argument. It can reside anywhere on disc; there is no association to any Eclipse workspace and/or project.
Each line in the property file sets a value of a field defined in a TaskingConfigurationExtension implementation —more on this in Chapter 7.
In the IDE, each TEA configuration option is accessible through Window ➤ Preferences ➤ Tasking (TEA). You can have a look at it now, but we’ll cover all of this (you may have guessed it) in Chapter 7.
Life Cycle
A Simple TaskingLifeCycleListener
The listener in Listing 6-8 again uses the OSGi DS @Component annotation to register the service with the runtime. Once it is registered (that is, when the bundle was loaded and started by the runtime), it will be called whenever a TaskChain execution is about to begin.
@CreateContext : Called when a new TaskExecutionContext is created, right after the context has been initialized from the TaskChain implementation by calling the @TaskChainContextInit method.
@DisposeContext : Called after execution of a context has finished, right before the context is removed.
@BeginTaskChain : Called right before a TaskChain execution starts (in other words, the first Task is executed).
@FinishTaskChain : Called after the last Task has finished executing (or execution aborted with an error). The state of the TaskChain can be determined by injecting and examining a MultiStatus object.
@BeginTask : Called before execution of an individual Task. The actual Task object can be accessed by injecting @Named(TaskingInjectionHelper.CTX_TASK) Object task as parameter into the method.
@FinishTask : Called after execution of an individual Task has finished. Injection is performed using the Task injection context, so an IStatus object can be injected and examined to determine the Task state.
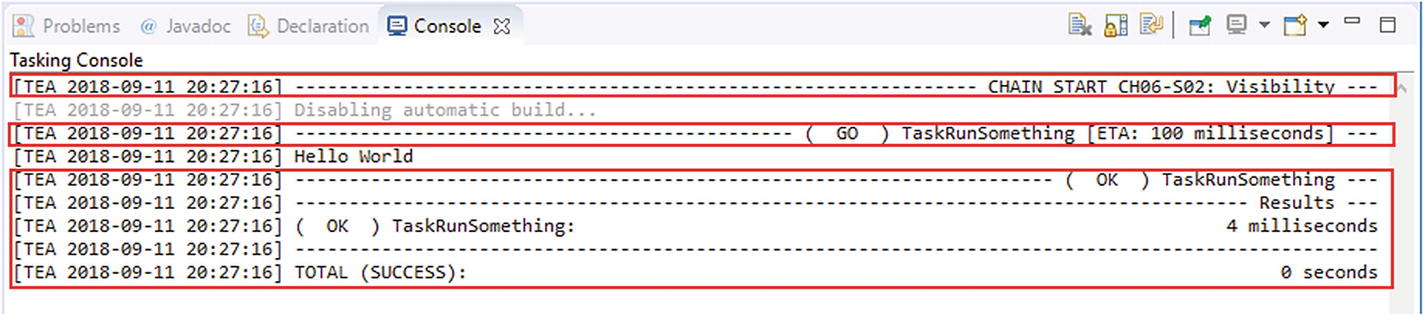
Output produced by TaskingStatusTracker
Defining the Priority of a TaskingLifeCycleListener
TEA built-in listeners use priorities between 10 and 100.
Headless Life Cycle
A Sample TaskingHeadlessLifeCycle
Note
The @HeadlessStatup method must return a value of the StartupAction enumeration. It has two possible values: CONTINUE and RESTART.
Returning StartupAction.RESTART from the @HeadlessStartup method can be used to implement automatic updating of the Eclipse running TEA in headless mode: (check for and apply updates and return RESTART on success).

Restart loop

Remove -Drestart=true to stop TEA from looping
Now re-running the same launch configuration from the Launch Configuration View will result in a smoothly running application.