
The “Build Library” is a collection of pre-built Task implementations, which can be used in your own TaskChain. As the name already suggests, they are focused on build. This means there is code that can help in compiling plug-ins, building update sites, and so on. At the time of writing, most of the Tasks have a strong focus on Eclipse PDE1 projects .
The heart of the Build Library is the so-called TeaBuildChain.2 This heart is responsible for orchestrating builds. A build may consist of compiling projects (maybe containing a generator) , running generators, compiling more projects (containing the newly generated code), and so forth. Virtually anything can be made part of a build—generating code and documentation, downloading files, uploading files, and so on. It heavily depends on what you need. Having orchestration on top of builds was—as mentioned in the introduction—the initial reason for creating the TEA predecessor in the first place.
The TeaBuildChain is usually used through TaskBuildWorkspace,3 which implements all the details around it. But TeaBuildChain can also be used stand-alone or in other Task implementations.
Once started up, TeaBuildChain will discover a set of TeaBuildElement objects. Next, it will discover dependencies between these elements. This will create TeaDependencyWire objects, which wire up all TeaBuildElement objects with each other. Once this directed (hopefully acyclic) graph has been created in memory, TEA will figure out an order in which elements can be visited. All elements are assigned a sequence number. Elements with the same sequence number could be built in parallel, provided the underlying Eclipse builders support that—which is currently not (yet) the case.
In the final stage, TeaBuildVisitor implementations are called in order and allowed to process elements.
Note
In the default implementation, the TeaBuildChain will build PDE Plug-in Projects only, due to its strong affinity to them in its history. It is trivial to implement support for any other project type though.
Custom Build Elements
Let’s see how these things could look in a very simple example. We will need four different components, each of them shown in the following Listings: 12-1, 12-2, 12-3, and 12-4. This might seem like overkill for this simple example, but looking at the skeleton of the four code snippets allows for a quick implementation of much more complex scenarios if required.
Note
You can find the whole code in the org.eclipse.tea.samples.ch12.s01 project in the TEA workspace.
The TeaBuildElement Implementation
The TeaBuildElementFactory Implementation
This factory class will create a new S01Element (from Listing 12-1) for each project that has "gen" in its name.
Caution
When looking at the example that follows, don’t confuse workspaces. The generator code we’re just developing will run in the Eclipse IDE, which powers your runtime workspace. Thus, it will look for a project containing "gen" in its name in the runtime workspace, not the TEA workspace.
The TeaDependencyWireFactory Implementation
The TeaBuildVisitor Implementation
- 1.
Creating an S01Element for each IProject (which represents a project in the runtime workspace) with the String “gen” in its name.
- 2.
Making all the projects depend on their generator instance respectively.
- 3.
Calling each of the generators. The visitor will be called by the TeaBuildChain at the correct point in time, depending on the calculated dependency graph.

Example output of demo generators
- 1.
USE_THRESHOLD: This is the default value. TEA will not immediately stop processing the build if any TeaBuildElement with this value fails. It will continue until another condition stops the build or a certain threshold of elements failed.
- 2.
IGNORE: Simply ignore any problem with the element.
- 3.
ABORT_IMMEDIATE: Immediately stop processing the TeaBuildChain.
- 1.
ABORT_IF_PREVIOUS_ERROR: If any element previously failed (even if the failure threshold is not yet reached), abort the TeaBuildChain processing.
- 2.
USE_THRESHOLD: This is the default value. Visit the element as long as the failure threshold (the same as used by the TeaElementFailurePolicy) is not yet reached.
P2-Related Tasks
As mentioned before, TEA has a strong affinity to PDE and PDE-related mechanisms. PDE applications use P2 as the update mechanism. TEA provides prebuilt Task implementations that allow creating P2 update sites from any feature project in the workspace.
There is actually nothing you need to implement to make this work with your feature(s). Simply create one in your workspace and run TEA ➤ TEA Build Library ➤ Create Update Site from Feature…. You will be prompted to select the feature project to export (choose the one you created). (See Figure 12-2.) Now pressing OK will start the process of creating the update site.
Note
For this to work, you need a feature project in the runtime workspace. Create one by clicking File ➤ New… ➤ Project…. Select Feature Project and name the project com.example.feature1. Once created, open the new project’s feature.xml and add the com.example.gen and com.example.other projects created previously in the Included Plug-ins tab using the Add… button.

Select feature to export
- 1.
Find all plug-in projects referenced in the feature
- 2.
Export JAR files for each of the contained projects as well as for the feature itself
- 3.
Run the P2 publisher to generate P2 metadata for the assembled update site
The site will be published in the workspace in the 01_BUILD_SITE directory by default. Since this directory is not part of the runtime workspace projects, you can see this directory only when browsing in the workspace directory using a filesystem browser of choice.
Note
TEA uses its custom configuration mechanism to provide the BuildDirectories4 configuration extension. It allows configuring output directories for various use-cases via Eclipse’s preferences (see Figure 12-3), as well as in headless.properties files as described in Chapter 7.

BuildDirectories configuration

Output of update site publishing
Once done, you can examine the results in the workspace directory in the folder 01_BUILD_SITE (by default). It will contain a dynamic_site*.zip file, which in turn contains a P2 update site including the feature and all previously selected plug-ins.
Maven Integration
TEA provides very rudimentary support for downloading Maven artifacts. This can be used for simple use-cases where single JAR files are required for plug-ins. More complex use-cases are hard to maintain (transitive dependencies are not fetched automatically). This may change in the future as TEA continues to mature.
The integration allows specifying a MANIFEST.MF header in any PDE project named 'Build-Maven'. It can be used to declare one or more dependencies to maven artifacts. They will be fetched when clicking TEA ➤ TEA Build Library ➤ Synchronize Maven Artifacts or when running the orchestrated build from TEA ➤ TEA Build Library ➤ Clean and Build all Projects.
Sample Maven Configuration File: maven.cfg
This configuration file can now be referenced in the preferences, as shown in Figure 12-5.

Adapt location of maven configuration file
Note
Eclipse String Variable substitution can be used in the configuration. See Window ➤ Preferences ➤ Run/Debug ➤ String Substitution.5
The configuration may contain an arbitrary amount of repository locations. They are specified by setting two properties for each repository: the type and the url. The mechanism is simple and straightforward: add the properties maven_repo_type_<NAME> and maven_repo_url_<NAME> where <NAME> is a unique identifier for the repository. Any id can be used.
Note
Any specified repository is either of type release or snapshot. This means that a repository that should provide both release and snapshot artifacts must be added twice.
- 1.
Add the MANIFEST.MF header to the target project:
Build-Maven: com.google.code.gson:gson:2.8.5
See Figure 12-6 for a sample.
- 2.
Run TEA ➤ TEA Build Library ➤ Synchronize Maven Artifacts.
- 3.
Adapt the class-path of the target project. Use the MANIFEST.MF editor and add the JAR (using the Add… button on the Runtime tab), as shown in Figure 12-7.
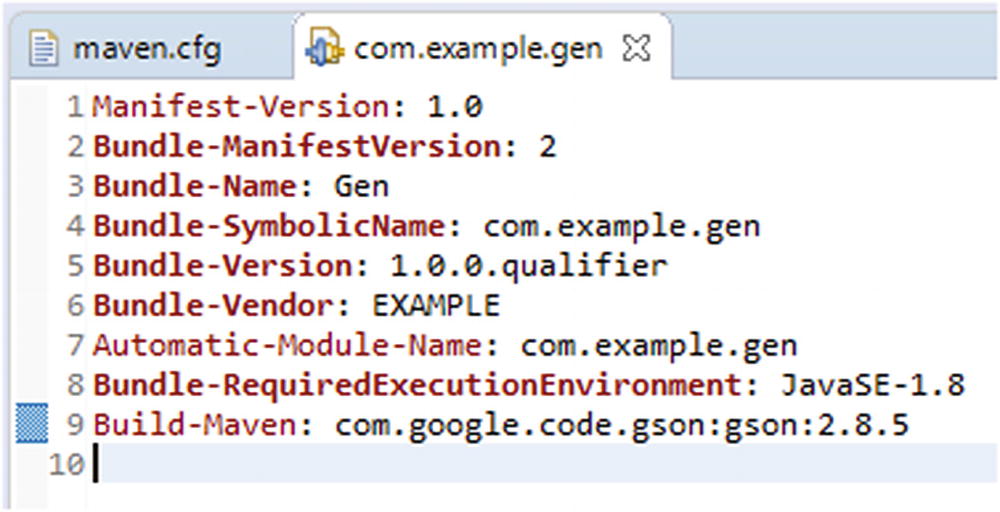
“Build-Maven” header in sample project

Adding maven-provided library to the project classpath
You can now access any code in the JAR from within the project.
Tip
TEA also downloads the source JAR along with the binary JAR from maven if possible. This allows setting the source path for easier debugging/source lookup. To do this, expand the projects Referenced Libraries node and find the library you just added to the class path. Right-click it and go to Properties. In the properties dialog, find the Java Source Attachment node . Use Workspace Location and browse for the source.jar. See Figure 12-8.

Configuring source attachment