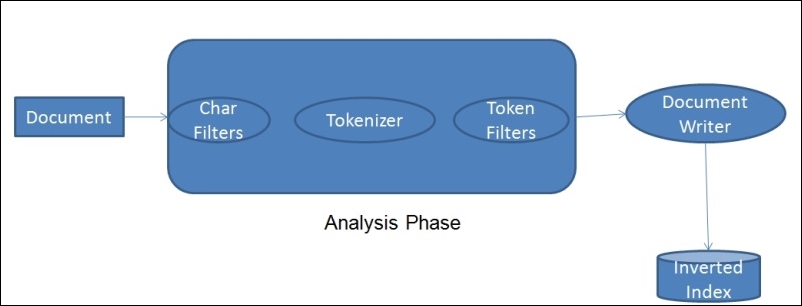
When we index documents into Elasticsearch, it goes through an analysis phase that is necessary in order to create inverted indexes. It is a series of steps performed by Lucene, which is depicted in the following image:

The analysis phase is performed by analyzers that are composed of one or more char filters, a single tokenizer, and one or more token filters. You can declare separate analyzers for each field in your document depending on the need. For the same field, the analyzers can be the same for both indexing and searching or they can be different.
- Character Filters: The job of character filters is to do cleanup tasks such as stripping out HTML tags.
- Tokenizers: The next step is to split the text into terms that are called tokens. This is done by a tokenizer. The splitting can be done based on any rule such as whitespace. More details about tokenizers can be found at this URL: https://www.elastic.co/guide/en/elasticsearch/reference/current/analysis-tokenizers.html.
- Token filters: Once the tokens are created, they are passed to token filters that normalize the tokens. Token filters can change the tokens, remove the terms, or add terms to new tokens.
The most used token filters are: the lowercase token filter, which converts a token into lowercase: the stop token filter, which removes the stop word tokens such as to, be, a, an, the, and so on: and the ASCII folding token filter, which converts Unicode characters into their ASCII equivalent. A long list of token filters can be found here: https://www.elastic.co/guide/en/elasticsearch/reference/current/analysis-tokenfilters.html.
Lucene has a wide range of built-in analyzers. We will see the most important ones here:
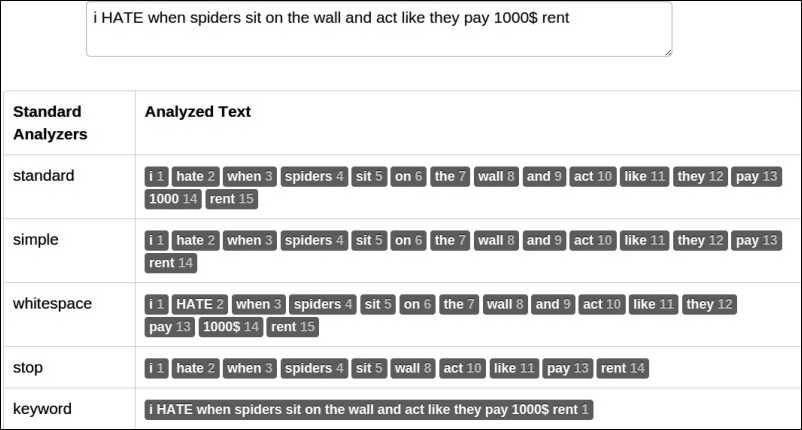
- Standard analyzer: This is the default analyzer used by Elasticsearch unless you mention any other analyzer to be used explicitly. This is best suited for any language. A standard analyzer is composed of a standard tokenizer (which splits the text as defined by Unicode Standard Annex), a standard token filter, a lowercase token filter, and a stop token filter.
- Simple analyzer: A simple analyzer splits the token wherever it finds a non-letter character and lowercases all the terms using the lowercase token filter.
- Whitespace analyzer: As the name suggests, it splits the text at white spaces. However, unlike simple and standard analyzers, it does not lowercase tokens.
- Keyword analyzer: A keyword analyzer creates a single token of the entire stream. Similar to the whitespace analyzer, it also does not lowercase tokens. This analyzer is good for fields such as zip codes and phone numbers. It is mainly used for either exact terms matching, or while doing aggregations. However, it is beneficial to use
not_analyzedfor these kinds of fields. - Language analyzer: There are lots of ready-made analyzers available for many languages. These analyzers understand the grammatical rules and the stop words of corresponding languages, and create tokens accordingly. To know more about language specific analyzers, visit the following URL: https://www.elastic.co/guide/en/elasticsearch/reference/current/analysis-lang-analyzer.html.
Elasticsearch provides an easy way to test the analyzers with the _analyze REST endpoint. Just create a test index, as follows:
curl –XPUT 'localhost:9200/test'
Use the following command by passing the text through the _analyze API to test the analyzer regarding how your tokens will be created:
curl –XGET 'localhost:9200/test/_analyze?analyzer=whitespace&text=testing, Analyzers&pretty'
You will get the following response:
{
  "tokens" : [ {
    "token" : "testing,",
    "start_offset" : 0,
    "end_offset" : 8,
    "type" : "word",
    "position" : 1
  }, {
    "token" : "Analyzers",
    "start_offset" : 9,
    "end_offset" : 18,
    "type" : "word",
    "position" : 2
  } ]
}
You can see in the response how Elasticsearch splits the testing and Analyzers text into two tokens based on white spaces. It also returns the token positions and the offsets. You can hit the preceding request in your favorite browser too using this: localhost:9200/test/_analyze?analyzer=whitespace&text=testing, Analyzers&pretty.
The following image explains how different analyzers split a token and how many tokens they produce for the same stream of text:

In the previous section, we saw in-built analyzers. Sometimes, they are not good enough to serve our purpose. We need to customize the analyzers using built-in tokenizers and token/char filters. For example, the keyword analyzer by default does not use a lowercase filter, but we need it so that data is indexed in the lowercase form and is searched using either lowercase or uppercase.
To achieve this purpose, Elasticsearch provides a custom analyzer that's type is custom and can be combined with one tokenizer with zero or more token filters and zero or more char filters.
Custom analyzers always take the following form:
{
  "analysis": {
    "analyzer": {}, //Where we put our custom analyzers
    "filters": {} //where we put our custom filters.
  }
}
Let's create a custom analyzer now with the name keyword_tokenizer using the keyword tokenizer and lowercase and asciifolding token filters:
      "keyword_tokenizer": {
        "type": "custom",
            "filter": [
              "lowercase",
              "asciifolding"
            ],
            "tokenizer": "keyword"
          }
Similarly, we can create one more custom analyzer with the name url_analyzer for creating tokens of URLs and e-mail addresses:
       "url_analyzer": {
                 "type": "custom",
                 "filter": [
                    "lowercase",
                    "stop"
                 ],
                 "tokenizer": "uax_url_email"
}You have all the control to define the type of analyzer to be used for each field while creating mapping. However, what about those dynamic fields that you do not know about while creating mappings. By default, these fields will be indexed with a standard analyzer. But in case you want to change this default behavior, you can do it in the following way.
A default analyzer always has the name default and is created using a custom type:
      "default": {
            "filter": [
              "standard",
              "lowercase",
              "asciifolding"
            ],
            "type": "custom",
            "tokenizer": "keyword"
          }
In the preceding setting, the name of the analyzer is default, which is created with the keyword tokenizer.
We have learned to create custom analyzers but we have to tell Elasticsearch about our custom analyzers so that they can be used. This can be done via the _settings API of Elasticsearch, as shown in the following example:
curl –XPUT 'localhost/index_name/_settings' –d '{
  "analysis": {
    "analyzer": {
      "default": {
        "filter": [
          "standard",
          "lowercase",
          "asciifolding"
        ],
        "type": "custom",
        "tokenizer": "keyword"
      }
    },
    "keyword_tokenizer": {
      "filter": [
        "lowercase",
        "asciifolding"
      ],
      "type": "custom",
      "tokenizer": "keyword"
    }
  }
}'
Note
If an index already exists and needs to be updated with new custom analyzers, then the index first needs to be closed before updating the analyzers. It can be done using curl –XPOST 'localhost:9200/index_name/_close'. After updating, the index can be opened again using curl –XPOST 'localhost:9200/index_name/_open'.
