
Elasticsearch does not have any default security mechanisms. Anyone can destroy your entire data collection with just a single command. However, with the increasing demand of securing Elasticsearch clusters, the Elastic team has launched a new product called shield that provides you with a complete security solution including authentication, encryption, role-based access control, IP filtering, field- and document-level security, and audit logging. However, if you cannot afford shield, there are other ways to protect Elasticsearch. One way can be to not expose Elasticsearch publicly and put a firewall in front of it to allow access to only a limited number of IPs. The other way is to wrap Elasticsearch in a reverse proxy to enable access control and SSL encryption. In this chapter, we will see how you can secure your Elasticsearch cluster using a basic HTTP authentication behind a reverse proxy.
In the remaining sections, we will go on to learn how to use Nginx to secure an Elasticsearch cluster. The commands used to set up Nginx and Basic Auth work on Ubuntu 12.04 and above. To set up the same on Centos systems, you can get the installation guide at the following URL:
https://gist.github.com/bharvidixit/8b00fdc85f8d31391876
HTTP authentication allows you to secure Elasticsearch using username- and password-based access. You can do this by installing the apache-utils package:
sudo apt-get update
sudo apt-get install apache-utils
Now, let's create a password file with this command:
sudo htpasswd -c /etc/nginx/.htpasswd username
The preceding command will prompt you to create a password for the username user, as shown in the following screenshot:

Once you create the password, a file with the .htpasswd name will be created inside the /etc/nginx directory in the format of login:password.
Run the following command to install Nginx on Ubuntu machines:
sudo apt-get install nginx
You can find the configuration directory of Nginx inside the /etc/nginx directory, which looks similar to this:
Proxy templates are usually created inside the sites-available directory. This can be created with the following command:
sudo vi /etc/nginx/sites-available/elastic_proxy
Enter the following configuration lines inside this file:
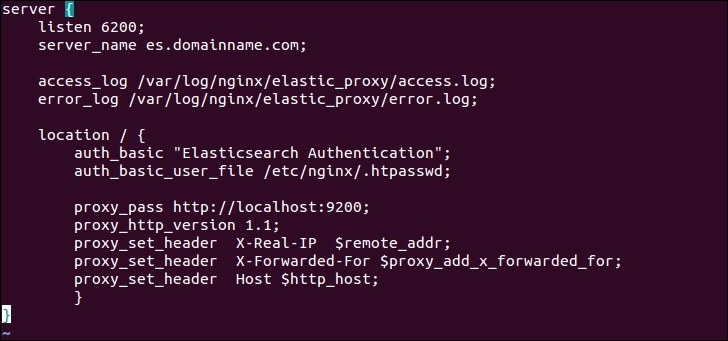
As you can see, we have configured the Nginx server to listen to port 6200, which is just a custom port number to connect with Elasticsearch. You are no longer required to connect Elasticsearch on its default port 9200 because it is running on localhost. It's also good if you can create a subdomain for your Elasticsearch cluster (es.domainname.com, in this example), which points to the public IP of this server. If you do not have any subdomain, but have a public IP available on this server, you can omit the server_name parameter.
The main things are written inside the location directive, where we have used the HTTP authentication file you had created. Now only those users who have this user name and password can access this Elasticsearch cluster.
When you are done with the configuration of your template, create a symbolic link of the template to make it available inside the /etc/sites-enabled directory that will be finally loaded by Nginx. To do this, run the following command:
sudo ln -s /etc/nginx/sites-available/elastic_proxy /etc/nginx/sites-enabled/
You also need to create a log directory to store all the access and error logs. You can do it using these commands:
sudo mkdir /var/log/nginx/elastic_proxy

sudo touch /var/log/nginx/elastic_proxy/access.log
sudo touch /var/log/nginx/elastic_proxy/error.log
Once done, start the Nginx server with the following command:
sudo service nginx start
Now, try to access Elasticsearch with this command:
curl localhost:6200
You will get the following response:
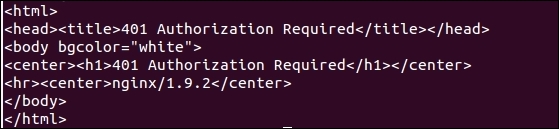
This clearly tells you that to access this URL, you need a valid user name and password. So, it can be accessed using the following command:
curl username:password@localhost:6200
Here, the username and password are the ones you have created in the previous section.
You know very well that Elasticsearch is based on REST and provides the HTTP endpoints for all the tasks, such as _search, _delete, _update, _stats, _settings, and so on, which essentially works on the HTTP verbs such as GET, PUT, POST, and DELETE.
Nginx is very good for rule-based access by getting the request parameters and putting constraints on the requests. Let's see how you can do this.
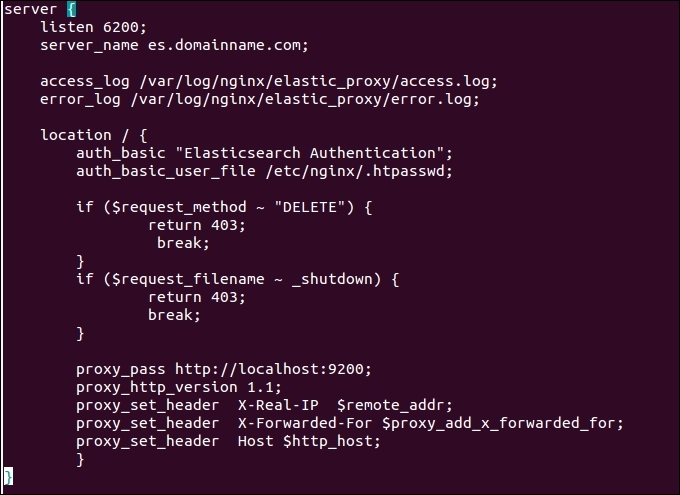
To keep your data safe by avoiding DELETE requests, you can do the following configurations inside your proxy template:
if ($request_method ~ "DELETE") {
                return 403;
                 break;
        }
To restrict endpoints, such as _shutdown, you can use the following configuration:
 if ($request_filename ~ _shutdown) {
                return 403;
                break;
        }
A final configuration would look like this:
You can add many other constraints using similar if statements as shown in the preceding template. Whenever you edit the template inside /etc/sites-available, it will automatically reflect the changes inside sites-enabled; however, make sure to reload the changed configurations by running this command:
sudo service nginx reload
If you have more than one client node in your Elasticsearch cluster, you can create connections to all of the client nodes for high availability. However, to load balance the requests in addition to cluster security, you can use the power of Nginx.
For example, you have three client nodes with the IP addresses, 192.168.10.42, 192.168.10.43, and 192.168.10.44. The following is a sample configuration that will listen to your proxy server subdomain or the public IP address (can be a private IP if not an Internet-facing ES) and will distribute the load to the Elasticsearch clients in a round-robin fashion:
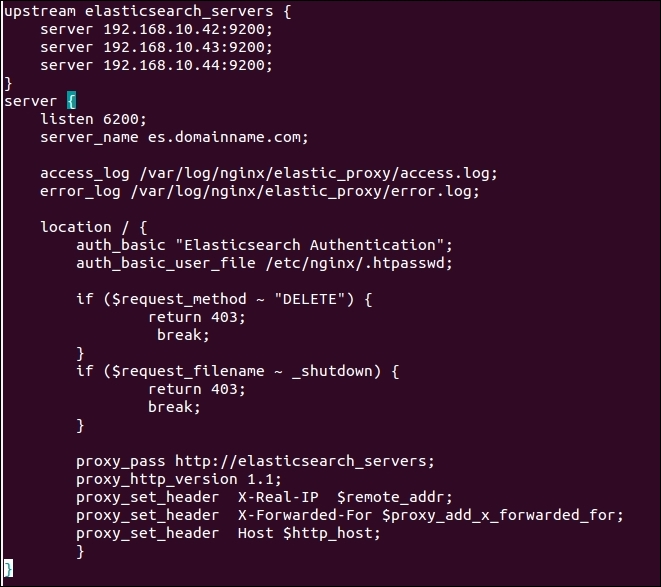
See the upstream directive in the preceding configuration template that holds all the IP and ports of the Elasticsearch clients using the elasticsearch_servers name. The proxy_pass directive now contains the name of the upstream directive instead of a single client address.
Nginx also provides options to load balance requests such as least connected, weighted, and session persistence. To use them, you can go through the load balancing guide of Nginx at http://nginx.org/en/docs/http/load_balancing.html and utilize them to give more power to your Elasticsearch cluster.