
9
Adding Audio-Visual Elements
In the previous chapter, we learned about the game UI and how to create and add a user interface (also known as a widget) to the screen.
In this chapter, we will learn how to add audio and particle effects to our game. Both of these aspects will increase the quality of our game and produce a much more immersive experience for the player.
Sound in video games can come in the form of either sound effects (also known as SFX) or music. Sound effects make the world around you more believable and alive, while the music helps set the tone for your game. Both these aspects are very important to your game.
In competitive games such as Counter-Strike: Global Offensive (CS: GO), sound is also extremely important because players need to hear the sounds around them, such as gunshots and footsteps, and which direction they came from, to gather as much information about their surroundings as possible.
In this chapter, we will cover the following topics:
- Audio in UE5
- Sound attenuation
- Understanding Particle Systems
- Exploring level design
- Extra features
Particle effects are important for the same reason that sound effects are important: they make your game world more believable and immersive.
Let’s start this chapter by learning how audio works in UE5.
Technical requirements
The project for this chapter can be found in the Chapter09 folder of the code bundle for this book, which can be downloaded here: https://github.com/PacktPublishing/Elevating-Game-Experiences-with-Unreal-Engine-5-Second-Edition.
Audio in UE5
One of the essential components of any game is sound. Sounds make your game more believable and immersive, which will provide a much better experience for your player. Video games usually have two types of sounds:
- 2D sounds
- 3D sounds
2D sounds don’t have any consideration for the listener’s distance and direction, while 3D sounds can be higher or lower in volume and pan to the right or left, depending on the player’s location. 2D sounds are usually used for music, while 3D sounds are usually used for sound effects. The main sound file types are .wav and .mp3.
Here are some of the assets and classes related to audio in UE5:
- Sound Base: Represents an asset that contains audio. This class is mainly used in C++ and Blueprint to reference an audio file that can be played.
- Sound Wave: Represents an audio file that has been imported into UE5. It inherits from Sound Base.
- Sound Cue: An audio asset that can contain logic related to things such as attenuation (how the volume changes as the listener’s distance varies), looping, sound mixing, and other audio-related functionality. It inherits from Sound Base.
- Sound Class: An asset that allows you to separate your audio files into groups and manage some of their settings, such as volume and pitch. An example of this would be grouping all your sounds related to sound effects in the SFX sound class, all your character dialog in the Dialog sound class, and so on.
- Sound Attenuation: An asset that allows you to specify how a 3D sound will behave; for example, at which distance it will start to lower the volume, at which distance it will become inaudible (can’t be heard), whether its volume will change linearly or exponentially as the distance increases, and so on.
- Audio Component: An actor component that allows you to manage the playback of audio files and their properties. This is useful for setting up continuous playback of sounds, such as background music.
Note
UE5 has a new audio system called Meta Sounds, which allows developers to create sounds using Digital Signal Processing (DSP). Because this topic is outside the scope of this book, we will not be covering this system. If you want to know more about the system and how it works, you can do so by going to
https://docs.unrealengine.com/5.0/en-US/AudioFeatures/MetaSounds/.
In UE5, we can import existing sounds the same way we would any other asset: either by dragging a file from Windows File Explorer into the Content Browser area or by clicking the Import button in the Content Browser area. We’ll do this in the next exercise.
Exercise 9.01 – Importing an audio file
In this exercise, you will import an existing sound file from your computer into UE5. This audio file will be played when the dodgeball bounces off a surface.
Note
If you don’t have an audio file (either a .mp3 or .wav file) available to complete this exercise, you can download the .mp3 or .wav file available at https://www.freesoundeffects.com/free-track/bounce-1-468901/.
Save this file as BOUNCE.wav.
Once you have an audio file, follow these steps:
- Open the editor.
- Go to the Content folder inside the Content Browser area and create a new folder called Audio:

Figure 9.1 – The Audio folder in the Content Browser area
- Go to the Audio folder you just created.
- Import your audio file into this folder. You can do this by dragging the audio file from Windows File Explorer into Content Browser.
- Once you’ve done this, a new asset should appear with the same name as your audio file, which you can listen to when clicking on it:
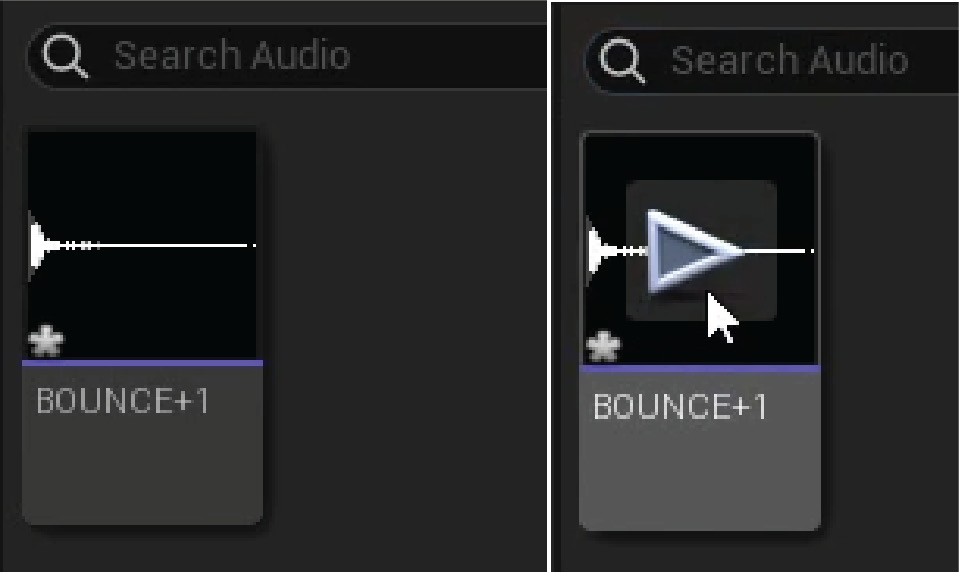
Figure 9.2 – The imported audio file
- Open this asset. You should see many properties available for editing. However, we’ll be focusing solely on some of the properties inside the Sound category:
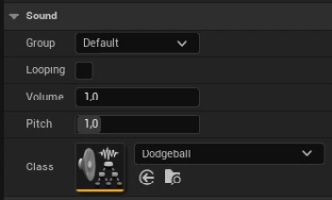
Figure 9.3 – The Sound asset’s settings
The following properties are available in the Sound category:
- Looping: Whether this sound will loop while being played.
- Volume: The volume of this sound.
- Pitch: The pitch of this sound. The higher the pitch, the higher the frequency, and the higher in tone this sound will be.
- Class: The sound class of this sound.
The only property we’ll be changing is the Class property. We could use one of the existing Sound classes that comes with UE5, but let’s create our own for the Dodgeball game to create a new group of sounds for our game.
- Go to the Audio folder inside the Content Browser area.
- Right-click, go to the Sounds category (the penultimate category), then the Classes category, and select Sound Class. This will create a new Sound Class asset. Rename this asset Dodgeball.
- Open your imported sound asset and set its Class property to Dodgeball:

Figure 9.4 – Changing the Class property to the Dodgeball Sound Class
Now that this imported sound asset belongs to a specific class, you can group other sound effects related to the dodgeball in the same Sound Class and edit their properties through that Sound Class, which includes Volume, Pitch, and many others.
And with that, we can conclude our exercise. You have learned how to import sounds into your project and how to change their basic properties. Now, let’s move on to the next exercise, where we’ll be playing a sound whenever a dodgeball bounces off a surface in our game.
Exercise 9.02 – Playing a sound when the dodgeball bounces off a surface
In this exercise, we will add the necessary functionality to our DodgeballProjectile class so that a sound will play when the dodgeball bounces off a surface.
To do this, follow these steps:
- Close the editor and open Visual Studio.
- In the header file for the DodgeballProjectile class, add a protected class USoundBase* property called BounceSound. This property should be a UPROPERTY and have the EditDefaultsOnly tag so that it can be edited in the Blueprint:
// The sound the dodgeball will make when it bounces off of a
surface
UPROPERTY(EditAnywhere, Category = Sound)
class USoundBase* BounceSound;
- Once you’ve done this, go to the DodgeballProjectile class’s source file and add an include for the GameplayStatics object:
#include "Kismet/GameplayStatics.h"
- Then, at the beginning of the class’s implementation of the OnHit function, before the cast to the DodgeballCharacter class, check whether our BounceSound is a valid property (different than nullptr) and whether the magnitude of the NormalImpulse property is greater than 600 units (we can access the magnitude by calling its Size function).
As we saw in Chapter 6, Setting Up Collision Objects, the NormalImpulse property indicates the direction and magnitude of the force that will change the dodgeball’s trajectory after it has been hit. The reason why we want to check whether its magnitude is greater than a certain amount is that when the dodgeball starts losing momentum and bounces off the floor several times per second, we don’t want to play BounceSound several times per second; otherwise, it will generate a lot of noise. So, we will check whether the impulse that the dodgeball is suffering is greater than that amount to make sure this doesn’t happen. If both these things are true, we’ll call the GameplayStatics object’s PlaySoundAtLocation. This function is responsible for playing 3D sounds. It receives five parameters:
- A world context object, which we’ll pass as the this pointer.
- A SoundBase property, which will be our HitSound property.
- The origin of the sound, which we’ll pass using the GetActorLocation function.
- VolumeMultiplier, which we’ll pass with a value of 1. This value indicates how much higher or lower the volume of this sound will be when it’s played. For instance, a value of 2 means it will have a volume twice as high.
- PitchMultiplier, which indicates how much higher or lower the pitch of this sound will be when it’s played. We’ll be passing this value by using the FMath object’s RandRange function, which receives two numbers as parameters and returns a random number between those two. To randomly generate a number between 0.7 and 1.3, we’ll be calling this function with these values as parameters.
Have a look at the following code snippet:
if (BounceSound != nullptr && NormalImpulse.Size() > 600.0f)
{
UGameplayStatics::PlaySoundAtLocation(this, BounceSound,
GetActorLocation(), 1.0f, FMath::RandRange(0.7f, 1.3f));
}
Note
The function responsible for playing 2D sounds is also available from the GameplayStatics object, and it’s called PlaySound2D. This function will receive the same parameters as the PlaySoundAtLocation function, except for the third parameter, which is the origin of the sound.
- Compile these changes and open Unreal Editor.
- Open the BP_DodgeballProjectile Blueprint, go to its Class Defaults tab, and set the BounceSound property to the Sound asset you imported:

Figure 9.5 – Setting the BounceSound property to our imported sound
- Play the level again and enter the enemy character’s line of sight. You should notice a sound playing with different pitch values every time the dodgeball that’s thrown by the enemy character hits a wall or the floor (not the player character):
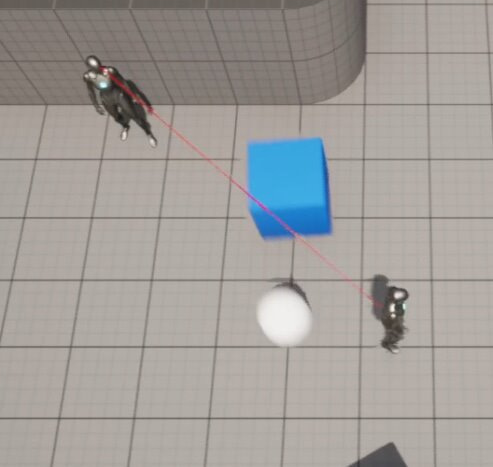
Figure 9.6 – The player character causing the enemy character to throw dodgeballs
If this happens, congratulations – you’ve successfully played a sound using UE5! If you can’t hear the sound playing, make sure that it is audible (it has a level of volume that you can hear).
However, another thing you’ll probably notice is that the sound is always played at the same volume, regardless of the distance that the character is from the dodgeball that is bouncing; the sound isn’t playing in 3D but rather in 2D. To play a sound in 3D using UE5, we’ll have to learn about Sound Attenuation assets.
Sound attenuation
For a sound to be played in 3D inside UE5, you’ll have to create a Sound Attenuation asset, as we mentioned previously. A Sound Attenuation asset will let you specify how you want a specific sound to change volume as its distance from the listener increases. Have a look at the following example.
Open Unreal Editor, go to the Audio folder inside the Content Browser area, right-click, go to the Sounds category, and select Sound Attenuation. Name this new asset BounceAttenuation:
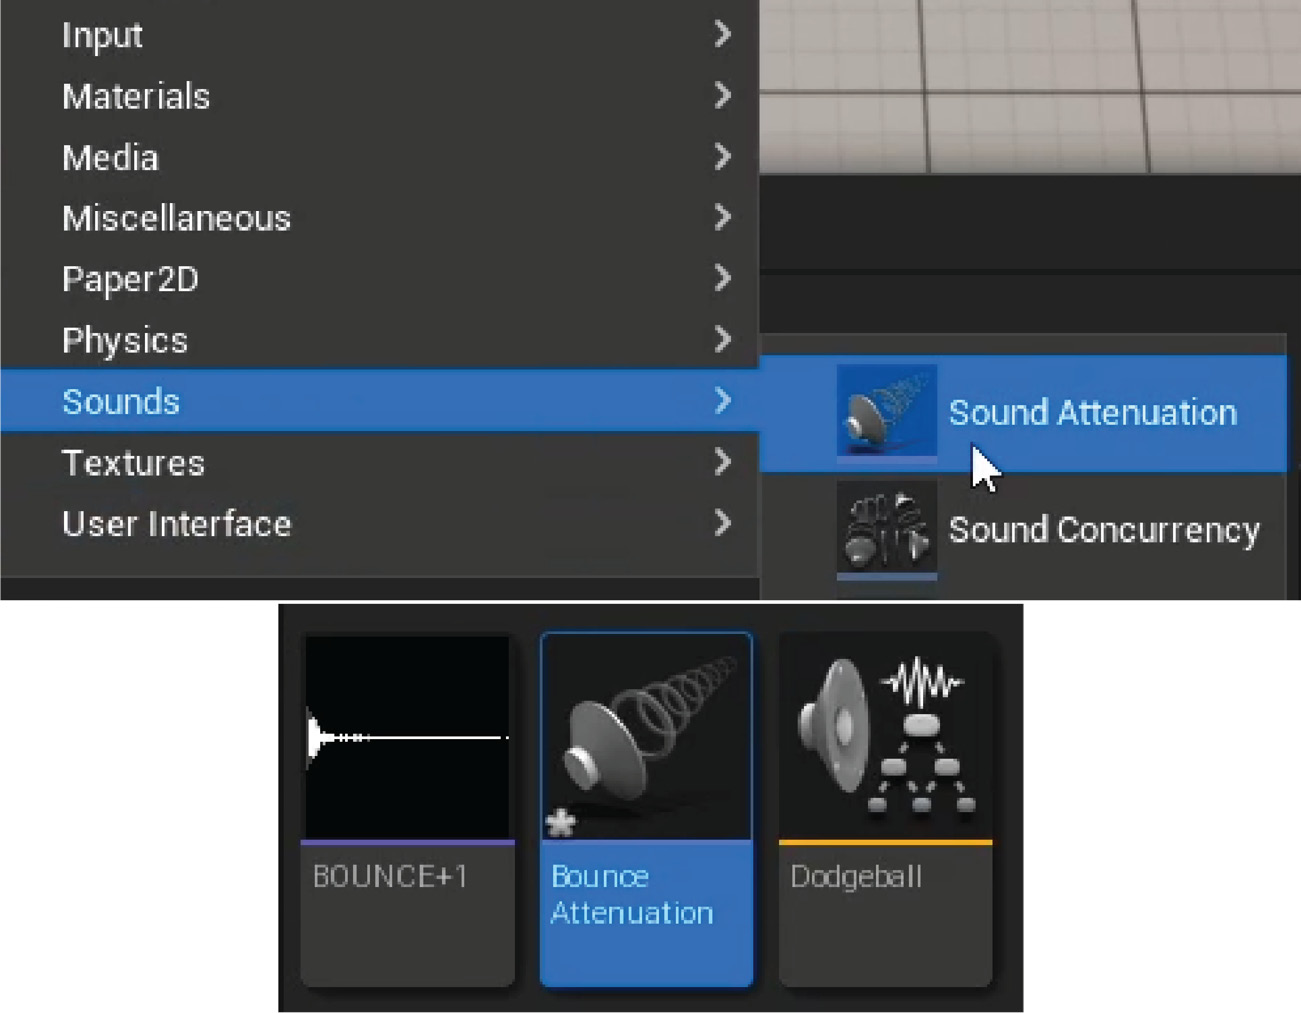
Figure 9.7 – Creating the Sound Attenuation asset
Open this BounceAttenuation asset.
Sound Attenuation assets have many settings; however, we’ll want to focus mainly on a couple of settings from the Attenuation Distance section:
- Inner Radius: This float property allows us to specify at what distance the sound will start lowering in volume. If the sound is played at a distance less than this value, the volume won’t be affected. Set this property to 200 units.
- Falloff Distance: This float property allows us to specify at what distance we want the sound to be inaudible. If the sound is played at a distance greater than this value, we won’t hear it. The volume of the sound will vary according to its distance to the listener and whether it’s closer to Inner Radius or Falloff Distance. Set this property to 1500 units:
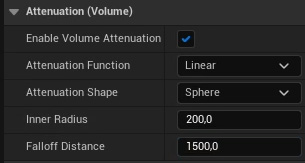
Figure 9.8 – The Sound Attenuation asset settings
Think of this as two circles around the player, with the smaller circle being the inner circle (with a radius value of Inner Radius) and the bigger circle being the falloff circle (with a radius value of Falloff Distance). If a sound originates from inside the inner circle, it is played at full volume, while a sound that originates from outside the falloff circle is not played at all.
Note
You can find more information on Sound Attenuation assets here: https://docs.unrealengine.com/en-US/Engine/Audio/DistanceModelAttenuation.
Now that you know about Sound Attenuation assets, let’s move on to the next exercise, where we’ll turn the sound that plays when the dodgeball bounces off the ground into a 3D sound.
Exercise 9.03 – Turning the bounce sound into a 3D sound
In this exercise, we’ll be turning the sound that plays when a dodgeball bounces off the ground, which we added in the previous exercise, into a 3D sound. This means that when the dodgeball bounces off a surface, the sound it plays will vary in volume, depending on its distance from the player. We’re doing this so that when the dodgeball is far away, the sound volume will be low, and when it’s close, its volume will be high.
To use the BounceAttenuation asset we created in the previous section, follow these steps:
- Go to the header file for DodgeballProjectile and add a protected class USoundAttenuation* property called BounceSoundAttenuation. This property should be a UPROPERTY and have the EditDefaultsOnly tag so that it can be edited in the Blueprint:
// The sound attenuation of the previous sound
UPROPERTY(EditAnywhere, Category = Sound)
class USoundAttenuation* BounceSoundAttenuation;
- Go to the DodgeballProjectile class’s implementation of the OnHit function in its source file and add the following parameters to the call to the PlaySoundAtLocation function:
- StartTime, which we’ll pass with a value of 0. This value indicates the time that the sound will start playing. If the sound lasts 2 seconds, we can have this sound start at its 1-second mark by passing a value of 1. We pass a value of 0 to have the sound play from the start.
- SoundAttenuation, to which we’ll pass our BounceSoundAttenuation property:
UGameplayStatics::PlaySoundAtLocation(this, BounceSound,
GetActorLocation(), 1.0f, 1.0f, 0.0f,
BounceSoundAttenuation);
Note
Although we only want to pass the additional SoundAttenuation parameter, we must pass all the other parameters that come before it as well.
- Compile these changes and then open the editor.
- Open the BP_DodgeballProjectile Blueprint, go to its Class Defaults tab, and set the BounceSoundAttenuation property to our BounceAttenuation asset:

Figure 9.9 – Setting the BounceSoundAttenuation property to the BounceAttenuation asset
- Play the level again and enter the enemy character’s line of sight. You should notice that the sound that plays every time the dodgeball thrown by the enemy character hits a wall or the floor will be played at different volumes, depending on its distance, and that you won’t hear it if the dodgeball is far away:

Figure 9.10 – The player character causing the enemy character to throw dodgeballs
With that, we can conclude this exercise. You now know how to play 3D sounds using UE5. We’ll add background music to our game in the next exercise.
Exercise 9.04 – Adding background music to our game
In this exercise, we will add game background music to our game. We will do this by creating a new Actor with an Audio component, which, as we mentioned earlier, is appropriate for playing background music. To achieve this, follow these steps:
- Download the audio file located at https://packt.live/3pg21sQ and import it into the Audio folder of the Content Browser area, just like we did in Exercise 9.01 – Importing an audio file.
- Right-click inside the Content Browser area and create a new C++ class with the Actor class as its parent class. Name this new class MusicManager.
- When the files for this class are generated and Visual Studio has opened automatically, close the editor.
- In the MusicManager class’s header file, add a new protected property of the class UAudioComponent* type called AudioComponent. Make this a UPROPERTY and add the VisibleAnywhere and BlueprintReadOnly tags:
UPROPERTY(VisibleAnywhere, BlueprintReadOnly)
class UAudioComponent* AudioComponent;
- In the MusicManager class’s source file, add an #include for the AudioComponent class:
#include "Components/AudioComponent.h"
- In the constructor for this class, change the bCanEverTick property to false:
PrimaryActorTick.bCanEverTick = false;
- After this line, add a new one that creates the AudioComponent class by calling the CreateDefaultSubobject function and passing the UAudioComponent class as a template parameter and “Music Component” as a normal parameter:
AudioComponent =
CreateDefaultSubobject<UAudioComponent>(TEXT("Music
Component"));
- After making these changes, compile your code and open the editor.
- Go to the ThirdPersonCPP | Blueprints folder in the Content Browser area and create a new Blueprint class that inherits from the MusicManager class. Name it BP_MusicManager.
- Open this asset, select its Audio component, and set that component’s Sound property to your imported sound:

Figure 9.11 – The Sound property being updated
- Drag an instance of the BP_MusicManager class into the level.
- Play the level. You should notice the music start playing when the game starts and it should also loop automatically when it reaches the end (this is done due to the Audio component).
Note
Audio components will automatically loop whatever sound they’re playing, so there’s no need to change that Sound asset’s Looping property.
With that, we’ve completed this exercise. You now know how to add simple background music to your game.
Now, let’s jump into the next topic, which is Particle Systems.
Understanding Particle Systems
Let’s talk about another very important element of many video games: Particle Systems.
In video game terms, a particle is essentially a position in a 3D space that can be represented with an image. A Particle System is a collection of many particles, potentially with different images, shapes, colors, and sizes. The following figure shows an example of two Particle Systems made in UE5:
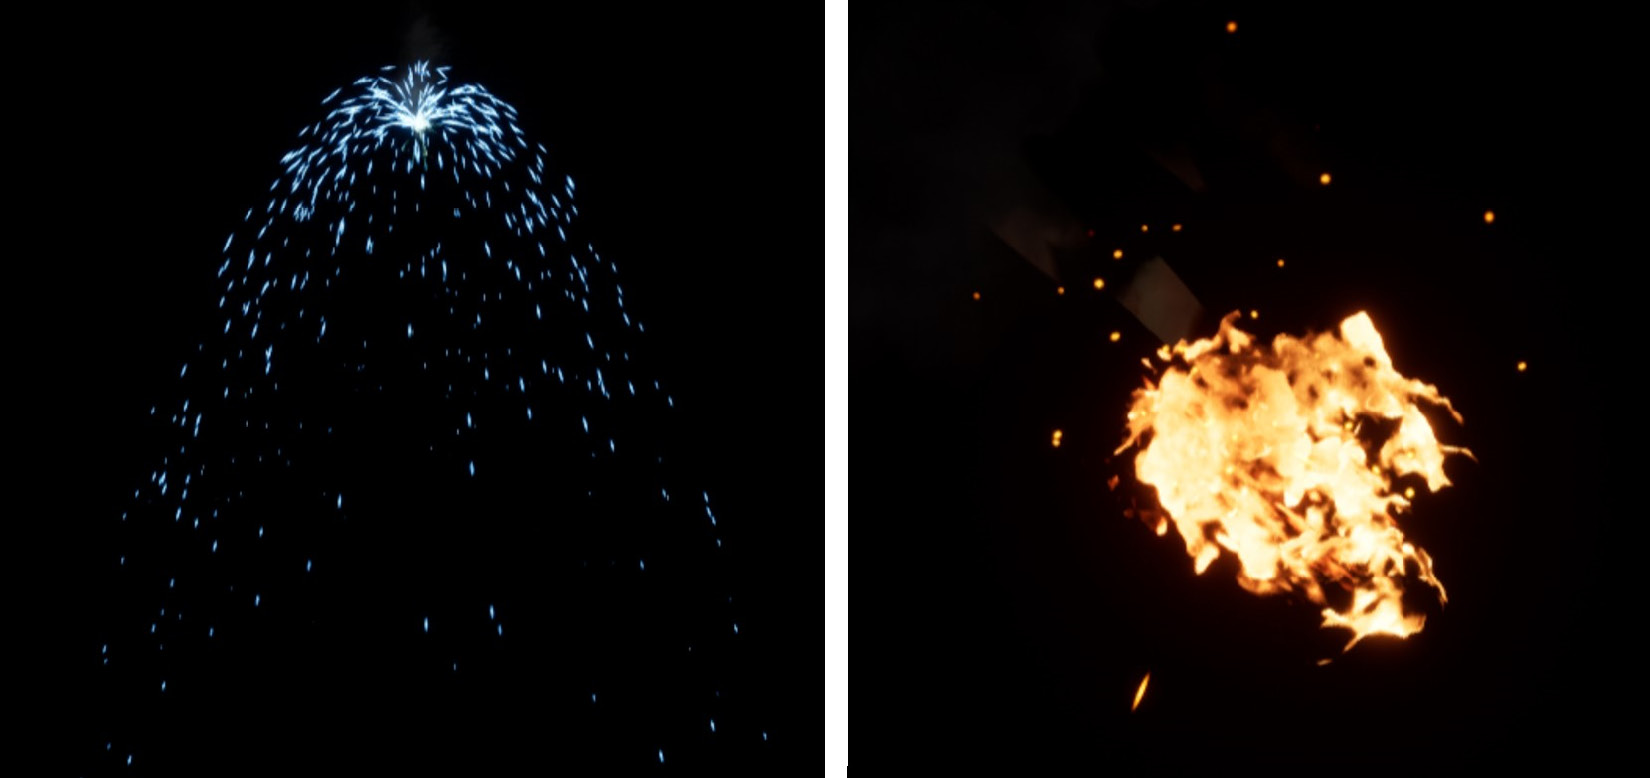
Figure 9.12 – Two different Particle Systems in UE5
The Particle System on the left is supposed to be electrical sparks that could come from a cable that has been sliced and is now in short-circuit, while the one on the right is supposed to be a fire. Although the particle system on the left is relatively simple, you can tell that the one on the right has more than one type of particle inside it, which can be combined in the same system.
Note
UE5 has two different tools for creating Particle Systems: Cascade and Niagara. Cascade has been present since the beginning of UE5, while Niagara is a system that is more recent and sophisticated and has only been production-ready since May 2020, as of Unreal Engine version 4.25.
Creating Particle Systems in UE5 is outside the scope of this book, but it is recommended that you use Niagara over Cascade, given that it is a more recent addition to the engine.
In this chapter, we will only be using Particle Systems that are already included in UE5, but if you want to create your own, these links will give you more information about both Cascade and Niagara:
Cascade:
https://docs.unrealengine.com/en-US/Engine/Rendering/ParticleSystems/Cascade
https://www.youtube.com/playlist?list=PLZlv_N0_O1gYDLyB3LVfjYIcbBe8NqR8t
Niagara:
https://docs.unrealengine.com/en-US/Engine/Niagara/EmitterEditorReference/index.html
https://docs.unrealengine.com/en-US/Engine/Niagara/QuickStart
We’ll learn how to add Particle Systems to our game in the next exercise. In this chapter, we will simply be using existing Particle Systems that were already made by the UE5 team.
Exercise 9.05 – Spawning a Particle System when the dodgeball hits the player
In this exercise, we will learn how to spawn a Particle System in UE5. In this case, we will be spawning an explosion Particle System when a dodgeball thrown by the enemy hits the player.
To achieve this, follow these steps:
- Close the editor and open Visual Studio.
- In the DodgeballProjectile class’s header file, add a protected class UParticleSystem* property called HitParticles.
The UParticleSystem type is the designation for a Particle System in UE5. Be sure to make this a UPROPERTY and give it the EditDefaultsOnly tag so that it can be edited in the Blueprint class:
// The particle system the dodgeball will spawn when it hits
the player
UPROPERTY(EditAnywhere, Category = Particles)
class UParticleSystem* HitParticles;
- In the DodgeballProjectile class’s source file, inside its implementation of the OnHit function, before the call to the Destroy function, check whether our HitParticles property is valid. If it is, call the GameplayStatics object’s SpawnEmitterAtLocation function.
This function will spawn an actor that will play the Particle System we pass as a parameter. It receives the following parameters:
- A World object, which we’ll pass using the GetWorld function
- A UParticleSystem* property, which will be our HitParticles property
- The FTransform of the actor that will play the Particle System, which we’ll pass using the GetActorTransform function:
if (HitParticles != nullptr)
{
UGameplayStatics::SpawnEmitterAtLocation(GetWorld(),
HitParticles, GetActorTransform());
}
Note
Although we won’t be using it in this project, there is another function related to spawning Particle Systems available from the GameplayStatics object, which is the SpawnEmitterAttached function. This function will spawn a Particle System and attach it to an actor, which might be useful if you want to, for instance, make a moving object light on fire so that the Particle System will always remain attached to that object.
- Compile these changes and open the editor.
- Open the BP_DodgeballProjectile Blueprint, go to its Class Defaults tab, and set the HitParticles property to the P_Explosion Particle System asset:

Figure 9.13 – Setting the HitParticles property to P_Explosion
- Now, play the level and let your player character get hit by a dodgeball. You should see the explosion Particle System being played:

Figure 9.14 – The explosion particle system being played when the dodgeball hits the player
And that concludes this exercise. You now know how to play Particle Systems in UE5. Particle Systems add visual flair to your game and make it more visually appealing.
In the next activity, we’ll be consolidating our knowledge of playing audio in UE5 by playing a sound when the dodgeball hits the player.
Activity 9.01 – Playing a sound when the dodgeball hits the player
In this activity, we will be creating the logic responsible for playing a sound every time the player character gets hit by a dodgeball. In a video game, it’s very important to transmit the player’s crucial information in many ways, so in addition to changing the player character’s health bar, we’ll also be playing a sound when the player gets hit so that the player knows that the character is taking damage.
To do this, follow these steps:
- Import a sound file that will be played when the player character gets hit into the Audio folder inside the Content Browser area.
Note
If you don’t have a sound file, you can use the one available at https://www.freesoundeffects.com/free-track/punch-426855/.
- Open the DodgeballProjectile class’s header file. Add a SoundBase* property, just like we did in Exercise 9.02 – Playing a sound when the dodgeball bounces off a surface, but this time, call it DamageSound.
- Open the DodgeballProjectile class’s source file. In the OnHit function’s implementation, once you’ve damaged the player character and before you call the Destroy function, check whether the DamageSound property is valid. If it is, call the GameplayStatics object’s PlaySound2D function (mentioned in Exercise 9.02 – Playing a sound when the dodgeball bounces off a surface), passing this and DamageSound as the parameters to that function call.
- Compile your changes and open the editor.
- Open the BP_DodgeballProjectile Blueprint and set its DamageSound property to the sound file you imported at the start of this activity.
When you play the level, you should notice that every time the player gets hit by a dodgeball, you will hear the sound you imported being played:
Figure 9.15 – A sound should play when the player character gets hit
And with those steps complete, you have finished this activity and consolidated the use of playing both 2D and 3D sounds in UE5.
Note
The solution for this activity can be found on https://github.com/PacktPublishing/Elevating-Game-Experiences-with-Unreal-Engine-5-Second-Edition/tree/main/Activity%20solutions.
Now, let’s wrap up this chapter by learning a bit about the concept of level design.
Exploring level design
Since Chapter 5, Query with Line Traces, which was related to our dodgeball game, we added a few game mechanics and gameplay opportunities, as well as some audio-visual elements, all of which were handled in this chapter. Now that we have all these game elements, we must bring them together into a level that can be played from start to finish by the player. To do that, let’s learn a bit about level design and level blockouts.
Level design is a specific game design discipline that focuses on building levels in a game. The goal of a level designer is to make a level that is fun to play, introduces new gameplay concepts to the player by using the game mechanics built for that game, contains good pacing (a good balance of action-packed and relaxed gameplay sequences), and much more.
To test the structure of a level, level designers must build what is called a level blockout. This is a very simple and boiled-down version of the level that uses most of the elements that the final level will contain, but it is made using only simple shapes and geometry. This is so that it will be easier and less time-consuming to modify the level in case parts of it need to be changed:

Figure 9.16 – An example of a level blockout made in UE5 using BSP Brushes
Note
It should be noted that level design is its own specific game development skill and is worthy of its own book, of which there are quite a few, but diving into this topic is outside the scope of this book.
In the next exercise, we will be building a simple level blockout using the mechanics we built in the last few chapters.
Exercise 9.06 – Building a level blockout
In this exercise, we will be creating a new level blockout that will contain some structure, where the player will start in a certain place in the level and have to go through a series of obstacles to reach the end of the level. We will be using all the mechanics and objects that we built in the last few chapters to make a level that the player will be able to complete.
Although we will be providing you with a solution in this exercise, you are encouraged to let your creativity loose and come up with a solution yourself, given that there is no right or wrong answer in this case.
To start this exercise, follow these steps:
- Open the editor.
- Go to the ThirdPersonCPP | Maps folder in the Content Browser area, duplicate the ThirdPersonExampleMap asset, and name it Level1. You can do this by either selecting the asset and pressing Ctrl + D or by right-clicking on the asset and selecting Duplicate (the third option). This may not be available in some situations, so you’ll have to do this by copying and pasting the existing level (Ctrl + C and Ctrl + V).
- Open the newly created Level1 map.
- Delete all the objects that have a mesh inside the map, except for the following:
- The PlayerStart object
- The enemy character (note that both characters will look the same)
- The floor object
- Both Wall objects that we created
- The VictoryBox object
Keep in mind that assets related to lighting and sound should remain untouched.
- Build the lighting for Level1 by pressing the Build button. This button is to the left of the Play button, in the Toolbar area at the top of the editor window.
- At this point, you should have an empty floor with just the objects you’ll be needing for this level (the ones mentioned in Step 4). Here’s the Level1 map before and after you followed Steps 4 and 5, respectively:

Figure 9.17 – Before deleting the required objects
Once you have deleted the objects, your floor should look as follows:
Figure 9.18 – After deleting the required objects
Because building a level, even a simple one, is something that takes a lot of steps and instructions, you will simply be shown a few screenshots of a possible level and, again, be encouraged to come up with your own.
- In this case, we have simply used the existing EnemyCharacter, Wall, and GhostWall objects and duplicated them several times to create a simple layout that the player can traverse from start to finish. We also moved the VictoryBox object so that it matches the new level’s end location:

Figure 9.19 – The created level – isometric view
The level can be seen in a top-down view too, as follows:

Figure 9.20 – The created level – top-down view with the player character marked with an arrow
Once you’re happy with the result, this means you have finished your dodgeball game and can now ask your friends and family to play it and see what they think. Great job – you are one step closer to mastering the art of game development!
Extra features
Before we conclude this chapter, here are some suggestions on what you can do next in this dodgeball project:
- Make it so that the normal Wall class we created in Chapter 6, Setting Up Collision Objects, doesn’t block the enemy’s line of sight. This way, the enemy will always throw dodgeballs at the player, which should still be blocked from going through this wall.
- Add a new feature that will allow the player to visualize where the dodgeball thrown by the enemy character will impact first, using the concept of Sweep Traces.
- Add a new type of wall that blocks the player character, the enemy character, and the dodgeballs, but that also takes damage from dodgeballs and gets destroyed when it runs out of health points.
There is a whole world of possibilities for expanding the scope of this project. You are encouraged to use the skills you’ve learned and do further research to build new features and add more complexity to your game.
Summary
You have now completed the dodgeball game project. In this chapter, you learned how to add polish to your game by playing audio and using Particle Systems. You now know how to add 2D and 3D sounds to your game, as well as some of the tools at your disposal regarding that. Now, you can try to add even more sound effects to your game, such as a special sound effect for when an enemy character sees you for the first time (such as in Metal Gear Solid), a footstep sound effect, or a victory sound effect.
You also built a level using all the tools that you have made throughout the last few chapters, thus culminating all the logic we have built in this project.
In the next chapter, we’ll be starting a new project: the SuperSideScroller game. In that project, you’ll be introduced to such topics as power-ups, collectibles, enemy artificial intelligence (AI), character animation, and much more. You will be creating a side-scrolling platform game where you control a character that must complete a level, collect gems, and use power-ups to avoid the enemies. The two most important topics you will learn about are UE5’s behavior trees and Blackboards, which fuel the AI system, and Animation Blueprints, which allow you to manage your character’s animations.