
2
Working with Unreal Engine
In the previous chapter, we went through the basics of the Epic Games Launcher, along with Unreal Editor fundamentals. We learned how to work with objects and what Blueprints are at a basic level, in addition to exploring the First Person template. In this chapter, we’ll be building upon those fundamentals by exploring the Third Person template and working with input and animations.
Game development can be done in a wide variety of languages, such as C, C++, Java, C#, and even Python. While each language has pros and cons, we will be using C++ throughout this book as it is the primary programming language that’s used within Unreal Engine.
In this chapter, we will get you up to speed on how to create a C++ project and perform basic-level debugging in UE5. It is very important to be able to debug code as it helps the developer while dealing with bugs. The tools provided come in very handy and are essential for any Unreal Engine developer.
Following this, we will get up close and personal with the core classes involved in creating games and experiences in Unreal Engine. You will explore Game Mode and the relevant class concepts, followed by an exercise to gain a hands-on understanding of this.
The final section in this chapter is all about animations. Almost every single game features animations, some to a very basic extent, but some to a very high level, which includes captivating details that are key to the gameplay experience. Unreal Engine offers several tools you can use to create and deal with animations, including the Animation Blueprint, which provides complex graphs, and a State Machine.
This chapter will focus on many of the basic concepts and features within Unreal Engine. You will be shown how to create a C++ project, how to perform some basic debugging, and how to work with character-specific animations.
In this chapter, we’ll cover the following topics:
- Creating and setting up a blank C++ project
- The Content folder’s structure in Unreal Engine
- Working with the Visual Studio solution
- Importing the required assets
- The Unreal Game Mode class
- Understanding levels and the Level Blueprint
- Animations
By the end of this chapter, you’ll be able to create C++ template projects and debug code within Visual Studio, understand the folder structure and the best practices involved, and be able to set up character animations based on their states.
Technical requirements
This chapter has the following technical requirements:
- UE5 installed
- Visual Studio 2019 installed
- The complete code for this chapter can be downloaded from this book’s GitHub repository at https://github.com/PacktPublishing/Elevating-Game-Experiences-with-Unreal-Engine-5-Second-Edition.
Creating and setting up a blank C++ project
At the start of every project, you may want to start with any of the templates provided by Epic (which contain ready-to-execute basic code) and build on top of that. Most/some of the time, you may need to set up a blank or empty project that you can mold and sculpt to your requirements. We’ll learn how to do that in the following exercise.
Exercise 2.01 – creating an empty C++ project
In this exercise, you will learn how to create an empty C++ project from the template provided by Epic. This will serve as the foundation for many of your future C++ projects.
Follow these steps to complete this exercise:
- Launch UE5 from the Epic Games Launcher.
- Click on the BLANK PROJECT section and click Blank.
- Under the Project Defaults section on the right pane, select C++.
Note
Make sure that the project folder and project name are specified with an appropriate directory and name, respectively.
- When everything is set up, click on the Create button. In this case, our project directory is inside a folder called UnrealProjects, which is inside the E drive. The project name is set to MyBlankProj (it is recommended that you use these names and project directories, but you can use your own if you wish to do so).
Note
The project name cannot have any spaces in it. It is preferable to have an Unreal directory as close to the root of a drive as possible (to avoid running into issues such as the 256-character path limit when creating or importing assets into your project’s working directory; for small projects, it may be fine, but for more large-scale projects, where the folder hierarchy may become too complex, this step is important).
- After it’s done generating the code and creating the project files, the project will open, along with its Visual Studio solution (.sln) file.
Make sure that the Visual Studio solution configuration is set to Development Editor and that the solution platform is set to Win64 for desktop development:
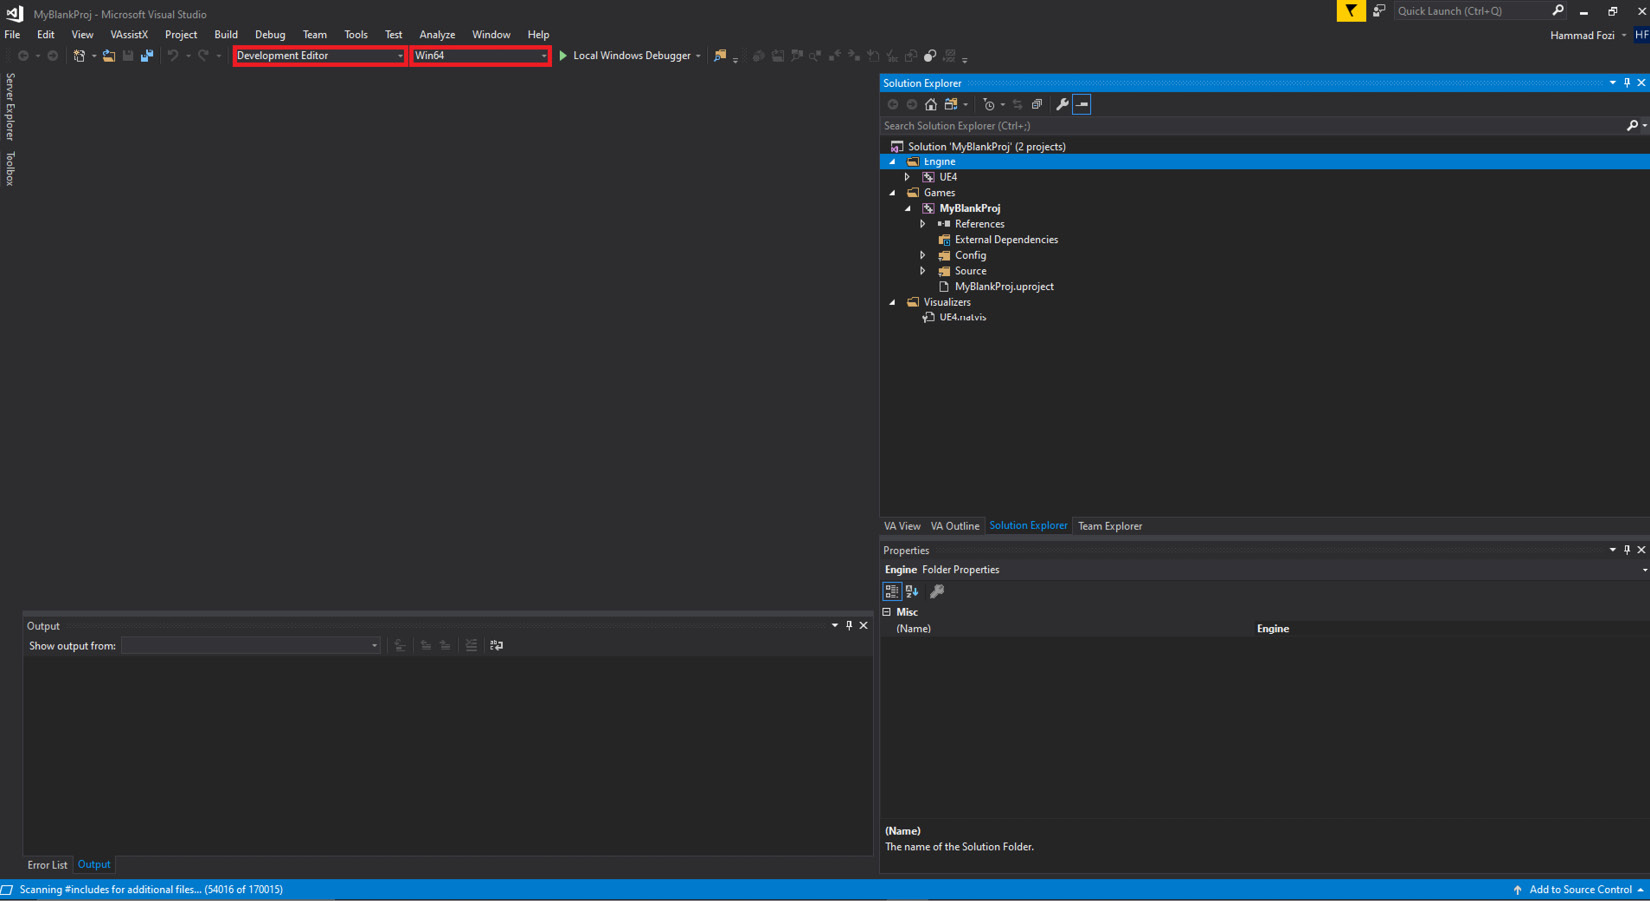
Figure 2.1 – Visual Studio deployment settings
By completing this exercise, you know how to create an empty C++ project on UE5, along with its considerations.
In the next section, we’ll talk about the folder structure, along with the most basic and most used folder structure format that’s used by Unreal developers.
The Content folder’s structure in Unreal Engine
In your project directory (in our case, E:/UnrealProjects/MyBlankProj), you will see a Content folder. This is the primary folder that your project uses for different types of assets and project-relevant data (including Blueprints). The C++ code goes into the Source folder in your project. Please note that the best practice is to create new C++ code files directly through the Unreal Editor as this simplifies the process and results in fewer errors.
There are many different strategies you can use to organize the data inside your Content folder. The most basic and easy-to-understand is using folder names to depict the type of content inside. Therefore, a Content folder directory structure may resemble the example at https://github.com/PacktPublishing/Game-Development-Projects-with-Unreal-Engine/blob/master/Chapter02/Images/06New.png. In this example, you can see that each file is categorically placed under the name of the folder representing its type at the first level, with the following levels further grouping it into meaningful folders.
Note
All Blueprints should prefix BP to their name (to differentiate them from the default blueprints used by Unreal Engine). The rest of the prefixes are optional (however, it is best practice to format them with the prefixes shown earlier).
In the next section, we will look at the Visual Studio solution.
Working with the Visual Studio solution
Every C++ project in Unreal Engine has a Visual Studio solution. This, in turn, drives all the code and allows developers to set up execution logic and debug code in its running state.
Solution Analysis
The Visual Studio solution (.sln) file that’s produced inside the project directory contains the entire project and any associated code that’s been added to it.
Let’s have a look at the files present in Visual Studio. Double-click the .sln file to open it within Visual Studio.
In Solution Explorer, you will see two projects called Engine and Games.
The Engine Project
At the base level, Unreal Engine itself is a Visual Studio project and has a solution file. This contains all the code and third-party integrations that work together in Unreal Engine. All the code within this project is called the source code.
The Engine project consists of the external dependencies, configurations, plugins, shaders, and source code of Unreal Engine that are currently being used for this project. You can, at any time, browse the UE5 | Source folder to view any of the engine code.
Note
As Unreal Engine is open source, Epic allows developers to both view and edit source code to suit their needs and requirements. However, you cannot edit the source code in the version of Unreal Engine that’s installed via the Epic Games Launcher. To be able to make and build changes in source code, you need to download the source version of Unreal Engine, which can be found via GitHub. You can use the following guide to download the source version of Unreal Engine: https://docs.unrealengine.com/en-US/GettingStarted/DownloadingUnrealEngine/index.html.
After downloading, you can also refer to the following guide to compile/build the newly downloaded engine: https://docs.unrealengine.com/en-US/Programming/Development/BuildingUnrealEngine/index.html.
Game Project
Under the Games directory is the solution folder that’s named after your project. Upon expansion, you’ll find a set of folders. You will need to understand the following ones:
- Config folder: This folder carries all the configurations that have been set up for the project and the build (these can optionally have platform-specific (such as Windows, Android, iOS, Xbox, or PlayStation) settings as well).
- Plugins folder: This is an optional folder that’s created when you add any third-party plugin (downloaded from the Epic Marketplace or obtained through the internet). This folder will contain all of the source code of the plugins associated with this project.
- Source folder: This is the primary folder we’re going to be working with. It will contain the Build Target files, as well as all the source code for the project. The following is a description of the default files in the source folder:
- Target and Build Files: These (as shown in Figure 2.2) contain code that specifies the Unreal Build Tool (the program that builds your game) that you will use to build your game. It contains any extra modules that need to be added to the game, as well as other build-related settings. By default, there are two target files (one for Unreal Editor and another for the build, as depicted by their names), which end with the .Target.cs extension, and one build file that ends with Build.cs.
- ProjectName code files (.cpp and .h): By default, these files are created for each project and contain the code that’s used to run the default game module code.
- ProjectNameGameModeBase code files (.cpp and .h): By default, an empty Project Game Mode Base is created. It’s not used in most cases.
- ProjectName.uproject file: This file contains the descriptors used to provide basic information about the project and the list of plugins associated with it.
Debugging code in Visual Studio
Visual Studio provides powerful debugging features with the help of breakpoints in code. This allows users to pause the game at a particular line of code so that the developer can see the current values of variables and step through the code and game in a controlled fashion (they can proceed line by line, function by function, and so on).
This is useful when you have a lot of variables and code files in your game project, and you want to see the values of the variables being updated and used in a step-by-step fashion to debug the code, find out what issues there are, and solve them. Debugging is a fundamental process of any developer’s work, and only after many continuous debugging, profiling, and optimization cycles does a project get polished enough for deployment.
Now that you’ve got the basic idea of the Visual Studio solution, we’ll move on and cover a practical exercise on it.
Exercise 2.02 – debugging the Third Person template code
In this exercise, you’ll be creating a project using the Third Person template of Unreal Engine and debugging the code from within Visual Studio. We’ll be investigating the value of a variable called BaseTurnRate in the Character class of this template project. We’ll learn how the value updates as we move through the code, line by line.
Follow these steps to complete this exercise:
- Launch Unreal Engine from the Epic Games Launcher.
- Click on the Games section and click Next.
- Select Third Person and click Next.
- Select C++, set the project’s name to ThirdPersonDebug, and click the Create Project button.
- Now, close Unreal Editor, go to the Visual Studio solution, and open the ThirdPersonDebugCharacter.cpp file:
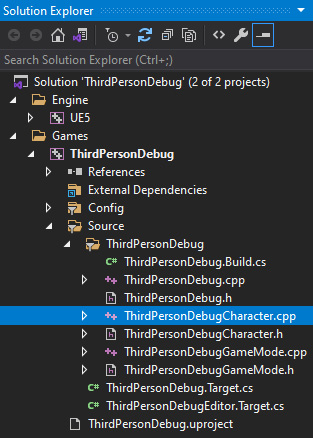
Figure 2.2 – The ThirdPersonDebugCharacter.cpp file’s location
- Left-click on the bar on the left-hand side of line 18. A red dot icon should appear on it (you can toggle it off by clicking on it again):

Figure 2.3 – Collision capsule init code
- Here, we are getting the capsule component (explained further in Chapter 3, Character Class Components and Blueprint Setup) of the character, which, by default, is the root component. Then, we are calling its InitCapsuleSize method, which takes in two parameters: the InRadius float and the InHalfHeight float, respectively.
- Make sure that the solution configuration setting in VS is set to Development Editor and click on the Local Windows Debugger button:
Figure 2.4 – Visual Studio build settings
- Wait until you’re able to see the following window in the bottom-left corner:
Note
If the window doesn’t pop up, you can open the window manually by opening Autos under Debug | Windows | Autos. Additionally, you may also use locals.

Figure 2.5 – Visual Studio variable watch window
this shows the object itself. The object contains variables and methods that it stores, and by expanding it, we’re able to see the state of the entire object and its variables at the current line of code execution.
- Expand this, then ACharacter, and then CapsuleComponent. Here, you can see the values for the CapsuleHalfHeight = 88.0 and CapsuleRadius = 34.0 variables. Next to line 18, where the red dot initially was, you will see an arrow. This means that the code is at the end of line 17 and has not executed line 18 yet.
- Click the Step Into button to go to the next line of code (shortcut: F11). Step Into will move into code inside the function (if present) on the line. On the other hand, Step Over will just execute the current code and move to the next line. Since there is no function on the current line, Step Into will mimic the Step Over functionality:
Figure 2.6 – Debug step into
- Notice that the arrow has moved to line 21 and that the variables have been updated. CapsuleHalfHeight = 96.0 and CapsuleRadius = 42.0 are highlighted in red. Also, notice that the BaseTurnRate variable has been initialized to 0.0:
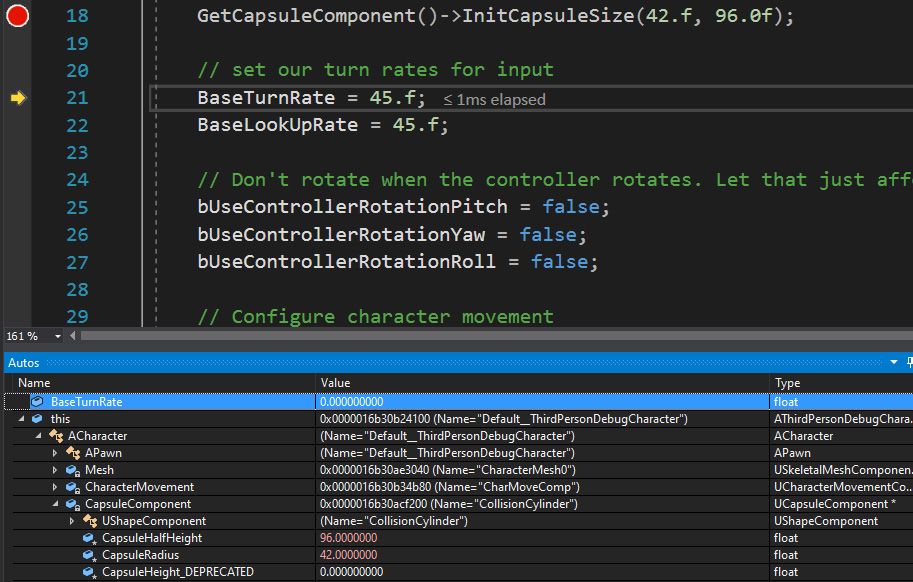
Figure 2.7 – BaseTurnRate initial value
- Step in (F11) once again to go to line 22. Now, the BaseTurnRate variable has a value of 45.0, and BaseLookUpRate has been initialized to 0.0, as shown in the following screenshot:

Figure 2.8 – BaseTurnRate updated value
- Step in (F11) once again to go to line 27. Now, the BaseLookUpRate variable has a value of 45.0.
Similarly, you are encouraged to step in and debug other sections of the code to not only familiarize yourself with the debugger but also to understand how the code works behind the scenes.
By completing this exercise, you’ve learned how to set up debug points in Visual Studio, as well as stop debugging at a point, and then continue line by line while watching an object and its variable’s values. This is an important aspect for any developer, and many often use this tool to get rid of pesky bugs within code, especially when there are a lot of code flows and the number of variables is quite large.
At any point, you can stop debugging, restart debugging, or continue with the rest of the code by using the buttons on the top menu bar, as shown here:
Figure 2.9 – Debugging tools in Visual Studio
Now, we’ll look at importing assets into an Unreal project.
Importing the required assets
Unreal Engine allows users to import a wide range of file types for users to customize their projects. There are several import options that developers can tweak and play around with to match their required settings.
Some common file types that game developers often import are FBX for scenes, meshes, animations (exported from Maya and other similar software), movie files, images (mostly for the user interface), textures, sounds, data in CSV files, and fonts. These files may be obtained from the Epic Marketplace or any other means (such as the internet) and used within the project.
Assets can be imported by dragging and dropping them into the Content folder, or by clicking the Import button in the Content Browser area.
Now let’s tackle an exercise where we’ll learn how to import FBX files and see how this is done.
Exercise 2.03 – importing a character FBX file
This exercise will focus on importing a 3D model from an FBX file. FBX files are widely used to export and import 3D models, along with their materials, animations, and textures.
Follow these steps to complete this exercise:
- Download the SK_Mannequin.FBX, ThirdPersonIdle.FBX, ThirdPersonRun.FBX, and ThirdPersonWalk.FBX files from the Chapter02 | Exercise2.03 | ExerciseFiles directory, which can be found on GitHub.
Note
The ExerciseFiles directory can be found on GitHub at https://github.com/PacktPublishing/Game-Development-Projects-with-Unreal-Engine/tree/master/Chapter02/Exercise2.03/ExerciseFiles.
- Open the blank project we created in Exercise 2.01 – creating an empty C++ project.
- In the Content Browser area of the project, click Import:

Figure 2.10 – The Content Browser area’s Import button
- Browse to the directory of the files we downloaded in Step 1, select SK_Mannequin.FBX, and click on the Open button.
- Make sure that the Import Animations button is unchecked and click the Import All button. You may get a warning here stating that There are no smoothing groups. You can ignore this for now. With that, you have successfully imported a skeletal mesh from an FBX file. Now, we need to import its animations.
- Click the Import button again, browse to the folder we created in Step 1, and select ThirdPersonIdle.fbx, ThirdPersonRun.fbx, and ThirdPersonWalk.fbx. Then, click on the Open button.
- Make sure that the skeleton is set to the one you imported in Step 5 and click Import All:

Figure 2.11 – FBX Import Options
- Now, you will see the three animations (ThirdPersonIdle, ThirdPersonRun, and ThirdPersonWalk) inside the Content Browser area.
- If you double-click on ThirdPersonIdle, you’ll notice that the left arm is hanging down. This means that there’s a retargeting issue. When the animations are imported separately from the skeleton, the Unreal Engine internally maps all the bones from the animation to the skeleton. However, sometimes, that results in a glitch. Let’s resolve this:

Figure 2.12 – ThirdPersonIdle UE4 mannequin animation glitch
- Open the SK_Mannequin Skeletal Mesh and open the Skeleton Tree tab if it wasn’t opened previously:

Figure 2.13 – SK_Mannequin Skeleton Tree tab

Figure 2.14 – Show Retargeting Options
- Now, inside the skeleton tree, reduce the spine_01, thigh_l, and thigh_r bones to enable better visibility.
- Now, select the spine_01, thigh_l, and thigh_r bones. Right-click on them and, in the menu, click the Recursively Set Translation Retargeting Skeleton button. This will fix the bone translation issues we encountered previously.
- Re-open the ThirdPersonIdle animation to verify the hanging arm has been fixed:

Figure 2.15 – Fixed ThirdPersonIdle animation
Note
You can find the complete exercise code files on GitHub in the Chapter02 | Exercise2.03 | Ex2.03-Completed.rar directory by going to the following link: https://packt.live/2U8AScR.
After extracting the .rar file, double-click the .uproject file. You will see a prompt asking Would you like to rebuild now?. Click Yes on that prompt so that it can build the necessary intermediate files, after which it should open the project in Unreal Editor automatically.
By completing this exercise, you’ve understood how to import assets and, more specifically, imported an FBX skeletal mesh and animation data into your project. This is crucial for the workflows of many game developers as assets are the building blocks of the entire game.
In the next section, we’ll look at the Unreal core classes for creating a game, how important they are for creating a game or experience, and how to use them inside a project.
The Unreal Game Mode class
Consider a situation where you want to be able to pause your game. All the logic and implementation that’s required to be able to pause the game will be placed inside a single class. This class will be responsible for handling the game flow when a player enters the game. The game flow can be any action or a set of actions that occur in the game. For example, game pause, play, and restart are considered simple game flow actions. Similarly, in the case of a multiplayer game, we require all the network-related gameplay logic to be placed together. This is exactly what the Game Mode class is there for.
Game Mode is a class that drives the game logic and imposes game-related rules on players. It essentially contains information about the current game being played, including gameplay variables and events, which will be mentioned later in this chapter. Game Mode can hold all the managers of the gameplay objects, it’s a singleton class, and it can be accessed by any object or abstract class present in the game.
As with all the other classes, the Game Mode class can be extended in Blueprints or C++. This can be done to include extra functionality and logic that may be required to keep players updated about what’s happening inside the game.
Let’s go over some example game logic that goes inside the Game Mode class:
- Limiting the number of players that are allowed to enter the game
- Controlling the Spawn location and Player Controller logic of newly connected players
- Keeping track of the Game Score
- Keeping track of the Game Win/Lose condition
- Implementing the Game Over/Restart Game scenario
In the next section, we will look at the default classes provided by Game Mode.
Game Mode default classes
In addition to itself, Game Mode uses several classes to implement game logic. It allows you to specify classes for its following defaults:
- Game Session Class: Handles admin-level game flow such as login approval.
- Game State Class: Handles the state of the game so that clients can see what’s going on inside the game.
- Player Controller Class: The main class that’s used to possess and control a pawn. It can be thought of as a brain that decides what to do.
- Player State Class: Holds the current state of a player inside the game.
- HUD Class: Handles the user interface shown to the player.
- Default Pawn Class: The main actor that the player controls. This is essentially the player character.
- Spectator Class: Being a subclass of the DefaultPawn class, the SpectatorPawn class specifies the pawn responsible for spectating the game.
- Replay Spectator Player Controller: The Player Controller that’s responsible for manipulating the replay during playback, within the game.
- Server Stat Replicator Class: Responsible for replicating server stat net data.
You can either use the default classes as-is or you can specify your own for custom implementation and behavior. These classes will work in conjunction with Game Mode and will automatically run without being placed inside the world.
Gameplay events
In terms of a multiplayer game, when many players enter the game, it becomes essential to handle logic to allow them to enter the game and maintain their state, as well as viewing other players’ states and handling their interactions.
Game Mode provides you with several events that can be overridden to handle such multiplayer gameplay logic. The following events are especially useful for networking features and abilities (which they are mostly used for):
- On Post Log In: This event is called after the player is logged into the game successfully. From this point onward, it is safe to call replicated logic (used for networking in multiplayer games) on the Player Controller class.
- Handle Starting New Player: This event is called after the On Post Log In event and can be used to define what happens to the newly entered player. By default, it creates a pawn for the newly connected player.
- SpawnDefaultPawnAtTransform: This event triggers the actual pawn spawning within the game. Newly connected players can be spawned at particular transforms or at preset player start positions placed within the level (which can be added by dragging and dropping the Player Start from the Models window into the world).
- On Logout: This event is called when a player leaves the game or is destroyed.
- On Restart Player: This event is called to respawn the player. Similar to SpawnDefaultPawnAtTransform, the player can be respawned at specific transforms or pre-specified locations (using the player start position).
Networking
The Game Mode class is not replicated to any clients or joined players. Its scope is only limited to the server where it is spawned. Essentially, the client-server model dictates that the clients only act as inputs within the game that is being played on the server. Therefore, the gameplay logic should not exist for the clients; it should only exist for the server.
GameModeBase versus Game Mode
From version 4.14 onward, Epic introduced the AGameModeBase class, which acts as the parent class for all Game Mode classes. It is essentially a simplified version of the AGameMode class.
However, the Game Mode class contains some additional functionality that is better suited for multiplayer shooter-type games as it implements the Match State concept. By default, the Game Mode Base is included in new template-based projects.
Game Mode also contains a State Machine that handles and keeps track of the player’s state.
Now that you have some understanding of Game Mode and its relevant classes, in the next section, you will learn about levels and the Level Blueprint, and how they tie to the Game Mode class.
Understanding levels and the Level Blueprint
Levels, in gaming, are sections or parts of a game. Since many games are quite large, they are broken down into different levels. A level of interest is loaded into the game for the player to play. When they are done with that level, another level may be loaded in (while the current one will be loaded out) so that the player can proceed. To complete a game, a player usually needs to complete a set of specific tasks to move on to the next level, eventually completing the game.
A Game Mode can be directly applied to the level. The level, upon loading, will use the assigned Game Mode class to handle all the logic and gameplay for that particular level and override the game mode of the project for this level. This can be applied using the World Settings tab after opening a level.
A Level Blueprint is a Blueprint that runs within the level, but cannot be accessed outside the scope of the level. Game Mode can be accessed in any blueprint (including the Level Blueprint) by the Get Game Mode node. This can later be cast to your Game Mode class, to obtain a reference to it.
Note
A level can only have one Game Mode class assigned to it. However, a single Game Mode class can be assigned to multiple levels to imitate similar functionality and logic.
The Unreal Pawn class
The Pawn class, in Unreal, is the most basic class of actors that can be possessed (either by a player or AI). It also graphically represents the player/bot in the game. Code inside this class should have everything to do with the game entities, including interaction, movement, and ability logic. The player can still only possess a single pawn at any time in the game. Also, the player can unpossess one pawn and possess another pawn during gameplay.
The DefaultPawn class
Unreal Engine gives developers a DefaultPawn class (which inherits from the base Pawn class). On top of the Pawn class, this class contains additional code that allows it to move within the world, as you would in the editor version of the game.
The Spectator Pawn class
Some games offer features to spectate games. Let’s say you’re waiting for a friend to finish their game before joining you, so you go ahead and spectate their game. This allows you to observe the game the player is playing, through a camera that you can move around to get a view of the players or the game. Some games also offer spectate modes that can travel back in time, to show a particular action of the game that happened in the past or at any point in the game.
As the name suggests, this is a special type of pawn that provides sample functionality to spectate a game. It contains all the basic tools (such as the Spectator Pawn Movement component) required to do so.
The Unreal Player Controller class
The Player Controller class can be thought of as the player. It is essentially the soul of a pawn. A Player Controller takes input from the user and feeds it to the pawn and other classes for the player to interact with the game. However, you must take note of the following points while dealing with this class:
- Unlike the pawn, there can only be one Player Controller that the player represents in a level. (This is just like when you travel in an elevator. While inside one, you can only control that elevator, but you can then exit it and enter another elevator to control that one.)
- The Player Controller persists throughout the game, but the pawn may not (for example, in a battle game, the player character may die and respawn, but the Player Controller would remain the same).
- Due to the temporary nature of the pawn and the permanent nature of the Player Controller, developers need to keep in mind which code should be added to which class.
Let’s understand this better through the next exercise.
Exercise 2.04 – setting up the Game Mode, Player Controller, and Pawn classes
This exercise will use the blank project we created in Exercise 2.01 – creating an empty C++ project. We’ll be adding our Game Mode, Player Controller, and Pawn classes to the game and testing if our code works in Blueprints.
Follow these steps to complete this exercise:
- Open the project we created in Exercise 2.01 – creating an empty C++ project.
- Right-click inside the Content Browser area and select Blueprint Class.
- Under the ALL CLASSES section, find and select Game Mode:

Figure 2.16 – Selecting the Game Mode class
- Set its name to BP_MyGameMode.
- Repeat steps 2 to 4 and select the Pawn class from under the Common Classes section, as shown in the preceding screenshot. Set the name of this class to BP_MyPawn.
- Repeat steps 2 to 4 and select the Player Controller class under the Common Classes section, as shown in the preceding screenshot. Set the name of this class to BP_MyPC:

Figure 2.17 – Game Mode, Pawn, and Player Controller names
- Open BP_MyGameMode and open the Event Graph tab:
Figure 2.18 – The Event Graph tab in Blueprint
- Left-click and drag from the white pin in the Event BeginPlay node and then release the left mouse button to open the Options menu. Type print and select the print node highlighted in the list:

Figure 2.19 – The Print String node (Blueprint)
- In the resultant Print String node that gets placed under the In String parameter, type My Game Mode has started!.
- Now, press the Compile and Save buttons on the top menu bar.
- Repeat steps 7 to 10 for both the BP_MyPawn and BP_MyPC classes, setting the In String parameter to My Pawn has started! and My PC has started!, respectively.
- Finally, open the World Settings tab by clicking Settings on the right of the editor and clicking on World Settings:

Figure 2.20 – World Settings
- Under the Game Mode section, use the dropdown to set the GameMode Override, Default Pawn Class, and Player Controller Class options to our respective classes:

Figure 2.21 – World Settings and Game Mode setup
- Click Play to play your game and see the three print statements on the top. This means that the current GameMode Override, Default Pawn Class, and Player Controller Class options have been set to your specified classes and are running their code:
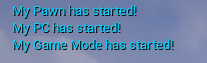
Figure 2.22 – Output prints
Note
You can find the completed exercise code files on GitHub, in the Chapter02 | Exercise2.04 | Ex2.04-Completed.rar directory, at https://packt.live/3k7nS1K.
After extracting the .rar file, double-click the .uproject file. You will see a prompt asking Would you like to rebuild now?. Click Yes on that prompt so that it can build the necessary intermediate files, after which it should open the project in Unreal Editor automatically.
Now that you know the basic classes and how they work in Unreal, in the next section, we will look at animations, what processes are involved, and how they complete them. We’ll follow this with an exercise.
Working with animations
Animation is essential for adding life and richness to a game. Superb animations are one of the major factors that differentiate average games from the good and the great from the best. Visual fidelity is what keeps gamers excited and immersed in games, and hence animations are a core part of all games and experiences created in Unreal Engine.
Note
This chapter seeks to cover animation basics. A more in-depth approach to animation will be taken in Chapter 11, Working with Blend Space 1D, Key Bindings, and State Machines
Animation Blueprints
An Animation Blueprint is a specific kind of blueprint that allows you to control the animation of a Skeletal Mesh. It provides users with a graph specifically for animation-related tasks. Here, you can define the logic for computing the poses of a skeleton.
Note
A Skeletal Mesh is a skeleton-based mesh that contains bones, all of which come together to give form to the mesh, whereas a Static Mesh (as the name suggests) is an un-animatable mesh. Skeletal Meshes are normally used for characters and life-like objects (for example, a player hero), whereas Static Meshes are used for basic or lifeless objects (for example, a wall).
Animation Blueprints provide two kinds of graphs: EventGraph and AnimGraph.
Event Graph
The Event Graph within an Animation Blueprint provides setup events related to animations, as we learned in Chapter 1, Introduction to Unreal Engine, that can be used for variable manipulation and logic. Event graphs are mostly used within Animation Blueprints to update Blend Space values, which, in turn, drive the animations within AnimGraph. The most common events that are used here are as follows:
- Event Blueprint Initialize Animation: Used to initialize the animation.
- Event Blueprint Update Animation: This event is executed every frame, allowing developers to perform calculations and update its values as required:
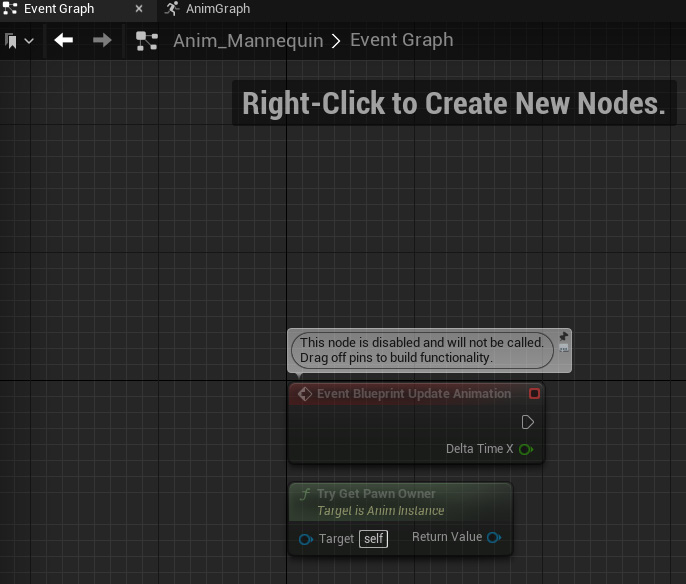
Figure 2.23 – Animation Event Graph
In the preceding screenshot, you can see the default Event Graph. The Event Blueprint Update Animation and Try Get Pawn Owner nodes are here. You created new nodes and appended them to a graph to complete some meaningful tasks in Exercise 2.04 – setting up the Game Mode, Player Controller, and Pawn classes.
The Anim Graph
The Anim Graph is dedicated to and responsible for playing animations and outputting the final pose of the skeleton on a per-frame basis. It provides developers with special nodes to execute different logic. For example, the Blend node takes in multiple inputs and is used to decide which input is currently being used in the execution. This decision is usually dependent on some external input (such as an alpha value).
The Anim Graph works by evaluating nodes by following the flow of execution between the exec pins on the nodes being used.
In the following screenshot, you can see a single Output Pose node on the graph. This is the final pose output of the animation that will be visible on the relevant Skeletal Mesh within the game. We will be using this in Exercise 2.05 – creating a mannequin animation:

Figure 2.24 – Animation AnimGraph
State Machines
You have already learned how animation nodes and logic can be set up, but one essential component is missing. Who decides when a particular animation or piece of logic should play or execute? This is where State Machines come into the picture. For example, a player may need to shift from crouching to a standing pose, so the animation needs to be updated. The code will call the Animation Blueprint, access the State Machine, and let it know that the state of the animation needs to be changed, resulting in a smooth animation transition.
A State Machine consists of states and rules that can be thought of as depicting the state of an animation. A State Machine can always be in one state at a particular time. A transition from one state to another is carried out when certain conditions (which are defined by rules) are met.
Transition Rules
Each Transition Rule contains a Boolean node called Result. If the Boolean is true, the transition can occur and vice versa:
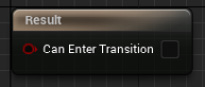
Figure 2.25 – Transition Rules
Blend Spaces
When you’re provided with a bunch of animations, you can create a State Machine and run those animations. However, a problem is presented when you need to transition from one animation to another. If you simply switch the animation, it will glitch since the new animation’s starting pose might be different from the old animation’s ending pose.
Blend Spaces are special assets that are used to interpolate between different animations based on their alpha values. This, in turn, removes the glitch issue and interpolates between the two animations, causing a swift and smooth change in animation.
Blend Spaces are created either in one dimension, known as a Blend Space 1D, or two dimensions, known as a Blend Space. These blend any number of animations based on one or two input(s), respectively.
Exercise 2.05 – creating a mannequin animation
Now that you’ve gone through most of the concepts related to animations, we’ll be diving in hands-on by adding some animation logic to the default mannequin. We’ll be creating a Blend Space 1D, a State Machine, and Animation logic.
Our goal here is to create a running animation of our characters and thus gain insight into how animations work, as well as the way they are bound to the actual character in a 3D world.
Follow these steps to complete this exercise:
- Download and extract all the contents of the Chapter02 | Exercise2.05 | ExerciseFiles directory, which can be found on GitHub. You can extract this to any directory you’re comfortable with using on your machine.
Note
The ExerciseFiles directory can be found on GitHub at the following link: https://github.com/PacktPublishing/Game-Development-Projects-with-Unreal-Engine/tree/master/Chapter02/Exercise2.05/ExerciseFiles.
- Double-click the CharAnim.uproject file to start the project.
- Press Play. Use the keyboard’s W, A, S, and D keys to move and the spacebar to jump. Notice that, currently, there are no animations on the mannequin.
- In the Content folder, browse to Content | Mannequin | Animations.
- Right-click the Content folder and, from the Animation section, select Blend Space 1D.
- Select UE4_Mannequin_Skeleton.
- Rename the newly created file BS_IdleRun.
- Double-click BS_IdleRun to open it.
- Under the Asset Details tab, inside the Axis Settings section, expand the Horizontal Axis section and set Name to Speed and Maximum Axis Value to 375.0:
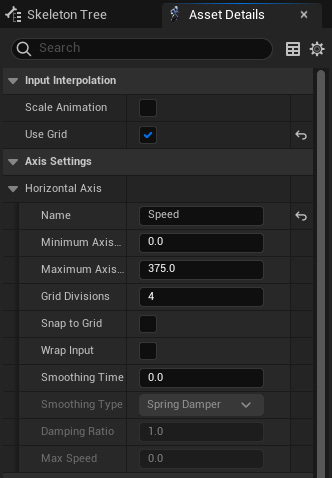
Figure 2.26 – Blend Space 1D – Axis Settings
- Go to the Sample Interpolation section and set Target Weight Interpolation Speed Per Sec to 5.0.
- Drag and drop the ThirdPersonIdle, ThirdPersonWalk, and ThirdPersonRun animations into the graph separately:

Figure 2.27 – Blend Space previewer
- In the Asset Details tab, under Blend Samples, set the following variable values:
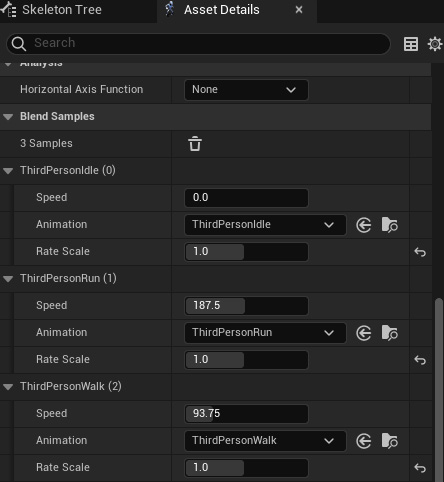
Figure 2.28 – Blend Samples
- Click Save and close this Asset.
- Right-click inside the Content folder and, from the Animation section, select Animation Blueprint.
- In the Target Skeleton section, select UE4_Mannequin_Skeleton and then click the OK button:

Figure 2.29 – Creating the Animation Blueprint asset
- Name the file Anim_Mannequin and press Enter.
- Double-click the newly created Anim_Mannequin file.
- Next, go to the Event Graph tab.
- Create a boolean variable called IsInAir? by clicking the + icon in the variable section on the bottom left-hand side. Be sure to assign the proper type:

Figure 2.30 – Adding variables
- Create a float variable called Speed.
- Drag off the Try Get Pawn Owner return value node and type Is Valid. Select the bottom one:

Figure 2.31 – Event Graph Is Valid node

Figure 2.32 – Connecting nodes
- From the Try Get Pawn Owner node, use the Get Movement Component node.
- From the node obtained in step 22, get the Is Falling node and connect the Boolean return value to a set node for the Is in Air? Boolean. Connect the SET node exec pin to the Is Valid exec pin:

Figure 2.33 – Is in Air Boolean setup
- From the Try Get Pawn Owner node, use the Get Velocity node, get its VectorLength, and connect the output to the A Variable Set node of Speed:

Figure 2.34 – Speed Boolean setup
- Next, go to the Anim Graph tab.
- Right-click anywhere inside Anim Graph, type state machine, and click on Add New State Machine:

Figure 2.35 – The Add New State Machine option
- Make sure that the node is selected and press F2 to rename it MannequinStateMachine.
- Connect the output pin of MannequinStateMachine to the input pin of the Output Pose node and click the compile button on the top bar:

Figure 2.36 – Configuring the State Machine result in the Output Pose node
- Double-click the MannequinstateMachine node to enter the State Machine. You will see an Entry node. The state that will be connected to it will become the default state of the mannequin. In this exercise, this will be our Idle Animation.
- Right-click on an empty area inside the State Machine and, from the menu, select Add State. Press F2 to rename it Idle/Run.
- Drag from the icon next to the Entry text, point it inside the Idle/Run node, and then release it to connect it:

Figure 2.37 – Connecting Added State to Entry
- Double-click on the Idle/Run state to open it.
- From the Asset Browser menu in the bottom-right corner, select and drag the BS_IdleRun animation onto the graph. Get the Speed variable from the Variable section on the left and connect it, as shown here:

Figure 2.38 – Idle/Run state setup
- Head back to MannequinStateMachine by clicking on its breadcrumb in the top banner:

Figure 2.39 – State Machine navigation breadcrumb
- From the Asset Browser menu, drag and drop the ThirdPersonJump_Start animation into the graph. Rename it Jump_Start.
- Repeat step 35 for ThirdPersonJump_Loop and ThirdPerson_Jump and rename them Jump_Loop and Jump_End, respectively:

Figure 2.40 – State setup
- Open the Jump_Start state. Click on the Play ThirdPersonJump_Start node. Uncheck Loop Animation in the Settings section.
- Open the Jump_Loop state and click on the Play ThirdPersonJump_Loop node. Set Play Rate to 0.75.
- Open the Jump_End state and click on the Play ThirdPerson_Jump node. Uncheck the Loop Animation Boolean.
- Since we can shift from Idle/Run to Jump_Start, drag from the Idle/Run state and drop it to the Jump_Start state. Similarly, Jump_Start leads to Jump_Loop, then to Jump_End, and finally back to Idle/Run.
Drag and drop the arrows to set up the State Machine, as follows:
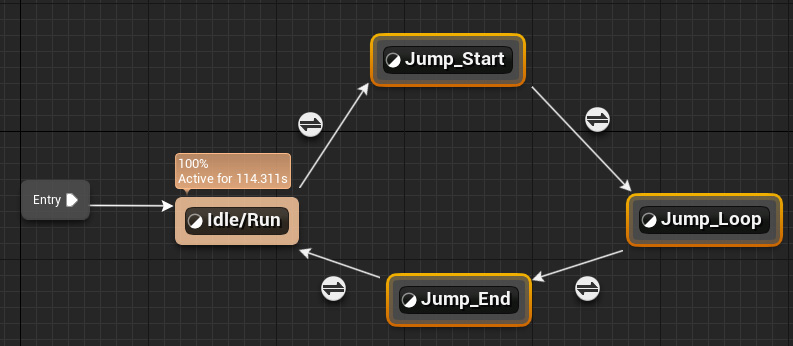
Figure 2.41 – State connections
- Double-click the Idle/Run to Jump_Start transition rule icon and connect the output of the Is in Air? variable to the result:

Figure 2.42 – Idle/Run to Jump_Start transition rule setup
- Open the Jump_Start to Jump_Loop transition rule. Get the Time Remaining (ratio) node for ThirdPersonJump_Start and check whether it is less than 0.1. Connect the resulting bool to the result:
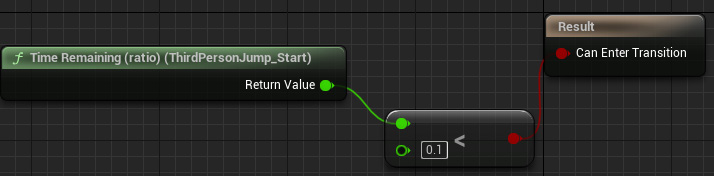
Figure 2.43 – Jump_Start to Jump_End transition rule setup
- Open the Jump_Loop to Jump_End transition rule. Connect the output of the inverse of the Is in Air? variable to the result:

Figure 2.44 – Jump_Loop to Jump_End transition rule setup
- Open the Jump_End to Idle/Run transition rule. Get the Time Remaining (ratio) node for ThirdPerson_Jump and check whether it is less than 0.1. Connect the resulting bool to the result:

Figure 2.45 – Jump_End to Idle/Run transition rule setup
- Close the Animation Blueprint.
- In the Content folder, browse to Content | ThirdPersonBP | Blueprints and open the ThirdPersonCharacter Blueprint.
- Select Mesh in the Components tab:

Figure 2.46 – The Mesh component

Figure 2.47 – Specifying the Animation Blueprint in the Skeletal Mesh component
- Close the Blueprint.
- Play the game again and notice the animations.
You should have achieved the following output. As you can see, our character is running, and the running animation is being shown:

Figure 2.48 – Character running animation
Note
You can find the complete exercise code files on GitHub, in the Chapter02 | Exercise2.05 | Ex2.05-Completed.rar directory at https://packt.live/3kdIlSL.
After extracting the .rar file, double-click the .uproject file. You will see a prompt asking Would you like to rebuild now?. Click Yes on that prompt so that it can build the necessary intermediate files, after which it should open the project in Unreal Editor automatically.
By completing this exercise, you’ve understood how to create State Machines, a Blend Space 1D, an Animation Blueprint, and how to tie it all together with the Skeletal Mesh of a character. You’ve also worked on play rates, transitional speed, and the transitional states, helping you understand how the world of animation intricately ties in together.
We kicked off this section by understanding how State Machines are used to represent and transition in-between Animation States. Next, we learned how a Blend Space 1D gives us blending in-between those transitions. All this is used by the Animation Blueprint to decide what the current animation of the character is. Now, let’s combine all these concepts in an activity.
Activity 2.01 – linking animations to a character
Let’s say, as an Unreal games developer, you’ve been provided with a character Skeletal Mesh and its animations, and you’ve been tasked with integrating them inside a project. To do that, in this activity, you’ll be creating an Animation Blueprint, State Machines, and a Blend Space 1D of a new character. By completing this activity, you should be able to work with animations in Unreal Engine and link them to Skeletal Meshes.
This activity’s project folder contains a Third Person template project, along with a new character, Ganfault.
Note
This character and its animations were downloaded from mixamo.com. These have been placed in the Content |Ganfault folder of this book’s GitHub repository: https://packt.live/35eCGrk.
Mixamo.com is a website that sells 3D characters with animations and is sort of an asset marketplace for 3D models. It also contains a library of free models, alongside the paid ones.
Follow these steps to complete this activity:
- Create a Blend Space 1D for the Walking/Running animation and set up the Animation Blueprint.
- Next, go to Content | ThirdPersonBP | Blueprints and open the ThirdPersonCharacter Blueprint.
- Click the Skeletal Mesh component on the left and, inside the Details tab on the right, replace the SkeletalMesh reference with Ganfault.
- Similarly, update the Animations Blueprint section of the Skeletal Mesh component with the Animation Blueprint you created for Ganfault.
Note
For the State Machine, only implement Idle/Run and Jump State.
Once you’ve completed this activity, the Walk/Run and Jump animations should be working properly, as shown in the following output:

Figure 2.49 – Activity 2.01 expected output (left: Run; right: Jump)
Note
The solution to this activity can be found on GitHub here: https://github.com/PacktPublishing/Elevating-Game-Experiences-with-Unreal-Engine-5-Second-Edition/tree/main/Activity%20solutions.
By completing this activity, you now know how to navigate Unreal Engine for the project, debug code, and work with animations. You also understand State Machines, which represent transitions between the Animation States and the Blend Spaces 1D that are used in that transition. You can now add animation to 3D models based on gameplay events and inputs.
Summary
In this chapter, we learned how to create an empty project. Then, we learned about the folder structure and how to organize files in the project directory. After that, we looked at template-based projects. We learned how to set breakpoints in code so that we can watch variable values and debug entire objects while the game is running, which would help us find and eradicate bugs in our code.
Thereafter, we saw how Game Mode, Player Pawn, and Player Controller are relevant classes that are used in Unreal Engine for setting up game flows (the execution order of code), as well as how they are set up inside a project.
Finally, we looked at animation basics and worked with State Machines, Blend Spaces 1D, and Animation Blueprints to make our character animate (walk/run and jump) within the game according to the keyboard input.
Throughout this chapter, we became more familiar with the powerful tools in Unreal Engine that are essential for game development. Unreal’s Game Mode and its default classes are required to make any kind of game or experience in Unreal Engine. Additionally, animations bring life to your character and help add layers of immersion to your games. All game studios have animations, characters, and game logic since these are the core components that drive any game. These skills will help you numerous times throughout your game development journey.
In the next chapter, we will talk about the Character class in Unreal Engine, its components, and how to extend the class for additional setup. You’ll be working on various exercises, followed by an activity.