
18
Using Gameplay Framework Classes in Multiplayer
In the previous chapter, we covered remote procedure calls (RPCs), which allow the server and the clients to execute remote functions on each other. We also covered enumerations and array index wrapping, which allow you to iterate an array in both directions and loop around when you go beyond its limits.
In this chapter, we’re going to look at the most common gameplay framework classes and see where their instances exist in a multiplayer environment. This is important to understand so that you know which instances can be accessed in a specific game instance. An example of this is that only the server should be able to access the game mode instance because you don’t want clients to be able to modify the rules of the game.
We’ll also cover the game state and player state classes, which, as their names imply, store information about the state of the game and each player, respectively. Finally, toward the end of this chapter, we’ll cover some new concepts in the game mode, as well as some useful built-in functionality.
In this chapter, we’re going to cover the following main topics:
- Accessing Gameplay Framework instances in multiplayer
- Using Game Mode, Player State, and Game State
By the end of this chapter, you’ll understand where the instances of the most important Gameplay Framework classes exist in multiplayer, as well as how the game state and player state store information that can be accessed by any client. You’ll also know how to make the most out of the Game Mode class and other useful built-in functionality.
Technical requirements
This chapter has the following technical requirements:
- Unreal Engine 5 installed
- Visual Studio 2019 installed
The project for this chapter can be found in the Chapter18 folder of the code bundle for this book, which can be downloaded here: https://github.com/PacktPublishing/Elevating-Game-Experiences-with-Unreal-Engine-5-Second-Edition.
In the next section, we will learn how to access the gameplay framework instances in multiplayer.
Accessing Gameplay Framework Instances in Multiplayer
Unreal Engine comes with a set of built-in classes (the Gameplay Framework) that provide the common functionality that most games require, such as a way to define the game rules (game mode), a way to control a character (the player controller and pawn/character class), and so on. When an instance of a gameplay framework class is created in a multiplayer environment, we need to know if it exists on the server, the clients, or the owning client. With that in mind, an instance of the gameplay framework class will always fall into one of the following categories:
- Server Only: The instance will only exist on the server.
- Server and Clients: The instance will exist on the server and the clients.
- Server and Owning Client: The instance will exist on the server and the owning client.
- Owning Client Only: The instance will only exist on the owning client.
Take a look at the following diagram, which shows each category and where the most common classes in the gameplay framework fall into:
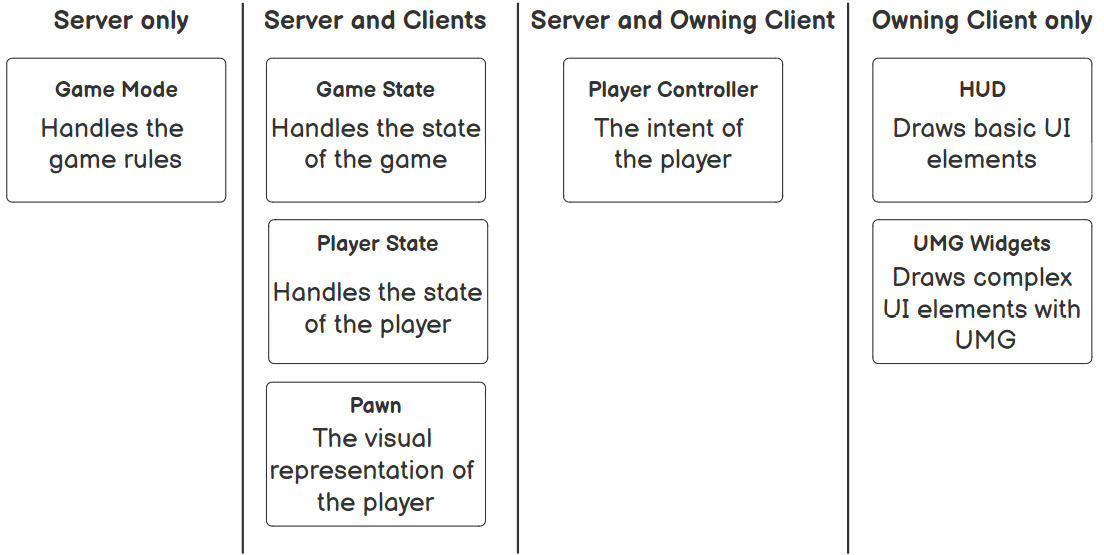
Figure 18.1 – The most common gameplay framework classes divided into categories
Let’s look at each class in the preceding diagram in more detail:
- Game Mode (Server Only): The Game Mode class defines the rules of the game and its instance can only be accessed by the server. If a client tries to access it, the instance will always be invalid, to prevent clients from changing the game rules.
- Game State (Server and Clients): The Game State class stores the state of the game and its instance can be accessed both by the server and the clients. The game state will be covered in greater depth in the next topic.
- Player State (Server and Clients): The Player State class stores the state of a player and its instance can be accessed both by the server and the clients. The player state will be covered in greater depth in the next topic.
- Pawn (Server and Clients): The Pawn class is the visual representation of a player and its instance can be accessed by the server and the clients.
- PlayerController (Server and Owning Client): The Player Controller class represents the intent of a player, which is relayed to the currently possessed pawn, and its instance can only be accessed on the server and the owning client. For security reasons, clients can’t access other clients’ player controllers, so they should use the server to communicate. If a client calls the UGameplayStatics::GetPlayerController function with an index other than 0 (which would return its player controller), the returned instance will always be invalid. This means that the server is the only place that has access to all of the player controllers. You can find out whether a player controller instance is in its owning client by calling the AController::IsLocalController function.
- HUD (Owning Client Only): The HUD class is used as an immediate mode to draw basic shapes and text on the screen. Since it’s used for the UI, its instance is only available on the owning client, because the server and the other clients don’t need to know about it.
- UMG Widgets (Owning Client Only): The UMG widget classes are used to display complex UI on the screen. Since it’s used for the UI, its instance is only available on the owning client, because the server and the other clients don’t need to know about it.
To help you understand these concepts, we will use Dota 2 as an example:
- The game mode defines that there are different phases of the game (pre-game for hero picking, the actual game, and the post-game phase with the winner) and that the end goal is to destroy the other team’s ancient. Since the game mode is a class that is critical to gameplay, clients can’t be allowed to access it.
- The game state stores the elapsed time, whether it’s day or night, the score of each team, and so on, so the server and the clients need to be able to access it.
- The player state stores the name, the hero selected, and the kill/death/assist ratio of a player, so the server and the clients need to be able to access it.
- The pawn would be the hero, the courier, the illusions, and so on, controlled by the player, so the server and the clients need to be able to access it.
- The player controller is what relays the input information to the controlled pawn, so only the server and the owning client need to be able to access it.
- The UI classes (HUD and User Widget) display all of the information on the owning client, so it only needs to be accessed there.
In the next exercise, you will display the instance values of the most common gameplay framework classes.
Exercise 18.01 – Displaying the Gameplay Framework instance values
In this exercise, we’re going to create a new C++ project that uses the Third Person template, and we’re going to add the following:
- On the owning client, the player controller creates and adds a simple UMG widget to the viewport that displays the name of the menu instance.
- On the Tick function, the character displays the value of its instance (as a pawn), as well as whether it has a valid instance for the game mode, game state, player state, player controller, and HUD.
Follow these steps to complete this exercise:
- Create a new Third Person template project using C++ called GFInstances (as in Gameplay Framework Instances) and save it to a location of your liking. Once the project has been created, it should open the editor as well as the Visual Studio solution.
- In the editor, create a new C++ class called GFInstancePlayerController that derives from PlayerController. Wait for the compilation to end, close the editor, and go back to Visual Studio.
- Open the GFInstancesCharacter.h file and declare the protected override for the Tick function:
virtual void Tick(float DeltaSeconds) override;
- Open the GFInstancesCharacter.cpp file and implement the Tick function:
void AGFInstancesCharacter::Tick(float DeltaSeconds)
{
Super::Tick(DeltaSeconds);
}
- Get the instances for the game mode, game state, player controller, and HUD:
const AGameModeBase* GameMode = GetWorld()->GetAuthGameMode();
const AGameStateBase* GameState = GetWorld()->GetGameState();
const APlayerController* PlayerController =
Cast<APlayerController>(GetController());
const AHUD* HUD = PlayerController != nullptr ? PlayerController->GetHUD() : nullptr;
In the preceding code snippet, we stored the instances for the game mode, game state, player controller, and HUD in separate variables so that we can check whether they are valid.
- Create a string for each gameplay framework class:
const FString GameModeString = GameMode != nullptr ?
TEXT("Valid") : TEXT("Invalid");
const FString GameStateString = GameState != nullptr ?
TEXT("Valid") : TEXT("Invalid");
const FString PlayerStateString = GetPlayerState() != nullptr ? TEXT("Valid") : TEXT("Invalid");
const FString PawnString = GetName();
const FString PlayerControllerString = PlayerController != nullptr ? TEXT("Valid") : TEXT("Invalid");
const FString HUDString = HUD != nullptr ? TEXT("Valid"):
TEXT("Invalid");
Here, we have created strings to store the name of the pawn and checked whether the other gameplay framework instances are valid.
- Display each string on the screen:
const FString String = FString::Printf(TEXT("Game Mode = %s Game
State = %s PlayerState = %s Pawn = %s Player Controller =
%s HUD = %s"), *GameModeString, *GameStateString,
*PlayerStateString, *PawnString,
*PlayerControllerString,
*HUDString);
DrawDebugString(GetWorld(), GetActorLocation(), String, nullptr, FColor::White, 0.0f, true);
In the preceding code snippet, we have printed the strings that indicate the name of the pawn and whether the other gameplay framework instances are valid.
- Before we can move on to the AGFInstancesPlayerController class, we need to tell Unreal Engine that we want to use the UMG functionality so that we can use the UUserWidget class. To do this, we need to open GFInstances.Build.cs and add UMG to the PublicDependencyModuleNames string array, like so:
PublicDependencyModuleNames.AddRange(new string[] { "Core", "CoreUObject", "Engine", "InputCore", "HeadMountedDisplay", "UMG" });
If you try to compile and get errors from adding the new module, then clean and recompile your project. If that doesn’t work, try restarting your IDE.
- Open GFInstancesPlayerController.h and add the protected variables to create the UMG widget:
UPROPERTY(EditDefaultsOnly, BlueprintReadOnly, Category = "GF Instance Player Controller")
TSubclassOf<UUserWidget> MenuClass;
UPROPERTY()
UUserWidget* Menu;
- Declare the protected override for the BeginPlay function:
virtual void BeginPlay() override;
- Open GFInstancesPlayerController.cpp and include UserWidget.h:
#include "Blueprint/UserWidget.h"
- Implement the BeginPlay function:
void AGFInstancePlayerController::BeginPlay()
{
Super::BeginPlay();
}
- Create the widget and add it to the viewport if it’s a local controller and the MenuClass variable is valid:
if (IsLocalController() && MenuClass != nullptr)
{
Menu = CreateWidget<UUserWidget>(this, MenuClass);
if (Menu != nullptr)
{
Menu->AddToViewport(0);
}
}
- Compile and run the code.
- In the Content Browser area, go to the Content folder, create a new folder called UI, and open it.
- Create a new widget blueprint called WBP_Menu and open it.
- Add a Canvas Panel to the Hierarchy panel.
- Add a Text Block called Name to the canvas panel and set it to be a variable.
- Change the text block Name so that its Size To Content is true.
- Go to the Graph section and, in Event Graph, implement Event Construct in the following manner:
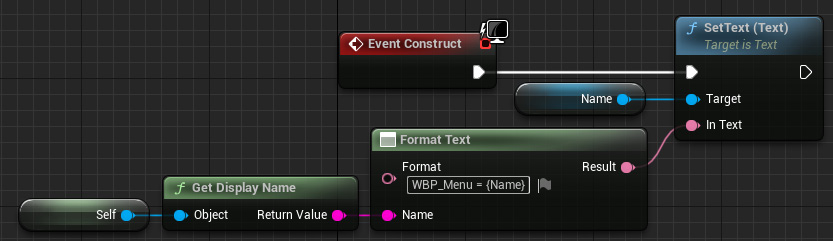
Figure 18.2 – The Event Construct that displays the name of the WBP_Menu instance
- Save and close WBP_Menu.
- Go to the Content folder and create a blueprint called BP_PlayerController that derives from GFInstancesPlayerController.
- Open BP_PlayerController and set Menu Class to use WBP_Menu.
- Save and close BP_PlayerController.
- Create a blueprint called BP_GameMode that derives from GFInstancesGameMode.
- Open BP_GameMode and set Player Controller Class to use BP_PlayerController.
- Save and close BP_GameMode.
- Go to World Settings, set GameMode Override to None, and save the map.
- Go to Project Settings and pick Maps & Modes from the left panel, which can be found in the Project category.
- Set the Default Game Mode to use BP_GameMode.
- Close Project Settings.
Finally, you can test the project.
- Go to Multiplayer Options, set Net Mode to Play As Listen Server, and set the Number of Players to 2.
- Set the window sizes to 800x600 and play using New Editor Window (PIE).
You should get the following output:

Figure 18.3 – Expected result on the Server and Client 1 windows
Now that you’ve completed this exercise, you’ll notice that each character displays its name, as well as if the instances for the game mode, game state, player state, player controller, and HUD are valid. It also displays the instance name of the WBP_Menu UMG widget in the top-left corner of the screen.
Now, let’s analyze the values that are displayed in the Server and Client 1 windows.
Note
The two figures for the Server and Client 1 window will have two text blocks that say Server Character and Client 1 Character. These were added to the original screenshot to help you understand which character is which.
Output for the Server window
Have a look at the following output of the Server window from the previous exercise:

Figure 18.4 – The Server window
In the preceding screenshot, you have the values for Server Character and Client 1 Character. The WBP_Menu UMG widget is displayed in the top-left corner and is only created for the player controller of Server Character since it’s the only player controller in this window that controls a character.
First, let’s analyze the values for Server Character.
Server Character
This is the character that the listen server is controlling. The values that are displayed on this character are as follows:
- Game Mode = Valid because the game mode instance only exists in the server, which is the case here
- Game State = Valid because the game state instance exists on the clients and the server, which is the case here
- Player State = Valid because the player state instance exists on the clients and the server, which is the case here
- Pawn = BP_ThirdPersonCharacter_C_0 because pawn instances exist on the clients and the server, which is the case here
- Player Controller = Valid because player controller instances exist on the owning client and the server, which is the case here
- HUD = Valid because HUD instances only exist on the owning client, which is the case here
Next, we are going to look at Client 1 Character in the same window.
Client 1 Character
This is the character that Client 1 is controlling. The values that are displayed on this character are as follows:
- Game Mode = Valid because the game mode instance only exists in the server, which is the case here
- Game State = Valid because the game state instance exists on the clients and the server, which is the case here
- Player State = Valid because the player state instance exists on the clients and the server, which is the case here
- Pawn = BP_ThirdPersonCharacter_C_1 because pawn instances exist on the clients and the server, which is the case here
- Player Controller = Valid because player controller instances exist on the owning client and the server, which is the case here
- HUD = Invalid because HUD instances only exist on the owning client, which is not the case here
Output for the Client 1 window
Have a look at the following output of the Client 1 window from the previous exercise:

Figure 18.5 – The Client 1 window
In the preceding screenshot, you have the values for Client 1 Character and Server Character. The WBP_Menu UMG widget is displayed in the top-left corner and is only created for the player controller of Client 1 Character since it’s the only player controller in this window that controls a character.
First, let’s analyze the values for Client 1 Character.
Client 1 Character
This is the character that Client 1 is controlling. The values that are displayed on this character are as follows:
- Game Mode = Invalid because the game mode instance only exists in the server, which is not the case here
- Game State = Valid because the game state instance exists on the server and the clients, which is the case here
- Player State = Valid because the player state instance exists on the server and the clients, which is the case here
- Pawn = BP_ThirdPersonCharacter_C_0 because pawn instances exist on the server and the clients, which is the case here
- Player Controller = Valid because player controller instances exist on the server and the owning client, which is the case here
- HUD = Valid because HUD instances only exist on the owning client, which is the case here
Next, we are going to look at Server Character in the same window.
Server Character
This is the character that the listen server controls. The values that are displayed on this character are as follows:
- Game Mode = Invalid because the game mode instance only exists in the server, which is not the case here
- Game State = Valid because the game state instance exists on the server and the clients, which is the case here
- Player State = Valid because the player state instance exists on the server and the clients, which is the case here
- Pawn = BP_ThirdPersonCharacter_C_1 because pawn instances exist on the server and the clients, which is the case here
- Player Controller = Invalid because player controller instances exist on the server and the owning client, which is not the case here
- HUD = Invalid because HUD instances only exist on the owning client, which is not the case here
By completing this exercise, you should have a better understanding of where each instance of the gameplay framework class exists and where it doesn’t. In the next section, we’re going to cover the player state and game state classes, as well as some additional concepts regarding the game mode and useful built-in functionalities.
Using Game Mode, Player State, and Game State
So far, we’ve covered most of the important classes in the gameplay framework, including the game mode, player controller, and the pawn. In this section, we’re going to cover the player state, game state, and some additional concepts regarding the game mode, as well as some useful built-in functionalities.
Game mode
We’ve already talked about the game mode and how it works, but there are a few concepts that are useful to know about. Let’s take a look.
Constructor
To set the default class values, you can use a constructor like so:
ATestGameMode::ATestGameMode()
{
  DefaultPawnClass = AMyCharacter::StaticClass();
  PlayerControllerClass =
  AMyPlayerController::StaticClass();
  PlayerStateClass = AMyPlayerState::StaticClass();
  GameStateClass = AMyGameState::StaticClass();
}
The preceding code lets you specify which classes to use when spawning pawns, player controllers, player states, and game states when we are using this game mode.
Getting the game mode instance
If you want to access the game mode instance, you need to get it from the GetWorld function by using the following code:
AGameModeBase* GameMode = GetWorld()->GetAuthGameMode();
The preceding code allows you to access the current game mode instance, but you have to make sure that you are calling it on the server since this will be invalid on the clients due to security reasons.
Match states
So far, we’ve only been using the AGameModeBase class, which is the most basic game mode class in the framework. Although it’s more than enough for certain types of games, there will be cases where you will require a bit more functionality. An example of this would be if we wanted to do a lobby system, where the match only starts if all the players have marked that they are ready. This example wouldn’t be possible to do with just the built-in function of the AGameModeBase class. For these cases, it’s better to use the AGameMode class instead, which is a child class of AGameModeBase that adds support for match states. The way match states work is by using a state machine that can only be in one of the following states at a given time:
- EnteringMap: This is the starting state when the world is still loading and the actors aren’t ticking yet. It will transition to the WaitingToStart state once the world finishes loading.
- WaitingToStart: This state is set when the world has finished loading and the actors are ticking, although the pawns for the players won’t be spawned because the game hasn’t started yet. When the state machine enters this state, it will call the HandleMatchIsWaitingToStart function. The state machine will transition to the InProgress state if the ReadyToStartMatch function returns true or if the StartMatch function is called somewhere in the code.
- InProgress: This state is where the actual game takes place. When the state machine enters this state, it will spawn the pawns for the players, call BeginPlay on all of the actors in the world, and call the HandleMatchHasStarted function. The state machine will transition to the WaitingPostMatch state if the ReadyToEndMatch function returns true or if the EndMatch function is called somewhere in the code.
- WaitingPostMatch: This state is set when the match ends. When the state machine enters this state, it will call the HandleMatchHasEnded function. In this state, actors still tick, but new players cannot join. It will transition to the LeavingMap state when it starts unloading the world.
- LeavingMap: This state is set while it’s unloading the world. When the state machine enters this state, it will call the HandleLeavingMap function. The state machine will transition to the EnteringMap state when it starts loading the new level.
- Aborted: This is a failed state that can only be set by calling the AbortMatch function, which is used to flag that something went wrong that prevented the match from happening.
To help you understand these concepts better, we can use Dota 2 again as an example:
- EnteringMap: The state machine will be in this state when the map is loading.
- WaitingToStart: The state machine will be in this state once the map is loaded and the players are picking their heroes. The ReadyToStartMatch function will check whether all the players have selected their heroes; if they have, then the match can start.
- InProgress: The state machine will be in this state when the game is underway. The players control their heroes to farm and fight other players. The ReadyToEndMatch function will constantly check the health of each ancient to see whether one of them was destroyed; if it was, then the match ends.
- WaitingPostMatch: The state machine will be in this state when the game has ended and you can see the destroyed ancient, as well as a message that displays the name of the winning team.
- LeavingMap: The state machine will be in this state when it’s unloading the map.
- Aborted: The state machine will be in this state if one of the players failed to connect in the initial stage, therefore aborting the whole match.
Respawning the player
When the player dies and you want to respawn it, you typically have two options. The first option is to reuse the same pawn instance, manually reset its state back to the defaults, and teleport it to the respawn location. The second option is to destroy the current pawn instance and spawn a new one, which will already have its state reset. If you prefer the latter option, then the AGameModeBase::RestartPlayer function handles the logic of spawning a new pawn instance for a certain player controller for you and places it on a player start.
One important thing to take into consideration is that the function only spawns a new pawn instance if the player controller doesn’t already possess a pawn, so make sure to destroy the controlled pawn before calling RestartPlayer.
Take a look at the following example:
void ATestGameMode::OnDeath(APlayerController* VictimController)
{
  if(VictimController == nullptr)
  {
    return;
  }

  APawn* Pawn = VictimController->GetPawn();
  if(Pawn != nullptr)
  {
    Pawn->Destroy();
  }

  RestartPlayer(VictimController);
}
In the preceding code, we have the OnDeath function, which takes the player controller of the player that died, destroys its controlled pawn, and calls the RestartPlayer function to spawn a new instance. By default, the new pawn instance will spawn in the player start actor that was used when the player spawned for the first time. Alternatively, you can tell the game mode that you want to spawn on a random player start. To accomplish that, all you need to do is override the AGameModeBase::ShouldSpawnAtStartSpot function and force it to return false, like so:
bool ATestGameMode::ShouldSpawnAtStartSpot(AController* Player)
{
  return false;
}
The preceding code will make the game mode use a random player start instead of always using the first one that was used.
Note
For more information about the game mode, please visit https://docs.unrealengine.com/en-US/Gameplay/Framework/GameMode/#gamemodes and https://docs.unrealengine.com/en-US/API/Runtime/Engine/GameFramework/AGameMode/index.html.
Player state
The player state class stores the information that other clients need to know about a specific player (such as their current score, kills/deaths/assists, and so on) since they can’t access its player controller. The most widely used built-in functions are GetPlayerName(), GetScore and GetPingInMilliseconds(), which give you the name, score, and ping of the player, respectively.
A good example of how to use the player state is a scoreboard entry on a multiplayer shooter such as Call Of Duty, because every client needs to know the name, kills/deaths/assists, and ping for that player. The player state instance can be accessed in various ways, so let’s take a look at the most common ones:
AController::PlayerState
This variable contains the player state associated with the controller and can only be accessed by the server and the owning client. The following example shows how to use the variable:
APlayerState* PlayerState = Controller->PlayerState;
AController::GetPlayerState()
This function returns the player state associated with the controller and can only be accessed by the server and the owning client. This function also has a template version so that you can cast it to your own custom player state class. The following example shows how to use the default and template versions of this function:
// Default version
APlayerState* PlayerState = Controller->GetPlayerState();
// Template version
ATestPlayerState* MyPlayerState = Controller->GetPlayerState<ATestPlayerState>();
APawn::GetPlayerState()
This function returns the player state associated with the controller that is possessing the pawn and can be accessed by the server and the clients. This function also has a template version so that you can cast it to your own custom player state class. The following example shows how to use the default and template versions of this function:
// Default version
APlayerState* PlayerState = Pawn->GetPlayerState();
// Template version
ATestPlayerState* MyPlayerState = Pawn-
  >GetPlayerState<ATestPlayerState>();
AGameState::PlayerArray
This variable in the game state (covered in the next section) stores the player state instances for each player and can be accessed on the server and the clients. The following example shows how to use this variable:
TArray<APlayerState*> PlayerStates = GameState->PlayerArray;
To help you understand these concepts better, we will use Dota 2 again as an example. The player state would have at least the following variables:
- Name: The name of the player
- Hero: The selected hero
- Health: The health of the hero
- Mana: The mana of the hero
- Stats: The hero stats
- Level: The level the hero is currently in
- Kill/Death/Assist: The kill/death/assist ratio for the player
Note
For more information about the player state, please visit https://docs.unrealengine.com/en-US/API/Runtime/Engine/GameFramework/APlayerState/index.html.
Game State
The game state class stores the information that other clients need to know about the game (such as the match’s elapsed time and the score required to win the game) since they can’t access the game mode. The most widely used variable is PlayerArray, which is an array that provides the player state of every connected client. A good example of how to use the game state is a scoreboard on a multiplayer shooter such as Call Of Duty because every client needs to know how many kills are required to win, as well as the names, kills/deaths/assists, and pings for every connected player.
The game state instance can be accessed in various ways. Let’s take a look.
UWorld::GetGameState()
This function returns the game state associated with the world and can be accessed on the server and the clients. This function also has a template version so that you can cast it to your own custom game state class. The following example shows how to use the default and template versions of this function:
// Default version
AGameStateBase* GameState = GetWorld()->GetGameState();
// Template version
AMyGameState* MyGameState = GetWorld()->GetGameState<AMyGameState>();
AGameModeBase::GameState
This variable contains the game state associated with the game mode and can only be accessed on the server. The following example shows how to use the variable:
AGameStateBase* GameState = GameMode->GameState;
AGameModeBase::GetGameState()
This function returns the game state associated with the game mode and can only be accessed on the server. This function also has a template version so that you can cast it to your own custom game state class. The following example shows how to use the default and template versions of this function:
// Default version
AGameStateBase* GameState = GameMode->GetGameState<AGameStateBase>();
// Template version
AMyGameState* MyGameState = GameMode->GetGameState<AMyGameState>();
To help you understand these concepts better, we will use Dota 2 again as an example. The game state will have the following variables:
- Elapsed Time: How long the match has been going on for
- Radiant Kills: How many Dire heroes the Radiant team has killed
- Dire Kills: How many Radiant heroes the Dire team has killed
- Day/Night Timer: Used to determine whether it is day or night
Note
For more information about the game state, please visit https://docs.unrealengine.com/en-US/API/Runtime/Engine/GameFramework/AGameState/index.html.
Useful built-in functionality
UE5 comes with a lot of functionality built in. Let’s look at some examples that are useful to know about when developing a game.
void AActor::EndPlay(const EEndPlayReason::Type EndPlayReason)
This function is called when the actor has stopped playing, which is the opposite of the BeginPlay function. This function has a parameter called EndPlayReason, which tells you why the actor stopped playing (if it was destroyed, if you stopped PIE, and so on). Take a look at the following example, which prints to the screen that the actor has stopped playing:
void ATestActor::EndPlay(const EEndPlayReason::Type EndPlayReason)
{
  Super::EndPlay(EndPlayReason);
  const FString String = FString::Printf(TEXT("The actor %s
  has just stopped playing"), *GetName());
  GEngine->AddOnScreenDebugMessage(-1, 2.0f, FColor::Red,
  String);
}
void ACharacter::Landed(const FHitResult& Hit)
This function is called when a player lands on a surface after being in the air. Take a look at the following example, which plays a sound when a player lands on a surface:
void ATestCharacter::Landed(const FHitResult& Hit)
{
  Super::Landed(Hit);
  UGameplayStatics::PlaySound2D(GetWorld(), LandSound);
}
bool UWorld::ServerTravel(const FString& FURL, bool bAbsolute, bool bShouldSkipGameNotify)
This function will make the server load a new map and bring all of the connected clients along with it. This is different from using other methods that load maps, such as the UGameplayStatics::OpenLevel function, because it won’t bring the clients along; it will just load the map on the server and disconnect the clients.
Take a look at the following example, which gets the current map name and uses server travel to reload it and bring along the connected clients:
void ATestGameModeBase::RestartMap()
{
  const FString URL = GetWorld()->GetName();
  GetWorld()->ServerTravel(URL, false, false);
}
void TArray::Sort(const PREDICATE_CLASS& Predicate)
The TArray data structure comes with the Sort function, which allows you to sort the values of an array by using a lambda function that returns whether the A value should be ordered first, followed by the B value. Take a look at the following example, which sorts an integer array from the smallest value to the highest:
void ATestActor::SortValues()
{
  TArray<int32> SortTest;
  SortTest.Add(43);
  SortTest.Add(1);
  SortTest.Add(23);
  SortTest.Add(8);
  SortTest.Sort([](const int32& A, const int32& B) { return
  A < B; });
}
The preceding code will sort the SortTest array’s values of [43, 1, 23, 8] from smallest to highest – that is, [1, 8, 23, 43].
void AActor::FellOutOfWorld(const UDamageType& DmgType)
In Unreal Engine, there is a concept called Kill Z, which is a plane on a certain value in Z (set in the World Settings panel). If an actor goes below that Z value, it will call the FellOutOfWorld function, which, by default, destroys the actor. Take a look at the following example, which prints to the screen that the actor fell out of the world:
void AFPSCharacter::FellOutOfWorld(const UDamageType& DmgType)
{
  Super::FellOutOfWorld(DmgType);
  const FString String = FString::Printf(TEXT("The actor %s
  has fell out of the world"), *GetName());
  GEngine->AddOnScreenDebugMessage(-1, 2.0f, FColor::Red,
  String);
}
URotatingMovementComponent
This component rotates the owning actor along time with a certain rate on each axis, defined in the RotationRate variable. To use it, you need to include the following header:
#include "GameFramework/RotatingMovementComponent.h"
You must also declare the component variable:
UPROPERTY(VisibleAnywhere, BlueprintReadOnly, Category = "Test Actor")
URotatingMovementComponent* RotatingMovement;
Finally, you must initialize it in the actor constructor, like so:
RotatingMovement = CreateDefaultSubobject
  <URotatingMovementComponent>("Rotating Movement");
RotatingMovement->RotationRate = FRotator(0.0, 90.0f, 0);
In the preceding code, RotationRate is set to rotate 90 degrees per second on the Yaw axis.
Exercise 18.02 – Making a simple multiplayer pickup game
In this exercise, we’re going to create a new C++ project that uses the Third Person template. The following will happen:
- On the owning client, the player controller will create and add to the viewport a UMG widget that, for each player, displays the score, sorted from highest to lowest, and how many pickups it has collected.
- Create a simple pickup actor class that gives 10 points to the player that picked it up. The pickup will also rotate 90 degrees per second on the Yaw axis.
- Set the Kill Z to -500 and make the player respawn and lose 10 points every time they fall from the world.
- The game will end when there are no more pickups available. Once the game ends, all characters will be destroyed and after 5 seconds, the server will do a server travel call to reload the same map and bring along the connected clients.
Follow these steps to complete the C++ part of this exercise:
- Create a new Third Person template project using C++ called Pickups and save it to a location of your liking.
- Once the project has been created, it should open the editor, as well as the Visual Studio solution.
Now, let’s create the new C++ classes we’re going to use.
- Create a Pickup class that derives from Actor.
- Create a PickupsGameState class that derives from GameState.
- Create a PickupsPlayerState class that derives from PlayerState.
- Create a PickupsPlayerController class that derives from PlayerController.
- Close the editor and open Visual Studio.
Next, we’re going to work on the PickupsGameState class:
- Open PickupsGameState.h and declare the protected replicated integer variable, PickupsRemaining, which tells all clients how many pickups remain in the level:
UPROPERTY(Replicated, BlueprintReadOnly)
int32 PickupsRemaining;
- Declare the protected override for the BeginPlay function:
virtual void BeginPlay() override;
- Declare the protected GetPlayerStatesOrderedByScore function:
UFUNCTION(BlueprintCallable)
TArray<APlayerState*> GetPlayerStatesOrderedByScore() const;
- Implement the public RemovePickup function, which removes one pickup from the PickupsRemaining variable:
void RemovePickup() { PickupsRemaining--; }
- Implement the public HasPickups function, which returns whether any pickups remain:
bool HasPickups() const { return PickupsRemaining > 0; }
- Open PickupsGameState.cpp and include Pickup.h, GameplayStatics.h, UnrealNetwork.h, and PlayerState.h:
#include "Pickup.h"
#include "Kismet/GameplayStatics.h"
#include "Net/UnrealNetwork.h"
#include "GameFramework/PlayerState.h"
- Implement the GetLifetimeReplicatedProps function and make the PickupRemaining variable replicate to all clients:
void APickupsGameState::GetLifetimeReplicatedProps(TArray<
FLifetimeProperty >& OutLifetimeProps) const
{
Super::GetLifetimeReplicatedProps(OutLifetimeProps);
DOREPLIFETIME(APickupsGameState, PickupsRemaining);
}
- Implement the BeginPlay override function and set the value of PickupsRemaining by getting all the pickups in the world:
void APickupsGameState::BeginPlay()
{
Super::BeginPlay();
TArray<AActor*> Pickups;
UGameplayStatics::GetAllActorsOfClass(this,
APickup::StaticClass(), Pickups);
PickupsRemaining = Pickups.Num();
}
- Implement the GetPlayerStatesOrderedByScore function, which duplicates the PlayerArray variable and sorts it so that the players with the highest scores show up first:
TArray<APlayerState*> APickupsGameState::GetPlayerStatesOrderedByScore() const
{
TArray<APlayerState*> PlayerStates(PlayerArray);
PlayerStates.Sort([](const APlayerState& A, const
APlayerState&
B) { return A.GetScore() > B.GetScore(); });
return PlayerStates;
}
Next, let’s work on the PickupsPlayerState class. Follow these steps:
- Open PickupsPlayerState.h and declare the protected replicated integer variable, Pickups, which indicates how many pickups a player has collected:
UPROPERTY(Replicated, BlueprintReadOnly)
int32 Pickups;
- Implement the public AddPickup function, which adds one pickup to the Pickups variable:
void AddPickup() { Pickups++; }
- Open PickupsPlayerState.cpp and include UnrealNetwork.h:
#include "Net/UnrealNetwork.h"
- Implement the GetLifetimeReplicatedProps function and make the Pickups variable replicate to all clients:
void APickupsPlayerState::GetLifetimeReplicatedProps(TArray<
FLifetimeProperty >& OutLifetimeProps) const
{
Super::GetLifetimeReplicatedProps(OutLifetimeProps);
DOREPLIFETIME(APickupsPlayerState, Pickups);
}
Next, let’s work on the PickupsPlayerController class.
- Open PickupsPlayerController.h and declare the protected ScoreboardMenuClass variable, which will set the UMG widget class we want to use for our scoreboard:
UPROPERTY(EditDefaultsOnly, BlueprintReadOnly, Category = "Pickup Player Controller")
TSubclassOf<class UUserWidget> ScoreboardMenuClass;
- Declare the protected ScoreboardMenu variable, which stores the scoreboard UMG widget instance we will create on the BeginPlay function:
UPROPERTY()
class UUserWidget* ScoreboardMenu;
- Declare the protected override for the BeginPlay function:
virtual void BeginPlay() override;
- Open PickupsPlayerController.cpp and include UserWidget.h:
#include "Blueprint/UserWidget.h"
- Implement the BeginPlay override function, which, for the owning client, creates and adds the scoreboard UMG widget to the viewport:
void ApickupsPlayerController::BeginPlay()
{
Super::BeginPlay();
if (IsLocalController() && ScoreboardMenuClass !=
nullptr)
{
ScoreboardMenu = CreateWidget<UUserWidget>(this,
ScoreboardMenuClass);
if (ScoreboardMenu != nullptr)
{
ScoreboardMenu->AddToViewport(0);
}
}
}
Now, let’s edit the PickupsGameMode class:
- Open PickupsGameMode.h and replace the #include statement for GameModeBase.h with GameMode.h:
#include "GameFramework/GameMode.h"
- Make the class derive from AGameMode instead of AGameModeBase:
class APickupsGameMode : public AGameMode
- Declare the protected game state variable, MyGameState, which holds the instance of the APickupsGameState class:
UPROPERTY()
class APickupsGameState* MyGameState;
- Move the constructor to the protected area and delete the public area.
- Declare the protected override for the BeginPlay function:
virtual void BeginPlay() override;
- Declare the protected override for the ShouldSpawnAtStartSpot function:
virtual bool ShouldSpawnAtStartSpot(AController* Player)
override;
- Declare the protected overrides for the match state functions of the game mode:
virtual void HandleMatchHasStarted() override;
virtual void HandleMatchHasEnded() override;
virtual bool ReadyToStartMatch_Implementation() override;
virtual bool ReadyToEndMatch_Implementation() override;
- Declare the protected RestartMap function:
void RestartMap() const;
- Open PickupsGameMode.cpp and include GameplayStatics.h and PickupGameState.h:
#include "Kismet/GameplayStatics.h"
#include "PickupsGameState.h"
- Implement the BeginPlay override function, which stores the APickupGameState instance:
void APickupsGameMode::BeginPlay()
{
Super::BeginPlay();
MyGameState = GetGameState<APickupsGameState>();
}
- Implement the ShouldSpawnAtStartSpot override function, which indicates that we want the players to respawn on a random player start and not always on the same one:
bool APickupsGameMode::ShouldSpawnAtStartSpot
(AController* Player)
{
return false;
}
- Implement the HandleMatchHasStarted override function, which prints to the screen, informing players that the game has started:
void APickupsGameMode::HandleMatchHasStarted()
{
Super::HandleMatchHasStarted();
GEngine->AddOnScreenDebugMessage(-1, 2.0f,
FColor::Green, "The game has started!");
}
- Implement the HandleMatchHasEnded override function, which prints to the screen, informing players that the game has ended, destroys all characters, and schedules a timer to restart the map:
void APickupsGameMode::HandleMatchHasEnded()
{
Super::HandleMatchHasEnded();
GEngine->AddOnScreenDebugMessage(-1, 2.0f,
FColor::Red, "The game has ended!");
TArray<AActor*> Characters;
UGameplayStatics::GetAllActorsOfClass(this,
APickupsCharacter::StaticClass(), Characters);
for (AActor* Character : Characters)
{
Character->Destroy();
}
FTimerHandle TimerHandle;
GetWorldTimerManager().SetTimer(TimerHandle, this,
&APickupsGameMode::RestartMap, 5.0f);
}
- Implement the ReadyToStartMatch_Implementation override function, which indicates that the match can start straight away:
bool APickupsGameMode::ReadyToStartMatch_Implementation()
{
return true;
}
- Implement the ReadyToEndMatch_Implementation override function, which indicates that the match ends when the game state has no more pickups remaining:
bool APickupsGameMode::ReadyToEndMatch_Implementation()
{
return MyGameState != nullptr && !MyGameState
->HasPickups();
}
- Implement the RestartMap function, which performs a server travel to the same level and brings all clients along:
void APickupsGameMode::RestartMap() const
{
GetWorld()->ServerTravel(GetWorld()->GetName(),
false, false);
}
Now, let’s edit the PickupsCharacter class. Follow these steps:
- Open PickupsCharacter.h and declare the protected sound variables for falling and landing:
UPROPERTY(EditDefaultsOnly, BlueprintReadOnly, Category =
"Pickups Character")
USoundBase* FallSound;
UPROPERTY(EditDefaultsOnly, BlueprintReadOnly, Category =
"Pickups Character")
USoundBase* LandSound;
- Declare the protected override functions:
virtual void EndPlay(const EEndPlayReason::Type EndPlayReason) override;
virtual void Landed(const FHitResult& Hit) override;
virtual void FellOutOfWorld(const UDamageType& DmgType) override;
- Declare the public functions that add scores and pickups to the player state:
void AddScore(const float Score) const;
void AddPickup() const;
- Declare the public client RPC that plays a sound on the owning client:
UFUNCTION(Client, Unreliable)
void ClientPlaySound2D(USoundBase* Sound);
- Open PickupsCharacter.cpp and include PickupsPlayerState.h, GameMode.h, PlayerState.h, and GameplayStatics.h:
#include "PickupsPlayerState.h"
#include "GameFramework/GameMode.h"
#include "GameFramework/PlayerState.h"
#include "Kismet/GameplayStatics.h"
- Implement the EndPlay override function, which plays the fall sound if the character was destroyed:
void APickupsCharacter::EndPlay(const EEndPlayReason::Type EndPlayReason)
{
Super::EndPlay(EndPlayReason);
if (EndPlayReason == EEndPlayReason::Destroyed)
{
UGameplayStatics::PlaySound2D(GetWorld(),
FallSound);
}
}
- Implement the Landed override function, which plays the landed sound:
void APickupsCharacter::Landed(const FHitResult& Hit)
{
Super::Landed(Hit);
UGameplayStatics::PlaySound2D(GetWorld(), LandSound);
}
- Implement the FellOutOfWorld override function, which stores the controller, removes 10 points from the score, destroys the character, and tells the game mode to restart the player using the previous controller:
void APickupsCharacter::FellOutOfWorld(const UDamageType&
DmgType)
{
AController* TempController = Controller;
AddScore(-10);
Destroy();
AGameMode* GameMode = GetWorld()
->GetAuthGameMode<AGameMode>();
if (GameMode != nullptr)
{
GameMode->RestartPlayer(TempController);
}
}
- Implement the AddScore function, which adds a certain amount to the score in the player state:
void APickupsCharacter::AddScore(const float Score) const
{
APlayerState* MyPlayerState = GetPlayerState();
if (MyPlayerState != nullptr)
{
const float CurrentScore = MyPlayerState->GetScore();
MyPlayerState->SetScore(CurrentScore + Score);
}
}
- Implement the AddPickup function, which adds a pickup to the Pickup variable in our custom player state:
void APickupsCharacter::AddPickup() const
{
APickupsPlayerState* MyPlayerState =
GetPlayerState<APickupsPlayerState>();
if (MyPlayerState != nullptr)
{
MyPlayerState->AddPickup();
}
}
- Implement the ClientPlaySound2D_Implementation function, which plays a sound on the owning client:
void APickupsCharacter::ClientPlaySound2D_Implementation(USoundBase* Sound)
{
UGameplayStatics::PlaySound2D(GetWorld(), Sound);
}
Now, let’s work on the Pickup class. Follow these steps:
- Open Pickup.h and clear all existing functions and delete the public areas.
- Declare the protected Static Mesh component called Mesh:
UPROPERTY(VisibleAnywhere, BlueprintReadOnly, Category =
"Pickup")
UStaticMeshComponent* Mesh;
- Declare the protected rotating movement component called RotatingMovement:
UPROPERTY(VisibleAnywhere, BlueprintReadOnly, Category =
"Pickup")
class URotatingMovementComponent* RotatingMovement;
- Declare the protected PickupSound variable:
UPROPERTY(EditDefaultsOnly, BlueprintReadOnly, Category =
"Pickup")
USoundBase* PickupSound;
- Declare the protected constructor and BeginPlay override:
APickup();
virtual void BeginPlay() override;
- Declare the protected OnBeginOverlap function:
UFUNCTION()
void OnBeginOverlap(UPrimitiveComponent* OverlappedComp, AActor*
OtherActor, UPrimitiveComponent* OtherComp, int32
OtherBodyIndex, bool bFromSweep, const FHitResult&
Hit);
- Open Pickup.cpp and include PickupsCharacter.h, PickupsGameState.h, and RotatingMovementComponent.h after Pickup.h:
#include "PickupsCharacter.h"
#include "PickupsGameState.h"
#include "GameFramework/RotatingMovementComponent.h"
- In the constructor, initialize the Mesh component so that it overlaps everything and make it the root component:
Mesh = CreateDefaultSubobject<UStaticMeshComponent>("Mesh");
Mesh->SetCollisionProfileName("OverlapAll");
RootComponent = Mesh;
- Still in the constructor, initialize the rotating movement component so that it rotates 90 degrees per second on the Yaw axis:
RotatingMovement = CreateDefaultSubobject
<URotatingMovementComponent>("Rotating Movement");
RotatingMovement->RotationRate = FRotator(0.0, 90.0f, 0);
- To finalize the constructor, enable replication and disable the Tick function:
bReplicates = true;
PrimaryActorTick.bCanEverTick = false;
- At the end of the BeginPlay function, bind the begin overlap event of Mesh to the OnBeginOverlap function:
Mesh->OnComponentBeginOverlap.AddDynamic(this, &APickup::OnBeginOverlap);
- Delete the definition for the Tick function.
- Implement the OnBeginOverlap function, which checks whether the character is valid and has authority, removes the pickup from the game state, plays the pickup sound on the owning client, and adds 10 points and the pickup to the character. Once all of that is done, the pickup will destroy itself:
void APickup::OnBeginOverlap(UPrimitiveComponent* OverlappedComp,
AActor* OtherActor, UPrimitiveComponent* OtherComp,
int32
OtherBodyIndex, bool bFromSweep, const FHitResult&
Hit)
{
APickupsCharacter* Character =
Cast<APickupsCharacter>(OtherActor);
if (Character == nullptr || !HasAuthority())
{
return;
}
APickupsGameState* GameState =
Cast<APickupsGameState>(GetWorld()
->GetGameState());
if (GameState != nullptr)
{
GameState->RemovePickup();
}
Character->ClientPlaySound2D(PickupSound);
Character->AddScore(10);
Character->AddPickup();
Destroy();
}
- Open Pickups.Build.cs and add the UMG module to PublicDependencyModuleNames, like so:
PublicDependencyModuleNames.AddRange(new string[] { "Core",
"CoreUObject", "Engine", "InputCore",
"HeadMountedDisplay",
"UMG" });
If you try to compile and get errors from adding the new module, then clean and recompile your project. If that doesn’t work, try restarting your IDE.
- Compile and run the code until the editor loads.
Once it’s loaded, we’re going to import some assets and create some blueprints that derive from the C++ classes we’ve just created.
First, let’s import the sound files:
- In the Content Browser, create and go to the ContentSounds folder.
- Import Pickup.wav, Footstep.wav, Jump.wav, Land.wav, and Fall.wav from the Exercise18.02Assets folder.
- Save the new files.
Next, we will add the Play Sound anim notifies to some of the character’s animations.
- Open the MM_Jump animation, located in ContentCharactersMannequinsAnimationsManny, and add a Play Sound anim notify at frame 0 using the Jump sound.
- Save and close MM_Jump.
- Open the MF_Run_Fwd animation, located in ContentCharactersMannequinsAnimationsQuinn, and add Play Sound anim notifies using the Footstep sound at 0.24, 0.56, 0.82, 1.12, 1.38, and 1.70 seconds.
- Save and close MF_Run_Fwd.
- Open the MF_Walk_Fwd animation, located in ContentCharactersMannequinsAnimationsQuinn, and add two Play Sound anim notifies using the Footstep sound at 0.33, 0.72, 1.23, and 1.7 seconds.
- Save and close MF_Walk_Fwd.
Now, let’s set the sounds to use on the character blueprint:
- Open the BP_ThirdPersonCharacter blueprint, located in ContentThirdPersonBlueprints, and set Fall Sound and Land Sound so that they use the Fall and Land sounds, respectively.
- Save and close BP_ThirdPersonCharacter.
Now, let’s create the blueprint for the pickup.
- Create and open the ContentBlueprints folder.
- Create a new blueprint called BP_Pickup that derives from the Pickup class and open it.
- Configure the Static Mesh component in the following way:
- Scale: (X=0.5, Y=0.5, Z=0.5)
- Static Mesh: EngineBasicShapesCube
- Material: EngineEngineMaterialsCubeMaterial
Note
To display the Engine content, you need to click on the dropdown for the static mesh, click on the cog icon next to the filter box, and make sure that the Show Engine Content flag is set to true.
Now, let’s create the scoreboard UMG widgets. Follow these steps:
- Create and go to the ContentUI folder.
- Create a new widget blueprint called WBP_Scoreboard_Header:
- Add a Canvas Panel to the Hierarchy panel.
- Add a text block called Name to the canvas panel with Is Variable set to true, Size To Content set to true, Text set to Player Name, and Color and Opacity set to use the color green.
- Add a text block called Score to the canvas panel with Is Variable set to true, Position X = 500, Alignment = 1.0, 0.0, Size To Content set to true, Text set to Score, and Color and Opacity set to use the color green.
- Add a text block called Pickups to the canvas panel with Is Variable set to true, Position X = 650, Alignment = 1.0, 0.0, Size To Content set to true, Text set to Pickups, and Color and Opacity set to use the color green.
- Save and close WBP_Scoreboard_Header.
- Go back to ContentUI, duplicate WBP_Scoreboard_Header, rename it to WBP_Scoreboard_Entry, and open it.
- Change the color of all of the text blocks to white instead of green.
- Go to the Graph section and create the Player State variable with the following configuration:

Figure 18.6 – Creating the Player State variable
- Go back to the Designer section and create a text block called Name with Text set to Player Name and bind it to the GetPlayerName function from the dropdown, like so:
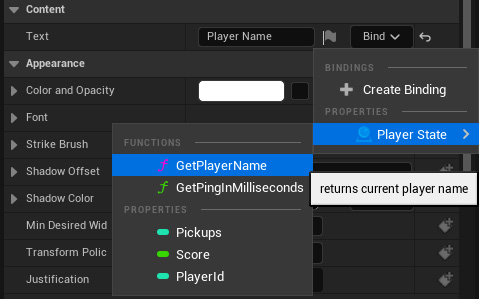
Figure 18.7 – Binding the player name function
- Create a text block called Score with Text set to Score and bind it to the Score variable from the dropdown, like so:

Figure 18.8 – Binding the player score function
- Create a text block called Pickups with Text set to Pickups and bind it to the Pickups variable from the dropdown, like so:

Figure 18.9 – Binding the pickups count function
- Create a pure function called Get Typeface that does the following:
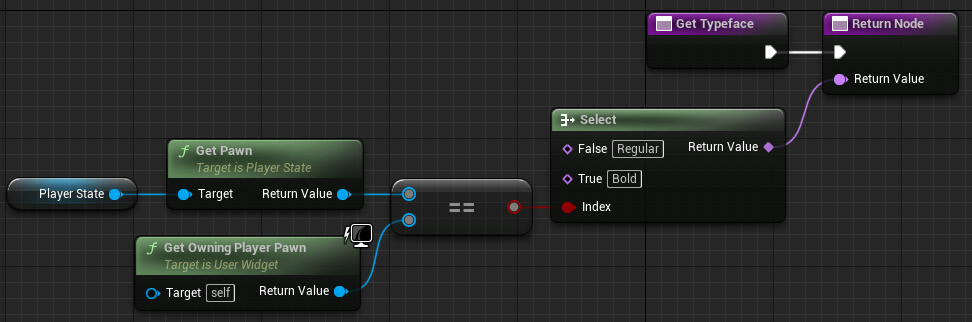
Figure 18.10 – Determining whether the entry should be displayed in Bold or Regular
In the preceding code, we used a Select node, which can be created by dragging a wire from the return value and releasing it on an empty space, and then typed Select on the filter. From there, we picked the Select node from the list. Here, we are using the Select node to pick the name of the typeface we’re going to use, so it should return Regular if the player state’s pawn is not the same as the pawn that owns the widget and Bold if it is. We do this to highlight the player’s state entry in bold so that the player knows what their entry is.
- Implement Event Construct in the following way:

Figure 18.11 – The Event Graph that sets the text for the name, score, and pickups count
In the preceding code, we set the font for Name, Score, and Pickups to use the Bold typeface to highlight which scoreboard entry is relative to the player of the current client. For the remainder of the players, use the Regular typeface. If you can’t find the Roboto font, then pick Show Engine Content from the dropdown options.
- Save and close WBP_Scoreboard_Entry.
- Open WBP_Scoreboard and add a Canvas Panel to the Hierarchy panel.
- Go to the Graph section and create a new variable called Game State of the Pickups Game State type.
- Go back to the Designer section and add a vertical box called Scoreboard to the canvas panel with Size To Content set to true.
- Add a text block to Scoreboard called PickupsRemaining with Text set to 100 Pickup(s) Remaining.
- Add a vertical box to Scoreboard called PlayerStates with Is Variable set to true and a top padding of 50. You should have the following:

Figure 18.12 – The WBP_Scoreboard widget hierarchy

Figure 18.13 – Displaying the number of pickups remaining in the world
- Go to Event Graph and create a new event called Add Scoreboard Header that adds an instance of WBP_Scoreboard_Header to Player States, as shown in the following screenshot:

Figure 18.14 – The Add Scoreboard Header event
- Create a new event called Add Scoreboard Entries. This goes through all of the player states ordered by score and adds an instance of WBP_Scoreboard_Entry to Player States, as demonstrated in the following screenshot:

Figure 18.15 – The Add Scoreboard Entries event
- Create a new event called Update Scoreboard. This event clears the widgets in Player States and calls Add Scoreboard Header and Add Scoreboard Entries, as shown in the following screenshot:

Figure 18.16 – The Update Scoreboard event
- Implement Event Construct in the following way:

Figure 18.17 – Event Construct
In the preceding code, we get the game state instance, update the scoreboard, and schedule a timer to automatically call the Update Scoreboard event every 0.5 seconds.
- Save and close WBP_Scoreboard.
Now, let’s create the blueprint for the player controller. Follow these steps:
- Go to ContentBlueprints and create a new blueprint called BP_PlayerController that derives from the PickupsPlayerController class.
- Open the new blueprint and set Scoreboard Menu to use WBP_Scoreboard.
- Save and close BP_PlayerController.
Next, let’s create the blueprint for the game mode.
- Create a new blueprint called BP_GameMode that derives from the PickupsGameMode class, open it, and change the following variables:
- Game State Class: PickupsGameState
- Player Controller Class: BP_PlayerController
- Player State Class: PickupsPlayerState
- Save and close BP_GameMode.
- Next, let’s configure Project Settings so that it uses the new game mode.
- Go to Project Settings and pick Maps & Modes from the left panel, which is in the Project category.
- Set Default GameMode to use BP_GameMode.
- Close Project Settings.
Now, let’s modify the main level. Follow these steps:
- Make sure you have ThirdPersonMap opened, located in ContentThirdPersonMaps.
- Add some cube actors to act as platforms. Make sure they have gaps between them to force the player to jump on them and possibly fall from the level.
- Add a couple of player start actors spread throughout the map.
- Add at least 50 instances of BP_Pickup and spread them across the entire map.
- Here is an example of a possible way of configuring the map:
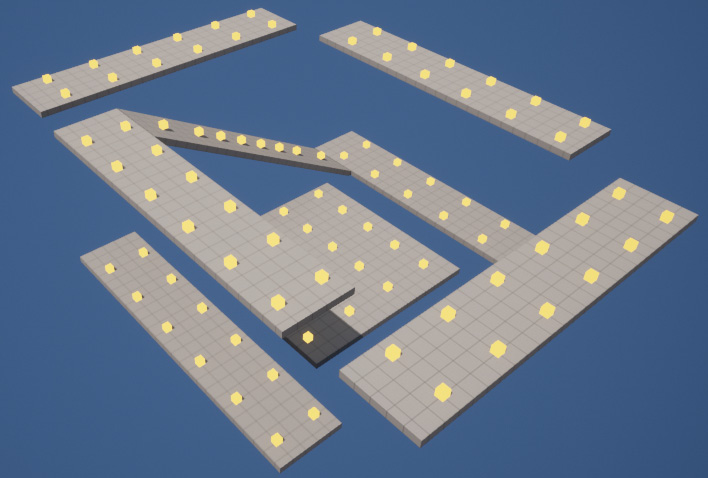
Figure 18.18 – An example of a map configuration
- Go to World Settings, set GameMode Override to None, and save everything.
- Go to Multiplayer Options, set Net Mode to Play As Listen Server, and set Number of Players to 2.
- Set the window sizes to 800x600 and play using New Editor Window (PIE).
You should get the following output:

Figure 18.19 – The listen Server and Client 1 picking up cubes in the world
By completing this exercise, you can play on each client. You’ll notice that the characters can collect pickups and gain 10 points just by overlapping with them. If a character falls from the level, they will respawn on a random player start and lose 10 points.
Once all the pickups have been collected, the game will end, and after 5 seconds, it will perform a server travel to reload the same level and bring all the clients with it. You will also see that the UI displays how many pickups are remaining in the level, as well as the scoreboard with information about the name, score, and pickups for each player.
In the next activity, you’re going to add a scoreboard, kill limit, the concept of death/respawning, and the ability for the characters to pick up weapons, ammo, armor, and health in our multiplayer FPS game.
Activity 18.01 – Adding death, respawning, a scoreboard, kill limit, and pickups to the multiplayer FPS game
In this activity, you’ll add the concept of death/respawning and the ability for a character to collect pickups to our multiplayer FPS game. We’ll also add a scoreboard and a kill limit to the game so that it has an end goal.
Follow these steps to complete this activity:
- Open the MultiplayerFPS project from Activity 17.01 – Adding weapons and ammo to the multiplayer FPS game. Compile the code and run the editor.
- Create a C++ class called FPSGameState, which derives from the GameState class, and has a kill limit variable and a function that returns the player states ordered by kills.
- Create a C++ class called FPSPlayerState, which derives from the PlayerState class, and stores the number of kills and deaths of a player.
- Create a C++ class called PlayerMenu, which derives from the UserWidget class, and has some BlueprintImplementableEvent functions to toggle the scoreboard visibility, set the scoreboard visibility, and notify when a player was killed.
- Create a C++ class called FPSPlayerController, which derives from APlayerController, that creates the PlayerMenu UMG widget instance on the owning client.
- Create a C++ class called Pickup, which derives from the Actor class, and has a static mesh that rotates 90 degrees per second on the Yaw axis and can be picked up by the player on overlap. Once picked up, it plays a pickup sound and disables collision and visibility. After a certain amount of time, it will make it visible and able to collide again.
- Create a C++ class called AmmoPickup, which derives from the Pickup class, and adds a certain amount of an ammo type to the player.
- Create a C++ class called ArmorPickup, which derives from the Pickup class, and adds a certain amount of armor to the player.
- Create a C++ class called HealthPickup, which derives from the Pickup class, and adds a certain amount of health to the player.
- Create a C++ class called WeaponPickup, which derives from the Pickup class, and adds a certain weapon type to the player. If the player already has the weapon, it will add a certain amount of ammo.
- Edit the FPSCharacter class so that it does the following:
- After the character is damaged, it checks whether it’s dead. If it’s dead, it registers the kill for the killer character and the death of the player and respawn it. If the character is not dead, then it plays the pain sound on the owning client.
- When the character dies and executes the EndPlay function, it should destroy all of its weapon instances.
- If the character falls from the world, it will register the death of the player and respawn it.
- If the player presses the Tab key, it will toggle the visibility of the scoreboard menu.
- Edit the MultiplayerFPSGameModeBase class so that it does the following:
- Uses the GameMode class instead of GameModeBase
- Stores the number of kills necessary to win the game.
- Uses our custom player controller, player state, and game state classes.
- Makes it implement the match state functions so that the match starts immediately and ends if there is a player that has the required number of kills.
- When the match ends, it will perform a server travel to the same level after 5 seconds.
- Handles when a player dies by adding the kill (when killed by another player) and the death to the respective player state, as well as respawn the player on a random player start.
- Import AmmoPickup.wav from Activity18.01Assets into ContentPickupsAmmo.
- Create BP_PistolBullets_Pickup from AmmoPickup, place it in ContentPickupsAmmo, and configure it with the following values:
- Scale: (X=0.5, Y=0.5, Z=0.5)
- Static Mesh: EngineBasicShapesCube
- Material: ContentWeaponPistolMI_Pistol
- Ammo Type: Pistol Bullets
- Ammo Amount: 25
- Pickup Sound: ContentPickupAmmoAmmoPickup
- Create BP_MachineGunBullets_Pickup from AmmoPickup, place it in ContentPickupsAmmo, and configure it with the following values:
- Scale: (X=0.5, Y=0.5, Z=0.5)
- Static Mesh: EngineBasicShapesCube
- Material: ContentWeaponMachineGunMI_MachineGun
- Ammo Type: Machine Gun Bullets
- Ammo Amount: 50
- Pickup Sound: ContentPickupAmmoAmmoPickup
- Create BP_Slugs_Pickup from AmmoPickup, place it in ContentPickupsAmmo, and configure it with the following values:
- Scale: (X=0.5, Y=0.5, Z=0.5)
- Static Mesh: EngineBasicShapesCube
- Material: ContentWeaponRailgunMI_Railgun
- Ammo Type: Slugs
- Ammo Amount: 5
- Pickup Sound: ContentPickupAmmoAmmoPickup
- Import ArmorPickup.wav from Activity18.01Assets into ContentPickupsArmor.
- Create the M_Armor material in ContentPickupsArmor, which has Base Color set to blue and Metallic set to 1.
- Create BP_Armor_Pickup from ArmorPickup, place it in ContentPickupsArmor, and configure it with the following values:
- Scale: (X=1.0, Y=1.5, Z=1.0)
- Static Mesh: EngineBasicShapesCube
- Material: ContentPickupArmorM_Armor
- Armor Amount: 50
- Pickup Sound: ContentPickupArmorArmorPickup
- Import HealthPickup.wav from Activity18.01Assets into ContentPickupsHealth.
- Create the M_Health material in ContentPickupsHealth, which has Base Color set to green and Metallic/Roughness set to 0.5.
- Create BP_Health_Pickup from HealthPickup, place it in ContentPickupsHealth, and configure it with the following values:
- Static Mesh: EngineBasicShapesSphere
- Material: ContentPickupHealthM_Health
- Health Amount: 50
- Pickup Sound: ContentPickupHealthHealthPickup
- Import WeaponPickup.wav from Activity18.01Assets into ContentPickupsWeapon.
- Create BP_Pistol_Pickup from WeaponPickup, place it in ContentPickupsWeapon, and configure it with the following values:
- Static Mesh: ContentPickupWeaponSM_Weapon
- Material: ContentWeaponPistolMI_Pistol
- Weapon Type: Pistol
- Ammo Amount: 25
- Pickup Sound: ContentPickupWeaponWeaponPickup
- Create BP_MachineGun_Pickup from WeaponPickup, place it in ContentPickupsWeapon, and configure it with the following values:
- Static Mesh: ContentPickupWeaponSM_Weapon
- Material: ContentWeaponMachineGunMI_MachineGun
- Weapon Type: Machine Gun
- Ammo Amount: 50
- Pickup Sound: ContentPickupWeaponWeaponPickup
- Create BP_Railgun_Pickup from WeaponPickup, place it in ContentPickupsWeapon, and configure it with the following values:
- Static Mesh: ContentPickupWeaponSM_Weapon
- Material: ContentWeaponRailgunMI_Railgun
- Weapon Type: Railgun
- Ammo Amount: 5
- Pickup Sound: ContentPickupWeaponWeaponPickup
- Import Land.wav and Pain.wav from Activity18.01Assets into ContentPlayerSounds.
- Edit BP_Player so that it uses the Pain and Land sounds, as well as deletes all of the nodes that create and add the WBP_HUD instance to the viewport in the Begin Play event.
- Create a UMG widget called WBP_Scoreboard_Entry in ContentUI that displays the name, kills, deaths, and ping of FPSPlayerState.
- Create a UMG widget called WBP_Scoreboard_Header that displays the headers for the name, kills, deaths, and ping.
- Create a UMG widget called WBP_Scoreboard that displays the kill limit from the game state, a vertical box that has WBP_Scoreboard_Header as the first entry, and then add a WBP_Scoreboard_Entry for each FPSPlayerState in the game state instance. The vertical box will update every 0.5 seconds, through a timer, by clearing its children and adding them again.
- Edit WBP_HUD so that it adds a new text block called Killed that starts with Visibility set to Hidden. When the player kills someone, it will make the text block visible, display the name of the killed player, and hide after 1 second.
- Create a new blueprint called WBP_PlayerMenu from PlayerMenu and place it in ContentUI. Use a widget switcher with an instance of WBP_HUD to index 0 and an instance of WBP_Scoreboard to index 1. In the event graph, make sure that you override the Toggle Scoreboard, Set Scoreboard Visibility, and Notify Kill events that were set as BlueprintImplementableEvent in C++. The Toggle Scoreboard event toggles the widget switcher’s active index between 0 and 1, the Set Scoreboard Visibility event sets the widget switcher’s active index to 0 or 1, and the Notify Kill event tells the WBP_HUD instance to set the text and hide it after 1 second.
- Create BP_PlayerController from FPSPlayerController, place it in the Content folder, and set the PlayerMenuClass variable to use WBP_PlayerMenu.
- Edit BP_GameMode and set Player Controller Class to use BP_PlayerController.
- Create the input action IA_Scoreboard to toggle the scoreboard with the Tab key and update IMC_Player.
- Edit the DM-Test level so that you have at least three new player starts placed in different locations. Then, place an instance of every different pickup.
- In World Settings, set Kill Z to -500.
Expected output:
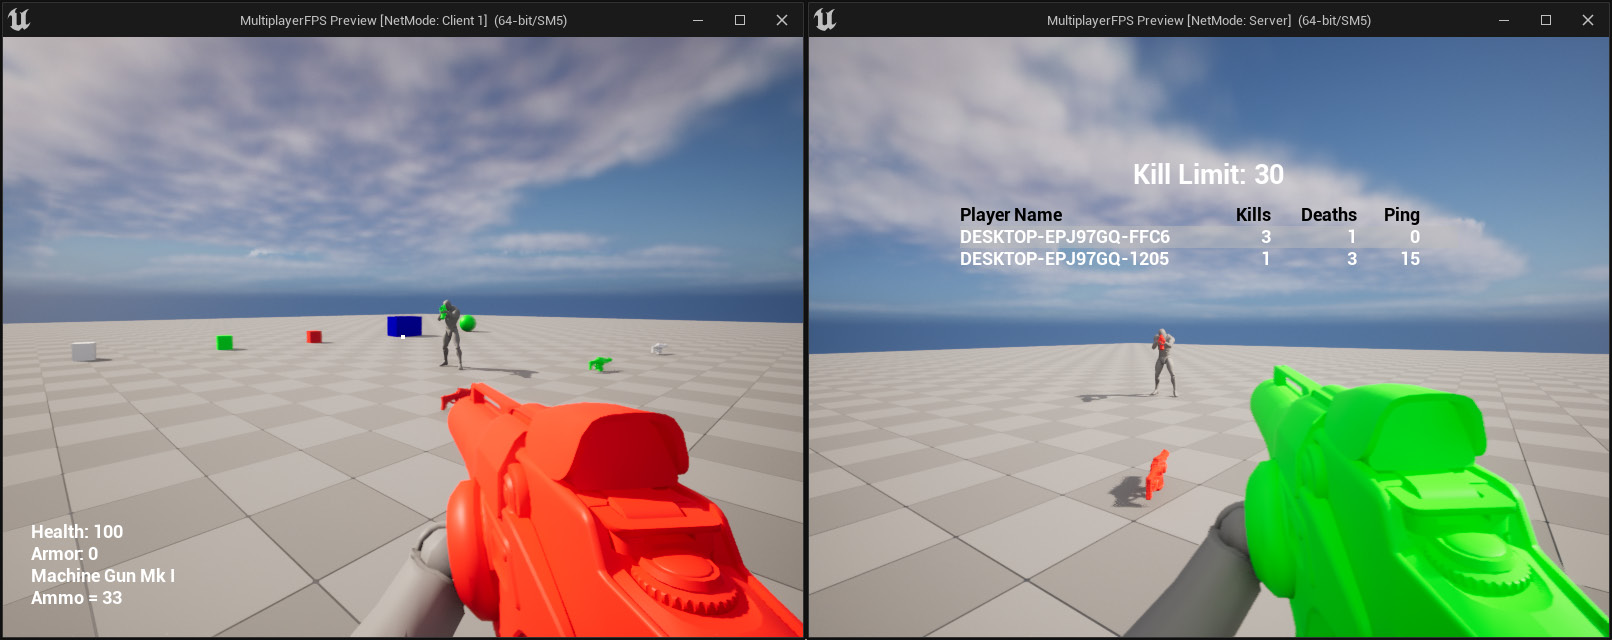
Figure 18.20 – The expected output of the activity
The result should be a project where each client’s character can use and switch between three different weapons. If a character kills another, it should register the kill and the death, as well as respawn the character that died at a random player start. You should have a scoreboard that displays the name, kill count, death count, and ping for each player. A character can fall from the level, which should only count as a death, and respawn at a random player start. The character should also be able to pick up the different pickups in the level to get ammo, armor, health, and weapons. The game should end when the kill limit has been reached by showing the scoreboard and server travel to the same level after 5 seconds.
Note
The solution to this activity can be found on GitHub here: https://github.com/PacktPublishing/Elevating-Game-Experiences-with-Unreal-Engine-5-Second-Edition/tree/main/Activity%20solutions.
Summary
In this chapter, you learned that the instances of the gameplay framework classes exist in some specific game instances, but not in others. You also learned about the purpose of the game state and player state classes, as well as new concepts for the game mode and some useful built-in functionalities.
At the end of this chapter, you made a basic but functional multiplayer shooter that can be used as a foundation to build upon. You added new weapons, ammo types, fire modes, pickups, and so on to make it more feature-complete and fun.
Having completed this book, you should now have a better understanding of how to use UE5 to make games come to life. We’ve covered a lot of topics in this book, ranging from the simple to more advanced. You started by learning how to create projects using the different templates and how to use Blueprints to create actors and components. Then, you learned how to create a fully functioning Third Person template from scratch by importing the required assets and setting up the Animation Blueprint, Blend Space, game mode, and character, as well as defining and handling the inputs.
Then, you moved on to your first project – a simple stealth game that uses game physics and collisions, projectile movement components, actor components, interfaces, blueprint function libraries, UMG, sounds, and particle effects. Following this, you learned how to create a simple side-scrolling game by using AI, Anim Montages, and Destructible Meshes. Finally, you learned how to create a first-person multiplayer shooter by using the Server-Client architecture, variable replication, and RPCs, as well as how the Player State, Game State, and Game Mode classes work.
By working on various projects that use different parts of Unreal Engine, you now have a strong understanding of how UE5 works. Although this is the end of this book, this is just the beginning of your journey into the world of game development using UE5.