
3
Character Class Components and Blueprint Setup
In the previous chapter, we learned how to create empty projects and import files, which folder structure to use, and how to work with animations. In this chapter, we’ll explore some other key tools and functionality that you will work with when using Unreal Engine.
Game developers often need to use certain tools that save them time and energy when building game functionality. Unreal Engine’s powerful object inheritance capabilities give developers the edge they need to be more efficient. Developers can also work with both C++ and Blueprints interchangeably and use them to their benefit when developing games.
Another value-added benefit developers gain is the ability to extend code for use later in a project. Let’s say your client has new requirements that build upon the old ones (as is the case in most game studios). Now, to extend functionality, developers can just inherit a class and add more functionality to it to get results quickly. This is very powerful, and it comes in handy in many situations.
This chapter will focus on the Character class in C++. You will be shown how to extend the Character class in C++ and then extend this newly created Character class further in Blueprints via inheritance. You will also work with player input and some movement logic. We will discuss the Unreal Character class, create C++ code, and then extend it in Blueprints, before finally using it to create an in-game character.
In this chapter, we will cover the following topics:
- The Unreal Character class
- Extending the C++ class with Blueprints
By the end of this chapter, you will understand how class inheritance works in UE5 and how to utilize it to your advantage. You will also be able to work with Axis Mappings and Action Input Mappings, which are key in driving player-related input logic.
Technical requirements
This chapter has the following technical requirements:
- Unreal Engine 5 installed
- Visual Studio 2019 installed
The complete code for this chapter can be downloaded from GitHub at https://github.com/PacktPublishing/Elevating-Game-Experiences-with-Unreal-Engine-5-Second-Edition.
The Unreal Character class
Before we talk about the Unreal Character class, let’s briefly touch on the concept of inheritance. If you’re used to working with C++ or another similar language, you should already be familiar with this concept. Inheritance is the process whereby a class derives characteristics and behavior from another class. A C++ class can be extended to create a new class – a derived class – that retains properties of the base class and allows these properties to be modified or new characteristics to be added. An example of this is the Character class.
The Character class is a special type of pawn and is a descendant of the Unreal Pawn class. Extending upon the Pawn class, the Character class has some movement capabilities by default, along with some inputs that add movement to the character. As standard, the Character class gives users the ability to get a character to walk, run, jump, fly, and swim within the created world.
Since the Character class is an extension of the Pawn class, it contains all the code/logic of the pawn, and developers can extend this class to add more functionality to it. When extending the Character class, its existing components get carried over to the extended class as inherited components (in this case, the Capsule, Arrow, and Mesh components).
Note
Inherited components cannot be removed. Their settings may be changed, but a component that’s added to a base class will always be present in the extended class. In this case, the base class is the Pawn class, while the extended (or child) class is the Character class.
The Character class provides the following inherited components:
- Capsule component: This is the root component that serves as the “origin” that other components get attached to within the hierarchy. This component can also be used for collisions and takes the form of a capsule that logically outlines many character forms (especially humanoid ones).
- Arrow component: This provides a simple arrow pointing toward the front of the hierarchy. By default, this is set to hide when the game starts, but it can be tweaked to be visible. This component can be useful for debugging and adjusting game logic if required.
- Skeletal Mesh component: This is the primary component that developers are mostly concerned with within the Character class. The Skeletal Mesh, which is the form the character will take, can be set up here, along with all the relevant variables, including animations, collisions, and so on.
Most developers usually prefer to code the game and character logic in C++ and extend that class to Blueprints so that they can perform other simple tasks, such as connecting assets to the class. So, for example, a developer may create a C++ class that inherits from the Character class, write all the movement and jumping logic within that class, and then extend this class with a Blueprint, in which the developer updates the components with the required assets (such as the Skeletal Mesh and animation blueprint), and optionally code additional functionality into blueprints.
Extending the Character class
The Character class is extended when it is inherited by either C++ or Blueprints. This extended Character class will be a child of the Character class (which will be called its parent). Extending classes is a powerful part of object-oriented programming, and classes can be extended to great depths and hierarchies.
Exercise 3.01 – creating and setting up a third-person Character C++ class
In this exercise, you will create a C++ class based on a Character class. You will also initialize the variables that will be set in the default values for the class that will extend this Character class.
Follow these steps to complete this exercise:
- Launch Unreal Engine, select the Games category, and click the Next button.
- Select Blank and click the Next button.
- Choose C++ as the project type, set up the project name as MyThirdPerson, choose a suitable project directory, and click the Create Project button.
- Right-click in the Content Browser area and click the New C++ Class button.
- In the dialog box that opens, select Character as the class type and click the Next button.
- Name it MyThirdPersonChar and click the Create Class button.
- Upon doing so, Visual Studio will open the MyThirdPersonChar.cpp and MyThirdPersonChar.h tabs.
Note
On some systems, you might be required to run the Unreal Engine editor with administrator privileges to automatically open the Visual Studio solution with the newly created C++ files.
- Open the MyThirdPersonChar.h tab and add the following code under the GENERATED_BODY() text:
// Spring arm component which will act as a
// placeholder for
// the player camera. This component is recommended to // be used as it automatically controls how the
//camera handles situations
// where it becomes obstructed by geometry inside the
// level, etc
UPROPERTY(VisibleAnywhere, BlueprintReadOnly, Category =
MyTPS_Cam, meta = (AllowPrivateAccess = "true"))
class USpringArmComponent* CameraBoom;
// Follow camera
UPROPERTY(VisibleAnywhere, BlueprintReadOnly, Category =
MyTPS_Cam, meta = (AllowPrivateAccess = "true"))
class UCameraComponent* FollowCamera;
In the preceding code, we’re declaring two components: the Camera component itself and Camera boom, which acts as the placeholder for the camera at a certain distance from the player. These components will be initialized in the constructor in step 11.
- Add the following #include statements under #include “CoreMinimal.h”, in the MyThirdPersonChar.h file:
#include "GameFramework/SpringArmComponent.h"
#include "Camera/CameraComponent.h"
- Now, go to the MyThirdPersonChar.cpp tab and add the following #include statements after the #include MyThirdPersonChar.h code:
#include "Components/CapsuleComponent.h"
#include "GameFramework/CharacterMovementComponent.h"
The preceding code adds the relevant classes to the class, which means we now have access to its methods and definitions.
- In the AMyThirdPersonChar::AMyThirdPersonChar() function, add the following lines:
// Set size for collision capsule
GetCapsuleComponent()->InitCapsuleSize(42.f, 96.0f);
// Don't rotate when the controller rotates. Let that // just
affect the camera.
bUseControllerRotationPitch = false;
bUseControllerRotationYaw = false;
bUseControllerRotationRoll = false;
// Configure character movement
GetCharacterMovement()->bOrientRotationToMovement = true;
// Create a camera boom (pulls in towards the
player if there is a collision)
CameraBoom =
CreateDefaultSubobject<USpringArmComponent>(
TEXT("CameraBoom"));
CameraBoom->SetupAttachment(RootComponent);
CameraBoom->TargetArmLength = 300.0f;
CameraBoom->bUsePawnControlRotation = true;
// Create a camera that will follow the character
FollowCamera =
CreateDefaultSubobject<UcameraComponent>(
TEXT("FollowCamera"));
FollowCamera->SetupAttachment(CameraBoom,
USpringArmComponent::SocketName);
FollowCamera->bUsePawnControlRotation = false;
The last line of the preceding code snippet will set up the camera to bind its rotation with the pawns’. This means that the camera should, in turn, rotate based on the rotation of the player controller that’s associated with this pawn.
- Head back to the Unreal Engine project and click the Compile icon button on the top bar:
Figure 3.1 – The Compile button on the top bar of Unreal Editor
A Live coding succeeded message should appear at the bottom right.
Note
You can find the completed exercise code files on GitHub, in the Chapter03 | Exercise3.01 directory, at https://github.com/PacktPublishing/Game-Development-Projects-with-Unreal-Engine/tree/master/Chapter03/Exercise3.01.
After extracting the .rar file, double-click the .uproject file. You will see a prompt asking Would you like to rebuild now?. Click Yes so that it can build the necessary intermediate files, after which it should open the project in Unreal Editor automatically.
By completing this exercise, you’ve learned how to extend the Character class. You have also learned how to initialize the default components of the Character class and how to compile the updated code from within Unreal Editor. Next, you will learn how to extend the C++ class you created in Blueprints and why that is feasible in many situations.
Extending the C++ class with Blueprints
As mentioned earlier, most developers extend the C++ code logic to blueprints to link this with the assets they will use. This is done to achieve easy asset assignment compared to finding and setting up the asset in code. Furthermore, it allows developers to use powerful blueprint features such as Timelines, Events, and ready-to-use macros, in combination with their C++ code, to achieve the maximum benefit of developing with both C++ and Blueprints.
So far, we have made a C++ Character class. In it, we have set up components and movement capabilities. Now, we want to specify the assets that are going to be used in our class, as well as add input and movement ability. For this, it is easier to extend with Blueprint and set up the options there. This is what we will be doing in the next exercise.
Exercise 3.02 – extending C++ with Blueprints
In this exercise, you will learn how to extend the C++ class you created with Blueprints to add Blueprint code on top of the pre-existing C++ code. You will also be adding input key bindings, which will be responsible for moving the character.
Follow these steps to complete this exercise:
- Download and extract the contents of the Chapter03/Exercise3.02/ExerciseFiles directory, which can be found on GitHub.
Note
The ExerciseFiles directory can be found on GitHub at https://github.com/PacktPublishing/Game-Development-Projects-with-Unreal-Engine/tree/master/Chapter03/Exercise3.02/ExerciseFiles.
- Browse to the Content folder inside the MyThirdPerson project we created in Exercise 3.01 – creating and setting up a third-person Character C++ class.
- Copy the MixamoAnimPack folder we created in step 1 and paste it into the Content folder directory we opened in step 2, as shown in the following screenshot:

Figure 3.2 – MixamoAnimPack placed in the project directory
Note
The MixamoAnimPack assets were obtained from the Epic marketplace via the following link: https://www.unrealengine.com/marketplace/en-US/product/mixamo-animation-pack.
- Open the project. Right-click inside the Content Browser area and click Blueprint Class.
- In the Search dialog, type GameMode, right-click the class matching the name, and click the Select button. Have a look at the following screenshot:

Figure 3.3 – Creating the GameMode class
- Name the blueprint we created in step 6 BP_GameMode.
- Now, repeat step 5.
- In the Search box, type MyThirdPersonChar, select the class, and then right-click on the Select button.
- Name the blueprint we created in step 9 BP_MyTPC.
- In the World Settings tab, click the None option next to GameMode Override and select BP_GameMode:

Figure 3.4 – Specifying Game Mode in World Settings
- Set Default Pawn Class to BP_MyTPC:
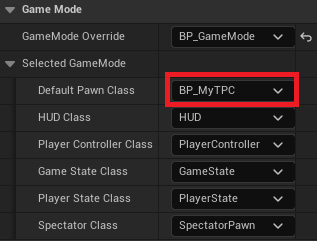
Figure 3.5 – Specifying Default Pawn Class in Game Mode
- Open BP_MyTPC and click on the Mesh (Inherited) component in the hierarchy of the Components tab on the left-hand side.
- In the Details tab, find the Mesh section and set Skeletal Mesh to Maximo_Adam.
Note
Meshes and Animations will be covered in depth in Chapter 11, Working with Blend Space 1D, Key Bindings, and State Machines.
- In the Details tab, find the Animation section and set Anim Class to MixamoAnimBP_Adam_C. You’ll note that this class name gets suffixed with _C when selected. This is the instance of the blueprint that was created by UE5. Blueprints, in a working project/build, usually get suffixed this way to differentiate between a Blueprint class and an instance of that class:

Figure 3.6 – Setting up Anim Class and Skeletal Mesh
- From the top-most menu, go to the Edit drop-down and click Project Settings.
- Click on the Input section, which can be found in the Engine section:
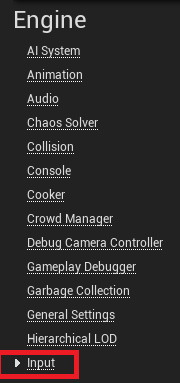
Figure 3.7 – The Input section of Project Settings
Note
Action Mappings are single keypress actions that are performed, such as jump, dash, or run, while Axis Mappings are float values that are assigned that will return a floating-point value based on the keypress of the user. This is more relevant in the case of gamepad controllers or VR controllers, where the analog thumb stick comes into play. In that case, it would return the floating value of the state of the thumb stick, which is very important for managing player movement or related functionalities.
- Rename NewAxisMapping_0 so that it’s called MoveForward.
- In the MoveForward section, click the drop-down menu and select W.
- Click the + icon next to the MoveForward icon to add another field.
- Set the new field to S. Set its scale to -1.0 (since we want to move backward with the S key).
- Create another axis mapping by repeating step 18, name it MoveRight, and add two fields – A with -1.0 for the scale and D with 1.0 for the scale:

Figure 3.8 – Movement Axis Mappings
- Open BP_MyTPC and click the Event Graph tab:
Figure 3.9 – The Event Graph tab
- Right-click anywhere inside the graph, type MoveForward, and select the first node option:
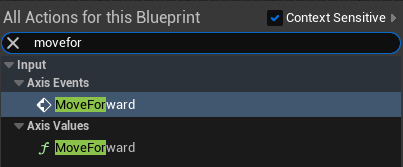
Figure 3.10 – The MoveForward Axis Event
Note
Since the camera associated with a player can choose not to show the pawn’s yaw, roll, or pitch, Get Control Rotation gives the pawn full aim rotation. This is useful in many calculations.
- Left-click and drag from Return Value of the Get Control Rotation node, search for Break Rotator, and select it.
- Right-click inside the graph, search for Make Rotator, and select the first node option.
- Connect the Z (yaw) node from Break Rotator to the Z (yaw) node of Make Rotator.
Note
Make Rotator creates a rotator with the pitch, roll, and yaw values, while the break rotator splits a rotator into its components (roll, pitch, and yaw).
- Left-click and drag from Return Value of the Make Rotator node, search for Get Forward Vector, and select it.
- Left-click and drag from Return Value of the Get Forward Vector node, search for Add Movement Input, and select it.
- Connect the Axis Value node from the InputAxis MoveForward node to the Scale Value node in the Add Movement Input node.
- Finally, connect the white Execution pin from the InputAxis MoveForward node to the Add Movement Input node.
- Right-click inside the graph, search for InputAxis MoveRight, and select the first node option.
- Left-click and drag from Return Value of the Make Rotator node, search for Get Right Vector, and select it.
- Left-click and drag from Return Value of the Get Right Vector node, search for Add Movement Input, and select it.
- Connect the Axis Value pin from the InputAxis MoveRight node to the Scale Value pin in the Add Movement Input node we created in the previous step.
- Finally, connect the white Execution pin from the InputAxis MoveRight node to the Add Movement Input node we added in step 36:
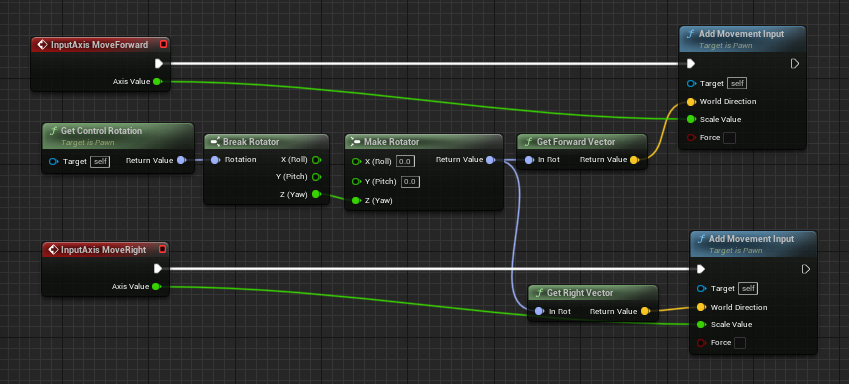
Figure 3.11 – Movement logic
- Now, head to the Viewport tab. Here, you will see that the character’s front is not pointing in the direction of the arrow and that the character is displaced above the capsule component. Click on the Mesh component and select the object translation node located at the top of the viewport. Then, drag the arrows on the Mesh to adjust it so that the feet align with the bottom of the capsule component and the Mesh is rotated to point toward the arrow:
Figure 3.12 – The Translation Rotation and Scale Selector section
Once the character is aligned in the capsule, it will look as follows:

Figure 3.13 – Mesh adjusted within the capsule component
- In the Toolbar menu, press the Compile button and then Save.
- Go back to the map tab and press the Play button to view your character in-game. Use the W, A, S, and D keys to move around.
Note
You can find the completed exercise code files on GitHub, in the Chapter03 | Exercise3.02 directory, at https://packt.live/3keGxIU.
After extracting the .rar file, double-click the .uproject file. You will see a prompt asking Would you like to rebuild now?. Click Yes on that prompt so that it can build the necessary intermediate files, after which it should open the project in Unreal Editor automatically.
By completing this exercise, you know how to extend C++ code with Blueprints, and why that is favorable in many situations for developers. You also learned how to add input mappings and how they are used to drive player-related input logic.
In the activity for this chapter, you will be combining the skills you have gained from the previous exercises of this chapter and extending the project you completed in Activity 2.01 – linking animations to a character of Chapter 2, Working with Unreal Engine. This will allow you to build on your own Blueprint and see how that maps to real-world scenarios.
Activity 3.01 – extending the C++ Character class with Blueprints in the Animation project
Now that you’ve created a C++ class and extended it with Blueprints, it is time to bring both concepts together in a real-world scenario. In this activity, you will be making our character from Activity 2.01 – linking animations to a character, which can be found in Chapter 2, Working with Unreal Engine, jump using the spacebar key on your keyboard. However, you need to create the Character class from scratch in C++ and then later extend it with Blueprint to reach the final goal.
Follow these steps to complete this activity:
- Open the project from Activity 2.01– linking animations to a character.
- Create a Character class in C++ that will initialize the character variables, including the camera associated with the player.
- Map the Jump input to the spacebar key in the project settings.
- Extend the created C++ class with a blueprint to add the associated assets and jump functionality.
Expected Output
The character should be able to jump when you press the spacebar key. The level should use the Blueprint that extends the C++ Character class:

Figure 3.14 – Ganfault jump activity expected output
Note
The solution to this activity can be found on GitHub here: https://github.com/PacktPublishing/Elevating-Game-Experiences-with-Unreal-Engine-5-Second-Edition/tree/main/Activity%20solutions.
By completing this activity, you’ve understood scenarios where C++ code is extended in Blueprints to implement functionalities and logic. This combination of C++ and Blueprints is the most powerful tool game developers possess to create masterful and unique games within Unreal Engine.
Summary
In this chapter, you learned how to create a C++ Character class, add initializer code to it, and then use Blueprints to extend it to set up assets and add additional code.
The result obeys the C++ code, as well as the Blueprint code, and can be used in any purposeful scenario.
You also learned how to set up Axis Mappings that have been mapped to the W, A, S, and D keys to move players (which is the default movement mapping in many games). You also learned how to make the character jump within the game.
In the next chapter, you will explore Input Mappings in more depth and how to use the Mobile Previewer within Unreal Editor. This will help you create games with solid inputs mapped to game and player logic. It will also allow you to quickly test what your game will look and feel like on a mobile, all within Unreal Editor.