
11
Working with Blend Space 1D, Key Bindings, and State Machines
In the previous chapter, we had a high-level look at animation and developing the game design for our SuperSideScroller project. You were provided with just the beginning steps in terms of developing the project itself. Then, you prepared the player character’s Animation Blueprint and character Blueprint, and also imported all of the required skeletal and animation assets.
In this chapter, we will set up the walking and jumping animations of our player character so that the movement has a sense of locomotion. To accomplish this, you will be introduced to Blend Spaces, Animation Blueprints, and Animation State Machines, the three pillars behind how character animations are controlled.
At this point, the character can move around the level, but is stuck in the T-Pose and does not animate at all. This can be fixed by creating a new Blend Space for the player character, which will be done in the very first exercise of this chapter. Once the Blend Space is complete, you will use it to implement the character Animation Blueprint for the character to animate while moving.
In this chapter, we’re going to cover the following main topics:
- Creating Blend Spaces
- Main character Animation Blueprint
- What are velocity vectors?
- Enhanced input system
- Using Animation State Machines
By the end of the chapter, the player character will be able to walk, sprint, and jump, thus providing a better game feel to how the character will move in our game. By creating and learning about Blend Space 1D and Animation Blueprint assets, you will add a layer of sophistication to how the player movement is handled, while also establishing the groundwork for further animations, such as the projectile throw.
Technical requirements
For this chapter, you will need the following:
- Unreal Engine 5 installed
- Visual Studio 2019 installed
The project for this chapter can be found in the Chapter11 folder of the code bundle for this book, which can be downloaded here: https://github.com/PacktPublishing/Elevating-Game-Experiences-with-Unreal-Engine-5-Second-Edition.
We’ll start this chapter by learning about Blend Spaces before creating the Blend Space asset that you will need to animate the player character.
Creating Blend Spaces
Blend Spaces allow you to blend between multiple animations based on one or more conditions. Blend Spaces are used in different types of video games, but, more often than not, in games where the player can view the entire character. Blend Spaces are not usually used when the player can only see the character’s arms, such as in the First-Person project template provided in UE5, as shown here:
Figure 11.1 – The first-person perspective of the default character in the First-Person project template in UE5
It is more common in third-person games where there is a need to use Blend Spaces to smoothly blend movement-based animations of the character. A good example is the Third-Person template project provided in UE5, as shown here:

Figure 11.2 – The third-person perspective of the default character in the First-Person project template in UE5
Let’s look at the Blend Space asset provided by Unreal Engine when creating the Third Person template project template by opening /Characters/Mannequins/Animations/Quinn/BS_MF_Unarmed_WalkRun. This is a Blend Space 1D asset created for the Side Scroller mannequin skeletal mesh so that the player character can smoothly blend between Idle, Walking, and Running animations based on the speed of the character.
If you check Persona in the Asset Details panel on the left-hand side, you will see the AXIS SETTINGS category, which contains the Horizontal Axis parameter, where we have settings for this axis, which essentially acts as a variable that we can reference in our Animation Blueprint. Please refer to the following screenshot to see the AXIS SETTINGS category within Persona:

Figure 11.3 – The axis settings for the Blend Space 1D
Below the preview window, we will also see a small graph with points along the line from left to right; one of these points will be highlighted green, while the others will be white. We can hold Shift and drag this green point along the horizontal axis to preview the blended animation based on its value. At speed 0, our character is in an Idle state. As we move our preview along the axis, the animation will begin to blend into Walking, followed by Running. The following screenshot shows the single-axis graph:

Figure 11.4 – The key frame timeline of the 1D Blend Space 1D
In the next section, we will look at Blend Space 1Ds versus a normal Blend Space, and when to use them based on your animation needs.
Blend Space 1D versus normal Blend Space
Before moving forward with the Blend Space 1D, let’s take a moment to look at the main differences between a Blend Space 1D and a normal Blend Space in UE5:
- The Blend Space in Unreal Engine is controlled by two variables, represented by the X and Y axes of the Blend Space graph.
- On the other hand, the Blend Space 1D only supports one axis.
Try to imagine this as a 2D graph. Since you know that each axis has a direction, you can visualize why and when you would need to use this Blend Space rather than a Blend Space 1D, which only supports a single axis.
Say, for example, you wanted to make the player character strafe left and right while also supporting forward and backward movement. If you were to map this movement out on a graph, it would look as follows:

Figure 11.5 – What a Blend Space movement would look like on a simple graph
Now, visualize the movement of the player character, keeping in mind the fact that the game is a Side Scroller. The character won’t be supporting left or right strafing or forward and backward movement. The player character will only need to animate in one direction because the Side Scroller character rotates toward the direction of movement by default. Having to only support one direction is why you are using a Blend Space 1D instead of a normal Blend Space.
We will need to set up this type of Blend Space asset for our main character and use the Blend Space for the same purpose, for movement-based animation blending. In the next exercise, we’ll create the Blend Space asset using our custom animation assets.
Exercise 11.01 – creating the CharacterMovement Blend Space 1D
To get the player character to animate while they move, you need to create a Blend Space.
In this exercise, you will create the Blend Space asset, add the idle animation, and update the CharacterMovement component so that you assign an appropriate walking speed value that corresponds with the Blend Space.
Follow these steps to complete this exercise:
- Navigate to the /MainCharacter/Animation folder in the Content Drawer window, where all the new animations you imported in the previous chapter are located.
- Now, right-click in the main area of the Content Drawer window and, from the drop-down menu, hover over the Animation option. From its additional drop-down menu, select Blend Space 1D.
- Make sure to select MainCharacter_Skeleton, not UE4_Mannequin_Skeleton, as the skeleton for the Blend Space.
Note
If you apply the incorrect skeleton, the Blend Space will not be functional for the player character, nor will the custom skeletal mesh when you select the skeleton assets, such as Blend Spaces or Animation Blueprints, that are required. Here, you are telling this asset which skeleton it is compatible with. By doing so, in the case of a Blend Space, you can use animations that have been made for this skeleton, thereby ensuring that everything is compatible with everything else.
- Name this Blend Space asset SideScroller_IdleRun_1D.
- Next, open the SideScroller_IdleRun_Blend Space 1D asset. You can see the single-axis graph below the preview window:
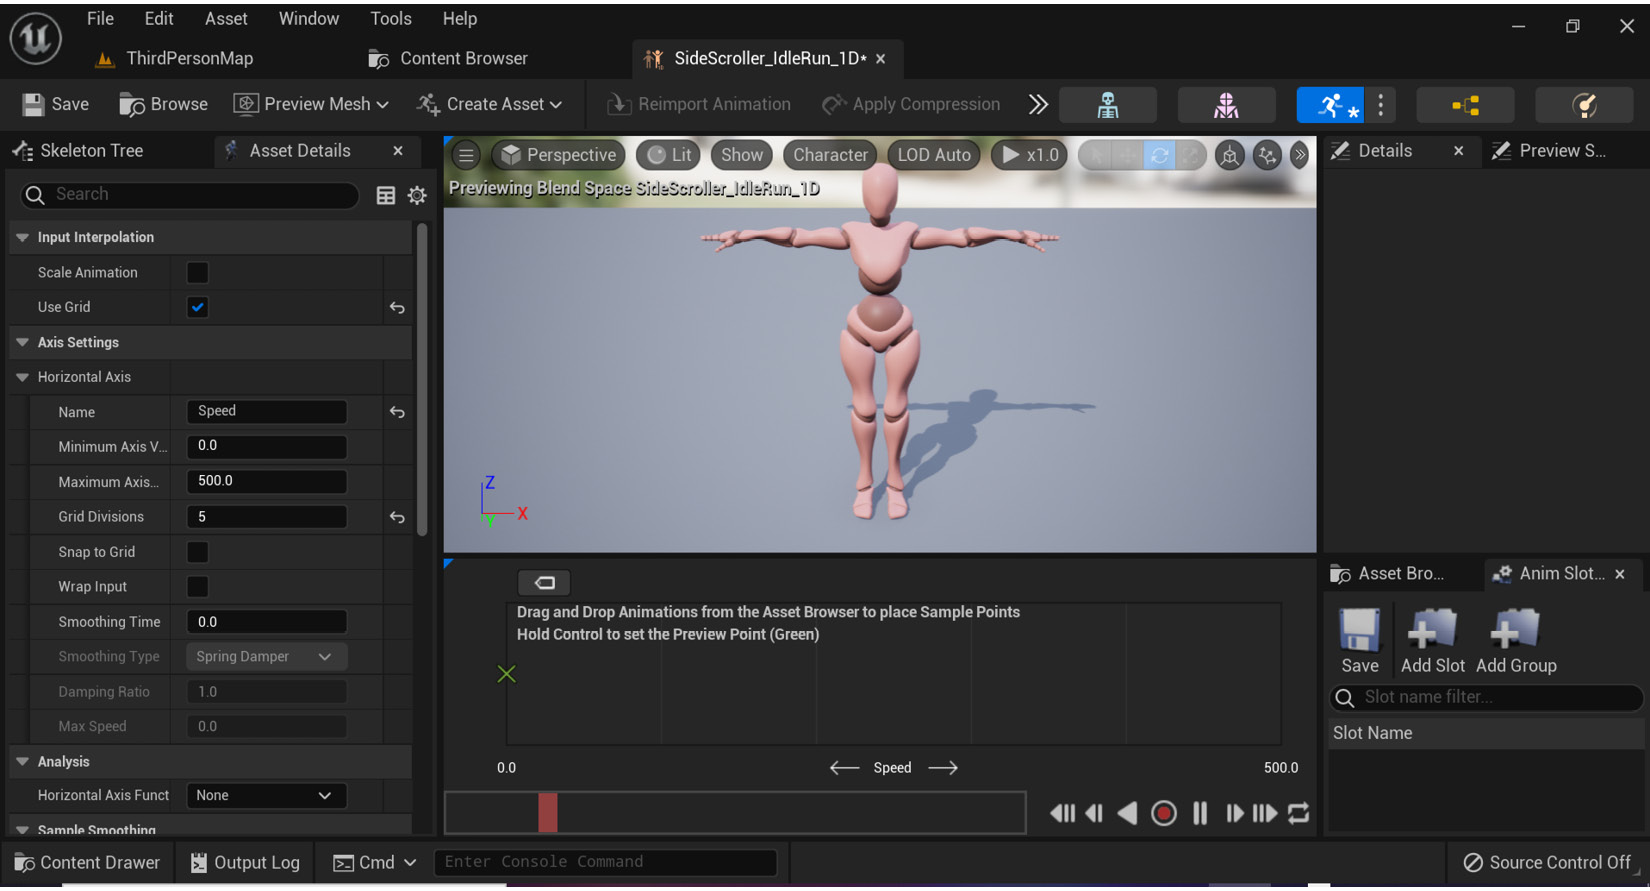
Figure 11.6 – The editing tool used to create Blend Spaces in UE5
On the left-hand side of the editor, you have the Asset Details panel, which contains the AXIS SETTING category. Here, you can label the axis and provide both a minimum and maximum float value that will be of use to you in the Animation Blueprint property for the player character. The following screenshot shows the default values that have been set for Horizontal Axis:

Figure 11.7 – The axis settings that affect the axis of the Blend Space

Figure 11.8 – The horizontal axis is now named Speed
- The next step is to establish Minimum Axis Value and Maximum Axis Value. You will want the minimum value to be 0.0f, which is set by default, because the player character will be in an Idle state when they are not moving at all.
But what about Maximum Axis Value? This one is a little trickier because you need to bear the following points in mind:
- You will be supporting a sprinting behavior for the character that allows the player to move faster when holding down the Left Shift keyboard button. When released, the player will return to the default walking speed.
- The walking speed must match the characters’ Max Walk Speed parameter of CharacterMovementComponent.
- Before you set Maximum Axis Value, you need to set the character’s Max Walk Speed to a value that suits the SuperSideScroller game.
- For this, navigate to /Game/MainCharacter/Blueprints/ and open the BP_SuperSideScroller_MainCharacter Blueprint.
- Select the Character Movement component and, in the Details panel, under the Character Movement: Walking category, find the Max Walk Speed parameter and set its value to 300.0f.
With the Max Walk Speed parameter set, return to the SideScroller_IdleRun_Blend Space 1D and set the Maximum Axis Value parameter. If the walking speed was 300.0f, what should the maximum value be? Keeping in mind that you will support sprinting for the player character, this maximum value needs to be more than the walking speed.
- Update the Maximum Axis Value parameter so that its value is 500.0f.
- Lastly, set the Number of Grid Divisions parameter to a value of 5. The reason for this is that when working with divisions, a 100 unit spacing between each grid point makes it easier to work with since Maximum Axis Value is 500.0f. This is useful in the case of grid point snapping when you apply the movement animations along the grid.
- Leave the remaining properties set as their defaults:

Figure 11.9 – The final axis settings for the Blend Space
With these settings, you are telling the Blend Space to use an incoming float value between 0.0f and 500.0f to blend between the animations that you will place in the next step and the activity. By dividing the grid into 5 divisions, you can easily add the animations needed at the correct float value along the axis graph.
Let’s continue creating the Blend Space by adding our first animation to the axis graph: the Idle animation.
- To the right of the grid, there is the Asset Browser tab. Notice that the list of assets includes all of the animations of the player character that you imported in Chapter 10, Creating the SuperSideScroller Game. This is because you selected the MainCharacter_Skeleton asset when creating the Blend Space.
- Next, left-click and drag the Idle animation to our grid at position 0.0:

Figure 11.10 – Dragging the Idle animation to our grid at position 0.0
Notice that when dragging this animation to the grid, it will snap to the grid point. Once the animation has been added to the Blend Space, the player character will change from its default T-Pose and start to play the Idle animation:

Figure 11.11 – With the Idle animation added to the Blend Space 1D, the player character begins to animate
With this exercise complete, you now have an understanding of how to create a Blend Space 1D and, more importantly, you know the differences between a Blend Space 1D and a normal Blend Space. Additionally, you know the importance of aligning the values between the player character movement component and the Blend Space and why you need to ensure that the walking speed correlates appropriately with the values in the Blend Space.
Now, let’s move on to the first activity of this chapter, where you will be applying the remaining Walking and Running animations to the Blend Space, just as you added the Idle animation.
Activity 11.01 – adding the Walking and Running animations to the Blend Space
The 1D movement Blend Space is coming together nicely so far, but you are missing the Walking and Running animations. In this activity, you will finish the Blend Space by adding these animations to the Blend Space at the appropriate horizontal axis values that make sense for the main character.
Using the knowledge you acquired from Exercise 11.01 – creating the CharacterMovement Blend Space 1D, follow these steps to finish up the character movement Blend Space:
- Continuing from Exercise 11.01 – creating the CharacterMovement Blend Space 1D, head back to the Asset Browser window.
- Now, add the Walking animation to the horizontal grid position 300.0f.
- Finally, add the Running animation to the horizontal grid position 500.0f.
Note
Remember that you can hold shift and drag the green preview grid point along the grid axis to see how the animation blends together based on the axis value, so pay attention to the character animation preview window to make sure that it looks correct.
The expected output is as follows:
Figure 11.12 – The Running animation in the Blend Space
At this point, you should have a functional Blend Space that blends the character movement animations from Idle to Walking to Running based on the value of the horizontal axis that represents the player character’s speed.
Note
The solution to this activity can be found on GitHub here: https://github.com/PacktPublishing/Elevating-Game-Experiences-with-Unreal-Engine-5-Second-Edition/tree/main/Activity%20solutions.
The Main Character Animation Blueprint
With the animations added to the Blend Space, you should be able to walk around and see those animations at work, right? Well, no. If you select Play-In-Editor, you will notice that the main character is still moving in the T-Pose. The reason is that you aren’t telling the Animation Blueprint to use our Blend Space asset yet, which you will do later in this chapter.
Animation Blueprints
Before jumping into using the Animation Blueprint you created in the previous chapter, let’s briefly discuss what this type of Blueprint is, and what its main function is. An Animation Blueprint is a type of Blueprint that allows you to control the animation of a skeleton and skeletal mesh – in this instance, the player character skeleton and mesh you imported in the previous chapter.
An Animation Blueprint is broken into two main graphs:
- Event Graph
- Anim Graph
The Event Graph works as in a normal Blueprint where you can use events, functions, and variables to script gameplay logic. The Anim Graph, on the other hand, is unique to an Animation Blueprint, and this is where you use logic to determine the final pose of the skeleton and skeletal mesh at any given frame. It is here where you can use elements such as State Machines, anim slots, Blend Spaces, and other animation-related nodes to then output the final animation for the character.
Let’s look at an example.
Open the AnimBP_SuperSideScroller_MainCharacter Animation Blueprint in the MainCharacter/Blueprints directory.
By default, AnimGraph should open, where you will see the character preview, the Asset Browser window, and the main graph. It is inside this AnimGraph that you will implement the Blend Space you just created to have the player character animate correctly when moving around the level.
Let’s get started with the next exercise, where we will do this and learn more about Animation Blueprints.
Exercise 11.02 – adding the Blend Space to the character Animation Blueprint
For this exercise, you will add the Blend Space to the Animation Blueprint and prepare the necessary variable to help control this Blend Space based on the movement speed of the player character. Let’s begin by adding the Blend Space to AnimGraph.
Follow these steps to complete this exercise:
- Add the Blend Space to AnimGraph by finding the Asset Browser window on the right-hand side and left-clicking and dragging the SideScroller_IdleRun_Blend Space 1D asset into AnimGraph.
Notice that the variable input for this Blend Space node is labeled Speed, just like the horizontal axis inside the Blend Space. Please refer to Figure 11.14 to see the Blend Space in the Asset Browser window:
Note
If you were to name Horizontal Axis differently, the new name would be shown as the input parameter of the Blend Space.

Figure 11.13 – Asset Browser gives you access to all animation assets related to MainCharacter_Skeleton
- Next, connect the Output Pose asset of the Blend Space node to the Result pin of the Output Pose node. Now, the animation pose in the preview will show the character in the Idle animation pose:
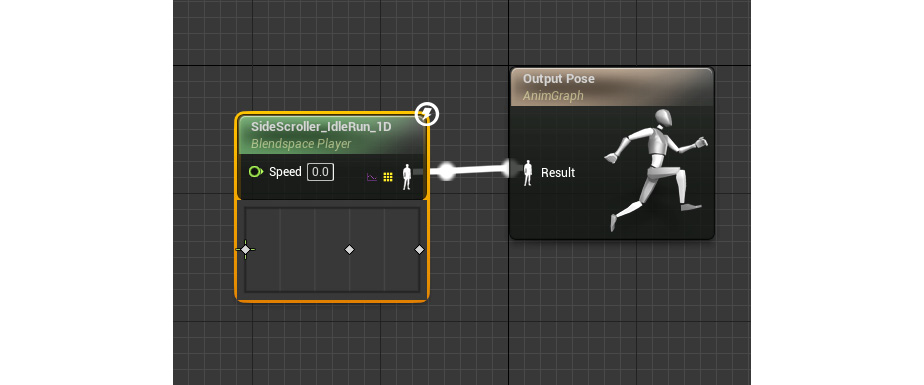
Figure 11.14 – You now have limited control of the Blend Space and can manually enter values into the Speed parameter
- If you use Play In Editor (PIE), the player character will be moving around, but will play the Idle animation instead of remaining in the T-Pose position:

Figure 11.15 – The player character now plays the Idle animation in-game
Now, we can control our Blend Space with our Speed input variable. With the ability to use the Blend Space in place, you need a way to store the character’s movement speed and pass that value to the Speed input parameter of the Blend Space. Let’s learn how to do this.
- Navigate to the Event Graph property of our Animation Blueprint. By default, there will be the Event Blueprint Update Animation event and a pure Try Get Pawn Owner function. The following screenshot shows the default setup of Event Graph. The event is updated each frame that the animation is updated, and returns the Delta Time property between each frame update and the owning pawn of this Animation Blueprint. You need to make sure that the owning pawn is of the SuperSideScroller player character Blueprint class before attempting to get any more information:
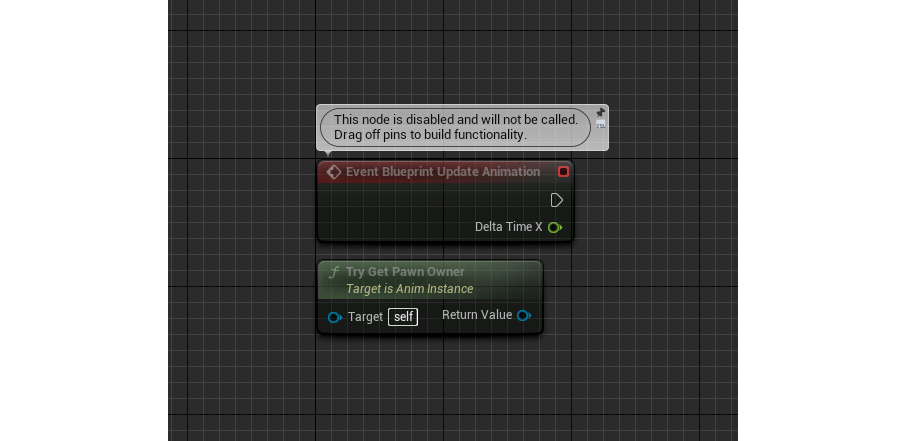
Figure 11.16 – Animation Blueprints include this event and function pair by default for use in your Event Graph
Note
The main difference between a Pure and Impure function in UE5 is that a Pure function implies that the logic it contains will not modify a variable or member of the class that it is being used in. In the case of Try Get Pawn Owner, it is simply returning a reference to the Pawn owner of the Animation Blueprint. Impure functions do not have this implication and are free to modify any variable or member it wants.
- Get the Return Value property from the Try Get Pawn Owner function and, from the Context Sensitive menu that appears, search for the cast to SuperSideScrollerCharacter:

Figure 11.17 – Casting ensures we are working with the correct class
- Connect the execution output pin from Event Blueprint Update Animation to the execution input pin of the cast:
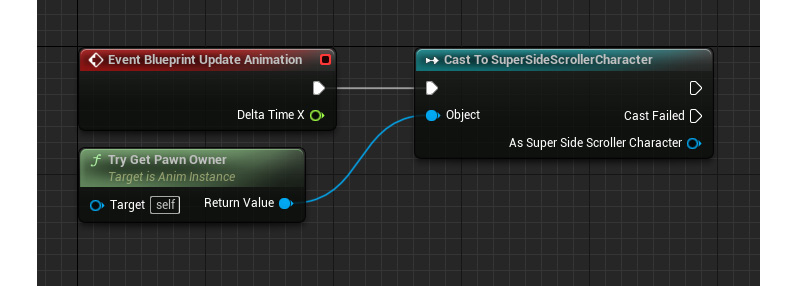
Figure 11.18 – Use the Try Get Pawn Owner function to cast the returned Pawn object to the SuperSideScrollerCharacter class
The character Blueprint you created inherits from the SuperSideScrollerCharacter class. Since the owning pawn of this Animation Blueprint is your BP_SuperSideScroller_MainCharacter character Blueprint and this Blueprint inherits from the SuperSideScrollerCharacter class, the cast function will execute successfully.
- Next, store the returned value from the cast to its own variable; that way, we have a reference to it in case we need to use it again in our Animation Blueprint. Refer to Figure 11.20 and make sure to name this new variable MainCharacter:
Note
The Promote to Variable option is available in the context-sensitive dropdown, and allows you to store any valid value type in its own variable.
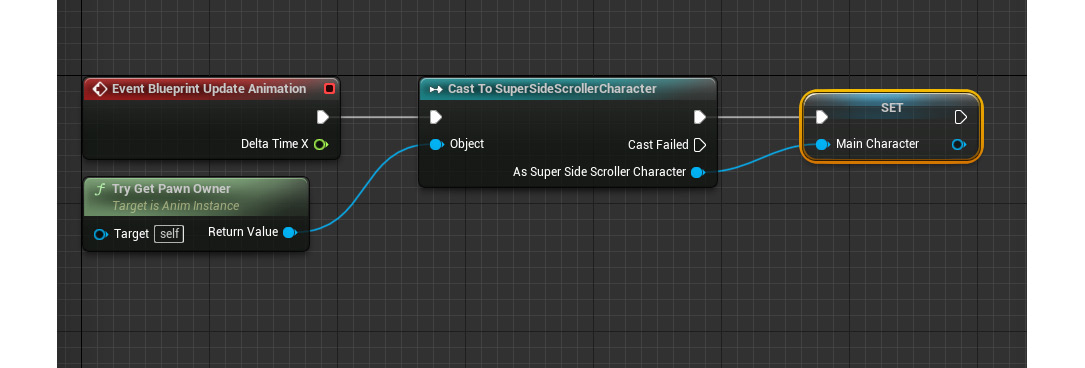
Figure 11.19 – So long as the cast is successful, you will want to keep track of the owning character
- Now, to track the character’s speed, use the Get Velocity function from the MainCharacter variable. Every object from the Actor class has access to this function and returns the magnitude and direction vector that the object is moving in:

Figure 11.20 – The GetVelocity function can be found under Utilities/Transformation
- From Get Velocity, you can use the VectorLength function to get the actual speed:

Figure 11.21 – The VectorLength function returns the magnitude of the vector
- Return Value from the VectorLength function can then be promoted to its own variable named Speed:

Figure 11.22 – Every actor has the Get Velocity function
In this exercise, you obtained the player character speed by using the GetVelocity function. The vector that was returned from the GetVelocity function gives the length of the vector to ascertain the actual speed. By storing this value in the Speed variable, you can now reference this value in the AnimGraph property of the Animation Blueprint to update your Blend Space, which you will do in the next exercise. But first, let’s briefly discuss velocity vectors and how we use vector mathematics to determine the speed of our player character.
What are velocity vectors?
Before moving on to the next step, let’s explain what you are doing when you get the velocity of the character and promote the vector length of that vector to the Speed variable.
What is velocity? Velocity is a vector that has a given magnitude and direction. To think about it another way, a vector can be drawn like an arrow.
The length of the arrow represents the magnitude, or strength, while the direction of the arrowhead represents the direction. So, if you want to know how fast the player character is moving, you will want to get the length of that vector. That is exactly what you are doing when you use the GetVelocity function and the VectorLength function on the returned velocity vector; you are getting the value of the Speed variable of your character. That is why you store that value in a variable and use it to control the Blend Space, as shown in the following diagram. Here, you can see an example of vectors. One has a positive (right) direction with a magnitude of 100, while the other has a negative (left) direction with a magnitude of 35:

Figure 11.23 – Two different vectors
In the following exercise, you will use the Speed variable you created from the VectorLength function of the velocity parameter of the player character from the previous exercise to drive how the Blend Space 1D will animate the character.
Exercise 11.03 – passing the character’s Speed variable into the Blend Space
Now that you have a better understanding of vectors and how to store the Speed variable of the player character from the previous exercise, let’s apply the speed to the Blend Space 1D you created earlier in this chapter.
Follow these steps to complete this exercise:
- Navigate to the AnimGraph property within your AnimBP_SuperSideScroller_MainCharacter Animation Blueprint.
- Use the Speed variable to update the Blend Space in real time in AnimGraph by left-clicking and dragging the Speed variable onto the graph, and connecting the variable to the input of the Blendspace Player function:

Figure 11.24 – Using the Speed variable to update the Blend Space on every frame
With that, you can update the Blend Space based on the speed of the player character. When you use PIE, you will see the character in the Idle state and the Walking state when you move:

Figure 11.25 – The player character is finally able to walk around in the level
Finally, the main character is using the movement animations based on movement speed. In the next activity, you will update the character movement component so that you can preview the character’s Running animation from the Blend Space.
Activity 11.02 – previewing the Running animation in-game
With the Animation Blueprint updating and getting the speed of the player character, you can preview the Idle and Walking animations in-game.
In this activity, you will update the CharacterMovement component of the player character Blueprint so that you can preview the Running animation in-game as well.
Follow these steps to complete this activity:
- Navigate to, and open, the BP_SuperSideScroller_MainCharacter player character Blueprint.
- Access the CharacterMovement component.
- Modify the Max Walk Speed parameter to a value of 500.0 so that your character can move fast enough to blend its animation from Idle to Walking and, finally, to Running.
By doing this, the player character can reach a speed that allows you to preview the Running animation in-game.
The expected output is as follows:

Figure 11.26 – The player character running
Note
The solution to this activity can be found on GitHub here: https://github.com/PacktPublishing/Elevating-Game-Experiences-with-Unreal-Engine-5-Second-Edition/tree/main/Activity%20solutions.
Now that you have handled the player character movement blending from Idle to Walking and finally to Running, let’s add the functionality that allows the player character to move even quicker by sprinting.
Enhanced input system
Every game requires input from the player, whether it is the keys on a keyboard such as W, A, S, and D for moving the player character, or the thumb sticks on a controller; this is what makes video games an interactive experience. We will be using the Enhanced Input System to add an input binding for the sprint action of the player character. For a refresher on how to enable and set up the Enhanced Input System plugin, please review Chapter 4, Getting Started with Player Input; moving forward, the exercises in this chapter assume you have enabled the plugin.
UE5 allows us to map keyboard, mouse, gamepad, and other types of controls to labeled actions or axes that you can then reference in Blueprints or C++ to allow character or gameplay functionality to occur. It is important to point out that each unique action or axis mapping can have one or more key bindings, and that the same key binding can be used for multiple mappings. Input bindings are saved into an initialization file called DefaultInput.ini and can be found in the Config folder of your project directory.
Note
Legacy input bindings can be edited directly via the DefaultInput.ini file or through Project Settings in the editor itself. The latter is more easily accessible and less error-prone when editing.
In the next exercise, we’ll add a new input binding for the player character’s Sprint functionality.
Exercise 11.04 – adding input for sprinting
With the player character moving around the level, you will now implement a unique character class for the player character that derives from the base SuperSideScrollerCharacter C++ class. The reason to do this is so that you can easily differentiate between classes of the player character and the enemy later on, instead of relying solely on unique Blueprint classes.
While creating the unique C++ character class, you will implement the sprinting behavior to allow the player character to walk and sprint as desired.
Let’s begin by implementing the Sprinting mechanic by adding an Input Action for Sprint:
- Navigate to the Content Drawer window and, under the Content directory, add a new folder called Input.
- In the Input directory, create another folder called Sprint. It is in this directory that we will create both the Input Action and Input Mapping Context assets.
- In the Sprint folder, right-click and find the Input Action option, under the Input category of the menu, as shown here:

Figure 11.27 – The Input Action class
- Name this Input Action IA_Sprint and open the asset.
- Under the Triggers section, add a new Trigger by left-clicking on the + icon. Under the Index[0] parameter, select the Down type:

Figure 11.28 – The IA_Sprint Input Action class using the Down Trigger type
Now that we have our Input Action, let’s create the Input Mapping Context asset and add the action to it.
- In the Input directory, right-click and find the Input Mapping Context option, under the Input category of the menu, as shown here:

Figure 11.29 – The Input Mapping Context class
- Name this Input Mapping Context IC_SideScrollerCharacter and open the asset.
- In the Mappings section, add a new mapping by left-clicking the + icon and then assigning IA_Sprint.
- Next, we want to assign Left Shift as the binding to use for sprinting.
- In the Triggers section, add a new Trigger by left-clicking on the + icon. Under the Index[0] parameter, select Down. The final Input Mapping Context should look like this:
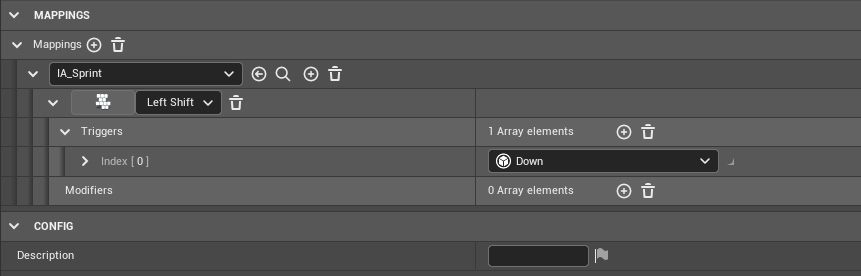
Figure 11.30 – IC_SideScrollerCharacter using the IA_Sprint Input Action mapping
With the Sprint input binding in place, you need to create a new C++ class for the player character based on the SuperSideScrollerCharacter class.
- Make sure that you update the SuperSideScroller.Build.cs file so that it includes the Enhanced Input plugin; otherwise, your code will not compile. Add the following line inside the public SuperSideScroller(ReadOnlyTargetRues Target) : base(Target) function:
PrivateDependencyModuleNames.AddRange(new string[] {“EnhancedInput”});
- Then, head back inside the editor, navigate to Tools, and, from the drop-down list, select the New C++ Class option.
- The new player character class will inherit from the SuperSideScrollerCharacter parent class because this base class contains the majority of the functionality needed for the player character. After selecting the parent class, click Next. The following screenshot shows where you can find the SuperSideScrollerCharacter class:
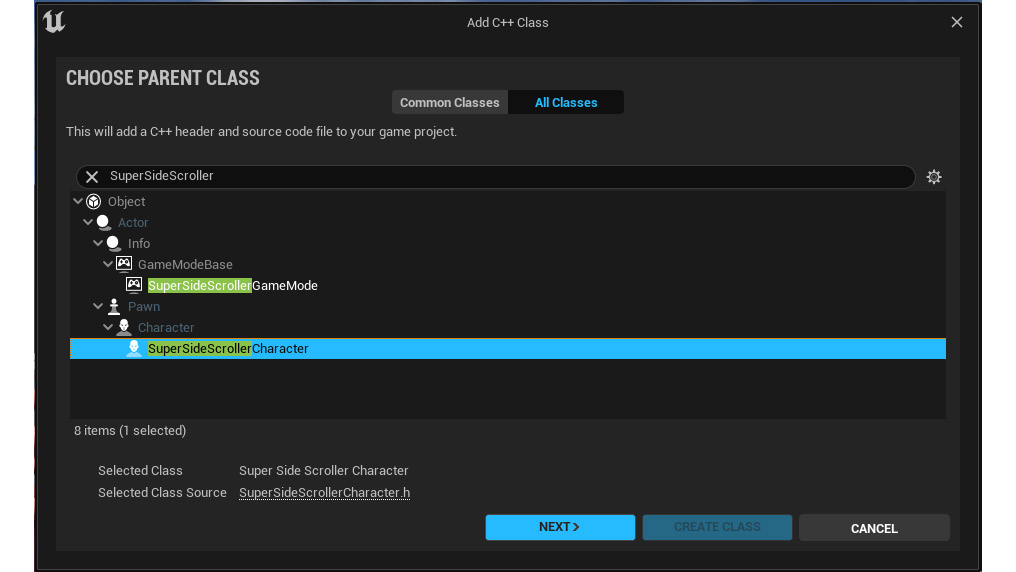
Figure 11.31 – Selecting the SuperSideScrollerCharacter parent class
- Name this new class SuperSideScroller_Player. Leave the path as the default that Unreal Engine provides for you unless you need to adjust the file directory of this new class. After naming the new class and selecting the directory to save the class in, click Create Class.
After selecting Create Class, Unreal Engine will generate the source and header files for you, and Visual Studio will automatically open these files. You will notice that both the header file and the source file are almost empty. This is OK because you are inheriting from the SuperSideScrollerCharacter class and much of the logic you want is done in that class.
- In SuperSideScroller_Player, you will only add the functionality you need on top of what you inherit. You can view the line where the inheritance is taking place inside SuperSideScroller_Player.h:
class SUPERSIDESCROLLER_API ASuperSideScroller_Player : public ASuperSideScrollerCharacter
This class declaration is saying that the new ASuperSideScroller_Player class inherits from the ASuperSideScrollerCharacter class.
By completing this exercise, you added an Enhanced Input Binding for the Sprint mechanic that can then be referenced in C++ and used to allow the player to sprint. Now that you have also created the C++ class for the player character, you can update the code with the Sprint functionality, but first, you will need to update the Blueprint character and the Animation Blueprint to reference this new class. We’ll do this in the next exercise.
What happens when you reparent a Blueprint to a new class? Each Blueprint inherits from a parent class. In most cases, this is Actor, but in the case of your character Blueprint, its parent class is SuperSideScrollerCharacter. Inheriting from a parent class allows a Blueprint to inherit the functionality and variables of that class so that the logic can be reused at the Blueprint level.
For example, when inheriting from the SuperSideScrollerCharacter class, the Blueprint inherits components such as the CharacterMovement component and the Mesh skeletal mesh component, which can then be modified in the Blueprint.
Exercise 11.05 – reparenting the character Blueprint
Now that you have created a new character class for the player character, you need to update the BP_SuperSideScroller_MainCharacter Blueprint so that it uses the SuperSideScroller_Player class as its parent class. If you don’t, then any logic you add to the new class will not affect the character made in the Blueprint.
Follow these steps to reparent the Blueprint to the new character class:
- Navigate to /Game/MainCharacter/Blueprints/ and open the BP_SuperSideScroller_MainCharacter Blueprint.
- Select the File option on the toolbar and, from the drop-down menu, select the Reparent Blueprint option.
- When selecting the Reparent Blueprint option, Unreal Engine will ask for the new class to reparent the Blueprint to. Search for SuperSideScroller_Player and select that option from the dropdown by left-clicking.
Once you select the new parent class for the Blueprint, Unreal Engine will reload the Blueprint and recompile it, both of which will happen automatically.
Note
Be careful when reparenting Blueprints to new parent classes as this can lead to compile errors or settings to be erased or reverted to class defaults. Unreal Engine will display any warnings or errors that may occur after compiling the Blueprint and reparenting it to a new class. These warnings and errors usually occur if there is Blueprint logic that references variables or other class members that no longer exist in the new parent class. Even if there are no compile errors, it is best to confirm that any logic or settings you have added to your Blueprint are still present after the reparenting before moving on with your work.
Now that your character Blueprint has been correctly reparented to the new SuperSideScroller_Player class, you need to update the AnimBP_SuperSideScroller_MainCharacter Animation Blueprint to ensure that you are casting to the correct class when using the Try Get Pawn Owner function.
- Next, navigate to the /MainCharacter/Blueprints/ directory and open the AnimBP_SuperSideScroller_MainCharacter Animation Blueprint.
- Open Event Graph. From the Return Value property of the Try Get Pawn Owner function, search for Cast to SuperSideScroller_Player:

Figure 11.32 – Casting to the new SuperSideScroller_Player class
- Now, you can connect the output as a SuperSideScroller_Player cast to the MainCharacter variable. This works because the MainCharacter variable is of the SuperSideScrollerCharacter type and the new SuperSideScroller_Player class inherits from that class:

Figure 11.33 – You can still use the MainCharacter variable because SuperSideScroller_Player is based on SuperSideScrollerCharacter due to inheritance
Now that both the BP_SuperSideScroller_MainCharacter character Blueprint and the AnimBP_SuperSideScroller_MainCharacter Animation Blueprint are referencing your new SuperSideScroller_Player class, it is safe to venture into C++ and code the character’s sprint functionality.
Exercise 11.06 – coding the character’s sprint functionality
With the new SuperSideScroller_Player class reference correctly implemented in a Blueprint, it is time to start coding the functionality that will allow the player character to sprint.
Follow these steps to add the Sprinting mechanic to the character:
- The first thing to take care of is the constructor of the SuperSideScroller_Player class. Navigate back to Visual Studio and open the SuperSideScroller_Player.h header file.
- You will use the constructor function later in this exercise to set initialized values for variables. For now, it will be an empty constructor. Make sure that the declaration is made under the public access modifier heading, as shown in the following code:
//Constructor
ASuperSideScroller_Player();
- With the constructor declared, create the constructor function definition in the SuperSideScroller_Player.cpp source file:
ASuperSideScroller_Player::ASuperSideScroller_Player()
{
}
With the constructor in place, it’s time to create the SetupPlayerInputComponent function so that you can use the key bindings you created earlier to call functions within the SuperSideScroller_Player class.
The SetupPlayerInputComponent function is a function that the character class has built-in by default, so you need to declare it as a virtual function with the override specifier. This tells Unreal Engine that you are using this function and intend to redefine its functionality in this new class. Make sure that the declaration is made under the Protected access modifier heading.
- The SetupPlayerInputComponent function requires an object of the UInputComponent class to be passed into the function, like so:
protected:
//Override base character class function to setup our
//player
input component
virtual void SetupPlayerInputComponent(class UInputComponent*
PlayerInputComponent) override;
The UInputComponent* PlayerInputComponent variable is inherited from the UCharacter base class that our ASuperSideScroller_Player() class derives from, so it must be used as the input parameter of the SetupPlayerInputComponent() function. Using any other name will result in a compilation error.
- Now, in the source file, create the definition of the SetupPlayerInputComponent function. In the body of the function, we will use the Super keyword to call it:
//Not always necessary, but good practice to call the
//function inthe base class with Super.
Super::SetupPlayerInputComponent(PlayerInputComponent);
The Super keyword enables us to call the SetupPlayerInputComponent parent method. With the SetupPlayerInputComponent function ready, you need to include the following header files to continue with this exercise without any compile errors:
- #include “Components/InputComponent.h”
- #include “GameFramework/CharacterMovementComponent.h”
You will need to include the header for the input component to bind the key mappings to the sprint functions you will be creating next. The header for the Character Movement component will be necessary for the sprint functions because you will be updating the Max Walk Speed parameter based on whether the player is sprinting. The following code contains all of the headers that need to be included for the player character:
#include "SuperSideScroller_Player.h"
#include "Components/InputComponent"
#include "GameFramework/CharacterMovementComponent.h"
With the necessary headers included in the source file of the SuperSideScroller_Player class, you can create the sprint functions to make the player character move faster. Let’s begin by declaring the required variable and functions.
- Under the Private access modifier in the header file of the SuperSideScroller_Player class, declare a new Boolean variable called bIsSprinting. This variable will be used as a failsafe so that you know whether the player character is sprinting before making any changes to the movement speed:
private:
//Bool to control if we are sprinting. Failsafe.
bool bIsSprinting;
- Next, declare two new functions, Sprint(); and StopSprinting();. These two functions will not take any arguments and will not return anything. Declare these functions under the Protected access modifier:
//Sprinting
void Sprint();
//StopSprinting
void StopSprinting();
The Sprint(); function will be called when the player presses/holds the Sprint key mapped to the binding; StopSprinting() will be called when the player releases the key mapped to the binding.
- Start with the definition of the Sprint(); function. In the source file of the SuperSideScroller_Player class, create the definition for this function, as shown here:
void ASuperSideScroller_Player::Sprint()
{
}
- Within the function, you will want to check the value of the bIsSprinting variable. If the player is NOT sprinting, meaning that bIsSprinting is False, then you can create the rest of the function.
- Within the If statement, set the bIsSprinting variable to True. Then, access the GetCharacterMovement() function and modify the MaxWalkSpeed parameter. Set MaxWalkSpeed to 500.0f. Remember that the Maximum Axis Value parameter of the movement Blend Space is 500.0f. This means that the player character will reach the speed necessary to use the Running animation:
void ASuperSideScroller_Player::Sprint()
{
if (!bIsSprinting)
{
bIsSprinting = true;
GetCharacterMovement()->MaxWalkSpeed = 500.0f;
}
}
The StopSprinting() function will look almost identical to the Sprint() function you just wrote, but it works in the opposite manner. First, you want to check whether the player is sprinting, meaning that bIsSprinting is True. If so, you can create the rest of the function.
- Inside the If statement, set bIsSprinting to False. Then, access the GetCharacterMovement() function to modify MaxWalkSpeed. Set MaxWalkSpeed back to 300.0f, which is the default speed for the player character when they’re walking. This means that the player character will only reach the speed that’s necessary for the Walking animation:
void ASuperSideScroller_Player::StopSprinting()
{
if (bIsSprinting)
{
bIsSprinting = false;
GetCharacterMovement()->MaxWalkSpeed = 300.0f;
}
}
Now that you have the functions needed for sprinting, it is time to bind these functions to the action mappings you created earlier. To do this, you need to create variables that hold a reference to the Input Mapping Context and Input Action that were created earlier in this chapter.
- Inside the SuperSideScroller_Player header file, under the Protected category, add the following lines of code to create the properties for the Input Mapping Context and Input Action:
UPROPERTY(EditAnywhere, Category = "Input")
class UInputMappingContext* IC_Character;
UPROPERTY(EditAnywhere, Category = "Input")
class UInputAction* IA_Sprint;
We must remember to assign these properties within our character Blueprint before we attempt to test the sprinting functionality.
- Next, inside the SuperSideScroller_Player source file, within the SetupPlayerInputComponent() function, we need to get a reference to the Enhanced Input Component by writing the following code:
UEnhancedInputComponent* EnhancedPlayerInput = Cast<UEnhancedInputComponent>(PlayerInputComponent);
Now that we are referencing UEnhancedInputComponent, we need to remember to include this class as well:
#include "EnhancedInputComponent.h"
Since we want to support both legacy input and the Enhanced Input System, let’s add a specific if statement to our code to check if the EnhancedPlayerInput variable is valid:
if(EnhancedPlayerInput)
{}
If the EnhancedPlayerInput variable is valid, then we want to get a reference to our Player Controller so that we can get access to the EnhancedInputLocalPlayerSubsystem class, which will allow us to assign our Input Mapping Context:
if(EnhancedPlayerInput)
{
APlayerController* PlayerController =
Cast<APlayerController>(GetController());
UEnhancedInputLocalPlayerSubsystem* EnhancedSubsystem = ULocalPlayer::GetSubsystem<UEnhancedInputLocal PlayerSubsystem> (PlayerController->GetLocalPlayer());
}
- Now that we are referencing the UEnhancedInputLocalPlayerSubsystem class, we need to add the following include header file:
#include "EnhancedInputSubsystems.h"
- Finally, we will add another if statement that checks if the EnhancedSubsystem variable is valid and then call the AddMappingContext function to add our IC_Character Input Mapping Context to our Player Controller:
if(EnhancedSubsystem)
{
EnhancedSubsystem->AddMappingContext(IC_Character,
1);
}
Now that we have applied the Input Mapping Context to the player characters’ EnhancedSubsystem, we can bind the Sprint() and StopSprinting() functions to the Input Action we created earlier.
- At the end of the if(EnhancedPlayerInput) statement, we will add a BindAction to bind ETriggerEvent::Triggered to the Sprint() function:
//Bind pressed action Sprint to your Sprint function
EnhancedPlayerInput->BindAction(IA_Sprint, ETriggerEvent::Triggered, this, &ASuperSideScroller_Player::Sprint);
- Finally, we can add our BindAction to bind ETriggerEvent::Completed to the StopSprinting() function:
//Bind released action Sprint to your StopSprinting
//function
EnhancedPlayerInput->BindAction(IA_Sprint, ETriggerEvent::Completed, this, &ASuperSideScroller_Player::StopSprinting);
Note
For more information regarding the ETriggerEvent enumerator type, as well as more details about the Enhanced Input System, please revisit Chapter 4, Getting Started with Player Input, or refer to the following documentation from Epic Games: https://docs.unrealengine.com/5.0/en-US/GameplayFeatures/EnhancedInput/.
With Action Mappings bound to the sprint functions, the last thing you need to do is set the default initialized values of the bIsSprinting variable and the MaxWalkSpeed parameter from the Character Movement component.
- Inside the constructor function in the source file of your SuperSideScroller_Player class, add the bIsSprinting = false line. This variable is constructed as false because the player character should not be sprinting by default.
- Finally, set the MaxWalkSpeed parameter of the character movement component to 300.0f by adding GetCharacterMovement()->MaxWalkSpeed = 300.0f. Please review the following code:
ASuperSideScroller_Player::ASuperSideScroller_Player()
{
//Set sprinting to false by default.
bIsSprinting = false;
//Set our max Walk Speed to 300.0f
GetCharacterMovement()->MaxWalkSpeed = 300.0f;
}
With the variables that have been added to the constructor initialized, the SuperSideScroller_Player class is done, for now. Return to Unreal Engine and left-click on the Compile button on the toolbar. This will recompile the code and perform a hot-reload of the editor.
After recompiling and hot-reloading the editor, we need to remember to assign both the Input Mapping Context and the Input Action inside our player character.
- Navigate to the MainCharacter/Blueprints directory and open the BP_SuperSideScroller_MainCharacter Blueprint.
- In the Details panel, under the Input category, you will find parameters for IC_Character and IA_Sprint. Assign the Input Context Mapping and Input Action assets we created earlier to these parameters:

Figure 11.34 – The IC_Character and IA_Sprint parameters
Upon compiling the BP_SuperSideScroller_MainCharacter Blueprint, you can use Play In Editor to see the fruits of your labor. The base movement behavior is the same as it was previously, but now, if you hold Left Shift or Gamepad Right Shoulder on a controller, the player character will sprint and begin to play the Running animation:

Figure 11.35 – The player character can now sprint
With the player character able to sprint, let’s move on to the next activity, where you will implement the base Throw functionality in a very similar way.
Activity 11.03 – implementing the throwing input
One of the features included with this game is the ability for the player to throw projectiles at the enemy. You won’t be creating the projectile or implementing the animation in this chapter, but you will set up the key bindings and the C++ implementation for use in the next chapter.
In this activity, you need to set up the Enhanced Input Mapping for the Throw projectile functionality and implement a debug log in C++ for when the player presses the key(s) mapped to Throw.
Follow these steps to complete this activity:
- Create a new folder inside of the Input directory named Throw, and create a new Input Action called IA_Throw.
- Use the Trigger type called Pressed inside IA_Throw.
- Add the new IA_Throw Input Action to IC_SideScrollerCharacter with bindings to both Left Mouse Button and Gamepad Right Trigger.
- Within Visual Studio, add a new UInputAction variable called IA_Throw and add the appropriate UPROPERTY() macro to the variable.
- Add a new function to the header file of SuperSideScroller_Player. Name this function ThrowProjectile(). This will be a void function without parameters.
- Create the definition in the source file of the SuperSideScroller_Player class. In the definition of this function, use UE_LOG to print a message that lets you know that the function is being called successfully.
- Add a new BindAction function call using the EnhancedPlayerInput variable to bind the new Throw Input Action to the ThrowProjectile() function.
Note
You can learn more about UE_LOG here: https://nerivec.github.io/old-ue4-wiki/pages/logs-printing-messages-to-yourself-during-runtime.html.
- Compile the code and return to the editor. Next, add IA_Throw to the BP_SuperSideScroller_MainCharacter parameter, IA_Throw.
The expected result is that when you use the left mouse button or the gamepad right trigger, a log will appear in Output Log, letting you know that the ThrowProjectile function is being called successfully. You will use this function later to spawn your projectile.
The expected output is as follows:

Figure 11.36 – The expected output log
Note
The solution to this activity can be found on GitHub here: https://github.com/PacktPublishing/Elevating-Game-Experiences-with-Unreal-Engine-5-Second-Edition/tree/main/Activity%20solutions.
With this activity complete, you now have functionality in place for when you create the player projectile in Chapter 13, Creating and Adding the Enemy Artificial Intelligence. You also have the knowledge and experience of adding new key mappings to your game and implementing functionality in C++ that utilizes these mappings to enable gameplay functionality. Now, you will continue updating the player character’s movement to allow the jumping animation to play correctly when the player jumps. But first, let’s take a moment to learn about Animation State Machines.
Using Animation State Machines
State Machines are a means of categorizing an animation, or sets of animations, into a state. A state can be thought of as a condition that the player character is in at a specific time. Is the player currently walking? Is the player jumping? In many third-person games such as The Last of Us, this involves separating the movement, jumping, crouching, and climbing animations into their own states. Each state is then accessible when certain conditions are met while the game is played. Conditions can include whether the player is jumping, the speed of the player character, and whether or not the player is in the crouched state. The job of the state machine is to transition between each state using logical decisions called Transition Rules. When you create multiple states with multiple Transition Rules that intertwine with one another, the state machine begins to look like a web. Please refer to the following screenshot to see what the state machine looks like for the ThirdPerson_AnimBP Animation Blueprint:
Note
A general overview of State Machines can be found here: https://docs.unrealengine.com/en-US/Engine/Animation/StateMachines/Overview/index.html.
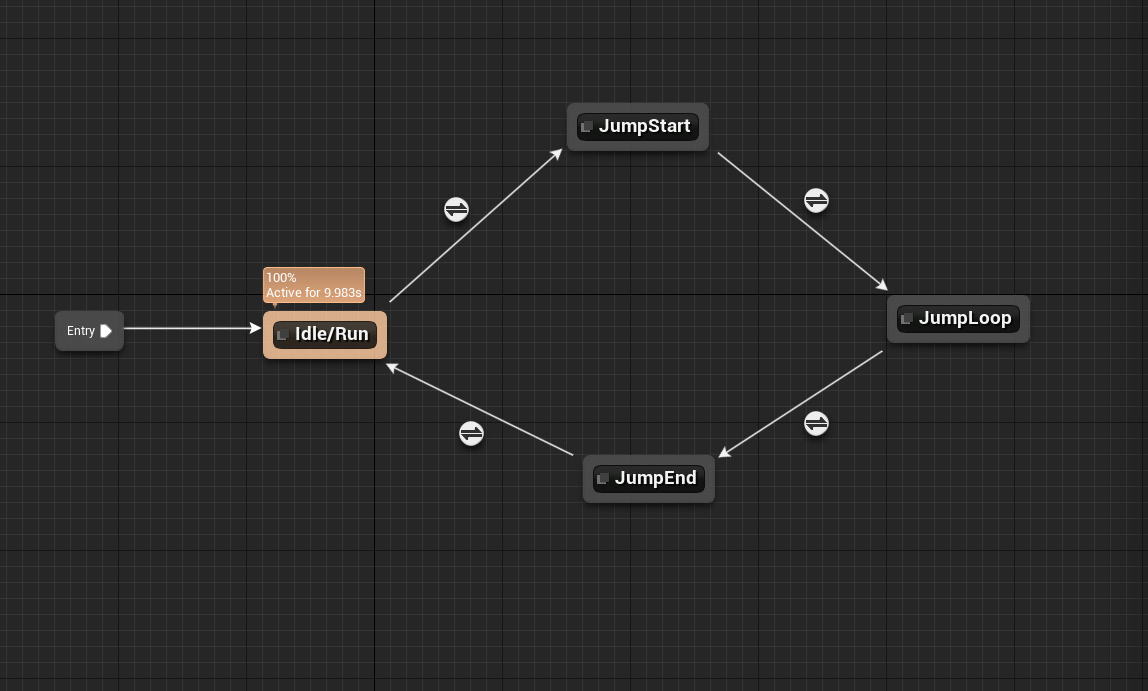
Figure 11.37 – The state machine of ThirdPerson_AnimBP
In the case of the state machine for the player character, this state machine will handle the states of the default player’s movement and jumping. Currently, you have the player character animating simply by using a Blend Space that is controlled by the speed of the character. In the next exercise, you will create a new state machine and move the movement Blend Space logic into its own state within that state machine. Let’s start creating the new state machine.
Exercise 11.07 – player character movement and jump state machine
In this exercise, you will implement a new animation state machine and integrate the existing movement Blend Space into the state machine. Additionally, you will set up the states for when the player jump starts, and for when the player is in the air during that jump.
Let’s start by adding this new state machine:
- Navigate to the /MainCharacter/Blueprints/ directory and open the AnimBP_SuperSideScroller_MainCharacter Animation Blueprint.
- In AnimGraph, right-click in the empty space of the graph and search for state machine inside the context-sensitive search to find the Add New State Machine option. Name this new state machine Movement.
- Now, instead of plugging the output pose of the SideScroller_IdleRun Blend Space, we can connect the output pose of the new state machine, Movement, to the output pose of the animation:

Figure 11.38 – The new Movement state machine replaces the old Blend Space
Connecting an empty state machine to the Output Pose property of the Animation Blueprint will result in the warnings shown in the following screenshot. All this means is that nothing is happening within that state machine and that the result will be invalid to Output Pose. Don’t worry; you will fix this next:

Figure 11.39 – The empty state machine results in compile warnings
Double left-click on the Movement state machine to open the state machine itself.
You will start by adding a new state that will handle what the character was doing previously; that is Idle, Walking, or Running.
- From the Entry point, left-click and drag out to open the context-sensitive search. You will notice that there are only two options – Add Conduit and Add State. For now, you will add a new state and name this state Movement. The following screenshot shows how the Movement state was created:
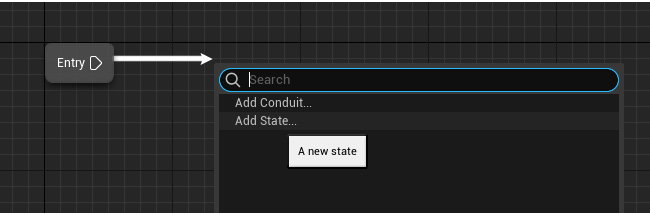
Figure 11.40 – Inside the state machine, you need to add a new state
- After selecting Add State, you can rename the state to Movement and it should automatically connect to the Entry node of the State Machine.

Figure 11.41 – The new Movement state
- Copy and paste the logic you had where you connected the Speed variable to the SideScroller_IdleRun Blend Space into the new Movement state you created in the previous step. Connect it to the Result pin of the Output Animation Pose node of this state:
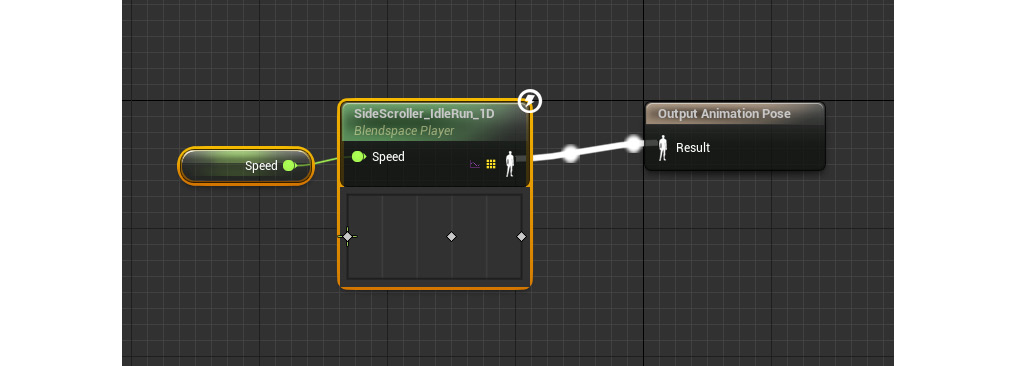
Figure 11.42 – Connecting the output pose of the Blend Space to the output pose of this state
Now, if you recompile the Animation Blueprint, you will notice that the warnings you saw earlier are now gone. This is because you added a new state that outputs an animation to Output Animation Pose instead of having an empty state machine.
By completing this exercise, you have constructed your very first state machine. Although it is a very simple one, you are now telling the character to enter and use the Movement state by default. Now, if you use PIE, you will see that the player character is moving around like they were earlier before you made the state machine. This means that your state machine is functioning and that you can continue to the next step, which will be adding the initial states that are required for jumping. Let’s start by creating the JumpStart state.
Transition rules
Conduits are a way of telling each state the conditions under which it can transition from one state to another. In this case, a Transition Rule is created as a connection between the Movement and JumpStart states. This is indicated by the directional arrow of the connection between the states again. The tooltip mentions the term Transition Rule, which means that you need to define how the transition between these states will happen, using a Boolean value to do so:

Figure 11.43 – There needs to be a Transition Rule to go from Movement to the start of JumpStart
The main difference between a simple Transition Rule and a conduit is that a Transition Rule can only connect between two states, whereas a conduit can serve as a means to transition between one and many other states. For more information, please refer to the following documentation: https://docs.unrealengine.com/5.0/en-US/state-machines-in-unreal-engine/#conduits.
In the next exercise, you will be adding this new JumpStart state and adding the proper Transition Rule necessary for the character to go from the Movement state to the JumpStart state.
Exercise 11.08 – adding states and transition rules to the state machine
In the case of transitioning from the player character’s default movement Blend Space to the beginning of the jump animation, you will need to know when the player decides to jump. This can be done using a useful function called IsFalling from the Character Movement component of the player character. You will want to track whether the player is currently falling to transition in and out of jumping. The best way to do this is to store the result of the IsFalling function in its own variable, just like you did when tracking the player’s speed.
Follow these steps to complete this exercise:
- Back in the overview of the state machine itself, left-click and drag from the edge of the Movement state to open the context-sensitive menu.
- Select the Add State option and name this state JumpStart. When you do this, Unreal Engine will automatically connect these states and implement an empty Transition Rule for you:
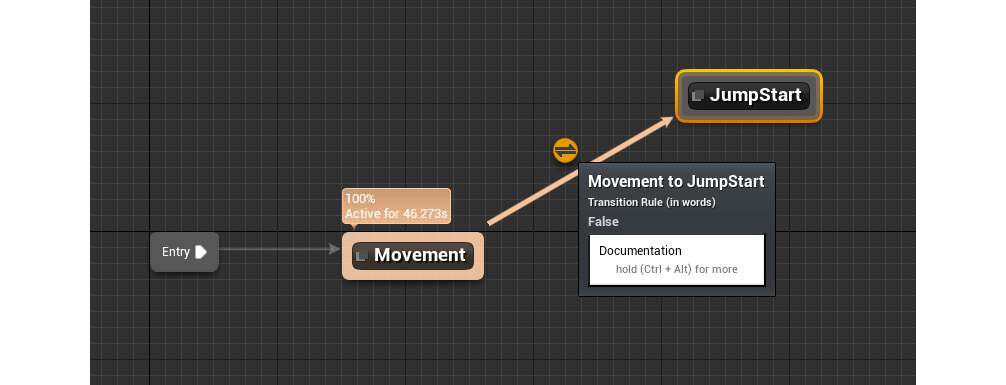
Figure 11.44 – The Transition Rule that Unreal automatically creates for you when connecting two states
- Navigate back to Event Graph inside the Animation Blueprint, where you used the Event Blueprint update animation event to store the Speed value of the player character:
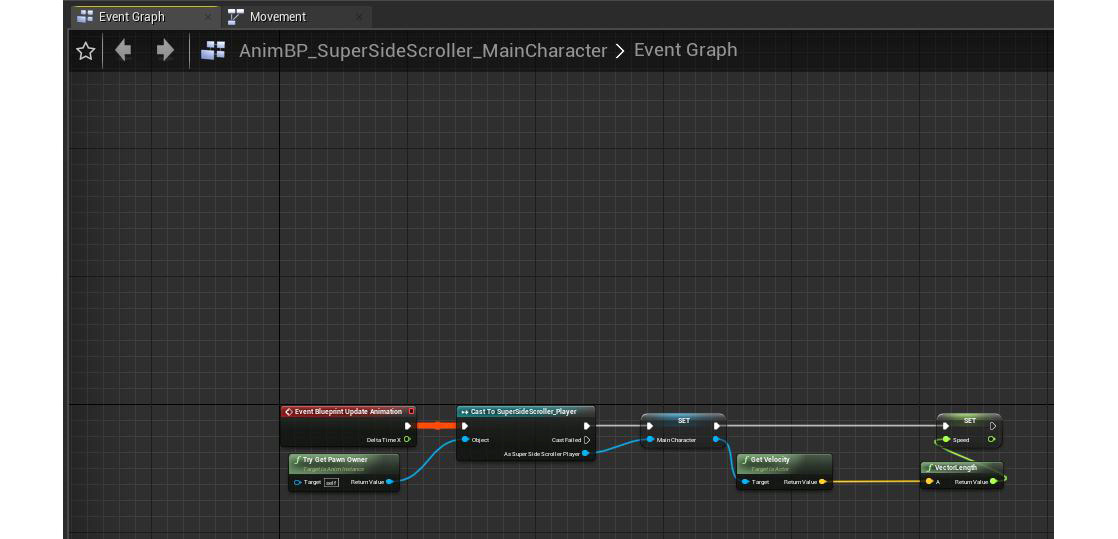
Figure 11.45 – We are now storing the Vector Length of the Main Character as Speed
- Create a getter variable for MainCharacter and access the Character Movement component. From the Character Movement component, left-click and drag to access the context-sensitive menu. Search for IsFalling:
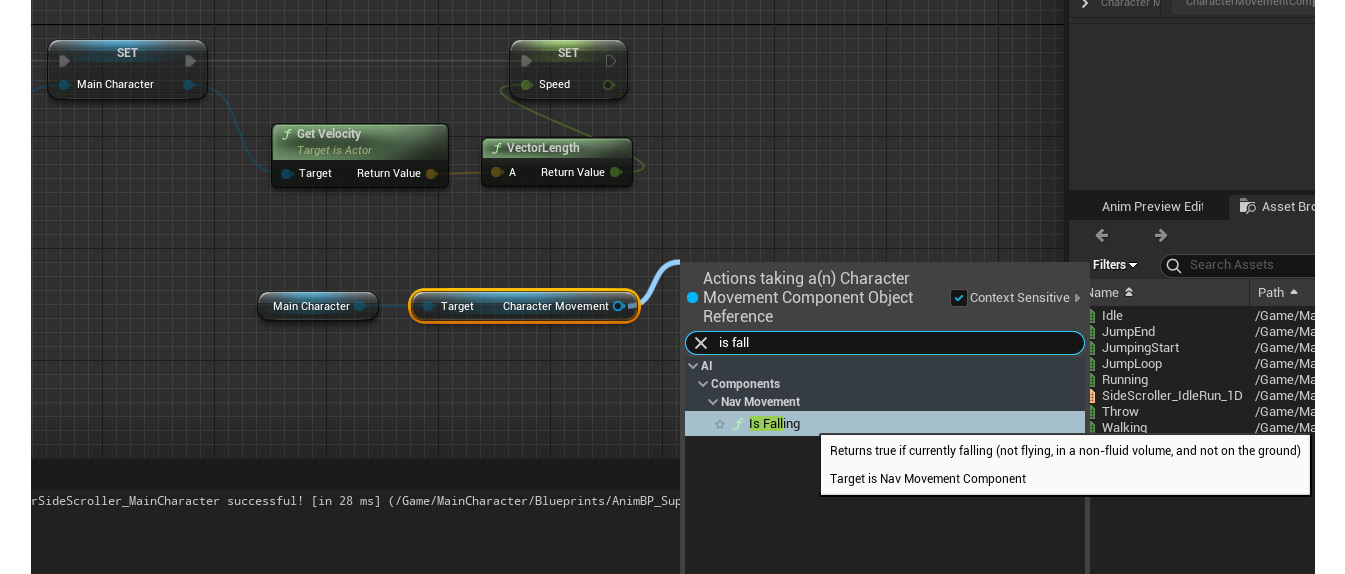
Figure 11.46 – How to find the IsFalling function
- The character movement component can tell you whether the player character is currently in the air with the help of the IsFalling function:

Figure 11.47 – The Character Movement component showing the state of the player character
- From the Return Value Boolean of the IsFalling function, left-click and drag to search for the Promote to Variable option from the context-sensitive menu. Name this variable bIsInAir. When promoting to a variable, the Return Value output pin should automatically connect to the input pin of the newly promoted variable. If it doesn’t, remember to connect them:
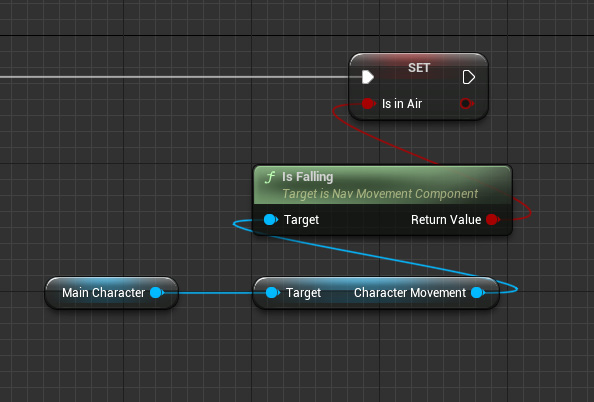
Figure 11.48 – A new variable, bIsInAir, that contains the value of the IsFalling function
Now that you are storing the state of the player and whether or not they are falling, this is the perfect candidate for the Transition Rule between the Movement and JumpStart states.
- In the Movement State machine, double left-click on Transition Rule to enter its graph. You will find only one output node, Result, with the Can Enter Transition parameter. All you need to do here is use the bIsInAir variable and connect it to that output. Now, Transition Rule is saying that if the player is in the air, the transition between the Movement state and the JumpStart states can happen:

Figure 11.49 – When in the air, the player will transition to the start of the jumping animation
With your Transition Rule in place between the Movement and JumpStart states, all you must do is tell the JumpStart state which animation to use.
- From the state machine graph, double left-click on the JumpStart state to enter its graph. From the Asset Browser window, left-click and drag the JumpingStart animation to the graph:

Figure 11.50 – Ensure you have the JumpingStart animation selected in Asset Browser
- Connect the output of the Play JumpingStart node to the Result pin of the Output Animation Pose node:

Figure 11.51 – Connecting the JumpingStart animation to Output Animation Pose of the JumpStart state
Before you can move forward with the next state, some settings need to be changed on the JumpingStart animation node.
- Left-click on the Play JumpingStart animation node and update the Details panel so that it contains the following settings:
- Loop Animation = False
- Play Rate = 2.0
The following screenshot shows the final settings for the Play JumpingStart animation node:
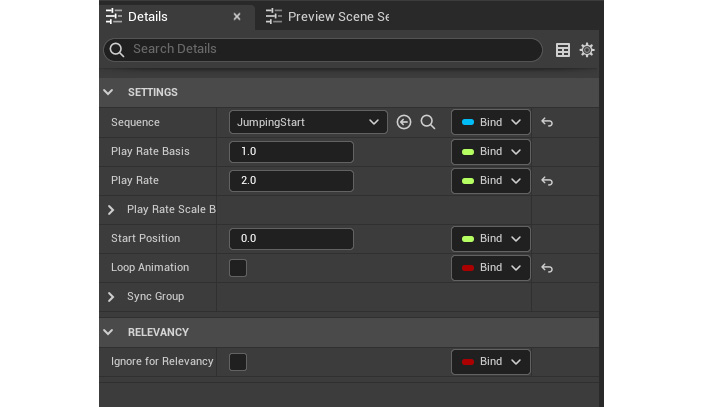
Figure 11.52 – Increasing the play rate will result in a smoother jumping animation overall
Here, you are setting the Loop Animation parameter to False because there is no reason that this animation should loop; it should only play once in any case. The only way that this animation would loop is if the player character is somehow stuck in this state, but this will never happen because of the next state you will create. The reason for setting Play Rate to 2.0 is because the animation itself, JumpingStart, is too long for the game you are making. The animation has the character bend their knees drastically, and jump upward for more than a second. For the JumpStart state, you want the character to play this animation quicker so that it is more fluid and offers a smoother transition to the next state; that is, JumpLoop. To give additional context to the Play Rate parameter that’s available in an animation, there is both Play Rate and Play Rate Basis. The Play Rate Basis parameter allows you to change where the Play Rate parameter is expressed; so, by default, this is set to 1.0. If you wanted to, you could change this value to 10.0, meaning that the Play Rate input will be divided by 10. So, depending on Play Rate Basis, the value that’s used in Play Rate can lead to different results; for simplicity, we will keep Play Rate Basis at its default value of 1.0.
Once the player character has begun the JumpStart animation, there is a point in time during that animation where the player is in the air and should transition to a new state. This new state will loop until the player is no longer in the air and can transition into the final state of ending the jump. Next, we will create a new state that will transition from the JumpStart state.
- From the state machine graph, left-click and drag from the JumpStart state and select the Add State option. Name this new state JumpLoop. Again, Unreal Engine will automatically provide you with a Transition Rule between these states that you will add to in the next exercise. Finally, recompile the Animation Blueprint and ignore any warnings that may appear under Compiler Results:

Figure 11.53 – A new state to handle the animation of the character while they’re in the air
By completing this exercise, you have added and connected states for JumpStart and JumpLoop. Each of these states is connected via a Transition Rule. You should now have a better understanding of how states within a state machine transition from one to another via the rules established in each Transition Rule.
In the next exercise, you will learn how to transition from the JumpStart state to the JumpLoop state via the Time Remaining Ratio function.
Exercise 11.09 – The Time Remaining Ratio function
For the JumpStart state to smoothly transition to the JumpLoop state, you need to take a moment to think about exactly how you want this transition to work. Based on how the JumpStart and JumpLoop animations work, it is best to transition to the JumpLoop animation after a specified set of time has elapsed on the JumpStart animation. That way, the JumpLoop state plays smoothly after X seconds of the JumpStart animation playing.
Perform the following steps to achieve this:
- Double left-click on the Transition Rule property between JumpStart and JumpLoop to open its graph. This Transition Rule will check how much time is remaining from the JumpingStart animation. This is done because a certain percentage of time remains in the JumpingStart animation, and you can safely assume that the player is in the air and is ready to transition to the JumpingLoop animation state.
- To do this, make sure that the JumpingStart animation is selected in the Asset Browser window. Then, right-click Event Graph of Transition Rule and find the Time Remaining Ratio function.
Let’s take a moment to talk about the Time Remaining Ratio function and what it is doing. This function returns a float between 0.0f and 1.0f that tells you how much time is remaining in the specified animation. The values 0.0f and 1.0f can directly be translated into a percentage value so that they are easier to consider. In the case of the JumpingStart animation, you want to know whether less than 60% of the animation is remaining to transition successfully to the JumpingLoop state. This is what you will do now.
- From the Return Value float output parameter of the Time Remaining Ratio function, search for the Less Than comparative operative node from the context-sensitive search menu. Since you are working with a returned value between 0.0f and 1.0f to find out whether less than 60% of the animation remains, you need to compare this returned value with a value of 0.6f. The final result is as follows:

Figure 11.54 – The new Transition Rule between the JumpingStart and JumpingLoop states
With this Transition Rule in place, all you need to do is add the JumpLoop animation to the JumpLoop state.
- In the Movement state machine, double left-click on the JumpLoop state to enter its graph. With the JumpLoop animation asset selected in the Asset Browser window, left-click and drag it onto the graph. Connect its output to the Result input of Output Animation Pose, as shown in the following screenshot. The default settings of the Play JumpLoop node will remain unchanged:
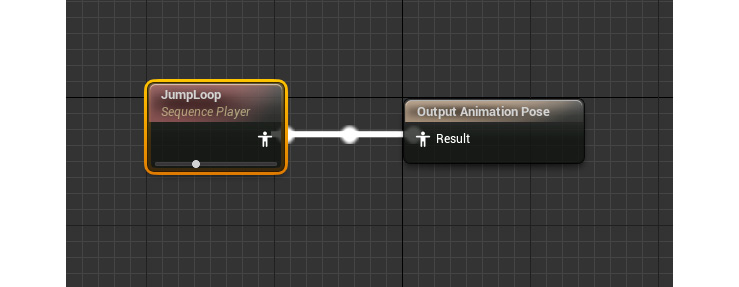
Figure 11.55 – The JumpLoop animation connected to Output Animation Pose of the new state
With the JumpLoop animation in place in the JumpLoop state, you can compile the Animation Blueprint and PIE. You will notice that the movement and sprinting animations are still present, but what happens when you try to jump? The player character begins the JumpStart state and plays the JumpLoop animation while in the air. This is great – the state machine is working, but what happens when the player character reaches the ground and is no longer in the air? The player character does not transition back to the Movement state, which makes sense because you haven’t added the state for JumpEnd, nor the transitions between JumpLoop and JumpEnd, and from JumpEnd back to the Movement state. You will do this in the next activity. The following screenshot shows an example of a player character stuck in the JumpLoop state:

Figure 11.56 – The player character can now play the JumpingStart and JumpLoop animations
By completing this exercise, you successfully transitioned from the JumpStart state to the JumpLoop state by using the Time Remaining Ratio function. This function allows you to know how far along an animation has played, and with this information, you had the state machine transition into the JumpLoop state. The player can now successfully transition from the default Movement state to the JumpStart state and then to the JumpLoop state. However, this results in an interesting issue: the player is now stuck in the JumpLoop state because the state machine does not contain the transition backs to the Movement state. We’ll fix this in the next activity.
Activity 11.04 – finishing the Movement and Jumping state machines
With half of the state machine completed, it’s time to add the state for when the jump ends, as well as the Transition Rules that allow you to transition from the JumpLoop state to this new state, and then transition from this new state back to the Movement state.
Follow these steps to complete the Movement state machine:
- Add a new state for Jump End that transitions from JumpLoop. Name this state JumpEnd.
- Add the JumpEnd animation to the new JumpEnd state.
- Based on the JumpEnd animation and how quickly we want to transition between the JumpLoop, JumpEnd, and Movement states, consider modifying the parameters of the animation like you did for the JumpStart animation. The loop animation parameter needs to be False and the Play Rate parameter needs to be set to 3.0.
- Add a Transition Rule from the JumpLoop state to the JumpEnd state based on the bIsInAir variable.
- Add a Transition Rule from the JumpEnd state to the Movement state based on the Time Remaining Ratio function of the JumpEnd animation. (Look at the JumpStart to JumpLoop Transition Rule).
By the end of this activity, you will have a fully functioning movement state machine that allows the player character to idle, walk, and sprint, as well as jump and animate correctly at the start of the jump, while in the air, and when landing.
The expected output is as follows:
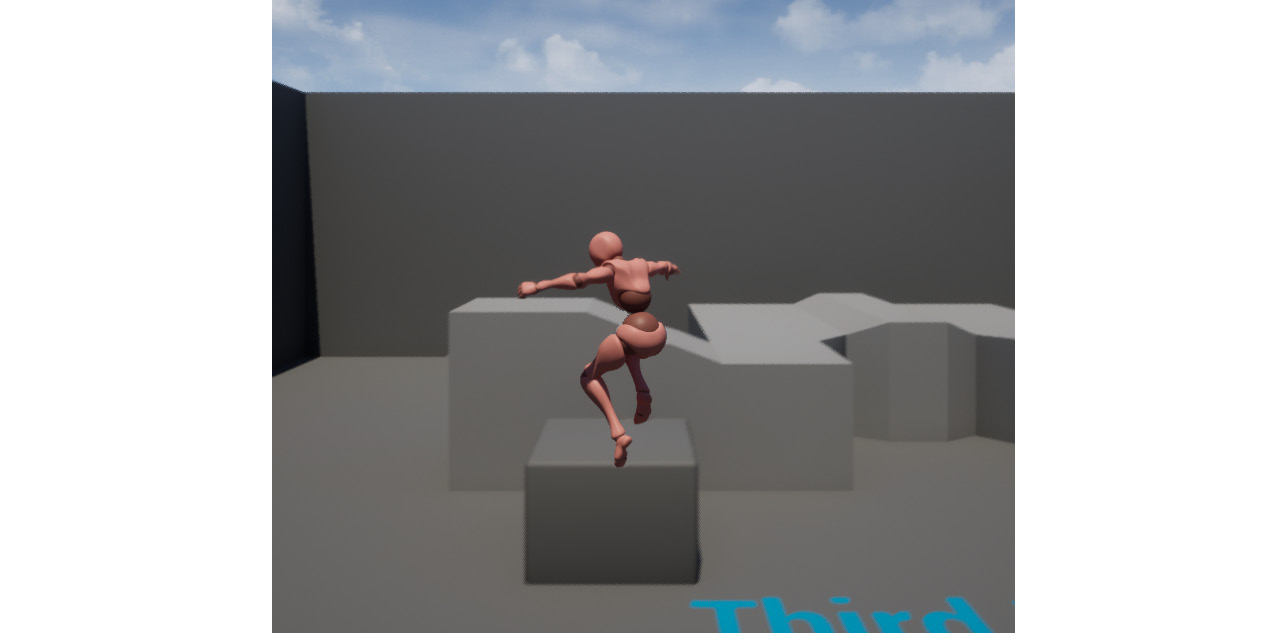
Figure 11.57 – The player character can now idle, walk, sprint, and jump
Note
The solution to this activity can be found on GitHub here: https://github.com/PacktPublishing/Elevating-Game-Experiences-with-Unreal-Engine-5-Second-Edition/tree/main/Activity%20solutions.
By completing this activity, you have finished the Movement state machine for the player character. By adding the remaining JumpEnd state and Transition Rules to transition to the JumpEnd state from the JumpLoop state, and to transition from the JumpEnd state back to the Movement state, you have successfully created your first animation state machine. Now, you can run around the map and jump onto elevated platforms, all while animating correctly and transitioning between the Movement and jump states.
Summary
With the player movement Blend Space created and the player character Animation Blueprint using a State Machine to transition from movement to jumping, you are ready to move on to the next chapter, where you will prepare the required animation slot and animation montage, and then update the Animation Blueprint for the throw animation, which will only use the upper body of the character.
From the exercises and activities in this chapter, you learned how to create a Blend Space 1D that allows you to smoothly blend movement-based animations such as idling, walking, and running using the speed of the player character to control the blending of animations.
Additionally, you learned how to integrate new key bindings into the project settings and bind those keys in C++ to enable character gameplay mechanics such as sprinting and throwing.
Lastly, you learned how to implement your very own animation state machine within the character Animation Blueprint for the player to transition between movement animations, to the various states of jumping, and back to movement again. With all of this logic in place, in the next chapter, we’ll create the assets and logic that allow the player character to play the throwing animation, and set up the base class for the enemy.