
This appendix introduces the wonderful and magical world of XNA programming. XNA is a really nifty tool for prototyping game ideas and even for the development of games for Windows, Xbox 360, and Zune (with XNA 3.0) platforms. I’ve found that as a tool, XNA is quite cool—and I absolutely love it for rapid development tasks.
I’m proceeding on the assumption that you, Valued Reader, are already familiar with programming in general, and as such don’t really need a full primer on basic programming skills or basic syntax rules. (If you do, a trip to the bookstore for a C# text won’t hurt.) What I plan to provide in these pages is a basic introduction to what I’ve been calling “How to Get It Done Using XNA.”
We will begin our exploration by creating some fairly simple examples, progress to a few more interesting things (showing along the way some of the innovative things the XNA team did for you), and finish by creating a UI for the Tic-Tac-Toe example presented in Chapter 1, “Introduction to Video Game Artificial Intelligence (VGAI).”
Every programming book in the history of the universe (yes, even those on programming in the Ursa Minor cluster) begin with a cruel and unusual punishment: creating a Hello World program. I always promised myself that if I were to write such a book, I would rebel and purposefully ignore this cliché, however tried and true it may be. Unfortunately, I have since discovered that it is, indeed, a law of nature that I must put such an example in this book. Sorry. It’s not my fault, though. Honest. I’ll explain why in a minute.
I’m assuming you have XNA Game Studio installed and humming. If you haven’t yet installed this, please do so now—I’ll wait patiently here. For installation help, the XNA Creator’s Club Web site has some great resources; get started at http://creators.xna.com/en-US/. The code example here is presented with XNA 3.0 projects. If your version of XNA doesn’t match, just create new projects and import the class and content files (we will discuss how to do this in detail later in the appendix).
Enough prattle. Let’s get started.
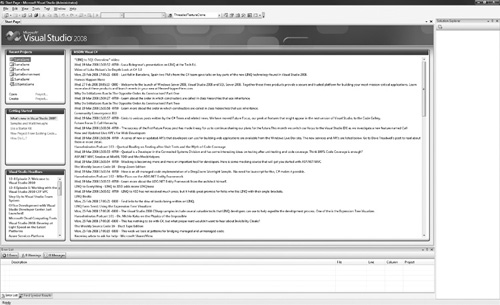
Open Microsoft Visual Studio (or the express edition, if that’s the case on your computer). You should find a startup screen similar to what is shown in Figure A.1 (which was generated using Visual Studio 2008 Professional Edition).
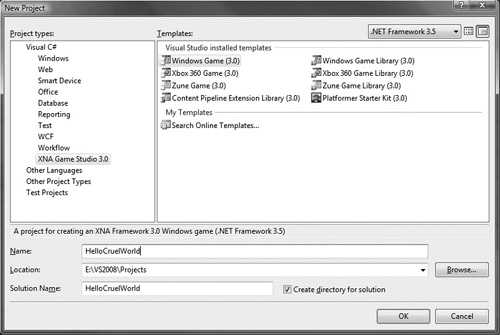
In Visual Studio, applications are developed in a sort of master container called a solution; the solution can hold multiple bases called projects (although all the examples in this book will contain only a single project). Projects contain the actual code for the application plus any other assets that are required, be they art, sound, fonts, text files, whatever. Start a new project either by pressing Ctrl+Shift+N or by choosing File→ New→ Project, as shown in Figure A.2.
A dialog box with 40 gabillion options (and this is much better than it used to be) will present itself (see Figure A.3). All you need to do here is navigate to the Visual C# heading and select XNA Game Studio 3.0 (or the correct version number for your installation) in its sublist. Then, in the Templates window, select Windows Game (3.0) and provide both a name for the project and a solution name. In this example, I chose HelloCruelWorld for both the project and the solution, simply out of pique and bad taste.
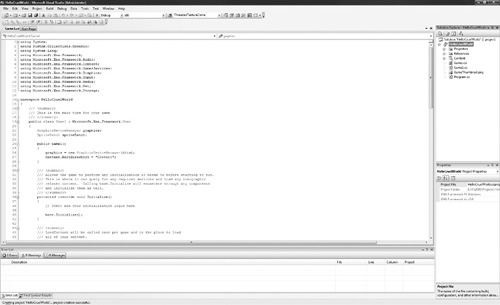
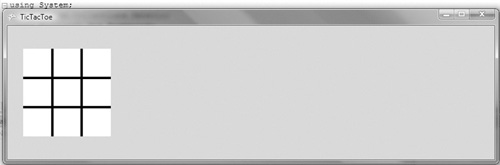
Click the OK button and let VS do its thang—which, in this case, boils down to creating the project and solution files, creating a default directory structure, and populating the project with some auto-generated files. It will also helpfully open a file named Game1.cs, as shown in Figure A.4.
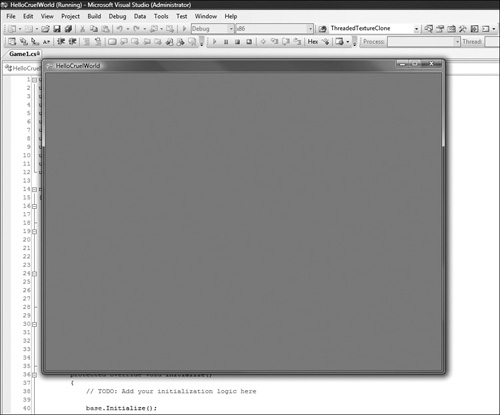
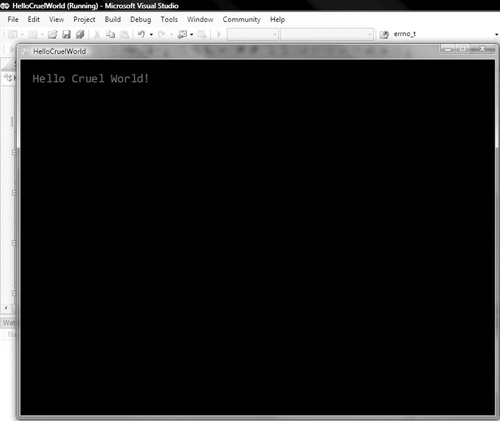
Returning to the flinging around of blame and general stamping of feet, here you will see the main reason I’m breaking my promise and subjecting you (and me) to a Hello World example. Without touching the code, I want you to compile and run the solution. To do this, press F5, click choose Debug→Start Debugging, or click the little green play button in the center of the toolbar. (Any path you choose will also automatically build the solution for you.) Yes, Valued Reader, XNA is all that…. Part of the auto-generation of code I mentioned earlier is the creation of a fully functioning game window with no input from anyone. What should happen is an error-free compilation; when the project is run, a cornflower blue screen (ewwww) should appear with the window label “HelloCruelWorld,” as shown in Figure A.5.

But wait! No Hello World example in the known universe can be considered complete until we print those fateful (hateful?) words on the screen in the new program. A self-titling window is just cheating! That’s cool, though, because we can jump right in with one of the bigger mysteries of XNA: getting text stuff to print on the screen. One of my biggest hangups is the whole “drawing stuff to the screen” part. Yeah, I know it’s pretty easy in XNA, but, hey, I’m an AI guy, so I’m required by law (in 47 states!) to hate doing graphics. Part of the problem for me is that the graphics cards have all firmly made the switch to 3D graphics, actually making it harder in my mind to do 2D graphics because of the convolutions of thought required to make a 2D image in a 3D environment. Gone are the days of simply drawing some lines or using ASCII text to print to the screen … but really, good riddance. XNA makes it all pretty easy once you stop looking for those old 2D drawing methods. In fact, it actually encouraged me to learn more about graphics than I thought I’d ever want to.
Another thing to keep in mind is that XNA has a managed content pipeline. That’s really just a fancy way of saying “XNA makes this easy.” XNA takes care of importing the art, converting it into a usable format, and unloading it when finished. Let’s keep this simple model in mind, though: Create the art, import it into XNA, load the art, use the art, unload the art. Wait a minute, Mr. Authorman. Why the heck are we talking about art? You said we would print something to the screen! Yes, Valued Reader—alas, that means we need to talk about art because XNA treats text on the screen like any other piece of 2D art. It has a few specialized methods to make this job easier, but at the end of the day, a draw call must be made for text just like any other 2D image.
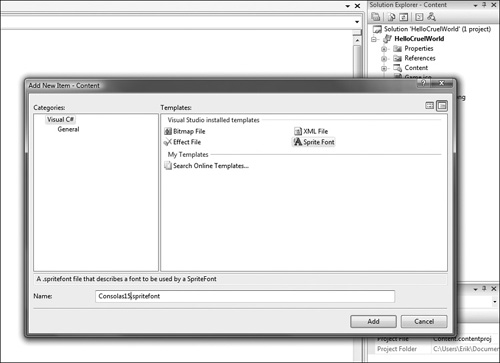
First, we need something called a spriteFont. The cool part is that a spriteFont is really just an XML file that describes the font to load and how it should appear. For this example, we will use Consolas15.spritefont.
Right-click the Content item in the Solution Explorer on the right side of the screen.
Caution
Visual Studio will happily add the new file anywhere inside the project on which you happened to right-click, but assets must all appear in the Content directory. Make sure you are right-clicking on the Content item in the Solution Explorer (and double-check your success by opening the folder afterward).
Select Add → New Item.
Select SpriteFont in the dialog box that appears, as shown in Figure A.6. Type
Consolas15in the Name field and click Add. XNA adds a file calledConsolas15.spritefontunder the Content item and opens the new file.
As you can see, the spriteFont XML is really very basic. We will be concerned with only two parts. The first change necessary will be to the FontName element. XNA has helpfully inserted the name of our spriteFont into the FontName field, but in this case, that name is not quite right. My convention is to provide a name and a size to the spriteFont so I can easily select them later. In this case, the XML reads as follows:
Note
Depending on your installation, the value of the FontName tag may be something else (Kootenay, whatever). No worries; we’re about to fix it anyway!
<FontName>Consolas15</FontName>

<!–
Size is a float value, measured in points. Modify this value to change
the size of the font.
–>
<Size>14</Size>
We, however, need it to read as follows (changes are in bold):
<FontName>Consolas</FontName>

<!–
Size is a float value, measured in points. Modify this value to change
the size of the font.
–>
<Size>15</Size>
Why choose 15 points instead of 14? I have no idea, other than it offers an excuse to edit the spriteFont file more, and I’m okay with that. With those edits made, save the spriteFont file (with the Consolas15.spritefont tab selected, press Ctrl+S or press the little blue “floppy disk” icon in the tool bar) and close it (with the Consolas15.spritefont tab still selected, click on the little × in the top-right corner of the code panel).
Switch back to the Game1.cs file (by clicking its associated tab) and find the start of the class definition—the lines that say
public class Game1 : Microsoft.Xna.Framework.Game
{

   GraphicsDeviceManager graphics;
   SpriteBatch spriteBatch;
The good news is that we are going to ignore everything here but the last line. spriteBatch might sound evil and full of venom, but it’s really a big teddy bear of a class. It simplifies life in the drawing loop and essentially lets us draw a bunch of sprites with the same graphic card settings. We will use it to call the actual Draw() methods that put stuff on the screen for us. For now, however, we are using it as a landmark.
In the line immediately below the SpriteBatch declaration, type the following:
//a point object representing where the text will be drawn
Vector2 textPos;
//a font object to hold 15 point Consolas ttf
SpriteFont C15;
By doing so, you are telling XNA that you plan to use a Vector2 object called textPos and a spriteFont object called C15, but you aren’t actually giving them any values at this point. You’ll do that next.
Find the Initialize() method, select the TODO comment line, and replace it with the following:
textPos = new Vector2(20.0f, 20.0f);
Basically, you are creating a point at 20,20 in the screen space of the game. You’ll use textPos later as a way to position the string of text on the screen.
Next, find the LoadContent() method and look for the following line:
spriteBatch = new SpriteBatch(GraphicsDevice);
Select the TODO comment immediately after this line and replace it with the following:
C15 = this.Content.Load<SpriteFont>("Consolas15");Let’s talk about what is happening here, because it may not be exactly clear at first glance. We all know that this refers to the object executing the code (in this case, an object of the Game1 class). Content is an object of the ContentManager class that we get by inheritance from the Game parent class, and Load() is one of its methods. The <spriteFont> construction is like a cast that tells the Load() method to return whatever it loads as a spriteFont object.
This is one of the biggest and most frustrating potential SNAFUs to new XNA users. Note that in the Solution Explorer, under the console item, you see Consolas15.spriteFont. If this were a graphics file, you would see a more common file extension such as .jpg, .bmp, or .png. If you right-click that item in the Solution Explorer, the properties panel tells you that the file name is indeed Consolas15.SpriteFont; but if you try to tell XNA to load Consolas15.SpriteFont in the preceding line of code, XNA will compile and throw a runtime file not found exception. Manual inspection of the directory will show that the file is there, and severe frustration and possibly prolonged bouts of heavy drinking may ensue. The reason for this, however, is that the content manager of XNA already knows the proper extension for the file and will append it when it’s needed. By passing in an extension to the Content.Load call, you are telling XNA to, in essence, go look for Consolas15.SpriteFont.spriteFont, which leads to the file not found exception. Note that this only applies to the Content manager class; other methods of loading content in C# and XNA require the full name of the file.
We’re almost home, now, Valued Reader. We have only one more method to modify. It is common in video game architecture to split the game loop across two broad functional areas: updating the game state and rendering the game state to the player. XNA keeps these two broad divisions and provides two high-level hooks for tapping into them: the Update() method and the Draw() method.
We’re only concerned with Draw() in this simple example (we’ll delve into Update() later), so find the Draw() method and look for the following line:
graphics.GraphicsDevice.Clear(Color.CornflowerBlue);
The use of CornflowerBlue for the default screen in XNA borders on criminal insanity—funny or not. Fortunately, you can easily change the background color for your game by changing the Color attribute in this line. For example, you can change the line to read as follows:
graphics.GraphicsDevice.Clear(Color.Black);
Note
The object name (graphics) in the preceding line won’t appear in XNA 3.0 files that are generated from scratch. It is required in XNA 2.0 files, however. This change represents a small bit of syntactic sugar---that is, changes in syntax designed to make a coder’s life easier. I include the graphics member out of habit from coding in XNA 2.0.
This will be much more soothing (not to mention slimming).
Next, highlight the TODO comment immediately following the Clear call and replace it with these two lines:
spriteBatch.Begin();
spriteBatch.End();
Remember I mentioned briefly that spriteBatch objects allow you to draw a bunch of sprites while using the same graphics card settings? spriteBatch. Begin() is the method that prepares the graphics device for rendering. By calling a slightly different version of the method, you could set different blending, sorting, and state options for the batch. spriteBatch.End(), on the other hand, flushes the batch and restores the graphics device to the state it was in before the spriteBatch.Begin() call was executed. But where do you actually draw anything? You haven’t yet. You need one last line of code, positioned directly between the spriteBatch.Begin() and spriteBatch.End() calls. Type this line:
spriteBatch.DrawString(C15, "Hello Cruel World!", textPos, Color.Red);
Recall that C15 is the name of our spriteFont object that we loaded the font into, and that textPos is a Vector2 object (also known as a point) that we situated at 20,20. The other parameters are self explanatory.
Build and run your creation; results should be similar to what you see in Figure A.7. This is the payoff!
Now that we’ve gotten the (seemingly inevitable) Hello World programming example out of the way, let’s take a few minutes and look at what XNA didn’t do for us. First, run the example again. The most glaring omission to me is the lack of the mouse in the game window. The mouse is there; it’s just invisible because XNA doesn’t draw it for us automatically. The second problem I see relates to the window itself. There’s some seriously hinky magic being invoked somewhere in the automatically generated code. For instance, looking at the code, I see no dimensions for the screen. In a way, I’m happy about that, because it saves me from having to figure out how to draw the main game window, but I would like to get an idea of the canvas size we’re working with. Of course, there are potentially more issues, but at this point we can safely ignore the rest. Let’s deal with these two issues in a bite-size manner.
Okay, Valued Reader, let’s start this endeavor with a bit of magic of our own. It would be nice to start from the HelloCruelWorld solution we just created, but there seems to be no easy way to do this if we want to preserve HelloCruelWorld in its present form. So we’ll cheat—er, copy the existing classes and content over to a new project.
Open a clean instance of Visual Studio and create a new project as described in the HelloCruelWorld example (File → New → Project or Shift+Ctrl+N). Name it anything you like (I chose MiceNMen).
Next, you will invoke your magic. Right-click the project name in the Solution Explorer and select Add → Existing Item. Navigate to the HelloCruelWorld project in your directory tree and find the Game1.cs file; then click Add. Visual Studio will tell you the file already exists; click Yes to replace it.
I admit that I cringe every time I do this because I think I’m about to destroy the project that I’m importing from, but this process does not overwrite the existing class file in the HelloCruelWorld example. Instead, it creates a brand-new copy of the file in the MiceNMen project. You will be able to hack at it to your heart’s content and still have a pristine copy in the other project. Pretty neato.
Note
You can use this same method to copy entire projects, except you right-click on the solution name rather than the project name. This is an easy answer to the problem of having a different version of XNA. Simply start a new solution in your version and import the projects directly out of the sample projects on the CD-ROM.
Note, however, that the code you just copied will be pointing at the wrong namespace. Specifically, it will be trying to use the HelloCruelWorld namespace because that’s where it used to live. The fix is simple, however. In Game1.cs, find the namespace definition line. It looks like this:
namespace HelloCruelWorld
All you need to do to fix this namespace problem is to change this line to read as follows (changes are in bold):
namespace MiceNMenViola, it’s good to go.
Next, you need to copy the spriteFont from the HelloCruelWorld solution. You can easily do this using the same 1337 h4xx0r (that’s “elite hacker” for you non-1337 h4xx0rs) method you used earlier.
Right-click the Content item in the MiceNMen Solution Explorer and select Add → Existing Item.
Caution
Visual Studio will happily add the imported file anywhere inside the project on which you happened to right-click, but assets must all appear in the Content directory. Make sure you are right-clicking on the Content item in the Solution Explorer (and double-check your success by opening the folder afterward).
A dialog box will appear that points at the Content folder in the MiceNMen project. Navigate to the HelloCruelWorld Content folder, select All Files from the File Filter box, select Consolas15.
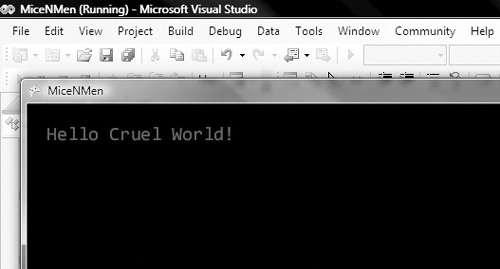
spriteFont, and then click Add. The file is automatically copied to the Content folder of the new solution. Pretty nice, eh?Close the HelloCruelWorld instance and test your new project by building the solution and running it. Your result should mimic that shown in Figure A.8. Notice that the window title has captured the new project name automatically—more XNA-fu!
Let’s do something about the mouse pointer. You need to perform three steps (all of which are easy):
You need to create the mouse pointer art and load it into the content pipeline.
You need to add a bit of input listening to find out where the mouse is.
You need to tell the
spriteBatchobject to draw the mouse pointer.
Sounds trivial, right?
Creating the artwork may be the only hitch in our collective giddy-up. XNA can create bitmap images natively inside Visual Studio—which is cool. It can’t, however, create anything that can do transparency—which is not cool. What we need is an external graphics program that can create Portable Network Graphics format (PNG) images (or “pings”). I use Adobe Photoshop, but any program that can create a PNG will do (or you can just use my art from the CD). Basically, you want a 16 × 16-pixel transparent background PNG that has something pointing at the upper-left corner of the square. The color for your pointer is up to you (later we will make everything white so we can program-matically control the color), but keep in mind that the background here is black. Save your art in the Content folder of your project and name it mouse.png; then do the following:
In Visual Studio, right-click the content item in the Solution Explorer and select Add → Existing Item.
The dialog box will appear again, but will likely be pointing at the HelloCruelWorld project. Navigate to the MiceNMen project Content folder, select mouse.png, and click Add.
Next, you need to create an object to hold the mouse art in very much the same manner that you created the C15 object to hold the spriteFont in HelloCruelWorld. In this case, however, you need a different kind of object: a Texture2D object.
Find the member variables section of the Game1 class definition again. It looks like this:
public class Game1 : Microsoft.Xna.Framework.Game
{
    GraphicsDeviceManager graphics;
    SpriteBatch spriteBatch;
    //a point object representing where the text will be drawn
    Vector2 textPos;
    //a font object to hold 15-point Consolas ttf
    SpriteFont C15;
Immediately following the declaration of C15, add the following lines:
//a texture object to hold the mouse pointer art
Texture2D mouse;
Now that you have the object declared, you need to instantiate it and load it with the correct texture. You will perform this task in the LoadContent() method as you did with the Consolas15 spriteFont. Navigate to the LoadContent() method and find the following lines:
//loading the Consolas 15pt. TTF
C15 = this.Content.Load<SpriteFont>("Consolas15");
Immediately following those two lines, use the this.Content.Load() method to load the mouse.png file. Your code should look something like this:
//load the mouse pointer texture
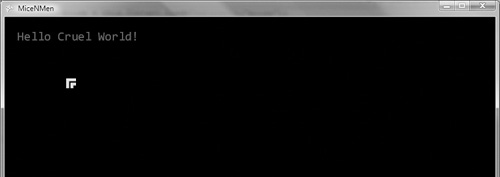
mouse = this.Content.Load<Texture2D>("mouse");To test that you’ve done this part of the task well, draw the mouse pointer at a random point on the screen (still with no relation to the mouse). You’ll do this by finding the spriteBatch.Begin() and spriteBatch.End() method calls in the Draw() method. After the spriteBatch.DrawString call, type the following line:
spriteBatch.Draw(mouse, new Vector2(100.0f, 100.0f), Color.White);
This will draw the mouse at 100,100 and use its defined colors. Save and run the project. You should see a screen similar to that shown in Figure A.9.
Perfect! One task down, two more to go.
Next up: simple input processing. You need to figure out where the mouse is in each frame so that you can draw the mouse pointer texture in that location. To accomplish this, you need to tell the XNA window to start paying attention to the mouse. In other words, you need a mouse listener, but you don’t want the overhead of the event pattern (this is supposed to be a game-ish thing, after all). Instead, you want to use a process called hardware polling, in which you query the hardware when you want to know its state. This is a little bit like the observer pattern, but it has no notification from the hardware that the state is changed, so
you must check regularly to avoid missing state changes. The good news is that this is blisteringly easy in XNA. In fact, everything is already done for you in the API. You just need to call the right methods at the right time.
What’s the right method?
Microsoft.Xna.Framework.Input.Mouse.GetState();
Perfect! Except that the method call will return a new set of data each time it is called, and you may want to use the data more than once. You need a container for the data. The API call returns an object of another class provided by the API: the MouseState class. Add a member variable to Game1 of the MouseState class called mouseState like this:
public class Game1 : Microsoft.Xna.Framework.Game
{
   GraphicsDeviceManager graphics;
   SpriteBatch spriteBatch;
   //a point object representing where the text will be drawn
   Vector2 textPos;
   //a font object to hold 15-point Consolas ttf
   SpriteFont C15;
   //a texture object to hold the mouse pointer art
   Texture2D mouse;
   //input state for the mouse
   MouseState mouseState;
Now that you have a place to store the state, you need to call that API method at the right time. What’s the right time? Remember when I spoke briefly about game architectures and splitting the game-state processing up from the rendering processing? It’s good practice to force yourself to think in those terms. Following that architecture, you want to make the preceding API call in the Update() method. This call helps to update the state of the code.
Currently, the Update() method is empty except for auto-generated code. As before, when touching auto-generated methods for the first time, you’re going to overwrite the TODO comment line with the following code:
mouseState = Microsoft.Xna.Framework.Input.Mouse.GetState();
All that’s left in this task is to use the mouseState object to draw the mouse texture in the right place. To do that, you’ll alter the Draw() call. You need to change it to this (changes are in bold):
spriteBatch.Draw(mouse, new Vector2(mouseState.X, mouseState.Y), Color.White);When you save, build, and run your file, you should see the custom mouse pointer texture following as you move the mouse around the game screen.
At this point, compulsive honesty compels me to admit that there is a much easier solution, although it doesn’t use a fancy custom-pointer texture as we did. The reason there is no Windows-generated mouse in the game is that the auto-generated code sets the Game.IsMouseVisible property to false by default. The simplest way to display a mouse in an XNA-based game for Windows is to set that property to true in the constructor of the Game1 class. In other words, change the code of the constructor method to match this:
public Game1()
{
    graphics = new GraphicsDeviceManager(this);
    Content.RootDirectory = "Content";
    IsMouseVisible = true;
}
To test this assertion, change the constructor as mentioned, and then comment out the line that draws the custom mouse pointer in the Draw() method, like so:
//spriteBatch.Draw(mouse, new Vector2(mouseState.X, mouseState.Y), Color.White);
So, uh, yeah, why’d we just go through all that rigmarole then? First, my mouse texture is cool, and that’s a fact. Second, we need the mouse state information anyway, and this was a simple problem that allowed me to introduce texture loading, texture drawing, and the mouse state methods. Third, what doesn’t kill you makes you stronger.
One last task: You need to print the mouse’s x and y coordinates to the screen so you can figure out how big the screen is (warning: this is a lie). The good news is that you’ve already done all the work. You just need to modify the text you are printing in the DrawString call. If you tried the IsMouseVisible trick, please comment it out and uncomment the mouse texture drawing line before you move on.
You currently have a line of code bumping around in the Draw() method that looks like this:
spriteBatch.DrawString(C15, "Hello Cruel World!", textPos, Color.Red);
You need to change it slightly thusly (ain’t that a cool word?):
spriteBatch.DrawString(C15, "Mouse coordinates: (" + mouseState.X + "," +
    mouseState.Y +")", textPos, Color.Red);
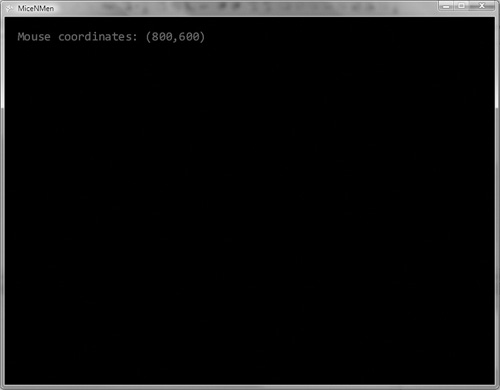
Save, build, and run your code. You are now the proud owner of a Magic Mouse Measuring Machine! If you draw the mouse down to the lower-right corner of the game window, you can finally answer the question “How big is the default game window?” with authority. As you can see in Figure A.10, 800 × 600 seems to be the magic number.
Playing around with the M4 a bit, you will notice that the magic code here can get the screen coordinates from the mouse even when it isn’t in the game window! Magic! Well, maybe not magic, but there are a few things you should keep in mind. First, XNA is just tapping its big brother (the operating system) on the shoulder and asking for the mouse state. That’s cool—you can take advantage of that fact later. Second, you will have to do your own limits testing for maintaining proper mouse use in any XNA game.
Er, Valued Reader? I have another one of those uncomfortable admissions to make. You didn’t really need to create all this to get the size of the window. (No doubt you knew that already.) You could have gotten the information at any time with a simple line of code. Our Game1 class includes (via inheritance from the Game class) an object named Window that is of the GameWindow type. This Window object has a member object named ClientBounds that is of the Rectangle type. ClientBounds represents the window you are drawing on the screen, thus the following two attribute accessors can tell you the width and height of the window:
this.Window.ClientBounds.Width
this.Window.ClientBounds.Height
Therefore, if you add yet another spriteBatch.DrawString call, you can print the size of the window directly. In the Draw() method, add the following line after the existing spriteBatch.DrawString call:
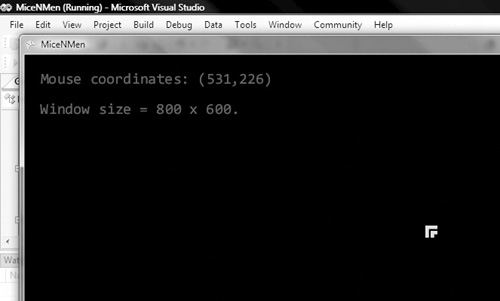
spriteBatch.DrawString(C15, "Window size = " +
    this.Window.ClientBounds.Width + " x " +
    this.Window.ClientBounds.Height + ".", new Vector2(textPos.X,
    textPos.Y +  40.0f), Color.Red);
This code will print the window size to the screen, as shown in Figure A.11. Note that you did not just use an unaltered version of the textPos object to place the text, since that would have caused the text to print over the mouse coordinate line. Instead, you used the values from the textPos object, adding a 40-pixel offset to the y coordinates, to create a new Vector2 object.
I can sense your question, Valued Reader. Why did you do all this if it is so stinking easy to get the window bounds? It seems like a good way to introduce the mouse-handling features you need for other topics to follow, and a way of doing so that I hope added some humor to the process as well as visually reinforcing
what you were doing. Please forgive me if you found this a little annoying. I promise not to do it again. Well, at least not in the example you just finished.
Okay, okay, enough with the mouse! Let’s do something game-ish already! I promise, we will get there. For now, let’s do something with a little smaller scope. Let’s continue to mess with the mouse state a bit, but add some more stuff to MiceNMen. Let’s see … we covered the mice … I know! Let’s add some men! I want to extend MiceNMen to accommodate 20 characters that I can place on the screen with the mouse. I’m going to start in a fresh project called MiceNMen2 and copy the content files and Game1.cs class file over from MiceNMen. Recall that once I do this, the Game1.cs namespace will need to be updated to point at the MiceNMen2 project.
Caution
At this point, Valued Reader, you might be tempted to simply import the project file from the MiceNMen solution. While this will certainly work, doing so will not preserve the MiceNMen solution. Instead, the project will be changed in its original location. You can copy the project manually in Windows Explorer and paste it into the new solution’s directory structure, however.
First things first: You need to fix the mouse listener so you won’t be trying to handle mouse clicks from outside the game space (as it would be annoying to the game code to have to draw little men outside its window). To accomplish this, you will slightly modify the Update() function to test the mouse position against the bounds of the screen. You could just test the MouseState object’s x and y coordinates and set them to 0 or their max if the mouse is outside the window—except for the small detail that the MouseState object’s x and y attributes are not modifiable. That means you need to keep track of a set of coordinates for your use. You could do this later, when you encounter problems caused by being out of bounds, but I can tell by your expression that you’d really like to fix this now, and I commend you for your bravery. It’s no problem; I’m easy that way.
You need to add two floats to Game1’s member list. For the sake of easy reading, name the two floats mX and mY. Your member list should look something like this:
public class Game1 : Microsoft.Xna.Framework.Game
{
    GraphicsDeviceManager graphics;
    SpriteBatch spriteBatch;
    //a point object representing where the text will be drawn

    Vector2 textPos;
    //a font object to hold 15-point Consolas ttf
    SpriteFont C15;
    //a texture object to hold the mouse pointer art
    Texture2D mouse;
    //input state for the mouse
    MouseState mouseState;
    //x,y coordinates to enforce bounds checking on the mouse
    float mX;
    float mY;
Next, you should for the sake of completeness (not to mention those stray neutrinos from Jupiter that cause strange and unanticipated behavior from game software) initialize these two variables to 0. In the Initialize() method, add the following code:
//initialize the bounds' x,y coordinates
mX = 0.0f;
mY = 0.0f;
With that done, you can move on to the real fun. To enforce bounds, you simply need to test the MouseState X and Y members against the bounds on the screen. Let’s test X against 0 and 800 and Y against 0 and 600. The logic here is simple: If X is less than 0, set mX to 0. If X is greater than 800, set mX to 800. Otherwise, set mX to the value of X. The logic for Y is the same.
Note
Note that by hard-coding these values, you are assuming that the screen size will not change from 800 × 600. If you want to accommodate a resizable screen, you should check the mouseState X and Y coordinates against the ClientBounds attributes---e.g.:
this.Window.ClientBounds.Widththis.Window.ClientBounds.Height
To implement the preceding tests in code, you just need to add some conditional statements after you capture the MouseState in the Update() method. After the line
mouseState = Microsoft.Xna.Framework.Input.Mouse.GetState();
add the following code:
//perform bounds checking on the mouse coordinates - - since we know the screen is
//800x600 we just need to keep mX between 0 and 800 and mY between 0 and 600
if (mouseState.X < 0)
{
    mX = 0.0f;
}
else if (mouseState.X > 800)
{
    mX = 800.0f;
}
else
{
    mX = mouseState.X;
}

if (mouseState.Y < 0)
{
    mY = 0.0f;
}
else if (mouseState.Y > 600)
{
    mY = 600.0f;
}
else
{
    mY = mouseState.Y;
}
The last bit you need to do to complete this task is to update everywhere you were using mouseState.X and mouseState.Y. That’s part of the reason you wanted to make these changes now, right? Because you haven’t done all that much code yet that relies on the x and y coordinates of the mouse? That was good thinking, Valued Reader.
In the Draw() method, use mouseState.X and mouseState.Y in two lines. To make these two lines comply with the new order of things, you just need to replace mouseState.X with mX and mouseState.Y with mY. Easy peasy.
In the Draw() method, your code should look like this:
//drawing the text to the screen
spriteBatch.Begin();
spriteBatch.DrawString(C15, "Mouse coordinates: (" + mouseState.X + ",
    " + mouseState.Y +")", textPos, Color.Red);
spriteBatch.Draw(mouse, new Vector2(mouseState.X, mouseState.Y), Color.White);
spriteBatch.End();
You also need to replace all the mouseState.Xs and mouseState.Ys accordingly. Because I’m feeling hackerish and experimental, let’s leave the DrawString with the actual mouse coordinates and add the bounds’ checked coordinates for comparison. Change the code to look like this:
//drawing the text to the screen
spriteBatch.Begin();
spriteBatch.DrawString(C15, "Mouse coordinates: (" + mouseState.X + ","+
mouseState.Y +") ::> bounds checking: mX,mY = (" + mX + "," + mY + ")",
textPos, Color.Red);
spriteBatch.Draw(mouse, new Vector2(mX, mY), Color.White);
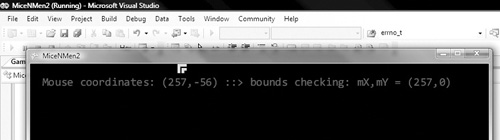
spriteBatch.End();Save, build, and run. You should see something similar to what is shown in Figure A.12. If you play around with this a bit, it quickly becomes apparent that your bounds-checking routine works beautifully and has the added benefit of keeping the mouse position inside the game screen at all times. This may or may not be a good thing, depending on the requirements of the game, but for our purposes it will work out fine.
Let’s take a minute to think and talk about the implications of this simple bounds-checking routine. First, as mentioned, the mouse is always visible in the game, even when the actual mouse position is out of the game space. Second, you have constrained the mouse position to always be a valid one in the context of the game. What does that mean? You can enable any click made (even if the mouse is out of the game space) with a behavior inside the game space (but you aren’t locked into that decision). That could be a problem if the game design does not need or want this ability. An alternative method is to put the bounds checking on the click detection—that is, to code the game to only hear clicks that happen inside the game space and ignore all others. Honestly, this is the best approach because it prevents something from happening in the game when the player clicks on an outside application as well. On the other hand, this kind of bounds
checking can enable other game behaviors (such as map scrolling in a real-time strategy game, etc.). If it were really important, you could turn off drawing the mouse when the mouse position is outside the bounds by setting the mX and mY values to be off the drawable screen (e.g., set mX to be −20 when mouseState.X < 0, etc.).
For MiceNMen2, I’d like to be able to put some men right up to the edge easily, so I will leave the mouse drawing enabled and allow a mouse-click event to occur. This isn’t really a game, so there is no downside to this (other than the potential development of bad habits!).
Let’s move on to adding the men to the screen. I mentioned that I’d like to be able to add up to 20 men to the play field, but I certainly don’t want to have to add and keep track of 20 individual variables for each of them. The solution is, of course, a container of some kind—you know, like an array. You need to keep track of a texture and some state information for the man you are adding, however, so you can’t just add an array of Texture2D objects (although you could add multiple arrays—say, a Texture2D array, an X coordinate array, a Y coordinate array, etc.—and tie them all together with a shared index, but that’s what we call an ugly solution). What you will do instead is add a small internal class to the Game1 class definition.
Whew, this Game1 class is really starting to fill up. In an actual game, I’d be breaking some of this stuff out into separate classes as a good coding practice, but in this context, I want to keep everything in one file to (hopefully) make the example easier. If it doesn’t actually make it easier, well, then keep in mind the great old adage I mentioned earlier: What doesn’t kill you makes you leet.
Let’s add the internal class at the very top of the Game1 class definition. You need to make a class that has three members: a Texture2D object (let’s call it texture), and two floats to hold the x and y coordinates (let’s get freaky and name them X and Y). You will also need accessors for each of these and a default constructor for the class.
C# has some nifty features beyond what XNA gives you. One of my current favorites is the property construct with its built-in get and set keywords that make accessor functions so easy and quick to create. The syntax is easy once you get the hang of it. It should look like this:
public datatype accessorname
{
        get { return membername;
        set { membername = value; }
}
I love that. It makes accessors so easy and uniform, not to mention easy. (Have I mentioned that they’re easy?) Here’s the code for the internal class:
public class Game1 : Microsoft.Xna.Framework.Game
{
    //an internal class to contain data and methods to control the men in
    //this example
    internal class Man
    {
        //the texture to draw for this object
        Texture2D texture;
        //position coordinates for this object
        float X;
        float Y;

        public Man()
        {
            texture = null;
            X = -100.0f;
            Y = -100.0f;
        }

       //accessor methods
       public Texture2D manTexture
       {
           get { return texture; }
           set { texture = value; }
       }
       public float x
       {
           get { return X; }
           set { X = value; }
       }
       public float y
       {
           get { return Y; }
           set { Y = value; }
       }
    }
With this class definition, you can move on to creating our array of Man objects. You also need to keep a count of how many objects are active (that is to say, placed in the game area). At the bottom of the members list, add the following directly beneath the definitions of mX and mY:
//the men container
Man[] men;
//count of active Man objects
int manCnt;
To initialize these new members, you need to find the Initialize() method and add the following code prior to the base.Initialize() line:
//initialize the Man object container and set the counter appropriately
men = new Man[20];
for (int i = 0; i < 20; i++)
{
    men[i] = new Man();
}
manCnt = 0;
Now you are set. You need to load some textures for the Man objects and set up a mouse-click listener that will place each Man object at the point clicked. You also need art for the textures; feel free to create your own or use my art (in the Content folder for the MiceNMen2 project—named man.png). My image is a 35 × 48 pixel stick figure, but none of the attributes for this image are critical except for the name: man.png. You’ll load the textures using the tried-and-true method. As the last line of the LoadContent() method, add the following:
//load textures for the Man objects
for (int i = 0; i < 20; i++)
{
    men[i].manTexture = this.Content.Load<Texture2D>("man");
}
Yes, you are loading the same texture for every object. It doesn’t matter, however, as each object now has its own copy of the texture to play with. All that’s left is to hook up the clickiness. First, you need to know when there has been a click. In some languages, this occurs in the form of a mouse-click event; in XNA, however, when polling the hardware, you only know whether the mouse is currently pressed or released. That means in order to capture a mouse click, you need to have a bit of history at your fingertips. Specifically, you need to know if the current mouse state is the same as the immediately previous mouse state. You may have already guessed this, but you need another MouseState object. We’ll call it oldState. It makes sense to keep the definition of like objects close to each other, so find the declaration line for mouseState and add another MouseState object beneath it. It should look like this:
//input state for the mouse
MouseState mouseState;
//last state for mouse clicks
MouseState oldState;
Next you need to copy the mouseState into oldState prior to getting the new state. In the Update() method, find the line where you set the mouseState value and, immediately before it, add code to copy its value into oldState. It should look something like this:
//capture the last state of the mouse and the current state of the mouse
oldState = mouseState;
mouseState = Microsoft.Xna.Framework.Input.Mouse.GetState();
Cool. Now you can determine if you’ve seen a click. To do so, you need another built-in attribute of the MouseState class, namely LeftButton. You can test the value of this attribute against some static values found in the ButtonState class (it has two: Pressed and Released) to determine what the user is doing to the left button of the mouse.
There are two options for determining a mouse click by polling. One evaluates to a mouse-down event, and the other evaluates to a mouse-up event in other languages. Both have equal importance in programming, but for our purposes you want to track the mouse-up event; when you see it, you will place a Man object at the mouse location.
You can detect a mouse-down event in XNA by comparing the value of old State.LeftButton to ButtonState.Released and mouseState.LeftButton to Button-State.Pressed. On the other hand, a mouse-up event corresponds to old State.-LeftButton being equal to ButtonState.Pressed with mouseState. LeftButton being equal to ButtonState.Released.
With that in mind, you can add code to determine whether our user has created a mouse click. After the y bounds-checking code, but before the call to base.-Update() in the Update() method, add the following conditional:
//check the state of the left button
if (oldState.LeftButton == ButtonState.Pressed &&
        mouseState.LeftButton == ButtonState.Released)

{
   //a mouse click occurred
}
You are now ready to start putting the Man objects on the screen. To accomplish that little detail, you will populate the code block you just created. You probably noticed that the default constructor for the internal class you created places the Man object outside of the drawable area of the screen. You can add it to the play field by simply assigning the current mouse coordinates (the bounds-checked version) to the Man object. Before you do that, however, you want to ensure that you are using a valid object. You can do so by simply testing the manCnt variable against 20. If it is less than 20, you have more objects available for activation. If it is equal to 20, however, you’re done.
You need to change the conditional block you just wrote to do these things by adding code to the block like this:
//check the state of the left button
if (oldState.LeftButton = = ButtonState.Pressed &&
    mouseState.LeftButton = = ButtonState.Released)
{
    //a mouse click occurred
    if (manCnt < 20)
    {
        men[manCnt].x = mX;
        men[manCnt].y = mY;
        manCnt++;
    }
}
All that’s left is the code to cause them to be drawn. You guessed it: That code goes between spriteBatch.Begin() and spriteBatch.End() in the Draw() method. Specifically, you want this:
//drawing the text to the screen
spriteBatch.Begin();
//draw the Man objects
for (int i = 0; i < manCnt; i++)
{
     spriteBatch.Draw(men[i].manTexture, new Vector2(men[i].x, men[i].y),
         Color.White);
}
spriteBatch.DrawString(C15, "Mouse coordinates: (" + mouseState.X + ","+
    mouseState.Y +") ::> bounds checking: mX,mY = (" + mX + "," + mY +    ")",
    textPos, Color.Red);
spriteBatch.Draw(mouse, new Vector2(mX, mY), Color.White);
spriteBatch.End();
Save, build, and run home for dinner. You will be rewarded by being able to place up to 20 men around in the play field, as I’ve done in Figure A.13. You will no doubt be overjoyed, but try not to disturb your neighbors with your shouts of glee.
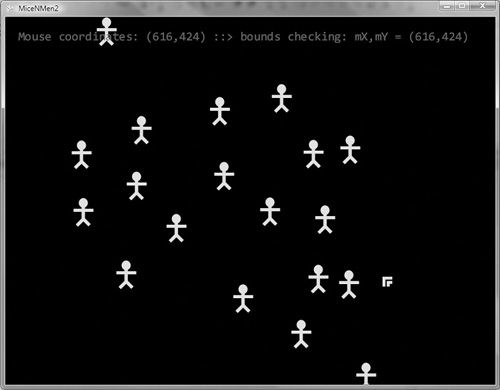
Take a closer look at Figure A.13. Specifically, look in the upper-left corner at the man that is drawn where the text is being displayed. See how the man appears to be behind the text? That is simply because you are drawing the man first and then drawing the text. Magic!
Still with me? I knew I could count on you, Valued Reader.
As a reinforcement to what you’ve just learned, and since you need an interface for a Tic-Tac-Toe game for the main example in Chapter 1, let’s do it using the techniques we talked about in the preceding sections of this appendix.
Start a new project called TicTacToeUI. If you recall, you went to great lengths to determine how big the window was using the default settings. I tried to get you to just use the easy method of accessing the size directly, but you insisted on creating a project that used the mouse to measure the screen size. I hope you learned your lesson by doing that, Valued Reader, and will be more amenable to my suggestions in this project.
Why don’t we solve the old “How big is the window?” problem by coming at it sideways? Instead of measuring the window or even accessing the inherited attributes that just tell us the size, why don’t we just tell the game how big we want the window to be? After all, it’s pretty simple to do so.
What you need is the constructor method for the Game1 class. The default constructor should look like this:
public Game1()
{
    graphics = new GraphicsDeviceManager(this);
    Content.RootDirectory = "Content";
}
All you need to do is access two attributes of the graphics member (which, as I’m sure you recall, is an object of the GraphicsDeviceManager class). The particular attributes you care about are PreferredBackBufferWidth and PreferredBack BufferHeight, and they directly correspond to the back buffer width and height on the graphics card and thus of the gameplay window. Enough with the GPU mumbo-jumbo! Here’s what you need to add to the constructor after the existing code:
//control the size of the game window - - 800x220
graphics.PreferredBackBufferWidth = 800;
graphics.PreferredBackBufferHeight = 220;
Shazam! When you run the code, you have an 800 × 220 window, as shown in Figure A.14. That’s almost too easy.
We are making a Tic–Tac-Toe game interface, so it might make sense to draw a Tic–Tac-Toe board to the screen. You need to create the grid pattern shown in Figure A.15 (minus the numbers, of course—we’ll talk about those later). You could draw the board complete as it appears in the figure, but considering what you will need to do—namely, place the right tokens in the right places during gameplay—that might not be the best solution. Alternately, you might decide that it would be cool to add some effects when the player or computer plays in a particular cell; that will also be easier if you don’t treat the entire board as one texture.
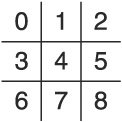
Okay, since you’ve talked me into drawing each cell separately, you will need nine 48 × 48 textures, each representing one of the cells in the grid. You can create your own or simply copy mine from the TicTacToeUI project on the CD (they are named CellN.bmp, where N ranges from 0 to 8). If you decide to use my art, you’ll notice that I included both the white space of the cell and the grid lines because of the inherent coolness of doing so. For example, Cell0.bmp is all white except for the bottom and right edges, which are black. I decided to do this to make placing them easier.
That may make as much sense as a herd of gazelle trying to integrate with a school of fish, but bear with me a moment. Consider that if I make the grid lines part of the cell textures, I can simply create an array of Texture2D objects (nine of ’em, in fact), populate the array in linear order, and then step through the array in the Draw() method and cause each cell to be drawn to the screen. The only thing I’m missing here is the in-game position of each cell (in other words, the Vector2 object that represents the x and y coordinates at which to draw the cell). Those x,y coordinates may seem tough, but since each cell is 48 × 48, and since the grid lines are included, all you need to do is add 48 to the existing y coordinate to add the next cell in the current row, and add 48 to the x coordinate to advance to the next row.
Before you jump in and start slinging code to draw these textures to the screen, let’s think about what kind of data you need to represent. From the point of view of the user interface, you need to keep track of the board—which means both the textures for the cells and the textures for the X and O player tokens—and the valid positions on the board. The requirements dictate three individual arrays just to keep track of the onscreen elements: one for the cell textures, one for the tokens, and one for the board positions. We haven’t even begun to discuss the data that will be required to write the AI (and we won’t here—that is covered in Chapter 1).
You are facing the same dilemma discussed in the second mice and men (MiceNMen2) example. Does it make more sense to keep individual arrays and track the index manually? Or does it make more sense to create a class representation that contains them all? I usually answer that question with class representation. In this case, the question is whether you create an internal class or an external class to represent each cell of the board. Again from personal preference, I create external classes if I’m going need a bunch of methods and members, reserving internal classes for small, concise code. I have a feeling the Cell class will be fairly complex, so let’s go with an external class. To add one, do the following:
In the Solution Explorer, right-click the project item (i.e., the line with TicTacToeUI) and select Add → Class.
A dialog box opens, providing you with a choice of templates on which to base the class. What you want is the plain old C# class template, which should be the first one in the list. Select the C# class template, name the new class Cell.cs, and click Add.
Visual Studio will create the class inside the project and add this code:
namespace TicTacToe
{
    class Cell
    {
    }
}
That is a nice, blank slate to start from, but it doesn’t go far enough. You know you’ll need to keep track of Texture2D objects and Vector2 objects from the previous discussion, but this set of using statements will not support those classes. You could explicitly name the classes you need, but that gets to be a drag in a big hurry. Instead, let’s add these three lines at the very top of the file:
using System;
using Microsoft.Xna.Framework.Graphics;
using Microsoft.Xna.Framework;
What these statements do is link this class file with various system libraries of classes that you want to use. These statements allow the compiler to figure out exactly which classes and methods you are referencing in the code. For example, the Texture2D class is found in the Microsoft.Xna.Framework.Graphics library, so you need a using statement for the library to use Texture2D objects.
From here you need to add the data members and behaviors for each cell that will be represented in the game. Add this code to the empty class definition (i.e., between the empty brackets):
//members
Texture2D cellTexture;
Texture2D cellTokenTexture;
Vector2 cellPosition;
Color cellTokenColor;

//default constructor, using this will require valid values set by accessors
public Cell()
{
    cellTexture = null;
    cellTokenTexture = null;
    cellPosition = new Vector2(-100.0f, -100.0f);
    cellTokenColor = Color.White;
}
//constructor for setting up a cell at a certain position with a default token
public Cell(Texture2D cTex, Vector2 cPos, Texture2D cTok)
{
cellTexture = cTex;
cellPosition = cPos;
cellTokenTexture = cTok;
cellTokenColor = Color.White;
}
//accessor methods
public Texture2D CellTexture
{
get { return cellTexture; }
set { cellTexture = value; }
}
public Texture2D TokenTexture
{
get { return cellTokenTexture; }
set { cellTokenTexture = value; }
}
public Vector2 Position
{
get { return cellPosition; }
set { cellPosition = value; }
}
public Color TokenColor
{
get { return cellTokenColor; }
set { cellTokenColor = value; }
}This class will be used to keep track of what’s going on in each individual cell and will be used to draw the cell and its contents to the screen at runtime. In addition, this code is expanded later to accommodate the knowledge representation tasks covered there and in building the rest of the AI.
Now that you have the internal class defined, you need to create an array of nine of the class’s objects in the Game1 class. As in the previous examples, at the top of the Game1 class definition you will find two auto-defined members:
GraphicsDeviceManager graphics;
SpriteBatch spriteBatch;
Immediately following these two lines, add an array of the Cell type named board—like this:
//board representation
Cell[] board;
Note
It may seem strange to add a member of an externally defined type without having to import it or add to the using list, but that’s an effect of the enforcement of namespaces in C#. As long as both classes are in the same namespace, there is no need to import the new type.
In the Initialize() method, you need to initialize the array. Add the following line of code above base.Initialize():
//initialize the board array
board = new Cell[9];
Before you can populate the array, you need to create at least one token texture—the “no token here” token (often called a “space” in high-brow Tic-Tac-Toe circles). Again, you may create your own transparent 48 × 48 texture, or use mine (NullToken.png in the Content folder). To add the content to the array, add the following code to the LoadContent() method, immediately following the spriteBatch member initialization:
//load the board content and position vectors for each cell
board[0] = new Cell(this.Content.Load<Texture2D>("Cell0"),
                     new Vector2(26.0f, 38.0f),
                     this.Content.Load<Texture2D>("NullToken"));
board[1] = new Cell(this.Content.Load<Texture2D>("Cell1"),
                     new Vector2(74.0f, 38.0f),
                     this.Content.Load<Texture2D>("NullToken"));
board[2] = new Cell(this.Content.Load<Texture2D>("Cell2"),
                     new Vector2(122.0f, 38.0f),
                     this.Content.Load<Texture2D>("NullToken"));
board[3] = new Cell(this.Content.Load<Texture2D>("Cell3"),
                     new Vector2(26.0f, 86.0f),
                     this.Content.Load<Texture2D>("NullToken"));
board[4] = new Cell(this.Content.Load<Texture2D>("Cell4"),
                     new Vector2(74.0f, 86.0f),
                     this.Content.Load<Texture2D>("NullToken"));

board[5] = new Cell(this.Content.Load<Texture2D>("Cell5"),
                     new Vector2(122.0f, 86.0f),
                     this.Content.Load<Texture2D>("NullToken"));
board[6] = new Cell(this.Content.Load<Texture2D>("Cell6"),
                     new Vector2(26.0f, 134.0f),
                     this.Content.Load<Texture2D>("NullToken"));
board[7] = new Cell(this.Content.Load<Texture2D>("Cell7"),
                     new Vector2(74.0f, 134.0f),
                     this.Content.Load<Texture2D>("NullToken"));
board[8] = new Cell(this.Content.Load<Texture2D>("Cell8"),
                     new Vector2(122.0f, 134.0f),
                     this.Content.Load<Texture2D>("NullToken"));
If these lines of code are confusing, recall that the Cell objects in the array have not been initialized yet, only the array itself was initialized. All you are doing here is calling the non-default constructor and passing in the correct cell texture, random vector positions and the space token. No, really, those Vector2 values are just completely off the top of my head. I have no idea why I chose those particular coordinates. Really. Would I lie to you, Valued Reader?
Moving on…. To draw all this magical stuff, you need to find the Draw() method in Game1 and replace its current code with the following:
//NO CORNFLOWER BLUE!!
graphics.GraphicsDevice.Clear(Color.Silver);
spriteBatch.Begin();
//draw the board and player tokens
for (int i = 0; i < 9; i++)
{
spriteBatch.Draw(board[i].CellTexture, board[i].Position, Color.White);
spriteBatch.Draw(board[i].TokenTexture, board[i].Position, board[i].
TokenColor);
}
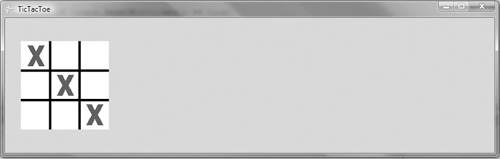
spriteBatch.End();Save, build, run, and shout in delight! You should see a game screen like that shown in Figure A.16.
Since this is going to be a player versus NPC kind of game, you need to think about how the player will enter his or her moves. You could come up with some keyboard scheme—something like pressing 0–8 to pick the corresponding cell of the Tic-Tac-Toe board (refer to Figure A.15)—but XNA makes using the mouse very simple.
What you need to do is add code to track the mouse position, detect a mouse click, and figure out whether the click occurs inside one of the board positions. If the click is inside one of the board positions, you need to add an X token on that spot on the board (unless that spot is already taken, in which case you can ignore the click). Note that we are adding X tokens only at this point for the purpose of testing the UI.
You could add the mouse handler directly in the Game1 class as you’ve done previously, but I have a sneaky suspicion that you’ll need to handle more than a simple mouse position for this example. You might add some buttons to your UI, for instance. That being the case, let’s create an external input handler for the game.
Create a new class using the standard C# template named Input.cs. You need to update the using list again, but this time add these two lines:
using Microsoft.Xna.Framework.Input;
using Microsoft.Xna.Framework;
In this class, you need to track the current mouse state and the previous mouse state. You will eventually use this class to track button clicks and keyboard inputs, but for now the following is sufficient. Add the code between the two brackets of the input class definition:
//state members for our devices, including members to track the previous state.
private KeyboardState keyState;
private KeyboardState oldKState;

private MouseState mouseState;
private MouseState oldMState;

//constructor
public Input()
{
}

//accessors
public MouseState Mouse
{
    get { return mouseState; }
}

public KeyboardState Keyboard
{
    get { return keyState; }
}

//utility methods
public void Update(GameTime gameTime)
{
    oldKState = keyState;
    keyState = Microsoft.Xna.Framework.Input.Keyboard.GetState();
        oldMState = mouseState;
    mouseState = Microsoft.Xna.Framework.Input.Mouse.GetState();
}

//this method determines if the mouse is clicked with in the bounds of the board
    public bool MouseClicked()
    {
    //if the mouse position is inside the bounds of the board
    if (Mouse.X >= 26 && Mouse.X < 171 &&
        Mouse.Y >= 38 && Mouse.Y < 183)
            {
        //check to see if the left button was down, but now up
                  return oldMState.LeftButton = = ButtonState.Pressed &&
               mouseState.LeftButton = = ButtonState.Released;
            }
            else return false;
    }
Let’s discuss the interesting portions of this code. First, note that this file gets its own Update() function. That means you will need to call this function appropriately from inside Game1. Why do this? It makes it easier to keep track of what is being updated and when it is being updated as the functionality of the Input class is expanded.
Also, take note of the MouseClicked() method. This offers the same functionality and bounds checking as we discussed in the MiceNMen examples, but we are combining the bounds checking with the button-state checking. I chose to do it this way because I know I will eventually be adding code to handle buttons to this class, and the buttons will have separate bounds checking.
To add this functionality to the game, you need to add an object of the Input class to Game1, initialize it, and call its Update() function as discussed earlier. To do so, add the following code after the Cell[] board member definition:
//Input handler
Input input;
Next, in the Initialize() method, add the following before the base.Initialize() call:
//initialize the input handler
input = new Input();
Finally, in the Update() method, add this code before the call to base.Update():
//update the input handler
input.Update(gameTime);
All that’s left is to use the input data. To do so, expand the Update() method further by adding code to determine which cell of the board saw the mouse click. All you need to do there is determine whether there was a valid mouse click (and recall that we defined “mouse click” to mean a click occurring inside the bounds of the Tic-Tac-Toe board) and if so, compare the mouse position against the bounds of each cell. To do this easily, I am dividing the testing of cells into a row × column format rather than trying to test them by index (e.g., cell 0 through cell 8 directly). It’s just simpler, and since you already know the mapping between row n and column m to cell x, the logic isn’t very confusing.
Basically, you need a few nested conditional statements to find the row and column, and then add a few more nested conditionals to do the right thing to the right cell. One small caveat: You need to add some functionality to the Cell class. To determine whether a Cell object has already been filled, you could just test the value of the Texture2D object against some ideal, but for the game to actually work, you will need to be able to assign a numeric value to the cell anyway—depending on which token the cell holds. You might as well add that ability now and use it for your emptiness testing rather than add one method now, only to replace it later with what you will need when you move on to building the AI.
In Cell.cs, add an integer member named cellValue and initialize it in each constructor with a value of 2. You need to add two accessor methods to the class as shown (changes are in bold):
//members
Texture2D cellTexture;
Texture2D cellTokenTexture;
Vector2 cellPosition;
Color cellTokenColor;
int cellValue;

//accessor methods
public Texture2D CellTexture
{
    get { return cellTexture; }
    set { cellTexture = value; }
}

public Texture2D TokenTexture
{
    get { return cellTokenTexture; }
    set { cellTokenTexture = value; }
}

public Vector2 Position
{
    get { return cellPosition; }
    set { cellPosition = value; }
}

public Color TokenColor
{
    get { return cellTokenColor; }
    set { cellTokenColor = value; }
}

public int Value
{
    get { return cellValue; }
    set { cellValue = value; }
}

public Boolean isFree
{
    get { return cellValue == 2; }
}

//default constructor, using this will require valid values set by accessors
public Cell()
{
    cellTexture = null;
    cellTokenTexture = null;
    cellPosition = new Vector2(-100.0f, -100.0f);
    cellTokenColor = Color.White;
    cellValue = 2;
}

//constructor for setting up a cell at a certain position with a default token
public Cell(Texture2D cTex, Vector2 cPos, Texture2D cTok)
{
    cellTexture = cTex;
    cellPosition = cPos;
    cellTokenTexture = cTok;
    cellTokenColor = Color.White;
    cellValue = 2;
}
You will also add an isX and is0 test, but since you don’t need them yet, we will leave that for later.
With the Cell class updated to support your needs, you can get back to the fancy-shmancy coding. But before you do, be sure to either create a 48 × 48 X token that is transparent except for the X or use mine (XToken.png) and add a Texture2D member to contain it called XTok to the Game1 class.
//texture updates
Texture2D XTok;
Remember to load it in the LoadContent() method:
//init player tokens
XTok = this.Content.Load<Texture2D>("XToken");
You also want the ability to give the X token and the O token different colors, so you need to add a couple of Color objects to the member list and initialize them in Game1. Create members called drawColorX and drawColorO:
//texture updates
Texture2D XTok;
Texture2D OTok;

Color drawColorX;
Color drawColorO;
Initialize drawColorX to Color.Red. Create another member named drawColorO and initialize it to Color.Green, like this:
protected override void Initialize()
{
    //initialize the board array
    board = new Cell[9];

    //initialize the input handler
    input = new Input();

    drawColorX = Color.Red;
    drawColorO = Color.Green;
It’s also probably a good idea (or at least neat) to add the ability to flash when a cell is changed. You can do that pretty easily in XNA; you just need a few support members, again in Game1.cs. Add a bool named isFlashing, an int named flashCnt, an int named flashTarget, and a const named NUM_FLASHES set to 16. Just in case, here’s the code that should be added to the members list:
//effects vars
int flashCnt;
int flashtTarget;
bool isFlashing;
const int NUM_FLASHES = 16;
You want to initialize flashCnt to 0, flashTarget to –1 and isFlashing to false. You also need to add two more Color objects: drawColorBG, which should be initialized to Color.White, and drawColorBGFlash, which should be initialized to Color.Yellow, like so:
//texture updates
Texture2D XTok;
Texture2D OTok;

Color drawColorX;
Color drawColorO;
Color drawColorBG;
Color drawColorBGFlash;

protected override void Initialize()
{
    //initialize the board array
    board = new Cell[9];

    //initialize the input handler
    input = new Input();

    drawColorX = Color.Red;
    drawColorO = Color.Green;
    drawColorBGFlash = Color.Yellow;
    drawColorBG = Color.White;
Finally! You’re back to enabling the mouse click. Whew! That was quite a detour. Add this code toward the end of Update() (but before the call to base.Update()):
//logic to control the background cell flashing after cell selection
if (isFlashing)
{
    if (flashCnt >= NUM_FLASHES)
    {
         flashCnt = 0;
         flashtTarget = -1;
         isFlashing = false;
    }
    else
    {
         flashCnt++;
    }
}

//check for mouse clicks inside the board and add player tokens accordingly
if (input.MouseClicked() = = true)
{
    //since typing 'x' is much shorter than 'input.Mouse.X'…
    float x = input.Mouse.X;
    float y = input.Mouse.Y;

    //row and column flags
    Boolean r0 = false;
    Boolean r1 = false;
    Boolean r2 = false;
    Boolean c0 = false;
    Boolean c1 = false;
    Boolean c2 = false;

    //cell target found by the row and column test
    int cellTarget = -1;

    //first find the column by comparing the mouse x to the known cell limits
    if (x >= 74)
    {
        if (x >= 122 && x <= 170)
        {
            c2 = true;
        }
        else
        {
            c1 = true;
        }
    }
    else
    {
        c0 = true;
    }

    //then determine the row by a similar comparison of mouse y
    if (y >= 86)
    {
       if (y >= 134 && y <= 184)
       {
           r2 = true;
       }
       else

       {
         r1 = true;
       }
    }
    else
    {
       r0 = true;
    }

    //next, compare the r x c coordinates to find the correct cell, and add the
    //player token
    //test the first row
    if (r0)
    {
        //r0-c0 = cell 0
        if (c0)
        {
            cellTarget = 0;
        }
        //r0-c1 = cell 1
        if (c1)
        {
            cellTarget = 1;
        }
        //r0-c2 = cell 2
        if (c2)
        {
            cellTarget = 2;
        }
    }

    //test the second row
    if (r1)
    {
        //r1-c0 = cell 3
        if (c0)
        {
            cellTarget = 3;
        }
        //r1-c1 = cell 4
        if (c1)

        {
            cellTarget = 4;
        }
        //r1-c2 = cell 5
        if (c2)
        {
            cellTarget = 5;
        }
   }

   //test the last row
   if (r2)
   {
        //r2-c0 = cell 6
        if (c0)
        {
            cellTarget = 6;
        }
        //r2-c1 = cell 7
        if (c1)
        {
            cellTarget = 7;
        }
        //r2-c2 = cell 8
        if (c2)
        {
            cellTarget = 8;
    }
         }

    if ( cellTarget > -1 && board[cellTarget].isFree )
    {
         board[cellTarget].TokenTexture = XTok;
         board[cellTarget].TokenColor = drawColorX;
         board[cellTarget].Value = 3;
         flashtTarget = cellTarget;
         isFlashing = true;
    }
}
That’s a fairly large chunk of code, but there’s nothing tricky about it. You just find the row and column in which the mouse click occurred and then translate that information into a cell index, test to see if the cell is empty, and if so, switch the texture to the X token, set it the right color, and start the cell background flashing.
Whew. All that’s left is hooking up the Draw() code. Luckily, it’s much shorter. All you’re going to do is test to see whether you should be flashing anything and, if so, make it flash and draw everything else normally. Sound easy?
You want to replace the code you already added to the Draw() method that looked like this:
//draw the board and player tokens
for (int i = 0; i < 9; i++ )
{
    spriteBatch.Draw(board[i].CellTexture, board[i].Position, drawColorBG);
    spriteBatch.Draw(board[i].TokenTexture, board[i].Position,
        board[i].TokenColor);
}
with a for loop that looks like this:
//draw the board and player tokens
for (int i = 0; i < 9; i++ )
{
     //check to see if we should be flashing a background texture
     if (isFlashing)
     {
         //and if so, if we are at the right target and the time is right
         if ( (i = = flashtTarget) && ((flashCnt % 3) != 0) )
         {
              //then draw the cell with the BGFlash color
              spriteBatch.Draw(board[i].CellTexture, board[i].Position,
                  drawColorBGFlash);
         }
         else
         {
             //otherwise draw the cell normally
             spriteBatch.Draw(board[i].CellTexture, board[i].Position,
                 drawColorBG);
         }
      }
      else
      {
         //otherwise draw the cell normally

         spriteBatch.Draw(board[i].CellTexture, board[i].Position, drawColorBG);
      }

      //draw the token that is set for this cell
      spriteBatch.Draw(board[i].TokenTexture, board[i].Position,
          board[i].TokenColor);
}
Oops. It seems we forgot all about the mouse defaulting to invisible. For now, set the IsMouseVisible property to true in the Initialize() method. After you run your test, you’ll add a custom mouse pointer for use over the board and will use the default mouse everywhere else in the play screen. In the meantime, save, build, and run (but not too far or this next bit could get hard to read). Be sure to test your flashiness. You should only see the flashing the first time you click on a cell (see Figure A.17).
Good news! We’re almost done with the UI. We need to hook up the mouse pointer, add the buttons, and add a text system so that we can taunt… uh, I mean, communicate with the player.
You already know how to add a custom mouse texture from the previous examples. I created a custom Tic-Tac-Toe mouse pointer (playerXPointer.png in the content folder), so please add a Texture2D object to the members list named mPointer and load the content:
//load mouse pointer and UI textures
mPointer = this.Content.Load<Texture2D>("playerXPointer");
What you want to do is replace the default mouse pointer with this one when the mouse is inside the board. First you need to figure out if the mouse is inside the board. You can do that by performing the same bounds check as with the MouseClicked() method, but without the subsequent test for the left button. Add the following method to the Input class definition at the end of the code we currently have in that class:
//this method performs board bounds checking on the mouse position
public bool InBoard()
{
    return Mouse.X >= 26 && Mouse.X < 171 &&
           Mouse.Y >= 38 && Mouse.Y < 183;
}
With that method added, you can add the following code to the Draw() method of Game1 and place the new code right before the spriteBatch.End() call:
//draw mouse last if required
if (input.InBoard())
{
    if (IsMouseVisible)
    {
        IsMouseVisible = false;
    }
    spriteBatch.Draw(mPointer, new Vector2(input.Mouse.X, input.Mouse.Y),
        Color.LightCoral);
}
else
{
    if (!IsMouseVisible)
    {
        IsMouseVisible = true;
    }
}
Test it out and be impressed by my artistically relevant artsy artistic ability. The cool bit here is the context-sensitive mouse. Given our context here, this is kind of like hunting mice with a thermonuclear weapon, but it’s a useful bit of skill to have (the context-sensitive mouse, not the overkill).
Next you need to add a few UI components. If you take a look at the Content folder on the CD, you’ll find the following files: playDown.png, playUp.png, reset-Down.png, resetUp.png, and TextWindow.png. Add the following code to the member list:
Texture2D textWindow;
Texture2D playBtn;

Texture2D playBtnUp;
Texture2D playBtnDown;
Texture2D resetBtn;
Texture2D resetBtnUp;
Texture2D resetBtnDown;
Vector2 textWindowLoc;
Vector2 playButtonLoc;
Vector2 resetButtonLoc;
Then initialize the Vector2 objects like this:
playButtonLoc = new Vector2(196, 20);
resetButtonLoc = new Vector2(196, 68);
textWindowLoc = new Vector2(420, 20);
As before, note that I haven’t figured all this out with a calculator—I’m just a really, really good guesser, Valued Reader. Load each object thusly (there’s that word again! It just writes itself!):
textWindow = this.Content.Load<Texture2D>("TextWindow");
playBtnDown = this.Content.Load<Texture2D>("playDown");
playBtnUp = this.Content.Load<Texture2D>("playUp");
resetBtnDown = this.Content.Load<Texture2D>("resetDown");
resetBtnUp = this.Content.Load<Texture2D>("resetUp");

//init buttons
playBtn = playBtnUp;
resetBtn = resetBtnUp;
Here’s where you are: You’ve loaded and positioned all the UI components on the screen and you’ve created a way to swap out textures for the two buttons. Now you need to draw the components and hook up some bounds checking and click listening for the buttons. To start, add the following code to the end of the Input class:
//this method determines if play button is being held down
public bool PlayBtnDown()
{
    //if the mouse is over the play button
    if (Mouse.X >= 196 && Mouse.X < 397 &&
        Mouse.Y >= 20 && Mouse.Y < 69)
    {
        //check to see if the mouse left button is down
        return mouseState.LeftButton = = ButtonState.Pressed;
    }

    else return false;
}

//this method determines if play button has been clicked
public bool PlayBtnClicked()
{
    //if the mouse is over the play button
    if (Mouse.X >= 196 && Mouse.X < 397 &&
        Mouse.Y >= 20 && Mouse.Y < 69)
    {
        //check to see if the mouse left button was down, but now is up
        return oldMState.LeftButton = = ButtonState.Pressed &&
               mouseState.LeftButton = = ButtonState.Released;
    }
    else return false;
}

//this method determines if reset button is being held down
public bool ResetBtnDown()
{
    //if the mouse is over the reset button
    if (Mouse.X >= 196 && Mouse.X < 397 &&
        Mouse.Y >= 68 && Mouse.Y < 97)
    {
        //check to see if the mouse left button is down
        return mouseState.LeftButton = = ButtonState.Pressed;
    }
    else return false;
}

//this method determines if reset button has been clicked
public bool ResetBtnClicked()
{
    //if the mouse is over the reset button
    if (Mouse.X >= 196 && Mouse.X < 397 &&
        Mouse.Y >= 68 && Mouse.Y < 97)
    {
        //check to see if the mouse left button was down, but now is up
        return oldMState.LeftButton = = ButtonState.Pressed &&
               mouseState.LeftButton = = ButtonState.Released;
    }
    else return false;
}
With these methods in place, you can track the state of the buttons. Further, you can make the button textures change as appropriate. Back in the Game1 class, find the Update() method and add the following code after the input.Update() call:
//track the state of the buttons, changing textures as appropriate
if (input.PlayBtnDown())
{
    //the play button is mid-click - - change the texture to down
    playBtn = playBtnDown;
}
else if ( input.PlayBtnClicked())
{
    //the play button just released - - change the texture to up
    playBtn = playBtnUp;
}

if (input.ResetBtnDown())
{
    //the reset button is mid-click - - change the texture to down
    resetBtn = resetBtnDown;
}
else if ( input.ResetBtnClicked())
{
    //the reset button just released - - change the texture to up
    resetBtn = resetBtnUp;
    ResetBoard();
}
All you are doing here is swapping the texture you will draw depending on the state of the mouse. (Well, except for that little method call I snuck in there in the last else if…. You might as well make the reset button do something, right? It’s an easy method anyway….)
Add this code to the end of the Game1 class definition to reset all the cells back to their blank state:
//functionality for the reset button
private void ResetBoard()
{
    for (int i = 0; i < 9; i++)
    {
        board[i].TokenTexture = this.Content.Load<Texture2D>("NullToken");
        board[i].TokenColor = Color.White;

        board[i].Value = 2;
    }

    flashCnt = 0;
    flashtTarget = -1;
    isFlashing = false;
}
One last bit of devilry, and this particular task is D-O-N-E, finished. Add this code to the Draw() method before the code that draws the mouse:
//draw UI items
spriteBatch.Draw(playBtn, playButtonLoc, Color.White);
spriteBatch.Draw(resetBtn, resetButtonLoc, Color.White);
spriteBatch.Draw(textWindow, textWindowLoc, Color.White);
Save, build, run for president. You should be suitably amazed at the graphical UI goodness and the clicky buttons, as shown in Figure A.18. As you can see, I am very good at playing Tic-Tac-Toe with no opponent—Grand Master level, maybe.
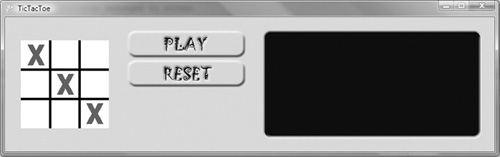
Valued Reader, you are almost finished here. One last task and you can quit this appendix with style. You added a text window, so you should be able to show some text in it. You’ve done that before, but let’s take it a step farther this time. Let’s create a taunting—uh, I mean messaging—system for our little game. To begin, create a new class called ScreenText.cs. You’re going to need the following two lines added to the using declarations:
using Microsoft.Xna.Framework.Graphics;
using Microsoft.Xna.Framework;
I’d like to be able to use different fonts on command, so let’s add an enum to facilitate the naming. At the top of the ScreenText class, add the following code:
//font controller helper
public enum FontName
{
    Chat,
    ChatBold,
    Exclaim,
    ExclaimBold
}
//members
public static Dictionary<FontName, SpriteFont> fonts = new Dictionary
    <FontName, SpriteFont>();

//accessors
public static Dictionary<FontName, SpriteFont> Fonts
{
    get { return fonts; }
}

public static void LoadFont(FontName name, SpriteFont path)
{
    fonts.Add(name, path);
}
You’re not finished with ScreenText by any means, but let’s coast here a minute and talk about the potentially new gizmo I just introduced. An enum is nothing but an automatic mapping between a word and a numeric value (in the case of C#, they are not integers as they are in other languages but can be cast as ints with no possibility of data loss). A Dictionary object is essentially a hash table that stores the payload (in this case, the spriteFont object) at the location created by the indexer (in this case the FontName, which is just an instance of the enum you created here). The two static methods you added allow you to get a copy of the Dictionary object (you’ll use this copy to print stuff to the screen) and as a way to add fonts into the object.
No time like the present to add fonts to a container object. I’ve created four spriteFonts for our use. They can be found in the Content folder and are named Consolas12.spriteFont, Consolas12B.spriteFont, Consolas24.spriteFont, and Consolas24B.spriteFont. They represent a 12-point Consolas, a 12-point bold Consolas, a 24-point Consolas, and a 24-point bold Consolas. In Game1’s LoadContent() method, use the static LoadFont() method from the ScreenText class to add each font like this:
//init screen text and fonts
ScreenText.LoadFont(ScreenText.FontName.Chat, this.Content.
    Load<SpriteFont>("Consolas12"));
ScreenText.LoadFont(ScreenText.FontName.Exclaim, this.Content.
    Load<SpriteFont>("Consolas24"));
ScreenText.LoadFont(ScreenText.FontName.ChatBold, this.Content.
    Load<SpriteFont>("Consolas12B"));
ScreenText.LoadFont(ScreenText.FontName.ExclaimBold, this.Content.
    Load<SpriteFont>("Consolas24B"));
Now that you have fonts, you should probably find a way to use them. In a messaging system, you rarely know how many messages you will have at any given time. You could create an array in which to store them and set its size to something really big, but that’s inefficient—and inefficiency is the bane of game programming. Fortunately, C# has a nice container class called List that dynamically adjusts its size to what is needed. It would be great if you could keep your messages in one of those gizmos.
Okay, let’s work toward that, since you seem to have your heart set on it already. First, though, let’s think about what a message really is. Of course, a message has to contain the string of text that you want to show on the screen or this is a really stupid system. You may want to include a Color object so you can make different messages be different colors (it’s a rainbow!). You may want to have a position tied to the message so you can programmatically move messages around in response to certain events, like time, the mouse, getting arrested, etc. Because you went to the trouble of building a font manager, you should probably add the ability for messages to have different fonts. Guess what? You’ve talked me into creating another internal class. Happy now?
Add this code to the ScreenText class between the enum you defined earlier and the members list:
//message data
internal class Message
{
    public String message;
    public double deltaT;
    public Vector2 position;
    public Color color;

    public FontName font;

    public Message(String m, double t)
    {
        message = m;
        deltaT = t;
        position = ScreenTextPos;
        color = ScreenTextColor;
        font = FontName.Chat;
    }

    public Message(String m, double t, Vector2 p, Color c, FontName f)
    {
        message = m;
        deltaT = t;
        position = p;
        color = c;
        font = f;
    }
}
As Emeril would say, BAM! You have a message class. Now, as you will be happy to note, you can employ it in one of those fancy List gizbots you’ve been pushing me to use. Add this to the members list:
public static Vector2 ScreenTextPos = new Vector2(434, 24);
public static Color ScreenTextColor = Color.SpringGreen;
private List<Message> messages;
private static double timer = 999999;
Yes, if you want to be picky, that is more than just the List object, but hey, I just said BAM! We gotta have some bang here. The two public static members are there because I am lazy and I wanted to be able to define these defaults once. The timer item is there because I said so (not to mention the functionality of having messages decay over time).
Wow. If you just add a few methods to this class, it could get pretty serious around here. First, you need a constructor that initializes your List object like this:
//screen text constructor
public ScreenText()
{
    messages = new List<Message>();
}
Next, you probably need a few different ways of causing a message to print to the screen. My Magic Eight Ball says we need four, so four it shall be:
//print a message with all the defaults and with the default timer value
public void Print(String message)
{
    Message m = new Message(message, timer);
    messages.Add(m);
}

//print a message with all the defaults and with custom timer value
public void Print(String message, int t)
{
    Message m = new Message(message, (double)t);
    messages.Add(m);
}

//print a message at a custom position, with a custom color and font, and with
//the default timer value
public void Print(String message, Vector2 pos, Color c, FontName f)
{
    Message m = new Message(message, timer, pos, c, f);
    messages.Add(m);
}

//print a message at a custom position, with a custom color, font, and timer value
public void Print(String message, int t, Vector2 pos, Color c, FontName f)
{
    Message m = new Message(message, (double)t, pos, c, f);
    messages.Add(m);
}
As you can see, each of these methods is pretty straightforward. The only difference is in the parameters you want to set when creating the message object. Given the awesome number of ways we allow a user to add messages here, you should create a way for the user to realize his or her mistakes, bag it all, and start over. Therefore, you need a global Clear() method like this one:
//dump all the messages and reset the list
public void Clear()
{
    messages.Clear();
}
Finally, you’re getting to the meat of things. The next two things you need to address (and last two things, in case you are swooning) are the Update() and Draw() methods for your class. None of what follows is any kind of special magic. You just find the messages that should eventually expire, decrease their timers, and remove the old stinky ones. Then draw what’s left to the screen. Here’s the code:
//update the message list
public void Update(GameTime gameTime)
{
    double tElapsed = gameTime.ElapsedGameTime.TotalMilliseconds;

    //step through the messages
    for (int i = 0; i < messages.Count; i++     )
    {
         //if a message is set to expire
         if (messages[i].deltaT != 999999)
         {
             //update its time left in this world
             messages[i].deltaT -= tElapsed;
             //test to see if it is still viable
             if (messages[i].deltaT < 0)
             {
                 //and kill it if necessary
                 messages.RemoveAt(i);
                 i-;
             }
         }
     }
}

//draw the messages to the screen
public void Draw(GameTime gameTime, SpriteBatch sb)
{
    //step through the messages list
    for (int i = 0; i < messages.Count; i++     )
    {
         //and draw them all
         sb.DrawString(Fonts[messages[i].font], messages[i].message,
            messages[i].position, messages[i].color);
    }
}
Beautiful, eh? Even better news, though: You’re done with the ScreenText class. All that remains is to make it work in Game1. Add the following to the member list:
ScreenText screenText = new ScreenText();
Bingo, we have liftoff.
In the Update() method, you need to invoke the ScreenText.Update() method like this:
//update message handler
screenText.Update(gameTime);
You need to do the same for the Draw() method, but you need to invoke ScreenText.Draw() after you draw the text window (or you won’t be able to see it) but before the mouse. Place the following code between the spriteBatch. Draw() method that draws the textWindow texture and the comment describing the mouse routine:
//draw messages to screen
screenText.Draw(gameTime, SpriteBatch);
Again with the BAM! We might even need a BOOM à la Madden. But wait! There’s more…. If you run this right now, you will be disappointed because nothing new will happen. Why not? Well, you kinda forgot to add any messages anywhere. I tried to warn you…. In Game1’s LoadContent() method, right after you made all those ScreenText.LoadFont calls, add this line:
screenText.Print("screen test print test");Now you will be suitably impressed! Save, build, you know the drill. You should take a look at Figure A.19 and make sure your version looks the same. If it does, I
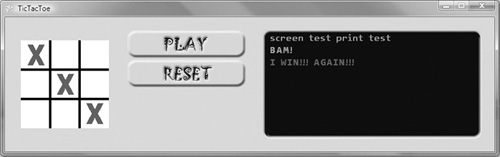
have good news: We are where we need to be with this example. If it doesn’t, blame me and my lying eyes.
What you’ve created here in this last section is reused in Chapter 1 when you create a Tic–Tac-Toe Grand Master AI and then turn that into a potentially fun game-playing experience.
I hope you’ve enjoyed this appendix, Valued Reader; I’ve tried to make it fun (or at least funny). I assure you that no animals were harmed during the production of this appendix and that I created it while thinking hard about alternative energy sources and political correctness. It was very cold outside my window (disregard the foot of snow at the bottom of the page) as I finished this, so I did not create this while coming up with solutions for global warming.