TRANSPARENCY // TRANSPARENCY IN PHOTOSHOP
![]()
See-through fabrics are are commonly recurring feature of fashion, meaning that fashion illustrators need to be able to recreate them in their work.
This exercise shows you a simple way of creating transparent effects by adjusting opacity and layer fills. When working with Photo-shop, transparency is quite easy to use and produces satisfactory results.
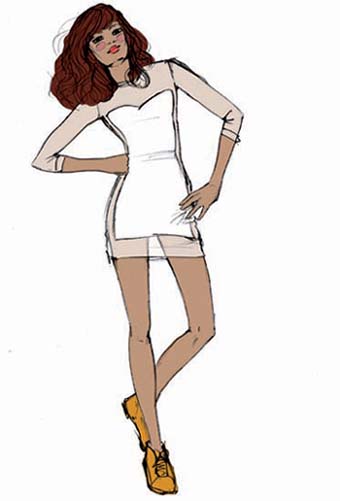
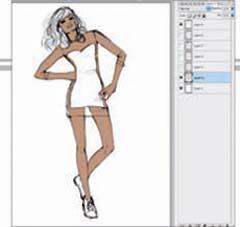
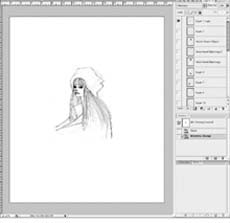
1. Open and clean the illustration in Photoshop. Set to Multiply mode and color all of the skin on a new layer (select with the Magnetic Lasso and fill with the Brush or Paint Bucket).

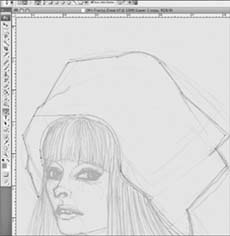
2. Select the entire dress and add color, white in this case. As the front of the dress will not be see-through, place it on a different layer.

3. Select the layer with the dress. To create transparency, use Fill on the toolbar and modify its values until you achieve the desired intensity.
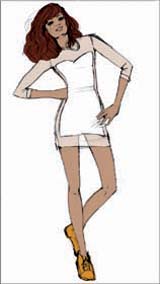
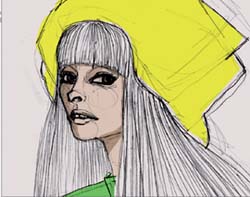
4. Once the transparent effect is created, continue to color the larger areas that still need it: the hair and shoes.

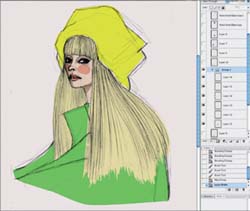
5. Finally, add color to the smaller details. Given their size, it is recommendable that you enlarge them and use a basic Brush.
MULTIPLY MODE
![]()
This exercise shows you how to create colors with transparency produced with the Mutiply in Blend mode. As its name indicates, this option is useful for multiplying layers as it turns white transparent, as seen in previous exercises. What has not been seen up to now is that the colors of the different layers can be overlapped to create new shades.

1. Paste the illustration onto a new Photoshop document – with a size that enables the entire final drawing to fit – and select Multiply in Blend mode.
2. Color the image. Even if different colors are used, it is interesting to have them all on the one layer.
2a. This image, created with the line and color layers is to be repeated, also by layers.
3. Duplicate the layer containing the lines. Place it to the left and a little higher than the other so that some parts of the dress overlap, allowing the combination of the colors to be seen.

4. Duplicate the color layer of the first silhouette. Fit it to the second silhouette and link them. Select the dress form and fill it with cyan so that the overlapping area of the two dresses becomes navy.

5. Duplicate the layer containing the lines again. To give the image the effect of skipping movement, adjust the distance between the layers and height of each of them.

6. Also duplicate a color layer of the dress and color it yellow. It is important to link the line layer with its respective color (use the Shift key to select both layers and right click for the option Link layers) so as to be able to move the figures without problems.

This enlargement of the image clearly shows how the colors are combined when they overlap, without losing opacity when they are on their own. The example shows that the three basic colors can be combined to make two new ones: navy blue and green.
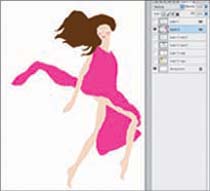
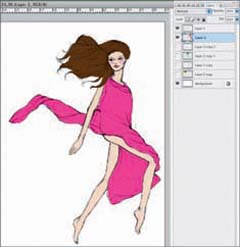
CREATIVE TRANSPARENCY
![]()
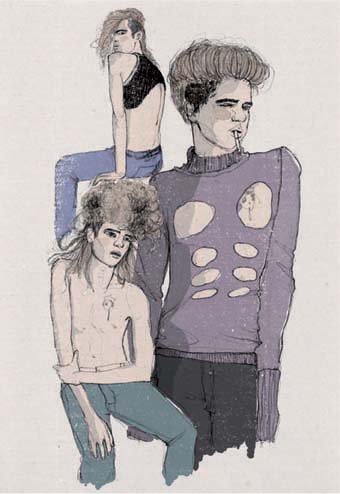
The previous exercises show you how to make basic transparency with two different techniques, which can now be combined to produce creative illustration. At first sight, this image seems somewhat complex to make, but the steps you follow will show how, little by little, you can create an image with greater creative quality using simple tools. The most important thing to make work easy is to keep your layers organized. In this exercise Folders will be used for this purpose.

1. Open the drawing in Photoshop and set it to Multiply Mode. This time a purplish-gray layer will be added as a background – staying under all of the others – to give the illustration a vintage feel.
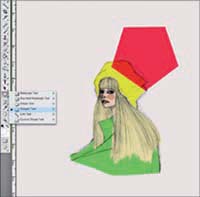
2. Select the hat and coat with the Pen tool, which gives greater stroke precision, for coloring. The Pen should be in Paths mode (the icon of the pen on a square should be selected in the options bar under the menus). To activate the selection, right click and choose Select.
3. Add the flesh tone of the face on one layer and its shading on another. Use a small Brush for the shading. You should finish the central figure before starting with the shapes.
4. Add the details of the face on another layer, also with a Brush. As seen in the Layers palette, create a folder (go to New Group on the dropdown Layers menu). Click and drag the layers you have made so far across to the folder.
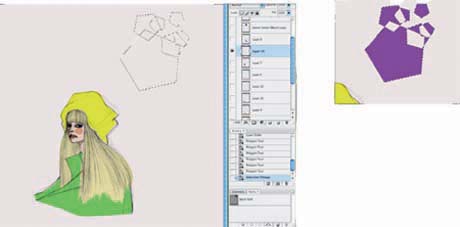
5. Experiment a little with making shapes. Create a new layer, select the Polygon Tool and draw several pentagons (for instance) overlapping one another. Just as you did with the hat outline, activate the selection and apply color with the Paint Bucket. You will see that the overlapping areas remain blank.
6. Now start to draw the figures that resemble the shape of the hat. As with the example, use the Polygon Tool to draw. Fill with the Paint Bucket. Set the layer to Multiply mode.
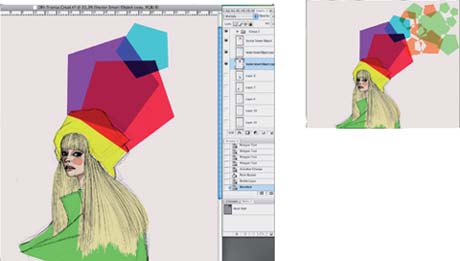
6a. Continue with the remaining pentagons. Remember to draw each one on a different layer in Multiply mode so that the colors will combine.

7. Then make the triangles that extend out from the dress with the Polygonal Lasso, the same as the pentagons, each one on a layer in Multiply mode. Open a new folder for the pentagon and triangle layers using the Pass Through option in Blend mode.
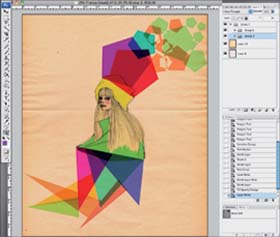
8. To give the illustration a more dynamic effect, add an old paper texture as the background. To do this, drag it from the document it was originally on (it has to have a suitable size and resolution) and place it at the bottom.

9. In order for the elements to appear integrated with the texture, create a new layer with a mask that is applied to all of the folders. It is important to ensure that when making the mask and selecting Apply Image on the Image menu, only the layers you want to copy onto the mask are active (only the paper texture in this case).
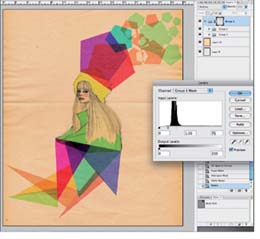
10. Activate all of the layers and invert the mask color (Ctrl+Shift+I). Adjust the values in the levels window until the texture looks good over everything.
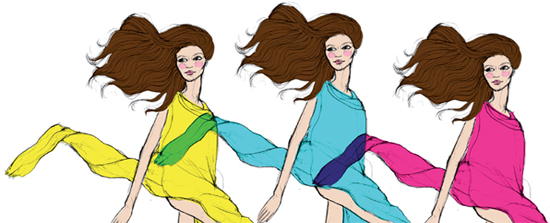
COMPOSITION
![]()
One of the most difficult things with making an illustration is its composition. This problem is minimized when working digitally because the images can be drawn separately and then assembled. This provides an opportunity for you to adjust the composition until you achieve a satisfactory result.
Here we show how three related illustrations are digitalized and composed on a document until a pleasing layout is achieved before adding color and texture. The Blend layer mode Multiply is used for most of this exercise, first to make the composition process easy, and later for adding texture and color.
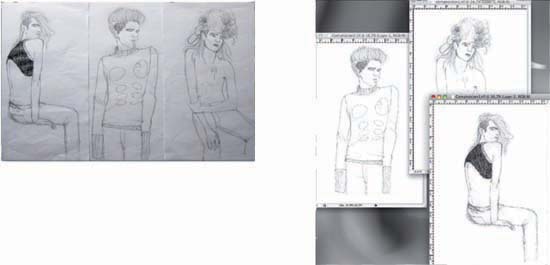
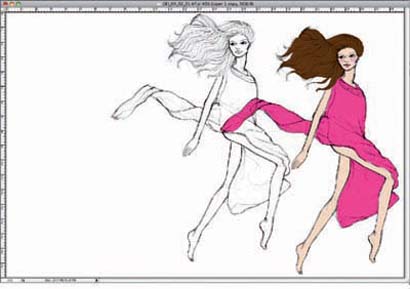
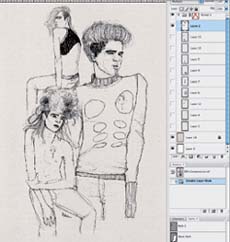
1. The three illustrations are drawn on paper. They are originally the same size, but this can later be modified on the computer. When digitizing, keep each of them on a separate document.

2. Create a new document at 300 dpi and of the size required for the final illustration and drag the three drawings onto it.

3. All of the layers (except the background) are placed in Blend layer mode Multiply so that the lines of all of the illustrations can be seen.

4. Select the layer and change its size and direction using Edit>Free Transform (Ctrl+T). Press the Shift key when adjusting the figures to maintain their proportion.
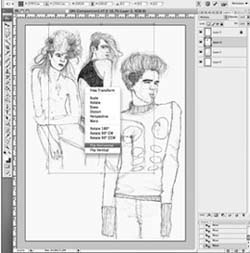
5. Besides modifying the size of this image, horizontal changes are also required: select Free Transform, right click on the mouse and select Flip Horizontal.

6. Once a pleasing layout is decided on, clean the edges of each figure so that the overlapping parts do not become transparent because the layers will be processed in Blend layer mode Normal.

7. The Polygonal Lasso can be used for large scale elimination of the edges, but to keep the figures well defined, it is recommendable that you enlarge the image and use the small Eraser to delete white areas.

8. When the composition is complete, select the three layers with the figures and use Flatten Image on the Layers menu, which will merge the three layers into a single one.
9. Set the new layer to Blend layer mode Multiply. Add a new layer with a background color and a layer with texture over it. Set this to Multiply too, and lower the values of its fill a little.

10. Now color the image starting with the skin. This is done all on one layer set to Blend layer mode Multiply. Continue with the skin shading, which also goes on a layer with Blend layer mode Multiply.

11. Continue with the skin shading, which also goes on a layer with Blend layer mode Multiply.

12. Add the hair color – the same for all three figures, seeing as it is the same model in the three drawings – on a new layer, also in Multiply mode.

13. Color the sweater and give it its respective shading. Leave parts around the edges uncolored so as to give movement and feel to the illustration.
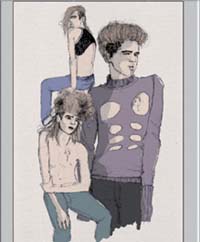
14. Color the pants. The two on the left are placed on the same layer, even though they are not the same color, because they are small forms and far apart.

15. Complete this stage of the illustration by doing the final details and shading with basic brushes in different sizes.

16. Place all of this together in the same folder except for the background texture and color. Deactivate all of the layers inside the folder, create a mask and select Image>Apply Image. Only the texture will be applied to the mask.
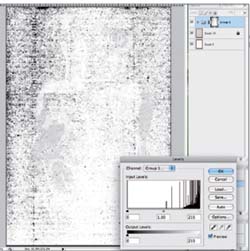
17. Invert the mask color (Image>Adjustments>Invert) and adjust the Levels. In order to see what is on the mask, click on it while pressing the Alt key.

18. Now activate all of the layers to see the effect the texture mask has on them. You can adjust the Levels until you obtain the desired effect.

19. The ideal situation is that the texture applied to the Group 1 folder is not too obvious, only giving the impression that the paper is old and worn.