
In Chapter 9, “TCP/IP,” you were introduced to basic TCP/IP concepts and shown some basic utilities you could use in Linux. You also saw how to use a basic method to configure the network card’s IP address from the shell. In this chapter, we will delve deeper into how to configure network settings in Linux, both from the shell and the desktop.
If you wanted, you could give this eth0 interface an IP address using the ifconfig command.
ifconfig eth0 10.0.0.11 netmask 255.255.255.0 up
You saw this command in Chapter 9. Unfortunately, simply executing this at the shell is a temporary option. To make this permanent, you will need to add this command in your /etc/rc.local file, which is run at the end of every reboot.
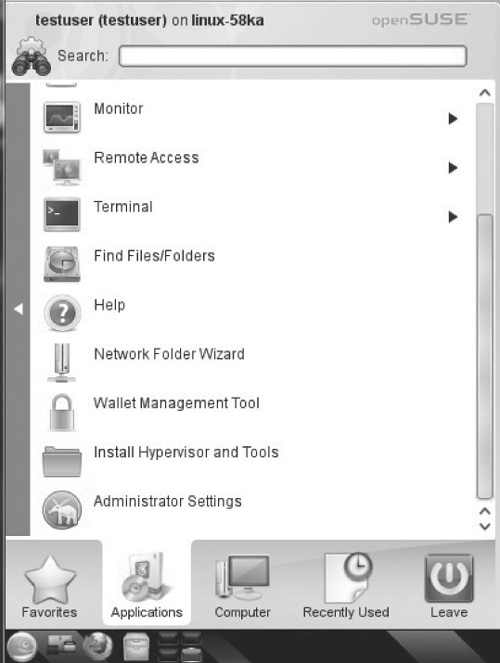
You can also set your IP address, as well as other settings, permanently from the desktop. Most desktops will have a similar process. On an openSUSE system running KDE, you would select Applications → System → Administrator Settings, as shown in Figure 10.1.
Then you would select Network Devices → Network Settings. That takes you to the utility shown in Figure 10.2.
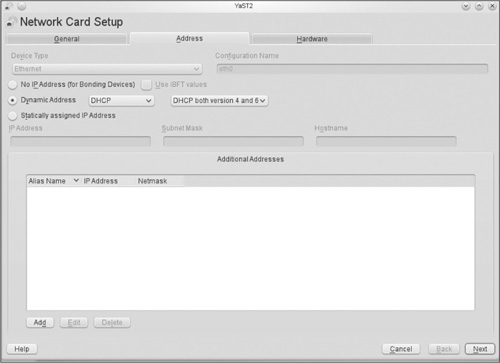
With just a little bit of exploration, you will see there are a number of options. We will discuss those here. The most obvious is to choose Statically assigned IP Address. When you select that option, you will need to manually assign the IP address and the subnet mask, as well as the hostname (see Figure 10.3).

Usually, servers will be configured for static IP addresses. While DHCP works well for workstations, it is a poor choice for servers. This brings us to dynamic settings. You have more choices than simply DHCP, and these choices are shown in Figure 10.4.
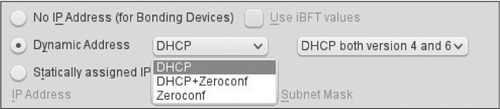
Notice that DHCP can be configured with or without Zeroconf, which brings us to the topic of what DHCP and Zeroconf are. Let’s begin by defining DHCP in case some readers are not as familiar with it as they should be.
DHCP is an acronym for Dynamic Host Configuration Protocol. Essentially, it is a means whereby a centralized DHCP server can assign IP addresses to a host in a given network. Over time, DHCP has expanded so that in addition to providing IP addresses, it also gives the host the IP address of the DNS server that the host is supposed to use, as well as the gateway address. DHCP is a non-routable protocol. This means that each network segment that is separated by a router must have its own DHCP server or a DHCP relay agent. This is not difficult to achieve since most routers you purchase can function as a DHCP server or relay agent. Even low-cost routers designed for home use usually have this functionality.
Clearly, the purpose of DHCP was to simplify network administration. Zeroconf simply takes that concept to the next level. Zeroconf, or Zero Configuration Networking, essentially creates an entire IP network without you having to do much. Not only does Zeroconf encompass automatic IP addressing, like DHCP, but it also will seek out any other Zeroconf devices on the local network and establish communications with them. As you might guess, the trade-off for such convenience is less robust security.
You can configure your network interface just as conveniently in GNOME as you just saw in KDE. You will select System → Preferences → Network Connections (see Figure 10.5).
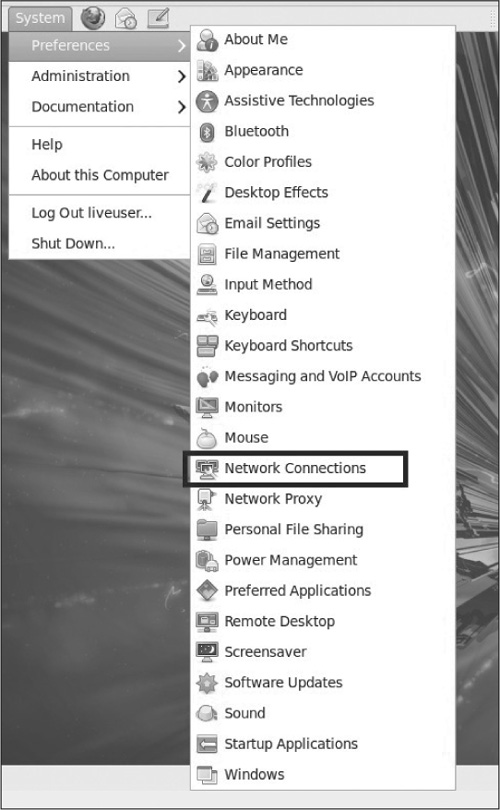
From there, you can see multiple tabs for wired, wireless, even setting up a VPN. We will be setting up a VPN later in this chapter (see Figure 10.6).
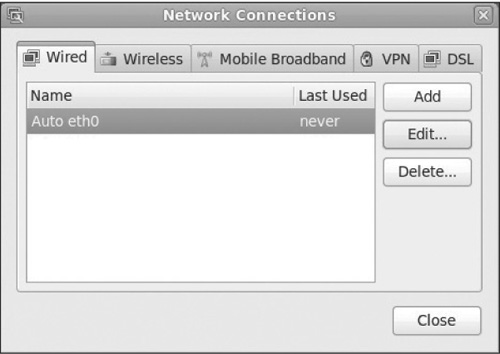
Once you select a specific network device for editing, such as a wired Ethernet card, you will see a screen much like the one shown in Figure 10.7.
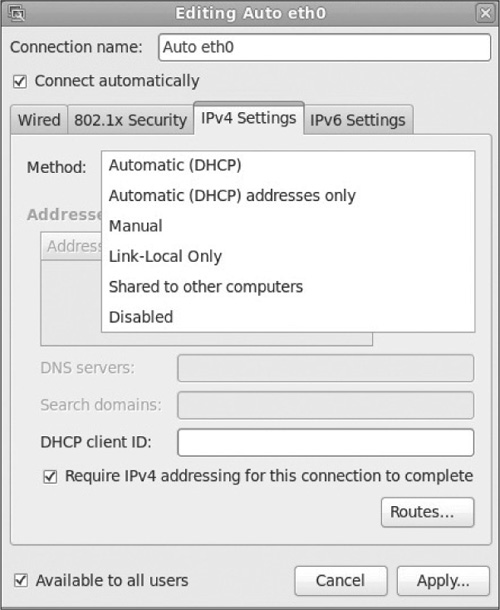
From this screen, you can configure anything you want on the network card. Just like with KDE, you can set up a static IP address, configure DHCP, and many other routine settings.
There are a number of problems that can occur when networking computers. These problems include issues with hardware, misconfiguration, and connectivity issues. In this section, we will look at the most common. Before we get to specific issues that require some discussion to solve, let’s look at some general issues that require very little discussion.
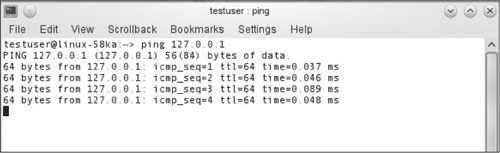
The most obvious way to check your network interface card is to ping the loopback address. If you ping 127.0.0.1 (see Figure 10.8), and you get a response, then the network card is functioning properly and whatever problem you are having is somewhere other than the network card.
If you believe the issue with your network card is an issue of having the wrong driver, this can be fixed. You can look in the folder.../lib/modules/kernelver/kernel/drivers/net...to find the required drivers. If you can locate the appropriate driver, as designated by the network card vendor documentation, you can load it with this shell command:
modprobe drivername
In many cases, this can lead to an error. If this is the wrong driver, you will obviously get an error. You will also get an error if your driver is the correct driver but requires you to enumerate additional parameters such as IRQ (interrupt request). It is impossible to cover all possible drivers in this chapter. The best approach is to look up your vendor’s driver specifications.
You can also try to load all drivers with the following command:
modprobe -t net *
This won’t always work, but it is surprising how often it will! So we have looked at two methods for correcting driver issues from the shell, and we have also looked at some of the factors that correcting driver issues might involve.
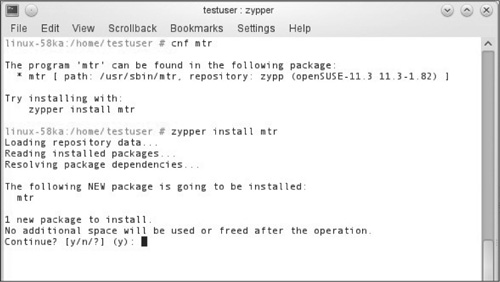
The mtr shell utility is quite useful. It basically combines functions of ping and traceroute into one program. It can be quite useful in checking network conditions. Your system may not have this installed. In Figure 10.9, you can see the installation of this application from the shell, using openSUSE.
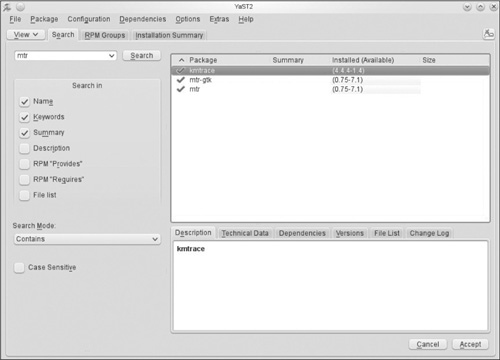
You can also install mtr, along with related applications via the desktop. In Figure 10.10, you can see the openSUSE KDE method for installing software packages, in this case mtr.
Depending on your configuration, entering mtr at the shell will likely launch a desktop application. Personally, I prefer this application, so that is what we will focus on here. When you launch the mtr program, it will look much like what you see in Figure 10.11.

You can see that it will report to you packet losses, average time, worst time, best time, standard deviation, and so on. It is common for network administrators to use this on IP addresses within their own network to identify congestion.
Another popular diagnostic tool is tcpdump. This utility will print, or dump, the TCP packer headers matching the criteria it is given. It has several options you may find useful. Some of the more commonly used options are given here:
-a:Attempts to convert network addresses to names.-c:Ends after receiving the designated number of packets.-d:Dumps the compiled packet-matching code in a human readable form to standard output and stops.-dd:Dumps packet-matching code as a C program fragment.-ddd:Dumps packet-matching code as decimal numbers.-F:Uses the designated file as input for the filter expression.-i:Listens on a particular interface.-n:Don’t convert host addresses to names.-p:Don’t put the interface into promiscuous mode.
This particular command has many more options, which you can find by consulting the man page for this command. But these are some of the more commonly used options. You can see a basic tcpdump in Figure 10.12.
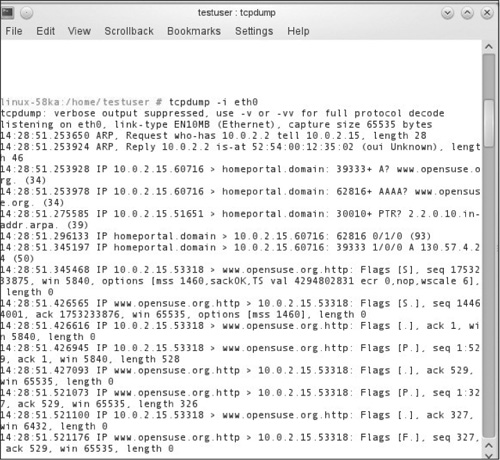
As you can see, to effectively use this tool requires some knowledge of TCP protocols. Without such knowledge, it appears to be just a meaningless jumble. Although it is beyond the scope of this book to thoroughly discuss tcpdump, it is important that you are at least aware of it. Unlike ping, traceroute, and other tools, you will need to spend some time to get comfortable with this tool, but it is well worth the effort. It makes an excellent packet sniffer should you need to know exactly what is in the packets going to and from your system.
As you can probably guess, it is possible to do the same things from the desktop. First, let’s take a look at how this is done in KDE. Begin by selecting Applications → System → Administrator Settings. Select Hardware, and then, if necessary, select Hardware Information. This will start the system probing your hardware. You will see a screen displaying your hardware devices. You can expand any hardware device and view the details, such as vendor, driver, current statues, and so on. You can see the network card displayed in Figure 10.13.
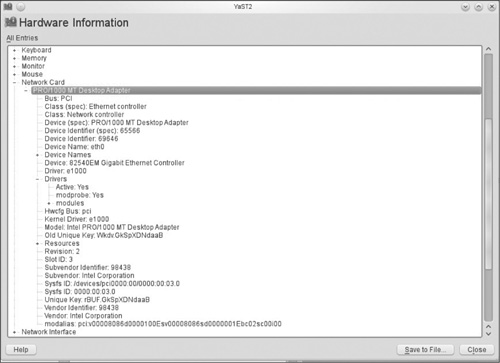
If there is a problem with the network card, you would see it displayed here. For example, it might say “Driver Active: No.”
Also from this same area (for example, Administrator Settings), you can configure network services. The list of network services is shown in Figure 10.14.
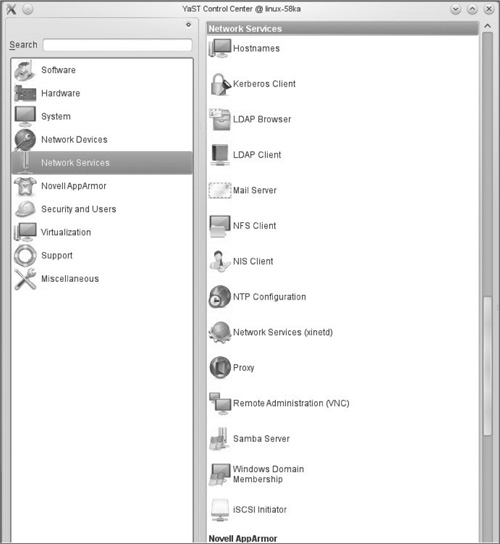
This section contains a great many network services you can configure. We won’t be addressing all of them here. Some are addressed in subsequent chapters; however, some of the more common ones, that may not fit neatly into another chapter, we will discuss here.
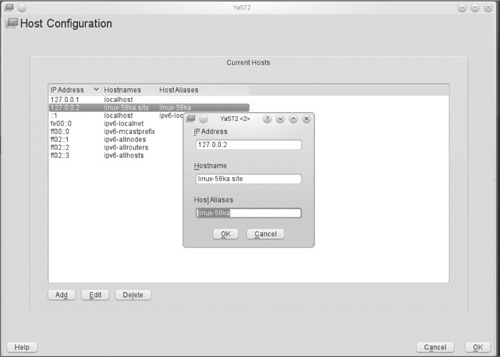
Let us begin with the hostname configuration (see Figure 10.15). This is a simple utility that lets you set a hostname or alias for any network interface IP address.
The LDAP service is particularly important to a network administrator. LDAP, or Lightweight Directory Access Protocol, is used to communicate information about your network. For example, what objects are in that network, such as computers, servers, and printers. LDAP also allows you to access shares on other computers. You can think of LDAP as a sort of phone book or directory of your entire network’s contents (see Figure 10.16).
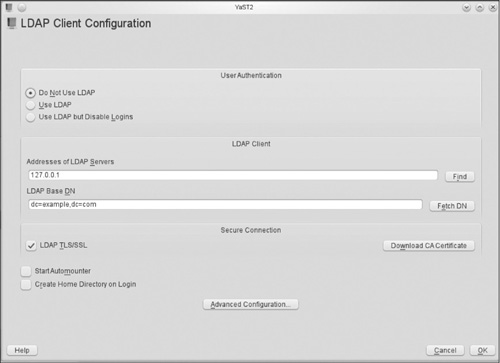
As you can see, your configuration options go beyond simply choosing whether or not to use LDAP. For example, you can also select whether or not to encrypt your LDAP communication. This is referred to as secure LDAP, and it is highly recommended that you use it.
As you are probably aware, there are many open source utilities you can download and install, both for KDE and GNOME. Here, we are focusing on the default applications, in this case, for KDE. In Figure 10.17, you can see the KDE network interface configuration.
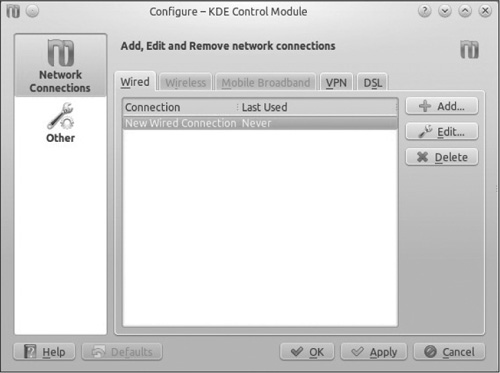
This looks and works very much like the utility we saw in GNOME. If you select a network card and press the Edit button, you can set its IP address, DHCP settings, subnet mask, and related settings. Any utility you use for network connections will need to have these basic settings.
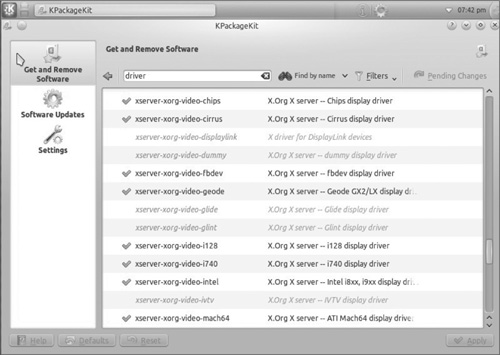
For examining drivers, KDE installs drivers through the software installation interface, shown in Figure 10.18.
Of course, the shell commands previously discussed for network troubleshooting or driver issues work from the shell, and thus the desktop used is irrelevant.
You have probably heard of Linux machines being used as routers. This is not as common as it once was, but it is still done and is relatively simple. It basically requires you to have two network interface cards and to have packet forwarding turned on. As shown below, the net.ipv4.ip_forward parameter activates packet forwarding and is located in the /etc/sysctl.conf file.
# Enables packet forwarding
net.ipv4.ip_forward=1
This will take effect after you reboot. To activate the feature immediately, you have to force Linux to read the /etc/sysctl.conf file with the sysctl command using the -p switch. Here is how it’s done:
sysctl -p
net.ipv4.ip_forward = 1
net.ipv4.conf.default.rp_filter = 1
kernel.sysrq = 0
kernel.core_uses_pid = 1
Now the next step is configuring ARP forwarding. ARP is Address Resolution Protocol, and it is used, among other things, to translate IP addresses into MAC addresses. It is important to realize that at the local network level, communication is based on MAC addresses.
You can edit the /etc/sysctl.conf file to activate proxy ARP.
#
# File: /etc/sysctl.conf
#
# Enables Proxy ARP on all interfaces
net/ipv4/conf/al1/proxy_arp = 1
# Enables Proxy ARP on interfaces eth1 and eth1
net/ipv4/conf/ethl/proxy_arp = 1
net/ipv4/conf/eth2/proxy_arp = 1
Once you’re finished editing the file, you can activate the new settings by using the following sysctl command:
sysctl -p
Your Linux box is now a router! There may be occasions when this is exactly the right solution for your network issues.
In this chapter, you have seen basic network configuration and troubleshooting. Chapter 10, along with Chapter 9, should provide you with the fundamental knowledge to handle networking on your servers. In later chapters, we will get to specifics such as interacting with Windows or setting up an FTP server.