
While many Linux administrators are quite enamored with Linux and would like to work in a pure Linux environment, those scenarios are fairly rare. It is far more likely that you will work in a mixed environment, likely including Microsoft Windows workstations or servers. Therefore, it is important that you understand how to get Linux and Windows to communicate. In Chapter 12, “Network File System,” we discussed NFS, which in some cases can be used for limited Windows/Linux interoperability. In this chapter, we will discuss other options, including methods for a Linux computer to join a Windows domain or to share print services.
Anytime the subject of Windows-Linux interoperability comes up, Samba is often the first thing to come to mind. Samba is a file and print server for Windows-based clients using TCP/IP. Samba is a utility that allows Windows machines to access files and even printers that are connected to a Linux machine. Since version 3, Samba provides file and print services for Microsoft Windows clients and can integrate with a Windows domain, either as a domain controller or by joining the domain as a client. Samba was originally developed by a man named Andrew Tridgell during December 1991 and January 1992, while pursuing a Ph.D. at the Australian National University. The project was released as open source, and is now being maintained by a global team of about 30 active programmers. As of this writing, the current stable release is 3.6.0.
You can find a lot of useful details about Samba, if you are interested, at www.samba.org; however, the documents you find will use some terminology you should be familiar with. These terms are explained in Table 14.1.
Table 14.1. Samba Terminology
Meaning | |
|---|---|
SMB | This stands for Server Message Block. It is the protocol that Microsoft uses for file and print sharing. |
IPC | This means Inter Process Communication. It is a term for communication between different programs. |
NetBios | This stands for Network Basic Input/Output System. This is a method for communicating on a network that has been used by Microsoft. |
W2K | Short for Windows 2000. |
Active Directory | Active Directory is a proprietary implementation of Directory Services by Microsoft. |
LDAP | Lightweight Directory Access Protocol. This is the protocol responsible for accessing resources on a network. |
In much of the Samba documentation, you will find that these terms are used but not always clearly defined. I define them for you here so that you can make use of the online Samba documentation available on the Internet. It is certainly possible to configure and use Samba without going into any extensive research on the topic. In fact, in this chapter, you will see how to set up Samba and run it, although some readers will want to go a little deeper into this topic.
Samba is really three separate daemons:
nmbd:This daemon is responsible for name service requests. That means it is key for network browsing.smbd:This daemon handles all file sharing and printing services. This TCP/IP-based connection service is also responsible for local authentication.winbindd:This daemon uses the Name Service Switch to resolve user and group information in Windows NT Servers. It is also used when Samba has trust relationships with another domain.
In the past, the only way to configure Samba was via shell commands. Fortunately, that is no longer the case. As with previous chapters, I will show you the shell method first and then the desktop method.
The first step in configuring Samba from the shell is to verify that it is installed. By typing in smbd -V, you can confirm that the Samba daemon is installed and what version it is (see Figure 14.1).
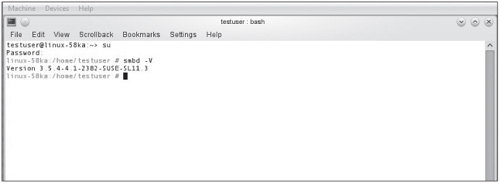
In the instance shown in Figure 14.1, the Samba daemon is installed and is version 3.5. If no version number is returned, then that means Samba is not installed.
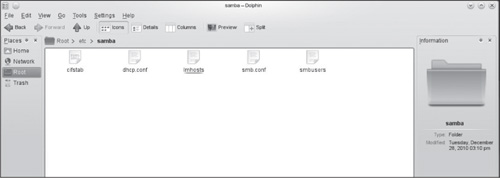
Next, you will need to locate the /etc/samba/smb.conf file so you can edit it. If you do not see a samba directory under /etc/ that means Samba is not installed. Many Linux distributions, such as openSUSE, have Samba installed by default. You will see several files in the /etc/samba/ directory (see Figure 14.2).
The smb.conf file has a number of important settings (see Figure 14.3).
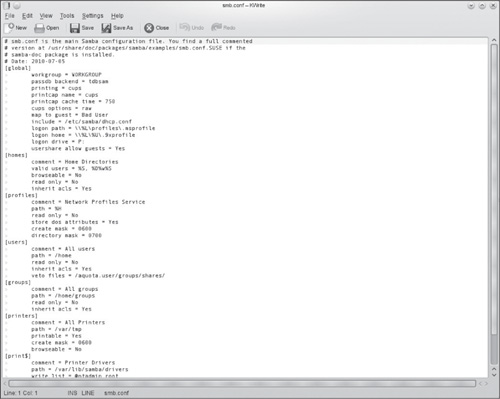
There are many settings in this file that we need to explore. You may not have to configure all of them for your specific Samba needs, but you should be aware of what they are used for. There are several sections to review.
global The global section covers items used in all sections. It is where you set general settings.
workgroup:Windows uses workgroups or domains for communications. This establishes the name of the Samba workgroup so that you can communicate with Windows computers.passdb backend:This determines where passwords will be stored. Windows stores passwords in a file called a SAM file, so Samba uses asamdb. You should leave the default settings for this.printing:This setting determines how printing will be handled. The default for this iscups. CUPSis an acronym for Common Unix Printing System.printcap name:This establishes the print process name. This also hascupsas a default.printcap cache time:This setting indicates the amount of time in seconds to cache print requests.cups options:Unless you have a very deep understanding of CUPS, you should leave this (and the other print options) as default settings.map to guest:This is where you designate the account to use for guest logins.include:This option simply includes the DHCP configuration file. You should leave this unchanged.logon path:Unless you have a compelling reason, you should leave this as the default.logon home:Unless you have a compelling reason, you should leave this as the default.logon drive:This defines the drive that will be logged onto.usershare allow guests:This option determines whether or not guest logins are allowed.
The global options set up some basic parameters for Samba. These are fairly simple settings.
homes The next section is homes, and it is among the simplest sections. The function of the browseable and read-only options should be completely obvious. The inherit acls option determines if you want Samba to inherit existing access control lists. The default is yes, and you should leave that default value.
The only item that might be a bit perplexing is the valid users. The default setting is valid users = %S, %D%w%S. This is a list of users that should be allowed to log in to the Samba service. A name starting with @ is interpreted as a group, rather than a user. These symbols each have a specific meaning:
%S:The name of the current service, if any.%D:The name of the domain or workgroup of the current user.%w:The winbind separator.
It should be noted that if no path was given, the path is set to the user’s home directory.
profiles This section describes where Samba user profiles will be stored and how they will be stored. These sections are also relatively straightforward.
comment:This is literally a comment and can be ignored.path:This is the path to where profiles are stored.read only:This setting indicates whether or not profiles are read only.store dos attributes:This setting indicates whether or not DOS style attributes are stored.create mask:This is a permissions mask when a share is created.directory mask:This is the permissions mask for a directory.
The mask options are four digits, and you will see them in other sections of the smb.conf file. So it is a good idea to make certain you understand them. They are actually quite similar to chmod parameters. Please note that only three of them are significant; the first digit indicates that it’s an octal number.
The first digit indicates the file’s owner’s options. Then the second digit indicates the file’s group member’s options. Finally, the third digit indicates the file’s options for everyone else (for example, anyone not in the file’s group). Remember, as with chmod, the permissions are the following:
0 – No permissions
1 – Execute only
2 – Write only
3 – Write and execute
4 – Read only
5 – Read and execute
6 – Read and write
7 – Full control
users This section determines paths and permissions for users. It also determines whether or not the ACL will be inherited and whether or not the user directories will be read only. The settings are relatively self-explanatory.
groups This section is almost identical to the users section, except that it applies to groups rather than individual users. Like the users section, this one is very easy to understand.
printers The printers section (along with the print$ section immediately following it) is very important. Many people set up Samba specifically to use the Linux server as a print server. For the most part, you can leave all default settings here.
path:This is the path to the print spool.printable:This will determine if Samba users can print via this machine.create mask:This setting determines the permissions for creating files.browseable:This setting determines whether or not this will be browsable via the network.
Once you have configured your smb.conf file, you are ready to start (or restart) Samba. Just start the two required daemons (see Figure 14.4).
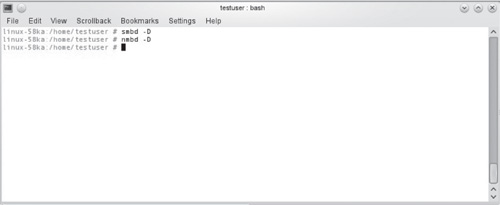
Obviously smbd has some flags you can use. Some of the most common are listed here:[1]
-D:This parameter causes the server to operate as a daemon.-S:This parameter causessmbdto log to standard output rather than a file.-i:This parameter causes the server to run interactively, not as a daemon, even if the server is executed on the command line of a shell.-d|--debuglevel=level:Level is an integer from 0 to 10. The default value if this parameter is not specified is 0. The higher this value, the more detail will be logged to the log files about the service. Usually, 0 is used; higher levels will create very large logs and are usually only used when you are trying to troubleshoot a problem.-h|--help:This will print a summary of all the shell command options.-b:This prints information about how Samba was built.-p|--port<port number(s)>:This is a space or comma-separated list of TCP ports smbd should listen on. The default ports are 139 and 445.
You can also list any Samba shares with this command:
smbclient -Lyourhostname
To connect to a Samba client, you use this command:
smbclient //yourhostname/yourservice
For remote connections, you use this command:
net use s: //servername/service
And now you should be able to configure and run Samba from the shell.
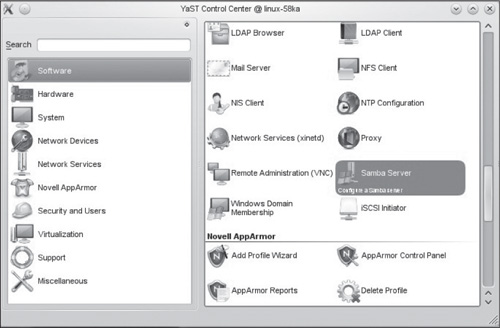
You can also configure Samba via the desktop, using either KDE or Gnome. In this case, we are using KDE. You first select Applications → System → Administrator Settings; then you select Samba Server (see Figure 14.5).
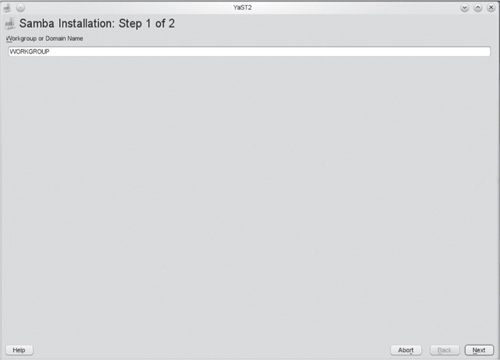
This will start a configuration wizard that will walk you through the important steps of configuring a Samba server. The first screen simply has you select a name for the workgroup (see Figure 14.6).
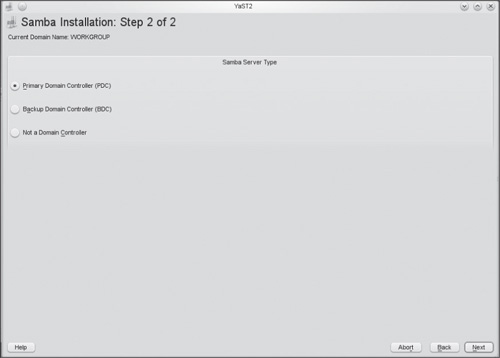
The next step is to configure whether or not this server is a domain controller (see Figure 14.7).
The following screen consists of five tabs (see Figure 14.8).
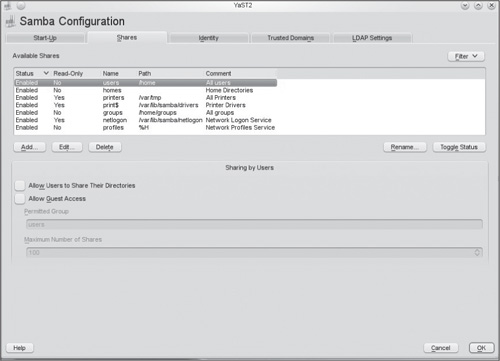
These tables allow you to set up shares, trusted domains, and all of the settings you would normally configure via the smb.conf file. Once you finish that screen, your machine is now configured and operating as a Samba server.
While Samba is an interesting service and very useful, it is not the only one available to you in Linux. Remember that the words service and daemon can be used interchangeably. Both words refer to a program that is running in the background and providing some service to the system. In the case of Samba, it is providing access to Windows machines.
Starting from Applications → System → Administrator Settings, you can find services (see Figure 14.9).
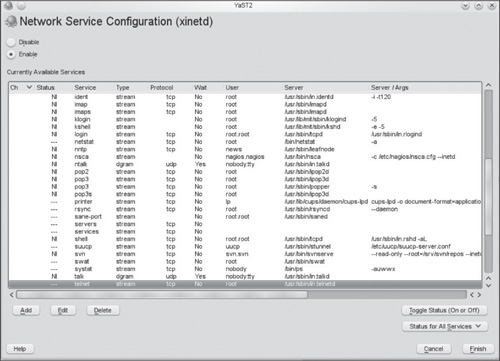
To edit any service, simply highlight it with a single-click and then click the Edit button. For example, you can edit the telnet service (see Figure 14.10).
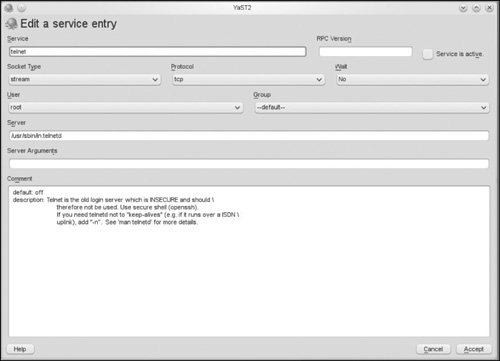
Notice that not only can you easily configure any service though this desktop utility, but you also get a brief description of that service.
It is very common to have your Linux server be part of a network that contains other operating systems. You may even administer a Linux server that is part of a Windows domain. You can join a Windows domain by selecting Applications → System → Administrator Settings and then Windows Domain Membership under Network Services (see Figure 14.11).
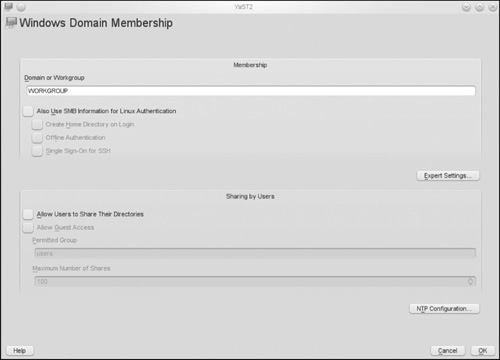
All you have to do on this screen is enter the settings for the Windows domain and click OK; then your machine will be a member of that Windows domain.
Kerberos is the standard Windows authentication method. Before we start exploring how to configure Kerberos, let’s discuss what it is and how it works.
Kerberos is a network authentication protocol designed at MIT. It is named after the mythical three-headed dog (often spelled Cerberus) that was said to guard the gates of Hades. It is designed to provide strong authentication for client/server applications by using secret key cryptography.
The process is a bit complicated. The client authenticates to the Authentication Server once, using a long-term password, and is then directed to a Ticket-Granting Server from the Authentication Server. Later, when the client wants to contact some Service Server, it can reuse this ticket to get additional tickets for a particular service on a specific server. These tickets can be used to prove authentication to the Service Server. This ticket process is essential to Kerberos.
Kerberos consists of a number components, described here:
Principal: A server or client that Kerberos can assign tickets to.
Authentication Server (AS): The server that authorizes the principal and connects it to the Ticket Granting Server.
Ticket Granting Server (TGS): The server that actually provides tickets.
Key Distribution Center (KDC): This is a server that provides the initial ticket and handles TGS requests. Often, it runs both AS and TGS services.
Realm: This defines a boundary within an organization. Each realm has its own AS and TGS.
Remote Ticket Granting Server (RTGS): This denotes a TGS in a remote realm.
Ticket Granting Ticket (TGT): This is the ticket that is granted during the authentication process.
Ticket: This is a digital certificate used to authenticate to the server. It contains the identity of the client, session key, timestamp, and checksum; encrypted with server’s key.
Session Key: The temporary encryption key.
Authenticator: This proves the session key was recently created; it often expires within five minutes.
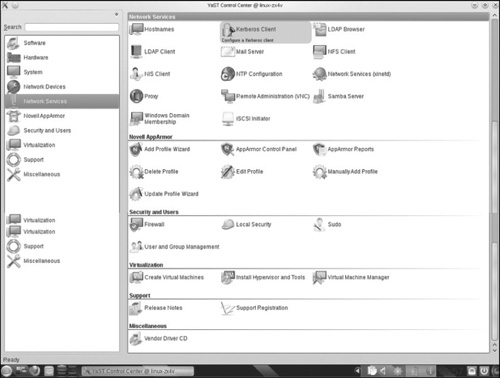
But don’t worry, configuring Kerberos in Linux is very easy. Go to Applications → System → Administrator Settings and then Kerberos Client under Network Services (see Figure 14.12).
Then you simply select Use Kerberos, enter the address of the Kerberos Key Distribution Center (KDC), and your machine can then participate in Kerberos authentication (see Figure 14.13).
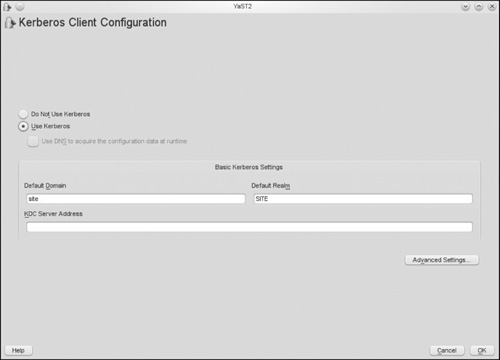
You will probably need to use Kerberos if you are participating in a Windows domain, since Kerberos is the default authentication method for Windows systems.
One of the most important services for your computer is printing. In our discussion of Samba, we mentioned that you can even share your printer with Windows users. It would probably be prudent to make certain that you can add printers to your Linux machine. We discussed this briefly in a previous chapter but not in any depth.
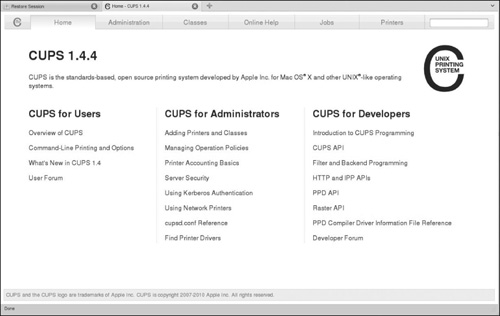
If you go to Applications → Utilities → Manage Printing, you will see a Web interface that allows you to manage CUPS (see Figure 14.14).
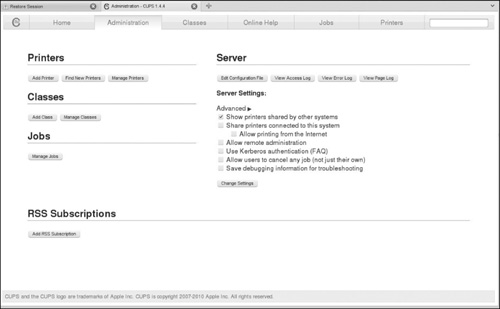
You can click on any option you want to manage. For example, if you click on Adding Printers and Classes, you can add any printer to your system (see Figure 14.15).
When you choose to add a printer, you will be prompted for the root user credentials and then you will begin the Add Printer wizard (see Figure 14.16).

You then select either a local or network printer. For local printers, this utility will usually detect your attached printers and list them. For network printers, you have to specify how you want to connect. Notice that one of the options is to connect via Samba.
In this chapter, you have seen a few very important topics covered. We have discussed Samba, which is a critical utility if you want your Linux machine to be accessible from Windows machines. Samba allows you to run a mixed environment combining Windows and Linux machines. We also discussed the service configuration utility. This is very useful for finding out what services are started, and stopping or starting these services as needed.
We completed the chapter with a discussion of adding printers. At some point, most people will want to print from their computer. Using the Add Printer wizard, you should have no trouble hooking up most printers to your Linux machine.
| 1. | Tridgell, Andrew, smbd(8) - Linux man page, die.net, accessed 2 September 2011, http://linux.die.net/man/8/smbd |