
In this chapter, we will be discussing Linux system services. Before we delve into system services, it is probably a good idea to define what we mean by the term. The term services refers to those services that are core parts of the system. These are almost always daemons, although they could theoretically be applications. In Chapter 1, “Introduction to Linux,” we referred to init and getty, which are core system service daemons. In this chapter, we are going to delve into these services in some depth, as well as others. Some of the material presented (like information on getty) is more to deepen your knowledge of how Linux is working behind the scenes. Other material, such as our discussion of scheduling and chrond and the use of syslog, will be very practical skills that you can apply immediately to administrative tasks.
Let’s begin by talking about the startup services. Those are services that either start when Linux starts, or they are involved in getting Linux to start. These will be daemons, as opposed to applications. The first one we will start with is init.
You may remember init from Chapter 1. It is the process that kicks off everything in Linux once the boot process has handed things off to the operating system. This daemon will basically read from a script in /etc/inittab and then start the processes indicated in that script.
After init is invoked as the last step of the boot sequence, it reads the file /etc/inittab to see if there is an entry of the type initdefault. The initdefault entry determines the initial runlevel of the system. If it finds no such entry, then the user will be prompted to select a runlevel.
In Figure 6.1, you can see a basic inittab file. This is the inittab from a newly installed Fedora Linux with no server options (no FTP, Web server, DNS, etc.).
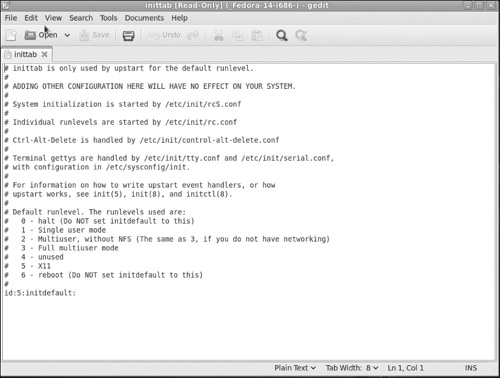
While this inittab is about as simple as one can be, it does provide us with an opportunity for understanding the format of inittab before we move onto more complex examples. The basic format for an entry is id:runlevels:action:process.
Lines beginning with # are ignored. These are comment lines. Comments are a way to explain to anyone reading the file what it is you are trying to do. I highly recommend that you use comments, not just in inittab, but in any configuration file. With that said, let’s look at the four items we have: id, runlevels, action, process:
id:Theidis a unique series of 1–4 characters which identifies an entry ininittab. You should note that in services/daemons launched during startup/login, such asgettys, theidfield should have thettysuffix of the corresponding terminal (for example, 1 forttyl).runlevels:This setting will list therunlevelsfor which the specified action should be taken. In other words, this particular process will only start if the machine is booted to the indicated runlevel. The runlevels field may contain multiple characters for different runlevels. For example, 123 specifies that the process should be started in runlevels 1, 2, and 3. When the system runlevel is changed, any running processes that are not specified for the new runlevel are killed.action:This entry describes which action should be taken. Valid actions for the action field are respawn. The process will be restarted whenever it terminates (for example,getty).process:The process entry specifies the process to be executed.
The following are some possible action entries:[1]
respawn:A process will be restarted whenever it terminates.wait:The process will be started once when the specified runlevel is entered andinitwill wait for its termination.once:The process will be executed once when the specified runlevel is entered.boot:The process will be executed during system boot. The runlevels field is ignored.bootwait:The process will be executed during system boot, whileinitwaits for its termination (for example,/etc/rc). When this option is used, the runlevels field is ignored.Ctrlaltdel:The process will be executed wheninitreceives the SIGINT signal (for example, when someone does aCtrl-Alt-Del).initdefault:Aninitdefaultentry specifies the runlevel that should be entered after the system boots up. If none exists,initwill prompt the user for a runlevel on the console.kbrequest:This option indicates that the process will be executed wheninitreceives a signal from the keyboard that a special key combination was pressed on the console keyboard.ondemand:A process marked with anondemandrunlevel will be executed whenever the specifiedondemandrunlevel is called.powerwait:The process will be executed when the power goes down.powerfail:This is just likepowerwait, except thatinitdoes not wait for the process’s completion.powerokwait:This process will be executed as soon as the power has been restored.powerfailnow:This process will be executed when the battery of an external UPS is almost empty and the power is failing.sysinit:The process will be executed during system boot. It will be executed before anybootorbootwaitentries.
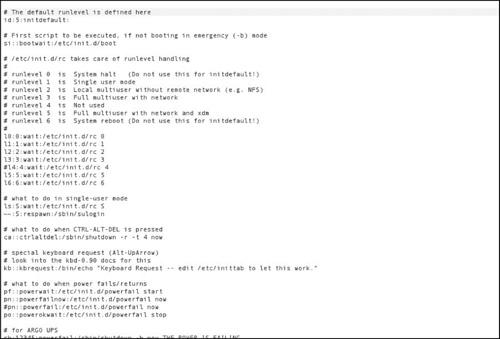
Obviously, you can have a lot of complex entries in the inittab, far more than you saw in Figure 6.1. In fact, very few real world systems will have an inittab as simple as that one. You can see a more complex inittab in Figure 6.2.
You should take time to get comfortable with the settings in inittab. One great way to learn more about inittab is to take the time to carefully study the inittabs on existing systems.
Linux offers a number of system services, some of which start automatically when the system boots and some that you will have to enable and configure. Only essential services are enabled automatically in order to make your system fast, stable and secure. The following sections describe some general system services.
Sysfs is a component of the Linux 2.6 kernel that is used to gather information about the system. Sysfs is a virtual filesystem that exports information about devices and drivers from the kernel device model to userspace. The organization of the filesystem directory hierarchy is based on the internal organization of kernel data structures. The files that are created in the filesystem are usually ASCII files that have one value per file.
A directory is created in sysfs for each object inserted in the driver model tree. The subdirectories under /sys/devices mirror the parent/child relationship. The /sys/bus subdirectory contains symbolic links that reflect how devices are a part of various busses. Devices that are grouped according to classes are contained in the /sys/class subdirectory and block devices are contained in the /sys/block subdirectory.
Attributes created for devices and device drivers are simple files that contain a single value and allow a single value to be set. Attribute files will appear in each respective device driver subdirectory. A subdirectory loaded with attributes can be created using attribute groups.
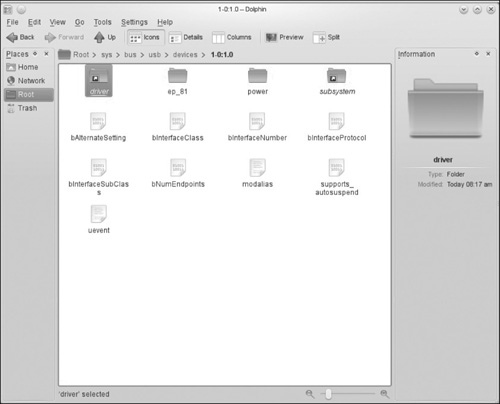
This service has gone through quite a few name changes in its lifetime. Formally called ddfs (Device Driver Filesystem), sysfs was originally developed to debug the driver model as it was being written. Debugging was carried out by procfs prior to sysfs. Procfs was eventually converted to a filesystem based on ramfs. The new driver model called driverfs was eventually merged into Linux kernel 2.5.1. If you open any file manager (in this case Dolphin) and look in the /sys directory, you will see subdirectories for firmware, devices, and more, as shown in Figure 6.3.

You can drill down to specifics by opening subdirectories, as shown in Figure 6.4.
Despite the name, this daemon does not update the operating system. Instead, it is used periodically to flush out the filesystem buffers. Essentially, it will do a sync. A sync is the process of updating memory pages and virtual memory pages that have been changed but not saved. This service has been supplanted by the more modern kupdate.
This daemon monitors battery power in laptops and warns if the battery is low. While this won’t be needed on your servers, it is an important part of using Linux on a laptop. Many of the users you administer are likely to use laptops.
This program loads the keyboard settings. It is not a daemon and does not continue running in the background, but upon bootup, it will load the keyboard mappings.
We briefly mentioned this daemon earlier and that it is responsible for processing keyboard input. However, that is just one of its functions. The getty daemon, short for “get teletype,” is a UNIX/Linux process that manages physical or virtual terminals (tty). When it detects a connection, it prompts for a username and runs the login program to authenticate the user. Now it will also have to process input via that terminal, thus the comment earlier in this book about getty being responsible for keyboard input.
The system logging daemon (syslog) is a utility to track and log all system messages. The syslog is stored in the /var/log directory. The daemon associated with the syslog is called klogd. Each system message sent to the syslog has two descriptive labels associated with it. The first label describes the function of the application that generated this logging event. The second label describes the severity of the message. There are eight severity levels shown in Table 6.1.
Table 6.1. Syslog Severity Levels
0 | emergencies | System unusable |
|---|---|---|
1 | alerts | Immediate action required |
2 | critical | Critical condition |
3 | errors | Error conditions |
4 | warnings | Warning conditions |
5 | notifications | Normal but significant conditions |
6 | informational | Informational messages |
7 | debugging | Debugging messages |
You can see that some severity levels, like level 5, are mundane items and are of no urgent concern to an administrator. However, items with severity levels 0 through 4 should be of concern to any administrator. These messages are typically stored in the /var/log/messages file. It is a prudent idea to check this file anytime you have a system error. The messages you find here can be an excellent first step in troubleshooting your systems problems.
If you have multiple servers, then having your system messages sent to a single centralized server is a good security practice. With all servers logging to a central syslog server, it becomes easier to track the logs from all servers. Also, if intruders gain access to one of your servers, they may want to cover their tracks by removing data from that system’s syslog. By default, syslog doesn’t expect to receive messages from remote clients, but you can easily configure your system to do so. You will need to go to the server that will receive messages and alter its syslog configuration. The configuration file can be found at /etc/sysconfig/syslog. In Figure 6.5, you can see a typical configuration file.

In order to enable the server to listen for remote messages, the SYSLOGD_OPTIONS variable in this file must have a -r included, like this:
SYSLOGD_OPTIONS="-m 0 -r"
or
SYSLOGD="-r"
For the any changes to take effect, you have to restart syslog. Then you can verify that the server is listening on UDP port 514 with the netstat command. If you are not familiar with netstat, don’t worry because we will be discussing it in depth in Chapter 10, “Network Configuration.”
Now you have to configure your client to send messages. You will need to edit your /etc/rsyslog.conf file on each client so they send messages to the syslog server. That file should have an entry similar to this:
*.debug /var/log/messages
If you add this line:
*.debug @name or ip of the server
then messages will be placed in the local machine’s log and sent to the remote server. Of course, you can simply replace the original line so that messages are only sent to the central server, if you so desire; however, I don’t recommend this. Should there be some connectivity issue, it is a good idea if messages are still kept in the local log.
Kudzu is a very important system service. This program detects and configures new or changed hardware on a system. This program is run initially when the system boots, and it does not run constantly as a daemon. Once the machine restarts, kudzu detects the hardware and determines what has been added or removed by checking the database file located in /etc/sysconfig/hwconf. The user is then afforded the opportunity to configure any hardware. If there are any changes, the database file is subsequently updated.
Kudzu can also determine hardware configuration by examining the following files: /etc/modules.conf, /etc/sysconfig/network-scripts/, and /etc/Xll/ XF86Config.
You should note that kudzu does not exist on all Linux distributions. For example, openSUSE uses YaST (an acronym for Yet another Setup Tool) to accomplish this same goal. We will discuss YaST next. If your system does use kudzu, it works from the shell as a command you can run and has the following options.
--help, -?:This will display basic help information.-q, --quiet:This informskudzuto run “quietly”; configuration without user input.-s, --safe:This option directskudzuto execute only “safe” probes that won’t disturb hardware.-t, --timeout [seconds]:This option sets a time out.Kudzuquits if no keys are pressed before the timeout elapses.-k, --kernel [version]:This option is tellingkudzuthat when determining whether a module exists, use the specified kernel version. If it is not set,kudzudefaults to the current kernel version.-b, --bus [bus]:This option allows you to probe only on the bus specified.-c, --class [class]:This option allows you to probe only on the class specified.-f, --fi1e [file]:This option is a bit less commonly used. It directskudzuto read hardware probe info from the file file and not to do an actual probe.-p, --probe:This is a very common option. It directskudzuto display probe information to the screen and not to actually configure any devices.
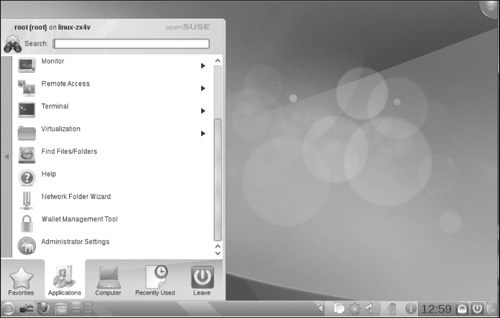
Personally, I like YaST because it has a GUI you can work with, and for this particular task, the GUI is much more efficient. You can find YaST in openSUSE by going to your computer and selecting Administrator Settings (YaST), as shown in Figure 6.6.
When you open YaST, you will see the screen shown in Figure 6.7.
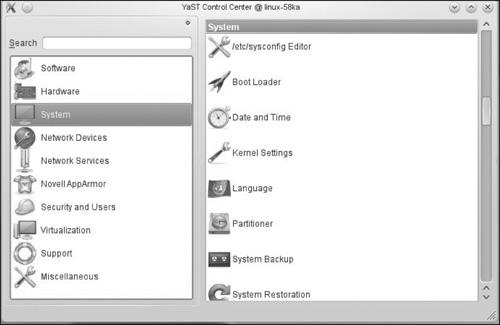
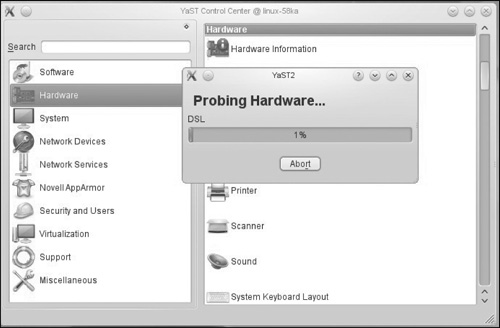
As you can see, there is a lot of information found in YaST, and not just about your system’s hardware, but also your system’s software, users, security settings, and more. If you select Hardware and then select Hardware Information, YaST will begin probing your system’s hardware (see Figure 6.8).
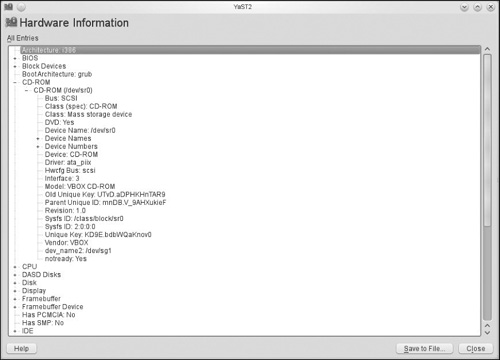
Once that probe is complete, you can view complete information about any hardware on your system, as shown in Figure 6.9.
Also called the automount daemon, autofs is used to automatically mount filesystems on demand. It is especially worthwhile for working with removable media, such as floppies or CD-ROM disks. The /etc/auto.master configuration file contains mount points on the system. An automount process is started for each mount point. Active mount points can be verified with the /etc/init.d/autofs status command for automount.
The autofs script checks for an NIS (Network Information Service) map once the auto.master configuration file is processed. This map will be processed in much the same way as auto.master. The final map to be processed will be NIS.
/etc/init.d/autofs reload will check the current auto.master map against running daemons. Daemons with entries that have changed will be killed, and subsequently, daemons for new or changed entries will be started. If a map is modified, then the change will become effective immediately. If the auto.master map is modified, then the autofs script must be rerun to activate the changes.[2] /etc/init.d/autofs status will display the current configuration and a list of currently running automount daemons.
Now let’s take a look at scheduling. Basically, all scheduling uses the crond daemon, but this can be done either via the shell or the GUI. We will start by discussing the crond daemon from the shell. Either way you do this, scheduling is a very important topic.
Crond is a daemon (thus the d on the end of the name) that is responsible for seeing that scheduled tasks run as scheduled. This is a critical system service for a network administrator. It is inefficient for you to manually run every task every time it is needed. And on any but the smallest networks, it is simply impossible. Therefore, you must have some mechanism whereby you can schedule tasks to run; crond is that mechanism.
The crond daemon uses crontab files for scheduling tasks. Crond searches /var/spool/cron for crontab files. Essentially, crond periodically examines all the crontab files to see if there are commands to be run, and if so, it executes them. Each user has his or her own crontab, and commands in any given crontab will be executed as the user who owns the crontab. It is important to keep this in mind. Unless absolutely necessary, you should not run tasks as the root.
The crontab file instructs the crond daemon to execute scheduled commands. All leading spaces, tabs, blank lines, and lines that begin with a pound sign (comments) are ignored in the crontab file. Comments are typically placed before each command. Comments are not allowed on the same line as crontab commands or environment variable settings, which are active lines in crontab.
The environment setting has the following format:
name = value
The following are some environment variables that are set up by crond:
SHELL = "/bin/sh"
LOGNAME and HOME are set in /etc/password
One thing to note: In the crontab settings, you can override HOME and SHELL, but not LOGNAME.
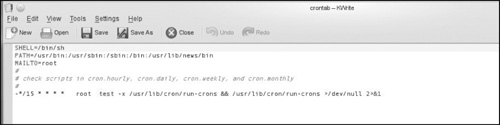
You can see a basic default crontab in Figure 6.10.
The format of a cron command is basically what you see here:
***** /bin/execute/this/script.sh
The five stars represent the date/time portions of the command. Note, these must be in order:
minute (from 0 to 59)
hour (from 0 to 23)
day of month (from 1 to 31)
month (from 1 to 12)
day of week (from 0 to 6) (0=Sunday)
So if you want to schedule the script to run at 3 a.m. every Thursday, you would need the following cron job:
0 3 * * 4 /bin/execute/this/script.sh
Here are some other example crontab entries:
“Remove all files from temp directory at 2:30 a.m. every night”
30 2 * * * rm /home/{username}/temp/*
This command sends a pop-up message to the user’s screen, at 3:00 p.m. Fridays, if they are logged in:
0 15 * * 5 echo “Time for staff meeting” | write $L0GNAME >/dev/null 2>&1
I think you can see how crontab entries work. They are relatively simple. It is common practice to have various administrative functions, such as backups, scheduled via crontab.
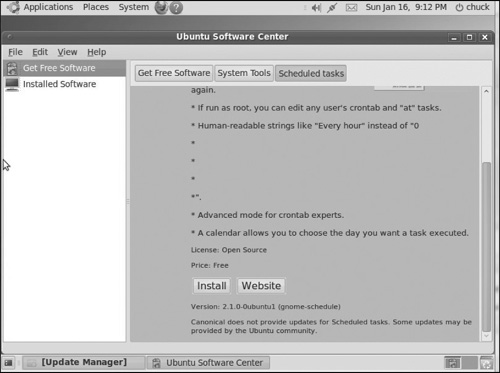
As you may suspect, there are many ways to do task scheduling from the GUI. Let’s take a look at one method. In Ubuntu, if you go to the Ubuntu software center, you will see a listing for a task scheduler, and it has a button to install this package on your Ubuntu machine. This can be seen in Figure 6.11. There are similar options available in most Linux distributions. In fact, this task scheduler is a common GNOME application and not specific to Ubuntu.
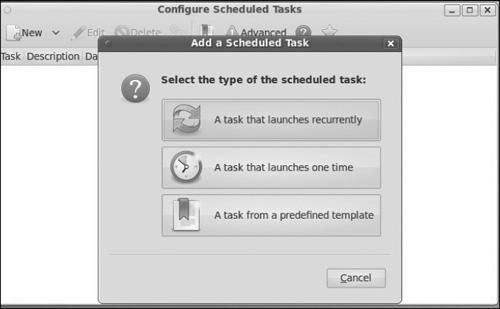
Once you have installed it, it will appear under Applications and System Tools. After you launch the program, simply click on New, and you will see the menu shown in Figure 6.12.
We are going to select a repeating task. As you can see in Figure 6.13, this is simply a GUI way to fill out the same items you would otherwise manually enter into the crontab.
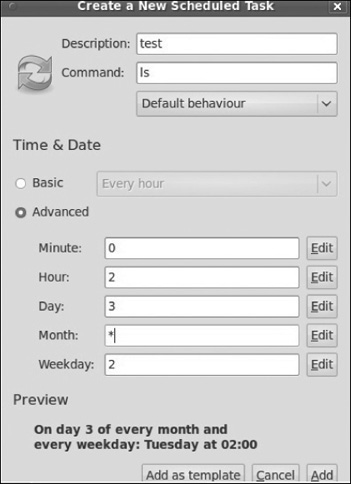
When you are done editing it, if you click Add, it will then appear in the list of scheduled tasks. You can always double-click a task and edit its schedule.
Some people prefer this GUI method for scheduling tasks, while others prefer to edit the crontab directly. In both cases, you are actually editing the crontab, so the effect is the same.
In this chapter, we have examined some essential system services. You should have a good understanding of these various services. The syslog and crontab are the most important to a network administrator. These both provide practical, day-to-day ways to facilitate your administrative duties.
It should also be noted that there are many other programs and daemons we did not cover. For example, we did not discuss network related daemons and programs. These will be discussed in Chapters 12, “The Network File System,” and Chapter 14, “Interoperability with Windows.”
| 1. | Lederer, Sebastian, Inittab, linuxmanpages.com, accessed 29 August 2011, http://www.linuxmanpages.com/man5/inittab.5.php |
| 2. | http://linux.die.net/man/8/autofs This manual page was written by Christoph Lameter [email protected] for the Debi GNU/Linux system. Edited by H. Peter Anvin [email protected]. |