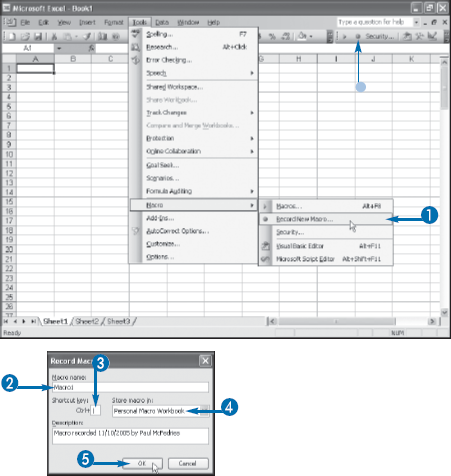
You can save time and make the process of creating a macro easier by recording some or all the actions you want your macro to perform.
A macro is a sequence of actions, commands, and statements that are executed one after another to perform a specific task. In Excel, as in all the other Office programs that support macros, the macro programming language is called Visual Basic for Applications, or VBA.
VBA is a powerful language that can perform a wide variety of tasks. However, VBA's main task is to operate on the application in which it is running. With Excel VBA, for example, you can create macros that add text and formulas to cells, format ranges, insert or delete worksheets, create and manipulate PivotTables, and much more.
Unfortunately, it can sometimes take a while to build and test a macro, and it is often difficult to remember the objects, properties, and methods that you are required to use to perform a task. Fortunately, when you want to build a macro that manipulates Excel in some way, VBA gives you an alternative method that is faster and easier: the macro recorder. After you activate this tool, you only need to use Excel to perform the action or actions that you want in the macro. All the text or formulas you insert in cells, all the formatting you apply, all the commands and buttons that you click, are recorded, translated into the equivalent VBA statements, and then stored as a macro for later use. You can store your recorded macros in any workbook, but Excel provides a special workbook for this purpose: the Personal Macro Workbook.
The Record Macro dialog box appears.
Note
If the macro name already exists, Excel displays a warning. Click Yes to replace the existing macro; click No to return to the Record Macro dialog box; click Cancel to stop the recording.
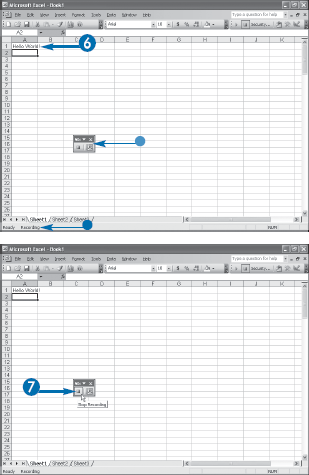
Excel starts the macro recorder.
Excel stops the macro recorder and saves the macro in the workbook.
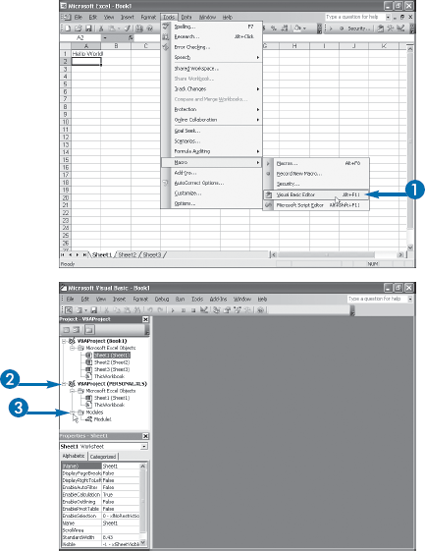
If you want to view or make changes to your recorded macro, or if you want to create macros from scratch, you need to open the Visual Basic Editor.
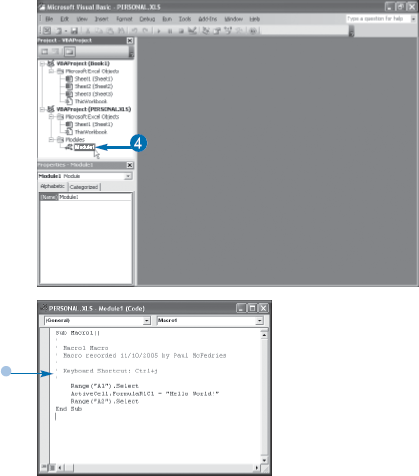
After you finish recording your actions, Excel translates them into VBA statements and stores them as a complete macro. Excel then saves the macro in a module, a special window in which you can view, edit, and run macros. If you are satisfied that your recording is accurate and properly executed, then you may never need to view the module in which it was stored. You can run the macro from Excel any time you want; see the task "Run a Macro," later in this appendix.
However, if you make mistakes during the recording, or if you want to augment the recorded macro with other VBA statements, then you need to view the module to work with the macro. Similarly, you also require access to the module if you want to create new macros from scratch.
In both cases, you access the module using the Visual Basic Editor, a program that enables you to view, create, edit, and run VBA macros. This task shows you how to start the Visual Basic Editor and how to open a module, such as one that contains a recorded macro.
To program PivotTables with VBA, you need to understand Excel's PivotTable object model.
You can build and manipulate a PivotTable using Excel commands, buttons, and dialog boxes. Therefore, many of Excel's PivotTable features are recordable, so you can create PivotTable-related macros by recording the appropriate PivotTable actions.
However, PivotTables are relatively complex features, so it is not always possible to record a PivotTable macro exactly the way you want. Therefore, most recorded PivotTable macros require a few adjustments to get them to work properly. This means that you need at least a basic understanding of how Excel translates PivotTable actions into VBA code. In other words, you need some understanding of the PivotTable object model.
In the programming lexicon, an object model is a complete summary of the objects associated with a particular program or feature, the hierarchy used by those objects, and the properties and methods supported by each object. Here an object is a distinct, manipulable item such as a PivotTable, a PivotTable field, or a value within a PivotTable field; a property is a programmable characteristic of an object such as a PivotTable's name or whether the PivotTable is displaying grand totals; and a method is an action you can perform on an object, such as refreshing or applying an AutoFormat to a PivotTable.
The top object in the PivotTable hierarchy is the PivotTable object, which represents an entire PivotTable report. You can reference a specific PivotTable either by using the PivotTables collection — which represents all the PivotTable objects on a specified worksheet, or by using the Range object's PivotTable property — which represents the PivotTable of which the range is a part. Here are some examples:
Worksheets("Budget").PivotTable("Sales")

ActiveSheet.PivotTables(1)

ActiveCell.PivotTablePROPERTY | DESCRIPTION |
|---|---|
| Toggles column grand totals on and off. |
| The name of the PivotTable. |
| Toggles row grand totals on and off. |
| Returns |
| Toggles whether source data is saved with the report. |
The PivotField object represents a row, column, page, or data field in a PivotTable object. You can reference a specific PivotField object using the PivotFields collection, which represents all the PivotField objects in a PivotTable report. Here is an example:
Worksheets("Budget").PivotTable("Sales").
PivotFields("Division")
Alternatively, you can use one of the following PivotTable object collections: RowFields, ColumnFields, PageFields, or DataFields.
PROPERTY | DESCRIPTION |
|---|---|
| Toggles whether you can drill down to the field's details. |
| The name of the field. |
| Where the field resides in the PivotTable layout (row, column, and so on). |
| The name of the field in the source data. |
| Sets the subtotals displayed with a row or column field. |
The PivotItem object represents an item in a row, column, or page PivotField object. You can reference a specific PivotItem object using the PivotItems collection, which represents all the PivotItem objects in a field. Here is an example:
Worksheets("Budget").PivotTable("Sales").
PivotFields("Division").PivotItems("East")PROPERTY | DESCRIPTION |
|---|---|
| Returns |
| The name of the item. |
| The item's position within its field. |
| The name of the item in the source data. |
| Toggles the item between visible and hidden. |
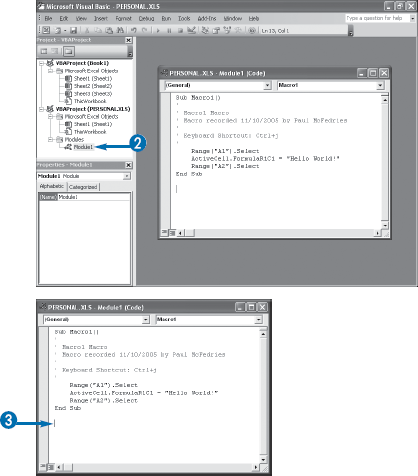
If you have a macro that you want to create or copy, you need to add the VBA code for the macro to a module in the Visual Basic Editor.
As you become familiar with manipulating PivotTables using VBA, you will likely come up with many macro ideas for simplifying complex tasks and automating routine and repetitive chores. To implement these macro ideas, you need to type your code into an existing module in the Visual Basic Editor.
Similarly, you may run across a macro that you want to use for your own work, either as-is or by modifying the code to suit your needs. For example, you have seen many PivotTable macro examples throughout this book, and these examples are available on the Web; see www.wiley.com/go/pivottablesvb. You can either transcribe these macros into a module on your system or, better yet, copy the macros and then paste them into a module.
Note
See the task "Open the Visual Basic Editor," earlier in this appendix.
If you prefer to add your code to a new module, click Insert→Module, instead.
Excel opens the module window.
Note
You must add the new macro either before or after an existing macro.
Note
Make sure the name you use is not the same as any existing macro name in the module.
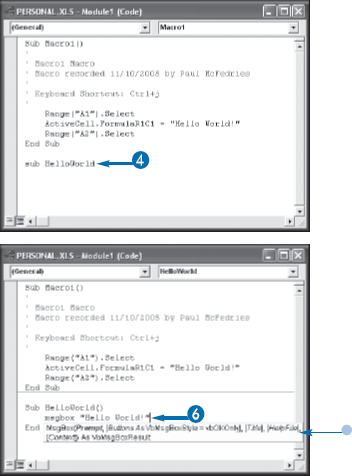
The Visual Basic Editor adds the line End Sub to denote the end of the macro.
If you copied the macro code from another source, click Edit→Paste, instead.
Extra
Here are some notes to bear in mind as you create your macros:
If you want to begin your macro with a few comments — notes that describe what the macro does — type an apostrophe (') at the beginning of each comment line.
To make your code easier to read, indent each statement by pressing the Tab key at the beginning of the line — you do not need to do this for the
SubandEnd Sublines. VBA preserves the indentation on subsequent lines, so you only have to indent the first line.After you enter a statement, VBA formats the color of each word in the line. By default, VBA keywords are blue, comments are green, errors are red, and all other text is black.
After you enter a statement, VBA converts keywords to their proper case. For example, if you type msgbox, VBA converts it to
MsgBoxwhen you press Enter.By always entering VBA keywords in lowercase letters, you can catch typing errors by looking for those keywords that VBA does not recognize; in other words, the ones that remain in lowercase.
Click Tools→Options and then the Editor tab. Select Require Variable Declaration (

After you enter a statement, VBA checks for syntax errors, which are errors when a word is misspelled, a function is entered incorrectly, and so on. VBA signifies a syntax error either by displaying a dialog box to let you know what the problem is, or by not converting a word to its proper case or color.
You can run a macro from any open workbook. You have the option of running the macro from the Visual Basic Editor or from Excel.
Excel maintains a list of the macros that are stored in each open workbook. When you want to run a macro, you can either open the module that contains the macro or display Excel's list of available macros. Either way, to run a macro, you must first open the workbook in which the macro is stored.
Note, however, that Excel's default macro security settings may prevent you from running any macros stored outside the Personal Macro Workbook. If you cannot perform the steps in this task — particularly after you create one or more macros and then close and restart Excel — then you either need to lower Excel's macro security settings or "self-sign" your own macros. See the next task, "Set Macro Security," for the details.
After you open a workbook, you then have two ways to run one of its macros:
From the Visual Basic Editor
From Excel
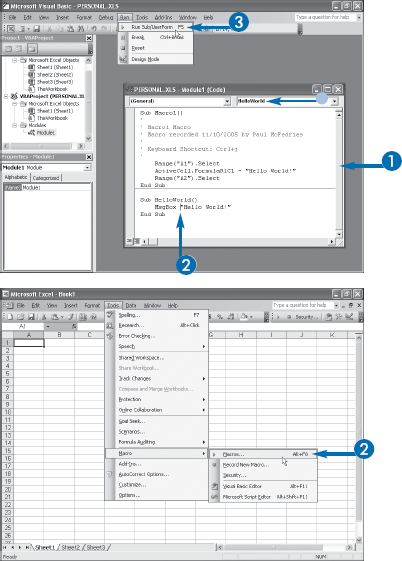
It is best to use the Visual Basic Editor if you are testing the macro, because although VBA switches to Excel to execute the code, it drops you back at the Visual Basic Editor when it is done. Therefore, you can run the code, see whether it works properly, and then adjust the code as necessary. When your code is working properly, you can run it from Excel without having to load the Visual Basic Editor.
You can also press F5 or click the VBA Run button (
The Visual Basic Editor runs the macro.
You can skip Step 1 if the macro is stored in the Personal Macro Workbook.
You can also press Alt+F8 or click the VBA Run button (
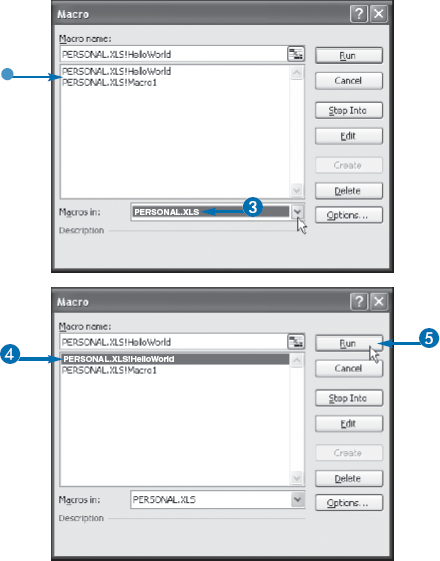
The Macro dialog box appears.
If you are not sure which workbook contains the macro, select All Open Workbooks, instead.
If you assigned a shortcut key to the macro, you can avoid Steps 1 to 4 by pressing the shortcut key.
Excel runs the macro.
VBA is a powerful programming language that can make your life easier and more efficient. Unfortunately, VBA's power is all too often used for nefarious ends—such as viruses that can trash entire systems—so Microsoft Office comes with VBA macros disabled as a security precaution. The exception is macros stored in Excel's Personal Macro Workbook, which you can always run.
Therefore, to run macros — even macros you create yourself — you need to adjust Excel's macro security setting to one of the following values:
Very High — Excel only enables macros if they are installed in a trusted folder on your hard disk. This gives you near-total macro safety, but it is overkill for most people.
High — Excel only enables macros if they come from a trusted source — that is, a source that has digitally signed the VBA project using a trusted code-signing certificate. Macros from any other source are automatically disabled. This is Excel's default security level and it gives you almost total macro safety. However, you need to self-sign your own macros, as described later in this task.
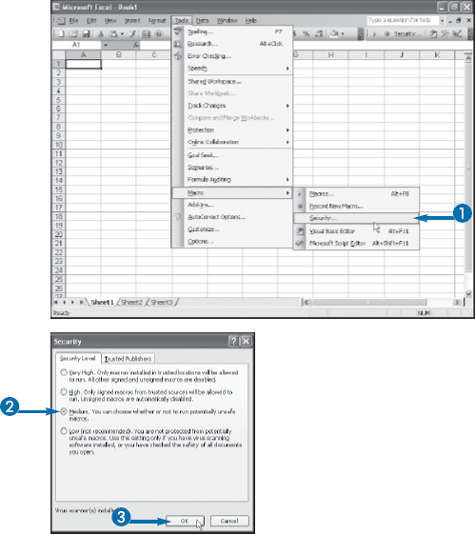
Medium — Excel warns you when a document you are about to open contains macros and asks if you want to enable or disable them. This is a useful option if you often open third-party documents. If you are expecting the document to contain macros, enable them; if you are not expecting macros, disable them and then check for malicious code.
Low — Excel runs all macros without prompting. If you do not have a virus scanner installed, use this level if you only run your own macros and you never open documents created by a third-party. If you do have a virus scanner, this level is probably safe if you only open third-party documents from people or sources you know.
The Security dialog box appears.
Excel puts the new security level into effect.
Note
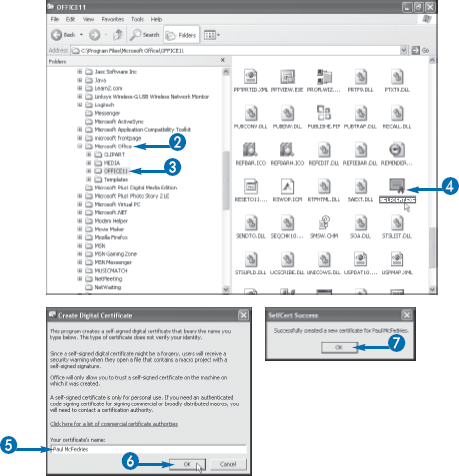
The default folder for Microsoft Office is C:Program FilesMicrosoft Office.
For Office XP, open the Office 10 subfolder, instead.
The Create Digital Certificate dialog box appears.
Excel creates a digital certificate in your name and displays a dialog box when it is done.
You can now use the digital certificate to sign your VBA code.
Note
See the next page to learn how to apply the digital certificate to your VBA projects.
Apply It
If you do not see the SelfCert.exe file, then it is not installed on your system. Click Start→Control Panel, and then click Add or Remove Programs. In the list of installed programs, click Microsoft Office and then click Change to start the Office Setup program. Select Add or Remove Features (
If you are a VBA programmer and you set Excel's macro security level to High, you immediately run into a problem: Excel does not allow you to run any of your own macros that reside outside the Personal Macro Workbook. This seems like overkill at first, but this stringent security policy is not without its fair share of common sense. That is, Excel has no way to tell whether you are the author of such macros. By definition, macros in the Personal Macro Workbook are yours, but code in any other file could have come from a third party, which makes that code a potential security risk.
Does this mean that you have to store all your macros in the Personal Macro Workbook? That would make it difficult to distribute your macros to other people, so fortunately the answer is "no." That is, because it is possible to "prove" that you are the author of your own macros. You can do that by self-certifying, which creates a trust certificate that applies only to your own work and to using that work on your own computer. The certificate is not valid on any other computer, so it is not a substitute for getting a proper code-signing digital certificate. However, if all you want to do is run your own macros, then self-certifying enables you to do that while still using the High macro security level.
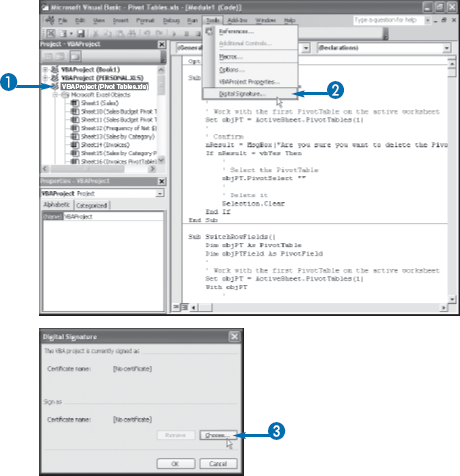
After you run the SelfCert.exe program to create your personal digital certificate, the next step is to assign that certificate to a VBA project. Note that you need to assign the certificate to each project that contains macros you want to run.
The Digital Signature dialog box appears.
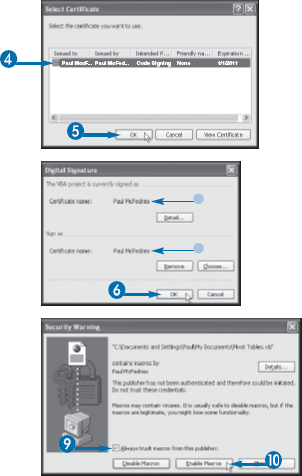
The Select Certificate dialog box appears.
If your macro security is set to High or Medium, the Security Warning dialog box appears.
Excel opens the workbook with macros enabled.
Excel no longer displays the Security Warning dialog box for workbooks signed with your digital signature.
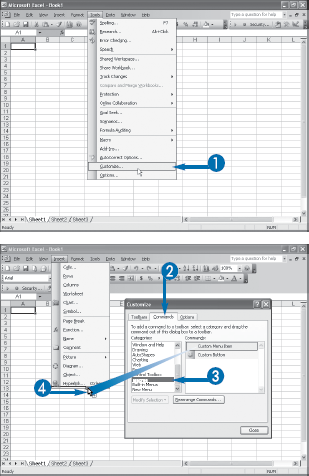
If you have a VBA macro that you use frequently, you can give yourself one-click access to the code by assigning that macro to an Excel toolbar.
A macro saves time by combining several actions into a single procedure. The more often you perform those actions in your day-to-day work, the more time you save by running the macro instead of doing the task by hand. However, the more macros you have, the longer it can take to run the macro you want because you have to scroll through a long list of macros. Assigning a shortcut key can help, but Excel only has a limited number of macro shortcut keys to go around.
A better solution is to create a new toolbar button and assign the macro to that button. As long as you leave the toolbar visible and as long as you leave open the workbook in which the macro is stored, you have one-click access to the macro. Because you must have the macro's workbook open, it is a good idea to only create toolbar buttons for macros in your Personal Macro Workbook, which is always open.
Note, too, that you can assign the macro to a button on an existing toolbar or to a button on a custom toolbar that you create yourself. The custom toolbar is often a better choice because it avoids cluttering existing toolbars with macro buttons. See the tip on the next page to learn how to create a custom toolbar.
Note
A quick way to display a toolbar is to right-click any visible toolbar or menu and then click the toolbar name.
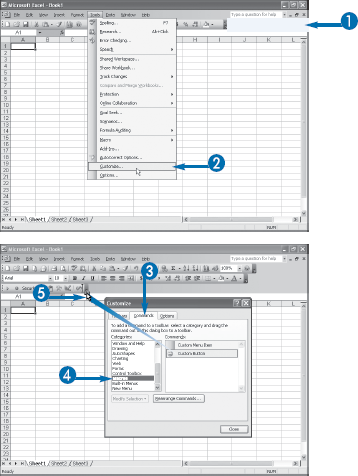
You can also right-click any visible toolbar or menu and then click Customize.
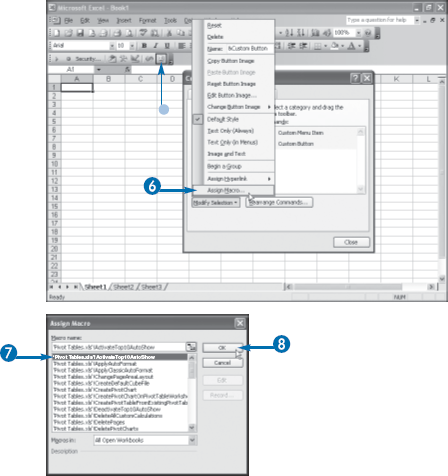
The Customize dialog box appears.
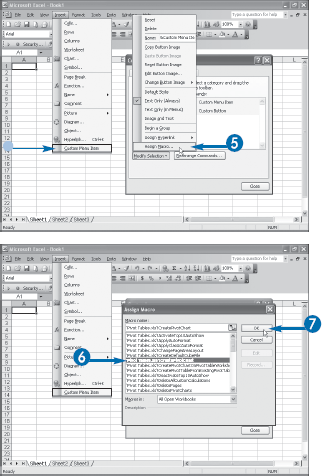
The Assign Macro dialog box appears.
Excel assigns the macro to the toolbar button.
If you have a large number of VBA macros, you can give yourself easier access to your most common macros by creating new menu commands that run the macros.
When you learn VBA and, in particular, VBA techniques for manipulating PivotTables, you may find that you end up with several dozen PivotTable-related macros on your system. It is likely that you run most of these macros only occasionally. However, it is common to have a few macros that you use a few times a week, or even every day. When you use a macro regularly, you do not want to waste time scrolling through a long list in the Macros dialog box, or worse, finding and running the macro in the Visual Basic Editor. On the other hand, you may not run the macro frequently enough to justify assigning it to a new toolbar button; see the previous task, "Assign a Macro to a Toolbar Button."
The middle ground here is to create a new command on a menu and then assign the macro to that command. When you pull down the menu and click the new command, Excel runs the macro automatically, which is quite a bit easier than using the Macros dialog box or the Visual Basic Editor. As with macro toolbar buttons, note that you must have the macro's workbook open, so it is a good idea to only create menu commands for macros in your Personal Macro Workbook, which is always open.
Note, too, that you can assign the macro to a command on an existing menu or on a custom menu that you create yourself. The custom menu is often a better choice because it avoids cluttering existing menus with macro commands. See the tip on the next page to learn how to create a custom menu.