
In This Chapter
Although the Ribbon has replaced menus and toolbars, Excel 2007 still offers developers the opportunity to customize the shortcut menus. Typically, right-clicking an item displays a context-sensitive shortcut menu containing relevant commands. In this chapter, I cover the following:
How to identify shortcut menus
How to customize the shortcut menus
How to disable shortcut menus
How to use events in conjunction with shortcut menus
How to create a completely new shortcut menu
The CommandBar object takes on a much less significant role in Excel 2007. This chapter covers the CommandBar object as it relates to customizing shortcut menus.
A CommandBar object is used for three Excel user interface elements:
Custom toolbars
Custom menus
Customs shortcut (right-click) menus
In Excel 2007, the CommandBar object is in a rather odd position. If you write VBA code to customize a menu or a toolbar, Excel intercepts that code and ignores many of your commands. As I describe in Chapter 22, menu and toolbar customizations performed with the CommandBar object appear in the Add-Ins ![]() Menu Commands or the Add-Ins
Menu Commands or the Add-Ins ![]() Custom Toolbars group. So, for all practical purposes, the
Custom Toolbars group. So, for all practical purposes, the CommandBar object in Excel 2007 is limited to shortcut menu operations.
In this section, I provide some background information about CommandBars.
Excel supports three types of CommandBars, differentiated by their Type property. The Type property can be any of these three values:
msoBarTypeNormal: A toolbar (Type= 0)msoBarTypeMenuBar: A menu bar (Type= 1)msoBarTypePopUp: A shortcut menu (Type= 2)
Even though toolbars and menu bars aren’t used in Excel 2007, these UI elements are still included in the object model for compatibility with older applications. However, attempting to display a CommandBar of Type 0 or 1 has no effect in Excel 2007. In Excel 2003, for example, the following statement displays the Standard toolbar.
CommandBars("Standard").Visible = TrueIn Excel 2007, that statement is ignored.
This chapter focuses exclusively on Type 2 CommandBars (shortcut menus).
Excel 2007 has 65 shortcut menus. How do I know that? I ran the ShowShortcutMenuNames procedure that follows, which loops through all CommandBars. If the Type property is msoBarTypePopUp (a built-in constant that has a value of 2), it displays the CommandBar’s index and name in a worksheet.
Sub ShowShortcutMenuNames()
Dim Row As Long
Dim cbar As CommandBar
Row = 1
For Each cbar In CommandBars
If cbar.Type = msoBarTypePopUp Then
Cells(Row, 1) = cbar.Index
Cells(Row, 2) = cbar.Name
Row = Row + 1
End If
Next cbar
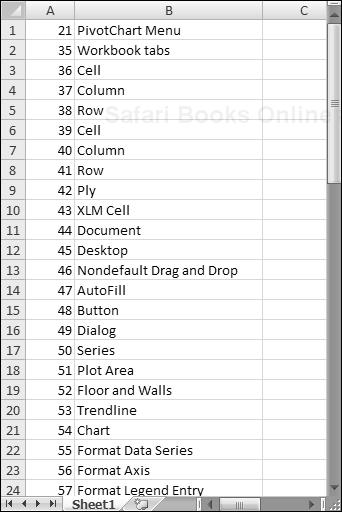
End SubFigure 23-1 shows part of the output from this procedure. The shortcut menu index values range from 21 to 145. Also, notice that not all the names are unique. For example, CommandBar 36 and CommandBar 39 both have a Name of Cell. This is because right-clicking a cell gives a different shortcut menu when the worksheet is in Page Break Preview mode.
You can reference a particular CommandBar object by its Index or by its Name property. For example, the expressions that follow both refer to the shortcut menu that displays when you right-click the Excel desktop (the area that’s visible when no documents are open):
Application.CommandBars (45)
Application.CommandBars("Desktop")
The CommandBars collection is a member of the Application object. When you reference this collection in a regular VBA module or in a module for a sheet, you can omit the reference to the Application object. For example, the following statement (contained in a standard VBA module) displays the name of the object in the CommandBars collection that has an index of 45:
MsgBox CommandBars(45).Name
When you reference the CommandBars collection from a code module for a ThisWorkbook object, you must precede it with a reference to the Application object, like this:
MsgBox Application.CommandBars(45).Name
A CommandBar object contains Control objects, which are buttons or menus. You can refer to a control by its Index property or by its Caption property. Here’s a simple procedure that displays the caption of the first menu item on the Cell shortcut menu:
Sub ShowCaption()
    MsgBox Application.CommandBars("Cell"). _
       Controls(1).Caption
End Sub
The following procedure displays the Caption property for each control in the shortcut menu that appears when you right-click a sheet tab (that shortcut menu is named Ply):
Sub ShowCaptions()
Dim txt As String
Dim ctl As CommandBarControl
For Each ctl In CommandBars("Ply").Controls
txt = txt & ctl.Caption & vbNewLine
Next ctl
MsgBox txt
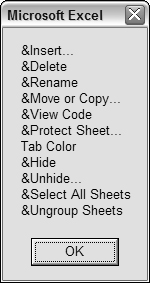
End SubWhen you execute this procedure, you see the message box shown in Figure 23-2. The ampersand is used to indicate the underlined letter in the text — the keystroke that will execute the menu item.
In some cases, Control objects on a shortcut menu contain other Control objects. For example, the Filter control on the Cell right-click menu contains other controls. The Filter control is a submenu, and the additional items are submenu items.
The statement that follows displays the first submenu item in the Filter submenu:
MsgBox CommandBars("Cell").Controls("Filter").Controls(1).CaptionCommandBar controls have a number of properties that determine how the controls look and work. This list contains some of the more useful properties for CommandBar controls:
Caption: The text displayed for the control. If the control shows only an image, the Caption appears when you move the mouse over the control.ID: A unique numeric identifier for the control.FaceID: A number that represents a graphic image displayed next to the control’s text.Type: A value that determines whether a control is a button (msoControlButton) or a submenu (msoControlPopup).Picture: A graphics image displayed next to the control’s text.BeginGroup: True if a separator bar appears before the control.OnAction: The name of a VBA macro that executes when the user clicks the control.BuiltIn: True if the control is an Excel built-in control.Enabled: True if the control can be clicked.Visible: True if the control is visible. Many of the shortcut menus contains hidden controls.ToolTipText: Text that appears when the user moves the mouse pointer over the control. (Not applicable for shortcut menus.)
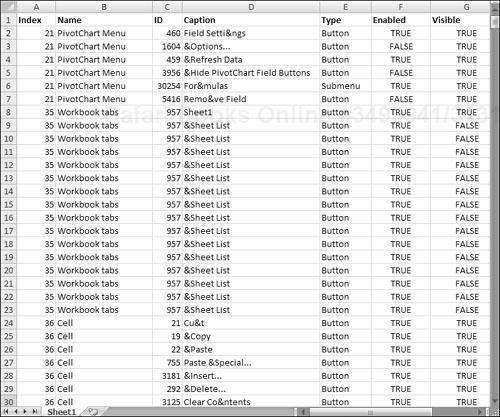
The ShowShortcutMenuItems procedure that follows creates a table that lists all of the first-level controls on every shortcut menu. For each control, the table includes the shortcut menu’s Index and Name, plus the ID, Caption , Type, Enabled, and Visible property values.
Sub ShowShortcutMenuItems()
  Dim Row As Long
  Dim Cbar As CommandBar
  Dim ctl As CommandBarControl
  Range("A1:G1") = Array("Index", "Name", "ID", "Caption", _
    "Type", "Enabled", "Visible")
  Row = 2
  Application.ScreenUpdating = False
  For Each Cbar In Application.CommandBars
    If Cbar.Type = 2 Then
      For Each ctl In Cbar.Controls
          Cells(Row, 1) = Cbar.Index
          Cells(Row, 2) = Cbar.Name
          Cells(Row, 3) = ctl.ID
          Cells(Row, 4) = ctl.Caption
          If ctl.Type = 1 Then
              Cells(Row, 5) = "Button"
          Else
              Cells(Row, 5) = "Submenu"
          End If
          Cells(Row, 6) = ctl.Enabled
          Cells(Row, 7) = ctl.Visible
         Row = Row + 1
      Next ctl
    End If
  Next Cbar
End Sub
Figure 23-3 shows a portion of the output.
If you run the ShowShortcutMenuItems macro, you see that many of the shortcut menus contain hidden or disabled controls. These hidden or disabled menu items represent items that are not available because of the current context. For example, the Desktop shortcut menu (Index 45) contains the following menu items:
&New...
&Open...
Save &Workspace...
&Calculate Now
F&ull Screen
The Full Screen menu item is normally hidden — unless Excel is in full screen mode. In such a case, the menu item is made visible and its caption is changed to &Close Full Screen.
In this section, I present some practical examples of VBA code that manipulates Excel’s shortcut menus. These examples give you an idea of the types of things you can do with shortcut menus, and they can all be modified to suit your needs.
The Reset method restores a shortcut menu to its original, default condition. The following procedure resets the Cell shortcut menu to its normal state:
Sub ResetCellMenu()
    CommandBars("Cell").Reset
End Sub
As I noted earlier, Excel has two shortcut menus named Cell. The preceding code resets only the first one (index of 36). To reset the second Cell shortcut menu, use its index number (39) instead of its name.
The following procedure resets all built-in toolbars to their original states:
Sub ResetAll()
    Dim cbar As CommandBar
    For Each cbar In Application.CommandBars
        If cbar.Type = msoBarTypePopup Then
            cbar.Reset
            cbar.Enabled = True
        End If
    Next cbar
End SubThe Enabled property lets you disable an entire shortcut menu. For example, you can set this property so that right-clicking a cell does not display the normal shortcut menu. The following statement disables the Cell shortcut menu:
Application.CommandBars("Cell").Enabled = FalseTo re-enable the shortcut menu, simply set its Enabled property to True.
If you want to disable all shortcut menus, use the following procedure:
Sub DisableAllShortcutMenus()
    Dim cb As CommandBar
    For Each cb In CommandBars
        If cb.Type = msoBarTypePopup Then _
          cb.Enabled = False
    Next cb
End SubYou might want to disable one or more shortcut menu items on certain shortcut menus while your application is running. When an item is disabled, its text appears in light gray, and clicking it has no effect. The following procedure disables the Hide menu item from the Row and Column shortcut menus:
Sub DisableHideMenuItems()
    CommandBars("Column").Controls("Hide").Enabled = False
    CommandBars("Row").Controls("Hide").Enabled = False
End SubThe AddToShortcut procedure that follows adds a new menu item to the Cell shortcut menu: Toggle Word Wrap. Recall that Excel has two Cell shortcut menus. This procedure modifies the normal right-click menu, but not the right-click menu that appears in Page Break Preview mode.
Sub AddToShortCut()
'   Adds a menu item to the Cell shortcut menu
    Dim Bar As CommandBar
    Dim NewControl As CommandBarButton
    DeleteFromShortcut
    Set Bar = CommandBars("Cell")
    Set NewControl = Bar.Controls.Add _
        (Type:=msoControlButton, _
         temporary:=True)
    With NewControl
        .Caption = "Toggle &Word Wrap"
        .OnAction = "ToggleWordWrap"
        .Picture = Application.CommandBars.GetImageMso _
           ("WrapText", 16, 16)
        .Style = msoButtonIconAndCaption
    End With
End Sub
Figure 23-4 shows the new menu item displayed after right-clicking a cell.
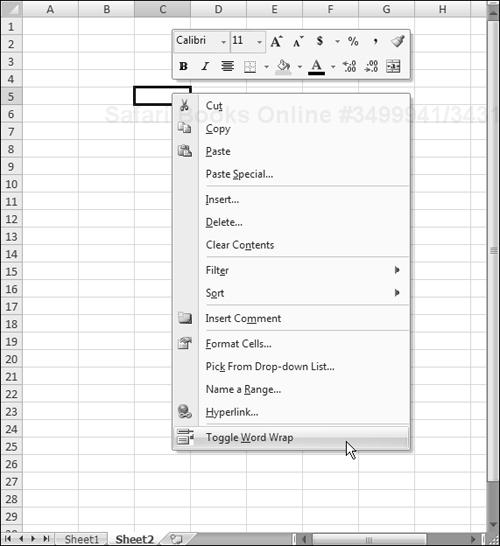
The first actual command after the declaration of a couple of variables calls the DeleteFromShortcut procedure (listed later in this section). This statement ensures that only one Toggle Word Wrap menu item appears on the shortcut Cell menu. Notice that the underlined hot key for this menu item is W, not T. That’s because T is already used by the Cut menu item.
The Picture property is set by referencing the image used in the Ribbon for the Wrap Text command. Refer to Chapter 22 for more information about images used in Ribbon commands.
The macro that is executed when the menu item is select is specified by the OnAction property. In this case, the macro is named ToggleWordWrap:
Sub ToggleWordWrap()
    CommandBars.ExecuteMso ("WrapText")
End Sub
This procedure simply executes the WrapText Ribbon command.
Note

When you modify a shortcut menu, that modification remains in effect until you restart Excel. In other words, modified shortcut menus don’t reset themselves when you close the workbook that contains the VBA code. Therefore, if you write code to modify a shortcut menu, you almost always write code to reverse the effect of your modification.
The DeleteFromShortcut procedure removes the new menu item from the Cell shortcut menu.
Sub DeleteFromShortcut()
    On Error Resume Next
    CommandBars("Cell").Controls _
      ("Toggle &Word Wrap").Delete
End Sub
In most cases, you want to add and remove the shortcut menu additions automatically: Add the shortcut menu item when the workbook is opened, and delete the menu item when the workbook is closed. Just add these two event procedures to the ThisWorkbook code module:
Private Sub Workbook_Open()
    Call AddToShortCut
End Sub
Private Sub Workbook_BeforeClose(Cancel As Boolean)
Call DeleteFromShortcut
End SubThe Workbook_Open procedure is executed when the workbook is opened, and the Workbook_BeforeClose procedure is executed before the workbook is closed. Just what the doctor ordered.
The example in this section adds a submenu with three options to a shortcut menu. Actually, it adds the submenu to six shortcut menus. Figure 23-5 shows the worksheet after right-clicking a row. Each of the submenu items executes a macro that changes the case of text in the selected cells.

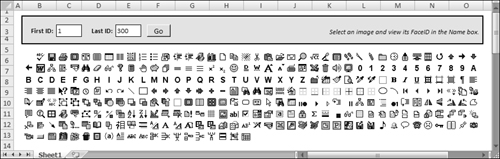
Finding FaceID Images
The icon that’s displayed on a shortcut menu item is determined by one of two property settings:
Picture: This option lets you use animageMsofrom the Ribbon. For an example, see “Adding a new item to the Cell shortcut menu,” earlier in this chapter.FaceID: This is the easiest option because theFaceIDproperty is just a numeric value that represents one of hundreds of images.
But how do you find out which number corresponds to a particular FaceID image? Excel doesn’t provide a way, so I created an application the lets you enter a beginning and ending FaceID number. Click a button, and the images are displayed in the worksheet. Each image has a name that corresponds to its FaceID value. See the accompanying figure, which shows FaceID values from 1 to 300. This workbook, named show faceids.xlsm, is available on the companion CD-ROM.
The code that creates the submenu and submenu items is as follows:
Sub AddSubmenu()
'   Adds a submenu to the six shortcut menus
    Dim Bar As CommandBar
    Dim NewMenu As CommandBarControl
    Dim NewSubmenu As CommandBarButton
    Dim cbIndex As Long

    DeleteSubmenu
    For cbIndex = 36 To 41
        Set Bar = CommandBars(cbIndex)
'       Add submenu
        Set NewMenu = Bar.Controls.Add _
            (Type:=msoControlPopup, _
             temporary:=True)
        NewMenu.Caption = "Ch&ange Case"
        NewMenu.BeginGroup = True
'       Add first submenu item
        Set NewSubmenu = NewMenu.Controls.Add _
          (Type:=msoControlButton)
        With NewSubmenu
            .FaceId = 38
            .Caption = "&Upper Case"
            .OnAction = "MakeUpperCase"
        End With
'       Add second submenu item
        Set NewSubmenu = NewMenu.Controls.Add _
          (Type:=msoControlButton)
        With NewSubmenu
            .FaceId = 40
            .Caption = "&Lower Case"
            .OnAction = "MakeLowerCase"
        End With
'       Add third submenu item
        Set NewSubmenu = NewMenu.Controls.Add _
          (Type:=msoControlButton)
        With NewSubmenu
            .FaceId = 476
            .Caption = "&Proper Case"
            .OnAction = "MakeProperCase"
        End With
    Next cbIndex
End Sub
The AddSubmenu procedure uses a loop to modify the six CommandBar objects that have an Index between 36 and 41. These shortcut menus are the ones that appear when you right-click a cell, row, or column (different shortcut menus appear when Excel is in Page Break preview mode).
The submenu is added first, and its Type property is msoControlPopup. Then the three submenu items are added, and each has a different OnAction property.
The examples in this section demonstrate various shortcut-menu programming techniques used in conjunction with events.
If you need to modify a shortcut menu when a workbook is opened, use the Workbook_Open event. The following code, stored in the code module for the ThisWorkbook object, executes the ModifyShortcut procedure (not shown here):
Private Sub Workbook_Open()
    Call ModifyShortcut
End Sub
To return the shortcut back to its state before the modification, use a procedure such as the following. This procedure is executed before the workbook closes, and it executes the RestoreShortcut procedure (not shown here):
Private Sub Workbook_BeforeClose(Cancel As Boolean)
    Call RestoreShortcut
End Sub
A problem could arise, however, if the workbook is not saved when the user closes it. Excel’s “Do you want to save the changes?” prompt occurs after the Workbook_BeforeClose event handler runs. So if the user clicks Cancel, the workbook remains open, but your custom menu has already been deleted!
One solution to this problem is to bypass Excel’s prompt and write your own code in the Workbook_BeforeClose procedure to ask the user to save the workbook. The following code demonstrates how:
Private Sub Workbook_BeforeClose(Cancel As Boolean)
    If Not Me.Saved Then
        Msg = "Do you want to save the changes you made to "
        Msg = Msg & Me.Name & "?"
        Ans = MsgBox(Msg, vbQuestion + vbYesNoCancel)
        Select Case Ans
            Case vbYes
                Me.Save
            Case vbNo
                Me.Saved = True
            Case vbCancel
                Cancel = True
                Exit Sub
        End Select
    End If
    Call RestoreShortcut
End Sub
This procedure determines whether the workbook has been saved. If it has been saved, no problem; the RestoreShortcut procedure is executed, and the workbook is closed. But if the workbook has not been saved, the procedure displays a message box that duplicates the one Excel normally shows. If the user clicks Yes, the workbook is saved, the menu is deleted, and the workbook is closed. If the user clicks No, the code sets the Saved property of the Workbook object to True (without actually saving the file) and deletes the menu. If the user clicks Cancel, the BeforeClose event is canceled, and the procedure ends without restoring the shortcut menu.
When a menu item is disabled, its text appears in a faint shade of gray, and clicking it has no effect. When a menu item is hidden, it does not appear on the shortcut menu. You can, of course, write VBA code to enable or disable shortcut menu items. Similarly, you can write code to hide shortcut menu items. The key, of course, is tapping into the correct event.
The following code, for example, disables the Change Case shortcut menu item (which was added to the Cells menu) when Sheet2 is activated. This procedure is located in the code module for Sheet2:
Private Sub Worksheet_Activate()
    CommandBars("Cell").Controls("Change Case").Enabled = False
End Sub
To enable the menu item when Sheet2 is deactivated, add this procedure. The net effect is that the Change Case menu item is available at all times except when Sheet2 is active.
Private Sub Worksheet_Deactivate()
    CommandBars("Cell").Controls("Change Case").Enabled = True
End Sub
To hide the menu item rather than disable it, simply access the Visible property instead of the Enabled property.
You can create an entirely new shortcut menu and display it in response to a particular event. The code that follows creates a shortcut menu named MyShortcut and adds six menu items to it. These menu items have their OnAction property set to execute a simple procedure that displays one of the tabs in the Format Cells dialog box (see Figure 23-6).
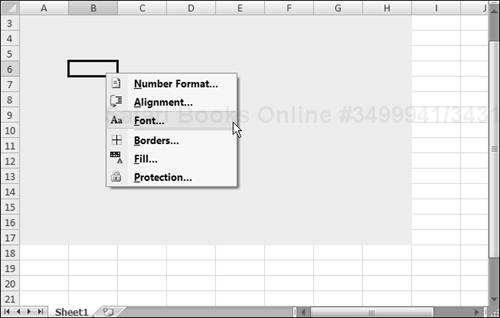
Figure 23-6. A new shortcut menu appears only when the user right-clicks a cell in the shaded area of the worksheet.
Sub CreateShortcut()
    Set myBar = CommandBars.Add _
      (Name:="MyShortcut", Position:=msoBarPopup, _
       Temporary:=True)

'   Add a menu item
    Set myItem = myBar.Controls.Add(Type:=msoControlButton)
    With myItem
        .Caption = "&Number Format..."
        .OnAction = "ShowFormatNumber"
        .FaceId = 1554
    End With

'   Add a menu item
    Set myItem = myBar.Controls.Add(Type:=msoControlButton)
    With myItem
        .Caption = "&Alignment..."
        .OnAction = "ShowFormatAlignment"
        .FaceId = 217
    End With

'   Add a menu item
    Set myItem = myBar.Controls.Add(Type:=msoControlButton)
    With myItem
        .Caption = "&Font..."
        .OnAction = "ShowFormatFont"
        .FaceId = 291
    End With

'   Add a menu item
    Set myItem = myBar.Controls.Add(Type:=msoControlButton)
    With myItem
        .Caption = "&Borders..."
        .OnAction = "ShowFormatBorder"
        .FaceId = 149
        .BeginGroup = True
    End With

'   Add a menu item
    Set myItem = myBar.Controls.Add(Type:=msoControlButton)
    With myItem
        .Caption = "&Patterns..."
        .OnAction = "ShowFormatPatterns"
        .FaceId = 1550
    End With

'   Add a menu item
    Set myItem = myBar.Controls.Add(Type:=msoControlButton)
    With myItem
        .Caption = "Pr&otection..."
        .OnAction = "ShowFormatProtection"
        .FaceId = 2654
    End With
End Sub
After the shortcut menu is created, you can display it by using the ShowPopup method. The following procedure, located in the code module for a Worksheet object, is executed when the user right-clicks a cell:
Private Sub Worksheet_BeforeRightClick _
  (ByVal Target As Excel.Range, Cancel As Boolean)
    If Union(Target.Range("A1"), Range("data")).Address = _
      Range("data").Address Then
        CommandBars("MyShortcut").ShowPopup
        Cancel = True
    End If
End Sub
If the active cell is within a range named data when the user right-clicks, the MyShortcut menu appears. Setting the Cancel argument to True ensures that the normal shortcut menu is not displayed. Note that the mini toolbar is not displayed.
You can also display this shortcut menu without even using the mouse. Create a simple procedure and assign a shortcut key by using the Options button in the Macro dialog box.
Sub ShowMyShortcutMenu()
'   Ctrl+Shift+M shortcut key
    CommandBars("MyShortcut").ShowPopup
End Sub
CD-ROM
The companion CD-ROM contains an example (named new shortcut menu.xlsm) that creates a new shortcut menu and displays it in place of the normal Cell shortcut menu.