
This chapter presents an introduction to class modules and includes several examples that might help you better understand this feature and give you ideas for using class modules in your own projects.
An introduction to class modules
Some typical uses for class modules
Examples that demonstrate some key concepts related to class modules
For many VBA programmers, the concept of a class module is a mystery, even though this feature has been available in Visual Basic for several years — it was added to Excel beginning with Excel 97. The examples in this chapter may help to make this powerful feature less mysterious.
A class module is a special type of VBA module that you can insert into a VBA project. Basically, a class module enables the programmer (you) to create a new object class. As you should know by now, programming Excel really boils down to manipulating objects. A class module allows you to create new objects, along with corresponding properties, methods, and events.
Cross-Reference
Examples in previous chapters in this book use class modules. See Chapters 15, 18, 19, and 22.
At this point, you might be asking, “Do I really need to create new objects?” The answer is no. You don’t need to, but you might want to after you understand some of the benefits of doing so. In many cases, a class module simply serves as a substitute for functions or procedures, but it could be a more convenient and manageable alternative. In other cases, however, you’ll find that a class module is the only way to accomplish a particular task.
Following is a list of some typical uses for class modules:
To handle events associated with embedded charts. (See Chapter 18 for an example.)
To monitor application-level events, such as activating any worksheet. (See Chapters 19 and 22 for examples.)
To encapsulate a Windows Application Programming Interface (API) function to make it easier to use in your code. For example, you can create a class that makes it easy to detect or set the state of the Num Lock or Caps Lock key. Or you can create a class that simplifies access to the Windows Registry.
To enable multiple objects in a UserForm to execute a single procedure. Normally, each object has its own event handler. The example in Chapter 15 demonstrates how to use a class module so that multiple CommandButtons have a single
Clickevent handler procedure.To create reusable components that can be imported into other projects. After you create a general-purpose class module, you can import it into other projects to reduce your development time.
In this section, I provide step-by-step instructions for creating a useful, albeit simple, class module. This class module creates a NumLock class that has one property (Value) and one method (Toggle).
Detecting or changing the state of the Num Lock key requires several Windows API functions, and the procedure varies depending on the version of Windows. In other words, it’s fairly complicated. The purpose of this class module is to simplify things. All the API declarations and code are contained in a class module (not in your normal VBA modules). The benefits? Your code will be much easier to work with, and you can reuse this class module in your other projects.
After the class is created, your VBA code can determine the current state of the Num Lock key by using an instruction such as the following, which displays the Value property:
MsgBox NumLock.Value
Or your code can change the state of the Num Lock key by changing the Value property. The following instruction, for example, turns on the Num Lock key:
NumLock.Value = True
In addition, your code can toggle the Num Lock key by using the Toggle method:
NumLock.Toggle
It’s important to understand that a class module contains the code that defines the object, including its properties and methods. You can then create an instance of this object in your VBA general code modules and manipulate its properties and methods.
To better understand the process of creating a class module, you might want to follow the instructions in the sections that follow. Start with an empty workbook.
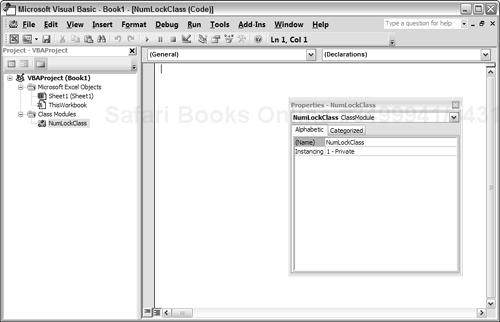
Activate the Visual Basic Editor (VBE) and choose Insert ![]() Class Module. This adds an empty class module named
Class Module. This adds an empty class module named Class1. If the Properties window isn’t displayed, press F4 to display it. Then change the name of the class module to NumLockClass (see Figure 29-1).
In this step, you create the code for the Value property. To detect or change the state of the Num Lock key, the class module needs the required Windows API declarations that are used to detect and set the Num Lock key. That code follows:

' Type declaration
Private Type OSVERSIONINFO
    dwOSVersionInfoSize As Long
    dwMajorVersion As Long
    dwMinorVersion As Long
    dwBuildNumber As Long
    dwPlatformId As Long
    szCSDVersion As String * 128
End Type

' API declarations
Private Declare Function GetVersionEx Lib "Kernel32" _
    Alias "GetVersionExA" _
    (lpVersionInformation As OSVERSIONINFO) As Long

Private Declare Sub keybd_event Lib "user32" _
    (ByVal bVk As Byte, _
    ByVal bScan As Byte, _
    ByVal dwflags As Long, ByVal dwExtraInfo As Long)

Private Declare Function GetKeyboardState Lib "user32" _
    (pbKeyState As Byte) As Long

Private Declare Function SetKeyboardState Lib "user32" _
    (lppbKeyState As Byte) As Long

'Constant declarations
Const VK_NUMLOCK = &H90
Const VK_SCROLL = &H91
Const VK_CAPITAL = &H14
Const KEYEVENTF_EXTENDEDKEY = &H1
Const KEYEVENTF_KEYUP = &H2
Const VER_PLATFORM_WIN32_NT = 2
Const VER_PLATFORM_WIN32_WINDOWS = 1
Next, you need a procedure that retrieves the current state of the Num Lock key. I’ll call this the Value property of the object. You can use any name for the property, but Value seems like a good choice. To retrieve the state, insert the following Property Get procedure:
Property Get Value() As Boolean
'   Get the current state
    Dim keys(0 To 255) As Byte
    GetKeyboardState keys(0)
    Value = keys(VK_NUMLOCK)
End Property
Cross-Reference
The details of Property procedures are described later in this chapter. See “Programming properties of objects.”
This procedure, which uses the GetKeyboardState Windows API function to determine the current state of the Num Lock key, is called whenever VBA code reads the Value property of the object. For example, after the object is created, a VBA statement such as this executes the Property Get procedure:
MsgBox NumLock.Value
You now need a procedure that sets the Num Lock key to a particular state: either on or off. You can do this with the following Property Let procedure:
Property Let Value(boolVal As Boolean)
    Dim o As OSVERSIONINFO
    Dim keys(0 To 255) As Byte
    o.dwOSVersionInfoSize = Len(o)
    GetVersionEx o
    GetKeyboardState keys(0)
'   Is it already in that state?
    If boolVal = True And keys(VK_NUMLOCK) = 1 Then Exit Property
    If boolVal = False And keys(VK_NUMLOCK) = 0 Then Exit Property
'   Toggle it
    If o.dwPlatformId = VER_PLATFORM_WIN32_WINDOWS Then '(Win95)
        'Toggle numlock
       keys(VK_NUMLOCK) = IIf(keys(VK_NUMLOCK) = 0, 1, 0)
        SetKeyboardState keys(0)
    ElseIf o.dwPlatformId = VER_PLATFORM_WIN32_NT Then ' (WinNT)
        'Simulate Key Press
        keybd_event VK_NUMLOCK, &H45, KEYEVENTF_EXTENDEDKEY Or 0, 0
        'Simulate Key Release
        keybd_event VK_NUMLOCK, &H45, KEYEVENTF_EXTENDEDKEY Or _
          KEYEVENTF_KEYUP, 0
    End If
End Property
The Property Let procedure takes one argument, which is either True or False. A VBA statement such as the following sets the Value property of the NumLock object to True by executing the Property Let procedure:
NumLock.Value = True
Finally, you need a procedure to toggle the NumLock state:
Sub Toggle()
'   Toggles the state
    Dim o As OSVERSIONINFO
    o.dwOSVersionInfoSize = Len(o)
    GetVersionEx o
    Dim keys(0 To 255) As Byte
    GetKeyboardState keys(0)
    If o.dwPlatformId = VER_PLATFORM_WIN32_WINDOWS Then '(Win95)
        'Toggle numlock
        keys(VK_NUMLOCK) = IIf(keys(VK_NUMLOCK) = 0, 1, 0)
        SetKeyboardState keys(0)
    ElseIf o.dwPlatformId = VER_PLATFORM_WIN32_NT Then ' (WinNT)
        'Simulate Key Press
        keybd_event VK_NUMLOCK, &H45, KEYEVENTF_EXTENDEDKEY Or 0, 0
        'Simulate Key Release
        keybd_event VK_NUMLOCK, &H45, KEYEVENTF_EXTENDEDKEY Or _
          KEYEVENTF_KEYUP, 0
    End If
End Sub
Notice that Toggle is a standard Sub procedure (not a Property Let or Property Get procedure). A VBA statement such as the following one toggles the state of the NumLock object by executing the Toggle procedure.
NumLock.Toggle
Before you can use the NumLockClass class module, you must create an instance of the object. The following statement, which resides in a regular VBA module (not the class module), does just that:
Dim NumLock As New NumLockClass
Notice that the object type is NumLockClass (that is, the name of the class module). The object variable itself can have any name, but NumLock certainly seems like a logical name for this.
The following procedure sets the Value property of the NumLock object to True, which results in the Num Lock key being turned on:
Sub NumLockOn()
    Dim NumLock As New NumLockClass
    NumLock.Value = True
End Sub
The next procedure displays a message box that indicates the current state of the Num Lock key (True is on; False is off):
Sub GetNumLockState()
    Dim NumLock As New NumLockClass
    MsgBox NumLock.Value
End Sub
The following procedure toggles the Num Lock key:
Sub ToggleNumLock()
    Dim NumLock As New NumLockClass
    NumLock.Toggle
End Sub
Notice that there’s another way to toggle the Num Lock key without using the Toggle method:
Sub ToggleNumLock2()
    Dim NumLock As New NumLockClass
    NumLock.Value = Not NumLock.Value
End Sub
It should be clear that using the NumLock class is much simpler than using the API functions. After you create a class module, you can reuse it in any other project simply by importing the class module.
The example in the preceding section demonstrates how to create a new object class with a single property named Value and a single method named Toggle. An object class can contain any number of properties, methods, and events.
The name that you use for the class module in which you define the object class is also the name of the object class. By default, class modules are named Class1, Class2, and so on. Usually, you’ll want to provide a more meaningful name for your object class.
Most objects have at least one property, and you can give them as many as you need. After a property is defined and the object is created, you can use it in your code using the standard “dot” syntax:
object.property
The VBE Auto List Members option works with objects defined in a class module. This makes it easier to select properties or methods when writing code.
Properties for the object that you define can be read-only, write-only, or read/write. You define a read-only property with a single procedure — using the Property Get keyword. Here’s an example of a Property Get procedure:
Property Get FileNameOnly() As String
    FileNameOnly = ""
    For i = Len(FullName) To 1 Step -1
        Char = Mid(FullName, i, 1)
        If Char = "" Then
            Exit Function
        Else
            FileNameOnly = Char & FileNameOnly
        End If
    Next i
End Property
You might have noticed that a Property Get procedure works like a Function procedure. The code performs calculations and then returns a property value that corresponds to the procedure’s name. In this example, the procedure’s name is FileNameOnly. The property value returned is the filename part of a path string (contained in a Public variable named FullName). For example, if FullName is c:datamyfile.txt, the procedure returns a property value of myfile.txt. The FileNameOnly procedure is called when VBA code references the object and property.
For read/write properties, you create two procedures: a Property Get procedure (which reads a property value) and a Property Let procedure (which writes a property value). The value being assigned to the property is treated as the final argument (or the only argument) of a Property Get procedure.
Two example procedures follow:
Dim XLFile As Boolean

Property Get SaveAsExcelFile() As Boolean
    SaveAsExcelFile = XLFile
End Property

Property Let SaveAsExcelFile(boolVal As Boolean)
   XLFile = boolVal
End PropertyA Public variable in a class module can also be used as a property of the object. In the preceding example, the Property Get and Property Let procedures could be eliminated and replaced with this module-level declaration:
Public SaveAsExcelFile As Boolean
In the unlikely event that you need to create a write-only property, you create a single Property Let procedure with no corresponding Property Get procedure.
The preceding examples use a Boolean module-level variable named XLFile. The Property Get procedure simply returns the value of this variable as the property value. If the object were named FileSys, for example, the following statement would display the current value of the SaveAsExcelFile property:
MsgBox FileSys.SaveAsExcelFile
The Property Let statement, on the other hand, accepts an argument and uses the argument to change the value of a property. For example, you could write a statement such as the following to set the SaveAsExcelFile property to True:
FileSys.SaveAsExcelFile = True
In this case, the value True is passed to the Property Let statement, thus changing the property’s value.
The preceding examples use a module-level variable named XLFile that actually stores the property value. You’ll need to create a variable that represents the value for each property that you define within your class module.
A method for an object class is programmed by using a standard Sub or Function procedure placed in the class module. An object might or might not use methods. Your code executes a method by using standard notation:
object.method
Like any other VBA method, a method that you write for an object class will perform some type of action. The following procedure is an example of a method that saves a workbook in one of two file formats, depending on the value of the XLFile variable. As you can see, there is nothing special about this procedure.
Sub SaveFile()
    If XLFile Then
        ActiveWorkbook.SaveAs FileName:=FName, _
          FileFormat:=xlWorkbookNormal
    Else
        ActiveWorkbook.SaveAs FileName:=FName, _
          FileFormat:=xlCSV
    End If
End Sub
The CSVFileClass example in the next section should clarify the concepts of properties and methods for object classes defined in a class module.
Every class module has two events: Initialize and Terminate. The Initialize event is triggered when a new instance of the object is created; the Terminate event is triggered when the object is destroyed. You might want to use the Initialize event to set default property values.
The frameworks for these event handler procedures are as follows:
Private Sub Class_Initialize()
'    Initialization code goes here
End Sub

Private Sub Class_Terminate()
'    Termination code goes here
End Sub
An object is destroyed (and the memory it uses is freed) when the procedure or module in which it is declared finishes executing. You can destroy an object at any time by setting it to Nothing. The following statement, for example, destroys the object named MyObject:
Set MyObject = Nothing
The example presented in this section defines an object class called CSVFileClass. This class has two properties and two methods:
Properties:
ExportRange: (Read/write) A worksheet range to be exported as a CSV file.ImportRange: (Read/write) The range into which a CSV file will be imported.
Methods:
Import: Imports the CSV file represented by theCSVFileNameargument into the range represented by theImportRangeproperty.Export: Exports the range represented by theExportRangeproperty to a CSV file represented by theCSVFileNameargument.
CD-ROM
The example in this section is available on the companion CD-ROM. The filename is ‘csv class.xlsm’.
A class module must maintain its own private variables that mirror the property settings for the class. The CSVFileClass class module uses two variables to keep track of the two property settings. These variables are declared at the top of the class module:
Private RangeToExport As Range
Private ImportToCell As Range
RangeToExport is a Range object that represents the range to be exported. ImportToCell is a Range object that represents the upper-left cell of the range into which the file will be imported. These variables are assigned values by the Property Get and Property Let procedures listed in the next section.
The property procedures for the CSVFileClass class module follow. The Property Get procedures return the value of a variable, and the Property Let procedures set the value of a variable.
Property Get ExportRange() As Range
    Set ExportRange = RangeToExport
End Property

Property Let ExportRange(rng As Range)
    Set RangeToExport = rng
End Property

Property Get ImportRange() As Range
    Set ImportRange = ImportToCell
End Property

Property Let ImportRange(rng As Range)
    Set ImportToCell = rng
End PropertyThe CSVFileClass class module contains two procedures that represent the two methods. These are listed and discussed in the sections that follow.
The Export procedure is called when the Export method is executed. It takes one argument: the full name of the file receiving the exported range. The procedure provides some basic error handling. For example, it ensures that the ExportRange property has been set by checking the RangeToExport variable. The procedure sets up an error handler to trap other errors.
Sub Export(CSVFileName)
'   Exports a range to CSV file
    If RangeToExport Is Nothing Then
        MsgBox "ExportRange not specified"
        Exit Sub
    End If

    On Error GoTo ErrHandle
    Application.ScreenUpdating = False
    Set ExpBook = Workbooks.Add(xlWorksheet)
    RangeToExport.Copy

    Application.DisplayAlerts = False

    With ExpBook
        .Sheets(1).Paste
        .SaveAs FileName:=CSVFileName, FileFormat:=xlCSV
        .Close SaveChanges:=False
    End With
    Application.CutCopyMode = False
    Application.ScreenUpdating = True
    Application.DisplayAlerts = True
    Exit Sub
ErrHandle:
    ExpBook.Close SaveChanges:=False
    Application.CutCopyMode = False
    Application.ScreenUpdating = True
    Application.DisplayAlerts = True
    MsgBox "Error " & Err & vbCrLf & vbCrLf & Error(Err), _
      vbCritical, "Export Method Error"
End Sub
The Export procedure works by copying the range specified by the RangeToExport variable to a new temporary workbook, saving the workbook as a CSV text file, and closing the file. Because screen updating is turned off, the user does not see this happening. If an error occurs — for example, an invalid filename is specified — the procedure jumps to the ErrHandle section and displays a message box that contains the error number and description.
The Import procedure imports a CSV file specified by the CSVFileName argument and copies its contents to a range specified by the ImportToCell variable, which maintains the ImportRange property. The file is then closed. Again, screen updating is turned off, so the user does not see the file being opened. Like the Export procedure, the Import procedure incorporates some basic error handling.
Sub Import(CSVFileName)
'   Imports a CSV file to a range
    If ImportToCell Is Nothing Then
        MsgBox "ImportRange not specified"
        Exit Sub
    End If

    If CSVFileName = "" Then
        MsgBox "Import FileName not specified"
        Exit Sub
    End If

    On Error GoTo ErrHandle

    Application.ScreenUpdating = False
    Application.DisplayAlerts = False
    Workbooks.Open CSVFileName
    Set CSVFile = ActiveWorkbook
    ActiveSheet.UsedRange.Copy Destination:=ImportToCell
    CSVFile.Close SaveChanges:=False
    Application.ScreenUpdating = True
    Application.DisplayAlerts = True
    Exit Sub
ErrHandle:
    CSVFile.Close SaveChanges:=False
    Application.ScreenUpdating = True
    Application.DisplayAlerts = True
    MsgBox "Error " & Err & vbCrLf & vbCrLf & Error(Err), _
      vbCritical, "Import Method Error"
End SubTo create an instance of a CSVFileClass object in your code, start by declaring a variable as type CSVFileClass. Here’s an example:
Dim CSVFile As New CSVFileClass
You might prefer to declare the object variable first and then create the object when needed. This requires a Dim statement and a Set statement:
Dim CSVFile As CSVFileClass
' other code may go here
Set CSVFile = New CSVFileClass
The advantage of using both a Dim and a Set statement is that the object isn’t actually created until the Set statement is executed. You might want to use this technique to save memory by not creating an object if it’s not needed. For example, your code might contain logic that determines whether the object is actually created. In addition, using the Set command enables you to create multiple instances of an object.
After creating an instance of the object, you can write other instructions to access the properties and methods defined in the class module.
As you can see in Figure 29-2, the VBE Auto List Members feature works just like any other object. After you type the variable name and a dot, you see a list of properties and methods for the object.
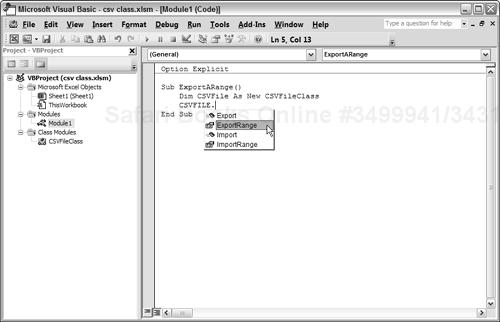
The following procedure demonstrates how to save the current range selection to a CSV file named temp.csv, which is stored in the same directory as the current workbook:
Sub ExportARange()
    Dim CSVFile As New CSVFileClass
    With CSVFile
        .ExportRange = ActiveWindow.RangeSelection
        .Export CSVFileName:=ThisWorkbook.Path & "	emp.csv"
    End With
End Sub
Using the With-End With structure isn’t mandatory. For example, the procedure could be written as follows:
Sub ExportARange()
    Dim CSVFile As New CSVFileClass
    CSVFile.ExportRange = ActiveWindow.RangeSelection
    CSVFile.Export CSVFileName:=ThisWorkbook.Path & "	emp.csv"
End Sub
The following procedure demonstrates how to import a CSV file, beginning at the active cell:
Sub ImportAFile()
    Dim CSVFile As New CSVFileClass
    With CSVFile
    On Error Resume Next

    .ImportRange = ActiveCell
    .Import CSVFileName:=ThisWorkbook.Path & "	emp.csv"
End With
If Err <> 0 Then _
    MsgBox "Cannot import " & ThisWorkbook.Path & "	emp.csv"   End Sub
Your code can work with more than one instance of an object. The following code, for example, creates an array of three CSVFileClass objects:
Sub Export3Files()
    Dim CSVFile(1 To 3) As New CSVFileClass
    CSVFile(1).ExportRange = Range("A1:A20")
    CSVFile(2).ExportRange = Range("B1:B20")
    CSVFile(3).ExportRange = Range("C1:C20")

    For i = 1 To 3
        CSVFile(i).Export CSVFileName:="File" & i & ".csv"
    Next i
End Sub