
![]()
Project 3: WordDune
How Much Do You Really See?
This project is all about looking good! That is, looking and doing it well.
The quickness of the computer often deceives the eye. We’re all quite used to thinking that we see moving images on a computer or TV screen when what we really see is very fast image manipulation and animation. In this project we use an LCD display to improve your looking skills.
The human brain is very good at pattern recognition; we can pick out a single familiar face in a crowd of hundreds of people, we can see pictures in apparently random clouds in the sky or in the flames of a fire, we can pick out somebody saying our name across a noisy room. Although we all have this ability to see order in apparent chaos, we have it in different degrees. How good are you? This game tests your ability to pick out complete words from a veritable dune of numbers, letters, and symbols. It’s a really easy game—at first: but at each level it gets more and more difficult . . . see where you reach your limit!
WordDune is a game in which actual words or phrases are semihidden in an on-screen torrent of random characters and letters. The torrent gets faster and denser at each level of the game. Your task is to spot four words which repeatedly hide among the ever-changing random characters. At the end of each level, you have to be able to say what the four words were.
Aside from the ATmega328 AVR chip, the only additional hardware for this game is a four-line LCD display and a push button. This makes this an easy project to build on the breadboard; if you want a permanent version of it, you could build it on a tripad or a strip board.
This project uses a 4x20 (4 rows by 20 columns) LCD display built around the Hitachi HD44780 LCD controller.
Example products might include the following:
- Sparkfun SKU: LCD-00256 (United States).
- Maplin Stock Number: N30AZ (UK).
- Various online auction site vendors.
I strongly recommend you solder a row of header pins to the display so that it can plug into a breadboard. Later on, if you ever decide to make a permanent version of this project you could use a socket header strip on your permanent board in which to plug in the display.
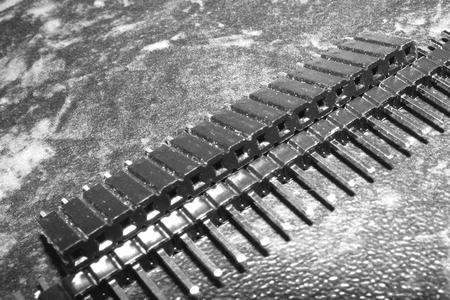
Figure 3-1. Header pin and socket strips
Suitable example products for header pins are
- Sparkfun SKU: PRT-10158 and PRT-10007 (United States).
- Maplin Stock Number: JW59P.
- The header sockets, which are usually available from various eBay vendors.
You can connect to the display by using just the lower four bits of the interface to save some MCU I/O pins and because it’s fast enough for our purposes here. I use the LiquidCrystal library—bundled with Arduino—to do the detailed display driving.
There are two ways to update the game’s dictionary (see section “WordDune Gameplay”).
- You can simply modify the word set that’s included in the code and reprogram the microcontroller—using the ISP connection.
- You can use a TTL level serial interface to use the game’s embedded command set to remove and add items. We’ll look at the command set in the section “WordDune Commands.”
Figure 3-2 shows the circuit diagram for the game.
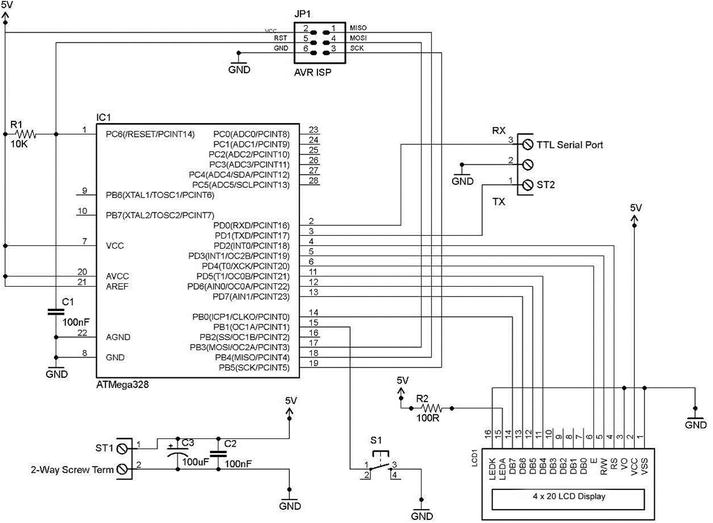
Figure 3-2. WordDune Hardware Circuit Diagram
As you can see, the WordDune hardware is pretty straightforward. The ATmega328 MCU is, as ever, center stage and is running without an external crystal, since an 8 MHz clock speed is plenty fast enough for this project. See Chapter 3 of Practical AVR Microcontrollers (Apress, 2012) for details on setting the MCU’s clock rate, if it’s not already done.
There is an ISP Jack that allows you to update the software AND the word list from your main computer. This is pretty important in this project, so whatever way you decide to build the project (strip board or breadboard) you will need this. We covered building a thing called “The test bed” breadboard in Chapter 2 of Practical AVR Microcontrollers (Apress, 2012). That section showed how to implement an ISP jack on a breadboard, using a ribbon cable to breadboard adaptor from Sparkfun.
There are two other screw terminal connectors shown. The first brings power (just +5V and ground needed): If you’re building a permanent version of this game, you might want to make ST1 (screw terminal 1) a panel-mounted female DC power socket instead: this would have to be a physical match for the plug of whatever you use as your power source (see the Wikipedia article ‘Coaxial Power Connector’ for details about DC power plugs and sockets). You could use various kinds of +5V supply, such as
- An external +5V mains supply (a so-called wall wart) capable of supplying 500 milliamps or more.
- A USB to DC power lead. This project uses only about 350 ma, so a USB port from most desktop machines can supply this, as can devices like a mains to USB power supply, or a “charge mule” (a mains charger that has its own internal battery that you can later use to charge your USB kit if you are away from a mains outlet).
- A set of three AA batteries (alkaline preferred), supplying about 4.5 volts. You would be well advised to check with the vendor of your display before committing to battery operation, however; some (but not all) LCD displays I have tried lose brightness and contrast very quickly when operated even slightly below +5V. If you are not running on +5V you could replace resistor R2 with a slightly lower value. However, you need to refer to the data sheet of the LCD display that you buy to determine a new value for a different voltage. Make certain that you don’t take the backlight LED over its maximum current, or else you will damage it. The data sheets for some LCD displays are strangely silent on the subject of maximum backlight LED current. If in doubt, 50 ma is a reasonably safe guess.
The capacitors C2 and C3 are to smooth out any fluctuations in the power supply.
The TTL level serial port (ST2) allows you connect to an external terminal emulator running in your desktop machine. Your breadboard probably already has this of course, but if not, or if you are building a keeper version of this game, take a look at the “Serial ports” discussion near the end of Chapter 3 of Practical AVR Microcontrollers (Apress, 2012) to see how to easily setup a serial channel to a desktop or laptop using a USB to TTL serial dongle.
The press button (momentary action, single pole, push to make) switch can be any switch that suits. In this application I’d advise a nice “clicky” switch that gives you strong feedback when you press it: you press the button a lot during this game, so you need something that you can be sure you have pressed. If you’re not keen on having the push-button switch mounted on the breadboard, or it doesn’t have the right connector type to plug in, you can put long leads on the switch and mount it in a small plastic box (you may find something suitable going out for recycling).
WordDune: The Build
I initially built WordDune on a breadboard. I started by installing the 4x20 LCD display (with header pins fitted) onto the breadboard on the upper side at column 40. Then, I installed tie-high and tie-low jumpers as indicated on the circuit diagram; I also installed R2. Figure 3-3 shows this stage.
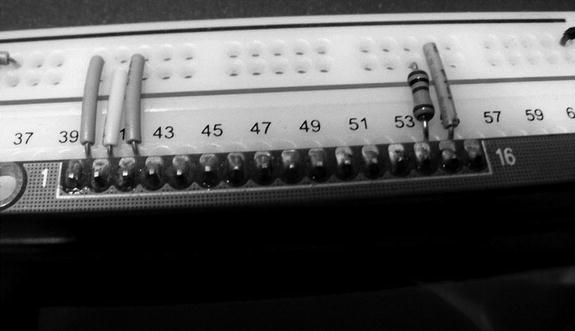
Figure 3-3. WordDune: LCD display at column 40 with ties and R2 installed
Next, I installed the seven “flying” jumpers that are required to link the signals between the MCU and the display. The photo in Figure 3-4 depicts this step.
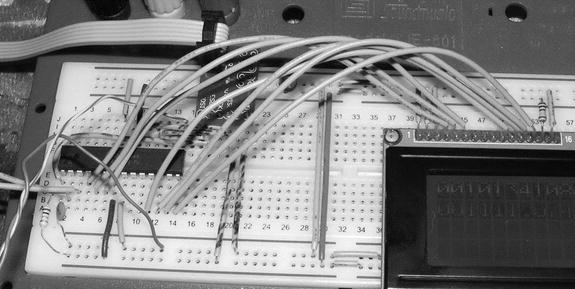
Figure 3-4. WordDune flying jumpers installed
The next step was to connect a push button S1 between ground and AVR pin 15 (see Figure 3-5). I took a button switch and soldered some wires to it (I had cut the wires out of an old CAT5 network cable). I’ve found that solid (not stranded) wires pulled out of old CAT5 cables make ideal connections because the stripped wire ends fit neatly into breadboard holes (see Figure 3-6).
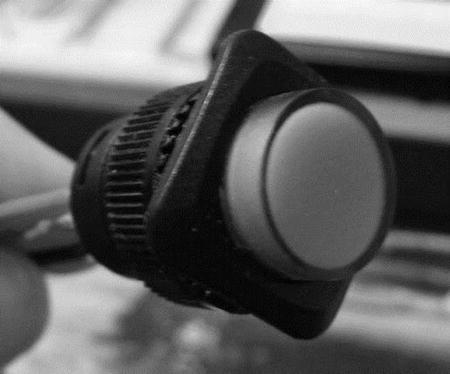
Figure 3-5. WordDune: The push button
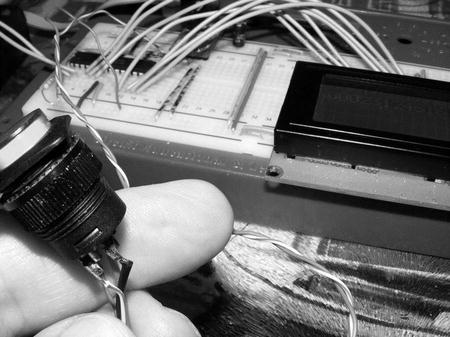
Figure 3-6. Push button wired to the breadboard
The push button I used in fact has an LED indicator in it. I haven’t used that in this version, but a spare pin on the AVR could easily be used to make the button light up to indicate times when the program is waiting for the button to be pressed. I leave this as an exercise for any reader who would like to take this extra step.
While doing the extensive testing for the game (it’s a tough job, but somebody had to do it) I did in fact get tired of the push button flopping around, so I liberated a coffee jar lid from our recycling box, cut a button-size hole in the top of it, cut a wire-size hole in the side, spray painted the whole thing black, and mounted the button into it (see Figure 3-7). Hey, presto! A much more usable button mount, All except it doesn’t any more. Who who photo-suited Nescafe out of this photo? It’s okay, I don’t care, just a surprise! (see Figure 3-8).

Figure 3-7. The coffee jar lid button mount

Figure 3-8. Button holder complete
So, for building the game on the breadboard, that’s about all there is to it!
A WordDune is a random jumble of numbers letter and symbols in which a set of four actual words is hidden, somewhere. The trouble is, this dune keeps shifting; the words appear but they are soon buried in the continuing onscreen torrent of random characters and letters. The torrent gets faster and denser at each level. You, as the player must spot the words. At the end of a level, you have to know what the four words were.
For each level, four words are randomly chosen from a list of words. You can add or remove words from this list to keep the game fresh. Each word is on screen at a random place for a few moments, four times during each level. However, as the levels progress, the onscreen time of each word gets less, and the clutter around the actual words gets denser, making it harder to spot.
The challenge is to identify the four words and—if you’re playing against others—to say them out loud before the four words are revealed at the end of the round. You can play the game in a group, or just on your own as a personal challenge.
The game has two distinct splash sequences (animated sequences that play over and over while the software is waiting for someone to start off a WordDune game). The screenshots in Figures 3-9 through 3-15 show the game in progress at various levels.
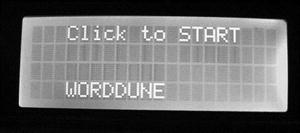
Figure 3-9. WordDune: Start prompt
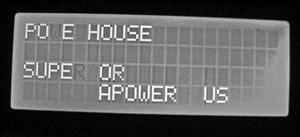
Figure 3-10. WordDune: Level 0 in progress
The first two screenshots show the start prompt that immediately follows the animated attractor sequence, and a game in progress at level 0. In level 0 words appear on the screen and are only gradually erased by spaces. It’s so easy you could do it in your sleep!
When a game level ends you get a screen like the one shown in Figure 3-11. When you click, you get shown the four words that you were searching for in the level that just completed. Then, it’s onto the next and slightly harder level. Figure 3-12 illustrates the Level 1 introducer screen.
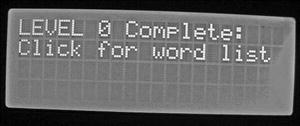
Figure 3-11. WordDune: End of level 0 screen
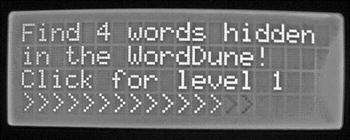
Figure 3-12. Level 1: The introducer screen
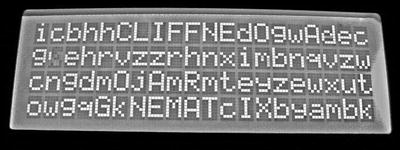
Figure 3-13. WordDune: CLIFF in lowercase soup
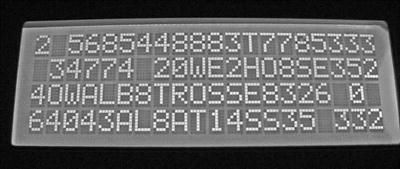
Figure 3-14. WordDune: Level 3, Albatross disappearing
As the levels progress, it gets harder to see the words, which are, first, among lowercase random letters and then later among random letters and numbers. And the words start getting overwritten faster and faster with each new level. In Figures 3-13 and 3-14, CLIFF is quite easy to spot and you can probably just about see where ALBATROSS was, but a short time ago!
So, it starts very easy, but gets harder and harder. On the easy levels it’s worth remembering that, once you’ve spotted the four words, you can terminate a level early by clicking the button (see Figure 3-15).
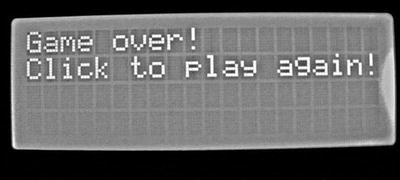
Figure 3-15. WordDune: The game end
When you have the hardware ready (as per the circuit diagram in Figure 3-1 and the build instructions) you can install the software. The installation of this software is a little unusual.
![]() Note You can download the sketch for this example at www.apress.com/9781430244462.
Note You can download the sketch for this example at www.apress.com/9781430244462.
Setting up the game proceeds in two steps.
- You first open the WordDune sketch and compile and upload it into the AVR using the usual upload method within the Arduino IDE. This, as usual, performs a chip erase before uploading (which, of course, erases the EEPROM as well as all the flash memory).
- Next, you use AVRDude to put the contents of the file WordDune_EEPROM.Hex into the AVR’s EEPROM memory. In WordDune, the EEPROM is used to hold a catalog of prompts and error messages: but the main use for it is to hold a dictionary of words that the game will use. As we shall see in the “WordDune Commands” section later on, you can add words, delete words, and list the contents of this dictionary using commands into the serial channel.
The idea of setting up the software in this way is to maximize the available space in EEPROM for the word list (which for, some reason, I misleadingly called a dictionary). The game works best when you have a large list of words. By adding new words you build up the size of the list; you can typically get about 90 words of average length into the space available in an ATmega328 EEPROM space. All words are entered and held in uppercase. If you try to enter a word that’s already in the list it will be rejected as a duplicate. The maximum length of a word is 20 characters. You start off with a default set of ten words, but you can add to or take away words and list all the current words using commands into the serial port.
The EEPROM also holds the error messages catalog and the help text that reminds you of what commands are available (see section “WordDune Commands”). We could hold all this stuff in flash memory (using PROGMEM) or we could use the unsupported EEMEM keyword in the code to specify EEPROM contents, but it’s easier (and uses completely supported Arduino functions) to do it this way.
Here is the detailed procedure for installing the game, once you have constructed the hardware. You will need the WordDune.PDE file containing the Word_Dune V3 sketch. You will need the WordDune_EEPROM.Hex file (which actually contains just raw bytes, not a hex dump). You will need to use AVRDude to upload the contents of the hex file into the AVR’s EEPROM.
First, you load up Word_Dune_V3 (see Figure 3-16) into Arduino. Press the “Upload” button to build (compile) the program and upload it into your AVR. The program itself should be approximately 15 KB in size.
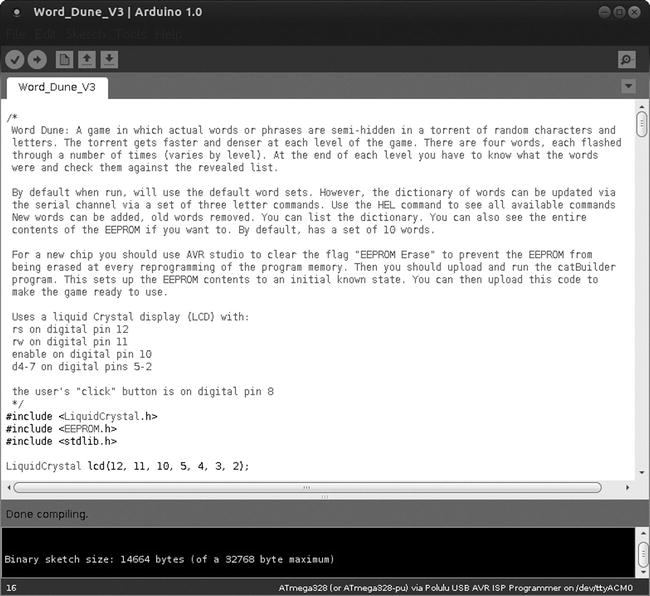
Figure 3-16. WordDune: Word_Dune_V3 sketch in Arduino
Now, start up a terminal window and execute the following AVRDude command:
avrdude –p m328 –P /dev/ttyACM0 –c avrisp2 –U eeprom:w:WordDune_EEPROM.Hex:r
You’ll need to adapt this command if you are using some other variant of AVR (e.g., an ATmega328p) and you’ll almost certainly need to change the /dev/ttyACM0 port name to whatever one you are using for your AVR programmer. For example, on a Windows system, you would use a COM port number such as COM2 instead. The section “AVRDude” in Chapter 3 of Practical AVR Microcontrollers (Apress, 2012) contains help on finding out your port number if you need it. That book’s Chapter 3 also contains help in other related areas regarding using AVRDude level MCU programming.
Once the EEPROM upload is complete (WordDune will restart after the upload because the chip is reset as the last part of that upload) you’re ready to start playing—as per the earlier game instructions.
WordDune supports a number of commands that you can issue via the TTL serial channel. When you are typing these commands, you will sometimes experience a second or so delay before the characters are echoed back; this is because the AVR is doing things on the LCD screen that delay the response. Nothing is lost; it’s just a very short delay in echoing the characters you type.
In summary,
- All commands and words are in UPPERCASE.
- You only need the first three characters of the command for it to be recognized, but you can type in the whole command if you want to (e.g., DIC or DICTIONARY will both work).
- If you make a mistake, you can use the backspace key on your keyboard to rub out characters.
- Pressing CTRL/R will show you what characters you have typed in your command so far.
- Press the return or Enter key when your command is complete.
The following table provides a list and description of each of the commands:
|
Command |
Description |
|---|---|
|
HELP |
Shows a list of all the available commands |
|
ADD [Word] |
Add a new word to the dictionary. All words will be uppercase. If word is already in the dictionary (the word list) then it will be rejected as a duplicate. If word was added, confirmation is given. The number of free characters remaining in the word list, after this word has been added, is also shown. Example: “ADD SPINNING.” |
|
DEPROM |
Show a hex dump of the entire EEPROM: shows a hex dump (hex values plus actual characters) of the EEPROM contents. This is mainly a debug feature. |
|
DICTIONARY |
Show a list of the words in the dictionary. Gives a numbered list of the currently known words. |
|
SWC |
Show Word Count—shows how many words are in the dictionary (word list). |
|
LEVEL [LevelID #] |
If used alone, just shows the current game level number. If used with an argument, sets the game level to the indicated value. Game levels number from 0 (beginner) to 6 (Impossible!) Example: “LEV 2” |
|
DELETE [Word] |
Delete the indicated word. Example: “DEL SPINNING.” |
The WordDune software comprises four blocks of data:
- The main body of code for the game. This is, as usual, stored in the flash program memory.
- A catalog of messages and prompts that the program uses to interact with and inform the user, both on the LCD screen and also via the serial channel, if active. This message catalog approach is useful because
- If messages are simply included in the main code (i.e., they just occur inline in the code in various println() function), then the strings of text comprising those messages have to be stored in the main flash memory. In the WordDune case it’s not a problem, since there is plenty of spare code space when using an ATmega328. However, where the program code body is larger, and there are more than a few messages, this can soon eat up all your code memory to the point where your software no longer fits.
You might think that you could declare the messages as static variables. However, it turns out that is an even worse alternative, since static values are held first in flash memory (as part of the program) but then they also get cached at runtime in RAM memory, which is a scarce resource on an AVR chip.
- Having the program’s messages in a catalog makes it easier to change the language the program “speaks.” If you wanted to change all the program’s messages to, for example, German, it would be quite easy to do, since most are in one place and not distributed throughout the code.
- If messages are simply included in the main code (i.e., they just occur inline in the code in various println() function), then the strings of text comprising those messages have to be stored in the main flash memory. In the WordDune case it’s not a problem, since there is plenty of spare code space when using an ATmega328. However, where the program code body is larger, and there are more than a few messages, this can soon eat up all your code memory to the point where your software no longer fits.
- The help text, which is put out to the serial port in response to a HELP command. Again this is, in MCU terms, quite a lot of data.
- The word list (called the dictionary in the software for reasons that now escape me). Although the code includes an initial set of ten words, the idea is that you will add a lot more words via serial channel commands once you have the game working.
In the WordDune implementation, the message catalog, the help text, and the word list are all held in the MCU’s EEPROM. As you will remember, this is nonvolatile but reprogrammable memory on the AVR chip which is available to store user data.
In the game setup instructions we installed a ready-made EEPROM image using AVRDude (see “Game Software Setup“). This image was actually built by another Arduino sketch called CatBuilder (available from this book’s web site, www.apress.com/9781430244462). This sketch programs the EEPROM memory from a set of text arrays. If you wanted to make alterations to the message catalog, this is where you should do it. The steps are as follows:
- Make your alterations to the data sections of CatBuilder and resave the sketch.
- Compile and upload your modified version of CatBuilder into your MCU.
- Let the modified CatBuilder run.
- Once it completes, use AVRDude to save your new EEPROM image into a new file with a descriptive name, something like
avrdude –p m328 –P /dev/ttyACM0 –c avrisp2 –U eeprom:r:WordDune_German.Hex:r(Again, you will need to adjust the port name from /dev/ttyACM0 to whatever you are using, and perhaps use a different AVR part code if you’re not using an ATmega328).
From the perspective of an Arduino sketch, the EEPROM is seen as a set of read-writable bytes, numbering from 0-n (where n is the last byte). These are accessed as follows:
EEPROM.read(x) ;   // Returns a byte value from EEPROM address x.
EEPROM.write(x,y); // Writes the byte value y into EEPROM address x.
CatBuilder fills the EEPROM space with a set of three catalog data structures, the message catalog, the help message catalog, and the dictionary (word list) catalog. The first six bytes of EEPROM contain pointers to the start address of each of these catalogs. Each pointer is a 16-bit value, stored in two bytes. Specifically, these are as follows:
- EEPROM Bytes 0&1 = EEPROM address of the message catalogue (low byte first).
- EEPROM Bytes 2&3 = EEPROM address of the help message catalogue (low byte first).
- EEPROM Bytes 4&5 = EEPROM address of the start of the dictionary (low byte first).
The format of these catalogs is very simple. They use seven-bit ASCII characters. ASCII stands for American Standard Code for Information Interchange: a standardized Western alphabet and number coding scheme. See Arduino’s help page on ASCII in the reference section or on the Wikipedia page
http://en.wikipedia.org/wiki/ASCII
Each catalog entry is a series of ASCII coded seven-bit characters, with the final character having bit 7 set, to indicate the end of the catalog entry. A byte containing 255 at what should be the start of an entry indicates the end of the catalog. The following table illustrates this arrangement.

We have only two messages “Hello You” and “Okay” in this catalog. Each of the messages is terminated by a byte with bit 7 set: bit 7 is always 0 in ASCII codes, so to indicate that a character is the last one in the string, we retain the code, but we add 128 (binary weight of bit 7) to it to show it’s the last character (as in the case of “U” and “Y” in Table 3-2). When we read the value 255 as the first byte of a message, it means we have reached the end of the catalog.
The help message is implemented as a catalog with just one single message incorporating newlines where needed, but the messages catalog and the word list/dictionary are multientry catalogs. To retrieve a message from a catalog you simply need to know the entry number (e.g., in Table 3-2, the string “Hello You” would be entry #0 and the string “Okay” would be entry #2). We’ll see how this works in more detail in the section “WordDune Sketch Code Walk”.
Although CatBuilder reserves EEPROM space for the word list/dictionary catalog, it’s actually the WordDune sketch that initializes it to the default set of words, if it hasn’t already been done.
The following code walk summarizes each of the functions within the WordDune program. Please refer to the program sources themselves, available from www.apress.com/9781430244462.
WordDune: Declarations Section
This section sets up various operation parameters and constants. Of interest might be
- DO_FORMAT which causes the EEPROM contents to be reinitialized.
- WORDS_PER_LEVEL which allows you to set more or fewer words to be spotted at each level.
- The initial set of words comes from the declaration of the array firstWords. If you don’t want to use the TTL serial channel to expand your word list you can expand this array with additional or different words and then set up the game again (as per earlier instructions).
- levelData, which is an array of values that set the timing parameters for each level of the game. See the comments embedded in the program code for what these mean.
In the setup function the serial channel is initialized, the LCD screen parameters set up, and the screen cleared. The switch port is made into an input, and the pull-up on it is enabled (by writing HIGH to it). Then, if there are no words yet in the dictionary, or DO_FORMAT is true, we format the word list area of the EEPROM. We then check if there are a usable number of words and output a message saying how many words there are using sayMessage(). The current game level is set to 0; the serial channel gets a “WordDune” prompt sent to it.
Because the game makes use of random selections at several points, we need a random element to seed the random number generator. What we do is read a value from the floating analog input 2 which will be some random value based on whatever electrical mush that input is picking up at that moment. We use that as the random seed to ensure we get different random numbers each time we play. Then, we transfer control to doSplashScreen() which does pretty stuff on the LCD screen, all the while inviting the user to click the press button to play a game. When a user does this, then, the splash screen returns control to setup(), we clear the LCD screen, and setup() ends, transferring control to the main loop().
In the main loop of the program, we select four random words (issuing an error message and going into a terminal loop if there are not enough words available to do so). Then, having selected the words, we call the level introducer, which does all the onscreen stuff to gently take a user into a game level. After waiting for the click switch to be released, we enter the main part of the level loop.
In the main part of the loop we loop around very fast, putting individual characters on the screen at random locations. To choose the individual characters, we use a switch case block, casing off the current game level, to choose a random character according to the game level: at first it’s spaces and symbols, which makes it far easier to spot complete uppercase words among them, but for the higher levels it’s a mix of lower- and uppercase letters and then eventually it’s all uppercase letters, among which it’s very hard to spot complete words. Every now and again, by seeing if a randomly generated number matches a preset value, we put one of our chosen complete words on the screen. Just before the end of each loop we check to see if the user has pressed the button. It’s part of the game spec that they don’t have to wait until the end of a level to see the list of words they were supposed to have spotted—they can end the level early if they think they already know the words. Also, at the end of each loop we check to see if there has been any input from the serial channel and we go process anything that has arrived.
When all four words have been shown for the configured number of times, the level ends. We do the levelEnd() function (which prompts the user to say what words he has spotted, and then shows him what words were actually duned during this level). We then clear the LCD screen and bump the level counter. If the level just ended was the last, highest level, the user is told game over and invited to play again and the game restarts at level 0. Otherwise we loop around again to play the next level in sequence.
Args: Size and StartByte
This function fills the indicated section of the EEPROM with all ones (0xFF). The fill operation starts from StartByte and goes on until EEPROM address Size is reached.
Args: theWord
This function appends the provided ASCII-coded word to the end of the word list (dictionary). It fails if the word already exists, if it was invalid, or if the WordList catalog is full.
Args: None
This function outputs a hex dump (Hex and ASCII format) of the EEPROM contents to the serial channel (see Figure 3-17)
.
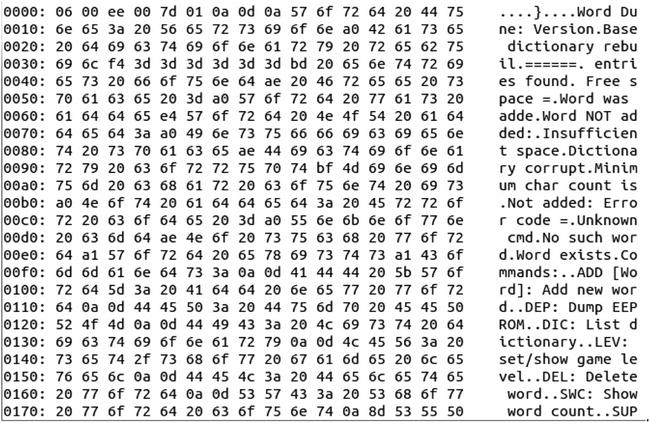
Figure 3-17. WordDune: Output from the dump EEPROM (DEP) command
The DEP command is mainly useful for debug purposes.
Args: None
This function outputs a formatted list of words in the dictionary/word list to the serial channel. Figure 3-18 illustrates the output.
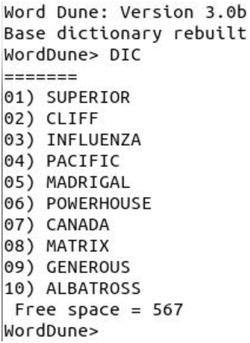
Figure 3-18. WordDune: Output from the Dictionary command
The table below describes the less major functions of the program.
|
NAME |
ARGS |
Description |
|---|---|---|
|
returnDictWordCount() |
None |
This function returns an integer indicating the number of words currently in the word list/dictionary. It can return zero, if the list is empty. |
|
getDictWord() |
wordNum, byteArray |
This function returns the wordNumth word from the list by writing it into the byte array. If there is no word at index wordNum then it returns -1 to indicate an error |
|
doInputBufferParser() |
None |
This function is called when a terminating character (return key) has been received via the serial line. This function looks at the contents of the input buffer and tries to resolve it into an actionable command. If it finds a command, it actions it with the appropriate program functions. If no match is found, it just puts out an “unrecognized command” response. |
|
processKeyboardChar() |
theChar |
Each time the serial line receives a character this function is called. If the received character is a normal printable character it is converted to uppercase (if it’s a letter), it is echoed back to the serial channel and it is placed into the next available slot in the input buffer. If it’s not a normal printable character then the function checks to see if it’s a terminator (return), in which case doInputBufferParser is called. If it’s a backspace then the rubout routine is run. If it’s CTRL/R the contents of the input buffer are echoed back out to the serial channel. |
|
sayMessage() |
catNumber, msgNumber, outMsg, doNewLine |
This function first retrieves the indicated message number from the indicated catalog. (0 = messages, 1 = help, dictionary = 2). If outMsg == true then the retrieved message is sent out to the serial channel, ending with a newline if indicated by the doNewLine arg. If outMsg is false then the message is only retrieved but nothing is done with it. This is purely to provide a debug tool for checking if a message exists. Returns an empty message if the requested message was found, or a generic error message if it was not. |
|
returnZeroPackedNumberString() |
number, desiredNumberLength |
This function returns a string representation of the indicated number front-padded with zeroes to make it up to the indicated length. So, for example, returnZeroPackedNumberString (3,3) would return “003.” Returns an empty string if there was a problem. Note: We could have used sprintf() for this, but that would have used more memory. |
|
returnFreeEEPROMSpace() |
EEPROM_LEN |
This function returns an integer indicating how many free bytes remain in the EEPROM. The arg tells it the overall size of the EEPROM (since this cannot easily be discovered dynamically). In effect, due to the way the catalogs in EEPROM are structured, the number returned from this function indicates how many more characters can be added to the dictionary/word list |
|
doDeleteWord() |
wordToZap |
This function deletes the indicated word from the dictionary/word list and fills in the empty space it leaves behind to maintain the integrity of the catalog. The argument wordToZap can be sent as “*” (asterisk) meaning delete all words. The user is appropriately prompted to confirm any delete action. The function returns true or false according to whether the word delete(s) went ahead or not. |
|
returnWordLocation() |
theWord |
This function is a utility for other functions. It returns the EEPROM offset location of a word in the catalog. Returns -1 if the word was not found. |
|
returnDictionaryBase() |
None |
This function is a utility for other functions. It returns the EEPROM address where the dictionary/word list begins. |
|
doLevelIntroducer() |
levelNumber, wordCount |
This function does all the messaging and prompting necessary to introduce the user of the game to a new level. The level number being introduced and the number of words available for use are indicated in the args. The function only returns when it detects that a user has pressed the push button. |
|
selectFourWords() |
None |
This function selects four unique words from the dictionary/word list. These are placed in the duneWords array. If there are insufficient words available it returns -1 |
|
findNumberInWordArray() |
numToFind |
Utility function used by others. Returns true if the word array already contains the indicated word number. |
|
chooseRandomWordIndexIndex() |
None |
Utility function used by others. Returns the index of a duneWord that has not yet been shown four times during the current level. |
|
returnTotalTryCount() |
None |
Utility function used by others. Returns an integer indicating how many complete words have been shown during the current level. |
|
doLevelEnd() |
None |
Utility function used by others. Does everything required at the end of a game level. Tells the user the level has ended, prompts her to click when she is ready to see the word list and then awaits a further click to proceed to next level or game end. |
|
showDuneWords() |
onSerial, onLCD, pastTense |
A function that shows the duneWords for the current level. The list of words is put out on the serial port and on to the LCD screen as indicated by the args. Uses current (words are. . .”) or past tense (“words were . . .”) according to the arg. The latter is mainly meant for debug use |
|
sayThis() |
whatToSay, onSerial, onLCD, serialGetsNewLine |
A function that puts out a message on the serial port and and/or to the LCD screen as indicated by the args. The serialGetsNewLine arg allows partial messages to be put out and subsequently appended to by others. |
|
awaitKeypress() |
timeoutMs, returnWhenPressed, digitalPinNum |
A function that will await a use key press for the indicated number of milliseconds (0 means wait forever). Returns either when the timeout period expires or when the button is pressed (returnWhenPressed == true) or when the button has been pressed and then released (returnWhenPressed == false) |
|
doSplashScreen() |
None |
Does a selection of eye-catching and pretty things on the LCD screen while waiting for the user to press the button to start a game. In arcade game terms this is an attractor sequence. |
|
fillScreenWithRandomCharacters() |
None |
A utility function used by doSplashScreen(). Does what the name suggests! |
|
doSerialInput() |
None |
Checks for an incoming character on the serial channel, if any is found calls processKeyboardCharacter to buffer the received character. It calls the input buffer parses if the character is a terminator. |
That concludes our code walk, and our description of the game WordDune. Have fun with it!
Summary
In this chapter we have looked at a game of observation called WordDune. We looked at the hardware, the game play, and the software. We looked at how you can customize the game by adding your own words to it. We also took a detailed code walk.
Coming Up Next
Project 4: The Lighting Waterfall.