
CHAPTER 7
![]()
Encapsulating and Organizing Your Code
Organizing code and making it available for people and programs to use is a key part of making the best use of F#. In this book, you’ve already seen many of the constructs to help do this: functions, objects, type definitions, modules, namespaces, and assemblies. In some cases, however, you’ve encountered these only peripherally when using the libraries that come with F#. This chapter covers these constructs from the perspective of code organization and encapsulation.
Packaging code has four distinct but related meanings:
- Organizing code into sensible entities using namespaces, types, and modules.
- Encapsulating internal data structures and implementation details by making them private.
- Assembling code and data as one component, which for F# is called an assembly. An assembly is code packaged together with supporting resources as a single, logical unit of deployment.
- Deploying one or more assemblies, for example as a Web application or using a Web-based community packaging mechanism, such as NuGET.
The first two of these topics are associated with the F# language, and the last is more associated with the pragmatics of deploying, installing, configuring, and maintaining software. The third lies in between, because a .NET assembly can act as both a unit of encapsulation and a unit of deployment. In Chapter 19, we also consider some of the different kinds of software you may write with F# and how you can organize and package your code for these different cases.
Hiding Things
In all kinds of software, it’s common to hide implementation details of data structures and algorithms behind encapsulation boundaries. Encapsulation is a fundamental technique when writing software and is possibly the most important idea associated with object-oriented programming.
For this book’s purposes, encapsulation means hiding implementation details behind well-defined boundaries. This lets you enforce consistency properties and makes the structure of a program easier to manage. It also lets an implementation evolve over time. A good rule of thumb is to hide anything you don’t want used directly by client code.
Later, this chapter explains how encapsulation applies when you’re building assemblies, frameworks, and applications. In the extreme, you may even be ensuring that your code is secure when used in partial trust mode—in other words, that it can’t be inadvertently or deliberately used to achieve malicious results when used as a library by code that doesn’t have full permissions. The most important kind of encapsulation, however, is the day-to-day business of hiding the internal implementation details of functions, objects, types, and modules. The primary techniques used to do this are:
- Local definitions
- Accessibility annotations
- Explicit signatures
We cover the first two of these techniques next, and we cover explicit signatures in “Hiding Things with Signatures” later in this chapter.
Hiding Things with Local Definitions
The easiest way to hide definitions is to make them local to expressions or constructed class definitions using inner let bindings. These aren’t directly accessible from outside their scope. This technique is frequently used to hide state and other computed values inside the implementations of functions and objects. Let’s begin with a simple example. Here is the definition of a function that incorporates a single item of encapsulated state:
let generateTicket =

    let count = ref 0

    (fun () -> incr count; !count)
If you examine this definition, you see that the generateTicket function isn’t defined immediately as a function; instead, it first declares a local element of state called count and then returns a function value that refers to this state. Each time the function value is called, count is incremented and dereferenced, but the reference cell is never published outside the function implementation, and it is thus encapsulated.
Encapsulation through local definitions is a particularly powerful technique in F# when used in conjunction with object expressions. For example, Listing 7-1 shows the definition of an object interface type called IPeekPoke and a function that implements objects of this type using an object expression.
Listing 7-1. Implementing Objects with Encapsulated State
type IPeekPoke =

    abstract member Peek : unit -> int

    abstract member Poke : int -> unit


let makeCounter initialState =

    let state = ref initialState

    {new IPeekPoke with

        member x.Poke n = state := !state + n

        member x.Peek() = !state}
The type of the function Counter is:
val makeCounter : initialState:int -> IPeekPoke
As with the earlier generateTicket function, the internal state for each object generated by the makeCounter function is hidden and accessible only via the published Peek and Poke methods.
The previous examples show how to combine let bindings with anonymous functions and object expressions. You saw in Chapter 6 how let bindings can also be used in constructed class types. For example, Listing 7-2 shows a constructed class type with private mutable state count that publishes two methods: Next and Reset.
Listing 7-2. A Type for Objects with Encapsulated State
type TicketGenerator() =

    // Note: let bindings in a type definition are implicitly private to the object

    // being constructed. Members are implicitly public.

    let mutable count = 0


    member x.Next() =

        count <- count + 1;

        count


    member x.Reset () =

        count <- 0
The variable count is implicitly private to the object being constructed and is hence hidden from outside consumers. By default, other F# definitions are public, which means they’re accessible throughout their scope.
Frequently, more than one item of state is hidden behind an encapsulation boundary. For example, the following code shows a function makeAverager that uses an object expression and two local elements of state, count and total, to implement an instance of the object interface type IStatistic:
type IStatistic<'T,'U> =

    abstract Record : 'T -> unit

    abstract Value : 'U


let makeAverager(toFloat: 'T -> float) =

    let count = ref 0

    let total = ref 0.0

    {new IStatistic<'T, float> with

          member stat.Record(x) = incr count; total := !total + toFloat x

          member stat.Value = (!total / float !count)}
The inferred types here are:
type IStatistic<'T,'U> =

  interface

    abstract member Record : 'T -> unit

    abstract member Value : 'U

  end

val makeAverager  : toFloat:('T -> float) -> IStatistic<'T,float>
The internal state is held in values count and total and is, once again, encapsulated.
![]() Note Most of the examples of encapsulation in this chapter show ways to hide mutable state behind encapsulation boundaries. Encapsulation can be just as important for immutable constructs, however, especially in larger software components. For example, the implementation of the immutable
Note Most of the examples of encapsulation in this chapter show ways to hide mutable state behind encapsulation boundaries. Encapsulation can be just as important for immutable constructs, however, especially in larger software components. For example, the implementation of the immutable System.DateTime type in the .NET BCL hides the way the date and time are stored internally but reveals the information via properties.
Hiding Things with Accessibility Annotations
Local definitions are good for hiding most implementation details. Sometimes, however, you may need definitions that are local to a type, a module, or an assembly. You can change the default accessibility of an item by using an accessibility annotation to restrict the code locations that can use a construct. These indicate what is private or partially private to a module, file, or assembly. The primary accessibility annotations are private, internal, and public:
privatemakes a construct private to the enclosing type definition/module.internalmakes a construct private to the enclosing assembly (DLL or EXE).publicmakes a construct available globally, which is the default for most constructs.
Accessibility annotations are placed immediately prior to the name of the construct. Listing 7-3 shows how to protect an internal table of data in a module using accessibility annotations.
Listing 7-3. Protecting a Table Using Accessibility Annotations
open System


module public VisitorCredentials =


   /// The internal table of permitted visitors and the

   /// days they are allowed to visit.

   let private  visitorTable =

       dict [("Anna", set [DayOfWeek.Tuesday; DayOfWeek.Wednesday]);

              ("Carolyn", set [DayOfWeek.Friday])]


   /// This is the function to check if a person is a permitted visitor.

   /// Note: this is public and can be used by external code

   let public checkVisitor(person) =

       visitorTable.ContainsKey(person) &&

       visitorTable.[person].Contains(DateTime.Today.DayOfWeek)


   /// This is the function to return all known permitted visitors.

   /// Note: this is internal and can be used only by code in this assembly.

   let internal allKnownVisitors() =

       visitorTable.Keys
The private table is visitorTable. Attempting to access this value from another module gives a type-checking error. The function checkVisitor is marked public and is thus available globally. The function allKnownVisitors is available only within the same assembly (or the same F# Interactive session) as the definition of the VisitorCredentials module. Note that you could drop the public annotations from function checkVisitor and module VisitorCredentials, because these declarations are public by default.
Accessibility annotations are often used to hide state or handles to resources such as files. In Listing 7-4, you protect a single reference cell containing a value that alternates between Tick and Tock. This example uses an internal event, a technique covered in more detail in Chapter 11.
Listing 7-4. Protecting Internal State Using Accessibility Annotations
module public GlobalClock =


    type TickTock = Tick | Tock


    let mutable private clock = Tick


    let private tick = new Event<TickTock>()


    let internal oneTick() =

        (clock <- match clock with Tick -> Tock | Tock -> Tick);

        tick.Trigger (clock)


    let tickEvent = tick.Publish


module internal TickTockDriver =


    open System.Threading


    let timer = new Timer(callback=(fun _ -> GlobalClock.oneTick()),

                          state = null, dueTime = 0, period = 100)
In Listing 7-4, the private state is clock. The assembly-internal module TickTockDriver uses the System.Threading.Timer class to drive the alternation of the state via the internal function oneTick. The GlobalClock module publishes one IEvent value, tickEvent, which any client can use to add handlers to listen for the event. The sample uses the Event type, covered in more detail in Chapter 11.
Another assembly can now contain the following code, which adds a handler to TickEvent:
module TickTockListener =

   GlobalClock.tickEvent.Add(function

       | GlobalClock.Tick -> printfn "tick!"

       | GlobalClock.Tock -> printfn "tock!")
You can add accessibility annotations in a number of places in F# code:
- On
let, andexterndefinitions in modules, and in individual identifiers in patterns- On
new(...)object constructor definitions- On
memberdefinitions associated with types- On
moduledefinitions- On
typedefinitions associated with types- On primary constructors, such as
type C private (...) = ...
![]() Note You can add accessibility annotations to type abbreviations. The abbreviation, however, is still just an abbreviation—only the name, and not the actual equivalence, is hidden. That is, if you define a type abbreviation such as
Note You can add accessibility annotations to type abbreviations. The abbreviation, however, is still just an abbreviation—only the name, and not the actual equivalence, is hidden. That is, if you define a type abbreviation such as type private label = int, then all users of the type label know that it’s really just an abbreviation for int and not a distinct type definition of its own. This is because .NET provides no way to hide type abbreviations; the F# compiler expands type abbreviations in the underlying generated .NET IL code.
Listing 7-5 shows a type in which some methods and properties are labeled public but the methods that mutate the underlying collection (Add and the set method associated with the Item property) are labeled internal.
Listing 7-5. Making Property Setters Internal to a Type Definition
open System.Collections.Generic


type public SparseVector () =


    let elems = new SortedDictionary<int, float>()


    member internal vec.Add (k, v) = elems.Add(k ,v)


    member public vec.Count = elems.Keys.Count

    member vec.Item

        with public get i =

            if elems.ContainsKey(i) then elems.[i]

            else 0.0

        and internal set i v =

            elems.[i] <- v
![]() Note In class types,
Note In class types, let bindings in types are always private to the object being constructed, and all member bindings default to public—they have the same accessibility as the type definition. This is a useful default, because it corresponds to the common situation in which internal implementation details are fully private and published constructs are available widely, and because omitting accessibility annotations makes code more readable in the common case.
Organizing Code with Namespaces and Modules
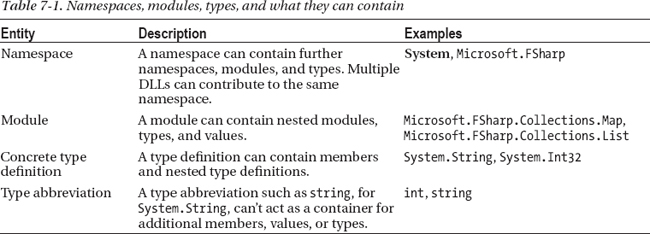
The most important organizational technique for large-scale software is giving sensible qualified names to your types and values. A qualified name is, for example, Microsoft.FSharp.Collections.List (for the F# list type) or System.IO.StreamReader (for one of the types in the .NET Framework BCL). Qualified names are particularly important when you’re writing frameworks to be used by other people, and they are also a useful way to organize your own code.
You give types and functions qualified names by placing them in namespaces, modules, and type definitions. Table 7-1 shows these three kinds of containers and what they can contain. For completeness, the table includes type abbreviations, which are slightly different, because you can’t use them as a container for other constructs.
Putting Your Code in a Module
One way to group items together with a common qualified name is to use a module. A module is a simple container for values, type definitions, and submodules. For example, here is the Vector2D example rewritten to use a module to hold the operations associated with the type:
type Vector2D =

    {DX : float; DY : float}


module Vector2DOps =

    let length v = sqrt (v.DX * v.DX + v.DY * v.DY)

    let scale k v = {DX = k * v.DX; DY = k * v.DY}

    let shiftX x v = {v with DX = v.DX + x}

    let shiftY y v = {v with DY = v.DY + y}

    let shiftXY (x, y) v = {DX = v.DX + x; DY = v.DY + y}

    let zero = {DX = 0.0; DY = 0.0}

    let constX dx = {DX = dx; DY = 0.0}

    let constY dy = {DX = 0.0; DY = dy}
Some people prefer to use classes with static members for this purpose, although modules tend to be more convenient for rapid prototyping. Modules may also contain type and submodule definitions.
Putting Your Modules and Types in Namespaces
When designing a library, it is usually better to place your code in a namespace, which can contain only types and modules. Think of this as a restricted form of module, because it is forbidden to use let bindings outside of module or type definitions. Using namespaces forces you to adopt design- and code-organization patterns that are familiar to other F#, C#, and .NET programmers.
For example, Listing 7-6 shows a file that contains two type definitions, both located in the namespace Acme.Widgets.
Listing 7-6. A File Containing Two Type Definitions in a Namespace
namespace Acme.Widgets

    type Wheel = Square | Round | Triangle

    type Widget = {id : int; wheels : Wheel list; size : string}
Most significantly, namespaces are open, which means multiple source files and assemblies can contribute to the same namespace. For example, another implementation file or assembly can contain the definitions shown in Listing 7-7.
Listing 7-7. A File Containing Two Type Definitions in Two Namespaces
namespace Acme.Widgets

    type Lever = PlasticLever | WoodenLever


namespace Acme.Suppliers

    type LeverSupplier = {name : string; leverKind : Acme.Widgets.Lever}
The file in Listing 7-7 contributes to two namespaces: Acme.Widgets and Acme.Suppliers. The two files can occur in the same assembly or in different assemblies. Either way, when you reference the assembly (or assemblies), the namespace Acme.Widgets appears to have at least three type definitions (perhaps more, if other assemblies contribute further type definitions), and the namespace Acme.Suppliers has at least one.
Hiding Things with Signatures
Every piece of F# code you write has a signature type. The inferred signature type for a piece of code is shown for every code fragment you enter into F# Interactive, and it can also be reported by using the F# command-line compiler, fsc.exe, with the -i option. For example, consider the following code, placed in an implementation file clock.fs:
module Clock


type TickTock = Tick | Tock


let ticker x =

    match x with

    | Tick -> Tock

    | Tock -> Tick
You can now invoke the command-line compiler from a command prompt:
C:UsersdsymeDesktop> fsc -i -a clock.fs


module Clock


type TickTock =

  | Tick

  | Tock


val ticker : x:TickTock -> TickTock
The inferred signature shows the results of type inference and takes into account other information, such as accessibility annotations.
If you want, you can make the inferred types explicit by using an explicit signature type for each implementation file. The syntax used for explicit signature types is identical to the inferred types reported by F# Interactive or fsc.exe, like those shown previously. If you use explicit signatures, they’re placed in a signature file, and they list the names and types of all values and members that are accessible in some way to the outside world. Signature files should use the same root name as the matching implementation file with the extension .fsi. For example, Listing 7-8 shows the explicit signature file vector.fsi and the implementation file vector.fs.
Listing 7-8. A Signature File vector.fsi with Implementation File vector.fs
// The contents of vector.fsi

namespace Acme.Collections

    type SparseVector =

        new: unit -> SparseVector

        member Add : int * float -> unit

        member Item : int -> float with get


// The contents of vector.fs

namespace Acme.Collections

    open System.Collections.Generic

    type SparseVector() =

        let elems = new SortedDictionary<int, float>()

        member vec.Add(k, v) = elems.Add(k, v)

        member vec.Item

            with get i =

                if elems.ContainsKey(i) then elems.[i]

                else 0.0

            and set i v =

                elems.[i] <- v
You can now invoke the command-line compiler from a command-line shell:
C:UsersdsymeDesktop> fsc -a vector.fsi vector.fs
![]() Note You can use signature types to hide constructs, which can be used as an alternative to giving accessibility annotations on types, values, and members. Neither accessibility annotations nor signatures can hide type abbreviations, for the reasons discussed earlier in “Hiding Things with Accessibility Annotations.” Some additional restrictions apply to both hiding techniques. For example, if a type is revealed to be a constructed class type or interface type, all of its abstract members must be included in the signature. Similarly, a record type must reveal all of its fields, and a discriminated union type must reveal all of its cases. Also, in some languages, such as OCaml, a signature may restrict the type of an implementation construct. For example, if a function is inferred to have a generic type
Note You can use signature types to hide constructs, which can be used as an alternative to giving accessibility annotations on types, values, and members. Neither accessibility annotations nor signatures can hide type abbreviations, for the reasons discussed earlier in “Hiding Things with Accessibility Annotations.” Some additional restrictions apply to both hiding techniques. For example, if a type is revealed to be a constructed class type or interface type, all of its abstract members must be included in the signature. Similarly, a record type must reveal all of its fields, and a discriminated union type must reveal all of its cases. Also, in some languages, such as OCaml, a signature may restrict the type of an implementation construct. For example, if a function is inferred to have a generic type 'a -> 'a, then in OCaml, the signature may specify a more restricted type, such as int -> int. This isn’t permitted in F#.
Designing with Signatures
Although explicit signature types are optional, many programmers like to use them, especially when writing a library framework, because the signature file gives a place to document and maintain a component’s public interface. For example, a signature file can be used to contain the “public facing” API and documentation for a library, while the implementation contains the implementation.
Using explicit signature types comes with a cost: the signature files duplicate names, documentation, attributes, and some other information found in the implementation.
When Are Signature Types Checked?
A signature file appears before the implementation file in the compilation order for the files in an F# program. The conformance between the signature type and the corresponding implementation is checked after an implementation has been fully processed, however. This is unlike type annotations that occur directly in an implementation file, which are applied before an implementation fragment is processed. This means that the type information in a signature file isn’t used as part of the type-inference process when processing the implementation.
![]() Note Each signature file must appear before its corresponding implementation file in the compilation order in an F# project. In Visual Studio, this means that the signature file must come before the implementation file in the project listing.
Note Each signature file must appear before its corresponding implementation file in the compilation order in an F# project. In Visual Studio, this means that the signature file must come before the implementation file in the project listing.
Defining a Module with the Same Name as a Type
Sometimes it is useful to have a module with the same name as one of your types. You can do this by adding an attribute to your code:
type Vector2D =

    {DX : float; DY : float}


[<CompilationRepresentation(CompilationRepresentationFlags.ModuleSuffix)>]

module Vector2D =

     let length v = sqrt(v.DX * v.DX + v.DY * v.DY)
Preventing Client Code from Opening a Module
Values in a module can be used via a long path, such as Vector2D.length. Alternatively, you can open the module, which makes all the contents accessible without qualification. For example, open Vector2D makes the identifier length available without qualification.
Modules, however, are often designed in such a way that client code should not normally “open” the module, because doing so will create too many ambiguities among various function and value names. Allowing clients to open your modules may make client code more brittle as you add new functions to your modules. For this reason, you can add an attribute RequireQualifiedAccess indicating that qualified access to the module or type is required:
[<RequireQualifiedAccess>]

module Vector2D =

     let length v = sqrt(v.DX * v.DX + v.DY * v.DY)

     let zero = {DX=0.0; DY=0.0}
The following code then gives an error:
> open Vector2D;;


error FS0892: This declaration opens the module 'FSI_0003.Vector2D', which is marked as

'RequireQualifiedAccess'. Adjust your code to use qualified references to the elements of the

module instead, e.g. 'List.map' instead of 'map'. This change will ensure that your code is

robust as new constructs are added to libraries.
Using Files as Modules
In F#, a module is a simple container for values and type definitions. Modules also often are used to provide outer structure for fragments of F# code; many of the simple F# programs you’ve seen so far in this book have been in modules without your knowing about them. In particular:
- Code fragments typed into F# Interactive and delimited by
;;are each implicitly placed in a module of their own.- Files compiled with the command-line compiler using Visual Studio or loaded into F# Interactive with
#loadhave their values and types placed in a namespace or module according to the leadingmoduleornamespacedeclaration in the file. Declarations in files without a leadingmoduleornamespacedeclaration are placed in a module whose name is derived from the name of the implementation file.
Let’s look at the second case in more detail. You can explicitly declare the name of the namespace/module for a file by using a leading module declaration. For example, Listing 7-9 defines the module Acme.Widgets.WidgetWheels, regardless of the name of the file containing the constructs.
Listing 7-9. An Implementation Module With an Explicit Initial Module Declaration
module Acme.Widgets.WidgetWheels


type Wheel = Square | Triangle | Round


let wheelCornerCount =

    dict [(Wheel.Square, 4)

          (Wheel.Triangle, 3)

          (Wheel.Round, 0)]
Here, the first line gives the name for the module defined by the file. The namespace is Acme.Widgets, the module name is WidgetWheels, and the full path to the value is Acme.Widgets.WidgetWheels.wheelCornerCount.
Automatically Opening Modules
Modules can be labeled AutoOpen, meaning they’re treated as opened whenever the enclosing namespace or module is opened. This can be useful when you’re defining ad hoc top-level operators and functions:
namespace Acme.Compenents


[<AutoOpen>]

module private Utilities =

    let swap (x,y) = (y,x)


// Note, the module is not explicitly opened, but 'swap' is accessible throughout the file

swap (3,4)
This mechanism can also be useful when designing libraries and frameworks, especially for modules holding extension members and functions. For example:
namespace Acme.NumberTheory


[<AutoOpen>]

module NumberTheoryExtensions =

    let private isPrime i =

        let lim = int (sqrt (float i))

        let rec check j =

           j > lim || (i % j <> 0 && check (j+1))

        check 2


    type System.Int32 with

        member i.IsPrime = isPrime i
In this example, the IsPrime extension property is automatically available as soon as the path Acme.NumberTheory is opened. There is then no need to open the specific extension module directly—you can simply open the enclosing namespace.
You can also attach an AutoOpen attribute to an assembly, with a string path. This means the path is opened as soon as the assembly is referenced, in the order in which the assemblies are given to the F# command- line compiler:
[<assembly:AutoOpen("Acme.NumberTheory")>]

do()
The path can be to a namespace or to a module. This last mechanism should be used rarely and diligently. It is most useful when writing a framework that configures F# as a scripting environment for a specific programming domain, because referencing an assembly can then automatically add various modules, types, functions, and extension members into the environment of the consuming code, without requiring “open” declarations in client code.
Reusing Your Code
This book has used F# Interactive for most of the samples. F# Interactive is excellent when you’re exploring a set of libraries and writing scripts or small applications that use them. As your F# programming progresses, however, you will need to venture beyond these small scripts and start to write libraries and components that are reused across multiple projects and scripts.
Using Files as Small Reusable Components
One of the simplest kinds of reusable components in F# is the “single standalone F# file with optional signature,” which we’ll call a single file component. We’ve seen examples of these earlier in this chapter, for example in Listing 7-8, showing implementation-file vector.fs and signature-file vector.fsi.
A single file component can be included in multiple assemblies simply by referencing the common file in multiple compilations. In Visual Studio, you can link to a single file from multiple projects—for example, using “Add Existing File” ![]() “Add as Link” and using Alt-Up and Alt-Down to move the file(s) to the right place in the compilation order for the project.
“Add as Link” and using Alt-Up and Alt-Down to move the file(s) to the right place in the compilation order for the project.
A single file component can be referenced from an F# Interactive script using #load, e.g.,
#load "vector.fs"
In F#, a single file may sometimes contain a very large amount of functionality, especially if accompanied by a signature file. If a single file component has a signature file, you can also refer to that in the #load, directive, e.g.,
#load "vector.fsi" "vector.fs"
A single file component may not list its dependencies in terms of other components or assemblies. This means the project that hosts the single file must list the dependencies in its references. For use from F# Interactive, however, you can place the dependencies in an accompanying script file that contains the necessary #r directives. For example, if you are using an F# wrapper for a charting library, and the wrapper is in charting.fs and charting.fsi, then it can be useful to also create a charting.fsx containing any necessary #r directives.
#load "charting.fsi" "charting.fs" "charting.fsx"
The #load directive for F# Interactive is not limited to a single file—you can include multiple signature files and implementation files in a single directive. For example:
#load "matrix.fsi" "matrix.fs" "vector.fsi" "vector.fs"
Again, the #load is only used in F# Interactive and is not valid in .fs or .fsi files.
Creating Assemblies, DLLs, and EXEs
F# Interactive is excellent when you’re exploring a set of libraries and writing scripts or small applications that use them. But to understand how to write libraries and organize other kinds of applications, you need to learn how to use the F# command-line compiler, fsc.exe, to compile your code into DLLs and EXEs. A Dynamic Link Library (DLL) is a name for library components, and .exe is the extension used for executable programs.
As you saw at the start of this chapter, all .NET code compiled to IL exists in an assembly, which is, roughly speaking, either a DLL or an EXE. Assemblies can also contain supporting code and data files. Every time you compile a set of files using fsc.exe, you create one assembly, either a DLL or an EXE. Even when you use F# Interactive (fsi.exe), you’re dynamically adding code to a dynamically generated assembly. You will now learn how to use the command-line compiler to create assemblies.
To compile code to an EXE, you call fsc.exe with the names of your source-code files in dependency order. For example, if the file dolphin.fs contains the code in Listing 7-10, then you can compile the code using fsc dolphin.fs. You can also use the -o flag to name the generated EXE.
Listing 7-10. File dolphins.fs
let longBeaked = "Delphinus capensis"

let shortBeaked = "Delphinus delphis"

let dolphins = [longBeaked; shortBeaked]

printfn "Known Dolphins: %A" dolphins
You can now compile this code to an EXE:
C:fsharp> fsc dolphins.fs

C:fsharp> dir dolphins.exe


...

18/06/2012  02:30 p.m.             4,608 dolphin.exe


C:fsharp> dolphins.exe


Known Dolphins: ["Delphinus capensis"; "Delphinus delphis"]
To compile F# code into a DLL, take one or more source files and invoke fsc.exe with the -a option. For example, let’s assume the file whales.fs contains the code shown in Listing 7-11. (This sample also includes some documentation comments, referred to in the “Generating Documentation” section later in this chapter.)
Listing 7-11. File whales.fs
module Whales.Fictional


/// The three kinds of whales we cover in this release

type WhaleKind =

    | Blue

    | Killer

    | GreatWhale


/// The main whale

let moby = "Moby Dick, Pacific", GreatWhale


/// The backup whale

let bluey = "Blue, Southern Ocean", Blue


/// This whale is for experimental use only

let orca = "Orca, Pacific", Killer


/// The collected whales

let whales = [|moby; bluey; orca|]
You can now compile the code as follows:
Here you’ve added one command-line flag: -g to generate debug output. When compiling other assemblies, you need to reference your DLLs. For example, consider the code in Listing 7-12, which needs to reference whales.dll.
Listing 7-12. File whalewatcher.fs
open Whales

open System


let idx = Int32.Parse(Environment.GetCommandLineArgs().[1])

let spotted = Fictional.whales.[idx]


printfn "You spotted %A!" spotted
You can compile this file by adding an -r flag to reference the DLLs on which the code depends. You can also use the -o flag to name the generated EXE or DLL and the -I flag to list search paths:
C:fsharp> fsc -g -r whales.dll -o watcher.exe whaleWatcher.fs

C:fsharp> dir watcher.exe


...

18/06/2012  02:48 p.m.             5,120 watcher.exe

C:fsharp> watcher.exe 1


You spotted ("Blue, Southern Ocean", Blue)!
![]() Note F# assemblies often contain a large amount of code. For example, a single assembly may contain the compiled output from as many as 30 to 50 F# source-code files. Having many small assemblies may seem tempting, but it can lead to difficulties when you’re managing updates, and it can be confusing to end users. Large assemblies are easier to version: you have to update only one component, and you can package multiple updates into a single new version of the DLL.
Note F# assemblies often contain a large amount of code. For example, a single assembly may contain the compiled output from as many as 30 to 50 F# source-code files. Having many small assemblies may seem tempting, but it can lead to difficulties when you’re managing updates, and it can be confusing to end users. Large assemblies are easier to version: you have to update only one component, and you can package multiple updates into a single new version of the DLL.
Creating and Sharing Packages
Once you have organized your code into files and assemblies, you may wish to make these available to a wider audience using a packaging and sharing mechanism. Sharing is at the heart of modern communities. Some alternatives for packaging your code for reuse and sharing are:
- NuGET. At the time of writing, one of the most popular package sharing mechanisms for F# and .NET code is NuGET, see
www.nuget.org.- Open Source Snippet Sites. Place your code on a snippet site, such as
www.fssnip.netandwww.tryfsharp.org.- Open Source Forges. Make your code a project on a forge site, such as
www.github.comorwww.codeplex.com.- Blogs and Web Sites. Make a ZIP of your code available on the Web.
- Installers. Package your code as an installer that installs local copies of components on a target machine in known locations.
- Network Drives. If using an intranet, place a copy of your code on a mounted network drive.
Summary
In this chapter, you learned about a number of techniques related to encapsulating and organizing your code, from the language mechanisms used for accessibility, encapsulation, modules, namespaces, and signatures to building assemblies and the related topics of building applications and DLLs.
The next three chapters look at some of the techniques you need to master to work with different kinds of data as you progress with learning to program in F#.