
CHAPTER 14
![]()
Building Smart Web Applications
Delivering content and applications via web browsers is one of the most important aspects of modern software development. This chapter examines how you can build web applications using F#. The topics covered are:
- Serving static files and dynamic content by directly responding to HTTP requests
- Techniques to build client-based web applications with WebSharper, the main F# web framework
- A walkthrough of the main WebSharper features, including pagelets, sitelets, formlets, and flowlets
- Using dynamic templates and sitelets to build WebSharper applications
- Building sitelets that handle different HTTP requests
- Using dependent formlets and flowlets to model user interface dependencies and wizard-like sequences of web forms
- Defining resources and attaching them to different code units
- A brief overview of developing WebSharper extensions to third-party JavaScript libraries
- Defining WebSharper proxies to extend the JavaScript translation coverage to additional .NET types
Serving Web Content the Simple Way
When you point your browser at a web page or call a web service from your application, you’re effectively issuing one or more requests (commands) to a web (HTTP) server. HTTP commands are simple text-based instructions that are automatically generated by your web browser. For instance, when your browser goes to a particular URL, it:
- Requests the page from the web server and waits for the response
- Analyzes the contents of the page in the response for further content to be fetched (images, for example), and issues the appropriate requests if necessary
- Displays the results, and executes any dynamic scripts and content contained in the page
A response can be a verbatim copy of a resource found on the web server (most often a static file such as an image, a style sheet, or a media file) or can be generated on the fly. This section shows how you can use F# to serve content directly.
Listing 14-1 shows a simple web server written directly in F#.
Listing 14-1. A Simple Web Server
open System.Net

open System.Net.Sockets

open System.IO

open System.Text.RegularExpressions

open System.Text


/// A table of MIME content types.

let mimeTypes =

    dict [".html", "text/html";

          ".htm",  "text/html";

          ".txt",  "text/plain";

          ".gif",  "image/gif";

          ".jpg",  "image/jpeg";

          ".png",  "image/png"]


/// Compute a MIME type from a file extension.

let getMimeType(ext) =

    if mimeTypes.ContainsKey(ext) then mimeTypes.[ext]

    else "binary/octet"


/// The pattern Regex1 uses a regular expression to match one element.

let (|Regex1|_|) (patt : string) (inp : string) =

    try Some(Regex.Match(inp, patt).Groups.Item(1).Captures.Item(0).Value)

    with _ -> None


/// The root for the data we serve

let root = @"c:inetpubwwwroot"


/// Handle a TCP connection for an HTTP GET request.

let handleRequest (client: TcpClient) (port: int) =

    async {

        use stream = client.GetStream()

        use out = new StreamWriter(stream)

        let sendHeaders (lines: seq<string>) =

            let printLine = fprintf out "%s
"

            Seq.iter printLine lines

            // An empty line is required before content, if any.

            printLine ""

            out.Flush()

        let notFound () = sendHeaders ["HTTP/1.0 404 Not Found"]

        let inp = new StreamReader(stream)

        let request = inp.ReadLine()

        match request with

        // Requests to root are redirected to the start page.
        | "GET / HTTP/1.0" | "GET / HTTP/1.1" ->

            sendHeaders <|

                [

                    "HTTP/1.0 302 Found"

                    sprintf "Location: http://localhost:%d/iisstart.htm" port

                ]

        | Regex1 "GET /(.*?) HTTP/1\.[01]$" fileName ->

            let fname = Path.Combine(root, fileName)

            let mimeType = getMimeType(Path.GetExtension(fname))

            if not <| File.Exists(fname) then notFound()

            else

                let content = File.ReadAllBytes fname

                sendHeaders <|

                    [

                        "HTTP/1.0 200 OK";

                        sprintf "Content-Length: %d" content.Length;

                        sprintf "Content-Type: %s" mimeType

                    ]

                stream.Write(content, 0, content.Length)

        | _ ->

            notFound()

    }


/// The server as an asynchronous process. We handle requests sequentially.

let server =

    let port = 8090

    async {

        let socket = new TcpListener(IPAddress.Parse("127.0.0.1"), port)

        socket.Start()

        while true do

            use client = socket.AcceptTcpClient()

            do! handleRequest client port

    }
You can use this code as follows, where http is the function defined in Chapter 2 for requesting web pages and where you assume the directory c:inetpubwwwroot contains the file iisstart.htm:
> Async.Start server;;

val it : unit = ()


> http "http://localhost:8090";;

val it : string = "..."   // the text of the iisstart.htm file will be shown here
This HTTP request (you can also open the previous URL in a browser) ultimately sends the following text down the TCP socket connection:
GET iisstart.htm HTTP/1.1
When started, the server in Listing 14-1 attaches itself to a given port (8090) on the local machine (which has IP 127.0.0.1) and listens for incoming requests. These requests are line-based, so when one comes in, you read the full input line and attempt to parse a valid GET request using regular expression matching. Other commands and error recovery aren’t dealt with.
The server’s actions in response are simple: it locates the requested file relative to a root web directory, determines the MIME type from a fixed table, and sends the necessary response header and content of the file through the client TCP connection. When all this is done, the connection is disposed, and the session ends. The main loop of the server task is a busy waiting loop, so you busy wait for requests indefinitely and handle them one by one.
Listing 14-1 uses two techniques not directly related to web programming:
Regex1is a simple and common active pattern for regular expression pattern matching. You learned about active patterns in Chapter 9. This example is particularly interesting because it also shows how to use a parameterized active pattern.- The value
serveris an asynchronous task, as is thehandleRequestfunction. You learned about asynchronous tasks in Chapter 11. Many web servers handle multiple requests simultaneously, and high-performance web servers use asynchronous techniques extensively. In this example, the server task serves requests sequentially using a single thread, but you can just as well start a dedicated thread for the server using more explicit threading techniques fromSystem.Threading.
While the above example may look simple, many common server-side applications are primarily TCP-based, and you can use the pattern shown above to implement many of these. For example, the following encapsulates an arbitrary TCP server:
type AsyncTcpServer(addr, port, handleServerRequest) =

    let socket = new TcpListener(addr, port)


    member x.Start() = async { do x.Run() } |> Async.Start


    member x.Run() =

        socket.Start()

        while true do

            let client = socket.AcceptTcpClient()

            async {

                try do! handleServerRequest client with e -> ()

            }

            |> Async.Start
This class can now be instantiated and developed in many ways, including more interesting applications than simple HTTP servers. For example, the code below is a simulation of a “quote server” that serves “quotes” (represented here as a blob of bytes) to a TCP client every 1 second. Because serving each quote is very simple (simply writing a few bytes to the socket), you can serve many thousands of clients simultaneously using this technique.
module Quotes =

    let private quoteSize = 8

    let private quoteHeaderSize = 4

    let private quoteSeriesLength = 3


    module Server =

        let HandleRequest (client: TcpClient) =

            // Dummy header and quote

            let header = Array.init<byte> quoteSize (fun i -> 1uy)

            let quote = Array.init<byte> quoteSize (fun i -> byte(i % 256))

            async {
                use stream = client.GetStream()

                do! stream.AsyncWrite(header, 0, quoteHeaderSize) // Header

                for _ in [0 .. quoteSeriesLength] do

                    do! stream.AsyncWrite(quote, 0, quote.Length)

                    // Mock an I/O wait for the next quote

                    do! Async.Sleep 1000

            }


        let Start () =

            let S = new AsyncTcpServer(IPAddress.Loopback,10003,HandleRequest)

            S.Start()


    module Client =

        let RequestQuote =

            async {

                let client = new TcpClient()

                client.Connect(IPAddress.Loopback, 10003)

                use stream = client.GetStream()

                let header = Array.create quoteHeaderSize 0uy

                let! read = stream.AsyncRead(header, 0, quoteHeaderSize)

                if read = 0 then return () else printfn "Header: %A" header

                while true do

                    let buffer = Array.create quoteSize 0uy

                    let! read = stream.AsyncRead(buffer, 0, quoteSize)

                    if read = 0 then return () else printfn "Quote: %A" buffer

            }

            |> Async.Start
Additionally, you should consider using secure sockets (HTTPS) for your application. Secure network programming is a vast topic, beyond the scope of this book, but the code below indicates the basic shape of an SSL server, built compositionally using a non-secure one, and indicates the .NET types you can use to implement authentication-related functionality:
open System.Net.Security

open System.Security.Authentication

open System.Security.Cryptography.X509Certificatestype


AsyncTcpServerSecure(addr, port, handleServerRequest) =


    // Gets the first certificate with a friendly name of localhost.

    let getCertficate() =

        let store = new X509Store(StoreName.My, StoreLocation.LocalMachine)

        store.Open(OpenFlags.ReadOnly)

        let certs =

            store.Certificates.Find(

                findType = X509FindType.FindBySubjectName,

                findValue = Dns.GetHostName(),

                validOnly = true)

        seq {

        for c in certs do if c.FriendlyName = "localhost" then yield Some(c)

        yield None}

        |> Seq.head


    let handleServerRequestSecure (client : TcpClient) =

        async {

            let cert = getCertficate()

            if cert.IsNone then printfn "No cert"; return ()

            let stream = client.GetStream()
            let sslStream = new SslStream(innerStream = stream, leaveInnerStreamOpen = true)

            try

                sslStream.AuthenticateAsServer(

                    serverCertificate = cert.Value,

                    clientCertificateRequired = false,

                    enabledSslProtocols = SslProtocols.Default,

                    checkCertificateRevocation = false)

            with _ -> printfn "Can't authenticate"; return()


            printfn "IsAuthenticated: %A" sslStream.IsAuthenticated

            if sslStream.IsAuthenticated then

                // In this example only the server is authenticated.

                printfn "IsEncrypted: %A" sslStream.IsEncrypted

                printfn "IsSigned: %A" sslStream.IsSigned


                // Indicates whether the current side of the connection

                // is authenticated as a server.

                printfn "IsServer: %A" sslStream.IsServer


            return! handleRequestStream stream

        }


    let server = AsyncTcpServer(addr, port, handleServerRequestSecure)


    member x.Start() = server.Start()
TCP-based applications achieve excellent scaling, and cloud-computing solutions such as Azure allow you to host your TCP-based services on a load-balanced set of machines dedicated to serving requests under one common TCP address. The modern Web is built with server-side programs following the architectures similar to those laid out above.
Building Ajax Rich Client Applications
In recent years, a new class of rich-client web applications has emerged, leading to what is commonly called the Ajax development paradigm. This is a general term for any web application that incorporates substantial amounts of code executed on the client side of the application by running JavaScript in the web browser.
You can develop Ajax applications in at least three ways using F#:
- You can manually write and serve additional JavaScript files as part of your web application. This isn’t hard, but you don’t benefit from existing frameworks.
- You can use the Ajax support via ASP.NET and develop Ajax web applications with F# code-behind files or F# library code exposed via C# or VB code-behind.
- You can use WebSharper (
http://websharper.com) to write both client and server code in F#.
Developing Ajax applications with the first two techniques follows a fairly standard path mostly independent of F#. The remainder of this section gives a brief overview of some of the core WebSharper features, including sitelets, pagelets, formlets, and flowlets.
WebSharper enables rapid, client-based web application development with F# and provides a wealth of composable primitives to build web applications from small to large-scale. These represent an extremely powerful way of writing robust, efficient, integrated client/server applications in a single, type-checked framework. In particular, WebSharper employs several advanced features of F#, the combination of which offers a unique programming experience for developing web applications:
- Client-side and server-side code are marked with custom attributes and can be authored in a single F# project. Client-side code, called pagelets, is automatically translated to JavaScript using F# quotations and reflection and is served to the client on demand. (See Chapter 17 for details on F# quotations and reflection.)
- The program runs initially as an ASP.NET-compatible server-side application, generating JavaScript code to populate and handle the interactions of the web user interface. WebSharper plays nicely with MVC (and includes project templates for it as well) and can easily be adopted to be used in conjunction with Web API as well.
- Web forms can be expressed in an extraordinarily compact form as first-class, type-safe values and are represented as formlets. They can be composed and enhanced with just a few lines of code, including adding validation and complex user interactions, and defining dependent formlets.
- Sequences of web forms, flowlets, are first-class values, providing an elegant and concise way to express larger-than-page functionality, yet remaining in Ajax space.
- The client-side code can use functionality from many .NET and F# libraries. The calls are mapped to corresponding JavaScript functionality through sophisticated techniques. You can also provide custom proxies to any .NET type, describing how to translate it to JavaScript.
- The client side may make calls to any JavaScript technology via WebSharper stubs implemented for that technology. At the time of writing, WebSharper comes with a number of extensions to various JavaScript libraries, including jQuery, jQuery UI, Google Maps, Google Visualization, ExtJS, Sencha Touch, Yahoo UI, and jQuery Mobile, among others.
- The client side may make asynchronous calls to the server using variations on the techniques described in Chapter 11.
- The resulting web applications are dramatically shorter and easier to maintain and extend, and can be readily deployed under IIS on the top of ASP.NET, or in any other ASP.NET-compatible web container.
Learning More from the WebSharper Documentation
While this section serves as a quick and somewhat thorough introduction to WebSharper and some of its features, you may want to consult the main WebSharper documentation for more details. This documentation is largely found in the main WebSharper PDF book, which sits in the /doc folder of your local WebSharper installation, or alternatively you can download it from http://websharper.com/websharper.pdf.
In addition, you can read more about the core WebSharper features such as sitelets and formlets online at http://websharper.com/docs, and you can check out the samples on the main WebSharper page. These samples come with fully annotated descriptions, the code you can copy and paste into your own projects, and you can even try them live.
Getting Started with WebSharper
WebSharper is open source and available free of charge for open source projects. It’s the recommended way of developing Rich Internet Applications (RIAs) with F#. You can grab the latest version of WebSharper from http://websharper.com/downloads.
WebSharper installs as a set of tools, most notably the F# to JavaScript compiler, and various Visual Studio project templates to build WebSharper applications. These templates, shown in Figure 14-1, come in different flavors and enable you to build WebSharper applications based on traditional ASP.NET, ASP.NET MVC, and WebSharper sitelets—and for different mobile platforms such as Android and Windows Phone. Some of these templates create single-project solutions, most notably offline sitelet projects such as the HTML Site project (see the section on offline vs. online sitelets later in this chapter). Other templates are multi-project and integrate onto standard ASP.NET web projects. For instance, the ASP.NET template creates two projects: an F# library project that contains WebSharper application code, and a web application project that exposes WebSharper site functionality via ASPX markup and includes the settings and post-processing hooks to make compiling, running, and deploying a pleasant experience. Finally, some templates come in two flavors; next to an empty application template you can find a matching sample application template as well. These make it easy to experiment with the different development approaches, such as using plain ASP.NET, MVC, or WebSharper sitelets.
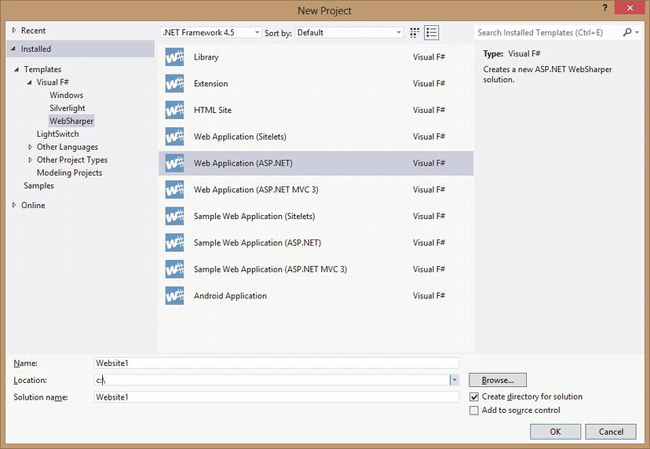
Figure 14-1. WebSharper Project Templates in Visual Studio 2010
WebSharper Pagelets
Handling user input in ASP.NET applications involves declaring server-side controls that are rendered to HTML to take input from the end user, and defining various event handlers to handle that input. You can add validators by declaring further server-side controls and connecting them with the controls they’re to validate against. Similarly, the ASP.NET controls defined in ASPX markup are paired with their event handlers either by a predefined naming convention or by connecting them via strings in the markup.
These examples of loose coupling between the various ASP.NET components easily lead to problems when you need to code more complex web applications. Furthermore, the server-centric view requires that all components be rendered to code on the server side, which then executes to produce HTML with any submission/processing event delegated to the server again, leaving little opportunity to customize interaction on the client side.
WebSharper takes a fundamentally different approach and views web applications primarily from a client-based perspective. Client-side functionality in WebSharper applications are made up of pagelets: annotated F# code that is automatically translated to JavaScript to run on the client on demand. You can combine pagelets to form larger pagelets; and you can develop full web pages and even entire web sites as a single pagelet. Pagelets that create DOM nodes can be exposed as ASP.NET server controls and composed into ASPX markup seamlessly as you will see shortly.
Consider the following simple example:
namespace Website


open IntelliFactory.WebSharper

open IntelliFactory.WebSharper.Html


[<JavaScript>]

let HelloWorld () =

    let welcome = P [Text "Welcome"]

    Div [

        welcome

        Input [Attr.Type "Button"; Attr.Value "Click me!"]

        |>! OnClick (fun e args ->

            welcome.Text <- "Hello, world!")

    ]
Here, HelloWorld defines a pagelet that returns a DOM node: a DIV tag with two child nodes. The first child node is a paragraph containing welcome text, and the second is an HTML button with “Click me!” as its title. The key thing to note here is the use of the [<JavaScript>] attribute, which defines a particular code element to be available in JavaScript and thus on the client side. The button’s click event handler is attached using OnClick, a shorthand function for Events.OnClick. Additional client-side HTML combinators are available in the IntelliFactory.WebSharper.Html namespace. These are not to be confused with their server-side HTML combinator equivalents in IntelliFactory.Html, as you will see shortly in the next sections describing WebSharper sitelets. Each combinator takes a sequence of DOM nodes or a sequence of attributes. If both are required, you can use the -< combinator, such as:
Div [Attr.Class "your-css-class"] -< [ … ]
Your pagelets can be embedded into ASP.NET markup directly, provided that you wrap them into ASP.NET server-side controls:
type MyControl() =

    inherit Web.Control()


    [<JavaScript>]

    override this.Body = HelloWorld () :> _
Here, the IntelliFactory.WebSharper.Web.Control type you are inheriting from is a subclass of System.Web.UI.Control, and it includes a Body member that bootstraps your pagelet when it is embedded into ASP.NET markup or used in a WebSharper sitelet, as you will see in the sections below. Among others, this control type, along with the WebSharper script manager control, acts as a conduit between server and client-side code; it ensures that any client-side dependencies are correctly tracked and included (see the section later in this chapter on resource dependencies), and computes and injects the DOM structure into the containing page. Roughly speaking, it renders a “skeleton” DOM node into the output, which “comes alive” once its associated scripts and tracked dependencies start executing on the client.
To be able to add this WebSharper pagelet to your ASPX markup, your web.config file has to contain a controls declaration for your assembly that contains it. In the Visual Studio templates that come with WebSharper, the F# assembly that contains sitelet code (by default, called Website.dll) is preconfigured in web.config as follows:
<configuration>

  <system.web>

    <pages>

      <controls>

        <add tagPrefix="WebSharper"

             namespace="IntelliFactory.WebSharper.Web

             assembly="IntelliFactory.WebSharper.Web" />

        <add tagPrefix="ws"

             namespace="Website"

             assembly="Website" />

      </controls>

...
With these set up, you can embed your MyControl pagelet into your ASPX markup as follows:
<html xmlns="http://www.w3.org/1999/xhtml">

  <head runat="server">

    <title>Your WebSharper Application</title>

    <WebSharper:ScriptManager runat="server" />

  </head>

  <body>

    <ws:MyControl runat="server"/>

  </body>

</html>
Note how you included the WebSharper script manager control in the <head> section as well. This server-side control tracks resource dependencies for all WebSharper pagelets contained in your ASPX page and injects these dependencies into the HTML content served back from the server. You can read more about WebSharper’s resource tracking and dependency handling later in this chapter.
Calling Server Code from the Client
While you can develop fully client-based (that is, all-JavaScript) applications with WebSharper, and indeed they are a very promising breed of applications, especially considering the opportunities in the mobile space, a more likely scenario is building client-server applications, where the client is actively using services or data obtained from the server either through pulling or asynchronous calls, or being pushed to using various reactive means. The common pattern in these applications is that once a page is served, it contains client-side code that implements application logic and makes occasional calls back to the server on demand. The general trend is to move as much functionality as possible to the client, yielding highly interactive, client-based applications that use clever client-side techniques and make occasional server calls only when they need to.
You can define server-side functionality, such as functions to fetch data from server files or databases as easily as you define client-side code. Server-side functions can be exposed as web services or defined to execute over RPC. RPC functions can be called from client-code seamlessly; the communication protocol is automatically inserted and is implemented by the WebSharper runtime as JavaScript code. The following skeleton code shows the necessary annotations:
module YourWebApplication =

    open IntelliFactory.WebSharper


    module Server =


        [<Rpc>]

        let YourServerFunction (...) =

            ...


    module Client =


        [<JavaScript>]

        let YourClientFunction (...) =

            ...

            let data = Server.YourServerFunction (...)

            ...
One rule of thumb: be sure to add your client and server code into separate F# modules for better readability. Mixing the two in a single module is possible, but adds an extra constraint: all your client-side bindings and pagelets must be functions, e.g., you can’t have top-level client-side value bindings.
WebSharper Sitelets
So far, you have seen how you can serve dynamic, client-side functionality wrapped in ASP.NET server-side controls and embedded directly into ASPX markup. WebSharper also offers a fundamentally different way to construct web applications using sitelets. WebSharper sitelets enable you to serve content without requiring a containing ASPX page, and instead let you programmatically define entire web sites in F# in a type-safe, robust, and composable way. They also provide automatic resource tracking within pages, safe URLs (computed URLs that never go out of sync), a closed representation of the entry points to your web applications, and a whole host of other useful features.
For instance, the following defines a single-page sitelet:
namespace Website


module OnePageSite =

    open IntelliFactory.Html

    open IntelliFactory.WebSharper.Sitelets


    type Action = | MyPage


    module Pages =

        let MyPage =

            Content.PageContent <| fun ctx ->
                {

                    Page.Default with

                        Title = Some "My page"

                        Body =

                            [

                                H1 [Text "Hello world!"]

                            ]

                }


    let EntireSite = Sitelet.Content "/" Action.MyPage Pages.MyPage


    type Website() =

        interface IWebsite<Action> with

            member this.Sitelet = EntireSite

            member this.Actions = []
Above, first, you define an Action type that contains a union case for the single page in your application. This Action type is the key to understanding sitelets: it is the type that describes the interface to the outside world by providing a discriminated union for every “entry point” in your web application. A sitelet and all of its content (for example, Pages.MyPage above) then is parameterized over a given Action type. This is reflected in the type of EntireSite, which is Sitelet<Action>.
Note how you defined the content served back on various entry points. The above sitelet serves a single entry point: “/”, e.g., the root of the application, maps it to the Action.MyPage action, and serves the content Pages.MyPage as a result. Note that both the action and the response content can be parameterized to provide flexibility in handling various request parameters. See the sections below about defining content in different shapes, and about composing sitelets into larger, more complex ones.
Once you defined your sitelet value, you can formally declare it as a web application by marking your assembly with the Sitelets.Website attribute and giving the type of your sitelet to be served as a top-level application:
open IntelliFactory.WebSharper


[<assembly : Sitelets.Website(typeof<OnePageSite.Website>)>]

do ()
An assembly with the Sitelets.Website attribute is then processed by the sitelet handler configured in your application’s web.config file, provided that you started your project based on one of the standard WebSharper sitelet project templates.
Online vs. Offline Sitelets
You may often see references to offline sitelets, for instance in HTML Site projects and mobile web projects for Android or Windows Phone (see Chapter 15). An offline sitelet is a rendered form of a sitelet, containing all HTML and JavaScript code used by that sitelet. In short, you can take an offline sitelet and view it in a web browser without having to serve and generate the content by a web server.
The most fundamental examples of offline sitelets are the applications you can develop using the HTML Site project template. These applications consist of 100% client-side code without an active server component. They can make calls to web services or involve other forms of dynamism, but their content is rendered into pure HMTL and JavaScript when these applications are compiled.
Offline sitelets are useful from a number of perspectives. First, the offline sitelet-based applications you develop can be served by any web container, without having to pin yourself to an ASP.NET-compatible web server such as IIS. Second, they provide the vehicle to develop self-contained mobile applications, a topic you will learn about in Chapter 15.
Online sitelets, in contrast, involve an active server-side component that responds to client queries issued over RPC. These sitelets can also be rendered into HTML and JavaScript, and packed into native mobile applications; however, their active server-side must also be available for these applications to work properly.
Serving Content from WebSharper Sitelets
In the example above, you constructed an HTML response using Content.PageContent, one of the union cases of the IntelliFactory.WebSharper.Sitelets.Content<_> type, a type that provides an abstraction for the content of server responses. This case is appropriate when you need to construct an ordinary HTML response, such as a web page with standard headers and content you define. To help assemble such standard HTML responses, WebSharper provides the IntelliFactory.WebSharper.Sitelets.Page type. This type encapsulates the basic features of an HTML page in a record type and provides a Default member to give a default implementation:
/// Represents HTML pages with embedded WebSharper controls.

type Page =

    {

      Doctype  : string option

      Title    : string option

      Renderer : string option -> string option -> Writer -> Writer -> HtmlTextWriter -> unit

      Head     : Element<unit> seq

      Body     : Element<Control> seq

    }


    static member Default =

        {

          Doctype = Some "<!DOCTYPE html>"

          Title = None

          Head = []

          Renderer = ...

          Body = []

        }
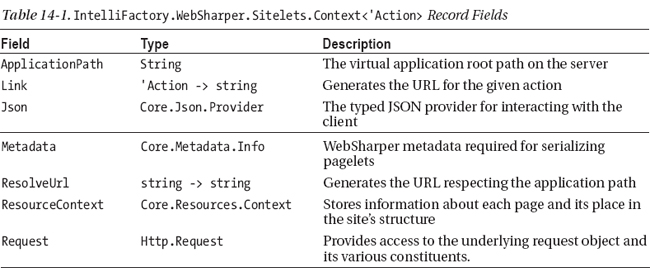
As in the example in the previous section, you can use Page.Default and override the fields you need to, most often the Title and Body of your page. The anonymous function passed to Content.PageContent takes a context parameter of type Context<Action>, where Action is the same action type that your sitelet and its response contents are parameterized over. You can use this context parameter to construct context-sensitive markup, such as using information available from the request or via important functions such as Link or ResolveUrl. These and the other Context<_> fields are summarized in Table 14-1.
Often times, you may need to construct non-HTML content for a response. For these situations, you can use Content.CustomContent, a Content constructor that takes a function returning an Http.Response value. This type is defined as a record type that provides all the necessary tools to cater to any kind of an HTTP response:
//// Represents HTTP responses

type Response =

    {

        Status    : Http.Status

        Headers   : Http.Header seq

        WriteBody : System.IO.Stream -> unit

    }
Here, Status is the HTTP status code returned (normally, you want to return Http.Status.Ok, but other often-used codes are available as well), Headers contains the HTTP headers returned with the response to instruct the requesting clients about treating the response in various ways, and WriteBody is the function responsible for writing the response from a System.IO.Stream value.
An example for returning content and triggering a Save As… dialog box with myfile.zip is:
Content.CustomContent <| fun ctx ->

    let cd = "attachment; filename="myfile.zip""

    {

         Status = Http.Status.Ok

         Headers = [Http.Header.Custom "Content-Disposition" cd]

         WriteBody = ...

    }
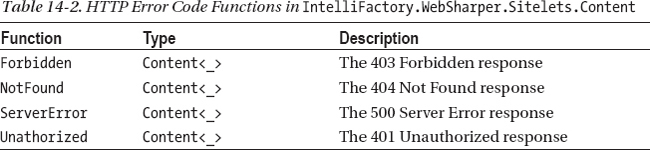
Next to using the two Content constructors, PageContent and CustomContent, you can also return various standard HTTP error codes using shorthand functions in the IntelliFactory.WebSharper.Sitelets.Content module; these are summarized in Table 14-2.
Using Dynamic Templates
Next to outputting all markup programmatically, WebSharper also provides templating facilities that enable you to externalize some or all of your markup into template files. These are typically easier to work with, as your design team can provide them separately or make stylistic changes on demand without affecting the code that is embedded into these templates.
As a historic note, WebSharper included static templating until version 2.4. Static templates were automatically translated to F# code by a Visual Studio add-in upon editing, and provided a type safe mechanism to instantiate templates programmatically. As of the current version of WebSharper, however, static templates are no longer supported; instead you should consider using dynamic templates as outlined below.
Dynamic templates plug in directly into the server-side sitelet content infrastructure, and generate values of Content<'T> similarly to Content.PageContent and Content.CustomContent. The main ingredients are templates defined with a set of content holes and Content.WithTemplate to fill these holes with actual content. Dynamic templates are created and instantiated at runtime, without static guarantees about their structure and content. This has the obvious disadvantage that templates may be incorrect and incompatible when filled with the content that your application intends to serve, but they have the flexibility to change markup dynamically, without requiring recompilation (as opposed to the now-obsolete static templates), greatly reducing the time it takes to go through various design iterations.
To use dynamic templates, you first need to define a record type to hold the content your template will be instantiated with. For instance, the following defines a Placeholders type for two placeholders and a MainTemplate template (of type Content.Template<Placeholders>) defined over this placeholder type that serves a local MyTemplate.html file with two content holes “title” and “body” defined within (you will see shortly how) instantiated from an eventual placeholder value:
open System.IO

open IntelliFactory.WebSharper.Sitelets


module MySite =

    open IntelliFactory.WebSharper

    open IntelliFactory.Html


    // Your sitelet action type

    type Action =

        | Home


    module Skin =

        type Placeholders =

            {

                Title : string

                Body : list<Content.HtmlElement>

            }


        let MainTemplate =

            let path = Path.Combine(__SOURCE_DIRECTORY__, "MyTemplate.html")

            Content.Template<Placeholders>(path)

                .With("title", fun x -> x.Title)

                .With("body", fun x -> x.Body)


        let WithTemplate title body : Content<Action> =

            Content.WithTemplate MainTemplate <| fun context ->
                {

                    Title = title

                    Body = body context

                }
The last function, Skin.WithTemplate takes a value for a title and a list of server-side HTML elements representing the body of the page, and calls Content.WithTemplate to instantiate MainTemplate with them, returning a Content<Action> value representing the assembled content. You can use these content values to build sitelet pages as you saw in the earlier sections.
A quick look in the imaginary template.html file that you are serving reveals the main dynamic templating elements:
<!DOCTYPE html>

<html>

  <head>

    <title>${title}</title>

    <meta name="generator" content="websharper" data-replace="scripts" />

  </head>

  <body>

    <div data-hole="body"></div>

  </body>

</html>
Here, you can see the main placeholder variants that WebSharper dynamic templates support:
- A
<div>tag called"body"defined indata-holemode. This mode causes the content of the placeholder to be added underneath/inside the annotated node. The content inserted must be a list of server-side HTML elements.- A
<meta>tag in the<head>section of the document, usingdata-replacemode. This mode causes the content of the placeholder to be added in place of the annotated node, in other words, replacing it. Here, the special name"scripts"is used to instruct WebSharper to embed the tracked resources and dependencies of the page, if any. Content inserted intodata-replacenodes must be a list of server-side HTML elements.- A string placeholder called
"title", using the special syntax${title}. As you may expect, content inserted into string placeholders must be strings.
As you see from the example, dynamic templates are also typed (albeit only weakly), and checking that inserted content is of the right type is done at the time the template is instantiated. Various other checks are performed at this time as well, such as checking for uninstantiated placeholders, resulting in a runtime error if things don’t match up. You will see examples using dynamic templates later in this chapter and in Chapter 15.
Embedding Client-Side Controls in Sitelet Pages
Client-side controls (pagelets) can be embedded into sitelet Content values directly, wrapped in a parent DOM node. Here is an example of embedding the Hello World control MyControl you saw earlier in this chapter into the dynamic template you defined in the previous section:
Formlets, as you will see shortly, can also be similarly embedded.
Constructing and Combining Sitelets
Building sitelets from smaller sitelets is a fundamental operation used in nearly all sitelet-based WebSharper applications. The most basic sitelet serves a response for a GET HTTP command at a given URL, for instance in the example above:
let EntireSite = Sitelet.Content "/" Action.MyPage Pages.MyPage
This constructs a sitelet over the Action type, which serves Pages.MyPage when the root path is requested. As you saw in the previous section, you have a number of alternatives for constructing responses, including basic HTML markup, non-HTML content, and various error codes.
Another important sitelet primitive is available for constructing protected sitelets, e.g., sitelets whose contents are protected until a requesting user logs in and possibly some further condition holds. Building upon our running example, you can update the Action type for your sitelet to introduce three more action cases: one for a protected page, and one for logging in and logging out. The Login case also takes an optional Action value that will be used to redirect the user after logging in:
module MySite =

    open IntelliFactory.Html

    open IntelliFactory.WebSharper.Sitelets


    type Action =

        | MyPage

        | Protected

        | Login of Action option

        | Logout
The contents you serve for these action cases are expanded as well; here you use a new helper function Utils.SimpleContent to construct simple HTML content with Login/Logout facilities prefixed:
    module Pages =


        /// A helper function to create a hyperlink.

        let ( => ) title href = A [HRef href] -< [Text title]


        /// A helper function to create a 'fresh' URL with a random parameter

        /// in order to make sure that browsers don't show a cached version.

        let R url =

            url + "?d=" +

                System.Uri.EscapeUriString (System.DateTime.Now.ToString())


        module Utils =


            let SimpleContent title content =

                Content.PageContent <| fun ctx ->

                    { Page.Default with

                        Title = Some title

                        Body =
                          [

                            match UserSession.GetLoggedInUser() with

                            | None ->

                                yield "Login" => ctx.Link (Action.Login (Some Action.MyPage))

                            | Some user ->

                                yield "Log out ["+user+"]" => R (ctx.Link Action.Logout)

                          ] @ content ctx

                    }


        let MyPage =

            Utils.SimpleContent "My Page" <| fun ctx ->

                [

                    H1 [Text "Hello world!"]

                    "Protected content" => R (ctx.Link Action.Protected)

                ]


        let ProtectedPage =

            Utils.SimpleContent "Protected Page" <| fun ctx ->

                [

                    H1 [Text "This is protected content!"]

                    "Go back" => (ctx.Link Action.MyPage)

                ]


        let LoginPage action =

            Utils.SimpleContent "Login Page" <| fun ctx ->

                let redirectUrl =

                    match action with

                    | None ->

                        Action.MyPage

                    | Some action ->

                        action

                    |> ctx.Link

                    |> R

                [

                    H1 [Text "You have been logged in magically..."]

                    "Proceed further" => redirectUrl

                ]
Now you can build two sitelets, one for the non-protected and one for the protected parts of your application, and combine them to form the complete web application. For constructing the former, you can use the handy sitelet constructor Sitelet.Infer, which creates a sitelet from an Action to Content<Action> mapping, greatly reducing the effort necessary to define larger sitelets:
    let NonProtected =

        Sitelet.Infer <| function

            | Action.MyPage ->

                Pages.MyPage

            | Action.Login action->

                // Log in a user as "visitor" without requiring anything

                UserSession.LoginUser "visitor"

                Pages.LoginPage action
            | Action.Logout ->

                // Log out the "visitor" user and redirect to home

                UserSession.Logout ()

                Content.Redirect Action.MyPage

            | Action.Protected ->

                Content.ServerError
The price you pay for not having to stitch together single-response Sitelet.Content values is losing the ability to control the URL space for your resulting sitelet, e.g., observe how Sitelet.Infer does away with you having to specify what URLs are matched with content. Instead, Sitelet.Infer, as its name suggests, infers these URLs from the names of the corresponding Action cases, and creates unique URLs such as /MyPage, /Login/…, /Logout, and /Protected automatically. You can also manually override the URL (without any trailing slashes) for an Action case by annotating it with the CompiledName attribute as shown in the following snippet:
    type Action =

        | [<CompiledName "home">] MyPage

        | Protected

        | Login of Action option

        | Logout
This will cause the URL for MyPage to be /home. One of the many advantages of WebSharper sitelets is this ability to automatically manage URLs and use action values instead for referring to concrete entry points that may otherwise go out of sync as development progresses. Therefore, as a best practice, you should always use the Link member (see Table 14-1 above) on your WebSharper context to compute URLs instead of hardcoded string values.
Note that above, NonProtected needs to match all Action cases, even the protected one, for which you are returning a 500 server error response. This response would be raised if you don’t provide an alternate response earlier in the request serving pipeline. To set that alternate response up, you can define a protected sitelet for handling requests to the page that you want to protect (Pages.ProtectedPage):
    let Protected =

        let filter : Sitelet.Filter<Action> =

            {

                VerifyUser = fun _ -> true

                LoginRedirect = Some >> Action.Login

            }


        Sitelet.Protect filter <|

            Sitelet.Content "/protected" Action.Protected Pages.ProtectedPage
These lines define a new response available at /protected, serving the Action.Protected action with the content Pages.ProtectedPage. In addition, this response is protected with a Sitelet.Filter value defined over the same action space. This filter requires that the requesting user is logged in. In addition, you can impose further conditions by giving a user predicate in VerifyUser. In this example, no additional filtering is defined and we allow any logged in user to proceed. When the filter determines that the protected content can’t be served (e.g., there is no logged in user or the VerifyUser predicate fails), it redirects to the action specified by LoginRedirect, which maps the current protected action to the one where you want to redirect to for logging in (note the use of the forward composition operator >> to wrap this action into an option first). In our example, Action.Login takes an optional Action parameter, making it a suitable solution to divert to the login page with a return URL.
For the above to work, you need to combine the non-protected and the protected parts of your application by “summing” the corresponding sitelets, and making sure that Protected appears first so that no 500 server error response is raised by NonProtected when requesting the protected page. You can sum several sitelets using the <|> operator, or alternatively the Sitelet.Sum combinator:
let EntireSite = Protected <|> NonProtected
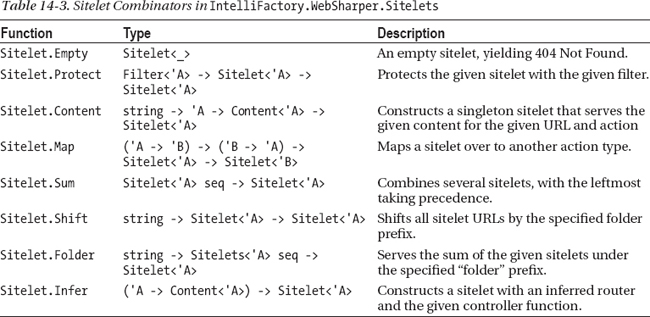
Next to Sitelet.Content, Sitelet.Protected, <|> and Sitelet.Sum, there are a number of other useful sitelet combinators in the IntelliFactory.WebSharper.Sitelets namespace. These are summarized in Table 14-3.
Sitelet Routers and Controllers
WebSharper sitelets provide a powerful abstraction for representing web applications as F# values. They are based on two encapsulated concepts: routers and controllers. Routers are functions responsible for mapping incoming requests to sitelet actions and linking/resolving these actions back to URLs. Ideally, these should form a bijection between requests and actions, except in the cases of non-GET requests.
Controllers are functions mapping sitelet actions to actual content. As you saw in the earlier sections, you can assemble this content in various ways and provide for standard HTML or other server responses, and error codes.
You will see an example of defining routers and controllers manually in the next section. You can also consult the WebSharper documentation for more examples and other utilities that WebSharper provides to work with routers and controllers.
Constructing Sitelets for Handling Non-GET HTTP Commands
Often times, you may need to construct sitelets that respond to non-GET HTTP commands, for instance to implement REST interfaces. As you saw in the previous sections, Sitelet.Infer and Sitelet.Content create sitelets that respond to GET requests, and in turn they abstract away the details that would otherwise be necessary to extend their coverage to other HTTP commands. You can nonetheless tap into the underlying routers and controllers to implement coverage for non-GET scenarios.
In this section, you will walk through the steps required to develop a small application to manage a set of orders and implement a simple REST API to manage these orders. This application consists of two main pages: one for adding a new order, and one for listing all past orders. These are accessible via regular GET requests at /create and /orders, respectively. The rest of the functionality is exposed via POST/PUT/DELETE requests, to create, update, and delete orders, respectively.
To get started, you may want to create an empty sitelet-based WebSharper solution. You will be updating the Main.fs and the Main.html files within this solution for this sample. In Main.fs, first, you create the Order type that represents orders. To keep things simple, your representation will cover an item name and ordered quantity only, although extending these fields to cover a realistic set of order attributes is straightforward.
namespace Website


type Order =

    {

        ItemName : string

        Quantity : int

    }

    static member Dummy() =

        { ItemName = "N/A"; Quantity = 0 }
Next, you implement a basic Orders store where orders are stored. This store provides an API to generate IDs (using a private mutable reference cell to keep track of the last ID assigned), save, update and delete orders, and find them by IDs. In a real-life application, you would want to save orders into a database or some other form of persistent storage.
module Orders =

    let private id = ref 0

    let Store = ref Map.empty


    let Save (id: int) (order: Order) =

        Store := (!Store).Add(id, order)


    let FindById (id: int) =

        if (!Store).ContainsKey id then

            Some <| (!Store).[id]

        else

            None


    let Delete (id: int) =

        if (!Store).ContainsKey id then

            Store := (!Store).Remove id


    let GetId () =

        id := !id + 1

        !id
You now can create a sitelet action type that enumerates the various entry points to your application, providing a conceptual mapping between the different functionalities and actions.
open IntelliFactory.WebSharper
type Action =

    | CreateOrderForm

    | CreateOrder of Order

    | DeleteOrder of int

    | GetOrder of int

    | ListOrders

    | UpdateOrder of int * Order
Here, CreateOrderForm and ListOrders correspond to the order creation and listing pages, whereas the other actions represent the REST API you are providing. Note that these actions carry strongly-typed Order values when they need to.
Your application will use dynamic templating based on the main.html file in the root of your web application project, and you will use the helper functions you saw in earlier sections already:
module Skin =

    open System.Web

    open IntelliFactory.Html

    open IntelliFactory.WebSharper.Sitelets


    let TemplateLoadFrequency = Content.Template.PerRequest


    type Page = { Body : list<Content.HtmlElement> }


    let MainTemplate =

        let path = HttpContext.Current.Server.MapPath("~/Main.html")

        Content.Template<Page>(path, TemplateLoadFrequency)

            .With("body", fun x -> x.Body)


    let WithTemplate body : Content<Action> =

        Content.WithTemplate MainTemplate <| fun context ->

            {

                Body = body context

            }
Note how the title placeholder was removed from the sample template to make things a tiny bit shorter. You should also modify your Main.html file accordingly:
<!DOCTYPE html>

<html>

  <head>

    <meta name="generator" content="websharper" data-replace="scripts" />

  </head>

  <body>

    <div data-hole="body" />

  </body>

</html>
To continue in Main.fs, you can build a simple formlet to gather the order information from the user. You will learn about WebSharper formlets in the next section, for now just observe the clarity and progressive enhancement you can apply in building this formlet.
module Client =

    open IntelliFactory.WebSharper.Formlet
    open IntelliFactory.WebSharper.Html


    [<JavaScript>]

    let OrderForm orderPostUrl =

        Formlet.Yield (fun title qty -> { ItemName = title; Quantity = qty })

        <*> (Controls.Input ""

            |> Validator.IsNotEmpty "Must enter a title"

            |> Enhance.WithTextLabel "Title")

        <*> (Controls.Input ""

            |> Validator.IsInt "Must enter a valid quantity"

            |> Formlet.Map int

            |> Enhance.WithTextLabel "Quantity")

        |> Enhance.WithSubmitAndResetButtons

        |> Enhance.WithErrorSummary "Errors"

        |> Enhance.WithFormContainer

        |> Enhance.WithJsonPost

            {

                Enhance.JsonPostConfiguration.EncodingType = None

                Enhance.JsonPostConfiguration.ParameterName = "order"

                Enhance.JsonPostConfiguration.PostUrl = Some orderPostUrl

            }


    type OrderFormControl(orderPostUrl: string) =

        inherit Web.Control()


        [<JavaScript>]

        override this.Body =

            Div [

                OrderForm(orderPostUrl)

            ] :> _
Here, the OrderForm function and the encapsulating OrderFormControl server control takes the URL to where your formlet will send a POST request with an Order record embedded in the request variables under the "order" parameter. This URL will be computed when you construct the various pages in your sitelet. First, let’s begin with the create order page:
module Pages =

    open IntelliFactory.Html


    let ( => ) text url =

        A [HRef url] -< [Text text]


    let Links (ctx: Context<Action>) =

        UL [

            LI ["Home" => ctx.Link Action.ListOrders]

            LI ["New"  => ctx.Link Action.CreateOrderForm]

        ]


    let CreateOrderFormPage =

        Skin.WithTemplate <| fun ctx ->

            [
                H1 [Text "Create order"]

                Links ctx

                HR []

                Div [

                    new Client.OrderFormControl(

                        Order.Dummy() |> Action.CreateOrder |> ctx.Link

                    )

                ]

            ]
This page displays a basic menu and the order creation form. The URL passed here for creating the order is computed using ctx.Link and a dummy order passed to the right action. The page that lists the stored orders is equally straightforward, creating a bullet list of the orders with a link to display/get each.
    let ListOrdersPage =

        Skin.WithTemplate <| fun ctx ->

            [

                H1 [Text "Orders"]

                Links ctx

                HR []

                UL <|

                    ((!Orders.Store)

                    |> Map.toList

                    |> Seq.map (fun (id, order) ->

                        LI [

                            A [HRef <| ctx.Link (Action.GetOrder id)] -< [

                                sprintf "#%d: %s [%d]" id order.ItemName order.Quantity

                                |> Text

                            ]

                        ]

                    ))

            ]
For retrieving a specific order, you can display it in HTML or serve it back in a more reusable format, say in JSON. Below is a function rendering JSON responses for a given order ID.
    let GetOrder id =

        if (!Orders.Store).ContainsKey id then

            Content.CustomContent <| fun ctx ->

                {

                    Http.Response.Status = Http.Status.Ok

                    Http.Response.Headers = [Http.Header.Custom "Content-type" "application/json"]

                    Http.Response.WriteBody = fun stream ->

                        use writer = new System.IO.StreamWriter(stream)

                        let order = (!Orders.Store).[id]

                        let encoder = Web.Shared.Json.GetEncoder(typeof<Order>)

                        order

                        |> encoder.Encode

                        |> Web.Shared.Json.Pack

                        |> Core.Json.Stringify

                        |> writer.Write
                        writer.Close()

                }

        else

            Content.NotFound
With the necessary response content functions defined, you can now build your sitelet to represent the entire web application:
module MySite =

    open IntelliFactory.WebSharper.Sitelets

    open UrlHelpers


    let (|PATH|_|) (uri: System.Uri) = Some <| uri.LocalPath


    let MySitelet =

        Sitelet.Sum [

            Sitelet.Content "/create" Action.CreateOrderForm Pages.CreateOrderFormPage

            Sitelet.Content "/orders" Action.ListOrders Pages.ListOrdersPage

        ]

        <|>

        {

            Router = Sitelets.Router.New

                <| function

                    | POST (values, PATH @"/order") ->

                        try

                            let decoder = Web.Shared.Json.GetDecoder<Order>()

                            let order =

                                values

                                |> Map.ofList

                                |> fun map -> map.["order"]

                                |> Core.Json.Parse

                                |> decoder.Decode

                            Some <| Action.CreateOrder order

                        with

                        | _ ->

                            None

                    | GET (values, SPLIT_BY '/' ["order"; INT id]) ->

                        Some <| Action.GetOrder id

                    | PUT (values, SPLIT_BY '/' ["/order"; INT id]) ->

                        try

                            let decoder = Web.Shared.Json.GetDecoder<Order>()

                            let order =

                                values

                                |> Map.ofList

                                |> fun map -> map.["order"]

                                |> Core.Json.Parse

                                |> decoder.Decode

                            Some <| Action.UpdateOrder(id, order)

                        with

                        | _ ->

                            None
                    | DELETE (values, SPLIT_BY '/' ["/order"; INT id]) ->

                        Some <| Action.DeleteOrder id

                    | _ ->

                        None

                <| function

                    | Action.CreateOrder order ->

                        Some <| System.Uri(@"/order", System.UriKind.Relative)

                    | Action.DeleteOrder id

                    | Action.GetOrder id

                    | Action.UpdateOrder (id, _) ->

                        Some <| System.Uri(sprintf @"/order/%d" id, System.UriKind.Relative)

                    | _ ->

                        None


            Controller =

                {

                    Handle = function

                        | Action.CreateOrder order ->

                            Orders.Save (Orders.GetId()) order

                            Content.Redirect Action.ListOrders

                        | Action.DeleteOrder id ->

                            Orders.Delete id

                            Content.Redirect Action.ListOrders

                        | Action.GetOrder id ->

                            Pages.GetOrder id

                        | Action.UpdateOrder (id, order) ->

                            Orders.Save id order

                            Content.Redirect Action.ListOrders

                        | _ ->

                            failwith "unmatched"

                }

        }


    type MyWebsite() =

        interface IWebsite<Action> with

            member this.Sitelet = MySitelet
member this.Actions = []The above code implements a router and controller manually. The router is created using Sitelets.Router.New and giving two functions to map from requests to actions and back. Note how you can use the various URL helpers from the Sitelets.UrlHelpers module to differentiate between the different HTTP commands and to parse out parts of the URLs in a type-safe manner. Consider, for instance, handling the GET request to an order, where id is an integer:
                    | GET (values, SPLIT_BY '/' ["order"; INT id]) ->
                        Some <| Action.GetOrder id
For the POST and PUT requests, next to the ID passed in the URL, we also expect a JSON representation of an Order value among the values passed in the request. This value is then extracted and converted to an Order instance using the built-in WebSharper JSON decoder.
The controller is less interesting; it simply maps actions to server responses. For instance, the CreateOrder action writes the given order into the store and redirects the user to the order listing page.
The final piece left is to mark this application as a website on the assembly:
Figure 14-2 shows the application in action: the create order and the list orders pages. When requesting a given order you get a JSON response, for instance:
{"$TYPES":[],"$DATA":{"$V":{"ItemName":"Windows Server 2012","Quantity":5}}}
This contains some additional fields embedded into the JSON representation that WebSharper uses to facilitate communication and type-safe conversation of values between the client and the server. You may also use another .NET JSON library to produce clean, neutral representations if you wish.
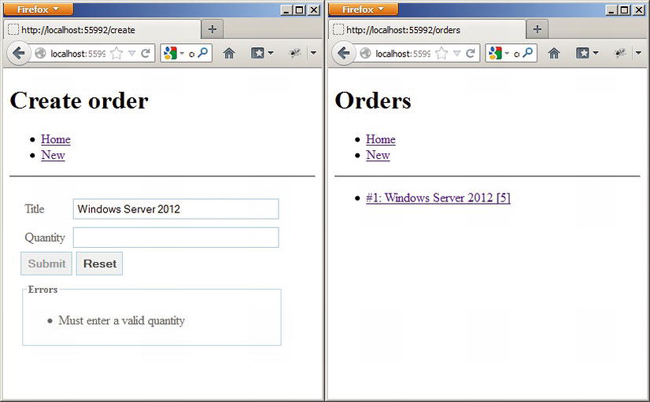
Figure 14-2. The Create Order and the List Orders Pages
WebSharper Formlets
Nearly all web pages need to take user input in one way or another. For example, the user may click buttons or links, or enter values in a web form. Furthermore, web forms typically impose various limitations for the values entered; for instance, many fields are required fields and must be supplied a value, or certain fields such as date fields require values in a specific format, or else, others expect values that contain alpha, numeric and/or special characters only, and the list goes on.
WebSharper formlets provide an elegant, type-safe, and robust way to build web forms and encapsulate the structural make-up, the validations involved, and the layout and other presentation details as a single F# value. They’re composable building blocks that can be nested, enhanced, and customized to an arbitrary complexity.
The IntelliFactory.WebSharper.Formlet namespace contains various formlet controls and enhancements that you can apply to them, along with important formlet combinators such as Formlet.Run, which renders a formlet into a DOM node. A simple example is a text-box formlet that takes a string input from the user:
namespace Website


open IntelliFactory.WebSharper


module FormletSnippets =

    open IntelliFactory.WebSharper.Formlet

    open IntelliFactory.WebSharper.Html


    [<JavaScript>]

    let Snippet1 = Controls.Input "initial value"
You can test this and other formlets quickly by writing a short wrapper function that takes a render function that translates values to DOM nodes and a formlet that supplies those values:
    [<JavaScript>]

    let RunInBlock title f formlet =

        let output = Div []

        formlet

        |> Formlet.Run (fun res ->

            let elem = f res

            output -< [ elem ] |> ignore)

        |> fun form ->

            Div [Attr.Style "float:left;margin-right:20px;width:300px;min-height:200px;"] -< [


                H5 [Text title]

                Div [form]

                output

            ]
Another helper function takes simple string formlets and echoes what has been accepted by those formlets:
    [<JavaScript>]

    let RunSnippet title formlet =

        formlet

        |> RunInBlock title (fun s ->

            Div [

                P ["You entered: " + s |> Text]

            ])
RunSnippet returns a client-side Element value that you can wrap in an ASP.NET server control:
module Formlets =

    open FormletSnippets

    open IntelliFactory.WebSharper.Html


    type Snippet() =

        inherit Web.Control()


        [<JavaScript>]

        override this.Body = RunSnippet "Snippet1" Snippet1 :> _
Adding this ASP.NET server control to an ASPX markup displays a text box to write text into and an empty echo message. Each time you press a key, an event is triggered, and the formlet enters an accepting state; subsequently, it displays a new echo message that is appended to the previous ones. Note that this formlet is in an accepting state even without typing anything into it.
To remove the initial empty echo message, that is to cause the formlet not to enter an accepting state initially, and impose further conditions for its acceptance, you can add various validators that “block” until a certain condition holds. For instance, you can use Validator.Is to inspect its current value and reject or accept based on any criteria you define. For instance, here is a basic input formlet, enhanced with a validator that doesn’t accept values with fewer than three characters:
    [<JavaScript>]

    let Snippet1a =

        Formlet.Yield (fun name -> name)

        <*> (Controls.Input ""

             |> Validator.Is (fun s -> s.Length > 3) "Enter a valid name")
This is a slightly more elaborate version of the input formlet, enhanced with a general validator and wrapped in a Formlet.Yield combinator. This function defines how the values collected in the formlet are combined and returned from the formlet and comes in handy for composing larger formlets that contain multiple input fields. The general form of Formlet.Yield looks like this:
Formlet.Yield (fun v1 ... vn -> <compose into a single return value>)

<*> formlet1

<*> ...

<*> formletn
Here, v1, …, vn correspond to the return values of formlet1, …, formletn, respectively. Note how these formlets are combined using the <*> formlet operator. Combining two formlets yields another formlet with the visuals of the combined formlets laid out vertically. You can learn about changing formlet layout later in this section.
Now that you are familiar with constructing basic formlets with validators and combining them to build larger formlets, let’s look at a few more snippets that apply progressive enhancement to your basic input formlet. Table 14-4 contains the most often used enhancements.
Many features of the WebSharper formlet library are driven by pure CSS, and the necessary CSS resources are automatically included in your page when you use formlet form containers by applying the Enhance.WithFormContainer function. This applies a clean visual theme to your buttons and input fields, and lights up the validation and informational features. For instance, here is a basic input control wrapped in a form container with a validator that accepts any non-empty string (so it blocks on empty input):
    [<JavaScript>]

    let Snippet1b =

        Formlet.Yield (fun name -> name)

        <*> (Controls.Input ""

             |> Validator.IsNotEmpty "Enter a valid name"

             |> Enhance.WithFormContainer)
You can also cause this formlet not to accept until a submit button is pressed. In addition, you can supply a reset button that resets the formlet to its original state. This example adds both:
    [<JavaScript>]

    let Snippet1c =

        Formlet.Yield (fun name -> name)

        <*> (Controls.Input ""

             |> Validator.IsNotEmpty "Enter a valid name"

             |> Enhance.WithFormContainer

             |> Enhance.WithSubmitAndResetButtons)
The accepting status of this formlet and any validation error messages can be revealed to the user via a validation icon or an error summary enhancement. For these to work properly, your formlet needs to be in a form container. You can add a validation icon and/or a validation error summary as follows:
    [<JavaScript>]

    let Snippet1d =

        Formlet.Yield (fun name -> name)

        <*> (Controls.Input ""

             |> Validator.IsNotEmpty "Enter a valid name"

             |> Enhance.WithValidationIcon

             |> Enhance.WithErrorSummary "Errors"
             |> Enhance.WithSubmitAndResetButtons

             |> Enhance.WithFormContainer)
Adding a label for the input control is yet another enhancement:
    [<JavaScript>]

    let Snippet1e =

        Formlet.Yield (fun name -> name)

        <*> (Controls.Input ""

             |> Validator.IsNotEmpty "Enter a valid name"

             |> Enhance.WithValidationIcon

             |> Enhance.WithTextLabel "Name"

             |> Enhance.WithSubmitAndResetButtons

             |> Enhance.WithFormContainer)
And finally, you can add an information icon before the label:
    [<JavaScript>]

    let Snippet1f =

        Formlet.Yield (fun name -> name)

        <*> (Controls.Input ""

             |> Validator.IsNotEmpty "Enter a valid name"

             |> Enhance.WithValidationIcon

             |> Enhance.WithLabelAndInfo "Name" "Enter your name"

             |> Enhance.WithSubmitAndResetButtons

             |> Enhance.WithFormContainer)
You can quickly test these formlets side-by-side by defining ASP.NET server-side controls for each and embed them into your ASPX markup as you did before. You can also test them quickly by embedding them into a sitelet page. Assuming you have the above snippets in a Formlets module, you can add in the same module a new pagelet to display them all:
module Formlets =

    open FormletSnippets

    open IntelliFactory.WebSharper.Html


    type Snippet() =

        inherit Web.Control()


        [<JavaScript>]

        override this.Body = RunSnippet "Snippet1" Snippet1 :> _


    type Snippets() =

        inherit Web.Control()


        [<JavaScript>]

        override this.Body =

            Div [

                RunSnippet "Snippet1"  Snippet1

                RunSnippet "Snippet1a" Snippet1a

                RunSnippet "Snippet1b" Snippet1b

                RunSnippet "Snippet1c" Snippet1c
                RunSnippet "Snippet1d" Snippet1d

                RunSnippet "Snippet1e" Snippet1e

                RunSnippet "Snippet1f" Snippet1f

            ] :> _
Your sitelet can then serve this pagelet in a single-page, single-action sitelet under the root path:
module VariousFormletSnippets =

    open IntelliFactory.Html

    open IntelliFactory.WebSharper.Sitelets


    type Action = | Home


    module Pages =

        let SnippetsPage =

            Content.PageContent <| fun ctx ->

                { Page.Default with

                    Title = Some "Formlet snippets"

                    Body =

                        [

                            H1 [Text "Snippets"]

                            Div [new Formlets.Snippets()]

                        ]

                }


    let EntireSite =

        Sitelet.Content "/" Action.Home Pages.SnippetsPage


    type Website() =

        interface IWebsite<Action> with

            member this.Sitelet = EntireSite

            member this.Actions = []


[<assembly : Sitelets.Website(typeof<VariousFormletSnippets.Website>)>]

do ()
The formlets from this sitelet are shown in Figure 14-3. Although these examples contain a single input field, you can also create input formlets with multiple fields as shown in the following example:
    [<JavaScript>]

    let input (label : string) (err : string) =

        Controls.Input ""

        |> Validator.IsNotEmpty err

        |> Enhance.WithValidationIcon

        |> Enhance.WithTextLabel label


    [<JavaScript>]

    let inputInt (label : string) (err : string) =

        Controls.Input ""

        |> Validator.IsInt err

        |> Enhance.WithValidationIcon

        |> Enhance.WithTextLabel label
    [<JavaScript>]

    let Snippet2 : Formlet<string * int> =

        Formlet.Yield (fun name age -> name, age |> int)

        <*> input "Name" "Please enter your name"

        <*> inputInt "Age" "Please enter a valid age"

        |> Enhance.WithSubmitAndResetButtons

        |> Enhance.WithFormContainer
Note how this formlet returns a string-int pair for the name and age obtained from the user, in essence providing a type-safe and robust way to collect and handle the input values.
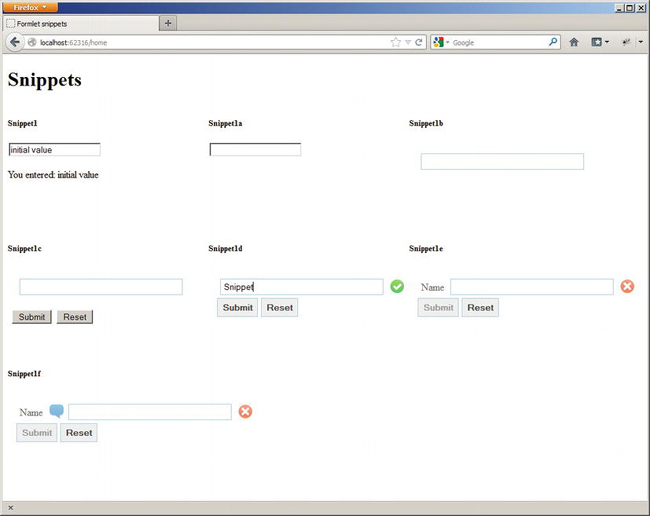
Figure 14-3. Various Formlet Snippets
Another useful formlet combinator is Enhance.Many. It gives you the ability to collect a list of values based on a formlet that collects a single value:
    [<JavaScript>]

    let Snippet3a =

        Formlet.Yield (fun name age -> name, age |> int)

        <*> input "Name" "Please enter your name"

        <*> inputInt "Age" "Please enter a valid age"
        |> Enhance.WithLegend "Person"

        |> Enhance.WithTextLabel "Person"

        |> Enhance.Many

        |> Enhance.WithLegend "People"

        |> Enhance.WithSubmitAndResetButtons

        |> Enhance.WithFormContainer
Dependent Formlets and Flowlets
Often, web forms need more elaborate considerations. For instance, part of a web form may depend on a value entered in another part. You can express these dependencies using dependent formlets, which you can create most conveniently using the Formlet.Do computation expression builder. As plain formlets, dependent formlets are also first-class values and further encode linear dependencies between the various form parts. Consider the following simple example in which the name and age are obtained one after the other, requiring that a name is entered before the input field for the age is displayed:
    [<JavaScript>]

    let Snippet4 =

        Formlet.Do {

            let! name = input "Name" "Please enter your name"

            let! age = inputInt "Age" "Please enter a valid age"

            return name, age |> int

        }

        |> Enhance.WithSubmitAndResetButtons

        |> Enhance.WithFormContainer
The IntelliFactory.WebSharper.Formlet namespace provides additional combinators you can use to express nonlinear dependencies and build complex user interface interactions and forms.
Similar to dependent formlets, flowlets provide a slightly different visual experience and enable you to serve various formlets as a sequence of steps, collecting and accumulating the composite result of the entire flowlet. The following example dresses up each primitive formlet step in a form container with reset and submit buttons:
    [<JavaScript>]

    let Snippet4b =

        Formlet.Do {

            let! name = input "Name" "Please enter your name"

                        |> Enhance.WithSubmitAndResetButtons

                        |> Enhance.WithFormContainer

            let! age =  inputInt "Age" "Please enter a valid age"

                        |> Enhance.WithSubmitAndResetButtons

                        |> Enhance.WithFormContainer

            return name, age |> int

        }

        |> Formlet.Flowlet
Automated Resource Tracking and Handling
Pagelets often need to define their own resource dependencies, such as style sheets, JavaScript code, and other artifacts that they need to work properly. These dependencies are automatically referenced and included by the WebSharper script manager when those pagelets are used in an ASPX or sitelet page. For instance, the formlet examples in the preceding section came with a dependency on the main formlet style sheet provided by WebSharper (along with additional skins), giving the appearance shown in Figure 14-3.
Resources can be defined and tagged on various parts of your code, most typically on functions or modules when binding various JavaScript libraries, and once those parts are referenced, the corresponding resources are included in the consuming page. From this automation point of view, resource annotations serve to define anchors to external artifacts using generated HTML markup, inserted into the <head> section of the containing page.
The most low-level implementation of a resource thus renders this HTML markup:
namespace Website


open IntelliFactory.WebSharper

open IntelliFactory.WebSharper.Core


// Put "my.js" in the root of the web project.

type MyResource() =

    interface Resources.IResource with

        member this.Render ctx writer =

            writer.WriteLine "<script src='my.js' type='javascript'></script>"
You rarely need to use custom rendered resources. Instead, to define a resource pointing to a CSS or JavaScript file, you can simply use the BaseResource class. This class has two constructors: one that you can use to define a resource embedded into the assembly, and another that can address an external resource relative to an absolute base URL (in the first argument). An example for an embedded resource, here, be sure to mark my.js as an embedded resource in your solution:
[<assembly:System.Web.UI.WebResource("my.js", "text/javascript")>]

do ()


type MyEmbeddedResource() =

    inherit Resources.BaseResource("my.js")
Using the multi-argument constructor:
type MyExternalResource() =

    inherit Resources.BaseResource(@"http:\your.net", "lib.js", "style.css")
The advantage of using Resources.BaseResource is that you can avoid having to render HTML in your resource declaration. Instead, Resources.BaseResource is smart enough to tell apart JavaScript and CSS artifacts, and outputs the right markup for each.
Once you have defined the resources you need, you can annotate them on any type (or module) or any static member using the Require attribute, specifying the type of the resource that is to be pinned to the given code unit.
    [<Require(typeof<MyExternalResource>)>]

    type Hello = ..
From this point, any use of the Hello type will trigger a dependency defined in MyExternalResource.
Using Third-Party JavaScript Libraries
One of WebSharper’s great strengths is its ability to use any JavaScript library in client-side F# code, freeing you from having to develop untyped JavaScript code as a separate code base. To talk to these JavaScript libraries in F#, you need a WebSharper extension for each library. At the time of writing, WebSharper comes with a number of extensions to various JavaScript libraries, including jQuery, Google Maps and Visualization, Yahoo UI, jQuery UI, jQuery Mobile, and many others. Some of these come with the main WebSharper installer (for instance, jQuery and the HTML5 extensions), and some you have to download from the WebSharper site (http://websharper.com) separately.
You can also develop WebSharper extensions to your own or third-party JavaScript libraries. Many JavaScript libraries use loosely typed constructs, such as functions that take a variable number and type of arguments, and return objects with different structures. To bind these libraries, you often need to resort to a low-level, weakly-typed extension often referred to as a native extension, and build a derived, more strongly-typed and safer F# abstraction around it as second library.
WebSharper extensions are defined in F# using embedded domain-specific language syntax and are processed through the WebSharper Interface Generator (WIG) tool. These definitions are meant to be terse and compact, reiterating the underlying JavaScript API in F# using a set of convenient notations and operators.
You can quickly get started with a new extension by using the Extension project template that comes with the standard WebSharper installer. This creates a new F# project with a single source file Main.fs that contains two important pieces: first, a Definition module that uses the WIG syntax to define various types, interfaces, classes, and members that form an “assembly,” which is a code unit that represents a JavaScript library as a single F# value, and second, a Main module that triggers the generation of the extension from this “assembly” value. The generation of the extension involves outputting source code decorated with Inline attributes, and compiling it to a .NET assembly that contains the extension. You could also write the code that WIG generates by hand, but you would quickly start to appreciate the amount of effort WIG saves you by automating many of the abstraction chores and common JavaScript usage patterns.
The full WIG language definition is outside the scope of this chapter, and you should consult the WebSharper documentation for more details. You will see a short example of using WIG in Chapter 15 for describing a small portion of the Facebook API to be used in mobile web application.
Working with .NET Proxies
WebSharper enables you to use F# in your client-side coding and gives you nearly the entire F# language to develop client-side code, including powerful language features such as pattern matching, active patterns, discriminated unions and records, classes, interfaces, exceptions, and asynchronous computations, among others. This is coupled with the ability to use a large part of the F# core libraries and standard .NET namespaces in client-side code, without having to worry about how to map them to JavaScript. The mechanism to enable this seamless translation experience is proxying, a fundamental WebSharper concept that you should be familiar with, as you may need to add proxies yourself to your own or third-party libraries to extend translation coverage.
WebSharper proxies provide a JavaScript interpretation for a .NET type. This proxy type is annotated with the Proxy attribute, giving the type of the underlying target .NET type for which the proxy is provided. Here is a small, partial example to proxy the standard F#/.NET int type:
open IntelliFactory.WebSharper


[<Proxy(typeof<System.Int32>)>]

type private Int32 =


    static member MaxValue with [<Inline "2147483647">]  get () = 0

    static member MinValue with [<Inline "-2147483648">] get () = 0


    [<Inline "parseInt($s)">]

    static member Parse(s: string) = X<int>
Note how the three static members use the Inline attribute to express their counterparts in JavaScript, and these inline expressions will be evaluated and used in the translation of client-side code instead of invoking the right-hand side of each member. The above snippet also demonstrates a subtle point in how proxies (and JavaScript stubs as well) are defined, e.g., what you supply as the .NET implementation for each member. You can apply the following techniques in defining your JavaScript mapping for proxying a .NET type or stubbing JavaScript code:
- You should never call proxies directly. Remember, they are only used in translating .NET types to JavaScript. Hence, you can leave their implementation empty (say, by constructing the default value of the return type) or yield an exception. For this, you can use the
X<'T>construct as in theParsemember above. Yielding an exception is a preferred approach, so in case you accidentally call proxy members, you are notified runtime.- Since stubbed (that is, inlined) code is designed to be called, you need to take care how you call these stubbed functions and members. Calling from client code is the intended behavior; here, WebSharper will evaluate and use the attached inline expressions and ignore the .NET implementation. However, if you also want to make your stubbed functions available for server-side use (a rare, but useful device when used in a controlled fashion), you should attach a semantically correct .NET implementation.
Summary
In this chapter, you’ve seen how to use F# to perform a range of web programming tasks. You started by using sockets and TCP/IP to implement a web server and other TCP-based services directly, an example of a system or web network programming task. In the larger part of the chapter, you have looked at using WebSharper, the main F# web framework to develop client-based applications that incorporate significant client-side scripting, and authored them in pure F# code. You looked at WebSharper pagelets, learned how you can use them to embed client-side functionality into your pages, and learned about WebSharper sitelets to represent entire web applications as server-side F# values in a type-safe and composable manner. You also saw how to build user interfaces and web forms in a declarative fashion, employing progressive enhancement techniques and represent these client-side user interfaces as strongly-typed F# values that can be combined and nested to an arbitrary complexity. As well, you saw a number of powerful formlet combinators that yield a massive productivity factor when it comes to building more complex web forms, such as accepting a list of user inputs, expressing dependencies within form elements, and applying different visual rendering techniques and validation functions.
You also became familiar with WebSharper’s extensibility framework: how you can develop
WebSharper extensions to any third-party JavaScript library, or proxies to extend the .NET to JavaScript translation coverage. With these techniques, you can leverage a massive paradigm shift towards building more client-oriented, reactive applications with less code, while enjoying more robustness and type safety.