
Chapter 17. Exporting and Importing
You may have forgotten it by now—building a big database can make you feel like a slave to your computer—but the point of a database is to make managing information more efficient. Nothing illustrates this point more quickly than FileMaker’s ability to suck data into your database from various sources, and dump it back out again in assorted ways.
If you have data of almost any kind—spreadsheets full of figures, lists of names and phone numbers, a vast corporate database, electronic orders in XML, folders full of pictures or text documents—FileMaker can import it directly into your database. On the other hand, if your data is already in FileMaker, you can export it to lists, other databases, XML, or almost any other format imaginable. FileMaker takes a wonderfully flexible approach: It lets you handle simple imports and exports with just a click or two, and provides the features to tackle the most complex cases as well—if you (or some hired help) are willing to do the necessary work.
Exporting a File
When you export data, FileMaker needs to know what data to export. You tell it with the Export dialog box (Figure 17-1). The Table pop-up menu shows you what FileMaker considers the current table—in this case, Customers. Below it, the Field list shows every field in the current layout for that table. But click the pop-up menu, and you’ll see that you can choose Current Table (“Table Name”), which shows you all the fields defined in the current table. You’re also welcome to pick other tables from the pop-up menu and see their fields. When you choose fields from other tables, you’re still exporting Customer records. If you include fields from other tables, FileMaker gets the values from the first record related to each customer record.
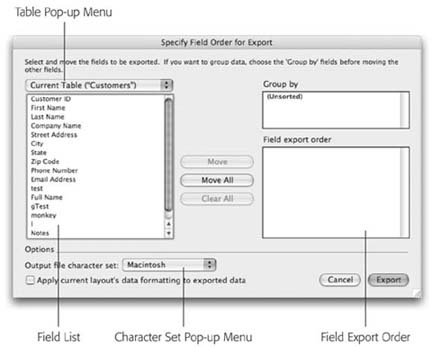
To choose a field for export, select it and click Move. FileMaker adds the field to the “Field export order” list, but doesn’t actually move it there. Rather, the field stays in the list because you may want to export the same field twice in the same export file. Imagine, for example, you are creating an export file that needs the billing address info in the first four fields, and the shipping address info in the next four fields. Since your database has only one set of address fields, you can export them twice so the resulting file has the right number of fields. (Unfortunately, you can’t ask FileMaker to export a blank field. If you often export to a format that needs fields you don’t have, and leaving them blank is OK, just export an empty global field in each one’s place.)
Tip
If a field isn’t on the current layout, it doesn’t show up in the export field list, so if you’re wasting time scrolling through fields that you don’t need, switch to a simpler layout from the same table. But if you can’t find a field that you know is in the table, use the pop-up menu to choose Current Table. That way, you’ll get a list of all the fields in the table, regardless of which ones are on the current layout.
At the bottom of the window, the Character Set pop-up menu lets you tell FileMaker how to encode characters in the export file so the receiving computer can read them properly. For instance, if you’re using Mac OS X and you know the person receiving the export file is using Windows, it probably makes sense to choose the Windows (ANSI) choice. Unfortunately, the conversion from Macintosh to Windows or Windows to Mac is imperfect, so some less common characters may be switched for others in the output file. Unicode is the best choice, assuming your recipient can accept it, because it can handle all the characters you might have in your database (even foreign language characters like Chinese and Korean).
Finally, the checkbox called “Apply current layout’s data formatting to exported data” is a little misleading. It has nothing to do with font, size, style, or color. Rather, when you turn this option on, FileMaker formats numbers, dates, times, and timestamps according to the formatting options for each field on the layout— number of decimal places, date formats, and so forth. If you leave this option off, FileMaker exports the data exactly as it was originally entered.
Note
The “Group by” list lets you sort data as you export it. You’ll learn how this feature works in the upcoming “grouped Export”; section.
Here’s an example of a typical database export. You’ve hired a printing company to print, address, and mail personalized cards to all your customers at holiday time. To do the job, the card company needs a list of names and addresses. Instead of typing all your customer info by hand, you can produce the list by exporting it from your database in the appropriate format. Often, plain text is fine, so that’s what this example uses.
Switch to the Customers layout.
Like many FileMaker features, the Export command is layout based. That is, it decides which table to export (and from which table occurrence to find related data) by looking at the current layout. To export customer records, you need to be on a layout associated with the Customers table.
Choose Records → Show All Records.
If this command is dimmed, then all records are already showing. Otherwise, take this step to ensure that you export every customer.
Choose File → Export Records. If the command isn’t available, you’re probably in Find mode, so switch to Browse mode.
You can also export from Layout and Preview modes, too, should the need arise. The Export Records to File dialog box appears. It looks a lot like a normal Save dialog box, except that it has a pop-up menu at the bottom called Type.
Name the file Holiday Card List.txt, and choose any location you want.
When FileMaker exports data, it creates a new file and puts the data in it. You use this window to tell FileMaker what to call the file and where to put it.
From the Type pop-up menu, choose Comma-Separated Text, and then click Save.
You’ll learn what each of these types means in the next section. The Specify Field Order for Export window appears (Figure 17-2).
While pressing Ctrl (Windows) or ⌘(Mac), select these fields in the field list: First Name, Last Name, Company Name, Street Address, City, State, and Zip Code. Then click Move.
FileMaker adds the highlighted fields to the field export order list.
Click Export.
FileMaker creates the file and returns you to your database.
So what just happened? If you open the Holiday Card List file you just created, you see names, company names, and addresses from your customers file. Dig a little deeper and you notice a few things:
Each record is on its own line (if the program you’re viewing the file in wraps lines, it might look like a record goes across two or more lines, but there’s a return character at the end of each record).
Each field value is in quotes, and there are commas between them.
These factors are important because this file conforms to a standard. Other programs—including the program used by the card printing company—that support files in the Comma-Separated Text format can read this file and grab the data.
Grouped Exports
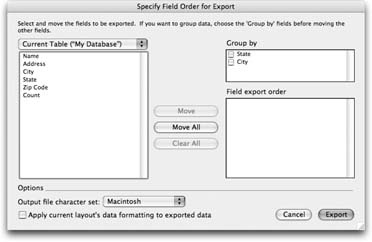
When you were learning about exporting data above, you may have noticed the “Group by” list in the Specify Field Order for Export dialog box. Under normal circumstances, you see “(Unsorted)” in this list. But if you sort the records in the found set before choosing the Export Records command, you see instead a list of the fields in your sort order, each with a checkbox by its name. You can see this in action in Figure 17-2.
If you opt to group the data, you get just one record in the export file for each unique value in the “group by” field. For example, if you export 300 people records, grouped by state, you get one record for each state. Why would you ever want to do this? Because you can include summary fields in your export list and FileMaker properly summarizes all the records represented by each group. You could see, for example, how many people you have in each state.
You’re free to select as many fields as you want in the “group by” list. If you select more than one, you get a hierarchical list of records, similar to a sub-summary report (Chapter 6). For example, if you sort first by state, then by city, and turn on the checkbox next to both fields in the “group by” list, you get a list of states, and below each state, you see one record for each city in that state. Again, summary fields included in your export show proper totals for both the state as a whole, and each city.
Export Formats
When exporting data, you always create a file, but you get to decide what format the file should be. In the last example, you exported your data to a Comma-Separated Text file. This example is one of the many file formats FileMaker can produce when it exports. Most formats exist simply because computer software has put forth a lot of standards in the last 50 years, and FileMaker wants to be as flexible as possible. Some formats do have unique advantages, though.
The first question you need to ask is, “Where is the data going?” Your export format choice almost always depends on what the person you’re sending it to needs, and most of the available formats are uncommon types you only use if the person on the other end asks for it. These include SYLK, DBF, DIF, WKS, and BASIC.
The remaining formats are explained below:
Tab-Separated Text and Comma-Separated Text are very common formats for database data. They put each record on its own line. With Tab-Separated Text, you get a tab between each field value, while Comma-Separated Text has quotes around field values, and commas between them. Almost every program in the world that can import data supports one of these formats. If you’re not sure, try Tab-Separated Text first—it’s the most common.
The Merge format is just like Comma-Separated Text, with one difference: The first line of the file shows individual field names. The advantage is that when you import this file in another program, you can see what each field is called, making it easier to get the right data. Unfortunately, most programs don’t expect this extra line, and treat it as another record. People most often use this format for mail merge in word processing programs.
If you want to put the data on a Web page, use HTML Table . The resulting file isn’t suitable for importing into another program, but it can be displayed nicely in a Web browser. You can also open the file, copy the HTML table from inside it, and paste it into another Web page.
The FileMaker Pro format is your best choice if your data is destined to go back into FileMaker some day, or if you just want to view and work with the exported data directly. When you choose this format, FileMaker creates a brand new database with just one table and only the fields you choose to export. This format is the only one that preserves font, style, size, and color in field data (see the box above) and one of the few that supports repeating fields (Section 3.3.4.2).
Tip
Usually, if you just want to export records from one FileMaker file to another, you don’t have to export them first. Just go to the database where you want the data to end up and import them directly (Section 17.3). Of course, if one database is in South Africa and the other is in Tibet, then by all means export them first.
For the ultimate in flexibility, choose XML—the un-format. When you export XML, you get to apply something called an XSLT Style sheet. An XSLT Style sheet is a document written in a programming language all its own that tells FileMaker exactly how the exported data looks. If you need to produce an export format that FileMaker doesn’t support directly, XSLT is the way to do it. But be forewarned: XSLT is not in the same league as FileMaker itself, ease-of-use-wise. Here is where you might need some hired help. XSLT is introduced briefly at the end of this chapter.
Tip
Although it applies to one field value and not a set of records, don’t forget about the Edit → Export Field Contents command. This command lets you export the data in the current field to a file. Text, number, date, time, and timestamp fields are exported to a plain text file. Container fields create a file whose type is appropriate for the data in the field.
Last but not least, you can choose Excel to create a bona fide spreadsheet. When you choose this format, FileMaker opens an extra dialog box, which lets you put FileMaker’s field names in the first row of your new spreadsheet. You can even give your Excel file a worksheet Name, document Title, Subject, and Author if you so desire.
Regardless of which format you choose, the Export Records to File dialog box has two options that let you determine what happens to the file after FileMaker creates it. Choose “Automatically open file” to avoid hunting down the file on your hard drive and launching it yourself. And “Create email with file as attachment” does just what it promises—opens your email program and creates a new message with your fresh new document attached. To share your date, you just need to supply the email address, add a subject line, and click Send.
Save/Send Records As
After wading through the technical details about FileMaker’s amazing flexibility in exporting to practically any format you might need, the following two export types should give you some breathing room. Forget about arcane formatting rules and settle into more familiar territory. Gone too, is the need to specify a field order for export. The File → Save/Send command lets you choose between an Excel spreadsheet and a PDF (Portable Document Format) document. Both commands grab whatever fields are on the current layout and whip them and their data into the shape you choose.
Excel
If people need to work with the data you send them, but they aren’t lucky enough to have FileMaker, you can create an Excel file for them, as shown in Figure 17-3. Once you’ve sent the file, they’re free to do anything to the data that Excel allows– make a table, create a chart, or run totals and summaries.
The Save option is a pop-up menu that lets you choose between the “Records being browsed” or the “Current Record” so you don’t even have to do a find if all you want to do is send the current record. Like the other formats under the Export menu, you have the option to “Automatically open file” and “Create email with file as attachment,” so it’s easy to check your work and create a quick email with the data your boss just asked to email her.

If you click Options, you can set up some basic details for your new Excel file. For example, you can choose whether you want your FileMaker field names put in the first row of the spreadsheet. You can also type in a file name and a title, subject, and author (which appear in the Properties dialog box).
Portable Document Format (PDF)
PDF files are viewable by just about anybody with a computer. With PDF files, you get to choose exactly how the data looks, since this format preserves your beautifully crafted layouts. With FileMaker’s layout tools, your keen design sense and the Save/Send Record as PDF command, you could use email to distribute invoices, product catalogs, sales brochures, or annual reports. You can even send vision impaired people a file their software can read out loud. Even if all you need to do is send people data they can see, but can’t change, then a PDF file is just what the software engineer ordered.
Tip
The most common PDF viewer, Adobe Acrobat, is a free download at http://www.adobe.com/products/acrobat/readstep2.html. Mac OS X also comes preloaded with its own PDF viewer, called Preview.
The basic choices are the same as for Excel. You choose between sending just the current record or the whole found set. You can have the file opened in a PDF viewer or attached to a new, blank email just as soon as FileMaker’s created it. But the PDF Option set is much richer. There are three tabs—Document, Security and Initial View. Starting with the Document tab, you can set:
Title. This title isn’t the name you give the file in the dialog box. It’s an additional title that becomes part of the properties of the document. Most, but not all, PDF viewer programs let you see a file’s properties.
Subject. This document property helps you tell a series of similar documents apart from each other.
Author. This document property is usually your name, but may also be the name of your company or department. Again, it helps you organize a bunch of similar files.
Keywords. Some file management programs can search these keywords to locate documents.
Compatibility. Choose from “Acrobat 5 and later” or “Acrobat 6 and later.” Choose the lower number if you think your recipient might not have the latest and greatest PDF viewer.
Number pages from. You can make a different numbering system than the one you have in FileMaker.
Include. You can set a limited page number range with these options, so that only a part of the found set is included in the PDF file. You may have to go to Preview mode in FileMaker first, though, to help you set the page range properly.
Note
You can see the PDF file’s Title, Subject, and Author in Adobe Acrobat’s PDF viewer’s Document Properties Summary window. For those on OS X, whose PDF viewer of choice is Preview, these items aren’t available.
In the Security Tab, you can decide how much access you give your recipients when they receive your file. You can choose:
Require password to open the file. Click the checkbox to turn this option on. Then enter a password. This checkbox is useful if you’re selling a catalog and provide passwords only to people who’ve paid to receive it. Then, of course, there’s the standard use; you just don’t want every Malcolm, Reese, and Dewey poking around in your PDF files.
Require password to control printing, editing and security. Click the checkbox to turn this option on and enter a password. You might want your PDF freely distributed, but not so freely used. If so, don’t require a password to open the file, but lock it down so nobody without a password can use the material without your permission. With this option checked, a whole raft of new options become available. You can set:
Printing. Choose from Not Permitted, Low Resolution (150 dpi) or High Resolution. These options would protect photographic or other artwork images that you want to send in a catalog, but don’t want people to reprint freely.
Editing. These options let your recipients interact with your document, but still allow you to protect your intellectual or business property. You can choose from Not Permitted for total control, restrict recipients to filling in form fields only, and so forth.
Enable copy of text, images and other content. With this option checked, recipients can copy and paste material from your PDF file.
Allow text to be read by screen reading software. This option allows people with vision or reading problems to let their screen reading programs read your document out loud.
The final tab in the PDF Options window is probably be the one you’ll use the least. But if you like to control which PDF viewer options are visible when your recipient first opens your PDF file, then Initial View is the panel for you:
Show. Your choices include Page Only (just the FileMaker layout, with no extra tools or panels), Bookmarks Panel and Page, or Pages Panel and Page to offer viewers some navigation options.
Page Layout. Control the way the PDF viewer displays multipage documents. If you choose Default, your recipients’ preferred view remains in force. But you can also specify Single Page, Continuous, or Magnification.
Importing Data
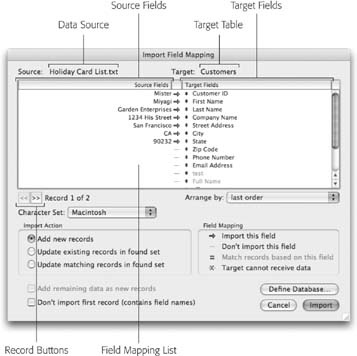
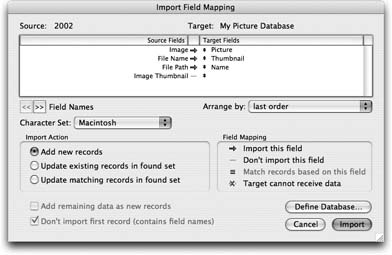
If you need to import information into FileMaker, you’ll soon gain a whole new appreciation for the term flexibility. FileMaker can handle the most common data types—and quite a few lesser-known ones—with the same straightforward process. You tell FileMaker which file contains your incoming data, and then show it how you want to match the incoming data (the source) with the fields in your file (the target). This procedure is called field mapping and it’s the trickiest part of any import. See Figure 17-4 for a preview of the Import Field Mapping dialog box.
The confusing part comes when you to try to match fields in the source with fields in the target. You can’t rearrange the source, but you can drag the fields in your target table up and down. Your job is to line these fields up with the proper source data fields. For instance, you want to move the First Name field so it lines up horizontally with the first name shown at left. Although it’s tempting to jump around and move fields as you happen to spot them, this place is one where a formal approach works best. Start at the top, with the first source field, match it, and then move along to the second one.
Between each source and destination field, you see one of two symbols: an arrow or a line. The arrow means FileMaker plans to import the data on the left side into the field on the right. A line tells FileMaker to ignore this particular piece of data in the import file. Click an arrow to change it to a line, or vice versa. (You sometimes see other symbols between fields, but they only show up when you change the Import Action setting. You’ll learn about that on Section 17.3.1.)
Tip
If you forget what the importing icons mean, never fear. The Import Field Mapping window has a legend at the bottom right.
For the sake of illustration, here’s the simple rundown on how importing works:
Choose File → Import Records → File.
FileMaker can import data from all kinds of sources. In this case, you’re telling it you want to import records from a file. When you choose this command, the standard Open File dialog box appears.
Choose the Holiday Card List.txt file you just created, and then click Open.
The Import Field Mapping dialog box pops up.
Drag the fields in the target field list so they line up properly with the input data.
As you drag, you can ignore the arrows completely. You can fix them once you’ve got the fields in the right order.
Tip
If your data source has a field that doesn’t match any existing field in your target table, just click the Define Database button to create a new field, and then return to your field mapping. See Section 17.3.2 for how to handle an entire table that’s missing.
Click the arrows or lines between fields until each matching field has an arrow, and each remaining field has a line.
You can see the field mapping process in Figure 17-5. It also shows how it looks when you’re done—although your import file may have different data, so your source field list looks different.
Make sure the “Add new records” radio button (in the Import Action area) is turned on .
This action tells FileMaker you want a new record created in the Customers table for each record in the import file. (The Import Field Mapping dialog box has more features, but you don’t need them right now. See the box on Section 17.3 for full detail.)
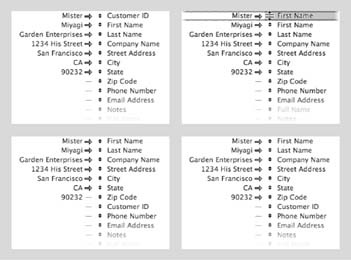
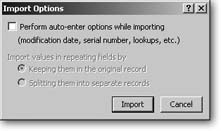
Figure 17-5. This series of images shows the steps involved in setting the import field order (sometimes called “field mapping” or just “import order”). The first picture (top left) shows how the fields look when you first get here. To adjust the order, you drag fields on the right side up and down, as shown in the second picture (top right). When you drop a field somewhere in the list, it changes places with the one that’s already there. In this example, the First Name field changes places with Customer ID. The third picture (bottom left) shows how things look once you’ve moved each field into place. Finally, you need to set the arrows between fields so FileMaker knows which fields to import (bottom right).Click Import. When the Import Options dialog box appears (Figure 17-6), turn on “Perform auto-enter options while importing.”
You want to make sure the new customers have valid customer IDs, and those come from auto-enter serial numbers.
Note
If you import into a field that has auto-enter options set, and you tell FileMaker to perform auto-enter options when importing, you might wonder which value will wind up in the field—the auto-entered data or the imported data. In almost every case, the imported data wins. The one exception: If a field is set to auto-enter a looked up value, FileMaker performs the lookup and thus overrides the imported value. Click Import one more time.
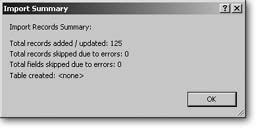
After a very short delay, the Import Records Summary dialog box appears (Figure 17-7). Click OK when you’re done looking.
After the import’s complete, FileMaker shows you a found set of just the records it imported. But don’t reach for the Show All Records command yet: The fact that it’s a found set is your safety net. If something goes wrong with your import (the wrong records came through, field mapping doesn’t look right, or whatever), just delete the found set and start over. You can scan through the data and make sure you got what you wanted and that the data went into the fields you intended. You can also take this opportunity to perform other actions (like use the Replace Field Contents command) on every imported record.
Importing Over Existing Data
When you import data into a file that already has some records in it, the Import Action section of the Import Field Mapping dialog box (Section 17.3) gives you three ways to specify how you want to deal with that existing data. Normally, it starts out with the “Add new records” setting turned on, meaning that FileMaker simply adds imported records to your database. Sometimes, though, you want to update existing records instead. For example, suppose your database holds shipping rates for every state you ship to. When your freight company updates its rates, it sends you a new file with one record for each state, and the new rates in a Rate field. If you add these records to your database, you end up with two records for each state, which is probably not what you want. So FileMaker gives you two other choices that let you update records as you import.
Update existing records in found set
To avoid creating duplicate records as in the shipping rates example, you can turn on “Update existing records in found set” and map just the Rate field to the appropriate field in your table. When you import, FileMaker takes the rate from the first record in the import file and puts it in the first record in the found set. It then copies the second rate into the second record. This process continues until it’s imported every rate.
If your import file has more records than the found set, FileMaker simply skips the extra records. If you’d rather import all the records (adding new records once all those in the found set have been updated), turn on “Add remaining data as new records.”
Warning
This import action is useful only if you’re certain the records in the import file are in the same order as those in the export file. If they’re not, FileMaker updates the wrong records, leaving you with incorrect data. If you aren’t positive the records are in the right order, use "Update matching records in found set” instead.
Update matching records in found set
The “Update matching records in found set” works much the same way. When you import with this action, FileMaker updates data in existing records by copying it from the import file. This time, though, you get to tell FileMaker how to figure out which records in the import file match each record in the found set. You tell FileMaker this by specifying one or more matching fields, as described in Figure 17-8.

To get the new symbol in the field mapping list, just click the spot between fields. FileMaker now toggles between the three possible symbols: Import, Don’t import, and Match. (If you forget what each symbol means, the “Field Mapping” area in the window reminds you.) Again, if you’d rather have FileMaker import every record in the import file, adding new records when no match is found, turn on “Add remaining data as new records.”
Creating Tables on Import
All the importing you’ve learned about so far assumes that your tables and fields are already defined. In other words, your target table is already in place when you choose your source file. But when you’re doing a big conversion job (say, moving a 35-file database system from FileMaker 6 format to FileMaker 7), it’ll take quite some time to create all those tables and fields. And even though you have access to the Define Database dialog box while you’re importing, this process isn’t quick or easy when you’ve got hundreds of fields coming in from dozens of files. FileMaker’s already thought of that, and offers to handle the tedious work of table and field creation for you.
Choose Import → File and select a data source. In the Import Field Mapping window, there’s a handy pop-up menu called Target. Click it, and you see the current table (remember that’s based on the layout that was active when you chose the Import command), all your other tables (grayed out, so you can’t choose them), and a very useful command, New Table (Data Source). The stuff in parentheses is the name of your data source and the name FileMaker gives the new table it creates for you. If you already have a table with the same name as your data source, FileMaker appends a number to the end of the new table’s name.
Choose New Table, then click Import. FileMaker creates a table and an appropriate set of fields for you, and then populates the new fields with data. You also get a simple form layout for your new table and a table occurrence on your relationships graph. You can treat this table just like one you created yourself. Start hooking it up to other table occurrences and you have a full-fledged related table.
Tip
See Section 19.5.1 to see how FileMaker Pro Advanced lets you import tables and fields, without the data that normally comes with them.
When you let FileMaker create fields for you, it does its best to create the field types you want. For instance, if the data source is a FileMaker file, your new fields match the old file’s field names and field types. But if the source is a plain text file with no formatting information to go by, FileMaker doesn’t have any names to go by, so the new fields become text fields and get the prosaic names of f1, f2, f3, and so on. In either case, you should check the fields in your new table to make sure you get the names and field types you want. You have to manually define any calculations you need.
Finally, it pays off to think about the order in which you import your files. FileMaker can handle data from related files (lookup fields, and calculations based on relationships) for you if you import the file that contains the supporting records first, and then the file containing the dependent records. If you get the order mixed up, or if your relationships are so complicated that you can’t import files in a perfectly clean order, then plan to spend some time cleaning up broken field references after your import.
Converting Files Without Importing
If using the import button is just too much trouble, or you don’t need much control over how it’s handled, FileMaker has an even simpler way of creating a FileMaker file from another data source, like an Excel file or a text file. Just choose File → Open and select the file you want to convert. (On the Mac, you can convert files by dragging them onto FileMaker’s application icon.)
Tip
If you can see the file you want to convert, but you can’t select it because it’s grayed out, change the option in the “Files of Type” (Windows) or “Show” (Mac) pop-up list. If your file is one of the formats FileMaker supports, you can select it once you identify its type.
If FileMaker finds data with a first row that looks like field names, it asks you if you want to use those when FileMaker defines fields. If it can’t find anything that looks like field names, you get those old standbys, f1, f2, f3. In addition to a single table and the appropriate number of fields (complete with data, of course), you get two very plain layouts. One is a generic form layout, showing one record at the time, and the other is a simple columnar list.
Use this same process (the Open file command), if you’re converting files from older versions of FileMaker to the .fp7 format. Converting old files is a huge topic and most people find that conversion requires a certain amount of retrofitting, either to make scripts and other things that break during conversion whole again or to take full advantage of the .fp7 multiple-table-per-file power. (FileMaker offers two excellent white papers on this subject for download at http://www.filemaker.com/support/whitepapers.html. Look under Migration Topics.)
Import Data Sources
You’ve learned about the most common importing task—when your data’s coming in from a single file. But you have other needs and FileMaker’s got other choices. File → Import is an entire sub-menu, with commands to suit even the most demanding database manager. From there, you get to pick where the data should come from (the data source), and you get several choices.
File
The File → Import → File command shows an Open File dialog box. Select any file that matches one of the export formats explained earlier in this chapter. You see your old friend, the Import Field Mapping dialog box (Figure 17-5). Match your source to your target, and away you go.
You can also use a similar command when you have to move data from one table to another within the same file. Go to your target layout and choose File → Import Records → File. In the dialog box, choose the database you’re in, and you see the Import Field Mapping dialog box. Select the table that’s your data source from the Source pop-up menu and you’re ready to go.
Folder
Using this command, you can pick any folder, and FileMaker imports the contents of each appropriate file in that folder. It creates one record for each file it imports, and puts the file into the field you specify. In other words, if you have a folder full of letters you’ve written in a folder, you can import them into a Letters database using this command. The complete text of each letter would go in a field, with one field per letter. (Remember, though, that FileMaker only supports pictures, movies, and plain text files when importing. If your letters are in Microsoft Word format, for example, you’re out of luck.)
Choosing File → Import → Folder summons the Folder of Files Import Options dialog box shown in Figure 17-9.

Normally, FileMaker finds only files directly inside the folder you pick—it ignores any other folders contained inside. You have to turn on “Include all enclosed folders” to make FileMaker look inside those folders, too. With this option turned on, it digs as deep as necessary to find every file.
Once you’ve picked a folder, you get to decide what kind of files to import. You have only two choices: “Picture and movie files” and “Text files.” In the first case, FileMaker ignores every file that isn’t a supported picture or movie type. You get to decide whether the files themselves are inserted in the container field, or just references to them. If you choose the “Text files” option instead, it seeks out only plain text files.
Importing a folder of pictures or movies
When you choose the “Pictures and movie files” option and click Continue, you might be in for a bit of a wait. Depending on the number of files FileMaker has to look through, you may see a progress dialog box for as long as several minutes. When the import is complete, you see the now-familiar Import Field Mapping dialog box. But the list of source fields looks entirely unfamiliar—in a good way. As outlined in Figure 17-10, FileMaker translates the file information into logical field types, perfect for database use.
Importing a folder of text files
When you choose to import text files, you still get an Import Field Mapping dialog box. This time, the source field list includes Text Content, File Name, and File Path. Each expects to be imported into a text field.
Digital Camera
If you’re using Mac OS X, the File → Import Records menu has a Digital Camera option. Unfortunately, this option relies on a feature unique to Mac OS X, so you can’t import directly from a camera on Windows. You have to download the images to your computer first, and then import them. (There’s a workaround, if you can set up your camera to show up as a USB disk on Windows, In that case, use the Import → Folder command to import images directly from the camera.)
When you first plug your camera into your Mac, chances are iPhoto launches and prepares to import the images. To avoid any potential confusion, quit iPhoto first (or be careful not to click Import in iPhoto while FileMaker’s working with the camera).
Tip
If you import from your camera to FileMaker a lot, you can tell iPhoto to get out of the way: Just launch Image Capture (in your Applications folders) and in its Preferences → Camera tab, select FileMaker. If you use iPhoto sometimes, and FileMaker others, choose No Application in the pop-up menu instead. That way, you get to decide what program each time.
With the camera connected, choose File → Import Records → Digital Camera. The verbosely titled FileMaker Pro Photo Import Options dialog box appears (Figure 17-11).
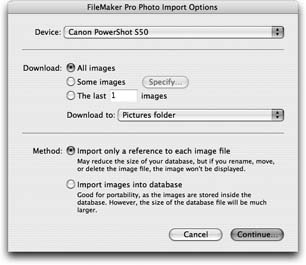
If you want to import everything on the camera, turn on “All images.” On the other hand, if you just want, for example, the last five shots you took, turn on the last radio button—“The last [blank] images”—and put the right number in its box. Finally, you can choose “Some images” and click Specify to see a list of image thumbnails to choose from.
Even if you want to import all the images, the “Some images” choice can come in handy. It’s the only place you can rotate the images before you import them. There’s no direct way to rotate an image once it’s in the container field. You have to export it, rotate it in another program, and then insert it again.
Even if you’re importing the images directly into FileMaker (rather than just a reference), it still puts them in the folder you specify in the “Download to” pop-up menu. If you want to, you can simply delete them when you’re done. (If you’re storing references, though, the folder you pick becomes very important. If you import the pictures and then move them to a different folder, the references are wrong, and the pictures don’t display in FileMaker.)
When you’re through making choices, click Continue. The Import Field Mapping window that appears next is loaded with source fields this time. FileMaker lets you import loads of image data along with the pictures, including dimensions, resolution, shot date and time, and all that photographer-speak stuff you see when you accidentally put your camera in advanced mode.
At this point you’re in familiar territory. Just match up the fields and click Import. Be prepared for a wait as it takes FileMaker longer to import full-color digital pictures than, say, zip codes.
XML Data Source
Because there are so many programs and data formats out there, the World Wide Web Consortium (W3C) created the XML format to make data exchange more predictable. FileMaker uses a special subset of XML’s code, called FMPXMLRESULT, to facilitate import. If your data source was created by another FileMaker Pro database, it already uses FMPXMLRESULT, and you can import that data straight up, no chaser. But if the XML document doesn’t use FileMaker’s Document Type Definition (DTD), you’ll need an Extensible StyleSheet Language (XSLT) document to tell FileMaker how to make the XML file work with FileMaker.
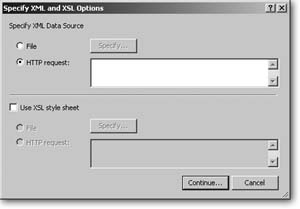
As you can see in Figure 17-12, the Specify XML and XSL Options window is where you tell FileMaker whether or not your XML Data Source needs a style sheet, and if it needs one, where to find it.
When you’re finished choosing XML and XSL options, click Continue. FileMaker processes the XML and XSL (which may take a few minutes), and then shows you the Import Field Mapping dialog box. From there, you can proceed like any import, as described earlier in this chapter.
Note
XML Data Source is a timesaver if you need data from a file that’s in an older version of FileMaker (pre–version 7). Normally, FileMaker requires that you convert a file before you can import data from it. But if you export its data into an XML file, and then import it as XML, you skip conversion altogether.
XML and XSLT are complex languages and this book can’t cover it in full. If you need to master XSLT, you can get whole books devoted to the subject. You can also find dozens of premade style sheets on FileMaker’s Web site at www.filemaker.com/technologies/xslt_library.html.
XML Export
When you export to XML, FileMaker exports the data in the FMPXMLRESULT format, and then applies the style sheet. You create the style sheet to translate this XML into the appropriate format for your intended recipient. You have slightly more flexibility when exporting than when importing: XSLT can translate only XML documents, but it can produce any text-based format. So although you can import only XML files, you can export just about anything.
ODBC Data Source
The last import data source is called ODBC. This data source is a popular standard to allow programs to access information stored in database systems. For instance, if your company has an Oracle, Sybase, or Microsoft SQL Server database to manage orders, you can extract data directly from that database and import it into your FileMaker Pro database (perhaps you want to make your own reports with FileMaker).
ODBC is the most complex import data source to set up. It’s a two-step process:
First, you need to install an ODBC Driver for the kind of database you’re connecting to. For example, if your corporate database is in Oracle, you need an ODBC driver for Oracle. These drivers are platform specific, and most vendors only supply drivers for Microsoft Windows. If you’re using Mac OS X, you can buy high-quality FileMaker compatible drivers from www.openlinksw.com.
Next, you need to set up an ODBC data source. FileMaker doesn’t connect to the database directly. Rather, it uses a data source that’s been defined in the ODBC system on your computer. So you have to set up that data source first. In Microsoft Windows, you do this setting up in the ODBC control panel. In Mac OS X, you need to refer to the documentation that came with your driver (most drivers install their own data source management program).
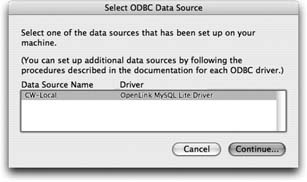
Once you have a driver installed and a data source set up, you can use the File → Import Records → ODBC Data Source command. When you do, you see the Select ODBC Data Source window (Figure 17-13).
When you click Continue in this window, you probably need to enter a user name and password for the database you’re connecting to. You need to get this information from the database administrator, unless you created it in the ODBC software yourself.
Next, FileMaker shows the SQL Query Builder dialog box (Figure 17-14). When you extract data from most databases (FileMaker being the notable exception), you have to use a special programming language called Structured Query Language, or SQL (often pronounced sequel). Writing an SQL query (or program) is a complicated affair. Luckily, in most cases, FileMaker can do it for you—you just make the right choices. (For more detail, see the box on Section 17.5.)

When you’re all finished building your query, click Execute. FileMaker performs the query, gathers the data from the data source, and shows the same Import Field Mapping dialog box you always see when importing data. If you find yourself doing a lot of ODBC imports, you might be well served by a good book on SQL.
Although the query builder supports only a little SQL, you can use any SQL commands supported by your database server if you type the query directly. And SQL can do a lot.
To make use of FileMaker’s query builder, you need to know just a little bit about SQL. An SQL query is made up of clauses, each of which influences the results you receive from the database server. Although SQL understands several clauses, the query builder window supports just three of them: SELECT, WHERE, and ORDER BY. The window has a tab for each of these.
The SELECT clause is where you tell the database what fields you want to import. You can include fields from more than one table if necessary. A SELECT clause alone imports every record in the table. If you include fields from more than one table, you get a result that might surprise you: Every record from each file is mixed in every possible combination. In other words, you import lots of records (multiply the record counts from each table to figure out how many).
The WHERE clause’s job is to control which records get imported and how the tables are related. To specify certain records, you build find criteria into the WHERE clause. First, select a table and column from the pop-up menus. Then select something from the Operator pop-up menu. You can match this field with a value you type yourself (turn on the Value radio button) or with another field (turn on the Column radio button). Either way, enter or select the correct value. Finally, select either the And radio button or the Or radio button and turn on Not if you want to omit the matching records. When you’re finished defining the criteria, click Insert into SQL Query.
Relationships in SQL are probably the most confusing. SQL databases don’t have a relationship graph like FileMaker, so the database doesn’t know how things relate to one another at all. Each time you build a query, it’s your job to tell it how to relate records from one table to those in another. You do this job by matching field values in each table in the WHERE clause.
For instance, you might pick the Customer ID field from the Customers table, the “=” operator, and the Customer ID field from the Orders table. When you add a criteria like this to your WHERE clause, you’ve told the database how Order and Customer records relate. You can add as many criteria in this way as you need.
The last tab is called ORDER BY. This clause lets you specify a sort order for your data. It works just like FileMaker’s normal Sort dialog box: Just add the fields to the Order By list, selecting Ascending or Descending as appropriate. When you’ve given it the order you want, click Insert into SQL Query again.
As you do these things, FileMaker builds the actual query in the SQL Query box at the bottom of the window so you can see how it comes together. If you feel adventurous, you can manually change this query at any time.

Importing and Exporting in a Script
Like almost everything else in FileMaker, you can completely control the import and export process from a script. You use the Import Records and Export Records script, which you can find in the Records section of the script steps list. You also find script steps for Save Records as Excel and Save Records as PDF, with similar options.
The Import Records Script Step
This script step has three options. First, you get to specify the data source to import from. Your choices match those in the File → Import Records menu: File, Folder, Digital Camera (Mac OS X only), XML Data, and ODBC Data. Whichever option you choose, FileMaker asks you for more information (which file to import, or which ODBC data source to use, for instance). When specifying a file, you get the standard path list dialog box. In other words, you can specify several paths if you want; FileMaker imports the first one it finds. (If you don’t specify a source, your users have to do it as they run the script, in a potentially confusing series of dialog boxes. Since you’re presumably providing a script to make things easier for people, it’s best to store source files in a safe place and have the script escort your users to them.)
Once you’ve specified the source, you can turn on “Specify import order” to record the import field mapping, and other import options. Finally, you can turn on “Perform without dialog” if you want FileMaker to import the data directly, with no input from your users. If you leave this option off, FileMaker displays the Import Field Mapping dialog box when the script runs, so folks can make changes to any field mapping you specified.
The Export Records Script Step
The Export Records script step offers similar options. You can specify the output file and export order, and you can choose “Perform without dialog” if you don’t want your users to see the export dialog box.
When you specify the output file, you may be surprised to see an Output File Path List. In other words, FileMaker lets you specify more than one file. This choice doesn’t mean FileMaker exports more than one file, though. Instead, it exports to the first file path that is valid. If the first path in the list includes a folder name that doesn’t exist, for example, FileMaker skips it and tries the next one.