Chapter 19. Developer Utilities
FileMaker Pro takes you from your first simple database all the way into power-user territory. It lets you create complex relational databases with ease, design virtually any layout imaginable, and add features of your own invention with buttons and scripts. With it, you can create any database you might need for a small business or organization. Once you have more than a handful of people using your database, you may eventually outgrow even FileMaker Pro’s abilities and need to buy another FileMaker product. In Chapter 18, for example, you can see how FileMaker Server lets more than five users work in a database at once—something FileMaker Pro simply can’t handle. When you learned about Custom Functions in Chapter 11, you got a hint of some of the extras in the Advanced version of FileMaker.
In this chapter, you’ll learn about FileMaker Pro Advanced 8. For a couple hundred dollars more ($299 for Pro versus $499 for Advanced), you get a whole raft of developer tools that will make your life easier and your databases better. If you find yourself troubleshooting long, complex scripts, Script Debugger may save your sanity and your valuable time. The analysis tools are indispensable if you’re in a consultant role, working on databases that other people created. And most FileMaker developers have longed for an easy way to keep their more adventuresome users away from potentially destructive menu commands (including but not limited to Delete All Records). Finally, a new feature called Custom Menus gives them—and you—the godlike power to determine which commands are available to a database’s users.
Script Debugger
When you write a script using FileMaker Pro, your testing and troubleshooting routine is pretty simple. You perform the script and wait to see what happens at the end. In a simple script, like one that prints a report, it’s easy enough to see what went wrong and fix it: Your script just went to the wrong layout, perhaps. But when you’re creating a complex script that sets variables and works with different sets of records that you can’t verify before the next script step whizzes past, it’s devilishly hard to figure out where your script veers off course. Even simple scripts can go wrong in puzzling ways that you can’t detect by reading over your steps. That’s where Script Debugger comes in. When you run scripts with Script Debugger turned on, FileMaker performs scripts at human speed, so you can see exactly what’s happening, each step of the way.
Note
To run Script Debugger, you must be logged into the file with a password that has script-editing privileges (Section 16.2.3.6). If a script for which you have editing privileges calls a subscript for which you don’t, the subscript will execute but you won’t be able to see the steps in the debugger.
The Script Debugger Window
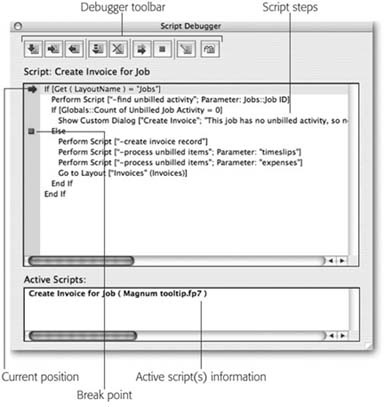
To run a script using Script Debugger, choose Tools → Debug Scripts. It’s a toggle command, so a checkmark appears when the debugger’s on and disappears when it’s off. While the debugger’s on, FileMaker shows the Script Debugger window any time you run a script (Figure 19-1).
Unlike most dialog boxes, Script Debugger stays on top of your work while your script is running, giving you constant feedback. Because you often need to see what’s happening on your layout, you may find yourself moving the debugger window around on your screen so you can keep tabs on data that’s being created or edited, changing found sets and the context in which script steps are performed.
You may find that debugging is a whole lot easier on a desktop’s monitor, preferably one with a whole lot of screen real estate. Often, you need to see two or more FileMaker windows and Debugger at the same time. (Now that most laptop computers have higher resolutions, though, you may be able to arrange a laptop’s screen so that you can see at least one FileMaker window that’s unobscured by Debugger.) For instance, when you’re pushing or pulling data from one table to another (Section 15.5.6.3.3) you may need to see the layout for the source table as well as the target table, so you can see if the data’s moving into the proper fields. Or, if you’re using lots of Go to Related Record steps to create your found sets, one layout can show the parent records and another can show the child records. See the box on Section 19.3 for more debugger tips.
Tip
You can resize the debugger window by dragging the handle in the bottom right corner. Make it smaller so you can see more of your database in the background or make it larger if you have long script names, lots of indented If or Loop steps, or subscripts with script parameters.
Debugger toolbar
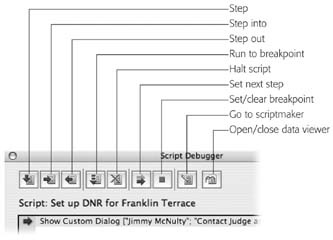
The most important part of the debugger is its toolbar: Its nine buttons give you all the control you could ever want over running scripts. Unfortunately, the buttons don’t have names, so you have to either learn what each icon means, or spend a lot of time pointing at things and waiting for the little yellow tooltip to appear. For reference, Figure 19-2 shows the debugger’s tools.
Stepping through a script. The first three buttons on the debugger toolbar all have “step” in their names. When you first start a script with the debugger, it doesn’t start running. Instead, you see all the steps in the script, and the Current Position arrow (see Figure 19-1) points to the first step. This arrow always points to the next step that will run. If you just want to run that single step, click Step. The step runs, FileMaker moves the arrow to the next step in the list, and everything stops again, waiting for you to do something else. With this behavior in mind, you can easily step through the script line by line. You can see how your If and Loop steps work (by following the arrow), and you can watch things happen in your database windows while the script runs.
When the Current Position arrow points to a Perform Script step, the Step button runs the subscript as one unit. In other words, it run the whole subscript without stopping and then moves the arrow to the next line in this script. Click Step Into instead if you want to move into the subscript and step through it line by line. The last Step button is called Step Out. When you click this button, FileMaker finishes the current script, and returns you to the one that called it. Then you can step through that script line by line. If you click Step Out from a script that wasn’t called by another script, FileMaker just finishes the script and closes the debugger window.
Breakpoints. If clicking a button for each step starts to wear on you—say you’ve got a looping script with a whole slew of steps—you can use Run to Breakpoint instead. Often when you debug a script, you know the first several lines work fine, and you want to fast-forward to the part that seems to be broken. You can tell the debugger where to stop and pause—a breakpoint. Just select the line you want to get to, and click Set/Clear Breakpoint (you can also just click the gray bar to the left of the script step). FileMaker adds a breakpoint symbol by the step name. (To remove a breakpoint, click it or select the step and click Set/Clear Breakpoint again.)
Then click Run to Breakpoint. FileMaker abandons the line-by-line approach and starts running through the script normally; that is, as fast as it can. The script runs until it ends, or until it hits a breakpoint. Once the breakpoint is reached, the debugger switches back to line-by-line mode.
Note
When you click Run to Breakpoint, FileMaker stops at the first breakpoint it finds. If your script calls other scripts, and they have breakpoints, it may stop inside another script before it gets back to your breakpoint. If that happens, click Run to Breakpoint again to move to the next one.
Skipping and repeating. If you want to completely skip a step (or a series of steps), simply select the next step you want to run, and then click Set Next Step. FileMaker moves the Current Position arrow down to the new step, but doesn’t run any of the steps in between. You can also repeat steps you’ve already run by selecting a line higher up in the script before clicking Set Next Step. Either way, FileMaker stops at the new line so you can use the Step buttons to go line by line from there.
Stopping. If you get halfway through a script and then spot the problem, you can stop the script right away without stepping to the end. Just click Stop Execution and the debugger window disappears, leaving you wherever the script left off.
Once you’ve been debugging for a while, you may forget you have it on. To your chagrin, the debugger window pops up when you expect to see the script running. Don’t feel bad—it happens to professional developers all the time. Just click Stop Execution right away, turn off the debugger, and then run the script again. When the debugger first appears, nothing has happened yet, so it’s always safe to stop before you step. (If you have breakpoints set throughout your scripts, you can use Stop Execution rather than repeatedly clicking Run to Breakpoint to get to the end of the script.)
Editing. More often than not, you want to edit the script you’re debugging once you’ve found the problem. Normally you’d have to switch to the right file, open ScriptMaker, and then scroll to the right script. But the Go to ScriptMaker button can do all this for you. Click it, and FileMaker opens ScriptMaker with the right script already selected.
The Go to ScriptMaker button is useful even when you don’t necessarily need to debug. Suppose you have a button on a layout, and you want to edit the script it runs. Trouble is, you’re not exactly sure which script that is. The quickest way to find out—and get to the script—is to turn on the debugger, click the Go to ScriptMaker button, and then click ScriptMaker’s Edit button. You go directly to the script in just three clicks.
Script steps
Most of the debugger window is devoted to showing you the steps in the script that’s running. You can’t edit the steps here, but you can select them, and scroll up, down, right, or left to see more. The gray bar running along the left side of the list of steps is just a place for the Current Position arrow and breakpoints to live. You can click this bar to set or remove breakpoints directly. (This same bar appears in the Edit Script window when you’re creating or editing scripts using FileMaker Advanced, so you can add breakpoints there, too.)
Active script(s) information
The bottom part of the window shows you detail about the active script—in other words, the script that’s running right now. It shows the name of the script, the file it lives in, and the value, if any, of the script parameter it had when it started.
But why’s this box so big if it just shows a few facts about one script? Because it can actually show a few bits about lots of scripts. Every time a script performs another script, it moves down in the list to make room for the new script’s information. FileMaker puts the top-most—and current—script in boldface at the top of the list. Below it, you see the script that came before. If that script was itself run by another script, that first script’s then third in the list. You can see how this looks in Figure 19-3.
Click on a script in the list to switch the debugger’s view to the new script. The Current Position arrow changes color (white with blue outline) to indicate that you’re viewing a script that doesn’t include the current script step.
Data Viewer
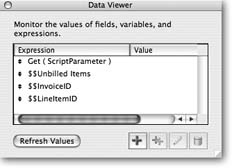
The last button on Script Debugger’s toolbar shows you the Data Viewer, a handy little window that lets you see the current values in script variables, fields, and calculations. You create a list of values that you want to keep an eye on—a watch list—and then use this box to see exactly what happens to them as you debug. Make heavy use of this little gem and you may find that you rarely need to switch layouts while Debugger’s running because you can monitor all your data through the Data Viewer. Before the viewer can show you any data, you have to tell it what to watch. Figure 19-4 shows you the Data Viewer window and its tools.
When you open the Data Viewer for the first time, there’s nothing in its watch list yet. To add a watch item, click the + sign. In the window that opens, you tell FileMaker what fields and calculations you want to inspect. It works much like the Specify Calculation dialog box (Section 9.2), but with a few changes and a couple of extras:
The Expression field is where you type your calculation.
Click Evaluate Now to see a live evaluation of the calculation you’re building in the Result field.
The “OK” button says Monitor instead. When you click it, the new item appears in the watch list’s Expressions column.
In all other respects, this dialog box works just like Specify Calculation. If you’re using Data Viewer in conjunction with Script Debugger, you want it to monitor the fields and variables in the script you’re troubleshooting. For example, if you wanted to troubleshoot the Create Invoice for Job script, you’d need to add its variables to the Data Viewer. The formula for watching a variable is just the variable’s name. Since variables aren’t tied to tables, they don’t appear in the Fields list, so you have to manually type in the names. But if you want to monitor a function, like Get ( ScriptParameter ), you pick it from the function list.
Items in your watch list may or may not show values when you tell Data Viewer to monitor them. Their behavior is determined by what you’re monitoring and when you add the item to the watch list. Here are some guidelines:
Local script variables are usually blank when you first create them, since they’re set only when a script step runs.
Global variables set by scripts may or may not have values in them when they’re created. You see a value if you run the script that sets a global variable after you open the file, but before you monitor the global variable. If you haven’t run a script that sets the global variable since the last time the file was closed, the value’s blank.
Local and global variables set by calculations display their values upon creation.
Functions that monitor continually evaluated processes (like Get ( Account-Name ) ) show their current value when you create them. These values don’t update unless you click the Refresh Values button, though.
Field values, like Customers::Last Name, have values based on the record that’s active when you add the item to the watch list. Field values don’t update automatically when you scroll through records. Like functions, click Refresh Values to see the updated value.
Once you’ve added all the items you want to monitor to Data Viewer’s watch list, run your script with the debugger turned on. As a script steps sets a variable or runs a function, you see the updated value in the Value column. By watching your layouts, running Script Debugger, and monitoring Data Viewer, you’ve got plenty of help troubleshooting misbehaving scripts.
Warning
Anybody with FileMaker Pro Advanced can fire up Data Viewer and monitor the values in local and global variables, even if their privilege set doesn’t allow them to peek into certain fields or layouts. Using local variables doesn’t alleviate the security problem entirely, but it makes it a little harder for folks to peek at the data, since the script that sets a local variable has to be running in order to see the value in it.
Data Viewer isn’t attached to any particular file, so its watch list contents don’t change when you open and close files. The viewer can even be open while you have no databases open. Since all files and scripts share the same watch list, it can quickly get long and hard to monitor. Select items you aren’t using, then click the trash can icon to delete them.
You can also use Data Viewer to test a calculation before you define a field for it, or add it to a testing step in a script. Click the Evaluate Now button to see the calculation’s value, and then tweak the formula and reevaluate it until you get it working. Then just copy the formula and paste it into a field definition or script step.
Debugging Controls submenu
If you prefer menus to toolbars, or keyboard shortcuts to mouse clicks, then the Tools → Debugging Controls menu is tailor-made for you. This menu’s grayed out until you start running a script with the debugger. Then the menu becomes active, with all your tools (complete with shortcuts), represented in the submenu. Plus, you get a new command, Remove Breakpoints, which does just what it promises, removes all the breakpoints in the script that’s currently running.
The ScriptMaker command in the Debugging Controls submenu is different from the ScriptMaker command on the Scripts menu, which does nothing but open ScriptMaker, with no scripts highlighted. Choosing ScriptMaker from the Debugging Controls submenu stops the script that’s running in the debugger, closes the debugger window and opens ScriptMaker, with the now-stopped script highlighted. Just double-click the highlighted script to edit it.
Disable Script Steps
The Set Next Step button (Section 19.2) lets you skip script steps manually, but it’s not much help unless you remember to click it at the right time. Instead, FileMaker Advanced lets you specify which steps you want to disable whenever the script runs. For example, looping scripts can take a long time to run in large databases, so temporarily disable your Loop and End Loop steps while you’re checking other parts of the script. After one loop, the script continues on its merry way so you can continue debugging. (See the box on Section 19.1.1.5 for another cool way to get out of a loop.) You should also disable script steps that may do something destructive to your data—relying on Set Next Step and your mouse button is leaving an awful lot to chance.
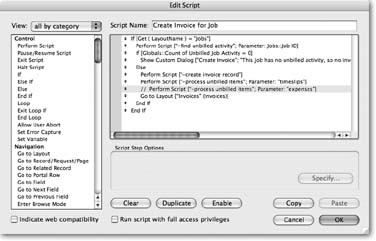
To disable a script step (see Figure 19-5), open the script in ScriptMaker, then highlight the step you want to disable. Click the Disable button in the Edit Script dialog box. FileMaker puts two slashes in front of disabled script steps so you can identify them. To enable a step again, select it. The Disable button changes to Enable; click it and the step is back in business.
Disabling script steps is useful for debugging, but it can have long-term use, too. Any step that you disable in FileMaker Advanced gets skipped whenever someone runs it—even in FileMaker Pro. So say your company has a semi-regular promotion, that creates discounts for a limited period.
You don’t have to write two different scripts, one with the discount and one without, and then worry about some kind of test to make them available on a button or in the script menu at the proper times. Write one script, making sure the discount creation steps are separate from the main process. Then you can enable the pertinent steps when the promotion starts and disable them when it’s over, with very little fuss or muss.
The Database Design Report
Sometimes you inherit a large database from somebody else, and you simply don’t see how it comes together. (OK, be honest. Sometimes you create a large database and still don’t understand how it’s put together.) While FileMaker’s point-and-click interface makes it easy to build databases, teasing things out later is a different story. You can look at a script, field, layout, table occurrence, or even an entire table in FileMaker Pro, and have no idea whether the database actually uses or needs it.
If you’ve shelled out for FileMaker Advanced, however, you’ve got help. Its built-in internal analysis tool, the Database Design Report (affectionately called DDR), gives you an overview of your database, where you can easily see how database items are connected and other details all in one place. You run the report, tell it what kinds of things you’re interested in, and FileMaker presents the information in a series of Web pages.
Unlike the reports discussed in Chapter 6, the DDR is a report about the structure of your database, not about the data inside. It tells you what tables and fields you have, which fields are used on each layout, and so on, but nothing about the information in your records and fields.
Generating the DDR
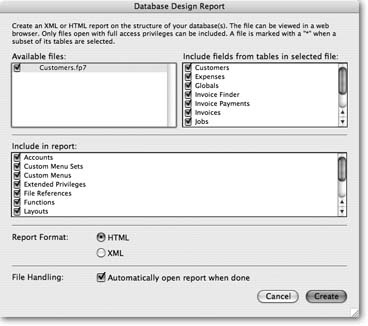
The Database Design Report window lets you tell FileMaker exactly what you want it to report on. You get to pick which files and table occurrences to include, what kinds of things you want to report on, and what format you want the report to use. You also get to decide whether you want to open the report right away, or just save it for later use. To get started, choose Tools → Database Design Report. Up pops the Database Design report dialog box (Figure 19-6).
The Available Files list in this window shows every open file. To include a file in the report, turn on the checkbox by its name. FileMaker assumes you want every file at first, so you may have to do more turning off than on.
In the DDR window, you tell FileMaker which files to examine by turning on their checkboxes. Select one in the list to see all its fields in the “Include fields from tables in selected file” list. Again, you can use the checkboxes in this list to tell FileMaker which tables you want included in the report.
In the “Include in Report” section, there’s a checkbox for each kind of database element the DDR can report on. Again, FileMaker assumes you want everything, but you’re free to limit the report to just certain information. The less you report on, the faster the report runs, and the smaller the final files.
Normally, FileMaker saves the report in HTML format so you can read and navigate it in any Web browser, but it also offers a more structured XML format. XML files aren’t easy for humans to read, but with the help of other software, you can process the XML and integrate information about your database into other systems. Furthermore, several companies make DDR analysis tools that process the XML version of your DDR and provide extra tools for browsing, finding, and reporting on the information it contains. (See the box on Section 19.3.3 for more information on these third-party tools.)
When you’re done making decisions, click Create. FileMaker asks you where to save the report. The DDR is made up of several files, so you probably want to make a new folder to hold the report. The more complex your files, the longer it takes to create the DDR. In a file with dozens of tables, each of which may have dozens or even hundreds of fields, this could take a minute or more. FileMaker displays a progress bar for you, so you can gauge how long the process will take.
Note
A DDR is a snapshot of the database at the moment you create it. So it’s good to make periodic DDRs as your database evolves. You can create a record of when you added or changed various parts of the database. A DDR can also help with troubleshooting broken elements (Section 19.3.3).
Using the DDR
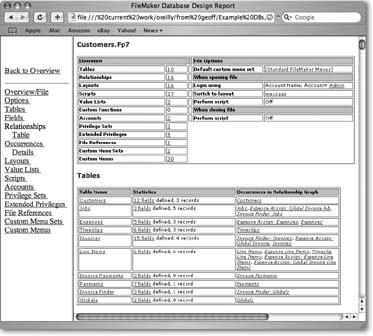
If you checked “Automatically open report when done,” when you created the DDR, FileMaker launches your browser and shows you the DDR Report Overview (Figure 19-7) as soon as the progress bar disappears.
This file is the main report file, and it has URL links that bring up the detail pages. To view the DDR later, go to where you saved it and open the file called Summary, or Summary.html. (You also see a folder named for each file you selected when you created the DDR.)
On the overview page, the DDR tells you which elements you chose when you created the DDR. If you click a file name, you see the file detail page (Figure 19-8), with lots of information about that file. The links in each column go to the same file detail page, but each link scrolls you to the relevant section. On large databases, with lots of fields, this option can save you a lot of time scrolling through the page, looking for what you want. For instance, if you click the number in the Relationships column, you see the Relationships section of the file detail page.
Use the DDR to help you figure out what parts of your database can safely be edited or deleted. Since it’s so easy to create tables, fields, and layouts in FileMaker, you may well end up with extras that you don’t need when your database reaches completion. You can make your database easier to understand and more efficient by deleting these extra elements. But even if a database is the last word in efficiency, running a DDR is one of the best ways to trace the designer’s thinking process.
To see if—and how—a particular element is used, look at its detail. Suppose you have a bunch of fields you’d like to delete from your database, and you want to find out whether it’s safe to do so. First, click the Tables link—fields are part of tables. You see a list of tables, with information about how many fields each table contains, along with a list of occurrences of each table in the Relationship Graph (Figure 19-8). Click the link for a table’s fields, and you see a list of all the fields defined for that table.
Details appear in the Field Name, Type, and Options columns for every field. Comments, if there are any, show up in the Comments column. Any layouts or scripts that use the field are listed in the Layout and Script columns, respectively. You see the information in the Relationship column only if it’s a key field. Fields used in layouts, relationships, and scripts are called dependencies of those elements.
Note
Even if you don’t use a Go to Field script step for a specific field, a key field may be listed in the scripts column. Go to Related Record, or any other step that uses a relationship, also requires the use of that relationship’s key field, so it also has that field as a dependency.
A DDR is also very useful if you’re upgrading a file from a previous version of FileMaker. You can figure out which elements of the old database are crucial and which ones you don’t have to bother recreating when you build your new database.
Finding Broken Elements with the DDR
Suppose you’ve deleted a field, unaware that it’s a dependency for a script, as described in the previous section. Later, you run that script and notice an error, but you’re not sure what you did wrong. The DDR is the best way to track down the error—which is the first step in fixing it. Take, for example, the “-find unbilled activity” script you wrote back in Chapter 15 (Section 15.5.5). It searched in the Expenses::Job ID field for all unbilled expenses…but you’ve deleted the Job ID field.
If you examine that script in ScriptMaker, you can see the words “<Field Missing>” right in the script.
Set Field [Expenses::<Field Missing>; "==" & Get (ScriptParameter)]
You might be able to find the error, but then again you might not, because the “<Field Missing>” error isn’t bold, or red, or highlighted in any way. And as great as Script Debugger is, it doesn’t lead you to the broken script step either. But a DDR can help you find all the trouble spots that arise from the deleted Expenses:: Job ID field.
To do this kind of sleuthing, search the DDR page for a character string, using your browser’s Find tool (pressing Ctrl+F or ⌘-F does the trick in most programs). Type the text you’re looking for in the Find field, then click Next (or whatever button your browser uses) to start the search. You see the first instance of your search criteria highlighted. Click the button again to find other instances.
The whole list of errors you might search for appears below. If you have any inkling what kind of error you’re looking for, start with that one:
<Missing Field>. Referenced field is missing.
<Missing Table Occurrence>. Referenced table occurrence set is missing.
<Missing Base Table>. Referenced base table is missing.
<Missing File Reference>. Referenced file reference is missing.
<Missing Layout>. Referenced layout is missing.
<Missing Valuelist>. Referenced value list is missing.
<Missing Custom Function>. Referenced custom function is missing.
<Missing Script>. Referenced script is missing.
<Missing Account>. Referenced account is missing.
<Missing Privilege Set>. Referenced privilege set is missing.
<Missing Extended Privilege>. Referenced extended privilege is missing.
<Missing Custom Menu>. Referenced custom menu is missing.
<Missing Custom Menu Set>. Referenced custom menu set is missing.
Once you find a broken element, return to your database and fix it manually. The DDR won’t update itself to show your fix until you run another one. And since you can’t mark the electronic version of your DDR, a good way to keep track of your work is to print it out, then mark off each item as you fix it. Then, when all the broken elements are fixed (or you’ve deleted all the unused stuff), run another DDR. This time it should be clean, but if it’s not, you’ve got the tools to fix it.
Tooltips
Training people, either when you first launch a new database, or when new employees come into your workforce, is a big part of making your database successful. You can have beautiful layouts, bulletproof privilege sets and complex, well-thought-out scripts, but if folks don’t know how and when to use them, they’ll miss out on the benefits. To spare you the wrath of confused (or worse, frustrated) users, FileMaker Advanced has a feature called tooltips. Like the onscreen labels that pop up in Windows and many other programs, tooltips can help guide people through the features you’ve created for them, maybe even cut down on training time.
You can attach tooltips to any object, or group of objects, that you can select on a layout: fields, text, or graphics. Tooltips are visible in FileMaker Pro Advanced, FileMaker Pro, runtimes (Section 19.7.1.2), and on databases that use Instant Web Publishing. You can create, edit, or delete tooltips only with FileMaker Pro Advanced.
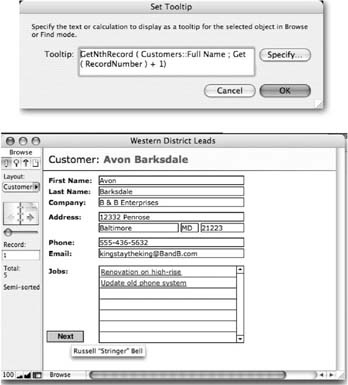
To create a tooltip, go to Layout mode and choose the object you want to have a tooltip. Then choose Format → Set Tooltip. Create your tooltip, and then click OK. Now people see the tooltip when the mouse hovers over the object in Browse Mode. Just like tooltips in other applications, the tooltip doesn’t appear immediately, so as not to inconvenience more advanced users.
The tooltip for a report button could give users the name of the report that the button runs. Or you could make field labels into tooltips, and let people know about the format the field needs. But the Set Tooltip dialog box gives you the power of calculations, so you might as well make full use of them. Using the GetNthRecord () function, you could put a tooltip on a button that takes your users to the next record. But before they click, the tooltip shows content from the next record. Now your users don’t need to go to the next record to see if it’s the one they want. See Figure 19-9 to see this calculation and tooltip in action.
Copying Database Structure
Since a large percentage of a database designer’s work is fairly repetitive, FileMaker Advanced provides some tools that let you take shortcuts through the tedious process of creating tables, fields, and scripts. By copying work you’ve already done, you can spend less time defining fields or recreating complex scripts and more time doing the creative work of designing a database.
As this section describes, you can import tables and fields without copying data between tables in the same file and between different files. FileMaker also provides Copy and Paste buttons in several major dialog boxes so that you can reuse fields, scripts and script steps. (You need full access privileges in both the source file and the target file to import or copy and paste elements from file to file.)
Importing Tables and Fields
Back on Section 17.3.2, you learned how to have FileMaker create tables and fields as you import data. But FileMaker Advanced is even cleverer. It lets you import tables and fields without the accompanying data, so you can copy the framework and fill in the information later. Start by choosing File → Define Database and clicking the Table tab. Click Import, and then locate the file that contains the table you want to copy.
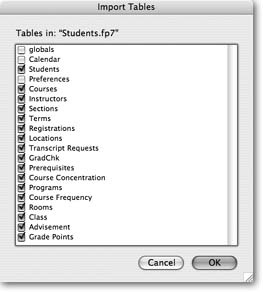
You can even choose the current file, effectively copying an entire table or set of tables within the same file. Next, you tell FileMaker which specific tables to import in the dialog box shown in Figure 19-10.
When FileMaker Advanced has finished importing the tables and fields, it displays a dialog box similar to the one you see when you import data (Section 17.3.1). You see a summary of how many tables and fields were created during the import.
Copying Fields
If you have complex calculations that you want to reuse in another table within the same file, or in a different file, use the Copy and Paste buttons on the Fields tab in Define Database dialog box. Use the Shift key to select items next to each other in the field list. Use the ⌘key (Mac) or the Ctrl key (Windows) to select fields that aren’t next to each other in the list. When you’ve selected the fields you need, click Copy. Then open the table where you want to create the new fields, and finally click Paste to do the deed.
When you copy calculation fields, your results may vary depending on whether you also copy the field’s calculations reference (Section 9.2.1). It usually saves time to plan ahead and make sure the field references already exist in the target table before you copy and paste. But you can always paste the calculation fields and clean up the references later, especially if you intend to use different field names anyway. Here are some general rules:
If fields matching the references in your copied calculation don’t exist in the target table, FileMaker pastes the calculation as a comment (/*Amount * Quantity*/), since it can’t find matching fields in the new table. Simply edit the calculations with the new field references, and then click OK.
To save yourself some editing work, first paste into the target table (or create) fields with names that match the ones in the calculation you’re transferring. Then, when you paste the calculation, FileMaker resolves the field references automatically.
If the field references are local (that is, they refer to other fields within the same table), you can copy the fields referenced in the calculation and the calculation field at the same time. When you paste the set of fields, FileMaker resolves the field references automatically, and you have nothing to edit.
If you’re copying a calculation field that contains a fully qualified field reference (containing both a table name and a field name, like Expenses::Job ID), the calculation again transfers just fine.
Copying Scripts and Script Steps
You can use the Import button in the Define Scripts dialog box to import whole scripts from other files, but if you have FileMaker Advanced, you can avoid that cumbersome process. Simply open the file that contains the scripts you want to copy, then use the Copy and Paste buttons in the Define Scripts dialog box. Copy the scripts you want to reuse, then open the Define Scripts dialog box in the target file, and finally click Paste. Check all pasted scripts to see if any field, layout, or other reference needs to be pointed to another element in its new location. Copying or importing scripts works best when you need the whole script and all the elements referenced in your script were already in place, so that no script steps break on the way in.
You can also copy script steps individually or in chunks. In the Edit Script dialog box, select just the script steps you want, then click Copy. Then you either create a new script or open the script that needs your copied steps. Highlight the script step just above where you want the next steps to land, and then click Paste. Your recycled steps appear in your script. Fix any broken references as needed.
You don’t even have to move to a new script to find Copy and Paste useful. If you have a script in which a series of steps could be duplicated, and then edited so that they work slightly differently, just copy and paste them. Sure, you could use the Duplicate button, but then you have to move each step down into place one by one. With Copy and Paste, you get to place the new steps right where you want them.
Custom Menus
FileMaker’s menus are all about power. Through them, you can control—and limit—your users’ access to the whole feature set. As the developer, you need all those commands to do your design and development of your database, but there are plenty of commands that give too much power to your users, particularly folks who don’t much computer experience or who aren’t shy about experimenting with commands…even if they aren’t sure what might happen at the other end of a dialog box.
Brand new to version 8 is the power to customize FileMaker’s menus. You can remove the Delete All Records and the Replace Field Contents commands for all your users, or you can remove them only from certain users’ privilege sets. If you’re the type of developer who likes to take charge of the user interface (see the box on Section 14.6.5, Custom Menus are your dream come true.
Here are just a few of the things you can do:
Remove potentially destructive items from menus (Delete All Records, for example).
Edit menu commands: Change Modify Last Find to read Repeat Last Find, perhaps.
Add, edit, or remove keyboard shortcuts: If you can’t remember that Ctrl+S (Windows) or ⌘-S (Mac) does not mean Save in FileMaker, you can at least prevent that pesky Sort dialog box from popping up every time.
Remove entire menus, like the Window menu, which can be confusing for folks new to FileMaker Pro.
Run a script from a new or edited menu item: Substitute a custom Delete Record script (complete with a custom warning), for FileMaker’s normal Delete Record command.
Change menus when a user changes layout: Create a special menu that runs commands or scripts that pertain to invoices and only shows up on the Invoice layout.
Make one set of menus for Mac and another for Windows. For example, you may want to suppress the Window → New Window command in Windows, since it bafflingly resizes all windows whenever someone uses it.
Make menu sets that match privilege sets: Give Admin-level users a special menu showing the scripts only they can run.
You can create and edit Custom Menus only in FileMaker Advanced, but anyone can use them with FileMaker Pro or in a runtime version of your database. These menus don’t transfer to files you publish on the Web, though (Section 18.2). When you create Custom Menus for a database, be sure to provide a User Guide or similar documentation explaining what your custom commands do.
You can use Custom Menus to supplement, and even go beyond, privilege set features. For example, if you want to limit data entry people to using the copy and paste buttons that run your scripts, remove the Edit menu for users with that privilege set. They won’t be able to use keyboard shortcuts to cut, copy, or paste. Removing the View menu prevents the Mode pop-up menu, toolbar, and all related keyboard shortcuts from working. (But you’ll need to do some work providing replacement commands in your buttons and menus.)
Note
As powerful as Custom Menus are, they’re no substitute for good security practices, as discussed in Chapter 16.
Editing a Menu
All new files you create use FileMaker’s standard menu set unless you tell them to use a custom set. Just as each new file contains three default privilege sets, you get one set of custom menus that you can edit to suit your needs. And as with privilege sets, some items are in brackets and cannot be edited or duplicated, but you’re free to create new menus with the same name and customize them.
Your goal for this exercise in customizing menus is to remove menu items that might confuse your users. When people are just learning FileMaker, simplified menus are less intimidating than masses of unfamiliar commands. You can also help protect your database from damage by someone unwittingly choosing the wrong command. You start the process by editing the View menu so that only a few items show up.
In FileMaker Advanced, choose File → Define → Custom Menus.
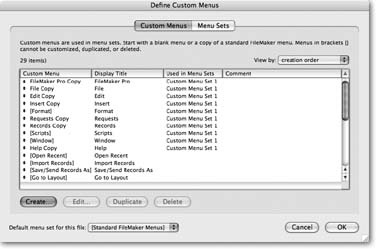
The Define Custom Menus dialog box appears (Figure 19-11).
Figure 19-11. You can reorder the items in the Custom Menu list with the “View by” pop-up menu. You can also click each of the four column heads to sort the list. Probably this window’s most important item is the small pop-up menu at the bottom. You can do all the editing of custom menus you like, but unless you remember to switch to your custom set, you don’t see any change in your file.Click “View copy” in the Custom Menu list, and then click Edit.
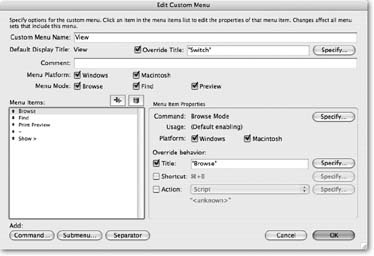
Or you can double-click an item to edit it. The Edit Custom Menu window appears (Figure 19-12). This where you tell the custom menu what it should look like and how it should behave.
Figure 19-12. This dialog box has many splendors. You can specify that a menu appears only when your user’s on a Mac, or only when she’s in Find mode. You can even make specific menu commands appear only on Windows computers, but not on Macs. You can add, change or remove keyboard shortcuts. You can even take the liberty of replacing a command’s normal action with a script.Click the checkbox beside the Override Title field, and then type Switch in the field.
The Override Title option changes what the user sees in his menu bar. You changed it to Switch since the word “View” is too vague for beginning users. Plus, you don’t want them getting confused if they pick up FileMaker’s manual (or this book) for help. The changed menu name should clue people in that they need to look at your custom documentation for help.
The menu’s name in this dialog box remains View Copy; that’s how you know it originated from the normal View menu, not from scratch.
Select the first hyphen below “Go to Layout >” in the Menu Items list, and then press Shift as you select the last item in the list. Click the trash can Icon. Then select Layout Mode and delete it.
All highlighted items disappear when you click the trash can icon (those hyphens represent divider lines in menus). You should have only three mode menu items, a hyphen and a Go to Layout menu (a total of five items) remaining in the list.
Click the Browse Mode menu item. As with View mode in step 2, turn on the override checkbox and change the title to “Browse”.
This menu item title replaces the text that appears in the list. Your users will see a command called Browse, not Browse Mode. Notice the quotation marks around “Browse.” If you forget (or refuse) to type the quotes, FileMaker obstinately puts them back in for you. That’s your indication that FileMaker considers that text a character string, and that’s a further cue that the Specify button gives you access to the calculation dialog box.
Repeat the previous step for Find Mode, Preview Mode and Go to Layout>. Change Find Mode’s title to “Find,” change Preview Mode’s title to “Print Preview,” and change Go to Layout>’s title to “Show.” When you’ve made these changes, click OK.
Use terms that are easy for folks to comprehend. Most people already understand what Print Preview does, but the meaning of Preview Mode is a little murky.
Choose "Custom Menu Set 1” from the Default menu set for this file pop-up menu, and then click OK.
You’ve just told FileMaker to display the customized version of your View menu.
The View menu now says “Switch.” When you click it, there are only four items. Notice that the Layout tool is grayed out, and Layout Mode has disappeared from the Layout pop-up menu at the bottom of your screen. Also, the commands in the pop-up menu match the changes you made in the View custom menu.
By editing menus to suppress items that might confuse those who haven’t had indepth FileMaker training, you’ve made your database a friendlier place to work. But don’t stop there: In the next section, you’ll learn how to create menus that show lists of commands you do want people to see, like your scripts.
Creating a New Menu
Using the steps described in the previous tutorial, you can edit FileMaker’s menus to your heart’s content, renaming them, and deleting extraneous commands to make room for new ones. If you don’t necessarily want to delete any existing menus or commands, or even if you do, you can always create additional menus from scratch.
In Define Custom Menus, click Create. In the Create Custom Menu window that appears, choose “Start with an empty menu.” Click OK.
If an existing menu is similar to what you need, you can use it as a template when you create new menus. But in this case, you don’t need any existing menu commands because you’ll attach your scripts to a new menu. When you click OK, the Edit Custom Menu window appears, just as in Figure 19-12. This time, though, you won’t edit it, you’ll build the menu from the ground up.
Type “Invoices” in the Custom Menu Name fields. Also type “Invoices” in the Override Title field.
Since you started with an empty menu, FileMaker assumes you want a custom name. If you don’t type a name, the word “Untitled” appears in your menu bar.
Turn off the Menu Mode options for Find and Preview modes.
You don’t want your scripts run from either Find or Preview modes, so by telling the menu not to even show up in those modes, you’re adding another layer of security.
Click the Command button. In the Specify FileMaker Command dialog box, choose the “No command assigned” option above the list of available commands, and then click OK
This action creates a new command, but doesn’t use one of FileMaker’s canned actions. You could use this method to build a new menu that picks and chooses from various default menus, but in this instance, you’re going to run your scripts from the new Invoices menu.
In the Title field, type Create invoice for unbilled expenses, and then click Specify (to the right of the Action pop-up menu). From the list in the Specify Script Options window, choose the “Create Invoice for Job” script, and then click OK.
The Specify Script Options shows all the scripts you’ve created in this database file. To add more scripts to this menu, repeat the last two steps until you’ve created new commands for all the scripts you want. The arrows to the left of each item let you rearrange them. Click the Separator button to create a divider line in the menu.
Click the Menu Sets tab of the Define Custom Menus dialog box. If necessary, select “Custom Menu Set 1” in the list, and then click Edit.
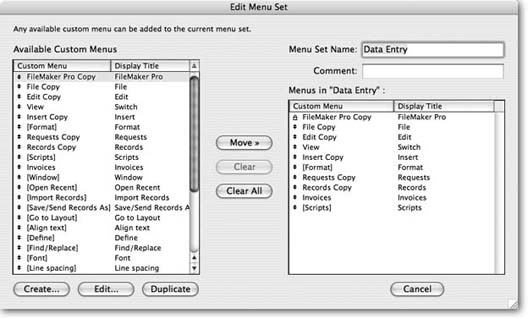
The Edit Menu Set window appears.
Scroll through the list of Available Custom Menus until you see Invoices. Select it, and then click the Move button. Click the arrow to the left of the Invoices menu and move it up, so that it appears above [Scripts]. Click OK until you’re back in your database.
The Invoices custom menu is now a part of the new custom menu set and it appears between the Records and Scripts Menu.
So far, you’ve simplified one of FileMaker’s menus and created a custom menu from scratch. Now you need to get rid of a menu that strikes fear even in the hearts of experienced FileMaker users: You’re going to completely suppress the Windows menu.
Removing a Menu
At first glance through the Define Custom Menus dialog box, you might think that you just click an item in the Custom Menu list, and then click Delete to remove it. But you’ll run into problems if you do. First, if you highlight menus with brackets around their names, the Delete button is inactive. And if you select an item where the Delete button remains active (Help), and then delete it, you get a nasty surprise when you click OK and return to your file. You see the text “Missing Menu” inserted in the menu bar, and the Help menu stays right where it was. Despite these obstacles, you can remove an entire menu; you just have to dig a little deeper to do it.
Tip
Troubleshoot a file for missing menu items by running a DDR (Section 19.3), or by checking Get ( LastError ) after you load a menu set in a script.
As mentioned previously (Section 1.7.2.1), the Window menu can cause problems for new users. For example, the Show command lists files that they may not know are open. Hiding and showing windows is also perilous for new users if they don’t understand how FileMaker manages windows. Instead of bothering people with stuff they don’t need to know, you can just suppress this menu entirely by removing it from the menu bar.
In the Define Custom Menus dialog box, click the Menu Sets tab. Select Custom Menu Set 1, and then click Edit.
The Edit Menu Set dialog box appears.
In the Menus Set Name field, type “Data Entry.”
This descriptive name helps you remember the menu set’s purpose. If you like, type additional information in the Comment box.
In the “Menus in ‘Data Entry’” list, click the [Window] menu. Click Clear, and then click OK until you’re back in your database.
Usually brackets on a list item indicate you can’t delete it. But you can delete it from the display list, as you’ve just done. The [Window] menu remains in the Available Custom Menus list at left. If you change your mind, you can move it back into the display list to restore it.
Back in your database, the Window menu is gone entirely from the menu bar. This menu configuration is ideal for your data entry people, but not so great for administrative users, who understand the Window menu and use it all the time. Read on to find out how to tailor sets of menus for people with different privilege levels.
Installing Custom Menu Sets
FileMaker Pro Advanced lets you create a set of custom menus (see Figure 19-13) and use it as the default for a file, meaning that everyone who uses your database sees it, every time. But since the people using your database may have different levels of skill (and trust), you may want your custom menus to adapt accordingly. In fact, if you’ve read this book’s chapters on layouts and privilege sets, you have all the tools you need to make the right menus appear to the right people at the right time. It’s a simple matter of assigning menu sets to these existing features. You can conceal certain menus and commands from people who don’t need them, but keep them available for everybody else. Or maybe you just want menu items to show up when they make sense for the active layout.
Once you’ve created menu sets using the steps outlined earlier in this chapter, you can install them in any of several ways:
As the default for a file. That’s what you did in the tutorial in the “Editing a Menu” section on Section 19.6.1. Unless you tell FileMaker otherwise, everybody gets the same custom menus. This option works great for a runtime file, or any situation where all users are at the same level.
On individual layouts. In this scenario, when someone switches layouts, either by menu command or via a script, the menu set changes to a layout-specific one of your choosing. Choose Layout → Layout Setup to attach a custom menu set to a layout.
By mode. This option offers the ultimate in elegance. It lets you do things like create a set with only one menu and just a few items, and make it the only menu people see when they’re in Find mode. Instead of a gaggle of buttons to perform and cancel finds, write the appropriate scripts and display them in the one menu, short and sweet.
When a script is run. By checking the privilege set in a script that runs when someone logs into your file, you can load a set of menus customized to that person’s level of privilege. Use the Get ( PrivilegeSetName ) step to check privileges (Section 16.2) and the Install Menu Set script step to specify which menu set installs. (If you have a Re-login script, you need to make sure that the right menu set is installed each time users re-login.)
Warning
Since you’re effectively removing features for your users when you customize menus, thorough testing is a critical part of the process. Be sure to test menus with all affected layouts, privilege sets, scripts and across platforms. In FileMaker Pro Advanced, choose Tools → Custom Menus to switch among sets as you test them.
Developer Utilities
The Tools → Developer Utilities command looks so insignificant and benign to the unsuspecting person, but behind it lurks a vast array of powerful features. There are developer utilities for all of the following techniques:
Rename one file in a system of interconnected files, and have every file reference in the other files automatically update to the new name.
Turn your database into a kiosk system. You can use this feature to make interactive programs that run on publicly accessible computers. In this setup, FileMaker hides the menu bars, the Windows taskbar or Macintosh Dock, and every other screen decoration that’s not a part of your layouts.
Create a runtime solution—a special version of your database that anyone can use, even if they don’t have FileMaker Pro.
Permanently remove full access to files so you can send your database to people you don’t know, and be sure they can’t tamper with your hard work, including your scripts, table and field definitions, and relationship graph.
Create an error log to help you troubleshoot problems that occur when FileMaker generates runtimes.
In fact, you can (and often want to) do several of these things at once. Here’s an example: You build a beautiful interactive product catalog, complete with pictures and an easy-to-use ordering screen. You then want to set up a kiosk computer at a trade show where attendees can use the database to see what you have and place their orders. Using the developer utilities, you could do all this:
Add “Kiosk” to the end of every file name, so you can keep this copy separate from the one you use in the office.
Make the database run in Kiosk mode so users at the trade show won’t be able to exit FileMaker, switch to other programs, or otherwise cause mischief.
Make the whole thing run by itself so you don’t have to bother installing FileMaker on the computer you’re renting just for this job.
Lock out full access so if someone manages to steal a copy of your database while you’re not looking, they can’t see how it works or steal your product’s beauty shots.
Using the Developer Utilities
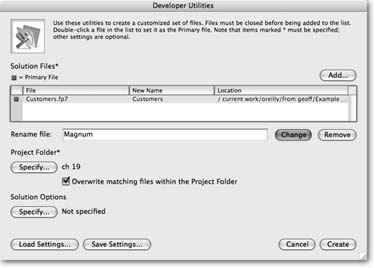
The most confusing thing about the developer utilities is that you have to close your files before you work with them—just the opposite of every other command in FileMaker. So close the files you want to modify, and then choose File → Developer Utilities. You behold the Developer Utilities dialog box (Figure 19-14).
In the Developer Utilities window, you first choose which files you want to work with. Click Add to put a file on the list. In Mac OS X, you can select several files at once in the Open File dialog box using your Shift and ⌘ keystrokes. Alas, in Windows, you have to pick just one file, and then click Add again to add the next one. Keep on adding until every file you want to change is in the list. If you accidentally add the wrong file, select it and click Remove.
You have to pick one file to be your main file. This file is the one that opens first if you create a runtime solution, for example. To set the main file, just double-click it in the list. FileMaker shows a red square—it looks surprisingly like a script break-point—by the main file.
Renaming files
Of course, you can always rename a file in Window Explorer or the Mac’s Finder. But those interfaces let you change only the file name. Developer Utilities makes that look like child’s play. When it changes a file name, it also looks inside the file and updates any internal file references to match the file’s new name. If you’ve ever tried to open two versions of a multiple file solution at the same time (to test some scripts that delete data and on a copy of the files, say), you know that FileMaker sometimes gets confused and keeps multiple copies open even after you try to close one set. You can eliminate the crossover problem by renaming one set in Developer Utilities. You can test your scripts without a problem, since the scripts in the copy files automatically inherit the correct new file names.
To rename a file or set of files, add them to the Solution File list (Figure 19-14). Select a file, type the new name in the “Rename file” box, and then click Change. FileMaker shows the new name in the New Name column.
Next, you need to pick the project folder. This folder is the one where FileMaker saves the finished files. Just click the Specify button under “Project Folder” and pick any folder you wish. If the folder already contains files with the same names as the ones you’re about to create, you get an error message—unless you turn on “Overwrite matching files within the Project Folder.” When you click Create, FileMaker Advanced makes copies of the files with their new names, leaving the originals untouched.
To complete the example above (your kiosk product catalog), you would turn on “Create Runtime solution application(s),” “Remove admin access from files permanently,” and “Enable Kiosk mode for non-admin accounts.” Only the first option needs to be configured.
Create Runtime Solution application(s)
To create Runtime Solutions, add the files to the Solution Files list, and then select a project folder, just as you did above. Don’t type a new name for the Runtime in this window, though. Click the Specify button under Solution Options. You see the Specify Solution Options dialog box, as shown in Figure 19-15.
When you tell FileMaker you want to build a runtime solution, it generates a special program that you need to include with your databases. This program can do most of what FileMaker Pro can do, but it can’t modify tables, fields, layouts, or scripts. You get to decide what this program is called—just type it in the Runtime Name box. Along with the runtime program, FileMaker creates new copies of each of your files to go with it, and changes all the file name extensions to something other than .fp7. Tell FileMaker what extension to use in the Extension field.
Warning
Your computer’s operating system uses file name extensions to figure out which program files belong to. The Developer Utilities let you assign any extension you want, but you should avoid common extensions like .doc, .jpg, .mp3, and so on. You know computers—they get confused easily.
The new files don’t just have a new name; they are also modified internally so they’re bound to the runtime program, and the runtime program in turn can open only properly bound files. In other words, when you send people a runtime program, they can’t use it to open any old FileMaker Pro file.
To facilitate the binding process, FileMaker asks you to provide a bindkey. FileMaker stores this value in both the runtime program and any database files in the Developer Utilities window. The value you use for the bindkey is entirely unimportant, and there’s no need to keep it secret. But if you later want to bind new databases to the same runtime program, you’ll have to use the same bindkey.
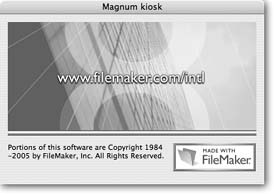
Finally, when users exit the runtime program (in other words, when they close your database system), they see a “Made with FileMaker” splash screen. Normally, this screen looks like the one in Figure 19-16. You can also control how long the splash screen shows by putting the number of seconds in the Delay box. Unfortunately, you can’t make it go away entirely.
Remove admin access from files permanently
The “Remove admin access from files permanently” option doesn’t actually remove the accounts that have full access. Instead, it modifies the [Full Access] privilege set so that it no longer truly has full access. If you log in with an account that normally has full access, it doesn’t have access to the Define Database window, Layout mode, or ScriptMaker, and its access to Accounts & Privileges is limited to the Extended Privileges tab. This option has no settings.
Enable Kiosk mode for non-admin accounts
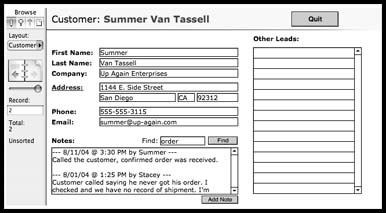
If you turn on Kiosk mode and then open the new file using an account that has full access, you don’t see any changes. But if you log in with a lesser account, everything changes. The screen goes completely black, except for the content area of your database window. You can see an example in Figure 19-17.
When you use Kiosk mode, you typically hide the status area and let people control everything from buttons on layouts. Alternatively, you can use custom menus (Section 19.5.3) to hide all the menus and commands that would let nosy people poke around in your file. Remember to troubleshoot your file before creating a custom runtime from it, because any problems in your file (broken links, missing data, bad scripts) also show up in the runtime. But once you’ve suppressed all the normal FileMaker commands, folks have no way of getting around these problems.
Databases must have a FileMaker file extension
Sometimes people, Mac types especially, create databases without the .fp7 file extension, only to regret that decision later. An extension is computers’ most accurate way to identify a file. So turn on “Database must have a FileMaker file extension,” and FileMaker adds “.fp7” to the end of every file name that doesn’t already have it.
Create error log for any processing errors
While FileMaker processes your files, applying your options, building runtime programs, or renaming files, it might encounter problems. Turn on “Create error log for any processing errors” so you can see what went wrong. FileMaker saves error messages in a file on your hard drive (you get to pick where it goes and what it’s called).
Loading and saving settings
If you maintain a database system that other people use, you may well run your files through developer utilities every time you send out a new version. To save you the tedium of configuring the Database Utilities dialog box again and again, FileMaker lets you save all your settings to a special file—just click Save Settings. Later, when you’re ready to process your files again, click Load Settings and select the same file. FileMaker sets up everything in the dialog box for you. All you have to do is click Create.
Delivering a Runtime Solution
If you build a runtime solution with FileMaker Advanced in Mac OS X, it runs only in Mac OS X. Likewise, if you build from Windows, your runtime solution is limited to Windows. If you need a runtime solution for both platforms, you must buy FileMaker Advanced for Mac OS X and for Windows and build a separate runtime solution on each kind of computer.
File Maintenance
The File Maintenance utility doesn’t come into play as you’re developing a database. Instead, you use it periodically on existing, actively used databases—with good reason. As people add, remove, and modify records in a database, FileMaker has to go to great lengths to make room for things in the file on your hard drive. For the sake of speed, the program avoids actions that require massive reorganization of the data on disk. As FileMaker shuffles things around, information from one record can spread to different parts of the file, and sections of the file can be wasted—too small to hold anything useful, but stuck there in the middle of the file anyway.
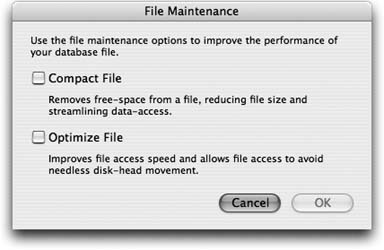
The Tools → File Maintenance command tidies up such scattered data and frees unused disk space. When you choose it, you see the File Maintenance dialog box (Figure 19-18).
The Compact File option goes through the file from top to bottom seeking out the wasted space. When it finds some, it moves everything else in the file a little bit so the wasted space is gone. In the end, you have a file that’s as small as possible.
The Optimize File option works differently. It goes through the records, layouts, scripts, and other elements of your database and makes sure all the information for each element is together. Instead of searching all over your large file to get the entire Customer list, FileMaker can stay within a consecutive block of information in a small area of the file. Everything in the database works just a little bit faster.
