
Chapter 10. Calculations and Data Types
The last chapter introduced the terminology and concepts behind FileMaker’s calculations. You learned how to create them using the Specify Calculation dialog box’s tools. Functions, as you saw in the previous chapter, play a big role in good calculation construction. In this chapter, you’ll learn the details about the most common functions for the various data types—text, number, date, time, timestamp, and container—and when to use them. As in your FileMaker design life, if you want to test a calculation, just create a calculation field and start building it using the techniques you’ve learned so far. If it doesn’t work the way you expect, or if you don’t need it after your experiment is done, just delete the field.
Number Crunching Calculations
Although they don’t come first in the function list, number functions are the most obvious application of calculations. Since most people easily understand them, number functions are a logical place to start. A lot of the concepts you’ll learn for number functions apply to other functions as well.
Number Operators
Operators, along with fields, constants, and functions, are one of the basic building blocks of a calculation. FileMaker has five operators that specifically apply to numerical calculations, the same five that you probably already know:
+ is for addition
- is for subtraction
* is for multiplication
/ is for division
^ is for exponentiation (“to the power of”)
Section 9.2.2.2 explains how to use these operators in detail. In your day-to-day work with FileMaker, you usually use these operators to calculate the numerical values in your fields.
Note
If you’re new to calculations, you’ll want to get a handle on the material in this chapter before proceeding. But if you’ve worked with logical tests before, you can skip straight to Chapter 11.
Say you’re an event planner and you always plan for 10 percent above the expected number of attendees. Use this calculation to find your fudge factor:
Sum ( Attendees::Confirmed ) * 1.1
Number Function Types
FileMaker also gives you dozens of functions that do special things to numbers. Because there are so many number functions, the function list breaks them up into smaller groups. The groups have descriptive names, so you can drive right to the group you need (or skim by them without looking, if you might be traumatized if you accidentally saw a sine or cosine function). The functions you use with your numeric data are:
Number functions
Aggregate functions
Financial functions
Trigonometric functions
As you saw on Section 9.2.4, every number function expects one or more parameters, each a number value, and all the number functions return a number result. Here’s how to put them to work:
Precision
Some calculations demand a high degree of precision, like those that track radioactive isotopes or other scientific data with lots of places following the decimal point. FileMaker comes prepared with the SetPrecision function. This function extends FileMaker’s default precision of 16 decimal places, up to a maximum of 400. If you need more precision, you add a SetPrecision function to the calculation that produces the value that requires precision. You can use SetPrecision with all other numeric functions, except trigonometric functions, which don’t accept this extended precision. See Figure 10-1.
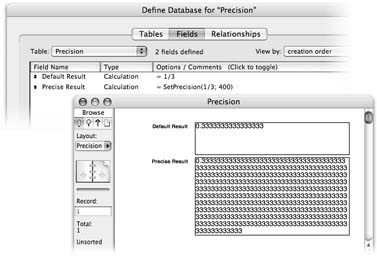
The SetPrecision function requires two parameters. The first parameter is a number, or any expression that results in a number. The second is the number of decimal places you want to see.
This calculation would return Pi with 3 decimal places:
SetPrecicion( Pi ; 3 )
This version would show 100 decimal places:
SetPrecision( Pi ; 100 )
Note
The SetPrecision function affects your calculation’s result, but not the way FileMaker displays it. To save space on your layout, you can format a very precise calculation to show only a few decimal places until you click the field, when you see the stored value (Figure 10-1).
Going Beyond Basic Calculations
In the last chapter you created two very simple calculation fields using numbers: Extended Price and Invoice Total. But those calculations were very simple. Now, you build on those basic concepts to see how you can make a set of calculations that fit an upcoming sales promotion.
Preparing the Data
You’ve decided to start reselling personal security products to your customers. To help you keep track of things, you need to add a Products table to your database. The table should have these fields:
A text field called SKU
A text field called Description
A number field called Cost
A number field called Price
Note
See Section 7.3 for advice on creating tables.
Once you’ve defined this new table, FileMaker automatically creates a layout—Products. Switch to that layout now and create a few product records. To help drive sales to your larger clients, you want to implement a volume discount scheme—they should get a 5 percent discount if they buy enough. But some of the products you sell don’t have enough mark-up to justify these discounts. You want to be sure the discount never reduces your mark-up below 20 percent.
First, you add a line to your marketing materials: “Volume discounts not available for all products.” You can make this line as small as humanly possible and hide it way down in the corner. Next, you need to fix your database so it tells you the discount price for each product.
Building the Calculation Fields
To implement this discount scheme, take what you need to know and translate it into calculation terms. You need three fields to carry out your sales promotion logic.
First, calculate 95 percent of the price (a 5 percent discount):
Price Each * .95
Second, you also know the cost (in the Cost field) and you can figure out the lowest price by adding 20 percent to this cost:
Cost * 1.2
Finally, the discounted price is either the calculated discount price, or the cost + 20 percent price, whichever is greater. Put another way, you want the maximum of these two values:
Max ( Price Each * .95 ; Cost * 1.2 )
Using the Max function, the previous calculation results in either the discounted price, or the minimum price, whichever is greater (see the box on Section 10.2.3). That result’s almost perfect. But suppose you have a product whose normal price is less than 20 percent above cost (hey, it’s a competitive market). If you use the Max calculation as it is now, the new discounted price is more than the normal price. You need to go back and add to your calculation so that it takes the regular price into account, and uses that price if it’s lower than the calculated discount. Read on to learn how to think through this calculation quandary.
Constructing the Calculation
When calculations start to get complicated like this discount price example, imagine that you have a field that contains the value you already want. You can use this pretend field in your new calculation, and then, when you’re all finished, put the old calculation in place of the pretend field. In this case, just pretend you have a field called Calculated Discount that holds the discount price. With that imaginary field in mind, you can fix your problem with this calculation:
Min ( Calculated Discount ; Price Each )
The result of this calculation is either the calculated discount or the regular price, if it’s lower. Now, just put the old calculation in place of the words “Calculated Discount” (since the old calculation results in the calculated discount):
Min ( Max ( Price Each * .95 ; Cost * 1.2 ) ; Price Each )
The entire Max function, complete with its two parameters, is now the Min function’s first parameter. You might think it looks a little confusing at first, but with practice you become accustomed to looking at functions-inside-functions like this.
If it helps, you can add white space and comments to clarify the calculation, as Figure 10-2 shows.
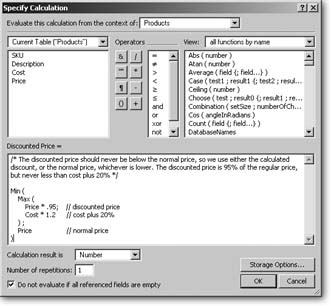
To use the calculation, just create a new calculation field (call it Discounted Price) with the calculation above. It automatically adjusts and shows you an appropriate discounted price.
If you want to test a complicated calculation, spot-check a few records where you know the result. Sometimes the math is so complex that you just have to work it out on paper and enter dummy records to check the calculation. Usually, if a calculation isn’t working, you can figure out how to fix it when you compare your math to the value in the field.
Text Parsing Calculations
Although most people think of functions for doing dry stuff like math in a spreadsheet, you can also use functions in your database’s text fields. Just as you can add and subtract numbers with number functions, you can use text functions to slice and dice the words in your database. For example, you might receive data from an outside source that needs major cleanup before you can use it. This data has people’s first and last names in the same field; it’s even got entire email messages crammed into a field—address, subject, and body—when all you need is the email address. You can equip a temporary database with fields and text calculations to parse (think of it as sifting) the data into the form your better-designed database expects.
Tip
Fixing data this way usually means that you do a find for a certain kind of bad data—if only some records have two email addresses in the same field, say. Use a calculation with the Records → Replace-Field Contents command. Do a find first, and then do a calculated Replace Field Contents that fixes the error.
The Concatenation Operator
In contrast to the wide variety of mathematical operators for working with numbers, there’s only one that pertains specifically to text—the concatenation operator. Represented by the & sign (ampersand), it strings bits of text together. (When you need to chop and divide your text in order to parse it, you use a function instead of an operator, as described on Section 10.3.2.)
To use it, put it between units of text, as in the expression below:
"This is a " & "test"
The result of this calculation is This is a test.
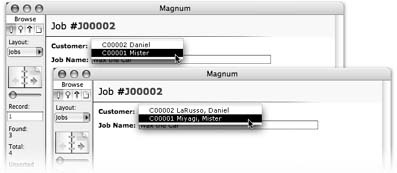
The concatenation operator lets you combine text from two different fields and make them work better together. For example, when you set up the Jobs layout in your database in Chapter 8, you had to settle for a compromise. When creating the value list for the Customer pop-up menu (Section 8.1), you could pick only one field to show along with the ID value. That example used the First Name field, but the full name would make the menu more useful. With a calculation, you can do just that.
Create a new field that shows what you want in your value list. Add a new calculation field to the Customers table, called Full Name. Use this calculation:
Last Name & ", " & First Name "
Some results might be “Gribble, Dale” or “Hill, Henry.” Note that the calculation includes a comma and the appropriate spaces for separating data between your fields. Now you can modify the All Customers value list to take advantage of the new field. Just change it to use the new Full Name field instead of the First Name field. Figure 10-3 shows the result.
Tip
Concatenating fields are great for simplifying the display of data, but they have other uses, too. Instead of setting up a two key sort to sort customers by last name, then first name, now you can just sort on your Full Name field. You can also make a subsummary part (Section 6.9.4.7) that works when you sort on the Full Name field.
Text Function Types
FileMaker’s text-handling functions come in two flavors: Text functions and Text formatting functions. Text functions handle tasks like the parsing mentioned above, or finding whether a particular string of characters occurs in a field. You can change all instances of specific characters within a field, or count text length, with text functions.
Text formatting functions change the way your text looks, like making a part of the text in a field bold and red. These functions are a lot more flexible than just making a field bold and red on your layout, because you can tell the calculation to search inside the field, find just the characters “Propane Sale!” and make them red, while it leaves all the surrounding text untouched.
Text Functions
Many of the text functions exist to help you parse text—split it apart in useful ways. Sometimes one text value contains multiple useful pieces of information, and you need to look at them individually. If you’re lucky, the information comes in a form that FileMaker already understands. If you’re not so lucky, you have to do some extra work to tell FileMaker exactly how to divide the text value.
FileMaker can automatically break text up three ways: by characters, words, or values. When it does the dividing, it gives you three ways to decide which parts you want: Left, Middle, or Right.
Character functions
Parsing by character comes in handy when you have data that’s in a well-known format and you need to access pieces of it. You can use functions to grab the first three digits of a Social Security number, the last four digits of a credit card number, or the style code buried inside a product number.
FileMaker can work with individual characters inside a text value. The first letter in a text value is number one; the second is number two; and so on. Then you can ask for the first few characters, or the last few, or just the fifth, sixth, and seventh.
Note
Every letter, number, punctuation mark, space, tab, carriage return, or other symbol counts as a character.
In Chapter 5, you learned how to create buttons on a layout and program them to perform all kinds of database duties at a click (Section 6.6.5.3). The only problem is, the more features you give your database, the more buttons you have to make. And some of the folks using your database need a completely different assortment of buttons than others. Fortunately, most button commands have one or more options you can set with a calculation. The calculation can adjust what the button does based on field data, user information, the current date or time, and so forth.
Suppose you want a quick way to map your customer’s location. Many Web sites provide free maps, and FileMaker has an Open URL button command that opens your Web browser and takes you to a specified Web page. With this command, and a calculation that produces the right Web address, you can add quick and easy mapping to your database.
First, you need to figure out what the URL should look like. You can make this decision by going to a Web page similar to the one you want. For example, this address shows a map of FileMaker Inc.’s home base using Map Quest:
| http://www.mapquest.com/maps/map. |
| adp?country=US&addtohistory=&address=5201+Patrick+ Henry+Drive&city=Santa+Clara&state=CA&zipcode=95052&homesubmit=Get+Map |
At first these lines might look like garbage, but if you look closely you can see the street address, city, state, and zip code in there. It wouldn’t be hard to make a text calculation that produces this same Web address for a customer, based on the right fields:
Add a button to the layout.
In the Specify Button dialog box, choose the Open URL command.
In the Options section of the window, turn on Perform without dialog, then click the Specify button.
When the Open URL Options window opens, click Specify in that window. A Specify Calculation window comes up.
You can now create the calculation. You probably want to paste a Web address, put quotes around it, and then set out inserting necessary fields in the right places. Be sure to end each section of the address with a quote, and use the & operator between each piece of text and each field. Here is a calculation from the address above:
	"http://www.mapquest.com/maps/map.
	adp?country=US&addtohistory=&address=" &
		Customers::Street Address &
	"&city=" &
		Customers::City &
	"&state=" &
		Customers::State &
	"&zipcode=" &
		Customers::Zip Code &
	"&homesubmit=Get+Map"
When you’re finished, click OK a couple times until you’re back on your layout. You can now test your button in Browse mode.

The Left function returns the first few letters of a text value, eliminating the rest. You pass (that is, tell) the calculation the actual text value, and the number of letters you want. For example, to get a person’s initials, you can use a calculation like this:
Left ( First Name ; 1 ) & Left ( Last Name ; 1 )
To get the first three digits of a Social Security number, you can use this calculation:
Left ( SSN ; 3 )
The Right function does the same thing but starts from other end of the text value. If you want to record the last four digits of someone’s credit card number, you can do it like this:
Right ( Credit Card Number ; 4 )
If the information you want isn’t on either end, you may need to use the Middle function instead. This function is a little different: It expects three parameters. Just as when using Left and Right, the first parameter is the text value FileMaker’s inspecting. The second parameter is the starting position. Finally, you tell FileMaker how many characters you want.
For example, suppose you have a product database that uses a special coding system for each item. The code “SH-112-M” indicates shirt style 112, medium size. To pull out just the style number (that 112 in the middle of the product code), you want your calculation to grab three characters from the Product Number field, starting with the fourth character.
Middle ( Product Number ; 4 ; 3 )
Word functions
FileMaker also understands the concept of words. With word functions, you don’t have to bother dealing with every single character.
In FileMaker’s mind, a word is any stretch of letters, numbers, or periods that doesn’t have any other spaces or punctuation in it. Most of the time, this definition means FileMaker does exactly what you expect: It sees the real words in the text. For example, each of the following is one word:
FileMaker
ABC123
This.is.a.word
Any sequence of other characters isn’t part of a word at all. Each of these has two words:
FileMaker Pro
ABC 123
A-Test
Two *** Words
Warning
If your text value doesn’t have normal words (like a long URL, for example), you may have to pay special attention to the letters-numbers-periods rule to get the results you expect.
Along the same lines as the Character functions, FileMaker has three word-oriented functions called LeftWords, RightWords, and MiddleWords. Each takes two parameters, including the text value to examine, and a number or two to tell FileMaker which words you’re interested in. You can use a LeftWords function to parse out a person’s First and Middle Name if you ever get a file with all three names unceremoniously dumped into a single field.
LeftWords returns all the text before the end of the specified word. For instance, this function:
LeftWords ( Preamble ; 3 )
Might return We the People. But if Preamble contained “This *** Is *** a *** Test” it would return This *** Is *** A instead. In other words, it doesn’t just return the words. It returns everything before the end of the third word.
Likewise, RightWords returns everything after the specified word’s beginning, counting from the end. This calculation:
RightWords ( Revelations ; 1 )
Would return Amen.
What would LeftWords and RightWords be without MiddleWords? You can probably guess how this function works: You pass in a text value, a starting word, and the number of words to return. It then returns everything from the beginning of the starting word through the end of the finishing word. The following calculation shows how it works; it returns “or not.”
MiddleWords ( "To be, or not to be" ; 3 ; 2 )
Text value functions
How can text have a value? Well, to FileMaker, values are what fields hold, so a field’s text is its value. If a field holds more than one chunk of text, each on its own line, FileMaker considers each a separate value, hence the term return-separated values. You can think of these bits of text as lines or paragraphs. Text value functions let you use those line breaks to parse text. This trick comes in handy more often than you think.
Here’s a simple example to show how it works. Suppose you have a field called Colors with lists like this:
| Red |
| Green |
| Blue |
| Orange |
| Yellow |
FileMaker tells you this field contains five values, and you can work with them just like characters and words. For example, this LeftValue function returns “Red” and “Green:”
LeftValues ( Colors ; 2 )
Use the GetValue function when you need to parse out just one value from a list. The value you need has to be in a predictable place in the list, as in the whole-email-slammed-into-one-field example at the beginning of this section. Say the email comes to you like this:
Email From
|
Email To
|
Subject
|
Body
|
You could grab the Email To address with this function:
Get Value ( Email ; 2 )
FileMaker has RightValues and MiddleValues functions, too. See the box below for ideas on how to use them.
Text counting functions
Another way to parse text is to simply count its individual parts. FileMaker has three related functions for finding out how much text your fields contain:
The Length function returns the length of a text value by counting characters.
The WordCount function tells you how many words are in a text value.
Using the ValueCount function, you can find out how many lines a field has.
These functions become powerhouses in combination with the various Left, Right, and Middle functions. When the fields you’re parsing contain varying amounts of text, you can have FileMaker count each one so you don’t have to. For example, to return all but the last letter in a field, you can use this calculation:
Left ( My Field ; Length ( My Field ) - 1 )
It uses the Left function to grab characters from the field, and the Length function (minus one) to find out how many to get. Just change the number on the end to chop off any number of junk characters from the end of a field. You’re welcome.
Other text parsing functions
FileMaker includes dozens of text functions, but a few of them are worth special mention because you see them throughout the rest of this section, and because they’re so useful for cleaning up messy data.
The Substitute function performs a find-and-replace within a text value. For example, if you want to turn all the Xs to Os in your love letter (maybe you felt like you were coming on too strong), you can do this:
Substitute ( Love Letter ; "X" ; "O" )
A few FileMaker functions support a special bracketed syntax and Substitute is one of them. If you want to perform several replacements on a piece of text, you can do it with one Substitute function. Each pair in brackets represents one search value and its replacement value. Here’s how you can show a field value with all the vowels removed. You can do this:
	Substitute ( My Field ; ["a" ; "] ; ["e" ; ""] ; ["i" ; ""] ; ["o" ; ""] ; ["u" ;
	""] )
While Substitute can be used to change or remove what you specify, Filter can remove everything you don’t specify. For example, suppose you want to strip any non-numeric characters from a credit card number. You can try to think of all the possible things a person might type in a Credit Card Number field (good luck!) or you can use Filter instead:
Filter ( Credit Card Number ; "0123456789" )
This calculation tells FileMaker to return the contents of the Credit Card Number field with everything except the numerals it removes. In other words, simply put the characters you’d like to keep in the second parameter.
Text Formatting Functions
Normally when you see data in a calculation field, it’s displayed in the format (font, size, style, color, and so on) you applied in Layout mode. Every character in the field shares the same format, unless you want to manually search through all your records selecting the words “Limited Time Only” in your Promotion Notes field, so you can make that bold and red every time it appears. Not only does that method waste your precious time (especially if you’re on salary), it also plays havoc with your design when you try to print the field.
FileMaker’s Text Formatting functions let you specify exactly what bit of text you want in 18-point, boldfaced, red Verdana. And you don’t have to visit a single record in person. You just write a calculation and FileMaker does the drudgework for you, without tampering with the real data.
FileMaker has six text formatting functions, as described below.
Tip
Since that big heading above clearly reads "Text Formatting Functions,” any reasonable person would assume that this formatting applies only to text. Luckily, the unreasonable people rule the world. You can apply text formatting to any data type, as you’ll see later in this chapter.
TextColor and RGB
The TextColor function takes two parameters: some text, and a color. It returns the text you send it in the right color. That’s the text you specify using the companion function, RGB. Like many computer programs, FileMaker thinks of colors in RGB code, which defines all colors as combinations of red, green, and blue as expressed by numerical values.
This function returns a color based on three parameters—red, green, and blue. For example, if you want to change the Full Name field to show the first name in bright red, and the last name in bright blue, you use this calculation:
	TextColor ( First Name ; RGB ( 255 ; 0 ; 0 ) )
		& " " &
	TextColor ( Last Name ; RGB ( 0 ; 0 ; 255 ) )
FileMaker has a basic conflict over color. After all, it’s a computer program that works with data, which comes in a limited number of types, like text value, number, date, and time. So what kind of data type is a color? The explanation isn’t very, er, colorful. FileMaker understands 16,777,216 distinct colors, each subtly different from the one before, and each numbered from 0 to 16,777,215. Unfortunately, learning all those colors by number is beyond the reach of even the most bored developer. So FileMaker uses a standard (albeit entirely unintuitive) method of specifying a color as a mixture of component colors—red, green, and blue—with varying intensities.
Each parameter to the RGB function is a number, from zero to 255. The number says how intense—or bright—the component color should be. A zero in the first parameter means red doesn’t enter into the equation at all. 255, on the other hand, means FileMaker should crank the red component to the max. The RGB function returns a number, identifying one of those 16-odd million choices. To make it doubly confusing for anyone who doesn’t have a degree in computer programming or television repair, the RGB system deals with red, green, and blue as sources of light, not the more intuitive red-yellow-blue primary colors of paints and pigments.
When colored lights mix (like those little pixels on a monitor), red and green make…yellow. In other words, to FileMaker and other RGB experts, it makes perfect sense to see bright yellow as the following:
RGB (255 ; 255 ; 0)
So what’s a person to do? Don’t use RGB codes. Find some other tools.
If you use Mac OS X, you have just such a tool in the Utilities folder (in your Applications folder). It’s called Digital Color Meter. Launch the application and choose RGB As Actual Value, 8-bit from the pop-up menu in its window. Now the little blue numbers show proper red (R), green (G), and blue (B) values for any color you point to on your screen. For example, in the status area (in Layout mode), pop open the Fill Color menu and point to any of the colors there to see the RGB equivalent.
On Microsoft Windows, you can see RGB colors in the standard color picker window. Just go to Layout mode, and in the status area, click the Fill Color button. Choose Other Color. When you click a color, you see the red, green, and blue values listed in the bottom-right corner of the window.

TextFont
To change the font in a calculation result, use the TextFont function. In its simplest form, this function is…well…simple. You just pass it the text you want to format, and the name of the font to use. FileMaker returns the same text with the font applied:
TextFont ( "Dewey Defeats Truman!" ; "Times New Roman" )
TextFont also has a third optional parameter called fontScript. Most people can simply ignore this option. It tells FileMaker which character set you’re interested in, and to select an appropriate font. (The character set determines which languages the font can be used for.) FileMaker accepts the following fontScript values:
Roman
Greek
Cyrillic
CentralEuropean
ShiftJIS
TraditionalChinese
SimplifiedChinese
OEM
Symbol
Other
Note
Unlike the font name, which is simply a text value, the script value shouldn’t be in quotes. It’s not a text value. Instead, you must specify one of the above values exactly, with no quotes.
If FileMaker can’t find the specific font you’ve asked for, it selects another font in the specified script, so if you’re on an English-based system and need to select a Chinese font, this parameter can help. (If you don’t specify a script, FileMaker automatically uses the default script on your computer. That’s why you rarely have to worry about it—you automatically get what you probably want.)
TextSize
The TextSize function is simple in every case. Just pass some text, and the point size you’d like (just like the sizes in the Format → Size menu in Browse mode). FileMaker returns the resized text.
TextStyleAdd and TextStyleRemove
Changing text styles (bold, italic, and so on) is a little more complicated. After all, a piece of text can only have one color, one font, or one size, but it can be bold, italic, and underlined all at the same time. With text styles, you don’t just swap one style for another; you need to do things like take italic text and add bold formatting or even take bold-titlecase-strikethrough text and un-strikethrough it, leaving everything else in place.
To solve these problems, FileMaker gives you two functions for dealing with style: TextStyleAdd and TextStyleRemove. You use the first to add a style to a piece of text:
"Do it with " & TextStyleAdd ( "style" ; Italic )
Likewise, the TextStyleRemove function removes the specified style from the text.
TextStyleRemove ( My Text Field ; Italic )
The text style parameter goes in the calculation without quotes, just like the examples above. You can use any and every text style in FileMaker: Plain, Bold, Italic, Underline, Condense, Extend, Strikethrough, SmallCaps, Superscript, Subscript, Uppercase, Lowercase, Titlecase, WordUnderline, and DoubleUnderline. And then there’s AllStyles. When you use the AllStyles parameter, it adds (or removes) all existing styles.
With these two functions and all these style options, you can do any kind of fancy formatting footwork imaginable. Here are some guidelines:
When you add a style to some text using TextStyleAdd, it doesn’t change any style that you’ve already applied. The new style’s simply layered over the existing styles.
Plain style’s the notable exception to the above point. Adding Plain style effectively removes any other styling. This style comes in handy when you need to remove a mess of styling and apply something simpler. Say your fields contain the words “Past Due,” styled in uppercase, bold, italic, and double underlined and you decide that modest italics would work just fine. Nesting the TextStyleAdd function with the Plain parameter does the trick:
TextStyleAdd ( TextStyleAdd ( "past due" ; Plain ) ; Italic )
When you add more than one style parameter, FileMaker applies them all to the text. You can use nesting, as shown in the previous point, or simply stack them up with + signs:
TextStyleAdd ( "WARNING" ; Bold+Italic )
If you take a bit of text that was formatted with a text formatting function, and then send it to another calculation as a parameter, the formatting goes along with the text. With the Substitute function, for example, you can format text that hasn’t even been typed yet. If you add this function to a text field into which people can type letters to customers, it changes every occurrence of “for a limited time” to bold italics.
	Substitute ( Letter ; "for a limited time" ; TextStyleAdd ( "for a limited time" ;
    Bold+Italic )
Date and Time Calculations
FileMaker can be a little esoteric about dates and times. If you don’t understand how they work, you can end up wasting a lot of time trying to do things that FileMaker can easily do for you. For example, you might need to know the first day of the month following the date an invoice is due. You can spend ages writing a calculation that takes leap years and the different number of days in each month into account. You’d be sweaty, tired, and proud when you were done…six hours after you started. But if you know how dates work in FileMaker, you can just type this single line:
Date ( Month ( Invoice Due Date ) + 1 ; 1 ; Year ( Invoice Due Date ) )
How FileMaker Looks at Time
Before you starting writing date and time calculations, you need to know how FileMaker actually keeps track of dates and times. FileMaker internally stores any date or time value as a single number that makes sense to it. Then, when it needs to display a date or time, it converts the number to a value people recognize as a date or time, like “11/7/2005” or “10:23 AM.” As with other numbers that it stores one way and displays another, FileMaker does the math on the stored value, then converts it for your convenience. Here’s how FileMaker keeps track of time:
It stores a date as the number of days since the beginning of the year 1 A. D.
It stores a time as the number of seconds since midnight.
It stores a timestamp as the number of seconds since midnight at the beginning of the year 1 A. D. (a really big number).
This secret to date and time storage isn’t just a technicality. It actually tells you a lot about how you can use dates and times in calculations. In the next few sections, you’ll see how you can use simple math to do temporal magic.
Math with Dates and Times
Because FileMaker looks at dates and times as numbers, you’re free to use them right along with other numbers and operators in all kinds of mathematical functions. By adding, subtracting, multiplying, and dividing dates, times, timestamps, and numbers, you can come up with meaningful results.
Dates
You can use the information in your database’s date fields to have FileMaker figure out due dates, anniversaries, and so on. You can use date fields and numbers interchangeably. FileMaker’s smart enough to figure out that you want to add whole days to the date value it’s storing. Here are some general principles:
To get a date in the future or past, add or subtract the number of days. For example, if your policy is that payments are due 10 days after invoices are presented, use this calculation:
Invoice Date + 10
Of course you aren’t limited to adding constant numbers to dates. You can add a number field to a date field just as easily. If your video rental database holds the checkout date and the rental duration, you can find the due date with this calculation:
Checkout Date + Rental Duration
To get the number of days between two dates, subtract them.
Imagine your registration database holds arrival and departure dates. You can find the duration of the stay (in days) using this calculation:
Departure Date–Arrival Date
Note
When you’re adding a number to a date, the result is a brand new date, and you should set the result type (Section 9.3.1.5) of your calculation accordingly. On the other hand, if you’re subtracting two dates, the result is a number—the number of days between the two dates. In this case, set your calculation to return a number result.
Times
Although FileMaker’s internal clock counts time as the number of seconds since midnight, a time value doesn’t always have to be a time of day. Depending on the field format (Section 3.2.6.4), a time value can be a time of day, like 2:30 PM, or a time (as in duration, like 3 hours, 27 minutes).
Tip
FileMaker is savvy to the concept that time passes, but not all programs are. For instance, if you’re exporting data to Excel, you should first convert time fields containing durations to plain old number fields.
In both cases, times have a numeric value, in hours:minutes:seconds format. 14:30:05 in a time of day field is 5 seconds after 2:30 PM, but in a time field, it’s a duration of 14 hours, 30 minutes, and 5 seconds. If the time has fractional seconds (a decimal point), the numerical value does too.
You can record how long your 5-year-old takes to find her shoes (34:26:18), or how long she takes to find the Halloween candy (00:00:02.13).
The key to doing math with any kind of time value is to remember you’re always adding and subtracting amounts of seconds. Here are the guidelines:
To get a time in the future or past, add or subtract a number of seconds or a time value. If you know when a student finished her exam, and you know how long the exam took in minutes (1 minute = 60 seconds), you can figure out when she started.
Finish Time–(Exam Duration * 60)
To get the number of seconds between two times, subtract one from the other. Your Test Reporting database stores start and finish times for each exam. To find the duration, use this calculation:
Finish Time–Start Time
To get a time of day value in the future or past, add or subtract the number of seconds or a time value. Suppose you have a database of movie show times for your theater business. You use a timestamp field to record the date and time when each showing starts. You also use a time field to keep track of how long each movie is. Now you need to know when each movie ends:
Showtime + Duration
Note
If you store the date and time the movie starts in separate date and time fields, the movie time calculation is much more difficult. Suppose a movie starts at 11:30 p.m. and runs for two hours. Adding these together, you get 25:30, which is a perfectly valid time value, but not a valid time of day. When you add to time values, they don’t “roll over” after midnight. Timestamps, on the other hand, work as expected: You get 1:30 a.m. on the next day.
To get the number of seconds between two timestamp values, subtract one from the other. For example, you use timestamps to record the date and time you start and finish a job. To find out how long the job took, in minutes, use this calculation:
(Finish Time Stamp–Start Time Stamp) / 60
To increase or decrease a time duration value, add or subtract the number of seconds, or another time duration. Say you use a repeating time field to hold the length of each song on a CD. This calculation tells you how long the entire CD is:
Sum ( Songs::Song Lengths )
To double, triple, halve, or otherwise scale a time duration, multiply or divide it by a number.
If chilling your microbrew always takes twice as long as cooking, you can determine the chilling time with this calculation:
Cooking Time * 2
Parsing Dates and Times
Just as you can parse out bits of text from text fields, FileMaker lets you pull out parts of a date or time value. For example, you might keep track of all your employee’s birthdays in a normal date field, but you’re trying to get statistical data from the year they were born, so you’re not concerned about the month or date part of that value. You have six functions at your disposal to pick those individual components from a date, time, or timestamp value. They are:
Year
Month
Day
Hours
Minutes
Seconds
With a date value, you can use Year, Month, and Day. If you have a time, Hours, Minutes, and Seconds apply. You can use all six functions with a timestamp value.
These functions all have the same form. Each takes a single parameter—the value—and returns a numerical result. For example, the Day function returns the day portion of a date. This calculation returns 27:
Day ( GetAsDate ( "7/27/2006" ) )
Calculations that Create Dates and Times
Almost every database in existence has fields that create date and time values. Otherwise, folks would still sit around pecking out business forms with a typewriter, an adding machine, and a wall calendar. It sounds quaint, but there was one advantage—the human brain. Without even being aware of it, people do incredibly complex math every time they glance at a paper calendar or analog clock. When the boss said, “I want these invoices to go out two days after the end of next month,” a human clerk knew exactly what to do.
When you work with dates and times in FileMaker, sometimes you can get away with just simple math as in the previous section, plugging date and time values into basic calculations. But how do you tell a computer to put “two days after the end of next month” in the Invoice Date field? FileMaker provides three functions to assist the translation:
The Date function accepts three parameters—Month, Day, and Year—and returns the appropriate date value. For example, to put a date value of January 21, 2006 in a calculation, you use the date function like this:
Date ( 1 ; 21 ; 2006 )
The Time function wants three parameters as well, this time Hours, Minutes, and Seconds. It returns the time value. (The Seconds parameter can have a decimal point if necessary.) For example, you can construct the time value “8:00 PM” like this:
Time ( 20 ; 0 ; 0 )
The Timestamp function takes just two parameters: Date and Time. It combines the two into a single timestamp value. It shows January 10, 2006 at 8:30 p.m. like this:
Timestamp ( Date ( 1 ; 10 ; 2006) ; Time ( 20 ; 30 ; 0 ) )
In this example, you use all three functions: the date function to produce the correct date value, the time function for the time value, and the timestamp function to put them together.
The secret powers of date
Although FileMaker doesn’t look at calendars the way people do, that’s not all bad. You see a calendar in absolute terms: April 30 belongs to April, May 1 belongs to May, and that’s that. FileMaker, however, thinks of dates in relative terms and sees no such limitations. You can use this flexibility to your advantage in calculations—big time. You can give seemingly illogical parameters to the date function, and have FileMaker produce a valid date anyway.
For example, this calculation actually produces a valid date:
Date ( 5 ; 0 ; 2006 )
You see a nonsense result—May 0, 2006. But FileMaker looks at the same code and says, “No problem. Zero comes before 1, so you must mean the day that comes before May 1.” And so it returns April 30, 2006.
These same smarts apply to the month as well:
Date ( 15 ; 11 ; 2006 )
Produces March 11, 2007. In other words, three months into the next year, since 15 is three months more than one year.
This behavior comes in super-handy when you’re trying to fiddle with dates in calculations. Suppose you have order records, each one with an order date. You bill on the last day of the month in which the order was placed, so your calculation needs to figure out that date, which could be 28, 30, or 31 depending on the month, or even 29 if it’s February in a leap year. That calculation would take an entire page in this book. But here’s a much easier approach: Instead of calculating which day each month ends, use the fact that the last day of this month is always the day before the first day of next month. To start with, you can calculate next month like this:
Month ( Order Date ) + 1
So the date of the first day of next month is:
Date ( Month(Order Date) + 1 ; 1 ; Year(Order Date) )
To get the day before, just subtract one from the whole thing:
	Date (
		 Month(Order Date) + 1;	// the _next_ month
		 1;				  //the _first_ day
		 Year(Order Date)	   // the same year
	)- 1				 // subtract 1 to get the day before
It may look a little confusing at first…but it’s much shorter than a page. And it works perfectly every month of every year.
Containers in Calculations
Although it isn’t a typical calculation data type, you can do a few interesting things with container fields in calculations. You don’t have the same vast options you do with other types. It would be great if you could subtract Cousin Clem.jpg from Family Reunion.jpg to get the scoundrel out of the picture, but alas, the technology’s not quite there yet. Nevertheless, FileMaker doesn’t leave containers entirely out in the cold when it comes to calculations.
Calculations with Pictures, Sounds, Movies, and Files
When you create a calculation field (Section 9.1.1), you can set its result type to Container. You can’t create container data in a calculation, but you can refer to other container fields. When you do, the picture, sound, movie, or file in the referenced container field shows in the new calculation field.
You can, for example, make a calculation field that shows the contents of one container field when you’re in Browse mode and another in Preview mode. This field lets you use low-resolution images when you view on the screen, and higher resolutions when you print. (You’ll learn to do that in the next chapter, when you learn about calculations with that kind of decision-making ability.)
You might also want to use container fields in a calculated replace. Suppose you have a found set of 30 records that don’t have a low-resolution image. You have to have something in that field, so you decide to take the hi-res image for those few records and plunk them down in the low-resolution image field. Choose Records → Replace Field Contents and perform this calculated replace:
Graphics::High Resolution Image
The entire calculation consists of a reference to a field of that name in the Graphics table. The calculation does the grunt work of copying the high-resolution image into the low-resolution field in each record.
Calculations with References
If a container field holds a reference to a picture, movie, sound, or file, instead of the object itself (Section 2.7.4), you can do even more. When you treat such a field as text, FileMaker gives you some information about the referenced file.
If you have a field called Product Shot (see Figure 10-4) that holds a reference to a photograph file, you can use this calculation:
GetAsText ( Product Shot )

The result of this calculation looks like this:
	size:266,309
	image:../../../../../quilt database/sale quilt pix/batik squares.jpg
	imagemac:/babycakes/current work/quilt database/sale quilt pix/batik squares.
	jpg
As shown in Figure 10-4, FileMaker tells you the size (width and height in pixels) and location of the file (if this weren’t a picture, you wouldn’t see the “size:” line).
You can use this calculation to help you keep track of a set of images that the whole company needs to use. You really need two container fields for this purpose. One holds the graphic itself, or a low-resolution copy, if you don’t want the file size to balloon. Then, when you place the graphic as a reference in the second container field, the calculation stores the graphic’s original location. The calculation’s not dynamic, however, so the path serves as a reference of where the file should be, not where it really is. Company policy about putting things back where you found them has to reinforce your good data practices.