
IN THIS CHAPTER
Thunderbird is an easy-to-use, complete email and news reader program. Many of the features Firefox offers, such as themes and extensions, are available in Thunderbird as well. Thunderbird and Firefox can be used either together or separately.
A comprehensive set of features is included with Thunderbird that will appeal to all users. Thunderbird has a flexible and powerful spam and junk mail filter. It is a news (NNTP) reader, but to be fair, Outlook Express is also a news reader program. Thunderbird also has a built-in spell checker, so there is no excuse for misspelled words in emails.
Only a few generally available programs exist for email clients. Included with Windows is Outlook Express, an easy-to-use email program that initially offered such poor security that many users decided to look elsewhere for email. Today, Outlook Express is better, but many users still refuse to even consider using it. Outlook Express offers an NNTP client in addition to email.
Included with Microsoft Office is a more advanced version of Outlook Express named Outlook. Outlook is a somewhat more robust program and offers many good enhancements. Surprisingly, Outlook doesn’t offer a news client.
From QualComm comes Eudora, an established name in email clients. It is available in both free and paid-for versions. As with Outlook, there is no NNTP client in Eudora.
Netscape offers Netscape Mail, an email client bundled with Netscape Communicator. This program is probably the least used of the various email clients.
Mozilla Suite also has an email client, from which Thunderbird was developed. This heritage makes the two seem a bit similar, but Thunderbird has many more features.
Finally, Thunderbird is an email client that has the benefits of being free, available for many platforms (such as Windows, Linux, and Macintosh), and easy to use. With Thunderbird, you have both an email and a news client in one compact package.
Thunderbird offers as many features as any competing program. It also adds some interesting capabilities that are either nonexistent in other email programs or severely limited in scope. These are as follows:
Themes—These are supported in Thunderbird in the same way they are in Firefox. This lets you create a look and feel that is your own, or you can use an existing theme to jazz things up.
Extensions—These add new or improved functionality and are available from Mozilla’s website. You can also write your own extensions just like Firefox extensions.
IMAP/POP/SMPT email protocol support—This allows Thunderbird to interface with virtually any email system.
Built-in RSS reader—This enables the reading of RSS feeds. (This functionality is similar to the RSS support found in Firefox.)
Support for HTML-formatted email—This is in addition to the plain-text format.
Search feature—This is powerful, fast, and easy to use. The results of searches are saved in search folders.
Filters—The Thunderbird filters enable you to process messages as they arrive from the server. A message may be placed in a specified folder, deleted, or have a number of other actions performed on it.
Message functionality—Messages can be arranged in groups, based on sort criteria.
Action labels—For example, Important, Work, Personal, To Do, and Later can be applied to emails.
Return receipts—If you worry that your message might not be received by the person to whom you sent it, you can use return receipts. If other people send email to you with a return receipt request, Thunderbird can be configured as to whether to send the receipt.
Address book—Thunderbird maintains an address book that holds names of people to whom you frequently send email. The address book can be configured to automatically add the email addresses from your outgoing emails.
LDAP—Thunderbird can use the Lightweight Directory Access Protocol (LDAP) interface to augment its address book features.
Import functionality—A powerful import facility is built in to Thunderbird to enable users of other email clients to import addresses, messages, and settings.
Blocking capability—You can block the loading of remote images that are frequently used by spammers and tracking services, unless the sender is in your address book.
Multiple accounts—Power users with multiple email and newsgroup accounts are in for a treat with Thunderbird because multiple accounts are easy to configure and use.
Thunderbird offers tremendous value for the cost (free) and, as such, is a valuable addition to any user’s computer.
In addition to this book, two online documents are useful in learning how to use Thunderbird. The first, “Getting Started with Thunderbird 1.0,” is at http://mozillanews.org/?article_date=2004-12-07+16-19-25. The second, “Managing Thunderbird Mail Accounts,” is at http://mozilla.gunnars.net/thunderbird_mail_setup.html.
The first step in setting up Thunderbird is to download the installation package from Mozilla’s website. Start at http://www.mozilla.org/products/thunderbird/ and download the installation program. This file is large (almost 6MB), so if you are a dial-up user, you might want to have something to keep you busy while it is transferred to your computer (a 56K modem will take about 20 minutes to fetch this file).
After the downloaded file is safely on your computer, you only need a few clicks of the mouse to get Thunderbird installed. We’ll do an installation of Thunderbird on Windows XP and another one on SUSE Linux.
An improvement in Thunderbird 1.5 is the automatic update feature. This feature checks with the Mozilla.org website and, if there is a newer version of Thunderbird, downloads it. After the update is downloaded, you are prompted to restart Thunderbird. (You can defer restarting if it is not convenient at this time.)
Thunderbird for Windows is distributed as an executable (Thunderbird Setup 1.5.EXE for Thunderbird version 1.5) file. After it’s downloaded, double-click this program; the setup routine will begin.
The first step in installation displays a welcome screen instructing you to close all currently open applications. This is a good precaution, but if you must have a program running, at least save any documents that might be lost if the unthinkable happens and the computer crashes.
The second step is the Thunderbird license. As with all computer software, you need to explicitly accept the license agreement.
As with Firefox, there are two types of installations: standard and custom. The standard installation installs Thunderbird for the typical user. The custom installation lets you set some useful options, so I recommend selecting Custom.
By default, Thunderbird is installed in your Program Files folder, in a subfolder named Mozilla Thunderbird. I strongly recommend accepting this default location if this is your first Thunderbird installation. However, if need be, the installation folder can be any folder accessible to the computer.
You should have selected Custom as your installation type. Figure 10.1 shows the three items this options lets you choose from.

Figure 10.1. A Custom installation gives you these three optional components to select if you want them.
Offline Support—Most of the time you will be online, connected to your email servers (SMTP and POP3/IMAP). However, for users who are not always connected to the network (perhaps you answer emails while on a coffee break), working offline is useful. To support offline usage and to be able to send outgoing messages the next time the computer is connected to the network, Thunderbird must download your incoming messages and store them locally.
RSS Support—With RDF Site Summary or Rich Site Summary (RSS) technology, Thunderbird is capable of checking RSS Internet sites on a scheduled basis (the default is every 100 minutes) for updates and stories. Thunderbird 1.5 also supports podcasting, RSS feeds that contain audio that plays on devices such as the Apple iPod. If you want to use podcasting, be sure this option is marked.
Quality Feedback Agent—Using this enables Thunderbird to send nonpersonal information to Mozilla whenever Thunderbird crashes. This information is anonymous and helps the developers find and fix flaws in Thunderbird.
You can choose to automatically create icons on your desktop, in the Start menu, and in the Quick Launch bar (the space next to the Start button).
After you have selected your options and configuration, the Thunderbird installation program can begin the installation.
When the installation completes, the final step is to click Finish to close the installation program. The only option on this screen is to select whether to launch Thunderbird at this time. Select the Launch option and give Thunderbird a test drive.
Installation of Thunderbird on Linux is as easy as with Windows. The size of the download is larger, though (about 10MB, so figure about 35 minutes on a dial-up connection).
Note
Even though the Windows installation of Thunderbird is easy, the Linux installation might be considered to be even easier.
With the Linux installation, there are no options to set or folders to install to; all you have to do is extract Thunderbird from the archive and place it into a convenient folder.
After Thunderbird downloads, open the archive (Thunderbird’s archive is named thunderbird-1.5.tar.gz) in your Linux archive viewer program (File Roller if you’re using GNOME). When the archive is open, extract the files (with directory information) to your installation location. Users typically extract the Thunderbird files to a folder in username/bin.
After the files are extracted, go to the folder to which you extracted the Thunderbird files and start the Thunderbird shell script—this is the only file named Thunderbird.
Most of us already have email. Some people use a web mail interface, such as Outlook Web Access (OWA). Those users should read the section after this, “Setting Up Accounts.” But, if you are already a user of Outlook, Outlook Express, or Eudora, read on.
After Thunderbird is installed, the first time it is run it prompts to see whether you want to import your email settings. Importing enables you to import your address books, existing mail from your existing email program, and some configuration settings.
Thunderbird can import address books from other email programs, including Outlook, Outlook Express, Eudora, and any email program that is capable of exporting address book information in a text file format (such as LDIF, CSV, TAB, and TXT).
Eudora stores address information in separate files in the Eudora program’s working folder (typically c:program filesqualcommeudora
ndbase.txt and c:program filesqualcommeudora
ndbase.toc).
Thunderbird imports these files into your new address book. Because Thunderbird has more detailed information for address book entries than Eudora does, you will likely want to go to the new address book entries and update them to include additional Thunderbird-specific information.
You don’t need to own the address book you are importing from Eudora: As long as you have access to this address book, Thunderbird will import it for you. This enables the publishing of a read-only copy of your Eudora address as a network shared resource, and other users can then also import the addresses.
Outlook supports address books as a .pst file (a personal store), a .pab file (a personal address book), or an Exchange Server object. Thunderbird imports the address book the installation of Outlook is configured to use.
Tip
If you are interested in using Outlook and Outlook Express address books directly without importing them into Thunderbird, visit http://abzilla.mozdev.org/. This document provides information about upgrades to the address book capabilities.
To be able to import an Outlook address book, Outlook must be defined as the default email program. After you have installed Thunderbird, when you reach this point, Outlook might not be your default email client. The easiest fix for this problem—which causes the message shown in Figure 10.2—is to start Outlook and click OK when it prompts to be made the default mail program.
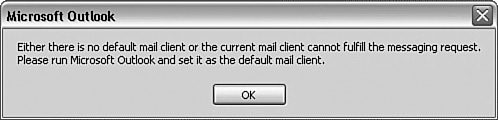
Figure 10.2. Importing from Outlook is made more difficult because Outlook must be the default mail program.
If you do receive this message, close Outlook if it was open and then restart it. When Outlook prompts whether it is to be the default mail client, click OK. Then the import from Outlook should work. When you’re done, make Thunderbird the default email client.
Outlook Express is the little brother of Outlook. Importing from Outlook Express is easier than from Outlook because you don’t have to make Outlook Express your default mail program.
Simply click Outlook Express in the Import Wizard’s screen; all Outlook Express addresses will then be imported for you.
The various text file formats require the most effort to import. You must tell Thunderbird what the file looks like (which columns are present and the order of the columns).
Tip
You might want to import data that has one or more fields that do not match those that Thunderbird expects. Thunderbird has four general-purpose fields named custom 1 through custom 4. And it has a notes field that can be used for this data.
In the exporting program, order the columns in the same order as the Thunderbird fields.
In Figure 10.3, I am importing a simple comma-delimited text file. The records in this file are
Peter, Hipson, Peter5, [email protected]
Peter, Hipson, Peter6, [email protected]

In the Import Address Book dialog box, you can check and uncheck fields and reorder fields to match your file’s field order. After you have selected the fields you want to import, simply click OK to perform the importation.
Transferring the contents of your existing email program into Thunderbird provides a seamless migration in which you lose none of your valuable messages or documents.
A sample import from Outlook Express shows a user with a number of folders and messages. This user then imported the mail, which also imports the entire folder structure, too!
As Figure 10.4 shows, all the messages in Outlook Express were imported into a folder named Outlook Express Mail. The entire Outlook Express folder hierarchy is preserved; if you want, you can move the various folders to other locations in Thunderbird.

Users seem to see setting up their accounts as one of the more intimidating tasks when setting up a mail program. You have to consider servers, what they do, usernames, mailbox names, passwords, domains, and so on—you get the idea. It’s somewhat complicated, to say the least.
To get started, let’s figure out as much as we can. First, let’s look at how email is done. You start with what is called a Simple Mail Transfer Protocol (SMTP) server. This server is what moves the mail between users, computers, and domains. You send all mail using SMTP because every Internet email system is SMTP based.
When your home domain’s mail system receives a message for someone in the domain (using SMTP), it puts that message in a special folder usually called the drop folder. Any mail your home domain’s email server receives that is not for its domain is then forwarded (or relayed) to the correct domain. Years ago, before spam, an email message could be relayed through 5–10 SMTP servers before it reached your domain. Today, to limit spam, relaying is much more limited and is allowed only between domains that trust each other. This keeps you from sending spam through my SMTP server, for example.
Back at your domain, the next link in the chain is the Post Office Protocol (POP3). This server checks the drop folder to see which messages the SMTP server has left for the domain users. Each email is examined to determine who it is intended for. If the user exists, he has a folder (usually called a mailbox) and the POP3 server places the email for that user into his mailbox folder. If, on the other hand, the POP3 server cannot find the person who the message is for, it sends a nondelivery receipt (NDR) to the sender’s mail system.
Now that POP3 has placed your mail into your mailbox folder, you can begin the process of getting your email. Your email program asks the POP3 server whether there is any email; if there is, it requests the mail. POP3 then transfers the mail to your email program.
This is perhaps an oversimplification of the process, but it covers the basic issues. Mail is transferred between domains with SMTP; POP3 collects email from the SMTP server; and users collect their email from POP3.
Security is the issue that sometimes makes setup difficult. You must protect your security, so POP3 wants you to use a user ID and password to ensure your email is delivered to you and not someone else. (SMTP wants you to use a password to ensure that you are allowed to send email, too.) Even this wouldn’t be so hard were it not for the fact that with some systems, your username and mailbox names are not the same. Fortunately, many systems are identical, making the setup process simpler.
Note
The Internet Message Access Protocol (IMAP) is another protocol used to interface with your mailbox. This protocol is similar to POP3, although it is more powerful. IMAP enables you to actually create folders on the mail server, perform searches, and other functionality.
This is possible because IMAP always stores messages and attachments on the server (local downloading is optional), whereas on POP3 it is usually the other way around.
To set up your mail accounts, first you must gather some information:
Your mail domain name—For example, my mail domain is
hipson.net.Your mailbox name—For example, my mailbox name is
thunderbird_user.Your logon ID—For example, on my email system mine is
[email protected].Your logon password—For example, mine is
apple-pear-grease.The incoming mail server—For mine, the server is
ishtar.hipson.netand the POP3 port is 110. Were this server to be IMAP, the port number would have been 143. A secure POP email account uses port 995. (Virtually all email systems that support IMAP also support POP3.)The outgoing mail SMTP server—Mine is
ishtar.hipson.net, and the SMTP port is 25.
After you have collected this information, setting up an email account is relatively painless. Just do the following:
Click Account Settings under Tools in the Thunderbird menu. The Account Settings dialog box lists currently defined accounts and has buttons labeled Add Account, Set As Default, and Remove Account. Click Outgoing Server (SMTP) in the list on the left.
Thunderbird allows multiple outgoing SMTP servers, but you usually need only one. Fill in the server’s name (for this example, it’s
ishtar; thehipson.netpart is unnecessary because it is a local server). The port, 25, is the default SMTP port. If your SMTP server uses a different port, change this value. Virtually all SMTP servers require authentication before they will allow sending email to any other SMTP server. In this case, you use your POP3 name and password. You will be prompted for the password when the account is used the first time, and Thunderbird can be told to remember the password for later use. If the SMTP server uses secure connections, set them as well. You might have to ask your network administrator (or ISP help desk) if you do not know the correct setting. You can always try with the default of no secure connection.Next, you must create a POP3 email account. This is the account where you receive your email. Click the Add Account button in the lower-right part of the Account Settings dialog box.
Thunderbird uses a wizard to create accounts. The first wizard page lets you specify the type of account you are creating. In this example, you are creating an email account, which is the default for the wizard.
The second page of the Account Wizard lets you enter your name and email address. The email address is what someone will use when they reply to an email from you. The name is simply a people-friendly name.
On the third wizard page, choose which type of email protocol the incoming mail server will use. The two choices are IMAP and POP. My email server supports only POP3, and not IMAP, so I use the default: POP.
The incoming account name is almost always the same as the mailbox name, and frequently the same name is used for both incoming (POP3) and outgoing (SMTP) servers. A few systems do use different names for the account and the mailbox.
Tip
Whenever a POP3 mail account is created, you have the option of using the global inbox (also called the Local Folders’ inbox), using another account’s folders, or creating a new set of folders for this account.
This enables you to keep email from different accounts separated, so you don’t mix personal email with business email, for example.
Next, you give your account a friendly name. This name is just for your use and does nothing except make the account look pretty. Choose a name that makes sense (such as Work Emails), or just use the default associated with this account.
You are done. The Account Wizard displays the account information, which you should review to ensure that no mistakes have been made (see Figure 10.5).
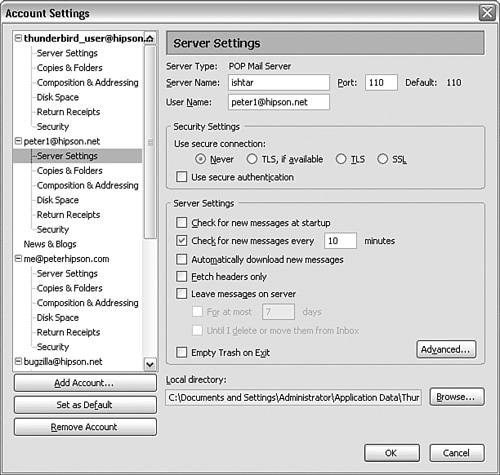
After an account has been set up, you can set settings and configurations for it. The first choice, Server Settings, enables further customization and modification of the settings for the incoming (POP or IMAP) server.
Server settings you can modify include those you initially configured, as well as a number of new settings.
When this is checked, each time Thunderbird starts all incoming email accounts are checked for new messages. This option is on by default, and most users leave it turned on.
Email comes at anytime; there is no schedule or appointed time for email to arrive. You can check frequently for new email using the interval specified in this option. If the time interval is too short, it could affect your system’s performance; if it’s too long, you might wait longer than necessary for emails. Again, the default (check every 10 minutes) seems to work well for most users. However, if you frequently receive time-critical email, you might want to set the interval to a smaller value, say 3 minutes. Regardless of the setting, you can tell Thunderbird to check for new emails at any time.
If this option is turned off, Thunderbird displays a message that you have new email but does not get the email or headers. If you don’t see the new messages in your folders, this option is turned off. Virtually all users turn on this option.
Instead of fetching the entire message, Thunderbird can be instructed to retrieve only the message headers. The body of the message remains on the email server. You can then examine the header fields, such as Subject and From, to determine whether you want the see the message (download it) or just delete it. This option is usually turned off, but users with slow connections should consider turning it on.
Also see the options under Disk Space, where you can choose to not download messages that exceed a certain size or download only a portion of large email messages.
If you check email from several computers, you might choose to leave your messages on the server. This option enables you to retrieve the messages later during another email session or on a different computer.
The most important consideration is your server mailbox’s maximum size. If your mailbox grows too large, you might lose new emails that are refused with the message Mailbox full.
The mail start page is displayed in the Message pane of Thunderbird. This file, by default, is an HTML file, although an image can be used as well.
To modify the mail start page, click Options in Thunderbird’s Tools menu. The Options window’s General section displays the Thunderbird Start Page settings (see Figure 10.6). This option can be turned off if you want—however, turning it off doesn’t improve anything.

Figure 10.6. The Thunderbird Start Page location is set here, but you can restore the original by clicking the Restore Default button.
A location specification exists for the file to be used for the mail start page. The syntax, for Windows users especially, is a bit odd. Because this will be a disk-based file, you specify it as follows:
file:///c:/folder/filename.ext
Notice in this example that the Windows backslash character () is replaced with a forward slash (/). Also notice that you must prefix the file’s location and name with file:///—and those three slashes are important! In the example shown in Figure 10.7, I’ve replaced the start page with an image.

To create a new email message, click the New Message toolbar button (the blue pen and paper button). This displays the Compose New Message window, where you can address and compose your message.
In the compose window, you should first address your message. You can enter either a complete email address or a name from your address book. If you want to CC (courtesy copy) or BCC (blind courtesy copy) the message to another recipient, click the down arrow to the left of To in the address field section.
After the addressing is done, begin by typing the message in the message area. After composing the new message, you can send the message by simply clicking the Send button in the message’s Compose window toolbar.
One useful trick that allows you to compose a message from the Thunderbird desktop icon is right-clicking the Thunderbird icon and selecting Compose Message from the pop-up menu. This is accomplished using a Registry change. The items you must change in the Registry and a description of this process can be found at http://collingrady.com/2004/12/12/thunderbird-static-desktop-icon/.
When you compose a message, Thunderbird automatically saves a draft of the message using the Auto Save feature. To enable (or disable) the Auto Save feature, open Thunderbird’s options dialog box (select Tools, Options in the Thunderbird menu). Click the Composition button at the top of the Options dialog box, and then click the General tab if it is not already active. You can then check (or uncheck) Auto Save Every and set the auto save interval. The default interval is 5 minutes, but I set mine at 2 minutes.
Tip
Thunderbird’s automatic spelling checker can be turned off. Select Tools, Options and click the Composition button at the top of the Options dialog box. Then click the Spelling tab to get to the spelling options. Once there, check the first option, Check Spelling Before Sending, to tell Thunderbird to always spell-check your message before it is sent.
Thunderbird has a spell-check-as-you-type feature that is new in version 1.5. This feature can make spelling errors a thing of the past and eliminates the need to perform a separate spelling check. As with Microsoft Word, Thunderbird checks your spelling as you type and underlines (with a dotted red line) any words it cannot find in the dictionary (see Figure 10.8 for an example, where I misspelled the word one as wone).

Figure 10.8. The word not found is underlined in red, and a right-click gives you some suggested replacement words.
A simple right-click allows you to select possible correct spellings for the word in question. Thunderbird also lets you easily add words to your custom dictionary (that way, those special terms and names won’t always be flagged as spelling errors).
Thunderbird supports languages other than English, so messages written in other languages can be checked.
Tip
Other language dictionaries can be downloaded from Mozilla’s website. This site has almost 50 dictionaries covering about 35 languages.
Additional dictionaries can be found at http://www.mozilla.org/products/thunderbird/dictionaries.html.
Many times your email consists of replying to messages sent by others. Any message in any folder (even the Trash folder) can be replied to or forwarded. On Thunderbird’s toolbar are three buttons: Reply (an envelope with a green arrow), Reply to All (two envelopes and a blue arrow), and Forward (an envelope with a violet arrow).
When you reply to an email, the To address(es) is retrieved from the original message. The subject is the original subject with RE: added to the front of it.
When replying, you can choose to have your reply quote the original message. Then you can configure your reply to start above the quoted message, start below the quoted message (the default), or have the quoted message text selected. These options are set in Account Settings, Composition & Addressing, in the Composition section.
Your reply header (by default, it’s <author> wrote:, where <author> is the author of the quoted message) can also be changed by setting a preference as described on this web page: http://mozilla.gunnars.net/mozfaq_use.html#change_reply_header_text.
After you have composed your reply, either click the Send button in the Compose window or press Ctrl+Enter (Return on the Mac).
Tip
Be careful of the Reply All button. One of the most serious breaches of email etiquette is to reply to all when you really want the reply to go to only the sender. Reply All sends your reply to the original sender and everyone else the sender sent the message to.
I have seen disastrous results when Reply All has been used and the reply was not a polite answer. If you call someone a raging idiot in your reply, think about what will happen when others, or that person, see the message. I’ve seen people lose their jobs due to this type of error.
Even though many traditional users abhor HTML-formatted email, younger users find that personalizing their emails with HTML content gives them the originality they crave.
To create an email message that contains HTML, simply use the formatting tools (fonts, colors, and so on) and apply them to your message. If the recipient has not been marked as being able to receive HTML-formatted email, Thunderbird displays a prompt to allow you to send only HTML, send both HTML and plain text, or just convert the message to plain text.
The safest choice is to either convert to plain text (and lose the formatting) or send both. Sending HTML to an email client that is incapable of displaying HTML-formatted messages can make your email difficult or impossible to read.
A template serves as a visual model of how a message should look. You can have a template message with your favorite background, formatting, and other HTML attributes. The template can also contain text, a signature, disclaimers, and anything you want to put in a message
To create a template, do the following:
Create a new email message. If this template is being sent to the same address every time, put that address in the To field. In the same manner you can load the other header fields, such as the subject, attachments, and so on.
Select File, Save As; then select Template in the Compose window. The message is saved as a template in your Templates folder. The name of the template is the subject line for the message, so include a subject line that is descriptive of what the template is to be used for.
Using a template is easy: Just click the Templates folder and then double-click the specific template you want to use. The Compose message window is loaded with the template’s contents.
Each email account can have a signature. A signature file is typically an HTML document that can easily be created using Thunderbird. First, to create the actual signature HTML code, follow these steps:
Create a new email message.
Create your signature in the body of the message. Anything valid in HTML can be used, such as images and character formatting.
Select the signature text, and images if you have any.
In the Compose window, select HTML under Insert.
The HTML code that creates your signature will be in the displayed window. Select and copy this text to the Clipboard.
Open Notepad, WordPad, or any other plain-text editor, and paste the HTML from the Clipboard into Notepad (or whichever editor you’re using).
Save this file as your signature file. I named my file
signature.html. The name choice is yours, though; it is not critical.
The next step is to tell Thunderbird to use your new signature. In Thunderbird’s Tools menu, select Account Settings. Next, click the account with which you want the signature to be associated. (Each account can have only one signature.) In the Account Settings section, check the box labeled Attach This Signature. After selecting this option, click the Choose button to select the file you saved in step 7 of the previous steps.
If you absolutely must have more than one signature for an account, it can be done like so:
Click Account Settings in the Tools menu.
Select the account to which you want to add another signature. Click the Manage Identities button.
Add a new identity, or select an existing one.
In the Identity Edit or Identity Add window, provide the information (all of which, excluding the name and signature, can be identical to another identity).
Add a signature to the identity being edited or added, and then save the identity.
Now, when you create an email message you can choose which identity is to be used in the From field. You can even switch identities anytime before sending the message.
Much like Firefox supports RSS feeds using live bookmarks, Thunderbird supports them as folders in which each news item is an item in the RSS folder. To set up a RSS account to read RSS feeds, you must first create an RSS account:
Click Account Settings in the Thunderbird Tools menu.
Select Add Account, RSS News and Blogs, Next.
Give the account an account name. (Make the name as descriptive as possible.) Click Next and then click Finish.
After you have created your RSS account, select it and click the Manage Subscriptions button. In the RSS Subscriptions window, click Add to add a new feed. You must provide the RSS URL—for example, the CBS News top stories RSS feed’s URL is http://www.cbsnews.com/feeds/rss/main.rss.
After you’re done, you will have a main folder, News and Blogs, containing a folder for each feed you added in the RSS Subscriptions window. Blogs are added in the same manner; an example is http://www.achievo.org/blog/feeds/categories/2-Tips-n-Tricks.rss, which is a blog feed for tips and tricks. Be careful, though, because this stuff can be addictive—and fun.
Thunderbird 1.5 has support for podcasting (a good reason to upgrade if you haven’t already). With podcasting, you can retrieve audio RSS content and send it to devices such as the Apple iPod.
Newsgroups, specifically NNTP, are forums in which people discuss given topics. Unlike blogs, which are people centric, NNTP feeds are subject or topic centric.
An example of a news server is msnews.microsoft.com. This publicly accessible NNTP site allows you to ask questions and give advice about various Microsoft products. Here’s how:
Open the Account Settings window. To access newsgroups, go to the Account Wizard and click Add Account. Then select Newsgroup Account and click Next.
Provide your name (I recommend a nickname or just your first name because this name will be visible whenever you post to the NNTP group). Also provide an email address if you want. Most NNTP users obfuscate their email accounts, such as: [email protected]; then they let the other party fix it if they want to send an email. Another trick is to use a disposable email account. This is important because posting in an NNTP group will almost certainly generate an enormous amount of spam email.
Note
Many ISPs maintain NNTP servers for their customers. To use these, you might need a user ID and password. If necessary, your ISP will provide a password and basic instructions on how to configure the NNTP connection.
If the NNTP server you want to connect to requires a user ID and password, select Account Settings, click the newsgroup’s Server Settings, and check the Always Request Authentication when Connecting to This Server option.
After clicking Next, specify the NNTP server’s name. For the Microsoft groups, use msnews.microsoft.com. Click Next and, optionally, make the account name more user friendly; then click Finish.
After following these steps, you will have a new folder. Clicking the folder itself displays the Thunderbird manager window, and selecting Newsgroups, Manage Newsgroup Subscriptions enables you to subscribe to the various newsgroups available on that particular NNTP server.
Here are a few ideas from the experts:
Thunderbird is probably the most configurable and customizable email program available today. No other email program allows the extensions, user interface look and feel, and features that Thunderbird offers.
Thunderbird is easy to install, involving just a simple download (like Firefox) from http://www.mozilla.org. Versions of Thunderbird are available for Windows, Linux, and Mac OS X.
Thunderbird does an excellent job of moving your email, folders, and settings from Outlook, Outlook Express, and Eudora to Thunderbird.
Account setup is straightforward and easy. Wizards are provided to help make the setup steps easy and understandable.
The Thunderbird email editor is easy to use and offers spell-checking and formatting.
If you like HTML email, Thunderbird is capable of creating your formatted email without relying on complex and difficult-to-use HTML editors.
Thunderbird is ready to work with RSS feeds and blogs, requiring only a simple setup to get going.
With Thunderbird, you can access NNTP newsgroups much like Outlook Express does.